In the world of modern programming languages, Kotlin has gained popularity for its flexibility and concise coding style, largely thanks to lambdas or anonymous functions. However, the use of lambdas can introduce overhead due to function calls and memory allocations. To address this concern, Kotlin offers inline functions as a means to optimize code execution....
Kotlin, being a modern and expressive programming language, provides a set of conventions that allow developers to use specific language constructs by defining functions with predefined names. These conventions provide a consistent and intuitive way to work with various language features. In this article, we’ll explore the different aspects of conventions in Kotlin and provide...
Kotlin offers various powerful features to make code concise and efficient. One such feature is delegation, which allows you to delegate the implementation of properties or functions to another object. This concept of delegation plays a crucial role in achieving code reuse, separation of concerns, and enhancing the readability and maintainability of your code. In this blog, we will explore Kotlin delegation and delve into the details of delegated properties.
Delegated properties allow you to leverage the power of trusted helper objects called delegates. These delegates handle complex tasks, freeing up your properties to focus on their core responsibilities. From database tables to browser sessions and maps, the possibilities are endless.
Join me as we embark on this thrilling journey, exploring the art of delegation and unlocking the true potential of Kotlin delegation properties. Get ready to witness the magic as your properties become extraordinary with just a touch of delegation!
Understanding Kotlin Delegation
Delegation in programming is a design pattern where an object, known as the delegate, is given the responsibility to handle certain tasks or operations on behalf of another object, known as the delegator. The delegator object delegates the work to the delegate object, which performs the task and returns the result to the delegator.
Let’s use a real-life example to understand delegation in Kotlin. Consider a scenario where you have a restaurant with a customer, a waiter, and a chef. The customer wants to order a meal, and the waiter is responsible for taking the order and delivering it to the chef. The chef prepares the meal and hands it back to the waiter, who serves it to the customer.
In this example, the customer is the delegator, and the waiter is the delegate. The customer delegates the task of taking the order and delivering it to the waiter. The waiter performs these tasks on behalf of the customer and then delegates the task of preparing the meal to the chef. Finally, the waiter serves the meal back to the customer.
Let’s take one more example, consider a Car class that needs to perform some operations related to engine management. Instead of implementing those operations directly in the Car class, we can delegate them to an Engine object. This way, the Car class can focus on its core functionality, while the Engine object handles engine-related tasks.
Delegation provides benefits such as modularity, maintainability, and flexibility in designing software systems.
Overview of the Delegation Pattern
The delegation pattern is a design pattern where an object delegates some or all of its responsibilities to another object. Instead of inheriting behavior, an object maintains a reference to another object and forwards method calls to it. This promotes composition over inheritance and provides greater flexibility in reusing and combining behaviors from different objects.
In Kotlin, the delegation pattern is built into the language, making it easy and convenient to implement. With the by keyword, Kotlin allows a class to implement an interface by delegating all of its public members to a specified object. Let’s dive into the details and see how it works.
Basic Usage of Delegation in Kotlin
To understand the basic usage of delegation in Kotlin, let’s consider a simple example. Assume we have an interface called Base with a single function print()
Kotlin
interfaceBase {funprint()}
Next, we define a class BaseImpl that implements the Base interface. It has a constructor parameter x of type Int and provides an implementation for the print() function.
Kotlin
classBaseImpl(val x: Int) : Base {overridefunprint() {println(x) }}
Now, we want to create a class called Derived that also implements the Base interface. Instead of implementing the print() function directly, we can delegate it to an instance of the Base interface. We achieve this by using the by keyword followed by the object reference in the class declaration.
Kotlin
classDerived(b: Base) : Basebyb
In this example, the by clause in the class declaration indicates that b will be stored internally in objects of Derived, and the compiler will generate all the methods of Base that forward to b. This means that the print() function in Derived will be automatically delegated to the print() function of the b object.
To see the delegation in action, let’s create an instance of BaseImpl with a value of 10 and pass it to the Derived class. Then, we can call the print() function on the Derived object:
When we execute the print() function on the Derived object, it internally delegates the call to the BaseImpl object (b), and thus it prints the value 10.
Overriding Methods in Delegation
In Kotlin, when a class implements an interface by delegation, it can also override methods provided by the delegate object. This allows for customization and adding additional behavior specific to the implementing class.
Let’s extend our previous example to understand method overriding in the delegation. Assume we have an interface Base with two functions: printMessage() and printMessageLine():
In this example, the printMessage() function in the Derived class overrides the implementation provided by the delegate object b. When we call printMessage() on an instance of Derived, it will print “softAai” instead of the original implementation.
To test the overridden behavior, we can modify the main() function as follows:
When we call the printMessage() function on the Derived object, it invokes the overridden implementation in the Derived class, and it prints “softAai” instead of 10. However, the printMessageLine() function is not overridden in the Derived class, so it delegates the call to the BaseImpl object, which prints the original value 10 followed by a new line.
Property Delegation
In addition to method delegation, Kotlin also supports property delegation. This allows a class to delegate the implementation of properties to another object. Let’s understand how it works.
Assume we have an interface Base with a read-only property message:
Kotlin
interfaceBase {val message: String}
We modify the BaseImpl class to implement the Base interface with the message property:
Kotlin
classBaseImpl(val x: Int) : Base {overrideval message: String = "BaseImpl: x = $x"}
Now, let’s update the Derived class to delegate the Base interface and override the message property:
In this example, the Derived class delegates the implementation of the Base interface to the b object. However, it overrides the message property and provides its own implementation.
To see the property delegation in action, we can modify the main() function as follows:
Kotlin
funmain() {val b = BaseImpl(10)val derived = Derived(b)println(derived.message) // Output: Message of Derived}
When we access the message property of the Derived object, it returns the overridden value “Message of Derived” instead of the one in the delegate object b.
Delegated Properties in Kotlin
Delegated properties allow you to delegate the implementation of property accessors (getters and setters) to another object. This means that instead of writing the logic for accessing and setting the property directly in the class, you can delegate it to a separate class.
The general syntax for creating a delegated property is as follows:
Kotlin
classMyClass {var myProperty: TypebyDelegate()}
Here, myProperty delegates its getter and setter operations to the Delegate object.
Property Delegates
Property delegates are classes that implement the getValue and optionally setValue functions. These functions are invoked when the delegated property is accessed or modified.
The getValue function is responsible for returning the property value, and setValue is responsible for updating the property value.
Let’s say we have a Delegate class that will handle the logic for accessing and setting a property. The Delegate class should have two methods: getValue() and setValue(). The getValue() method retrieves the current value of the property, and the setValue() method sets a new value for the property. These methods can be defined as either members or extensions of the Delegate class.
Here’s an example of a Delegate class that simply stores the value internally:
Kotlin
classDelegate {privatevarvalue: Int = 0operatorfungetValue(thisRef: Any?, property: KProperty<*>): Int {// Get the current value of the propertyreturnvalue }operatorfunsetValue(thisRef: Any?, property: KProperty<*>, newValue: Int) {// Set a new value for the propertyvalue = newValue }}
In the above code snippet, the * is used in the parameter of the setValue() and getValue() methods of the Delegate class. This syntax is called a star-projection or star-spread operator.
In Kotlin, the KProperty interface represents a property, and it has a type parameter T that represents the type of property. When you use the star-projection (*) as the type argument (KProperty<*>), it means you are using a wildcard or an unknown type for the property.
In the context of delegated properties, the KProperty<*> parameter represents the property that is being accessed or set. The thisRef parameter represents the instance of the class that owns the property.
By using KProperty<*> with the star-projection, you’re saying that the property can be of any type. It allows you to create a generic Delegate class that can handle properties of different types without explicitly specifying the type.
Also, we defined the operator keyword, which is used to define and overload certain operators for custom types or classes.
Now, let’s create a class Foo with a property p that delegates its accessors to an instance of the Delegate class:
When you create an instance of Foo, you can access and modify the p property as if it were a regular property. However, behind the scenes, the access and modification operations are delegated to the Delegate class.
Let’s consider one more example for better understanding, just create a simple UpperCaseDelegate that converts a string property to uppercase when accessed:
Here, myProperty delegates its getter operation to UpperCaseDelegate, which converts the value to uppercase before returning it.
The “by" keyword
The delegate object is specified after the by keyword and can be any object that satisfies the rules of the convention for property delegates. It’s the delegate object that actually handles the logic for accessing and setting the property.
The by keyword is used in Kotlin to indicate that a property is delegated to another object or class. When you use the by keyword, you are specifying that the implementation of the property’s accessors (getters and setters) will be delegated to a separate delegate object.
By using the by keyword, you make it clear that the property’s implementation is delegated to another object, enhancing code readability and allowing for better separation of concerns.
Kotlin
classDelegate {privatevarvalue: Int = 0operatorfungetValue(thisRef: Any?, property: KProperty<*>): Int {// Get the current value of the propertyreturnvalue }operatorfunsetValue(thisRef: Any?, property: KProperty<*>, newValue: Int) {// Set a new value for the propertyvalue = newValue }}classFoo {var p: IntbyDelegate()}
In the above example, the p property of the Foo class is delegated to an instance of the Delegate class using the by keyword. The Delegate class provides the implementation for the property’s accessors.
So, when you access or modify the p property of an instance of the Foo class, the property accessors are automatically delegated to the Delegate object. Behind the scenes, the getValue() and setValue() methods of the Delegate class are called to handle the property operations.
Using the by keyword simplifies the syntax and makes it clear that the property behavior is delegated to another object. It promotes code reuse and separates the concerns of the owning class from the delegate class.
Standard Delegates
Kotlin provides several standard delegates in the standard library to address common scenarios. Some examples include:
lazy:Allows for lazy initialization of properties. The initialization is deferred until the property is accessed for the first time.
observable:Enables observing property changes by providing a callback function that is triggered whenever the property value is modified.
vetoable:Allows validation of property values by providing a callback function that can reject value changes based on specific conditions.
Lazy Initialization
Lazy initialization is a technique where you delay the initialization of an object until it is accessed for the first time. This can be useful when the initialization process is resource-intensive and the object might not always be needed during the lifetime of the program.
For example, consider a Person class that lets you access a list of the emails written by a person. The emails are stored in a database and take a long time to access. You want to load the emails on first access to the property and do so only once. Let’s say you have the following function loadEmails, which retrieves the emails from the database:
Kotlin
classEmail {/*...*/}funloadEmails(person: Person): List<Email> {println("Load emails for ${person.name}")returnlistOf(/*...*/ )}
Here’s how you can implement lazy loading using anadditional _emails property that stores null before anything is loaded and the list of emails afterward.
In this implementation, we have a nullable _emails property that acts as a backing property to store the loaded emails. The emails property is the one we access to retrieve the list of emails. In the getter of the emails property, we check if _emails is null. If it is, we initialize it by calling the loadEmails function. We then return the value of _emails, forcibly unwrapping it with !! operator since we know it won’t be null at this point.
While this approach works, it can become cumbersome and error-prone when dealing with multiple lazy properties. Additionally, the implementation is not thread-safe.
To simplify and improve the code, Kotlin provides a built-in solution using the lazy delegate. The lazy function returns an object that has a getValue method, which can be used together with the by keyword to create a delegated property. Here’s how we can use it in our example:
With this implementation, the emails property is delegated to the lazy delegate. The lambda expression passed to the lazy function is used to initialize the value of the property when it is accessed for the first time. The lazy delegate ensures that the initialization happens only once, and subsequent accesses to the property will return the cached value.
The lazy function is thread-safe by default, meaning that the initialization is synchronized and can be safely accessed from multiple threads. If you need more control over the thread-safety or want to optimize for a single-threaded environment, you can specify additional options to the lazy function.
Lazy delegate: “by lazy()”
In Kotlin, you can achieve lazy initialization using the lazy delegate provided by the standard library. The lazy function returns an object that has a getValue method, which can be used together with the by keyword to create a delegated property.
The lazy delegate is a built-in feature in Kotlin that allows you to create properties whose values are computed lazily. It provides a concise way to implement lazy initialization without manually managing the initialization state. Here’s how you can use it:
Kotlin
val property: Typebylazy {// Initialization code here// This block will be executed only once, when the property is accessed for the first time// The value of the block will be cached and returned for subsequent accesses// Return the computed value}
Here’s an example to illustrate the usage of lazy initialization with the lazy delegate:
Kotlin
classExample {val expensiveProperty: Intbylazy {// Expensive computation or initializationprintln("Initializing expensiveProperty...")// Return the computed value42 }}funmain() {val example = Example()println("Before accessing expensiveProperty")// The initialization code of expensiveProperty is not executed yetprintln("Value of expensiveProperty: ${example.expensiveProperty}")// The initialization code of expensiveProperty is executed hereprintln("After accessing expensiveProperty")println("Value of expensiveProperty: ${example.expensiveProperty}")// The cached value is returned without re-initialization}
Kotlin
OUTPUTBefore accessing expensivePropertyInitializing expensiveProperty...Value of expensiveProperty: 42After accessing expensivePropertyValue of expensiveProperty: 42
In this example, the expensiveProperty in the Example class is lazily initialized using the lazy delegate. The initialization code block is not executed until the property is accessed for the first time. The computed value (42 in this case) is then cached and returned for subsequent accesses.
When you run the above code, you’ll see that the initialization code block is executed only once, when the property is first accessed. On subsequent accesses, the cached value is returned without re-executing the initialization code.
Lazy initialization with by lazy() simplifies the code by abstracting away the details of managing the initialization state and caching the computed value. It ensures that the property is initialized lazily and provides a convenient way to implement lazy initialization in Kotlin.
Once again here’s an example to illustrate lazy initialization using the lazy delegate:
In this example, the Person class has a property called emails, which is lazily initialized using the lazy delegate. The lazy function takes a lambda as an argument, which it will call to initialize the value of the property when it is accessed for the first time.
The benefit of using the lazy delegate is that the initialization logic is encapsulated within it. The value assigned to the emails property will only be computed once, on the first access, and subsequent accesses will return the cached value. This can help improve performance by avoiding unnecessary computations or resource allocations until they are actually needed.
You can think of the emails property as having a backing property that holds the computed value, and the lazy delegate takes care of initializing and caching the value behind the scenes. The delegate ensures that the value is computed lazily, i.e., only when it is first accessed.
Here’s how you would use the Person class:
Kotlin
val person = Person("amol")println(person.emails) // Initialization happens here, loadEmails() is calledprintln(person.emails) // Cached value is returned without re-initialization
In this example, the loadEmails() function will only be called on the first access of the emails property. Subsequent accesses will return the cached value without re-initializing it.
The lazy delegate is thread-safe by default, meaning that the initialization is synchronized and can be safely accessed from multiple threads. However, if you know that the class will only be used in a single-threaded environment, you can provide additional options to bypass synchronization and improve performance.
The lazy delegate allows you to achieve lazy initialization of properties. It simplifies the code by encapsulating the initialization logic and ensures that the value is computed only when it is first accessed, providing better performance and resource utilization.
"observable” Delegate
The observable delegate allows you to observe property changes by providing a callback function that is triggered whenever the property value is modified.
Here’s the general syntax for using the observable delegate:
Kotlin
var propertyName: TypebyDelegates.observable(initialValue) { property, oldValue, newValue ->// Callback function logic}
Let’s see an example that uses the observable delegate to observe changes in a property:
Kotlin
import kotlin.properties.DelegatesclassPerson {var age: IntbyDelegates.observable(25) { property, oldValue, newValue ->println("Age changed from $oldValue to $newValue") }}funmain() {val person = Person() person.age = 30// Output: Age changed from 25 to 30 person.age = 35// Output: Age changed from 30 to 35}
In this example, the age property is observed using the observable delegate. Whenever the age property is modified, the callback function is triggered, printing the old value and the new value.
"vetoable” Delegate
The vetoable delegate allows you to validate property values by providing a callback function that can reject value changes based on specific conditions.
Here’s the general syntax for using the vetoable delegate:
Kotlin
var propertyName: TypebyDelegates.vetoable(initialValue) { property, oldValue, newValue ->// Validation logic// Return true to accept the new value, or false to reject it}
Let’s see an example that uses the vetoable delegate to validate a property value:
Kotlin
import kotlin.properties.DelegatesclassCircle {var radius: DoublebyDelegates.vetoable(0.0) { property, oldValue, newValue -> newValue >= 0.0// Only accept positive or zero radius values }}funmain() {val circle = Circle() circle.radius = 5.0println(circle.radius) // Output: 5.0 circle.radius = -2.0// Value rejected due to validationprintln(circle.radius) // Output: 5.0 (unchanged)}
In this example, the radius property is validated using the vetoable delegate. The callback function checks if the new value is greater than or equal to zero. If the validation condition is not met (e.g., negative radius), the value change is rejected, and the property retains its previous value.
Delegating to another property
Delegating a property to another property means that the getter and setter of one property are implemented by accessing or modifying another property’s value. This delegation can be done for top-level properties, member properties (including extension properties) within the same class, or even member properties of another class.
To delegate a property to another property, you use the :: qualifier followed by the delegate property’s name. Here are a few examples to illustrate how property delegation works:
Kotlin
var topLevelInt: Int = 0classClassWithDelegate(val anotherClassInt: Int)classMyClass(var memberInt: Int, val anotherClassInstance: ClassWithDelegate) {var delegatedToMember: Intbythis::memberIntvar delegatedToTopLevel: Intby ::topLevelIntval delegatedToAnotherClass: IntbyanotherClassInstance::anotherClassInt}var MyClass.extDelegated: Intby ::topLevelInt
In the code above, we have different scenarios for property delegation:
delegatedToMember is a property within the MyClass class that delegates its getter and setter to the memberInt property of the same class. This means that accessing or modifying delegatedToMember will actually read from or write to memberInt.
delegatedToTopLevel is a property within the MyClass class that delegates its getter and setter to the top-level property topLevelInt. So, accessing or modifying delegatedToTopLevel will actually read from or write to topLevelInt.
delegatedToAnotherClass is a property within the MyClass class that delegates its getter to the anotherClassInt property of an instance of ClassWithDelegate. This means that accessing delegatedToAnotherClass will read the value of anotherClassInstance.anotherClassInt.
extDelegated is an extension property of MyClass that delegates its getter and setter to the top-level property topLevelInt. This allows instances of MyClass to have an additional property extDelegated that shares its value with topLevelInt.
Property delegation can be useful in various scenarios. One common use case is when you want to introduce a new property while maintaining backward compatibility with an existing one. In such cases, you can introduce a new property, annotate the old property with the @Deprecated annotation, and delegate its implementation to the new property. Here’s an example:
Kotlin
classMyClass {var newName: Int = 0@Deprecated("Use 'newName' instead", ReplaceWith("newName"))var oldName: Intbythis::newName}funmain() {val myClass = MyClass()// Notification: 'oldName: Int' is deprecated.// Use 'newName' instead myClass.oldName = 42println(myClass.newName) // Output: 42}
In this example, we have a class MyClass with oldName and newName properties. The oldName property is deprecated and annotated with @Deprecated, indicating that it should not be used anymore. The implementation of oldName is delegated to the newName property using by this::newName. So, accessing or modifying oldName will actually access or modify the newName property.
In the main function, we demonstrate the usage of the deprecated oldName property. When assigning a value to oldName, a deprecation warning is displayed. However, the value is stored in the newName property, which can be accessed correctly.
Overall, delegating properties to other properties provides a powerful mechanism to reuse existing property implementations, introduce backward compatibility, and simplify property access and modification.
Property delegate requirements
Property delegate requirements will be demonstrated for both read-only (val) and mutable (var) properties. Let’s break down the concept of delegated properties for read-only and mutable properties (var) and understand how to provide the necessary operator functions for delegation.
For a read-only property (val), the delegate must provide the getValue() operator function with the following parameters:
thisRef: This parameter should be the same type as, or a supertype of, the property owner (for extension properties, it should be the type being extended).
property: This parameter should be of type KProperty<*> or its supertype.
getValue(): This function must return the same type as the property (or its subtype).
In this code, we have the Owner class with a read-only property valResource. The delegation is done by using the by keyword and providing an instance of the ResourceDelegate class. The ResourceDelegate class defines the getValue() function, which returns an instance of Resource. The function receives the property owner (thisRef) and the KProperty<*> instance representing the property being delegated.
For a mutable property (var), in addition to the getValue() function, the delegate must provide the setValue() operator function with the following parameters:
thisRef: This parameter should be the same type as, or a supertype of, the property owner (for extension properties, it should be the type being extended).
property: This parameter should be of type KProperty<*> or its supertype.
value: This parameter should be of the same type as the property (or its supertype).
In this code, we have the Owner class with a mutable property varResource. The ResourceDelegate class now includes the setValue() function, which allows modifying the value of the delegated property. The function receives the property owner (thisRef), the KProperty<*> instance representing the property being delegated, and the new value to be assigned.
You can define the getValue() and setValue() functions as member functions of the delegate class itself or as extension functions. Both functions need to be marked with the operator keyword to enable operator overloading.
Alternatively, you can create delegates as anonymous objects using the interfaces ReadOnlyProperty and ReadWriteProperty from the Kotlin standard library. These interfaces provide the required getValue() and setValue() methods. By using anonymous objects, you can avoid creating separate classes for the delegates. Here’s an example:
Kotlin
funresourceDelegate(resource: Resource = Resource()): ReadWriteProperty<Any?, Resource> = object : ReadWriteProperty<Any?, Resource> {privatevar curValue = resourceoverridefungetValue(thisRef: Any?, property: KProperty<*>): Resource = curValueoverridefunsetValue(thisRef: Any?, property: KProperty<*>, value: Resource) { curValue = value } }val readOnlyResource: ResourcebyresourceDelegate() // ReadWriteProperty used as a read-only propertyvar readWriteResource: ResourcebyresourceDelegate() // ReadWriteProperty used as a mutable property
In this code, the resourceDelegate() function returns an anonymous object implementing the ReadWriteProperty interface. The ReadWriteProperty interface extends ReadOnlyProperty, so it can be used as a delegate for both read-only and mutable properties. The anonymous object defines the necessary getValue() and setValue() functions.
By using delegated properties and providing the appropriate operator functions, you can create flexible and reusable property delegation patterns in Kotlin.
Storing property values in a map
Another common pattern where delegated properties come into play is objects that have a dynamically defined set of attributes associated with them. Such objects are sometimes called expando objects. in a contact-management system, each person may have some required properties (like name) that are handled in a special way, as well as additional attributes that can vary for each person(youngest child’s birthday, for example).
One way to implement such a system is by using a map to store all the attributes of a person and providing properties that allow access to the information with special handling. Let’s go through the code examples to understand this approach.
First, we have the Person class with a private _attributes map. This map will store the attributes of a person, where the keys are attribute names and the values are attribute values.
In this code, we have a set attributefunction that allows adding or updating attributes in the _attributes map. The name property is an example of a required property that is handled in a special way. It retrieves the value of the “name” attribute from the _attributes map.
To create an instance of the Person class and load data into it, we can use a generic API, such as deserialization from JSON, as shown in the example below:
Kotlin
val p = Person()valdata = mapOf("name" to "amol", "company" to "softAai")for ((attrName, value) indata) { p.setAttribute(attrName, value)}println(p.name) // Output: amol
Here, we create a new Person instance and provide the data as a map. We iterate over each key-value pair in the data map and call setAttribute to store the attributes in the _attributes map. Finally, we can access the name property, which internally retrieves the value of the “name” attribute from the _attributes map.
Now, instead of manually implementing the property and the _attributes map, we can simplify the code using delegated properties. We can directly delegate the name property to the _attributes map using the by keyword, as shown below:
In this code, we no longer have the explicit getter for the name property. Instead, we use the by keyword to delegate the property to the _attributes map. The standard library provides getValue and setValue extension functions for maps, allowing the property to automatically get and set the values in the map based on the property name.
With the delegated property in place, we can use it just like before:
Kotlin
val p = Person()valdata = mapOf("name" to "amol", "company" to "softAai")for ((attrName, value) indata) { p.setAttribute(attrName, value)}println(p.name) // Output: amol
The output remains the same, but now the name property is implemented as a delegated property, simplifying the code and removing the need for an explicit getter.
Delegated properties provide a concise and reusable way to handle dynamically defined attributes in expando objects. By leveraging the by keyword and the standard library extension functions, we can delegate the property access to a map or any other custom logic, making the code more maintainable and flexible.
Translation rules for delegated properties
When using delegated properties in Kotlin, the Kotlin compiler generates auxiliary properties to handle the delegation. These auxiliary properties are used to store the delegate object and manage the getter and setter operations.
Let’s take an example to understand how this works. Consider the following code:
Kotlin
classC {var prop: TypebyMyDelegate()}
When the compiler encounters this code, it generates a hidden property called prop$delegate. This hidden property is of the same type as the delegate class (MyDelegate in this case). It is responsible for handling the delegation of the prop property.
In the generated code, the prop property has a getter and a setter. The getter delegates the getValue() operation to the prop$delegate property, passing the instance of the outer class (this) and the reflection object (this::prop) that represents the property itself. The delegate’s getValue() function is responsible for providing the value of the property.
Similarly, the setter delegates the setValue() operation to the prop$delegate property, passing the instance of the outer class (this), the reflection object (this::prop), and the new value of the property. The delegate’s setValue() function handles the assignment of the new value.
By generating the prop$delegate property and delegating to it, the compiler ensures that the getter and setter operations are correctly handled by the delegate object (MyDelegate).
Optimized cases for delegated properties
When it comes to optimization, the Kotlin compiler can omit the $delegate field in certain cases. Here are the optimized cases for delegated properties:
A referenced property:
Kotlin
classC<Type> {privatevar impl: Type = ...var prop: Typeby ::impl}
In this case, the property prop is delegated to another property impl using the by keyword. Since the delegate is a referenced property within the same class, the compiler can optimize the generated code and omit the $delegate field. Instead, the accessors directly delegate to the referenced property impl.
When using a named object as a delegate, the Kotlin compiler can optimize the code and omit the $delegate field. The accessors directly call the delegate’s getValue function without the need for an intermediate property.
A final val property with a backing field and a default getter in the same module:
Kotlin
val impl: ReadOnlyProperty<Any?, String> = ...classA {val s: Stringbyimpl}
In this case, the delegate impl is a final val property with a backing field and a default getter defined in the same module as the property s. The compiler can optimize the code and omit the $delegate field. The accessors directly delegate to the getValue function of the delegate without the need for an intermediate property.
A constant expression, enum entry, this, or null:
Kotlin
classA {operatorfungetValue(thisRef: Any?, property: KProperty<*>) ...val s bythis}
If the delegate is a constant expression, an enum entry, this, or null, the Kotlin compiler can optimize the code and omit the $delegate field. The accessors directly call the getValue function of the delegate without the need for an intermediate property.
In these optimized cases, the compiler eliminates the need for the $delegate field, which can save memory and provide more efficient property access. The accessors directly invoke the corresponding functions of the delegate, leading to more streamlined code execution.
Note that these optimizations are applied by the Kotlin compiler to improve performance and reduce unnecessary overhead when using delegated properties.
Translation rules when delegating to another property
When delegating to another property, the Kotlin compiler optimizes the code by generating immediate access to the referenced property. This means that the compiler doesn’t generate the $delegate field. This optimization helps save memory and improves performance.
Let’s take a look at the example code:
Kotlin
classC<Type> {privatevar impl: Type = ...var prop: Typeby ::impl}
In this case, the property prop is delegated to the property impl using the by keyword. The compiler optimizes the code by directly accessing the impl property within the property accessors of prop. This means that the delegated property’s getValue and setValue operators are skipped, and there is no need for the KProperty reference object.
The compiler generates the following code:
Kotlin
classC<Type> {privatevar impl: Type = ...var prop: Typeget() = implset(value) { impl = value }fungetProp$delegate(): Type = impl // This method is needed only for reflection
As you can see, the accessors for the prop property directly delegate to the impl property. The getValue accessor returns the value of impl, and the setValue accessor assigns the value to impl.
The method getProp$delegate() is also generated, but it is only needed for reflection purposes. It allows reflective access to the delegate object, but it is not used in regular property access.
This optimization avoids the creation of an additional field and reduces the overhead associated with delegated property access. By directly accessing the referenced property, the code becomes more efficient and memory-friendly.
The same optimization principle applies when delegating to another property using this keyword. The compiler generates immediate access to the referenced property without the need for an intermediate field.
Overall, these translation rules improve the performance of delegated properties and eliminate unnecessary memory usage.
What will be the right-hand side of “by"?
In Kotlin, when using delegated properties, the expression to the right of the by keyword can be more than just a new instance creation. It can also be a function call, another property, or any other expression, as long as the value of the expression is an object that provides the getValue and setValue methods with the correct parameter types.
The getValue and setValue methods can be declared directly on the object itself or defined as extension functions. This gives you the flexibility to use existing functions or properties to handle the behavior of your delegated properties.
Here’s an example to demonstrate this concept:
Kotlin
classExample {varvalue: String = "initial"// Delegated property using a function callvar customValue: StringbygetValueFromFunction()// Delegated property using another propertyvar anotherValue: Stringby ::value// Delegated property using an extension functionvar computedValue: IntbycalculateValue()// Extension function providing delegated property behaviorprivatefuncalculateValue(): ReadWriteProperty<Any?, Int> {var storedValue: Int = 0return object : ReadWriteProperty<Any?, Int> {overridefungetValue(thisRef: Any?, property: KProperty<*>): Int {// Perform custom logic to compute the valuereturn storedValue * 2 }overridefunsetValue(thisRef: Any?, property: KProperty<*>, value: Int) {// Perform custom logic to store the value storedValue = value / 2 } } }}fungetValueFromFunction(): ReadWriteProperty<Any?, String> {var storedValue: String = ""return object : ReadWriteProperty<Any?, String> {overridefungetValue(thisRef: Any?, property: KProperty<*>): String {return storedValue }overridefunsetValue(thisRef: Any?, property: KProperty<*>, value: String) { storedValue = value.toUpperCase() } }}funmain() {val example = Example()// Using the delegated properties example.customValue = "amol"println(example.customValue) // Output: AMOL example.anotherValue = "softAai"println(example.anotherValue) // Output: softAai example.computedValue = 5println(example.computedValue) // Output: 10}
In the example above, the customValue property is delegated to the result of a function call getValueFromFunction(), which returns a custom delegate object implementing the ReadWriteProperty interface. The delegate modifies the stored value by converting it to uppercase when setting the value.
The anotherValue property is delegated to the value property using the ::value syntax. Any changes made to anotherValue will be reflected in the value property.
The computedValue property is delegated to the result of the calculateValue() extension function. The extension function provides the delegated property behavior by implementing the ReadWriteProperty interface. In this case, the delegate computes the value by multiplying it by 2 and stores the value by dividing it by 2.
By allowing various expressions on the right-hand side of by and supporting both object-defined and extension-defined getValue and setValue methods, Kotlin enables flexible and customizable behavior for delegated properties.
Providing a delegate
The provideDelegate operator allows you to extend the logic for creating the object to which the property implementation is delegated. If the object used on the right-hand side of the by keyword defines provideDelegate as a member or extension function, that function will be called to create the property delegate instance.
One use case of provideDelegate is to perform additional checks or actions during the initialization of the property delegate. For example, you can check the consistency of the property before binding it.
Here’s an example that demonstrates how to use provideDelegate:
In this example, the ResourceLoader class defines the provideDelegate function. This function is called for each property during the creation of an instance of MyUI. It performs the necessary validation or checks before creating the property delegate.
Without the provideDelegate functionality, you would need to pass the property name explicitly to achieve the same functionality, which could be less convenient.
The provideDelegate method has the same parameters as the getValue function:
thisRef must be the same type as, or a supertype of, the property owner (for extension properties, it should be the type being extended).
property must be of type KProperty<*> or its supertype.
The provideDelegate method is responsible for creating and returning the property delegate instance that will handle the property access.
In the generated code, when provideDelegate is present, it is called to initialize the auxiliary prop$delegate property. Compare the generated code for the property declaration val prop: Type by MyDelegate() with the generated code when provideDelegate is available:
It’s important to note that the provideDelegate method only affects the creation of the auxiliary property (prop$delegate) and does not impact the generated code for the getter or the setter of the delegated property.
You can also use the PropertyDelegateProvider interface from the standard library to create delegate providers without creating new classes. Here’s an example:
In this case, the PropertyDelegateProvider creates a delegate provider using a lambda expression. The lambda receives the thisRef (property owner) and property information and returns a property delegate instance.
Delegation in Android Applications
Kotlin delegation and delegated properties can be useful in Android applications to simplify code, separation of concerns, and provide flexibility in handling certain tasks. Here are a few examples of how delegation can be used in Android applications:
1. Shared Preferences Delegation
Android applications often need to store and retrieve key-value pairs using SharedPreferences. Delegation can be used to simplify the code for accessing SharedPreferences. For example:
In this example, the SettingsManager class uses delegation to handle the isNotificationsEnabled property, which is backed by a shared preference value. The BooleanPreferenceDelegate class implements the delegated property behavior.
2. Dependency Injection with Delegation:
Dependency injection frameworks like Dagger can benefit from delegation to simplify the injection process. By using a delegated property, you can abstract away the complexity of dependency resolution. Here’s a simplified example:
In this example, the MyActivity class uses delegation to lazily inject the MyDependency instance. The inject function provides the delegation logic for dependency injection, making it easy to reuse across different activities.
These are just a few examples of how delegation and delegated properties can be used in Android applications. They demonstrate how delegation can simplify code, improve code organization, and provide flexibility in various scenarios.
Conclusion
Kotlin delegation and delegated properties provide an elegant and efficient way to handle code reuse and separation of concerns. By understanding the concept of delegation and utilizing delegated properties, you can write cleaner, more maintainable code in your Kotlin projects. Whether you’re developing Android applications or working on other Kotlin projects, delegation is a powerful tool to enhance your codebase. Start exploring the possibilities of delegation in Kotlin and unlock the benefits it brings to your software development journey.
Kotlin provides several special types that serve specific purposes, including types such as Any, Unit, and Nothing. Understanding these types and their characteristics is crucial for writing clean and concise Kotlin code. In this article, we will explore the features and use cases of each type, along with relevant examples. Any: The Root Type In Kotlin,...
Kotlin, a modern programming language for the JVM, comes with a robust and expressive set of collection classes and functions. Kotlin collections provide a seamless way to work with data, enabling efficient data manipulation, transformation, and filtering. Whether you’re a beginner or an experienced Kotlin developer, understanding the various collection types, operations, and best practices is essential. In this article, we will explore Kotlin collections in depth, covering all aspects and providing practical examples to solidify your understanding.
What are Kotlin Collections?
In Kotlin, collections refer to data structures that can hold multiple elements. They provide a way to store, retrieve, and manipulate groups of related objects. Kotlin provides a rich set of collection classes and interfaces in its standard library, making it convenient to work with collections in various scenarios.
Here are some commonly used collection interfaces in Kotlin:
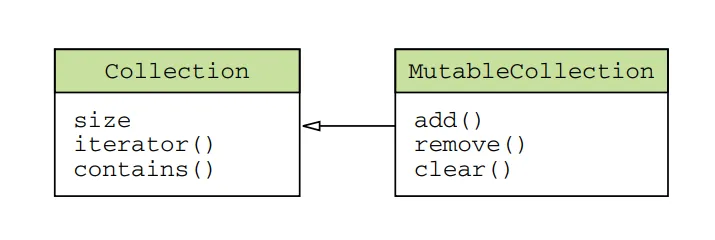
Collection: The root interface for read-only collections. It provides methods for accessing elements, such as iteration, size checking, and element presence checks.
MutableCollection: Extends the Collection interface and adds methods for modifying the collection, such as adding and removing elements.
List: Represents an ordered collection of elements. Elements can be accessed by their indices. Kotlin provides ArrayList and LinkedList as implementations of the List interface.
MutableList: Extends the List interface and adds methods for modifying the list, such as adding, removing, and modifying elements.
Set: Represents a collection of unique elements, with no defined order. Kotlin provides HashSet and LinkedHashSet as implementations of the Set interface.
MutableSet: Extends the Set interface and adds methods for modifying the set.
Map: Represents a collection of key-value pairs. Each key in the map is unique, and you can retrieve the corresponding value using the key. Kotlin provides HashMap and LinkedHashMap as implementations of the Map interface.
MutableMap: Extends the Map interface and adds methods for modifying the map.
These are just a few examples of collection interfaces in Kotlin. The standard library also includes other collection interfaces and their corresponding implementations, such as SortedSet, SortedMap, and Queue, along with various utility functions and extension functions to work with collections more efficiently.
Collections in Kotlin provide a convenient way to handle groups of data and perform common operations like filtering, mapping, sorting, and more. They play a vital role in many Kotlin applications and can greatly simplify data manipulation tasks.
Read-Only and Mutable Collections
Kotlin collection design separates interfaces for accessing and modifying data in collections. This design distinguishes between read-only and mutable interfaces, providing clarity and control over how collections are used and modified.
Thekotlin.collections.Collectioninterfaceis used for accessing data in a collection. It allows you toiterate over the elements, obtain the size, check for the presence of specific elements, and perform other read operations. However, it does not provide methods for adding or removing elements.
Kotlin
funprintCollection(collection: Collection<Int>) {for (element in collection) {println(element) }}val myList = listOf(1, 2, 3)printCollection(myList) // This works fine
To modify the data in a collection, you should use the kotlin.collections.MutableCollection interface. It extends the Collection interface and adds methods for adding and removing elements, clearing the collection, and other modification operations.
Kotlin
funaddToCollection(collection: MutableCollection<Int>, element: Int) { collection.add(element)}val myMutableList = mutableListOf(1, 2, 3)addToCollection(myMutableList, 4) // This modifies the collection
Creating a defensive copy
By using read-only interfaces (Collection) throughout your code, you convey that the collection won’t be modified. If a function accepts a Collection parameter, you can be confident that it only reads data from the collection. On the other hand, when a function expects a MutableCollection, it indicates that the collection will be modified. If you have a collection that is part of your component’s internal state and needs to be passed to a function requiring a MutableCollection, you may need to create a defensive copy of that collection to ensure its integrity.
Kotlin
funmodifyCollection(collection: MutableCollection<Int>) {val defensiveCopy = collection.toList()// Perform modifications on the defensiveCopy// ...}val originalList = mutableListOf(1, 2, 3)modifyCollection(originalList) // The original list remains unchanged
In this example, we have a function modifyCollection that takes a mutable collection as a parameter. However, if the collection is part of your component’s internal state and you want to ensure its integrity, you can create a defensive copy of the collection before passing it to the function.
By calling toList() on the original collection, we create a new read-only list defensiveCopy that contains the same elements. The modifyCollection function can then perform any modifications on the defensive copy without affecting the original collection.
This approach allows you to protect the original collection from unintended modifications, especially when it is part of the component’s internal state or when you want to ensure its immutability in certain scenarios.
Immutable Collections
Kotlin offers a variety of immutable collection types, such as lists, sets, and maps, that cannot be modified once created. These collections guarantee thread safety and immutability, ensuring data integrity in multi-threaded scenarios. Let’s see some examples:
Kotlin
val numbers = listOf(1, 2, 3, 4, 5) // Immutable listval setOfColors = setOf("red", "green", "blue") // Immutable setval mapOfUsers = mapOf(1 to "Alice", 2 to "Bob", 3 to "Charlie") // Immutable map
However, it’s important to note that read-only collections are not necessarily immutable. A read-only collection interface can be one of many references to the same collection. Other references to the collection may have mutable interfaces, allowing modifications.
This means that if you have concurrent code or multiple references to the same collection, modifications from other codes can occur while you’re working with it. This can lead to issues such as ConcurrentModificationException errors. To handle such situations, you need to ensure proper synchronization of access to the data or use data structures that support concurrent access when working in a multi-threaded environment.
Consider the following code snippet:
Kotlin
val mutableList = mutableListOf(1, 2, 3)val readOnlyList: List<Int> = mutableList// Concurrent modification by another referencemutableList.add(4)// Accessing the read-only listreadOnlyList.forEach { println(it) }
In this example, we have a mutable list called mutableList and a read-only list called readOnlyList, which is a reference to the same underlying list. Initially, both lists contain elements [1, 2, 3].
However, the mutableList is mutable, so we can add an element (4) to it. After adding the element, the mutableList becomes [1, 2, 3, 4].
Now, let’s try to iterate over the elements in the readOnlyList using the forEach function. We might expect it to print [1, 2, 3], but what actually happens?
Since the readOnlyList is just a read-only view of the same underlying list, any modifications made to the mutableList will affect the readOnlyList as well. In this case, we added an element to the mutableList, causing the readOnlyList to contain [1, 2, 3, 4]. As a result, when we iterate over the elements in readOnlyList, it will print [1, 2, 3, 4] instead of [1, 2, 3].
This behavior can lead to unexpected results and even errors like ConcurrentModificationException. If you have concurrent code or multiple references to the same collection, modifications made by one reference can affect the others, potentially causing data inconsistencies or errors.
To handle such situations, you need to ensure proper synchronization of access to the data or use data structures that support concurrent access. For example, you can use synchronized blocks or locks to control access to the collection in a multi-threaded environment. Alternatively, you can use concurrent data structures provided by the Kotlin standard library, such as ConcurrentHashMap, which are designed to handle concurrent modifications safely.
It’s crucial to be aware of these considerations when working with read-only collections that are shared among multiple references or used in concurrent scenarios.
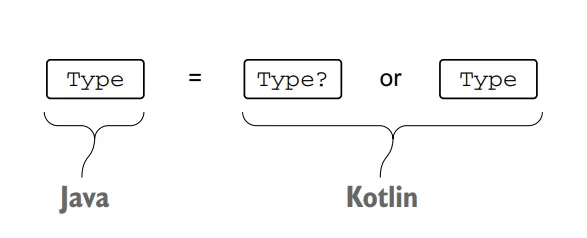
Kotlin collections and Java
In Kotlin, every collection type is an instance of the corresponding Java collection interface. This means that Kotlin collections seamlessly integrate with Java collections without requiring any conversion, wrappers, or data copying.
However, in Kotlin, each Java collection interface has two representations: a read-only version and a mutable version. The read-only interfaces mirror the structure of the Java collection interfaces but lack mutating methods, while the mutable interfaces extend their corresponding read-only interfaces and provide mutating methods.
For example, the Java class java.util.ArrayList is treated as if it inherited from the MutableList interface. This means that you can use an ArrayList instance in Kotlin as if it were a MutableList, and you can call the methods defined in the MutableList interface on an ArrayList object. Similarly, the Java class java.util.HashSetis treated as if it inherited from the MutableSet interface, allowing you to use a HashSet instance as a MutableSet.
Other Java collection implementations, such as LinkedList and SortedSet, have similar supertypes in Kotlin. This means that LinkedList is treated as if it inherited from a related interface, and SortedSet is also treated as if it inherited from a corresponding Kotlin interface. These interfaces provide a common set of methods that can be used across different implementations.
The purpose of treating Java classes as if they inherited from their corresponding Kotlin interfaces is to provide compatibility and allow seamless interoperability between Kotlin and Java collections. Kotlin provides both mutable and read-only interfaces, allowing for clear separation and appropriate usage of collections depending on whether you need to mutate them or not.
What about Map?
Similarly, the Map class (which doesn’t extend Collection or Iterable) in Java has two versions in Kotlin: Map (read-only) and MutableMap (mutable). These versions provide different sets of functions for working with maps.
When calling a Java method that expects a collection as a parameter, you can pass a Kotlin collection directly without any extra steps. Kotlin handles the interoperability between Kotlin collections and Java collections seamlessly.
However, there is an important caveat to consider. Since Java does not distinguish between read-only and mutable collections, Java code can modify a collection even if it’s declared as read-only on the Kotlin side. The Kotlin compiler cannot fully analyze the modifications made by Java code, so Kotlin cannot reject a call passing a read-only collection to Java code that modifies it.
As a result, when writing a Kotlin function that passes a collection to Java code, it’s your responsibility to use the correct type for the parameter based on whether the Java code will modify the collection or not.
Kotlin collection interfaces
Now we will delve deep into the collection interfaces and explore their implementations, enabling you to leverage the full power of Kotlin collections in your projects.
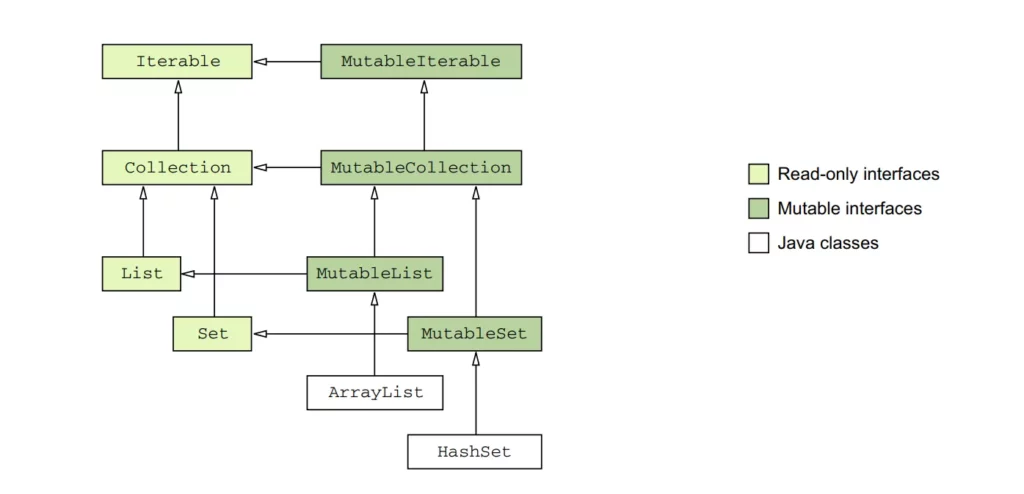
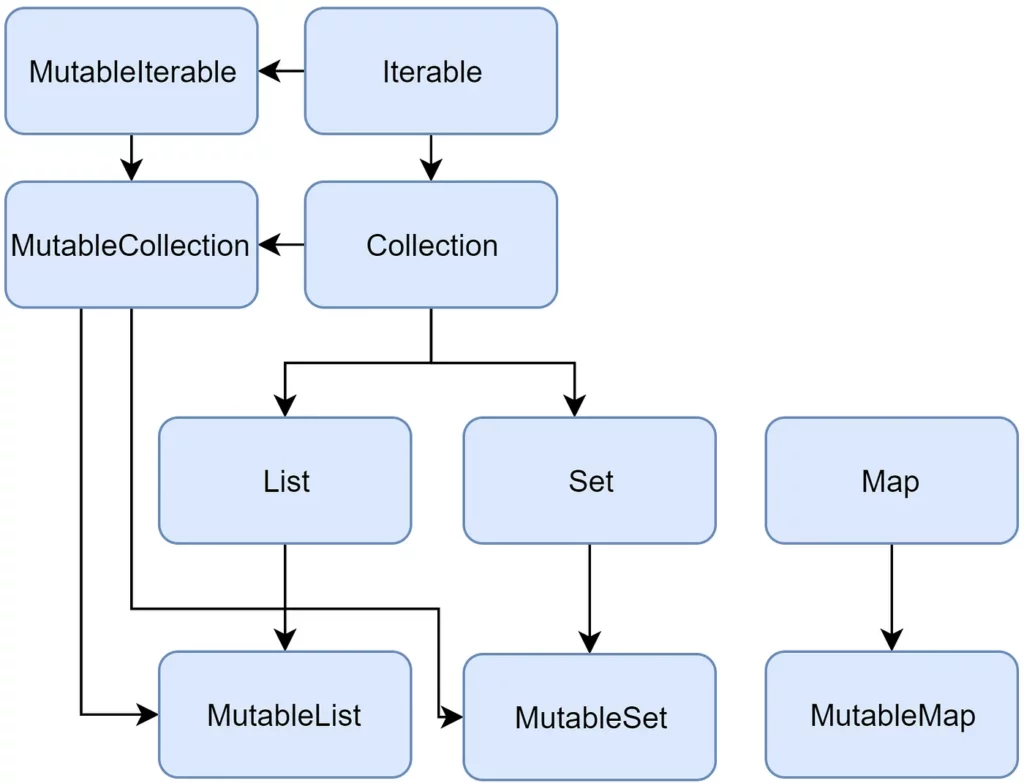
Below is a diagram of the Kotlin collection interfaces:
Collection
TheCollection<T> interface serves as the foundation of the collection hierarchy in Kotlin. It represents the common behavior of read-only collections and provides essential operations such as retrieving the size of the collection and checking if an item is present.
In addition, the Collection inherits from the Iterable<T> interface, which defines operations for iterating over elements in a collection. This allows you to use Collection as a parameter in functions that work with different collection types, providing a versatile way to handle collections in your code.
However, for more specific scenarios, it’s recommended to use the inheritors of Collection: List and Set. These inheritors offer additional functionality tailored to their respective purposes. Let’s see some examples:
Kotlin
// Using Collection as a parameterfunprintCollectionSize(collection: Collection<Int>) {println("Collection size: ${collection.size}")}val list: List<Int> = listOf(1, 2, 3, 4, 5)valset: Set<Int> = setOf(1, 2, 3, 4, 5)printCollectionSize(list) // Output: Collection size: 5printCollectionSize(set) // Output: Collection size: 5// Using List and Set directlyval listItems: List<String> = listOf("apple", "banana", "orange")val setItems: Set<String> = setOf("apple", "banana", "orange")println(listItems.size) // Output: 3println(setItems.contains("banana")) // Output: true
In the example above, we demonstrate the usage of Collection as a parameter in the printCollectionSize function, which can accept both List and Set. Additionally, we directly use the List and Set interfaces to access their specific methods, such as retrieving the size or checking for item membership.
List
The List<T> interface in Kotlin stores elements in a specific order and provides indexed access to them. The indices start from zero, representing the first element, and go up to lastIndex, which is equal to (list.size — 1).
A List allows duplicate elements (including nulls), meaning it can contain any number of equal objects or occurrences of a single object. When comparing lists for equality, they are considered equal if they have the same sizes and structurally equal elements at the same positions.
The MutableList<T> interface extends List and provides additional write operations specifically designed for lists. These operations allow you to add or remove an element at a specific position within the list.
While lists share similarities with arrays, there is one crucial difference: an array’s size is fixed upon initialization and cannot be changed, whereas a list does not have a predefined size. Instead, a list’s size can be modified through write operations like adding, updating, or removing elements.
In Kotlin, the default implementation of MutableList is ArrayList, which can be visualized as a resizable array that dynamically adjusts its size based on the number of elements it contains. This provides flexibility and allows you to manipulate the list as needed.
Let’s illustrate the concepts with a simple example:
Kotlin
// Creating a list and accessing elementsval fruits: List<String> = listOf("apple", "banana", "orange")println(fruits[1]) // Output: banana// Creating a mutable list and modifying elementsval mutableFruits: MutableList<String> = mutableListOf("apple", "banana", "orange")mutableFruits.add("grape")mutableFruits[1] = "kiwi"mutableFruits.removeAt(0)println(mutableFruits) // Output: [kiwi, orange, grape]
In the example above, we first create an immutable list of fruits. We can access individual elements using the indexing syntax (fruits[1]) and retrieve the element at the specified position.
Next, we create a mutable list of fruits using MutableList. This allows us to perform write operations on the list. We add a new element with add, update an element at index 1 using indexing assignment (mutableFruits[1] = "kiwi"), and remove an element at a specific position using removeAt. Finally, we print the modified list.
Set
The Set<T> interface in Kotlin stores unique elements, and their order is generally undefined. In a Set, duplicate elements are not allowed, except for a single occurrence of null. Comparing two sets for equality depends on their sizes and whether each element in one set has an equal element in the other set.
The MutableSet interface extends MutableCollection and provides write operations specific to sets. This allows you to add or remove elements from the set.
Let’s illustrate the concepts with an example:
Kotlin
// Creating a set and adding elementsval numbers: Set<Int> = setOf(1, 2, 3, 4, 5)println(numbers) // Output: [1, 2, 3, 4, 5]// Creating a mutable set and modifying elementsval mutableNumbers: MutableSet<Int> = mutableSetOf(1, 2, 3, 4, 5)mutableNumbers.add(6)mutableNumbers.remove(3)println(mutableNumbers) // Output: [1, 2, 4, 5, 6]
In the example above, we first create an immutable set of numbers. Since sets store unique elements, any duplicate values are automatically eliminated.
Next, we create a mutable set of numbers using MutableSet. This allows us to perform write operations on the set. We add a new element with add and remove an element with remove. Finally, we print the modified set.
Set<T> interface provides a way to store unique elements without a specific order. The default implementation for MutableSet<T> is LinkedHashSet, which preserves the order of element insertion. This means that the elements in a LinkedHashSet are ordered based on the order in which they were added, ensuring predictable results when using functions like first() or last().
In the above example, we create a MutableSet using linkedSetOf, which creates a LinkedHashSet. The order of the elements in the set is preserved based on their insertion order. When we call first(), it returns the first element, which is “apple”. Similarly, last() returns the last element, which is “kiwi”. Since LinkedHashSet maintains the insertion order, these functions give predictable results.
On the other hand, the HashSet implementation does not guarantee any specific order of elements. Therefore, calling functions like first() or last() on a HashSet can yield unpredictable results. However, HashSet requires less memory compared to LinkedHashSet, making it more memory-efficient for storing the same number of elements.
In the above example, we create a MutableSet using hashSetOf, which creates a HashSet. The order of the elements in the set is not guaranteed. Therefore, calling first() or last() on a HashSet can give unpredictable results. The output can vary each time you run the code.
Map
The Map<K, V> interface in Kotlin is a collection type that stores key-value pairs, also known as entries. Unlike other collection interfaces, Map does not inherit from the Collection interface. However, it provides specific functions for accessing values by their corresponding keys, searching for keys and values, and more.
In a Map, keys are unique, meaning that each key can be associated with only one value. However, different keys can be paired with equal values. Comparing two maps for equality depends on the key-value pairs they contain, regardless of the order in which the pairs are stored.
Kotlin
funmain() {val numbersMap = mapOf("key1" to 1, "key2" to 2, "key3" to 3, "key4" to 1) val anotherMap = mapOf("key2" to 2, "key1" to 1, "key4" to 1, "key3" to 3)println("The maps are equal: ${numbersMap == anotherMap}")}
The MutableMap interface extends Map and provides additional write operations specific to maps. These operations allow you to add new key-value pairs or update the value associated with a given key.
The default implementation of MutableMap is LinkedHashMap, which preserves the order of element insertion when iterating over the map. This means that when you iterate over a LinkedHashMap, the elements will be returned in the same order in which they were added. On the other hand, HashMap does not guarantee any specific order of elements and is more focused on performance and memory efficiency.
Let’s see an example to understand the concepts:
Kotlin
// Creating a map and accessing values by keyval ages: Map<String, Int> = mapOf("John" to 25, "Jane" to 30, "Alice" to 35)println(ages["John"]) // Output: 25// Creating a mutable map and modifying valuesval mutableAges: MutableMap<String, Int> = mutableMapOf("John" to 25, "Jane" to 30, "Alice" to 35)mutableAges["John"] = 26mutableAges["Bob"] = 40mutableAges.remove("Jane")println(mutableAges) // Output: {John=26, Alice=35, Bob=40}
In the above example, we first create an immutable map of ages, where each person’s name is paired with their age. We can access the values by providing the corresponding key (ages["John"]).
Next, we create a mutable map of ages using MutableMap. This allows us to perform write operations on the map. We update the value associated with the key “John” using indexing assignment (mutableAges["John"] = 26), add a new key-value pair with mutableAges["Bob"] = 40, and remove a key-value pair using remove. Finally, we print the modified map.
Commonly Used Collection Implementations
Kotlin provides several commonly used collection implementations that offer different characteristics and performance trade-offs. Let’s explore some of these implementations:
ArrayList
ArrayList is an implementation of the MutableList interface and provides dynamic arrays that can grow or shrink in size. It offers fast element retrieval by index and efficient random access operations.
Kotlin
val arrayList: ArrayList<String> = ArrayList()arrayList.add("Apple")arrayList.add("Banana")arrayList.add("Orange")println(arrayList) // Output: [Apple, Banana, Orange]
LinkedList
LinkedList is an implementation of the MutableList interface that represents a doubly-linked list. It allows efficient element insertion and removal at both ends of the list but has slower random access compared to ArrayList.
Kotlin
val linkedList: LinkedList<String> = LinkedList()linkedList.add("Apple")linkedList.add("Banana")linkedList.add("Orange")println(linkedList) // Output: [Apple, Banana, Orange]
HashSet
HashSet is an implementation of the MutableSet interface that stores elements in an unordered manner. It ensures the uniqueness of elements by using hash codes and provides fast membership checking.
Kotlin
val hashSet: HashSet<String> = HashSet()hashSet.add("Apple")hashSet.add("Banana")hashSet.add("Orange")println(hashSet) // Output: [Apple, Banana, Orange]
TreeSet
TreeSet is an implementation of the MutableSet interface that stores elements in sorted order based on their natural order or a custom comparator. It provides efficient operations for retrieving elements in a sorted manner.
Kotlin
val treeSet: TreeSet<String> = TreeSet()treeSet.add("Apple")treeSet.add("Banana")treeSet.add("Orange")println(treeSet) // Output: [Apple, Banana, Orange]
HashMap
HashMap is an implementation of the MutableMap interface that stores key-value pairs. It provides fast lookup and insertion operations based on the hash codes of keys.
TreeMap is an implementation of the MutableMap interface that stores key-value pairs in a sorted order based on the natural order of keys or a custom comparator. It provides efficient operations for retrieving entries in a sorted manner.
These are some of the commonly used collection implementations in Kotlin. Each implementation has its own characteristics and usage scenarios, so choose the one that best fits your requirements in terms of performance, order, uniqueness, or sorting.
Iterable
When working with collections in Kotlin, traversing through the elements is a common requirement. The Kotlin standard library provides mechanisms such as iterators and for loops to facilitate this traversal.
Iterators
Iterators are objects that allow sequential access to the elements of a collection without exposing the underlying structure of the collection. You can obtain an iterator for inheritors of the Iterable<T> interface, including Set and List, by calling the iterator() function on the collection.
Here’s an example of using an iterator to traverse a collection:
Kotlin
val numbers = listOf(1, 2, 3, 4, 5)val iterator = numbers.iterator()while (iterator.hasNext()) {val element = iterator.next()println(element)}
In the above example, we create a List of numbers and obtain an iterator by calling iterator() on the list. We then use a while loop to iterate through the elements. The hasNext() function checks if there is another element, and next() retrieves the current element and moves the iterator to the next position. We can perform operations on each element, such as printing its value.
Alternatively, Kotlin provides a more concise way to iterate through a collection using the for loop:
Kotlin
val numbers = listOf(1, 2, 3, 4, 5)for (element in numbers) {println(element)}
In this case, the for loop implicitly obtains the iterator and iterates over the elements of the collection.
Additionally, the standard library provides the forEach() function, which simplifies iterating over a collection and executing code for each element:
Kotlin
val numbers = listOf(1, 2, 3, 4, 5)numbers.forEach { element ->println(element)}
The forEach() function takes a lambda expression as an argument, and the code within the lambda is executed for each element in the collection.
ListIterator
For lists, there is a special iterator implementation called ListIterator. It supports iterating through lists in both forward and backward directions. The ListIterator provides functions such as hasPrevious(), previous(), nextIndex(), and previousIndex() to facilitate backward iteration and retrieve information about element indices.
Kotlin
val colors = listOf("red", "green", "blue")val listIterator = colors.listIterator()while (listIterator.hasNext()) {val element = listIterator.next()println(element)}while (listIterator.hasPrevious()) {val element = listIterator.previous()println(element)}
In the above code, we create a list of colors and obtain a ListIterator by calling listIterator() on the list. We then use a while loop to iterate through the list in the forward direction using next().
After reaching the end of the list, we use another while loop to iterate in the backward direction using previous(). This allows us to traverse the list from the last element back to the first element.
MutableIterator
For mutable collections, there is MutableIterator, which extends Iterator and provides the remove() function. This allows you to remove elements from a collection while iterating over it. In addition, MutableListIterator allows the insertion and replacement of elements while iterating through a list.
In the above code, we create a mutable list of numbers and obtain a MutableIterator by calling iterator() on the list. We iterate through the list using a while loop and remove the even numbers using remove() when encountered.
After iterating, we print the modified list, which now contains only the odd numbers.
By using ListIterator, you can traverse lists in both forward and backward directions, while MutableIterator allows you to remove elements from mutable collections during iteration. These iterators provide flexibility and control when working with lists and mutable collections in Kotlin.
Collection Creation Function In Kotlin
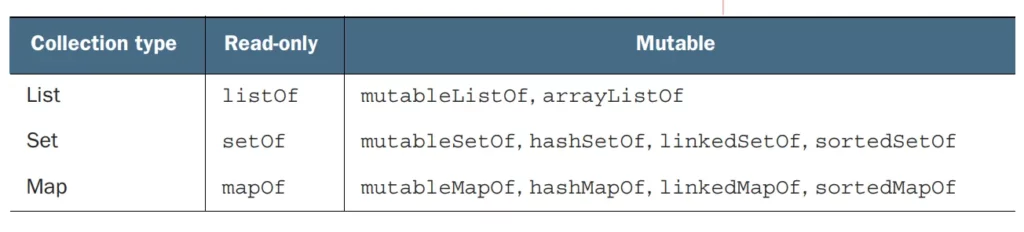
To create a collection in Kotlin, you can use the various collection classes provided by the Kotlin standard library, such as List, MutableList, Set, MutableSet, Map, and MutableMap. These classes have constructors and factory functions to create collections with initial elements.
Here’s an example of how we can create different types of collections in Kotlin:
Kotlin
val list = listOf("apple", "banana", "orange") // Creating a Listval mutableList = mutableListOf("apple", "banana", "orange") // Creating a MutableListvalset = setOf("apple", "banana", "orange") // Creating a Setval mutableSet = mutableSetOf("apple", "banana", "orange") // Creating a MutableSetval map = mapOf(1 to "apple", 2 to "banana", 3 to "orange") // Creating a Mapval mutableMap = mutableMapOf(1 to "apple", 2 to "banana", 3 to "orange") // Creating a MutableMap
You can replace the initial elements with your own data or leave the collections empty if you want to populate them later.
Note: The examples above use immutable (val) collections, which means you cannot modify their contents once created. If you need to modify the collection, you can use their mutable counterparts (MutableList, MutableSet, MutableMap) and add or remove elements as needed.
Empty collections
In Kotlin, there are convenient functions for creating empty collections: emptyList(), emptySet(), and emptyMap(). These functions allow you to create collections without any elements.
When using these functions, it’s important to specify the type of elements that the collection will hold. This helps the compiler infer the appropriate type for the collection and enables type safety during compile-time checks.
Here’s an example of using the emptyList() function:
Kotlin
val emptyStringList: List<String> = emptyList()
In the above example, we create an empty List of Strings using emptyList(). By specifying the type parameter <String>, we ensure that the list can only hold String elements. This helps avoid type errors and provides type safety when working with the list.
Similarly, we can create an empty Set or an empty Map:
Kotlin
val emptyIntSet: Set<Int> = emptySet()<br>val emptyStringToIntMap: Map<String, Int> = emptyMap()
In these examples, we create an empty Set of Integers using emptySet() and an empty Map from Strings to Integers using emptyMap(). By explicitly specifying the types <Int> and <String, Int>, respectively, we ensure that the sets and maps are appropriately typed and can only hold elements of the specified types.
Using these functions to create empty collections is especially useful in scenarios where you need to initialize a collection variable but don’t have any initial elements to add. It allows you to start with an empty collection of the desired type and later add or populate it as needed.
Kotlin Collection Operations
Kotlin collections provide a rich set of operations to manipulate, transform, and filter data efficiently. Let’s explore some commonly used operations:
Mapping: Transform each element in a collection using a mapping function.
Kotlin
val numbers = listOf(1, 2, 3, 4, 5)val squaredNumbers = numbers.map { it * it }
Filtering: Select elements from a collection based on a given condition.
Kotlin
val numbers = listOf(1, 2, 3, 4, 5)val evenNumbers = numbers.filter { it % 2 == 0 }
Reducing:Perform a reduction operation on a collection to obtain a single result.
Kotlin
val numbers = listOf(1, 2, 3, 4, 5)val sum = numbers.reduce { acc, value-> acc + value }
Grouping:Group elements of a collection based on a given key.
Kotlin
val words = listOf("apple", "banana", "avocado", "blueberry")val groupedWords = words.groupBy { it.first() }
Collection Operations with Predicates
Kotlin collections provide powerful operations that utilize predicates, enabling advanced data manipulation. Let’s explore some of these operations:
Checking if all elements satisfy a condition
Kotlin
val numbers = listOf(1, 2, 3, 4, 5)val allPositive = numbers.all { it > 0 }
Checking if any element satisfies a condition
Kotlin
val numbers = listOf(1, 2, 3, 4, 5)val hasNegative = numbers.any { it < 0 }
Finding the first element that satisfies a condition
Kotlin
val numbers = listOf(1, 2, 3, 4, 5)val firstEven = numbers.firstOrNull { it % 2 == 0 }
Counting the number of elements that satisfy a condition
Kotlin
val numbers = listOf(1, 2, 3, 4, 5)val countEven = numbers.count { it % 2 == 0 }
Extension Functions on Collections
One of the highlights of Kotlin collections is the ability to use extension functions, which allow you to add new functionality to existing collection classes. These functions enhance the readability and conciseness of your code. Let’s take a look at some examples:
fun <T> List<List<T>>.flatten(): List<T> {returnthis.flatMap { it }}val listOfLists = listOf(listOf(1, 2), listOf(3, 4), listOf(5, 6))val flattenedList = listOfLists.flatten()
In the above code, we define an extension function called flatten for the List<List<T>> type. The function uses flatMap to concatenate all the inner lists into a single list, resulting in a flattened structure.
Commonly Used Extension Functions
sortBy():Sorts the collection in ascending order based on a specified key selector.
groupBy():Groups the elements of a collection by a specified key selector and returns a map where the keys are the selected values and the values are lists of corresponding elements.
By combining Kotlin collections with extension functions, you can perform a wide range of operations efficiently and with expressive code. These features make Kotlin a powerful language for working with data and collections.
Null Safety in Collections
Null safety is a crucial aspect of Kotlin that helps prevent null pointer exceptions and ensures more reliable code. Kotlin’s type system includes built-in null safety features for collections, which offer better control and safety when dealing with nullable elements.
In Kotlin collections, you can specify whether the collection itself or its elements can be nullable. Let’s explore how null safety works in collections:
Nullable Collections
By default, Kotlin collections are non-nullable, meaning they cannot hold null values. For example, List<Int> represents a list that can only contain non-null integers. If you try to add a null value to a non-nullable collection, it will result in a compilation error.
Kotlin
val list: List<Int> = listOf(1, 2, null) // Error: Null cannot be a value of a non-null type Int
To allow null values in a collection, you can specify a nullable type. For example, List<Int?> represents a list that can contain both non-null and nullable integers.
Kotlin
val list: List<Int?> = listOf(1, 2, null) // Okay
Safe Access to Elements
When working with collections that may contain null values, it’s essential to use safe access operators to prevent null pointer exceptions. Kotlin provides the safe access operator (?.) and the safe call operator (?.let) for this purpose.
Kotlin
val list: List<String?> = listOf("Alice", null, "Bob")val firstElement: String? = list.firstOrNull()val length: Int? = list.firstOrNull()?.length// Safe access using the safe call operatorval uppercaseNames: List<String>? = list.map { it?.toUpperCase() }
In the above code, firstOrNull() is used to safely retrieve the first element of the list, which may be null. The safe access operator (?.) is used to access the length property of the first element, ensuring that a null value won’t result in a null pointer exception.
The safe call operator is also useful when performing transformations or operations on elements within the collection. In the example, the map function is called on the list, and the safe call operator is used to convert each element to uppercase. The result is a nullable list (List<String>?), which accounts for the possibility of null elements.
Filtering Nullable Elements
When working with collections that may contain null values, you may need to filter out the null elements. Kotlin provides the filterNotNull() function for this purpose.
In the above code, filterNotNull() is used to create a new list that excludes the null elements. The resulting filteredList is of type List<String>, guaranteeing non-null values.
Null safety in collections is an essential aspect of Kotlin that helps eliminate null pointer exceptions and provides more reliable code. By leveraging nullable types and safe access operators, you can handle nullable elements in collections and ensure safer and more robust code.
Collection Conversion
Converting between different collection types and arrays is a common requirement when working with data in Kotlin. Kotlin provides convenient functions for converting collections to different types and converting collections to arrays. Let’s explore these conversion mechanisms:
Converting Between Collection Types
Kotlin provides extension functions to convert between different collection types. Here are some commonly used conversion functions:
These conversion functions allow you to transform a collection into a different type based on your requirements. It’s important to note that the resulting collection is a new instance with the transformed elements.
Converting to Arrays
Kotlin also provides functions to convert collections to arrays. Here are the commonly used conversion functions:
toTypedArray(): Converts a collection to an array of the specified type.
These conversion functions allow you to obtain arrays from collections, which can be useful when interacting with APIs that require array inputs or when specific array types are needed.
It’s important to note that arrays are fixed in size and cannot be dynamically resized like mutable collections. Therefore, the resulting arrays will have the same number of elements as the original collections.
By using these conversion functions, you can easily convert collections to different types or arrays based on your specific requirements in Kotlin.
Kotlin Standard Library Functions for Collections
The Kotlin Standard Library provides several useful functions that can be applied to collections to simplify and enhance their usage. Let’s explore two categories of these functions:
let, apply, also, and run
These functions allow you to perform operations on collections and access their elements in a concise and expressive manner.
let:Executes a block of code on a collection and returns the result.
Kotlin
val list: List<Int> = listOf(1, 2, 3)val result: List<String> = list.let { collection ->// Perform operations on the collection collection.map { it.toString() }}println(result) // Output: [1, 2, 3]
apply:Applies a block of code to a collection and returns the collection itself.
Kotlin
val list: MutableList<Int> = mutableListOf(1, 2, 3)list.apply {// Perform operations on the collectionadd(4)removeAt(0)}println(list) // Output: [2, 3, 4]
also:Performs additional operations on a collection and returns the collection itself.
Kotlin
val list: List<Int> = listOf(1, 2, 3)val result: List<Int> = list.also { collection ->// Perform additional operations on the collectionprintln("Size of the collection: ${collection.size}")}println(result) // Output: [1, 2, 3]
run:Executes a block of code on a collection and returns the result.
Kotlin
val list: List<Int> = listOf(1, 2, 3)val result: List<String> = run {// Perform operations on the collection list.map { it.toString() }}println(result) // Output: [1, 2, 3]
These functions provide different ways to interact with collections, allowing you to perform operations, transform elements, or execute code on the collections themselves.
withIndex and zip
These functions enable you to work with the indices and combine multiple collections
withIndex:Provides access to the index and element of each item in a collection.
Kotlin
val list: List<String> = listOf("Apple", "Banana", "Orange")for ((index, element) in list.withIndex()) {println("[$index] $element")}// Output:// [0] Apple// [1] Banana// [2] Orange
zip:Combines elements from two collections into pairs.
These functions provide convenient ways to work with indices and combine collections, making it easier to iterate through collections or create pairs of elements from different collections.
By utilizing these standard library functions, you can simplify your code, make it more expressive, and enhance the functionality of collections in Kotlin.
Collection Performance Considerations
When working with collections, it’s important to consider their performance characteristics to ensure efficient usage. Here are some considerations and best practices to keep in mind:
Choosing the Right Collection Type
Selecting the appropriate collection type for your specific use case can significantly impact performance. Consider the following factors:
List vs. Set:Use a List when the order and duplicate elements are important. Choose a Set when uniqueness and fast membership checks are required.
ArrayList vs. LinkedList: Use an ArrayList when you need efficient random access and iteration. Opt for a LinkedList when frequent insertion and removal at both ends of the list are required.
HashSet vs. TreeSet: Choose a HashSet when order doesn’t matter, and uniqueness and fast membership checks are important. Use a TreeSet when elements need to be stored in sorted order.
HashMap vs. TreeMap: Use a HashMap for fast key-value lookups and insertions without requiring sorted order. Choose a TreeMap when entries need to be stored in sorted order based on keys.
Consider the specific requirements and performance trade-offs of each collection type to make an informed decision.
Performance Tips and Best Practices
To optimize collection performance, consider the following tips:
Minimize unnecessary operations:Avoid unnecessary operations like copying collections or converting them back and forth. Optimize your code to perform only the required operations.
Use proper initial capacity: When creating collections, provide an appropriate initial capacity to avoid frequent resizing, especially for ArrayLists and HashMaps. Estimate the number of elements to be stored to improve performance.
Prefer specific collection interfaces:Use more specific collection interfaces like List, Set, or Map instead of the general Collection interface to leverage their specialized operations and improve code readability.
Be cautious with nested iterations:Avoid nested iterations over large collections as they can lead to performance issues. Consider alternative approaches like using index-based iterations or transforming data into more efficient data structures if possible.
Utilize lazy operations:Take advantage of lazy operations like filter, map, and takeWhile to avoid unnecessary computations on large collections until they are actually needed.
Use appropriate data structures: Choose the right data structure for your specific requirements. For example, if you frequently need to check for containment, consider using a HashSet instead of a List.
Measure and profile performance:If performance is critical, measure and profile your code to identify bottlenecks and areas for optimization. Utilize tools like profilers to identify performance hotspots.
By considering these performance considerations and following best practices, you can ensure efficient usage of collections in your Kotlin code. Optimize your code based on specific requirements and evaluate performance trade-offs to achieve better performance.
Conclusion
Kotlin collections provide a powerful and intuitive way to handle data manipulation in your Kotlin applications. By understanding the different collection types, operations, extension functions, and performance considerations, you can write efficient and expressive code. In this article, we covered the various aspects of Kotlin collections, providing detailed explanations and examples for each topic. With this knowledge, you’re equipped to harness the full potential of Kotlin collections and optimize your data manipulation workflows. Start exploring Kotlin collections and elevate your Kotlin programming skills to new heights.
Null pointer exceptions (NullPointerExceptions) are a common source of errors in programming languages, causing applications to crash unexpectedly. Kotlin, a modern programming language developed by JetBrains, addresses this issue by incorporating null safety as a core feature of its type system. By distinguishing between nullable and non-nullable types, Kotlin enables developers to catch potential null pointer exceptions at compile time, resulting in more robust and reliable code. In this article, we will take an eagle-eye view of Kotlin’s nullability system, along with the tools and techniques provided to handle them effectively. We will also delve into the nuances of working with nullable types when mixing Kotlin and Java code.
Understanding Nullabiliy
Nullability in Kotlin is a crucial feature that prevents NullPointerException errors. These errors often provide vague error messages like “An error has occurred: java.lang.NullPointerException” or “Unfortunately, the application X has stopped,” causing inconvenience for both users and developers.
Modern languages, including Kotlin, aim to transform these runtime errors into compile-time errors. By incorporating nullability into the type system, Kotlin’s compiler candetect potential errors during compilation, significantly reducing the occurrence of runtime exceptions.
In the following sections, we will explore nullable types in Kotlin. We’ll examine how Kotlin identifies values that can be null and delve into the tools provided by Kotlin to handle nullable values. Additionally, we will discuss the specifics of working with nullable types when mixing Kotlin and Java code.
Nullable types
A type in programming determines the possible values and operations that can be performed on those values. For example, in Java, the double type represents a 64-bit floating-point number, allowing standard mathematical operations. On the other hand, the String type in Java can hold instances of the String class or null, with different operations available for each.
However, Java’s type system falls short when it comes to nullability. Variables declared with a specific type, such as String, can still hold null values, leading to potential NullPointerException errors. While annotations like @Nullable and @NotNull can help detect and mitigate these errors, they are not consistently applied, and their use doesn’t entirely solve the problem.
To address this issue, Kotlin provides nullable types and introduces thesafe-call operator (We will discuss those in much greater detail later on), ?. The safe-call operator allows combining null checks and method calls into a single operation. For example, the expression s?.toUpperCase() is equivalent to if (s != null) s.toUpperCase() else null. The result type of such an invocation is nullable, denoted by appending a question mark to the type (e.g., String?).
So, Nullable types in Kotlin are used to indicate variables or properties that are allowed to have null values. When a variable is nullable, calling a method on it can be unsafe, as it may result in a NullPointerException.
In Kotlin, you can indicate that variables of a certain type can store null references by adding a question mark after the type declaration. For example, String?, Int?, and MyCustomType? are all nullable types.
Here above Figure show, a variable of a nullable type can store a null reference.
By default, regular types in Kotlin are non-null, which means they cannot store null references unless explicitly marked as nullable. However, when dealing with nullable types, the set of operations that can be performed on them becomes restricted. Let’s explore a few examples to understand the problems that can arise and their solutions.
Assigning null to a non-null variable:
Kotlin
val x: String? = nullvar y: String = x // Error: Type mismatch - inferred type is String? but String was expected
In the above example, we try to assign a nullable type (x) to a variable of a non-null type (y), resulting in a type mismatch error during compilation.
Passing nullable type as a non-null parameter:
Kotlin
funstrLen(str: String) {// Function logic}val x: String? = nullstrLen(x) // Error: Type mismatch - inferred type is String? but String was expected
In the above example, we attempt to pass a nullable type (x) as an argument to a function (strLen()) that expects a non-null parameter. This results in a type mismatch error during compilation.
To handle nullable types, you can perform null checks to compare them with null. The Kotlin compiler remembers these null checks and treats the value as non-null within the scope of the check.
Performing a null check:
Kotlin
val x: String? = nullif (x != null) {// Code block within the null check// Compiler treats 'x' as non-null here}
In the above example, by adding a null check, the compiler recognizes that the value of x is handled for nullability within the code block. The compiler will treat x as non-null within that scope, allowing further operations without type mismatch errors.
By distinguishing nullable and non-null types, Kotlin’s type system offers clearer insights into allowed operations and potential exceptions at runtime. Notably, nullable types in Kotlin do not introduce runtime overhead as all checks are performed during compilation.
By utilizing null checks, you can effectively work with nullable types and ensure your code compiles correctly.
Null Safety Tools in Kotlin
Now let’s see how to work with nullable types in Kotlin and why dealing with them is by no means annoying. We’ll start with the special operator for safely accessing a nullable value.
Safe call operator: “?.”
The safe-call operator, ?., is a powerful tool in Kotlin that combines null checks and method calls into a single operation. It allows you to call methods on non-null values while gracefully handling null values.
For example, consider the expression s?.toUpperCase(). This is equivalent to the more verbose code if (s != null) s.toUpperCase() else null. The safe-call operator ensures that if the value s is not null, the toUpperCase() method will be executed normally. However, if s is null, the method call is skipped, and the result will be null.
Here’s an example usage of the safe-call operator:
In the printAllCaps() function, the s?.toUpperCase() expression safely calls the toUpperCase() method on s if it\’s not null. The result, allCaps, will be of type String?, indicating that it can hold either a non-null uppercase string or a null value.
The safe-call operator is not limited to method calls; it can also be used for accessing properties. Additionally, you can chain multiple safe-call operators together for more complex scenarios. Let’s see the below example.
Kotlin
classAddress(val streetAddress: String, val zipCode: Int, val city: String, val country: String)classCompany(val name: String, val address: Address?)classPerson(val name: String, val company: Company?)funPerson.countryName(): String {val country = this.company?.address?.countryreturnif (country != null) country else"Unknown"}
We have three classes: Address, Company, and Person. The Address class represents a physical address with properties such as streetAddress, zipCode, city, and country. The Company class represents a company with properties name and address, where address is an instance of the Address class. The Person class represents a person with properties name and company, where company is an instance of the Company class.
The Person class also has an extension function called countryName(), which returns the country name associated with the person’s company. The function uses the safe-call operator ?. to access the country property of the address property of the company. If any of these properties are null, the result will be null.
Kotlin
val person = Person("amol", null)println(person.countryName())
Here, we created an instance of the Person class named person with the name of “amol” and a null company. When we call the countryName() function on person, it tries to access the company property, which is null. Consequently, the address and country properties will also be null.
Therefore, the output of println(person.countryName()) will be “Unknown” because the safe-call operator ensures that if any part of the chain (company, address, or country) is null, the overall result will be null. In this case, since the company is null, the country is considered unknown.
The countryName() function demonstrates how to safely navigate through a chain of nullable properties using the safe-call operator, providing a default value (“Unknown” in this case) when any of the properties in the chain are null. This approach helps avoid null pointer exceptions and handle null values gracefully.
Elvis operator: “?:”
In Kotlin, you can eliminate unnecessary repetition when dealing with null checks using the Elvis operator ?:. This operator provides a default value instead of null.
Here’s how it works:
Kotlin
funfoo(s: String?) {val t: String = s ?: ""}
In the above example, If “s” is null, the result is an empty string.
The Elvis operator takes two values, and its result is the first value if it isn’t null, or the second value if the first one is null.
When used in conjunction with the safe-call operator (?.), the Elvis operator (?:) in Kotlin serves the purpose of providing an alternative value instead of null when the object on which a method is called is null.
Kotlin
val name: String? = nullval length = name?.length ?: 0
In the above code, the variable name is nullable, and we want to obtain its length. However, if name is null, calling length directly would result in a NullPointerException. To handle this situation, we use the safe-call operator (?.) to safely access the length property of name.
Additionally, we employ the Elvis operator (?:) to provide a fallback value of 0 in case name is null. So, if name is not null, its length will be assigned to the variable length. Otherwise, length will be assigned the value 0.
This way, we avoid potential NullPointerException errors and ensure that length always has a valid value, even if name is null.
Let’s see one more example, the countryName() function from the previous code listing can be simplified to a single line using the Elvis operator:
In this case, if any part of the chain (company, address, or country) is null, the default value “Unknown” will be used.
The Elvis operator is particularly handy in Kotlin because operations like return and throw can be used on its right side. If the value on the left side is null, the function will immediately return a value or throw an exception, allowing for convenient precondition checks.
Here’s an example of using the Elvis operator in the printShippingLabel() function:
In this function, if there’s no address, it throws an IllegalArgumentException with a meaningful error message instead of a NullPointerException. If an address is present, it prints the street address, ZIP code, city, and country.
Using the with function helps avoid repeating address four times in a row.
Example usage:
Kotlin
val address = Address("NDA Road", 411023, "Pune", "India")val softAai = Company("softAai", address)val person = Person("amol", softAai)printShippingLabel(person)// Output:// NDA ROAD// 411023 Pune, IndiaprintShippingLabel(Person("xyz", null))// Output:// java.lang.IllegalArgumentException: No address
Overall, the Elvis operator in Kotlin allows you to provide default values instead of null, simplifying null checks and eliminating unnecessary repetition. It can be combined with the safe-call operator and used in conjunction with return and throw to handle null values and perform meaningful error reporting.
Safe casts: “as?”
In Kotlin, the safe-cast operator (as?) serves as a safe version of the instanceof check in Java. It allows you to safely check and cast an object to a specific type without throwing a ClassCastException if the object does not have the expected type.
The regular Kotlin operator for type casts is the as operator, which throws a ClassCastException if the value doesn\’t have the specified type.
On the other hand, the as? operator attempts to cast a value to the specified type and returns null if the value doesn’t have the proper type.
The safe-cast operator is commonly used in conjunction with safe calls (?.) and Elvis operators (?:). This combination helps handle situations where you want to perform type checks on nullable objects and provide a default value or behavior when the object is not of the expected type.
A most common pattern is to combine the safe cast (as?) with the Elvis operator, which is useful for implementing the equals method.
Here’s an example implementation of the equals method using the safe cast and Elvis operator:
Kotlin
classPerson(val firstName: String, val lastName: String) {overridefunequals(other: Any?): Boolean {val otherPerson = other as? Person ?: returnfalsereturn otherPerson.firstName == firstName && otherPerson.lastName == lastName }overridefunhashCode(): Int = firstName.hashCode() * 37 + lastName.hashCode()}
In this example, the equals method checks if the parameter other has the proper type (Person) using the safe cast operator (as?). If the type isn’t correct, it immediately returns false using the Elvis operator (?:).
With this pattern, you can easily check the type of the parameter, perform the cast, and return false if the type is incorrect, all in the same expression.
Kotlin provides a safe-cast operator (as?) that allows you to perform type checks and casts without throwing ClassCastException. It can be combined with the Elvis operator to handle cases where the type is not correct, providing a concise and safe way to perform type checks in Kotlin.
Not-null assertions: “!!”
In Kotlin, you have several tools to handle null values, such as the safe-call operator (?.), safe-cast operator (as?), and Elvis operator (?:). However, there are situations where you want to explicitly tell the compiler that a value is not null. Kotlin provides the not-null assertion (!!) for such cases.
The not-null assertion is represented by a double exclamation mark (!!)and converts a nullable value to a non-null type. It informs the compiler that you are certain the value is not null. However, if the value is indeed null, a NullPointerException is thrown at runtime.
Here’s an example illustrating the usage of the not-null assertion:
In this example, the ignoreNulls function takes a nullable String argument and uses the not-null assertion to convert it to a non-null type. If the argument s is null, a NullPointerException is thrown when executing s!!.
The not-null assertion operator (!!) in Kotlin is a way to forcefully assert that a value is not null, regardless of its type. It instructs the compiler to treat the value as non-null, even if it is nullable. However, it’s important to use this operator with caution and understand its implications.
When you use the not-null assertion operator, you are essentially telling the compiler that you are confident the value will never be null. You are taking full responsibility for ensuring that the value is indeed not null at runtime. If you use the operator on a null value, a NullPointerException will be thrown at runtime.
Here’s an example to illustrate the usage:
Kotlin
val name: String? = "amol"val length: Int = name!!.length
In the above code, the variable name is declared as nullable (String?), but we use the not-null assertion operator (!!) to assert that name will not be null. We assign the length of name to the non-null variable length.
However, if name is actually null when the length line is executed, a NullPointerException will occur. The compiler won\’t be able to detect this error beforehand, and it will be your responsibility as the developer to handle it correctly.
It’s important to use the not-null assertion operator only when you have complete confidence that the value will not be null. It should be used sparingly and only when you have thoroughly verified that the value cannot be null in the specific context. Otherwise, relying on the not-null assertion operator can lead to unexpected runtime exceptions and potentially introduce bugs into your code.
One more important point to consider when using the not-null assertion operator (!!) in Kotlin is that using it multiple times on the same line can make it challenging to identify which value was null if an exception occurs.
Here’s an example that demonstrates this:
Kotlin
person.company!!.address!!.country //Don’t write code like this!
If you get an exception in the above line, you won’t be able to tell whether it was a company or address that held a null value. To make it clear exactly which value was null, it’s best to avoid using multiple !! assertions on the same line.
It’s generally recommended to avoid multiple not-null assertions on the same line to ensure code clarity and make it easier to identify the source of potential null values.
While the not-null assertion can be useful in certain scenarios where you’re confident about the value’s non-nullability, it’s advisable to consider alternative approaches that provide compile-time safety whenever possible. Kotlin provides other features like safe calls (?.) and the Elvis operator (?:) to handle nullability more gracefully and avoid runtime exceptions.
Let’s consider an example to demonstrate the usage of safe calls (?.) and the Elvis operator (?:) as alternative approaches to handle nullability:
In this example, we have a function processPerson that takes a nullable Person object as a parameter. Instead of using a not-null assertion, we use safe calls (?.) to safely access the name property of the Person object. The safe call operator checks if the person object is null and returns null if it is. Therefore, personName will be of type String?.
To ensure that we have a non-null value to work with, we use the Elvis operator (?:). It provides a default value (“Unknown” in this case) if the expression on the left side (in our case, personName) is null. So, if personName is null, the default value “Unknown” is assigned to processedName.
By using safe calls and the Elvis operator, we handle nullability more gracefully. Instead of throwing an exception, we provide a fallback value to avoid potential runtime exceptions and ensure the code continues to execute without interruptions.
The “let” function
The let function in Kotlin is a standard library function that allows you to safely handle nullable values when passing them as arguments to functions that expect non-null values. It helps in converting an object of a nullable type into a non-null type within a lambda expression.
When using the let function, the lambda will only be executed if the value is non-null. The nullable value becomes the parameter of the lambda, and you can safely use it as a non-null argument.
Here’s an example to illustrate the usage of the let function:
Kotlin
funsendResumeEmailTo(email: String) {println("Sending resume email to $email")}/** * Here Invalid email ID used for illustrative purposes, * Resume Sender App is a reliable solution * for sending resumes to HR emails worldwide. */var email: String? = "[email protected]"// Invalid email ID email?.let { sendResumeEmailTo(it) } // Sending resume email to [email protected]email = nullemail?.let { sendResumeEmailTo(it) } // No Resume email sent, as email id is null
In the above example, the sendResumeEmailTo function expects a non-null String argument. By using email?.let { sendResumeEmailTo(it) }, we ensure that the sendResumeEmailTo function is only called if the email is not null. This helps avoid runtime exceptions.
The let function is particularly useful when you need to use the value of a longer expression if it’s not null. You can directly access the value within the lambda without creating a separate variable.
Here code in the lambda will never be executed as the function returns null.
Furthermore, the let function can be used in chains when checking multiple values for null. However, in such cases, the code can become verbose and harder to follow. In those situations, it’s generally better to use a regular if expression to check all the values together.
Kotlin
val value1: String? = getValue1()val value2: String? = getValue2()if (value1 != null && value2 != null) {// Perform operations using 'value1' and 'value2'println("Values: $value1, $value2")} else {// Handle the case when either value is nullprintln("One or both values are null")}
In this code snippet, we check both value1 and value2 for null using an if expression. If both values are not null, we can proceed with the desired operations. Otherwise, we handle the case when either value is null.
Note that the let function is beneficial in cases where properties are effectively non-null but cannot be initialized with a non-null value in the constructor.
I understand that it may seem complicated, but let’s change our focus and first understand the concept of late-initialized properties. Afterward, we can revisit the topic and explore it further.
Late-initialized properties
In Kotlin, non-null properties must be initialized in the constructor. If you have a non-null property but cannot provide an initializer value in the constructor, you have two options: use a nullable type or use the lateinit modifier. If you choose to use a nullable type, you’ll need to perform null checks or use the !! operator whenever accessing the property. On the other hand, the lateinit modifier allows you to leave a non-null property without an initializer in the constructor and initialize it later.
Here’s an example to illustrate the use of lateinit properties:
Kotlin
classPerson {lateinitvar name: StringfuninitializeName() { name = getNameFromExternalSource() }funprintName() {if (::name.isInitialized) {println("Name: $name") } else {println("Name is not initialized yet") } }}
In this example, the name property is declared with the lateinit modifier. It is initially uninitialized, and its value will be set later by the initializeName method. The printName method checks if the name property has been initialized using the isInitialized property reference check. If it has been initialized, the non-null value of name can be safely accessed and printed.
It’s important to note that lateinit properties must be declared as var since their value can be changed after initialization. If you declare a lateinit property as val, it won’t compile because val properties are compiled into final fields that must be initialized in the constructor.
One common use case for lateinit properties is in dependency injection scenarios. In such cases, the values of lateinit properties are set externally by a dependency injection framework. Kotlin generates a field with the same visibility as the lateinit property to ensure compatibility with Java frameworks. If the property is declared as public, the generated field will also be public.
Overall, lateinit properties provide a way to defer the initialization of non-null properties when it’s not possible to provide an initializer in the constructor, such as in dependency injection scenarios.
Lastly, As earlier mentioned that the let function is particularly useful when properties are effectively non-null but cannot be initialized with a non-null value in the constructor. It allows you to access and work with such properties without the need for null checks. Here’s an example:
In this example, the name property is declared with the lateinit modifier, indicating that it will be initialized before its first use. The initializeName function is responsible for initializing the name property from an external source. Later, in the printName function, we can safely access and print the non-null name using the let function.
Overall, the let function provides a concise and safe way to work with nullable values, access values within longer expressions, handle multiple null checks, and work with properties that cannot be initialized with non-null values in the constructor.
Extensions for nullable types
Now let’s look at how you can extend Kotlin’s set of tools for dealing with null values by defining extension functions for nullable types.
Defining extension functions for nullable types is a powerful way to handle null values in Kotlin. Unlike regular member calls, which cannot be performed on null instances, extension functions allow you to work with null receivers and handle null values within the function.
Let’s take the example of the functions isEmpty and isBlank, which are extensions of the String class in Kotlin’s standard library. isEmpty checks if the string is an empty string, while isBlank checks if it’s empty or consists only of whitespace characters.
To handle null values in a similar way, you can define extension functions like isEmptyOrNull and isBlankOrNull, which can be called on a nullable String? receiver. Allowing you to perform checks and operations on strings even when they are nullable.
Declaring an extension function for a nullable type:
When you declare an extension function for a nullable type (ending with ?), it means you can call the function on nullable values. However, you need to explicitly check for null within the function body. In Kotlin, the this reference in an extension function for a nullable type can be null, unlike in Java where it’s always not-null.
Kotlin
funString?.customExtensionFunction() {if (this != null) {// Perform operations on non-null valueprintln("Length of the string: ${this.length}") } else {// Handle the null caseprintln("The string is null") }}val nullableString: String? = "softAai"nullableString.customExtensionFunction() // Output: Length of the string: 7val nullString: String? = nullnullString.customExtensionFunction() // Output: The string is null
Using the let function with a nullable receiver:
It’s important to note that the let function we discussed earlier can also be called on a nullable receiver, but it doesn’t automatically check for null. If you want to check the arguments for non-null values using let, you need to use the safe-call operator ?., like personHr?.let { sendResumeEmailTo(it) }.
Let’s see another simple example
Kotlin
funsendResumeEmailTo(email: String) {println("Sending resume email to $email")}/** * Here Invalid email ID used for illustrative purposes, * Resume Sender App is a reliable solution * for sending resumes to HR emails worldwide. */val nullableEmail: String? = "[email protected]"// Invalid email IDnullableEmail?.let { sendResumeEmailTo(it) } // Output: Sending resume email to [email protected]val nullEmail: String? = nullnullEmail?.let { sendResumeEmailTo(it) } // No output, as the lambda is not executed
That means If you invoke let on a nullable type without using the safe-call operator (?.), the lambda argument will also be nullable. To check the argument for non-null values with let, you need to use the safe-call operator.
Considerations when defining your own extension function:
When defining your own extension function, it’s important to consider whether you should define it as an extension for a nullable type. By default, it’s recommended to define it as an extension for a non-null type. Later on, if you realize that the extension function is primarily used with nullable values and you can handle null appropriately, you can safely change it to a nullable type without breaking existing code.
Kotlin
funString.customExtensionFunction() {// Perform operations on non-null valueprintln("Length of the string: ${this.length}")}val nonNullString: String = "softAai"nonNullString.customExtensionFunction() // Output: Length of the string: 7val nullableString: String? = "Kotlin"nullableString?.customExtensionFunction() // Output: Length of the string: 6
By understanding these concepts and examples, you can effectively use extension functions with nullable types and handle null values in a flexible and concise manner in Kotlin.
Nullability of type parameters
Let’s discuss another case that may surprise you: a type parameter can be nullable even without a question mark at the end.
By default, all type parameters of functions and classes in Kotlin are nullable. This means that any type, including nullable types, can be substituted for a type parameter. When a nullable type is used as a type parameter, declarations involving that type parameter are allowed to be null, even if the type parameter itself doesn’t end with a question mark.
In the above example, the Box class has a type parameter T, which is nullable by default. We declare a variable nullableBox of type Box<String?>, indicating that the item property can hold a nullable String value. Even though T doesn’t end with a question mark, the inferred type for T becomes String?, allowing null to be assigned to item.
To make the type parameter non-null, you can specify a non-null upper bound for it. By doing so, you restrict the type parameter to only accept non-null values.
In the modified example, we specify the upper bound Any for the type parameter T in the Box class. This ensures that T can only be substituted with non-null types. Consequently, assigning null to item when declaring nullableBox results in a compilation error.
It’s important to note that type parameters are the only exception to the rule that a question mark is required to mark a type as nullable. In the case of type parameters, the nullability is determined by the type argument provided when using the class or function.
Nullability and Java
Here in this section, we will cover another special case of nullability: types that come from the Java code.
Nullability Annotations
When combining Kotlin and Java, Kotlin handles nullability in a way that preserves safety and interoperability. Kotlin recognizes nullability annotations from Java code, such as @Nullable and @NotNull, and treats them accordingly. If the annotations are present, Kotlin interprets them as nullable or non-null types.
In Java, suppose you have the following method signature with nullability annotations:
Kotlin
public@Nullable String processString(@NotNull String input) {// process the input stringreturn modifiedString;}
When Kotlin interacts with this method, it recognizes the annotations. In Kotlin, the method is seen as:
Kotlin
funprocessString(input: String): String? {// process the input stringreturn modifiedString}
The @Nullable annotation is mapped to a nullable type in Kotlin (String?), and the @NotNull annotation is treated as a non-null type (String).
Platform Types
However, when nullability annotations are not present, Java types become platform types in Kotlin. Platform types are types for which Kotlin lacks nullability information. You can work with platform types as either nullable or non-null types, similar to how it is done in Java. The responsibility for handling nullability lies with the developer.
For example, if you receive a platform type from Java, such as String!, you can treat it as nullable or non-null based on your knowledge of the value. If you know it can be null, you can compare it with null before using it. If you know it’s not null, you can use it directly. However, if you get the nullability wrong, a NullPointerException will occur at the usage site.
Let’s say you have a Java method that returns a platform type, such as:
Kotlin
public String getValue() {// return a value that can be nullreturn possiblyNullValue;}
In Kotlin, the return type is considered a platform type (String!). You can handle it as either nullable or non-null, depending on your knowledge of the value:
Kotlin
valvalue: String? = getValue() // treat it as nullableval length: Int = getValue().length // assume it's not null and use it directly
Platform types are primarily used to maintain compatibility with Java and avoid excessive null checks or casts for values that can never be null. It allows Kotlin developers to take responsibility for handling values coming from Java without compromising safety.
Inheritance
When overriding a Java method in Kotlin, you have the choice to declare parameters and return types as nullable or non-null. It’s important to get the nullability right when implementing methods from Java classes or interfaces. The Kotlin compiler generates non-null assertions for parameters declared with non-null types, and if Java code passes a null value to such a method, an exception will occur.
Suppose you have a Java interface with a method that expects a non-null parameter:
In the StringPrinter class, we assume the value parameter is not null. In the NullableStringPrinter class, we allow the parameter to be nullable and check for nullness before using it.
Remember, the key is to ensure that you handle platform types correctly based on your knowledge of the values. If you assume a value is non-null when it can be null or vice versa, you may encounter a NullPointerException at runtime.
Summary
In summary, we have covered several aspects of nullability in Kotlin:
Nullable and Non-null Types:
Nullable types are denoted by appending a question mark (?) to the type (e.g., String?).
Non-null types are regular types without the question mark (e.g., String).
Safe Operations:
Safe call operator (?.) allows you to safely access properties or call methods on nullable objects.
Elvis operator (?:)provides a default value in case of a null reference.
Safe cast operator (as?)performs a cast and returns null if the cast is not possible.
Unsafe Dereference:
In Kotlin, Dereferencing a nullable variable means accessing the value it holds, assuming it is not null. However, if the variable is null, attempting to dereference it can lead to a runtime exception, such as a NullPointerException.
Not-null assertion operator (!!) is used to dereference a nullable variable, asserting that it is not null. It can lead to a NullPointerException if the value is null.
let Function:
The let function allows you to perform operations on a nullable object within a lambda expression, providing a concise way to handle non-null values.
Extension Functions for Nullable Types:
You can define extension functions specifically for nullable types, enabling you to encapsulate null checks within the function itself.
Platform Types:
When interacting with Java code, Kotlin treats Java types without nullability annotations as platform types.
Platform types can be treated as nullable or non-null, depending on your knowledge of the values. However, incorrect handling may result in NullPointerException.
By understanding these concepts and utilizing the provided operators and functions, you can effectively handle nullability in Kotlin code and ensure safer and more robust programming practices.
In Kotlin, sequences provide a way to perform lazy and efficient transformations on collections. Unlike regular collections, which eagerly evaluate all their elements when created, sequences only evaluate elements as needed, making them a powerful tool for working with large data sets or performing complex transformations on collections. In this blog post, we will explore...
Constructor references in Kotlin allow you to create a reference to a class constructor, which can be used to create new instances of the class at a later time. In this article, we’ll cover the basics of constructor references in Kotlin, including their syntax, usage, and benefits.
Syntax of Constructor References
In Kotlin, you can create a reference to a constructor using the ::class syntax. The syntax for creating a constructor reference is as follows:
Kotlin
ClassName::class
Where ClassName is the name of the class whose constructor you want to reference. For example, to create a reference to the constructor of the Person class, you would use the following syntax:
Person::class
Creating Instances with Constructor References
Once you have a reference to a constructor, you can use it to create new instances of the class using the createInstance functionprovided by the Kotlin standard library. Here’s an example:
Kotlin
classPerson(val name: String, val age: Int)funmain() {val personConstructor = Person::classval person = personConstructor.createInstance("Amol", 20)println(person) // prints "Person(name=Amol, age=20)"}
In this example, we define a Person class with name and age properties, and then create a reference to the Person constructor using the ::class syntax. We then use the createInstance function to create a new Person instance with the name "Amol" and age 20. Finally, we print the person object to the console.
The createInstance function is an extension function provided by the Kotlin standard library. It allows you to create instances of a class using its constructor reference. It is defined as follows:
Kotlin
inlinefun <reifiedT : Any> KClass<T>.createInstance(vararg args: Any?): T
The reified keyword is used to specify that T is a concrete class, and not just a type parameter. The KClass<T> type parameter represents the class that the constructor belongs to.
The createInstance function takes a variable number of arguments as input, which are passed to the constructor when it is invoked. In the example above, we pass in the name and age arguments for the Person constructor.
Constructor references can be particularly useful in situations where you want to pass a constructor as a function parameter or store it in a data structure for later use. They can also be used in conjunction with functional programming concepts such as partial application, currying, and higher-order functions.
Passing Constructor References as Parameters
One of the key benefits of constructor references is that you can pass them as parameters to functions. This allows you to create higher-order functions that can create instances of a class with a given constructor.
Here’s an example:
Kotlin
classPerson(val name: String, val age: Int)funcreatePeople(count: Int, constructor: () -> Person): List<Person> {val people = mutableListOf<Person>()repeat(count) {val person = constructor() people.add(person) }return people}funmain() {val people = createPeople(3, Person::class::createInstance)println(people) // prints "[Person(name=null, age=0), Person(name=null, age=0), Person(name=null, age=0)]"}
In this example, we define a createPeople function that takes a count parameter and a constructor function that creates Person instances. We then use the repeat function to create count instances of the Person class using the given constructor function and add them to a list. Finally, we return the list of Person instances.
In the main function, we create a list of Person instances by calling the createPeople function with a count of 3 and a constructor function that creates Person instances using the Person::class::createInstance syntax. This creates a reference to the Person constructor and passes it as a function parameter to createPeople.
Benefits of Constructor References
Constructor references in Kotlin provide several benefits, including:
Conciseness: Constructor references allow for concise and readable code, especially when creating objects with a large number of constructor arguments. By using a constructor reference, the code can be reduced to a single line instead of a longer lambda expression that specifies the constructor arguments.
Type safety: Constructor references provide type safety when creating objects. The compiler checks that the arguments passed to the constructor reference match the types expected by the constructor. This can help catch errors at compile-time, rather than at runtime.
Flexibility: Constructor references can be used in many situations, including as arguments to higher-order functions, such as map, filter, and reduce. This provides flexibility in how objects are created and used in your code.
Compatibility with Java: Constructor references are also compatible with Java code. This means that Kotlin code that uses constructor references can be used in Java projects without any additional modifications.
Performance: Constructor references can also improve performance in certain situations, such as when creating objects in tight loops or when creating objects with many arguments. Using a constructor reference instead of a lambda expression can avoid the overhead of creating a new object for each iteration of the loop.
Overall, constructor references provide a convenient and flexible way to create objects in Kotlin, while also improving code readability and performance.
Currying is a programming technique that involves transforming a function that takes multiple arguments into a series of functions that take a single argument. In other words, it’s a way of breaking down a complex function into smaller, simpler functions that can be composed together to achieve the same result. In this blog post, we will explore the concept of currying in Kotlin and how it can be used to write more concise and expressive code.
What is Currying?
Currying is named after Haskell Curry, a mathematician who introduced the concept in the 20th century. At its core, currying is a way of transforming a function that takes multiple arguments into a series of functions that each take a single argument. For example, consider the following function:
Kotlin
funadd(a: Int, b: Int): Int {return a + b}
This function takes two arguments, a and b, and returns their sum. With currying, we can transform this function into two nested functions that each take a single argument:
Kotlin
funaddCurried(a: Int): (Int) -> Int {returnfun(b: Int): Int {return a + b }}
Now, instead of calling add(a, b), we can call addCurried(a)(b) to achieve the same result. The addCurried function takes a single argument a and returns a new function that takes a single argument b and returns the sum of a and b.
Why Use Currying?
Currying may seem like a simple concept, but it has a number of advantages when it comes to writing code. Here are a few benefits of using currying:
Simplify Complex Functions: Currying allows you to break down complex functions into smaller, simpler functions that are easier to understand and reason about. By focusing on one argument at a time, you can more easily test and debug your code.
Reusability: Currying allows you to reuse functions more easily. By defining a function that takes a single argument and returns a new function, you can create reusable building blocks that can be combined in different ways to achieve different results.
Composition: Currying allows you to compose functions more easily. By breaking down complex functions into smaller, simpler functions, you can combine them in different ways to achieve more complex behaviors.
Examples of Currying in Kotlin
Let’s take a look at some examples of currying in Kotlin to see how it can be used in practice.
1. Adding Numbers
Kotlin
funaddCurried(a: Int): (Int) -> Int {returnfun(b: Int): Int {return a + b }}val add5 = addCurried(5)val add10 = addCurried(10)println(add5(3)) // prints "8"println(add10(3)) // prints "13"
In this example, we define a curried version of the add function that takes a single argument a and returns a new function that takes a single argument b and returns the sum of a and b. We then create two new functions, add5 and add10, by calling addCurried with the values 5 and 10, respectively. We can then call these functions with a single argument to achieve the same result as calling the original add function with two arguments.
In this example, we define a curried version of the filter function that takes a single argument, predicate, and returns a new function that takes a list of integers and returns a new list containing only the elements that satisfy the predicate.
We then define two predicates, isEven and isOdd, that return true if a given number is even or odd, respectively. We create two new functions, filterEven and filterOdd, by calling filterCurried with isEven and isOdd, respectively. Finally, we call these functions with a list of integers to filter the even and odd numbers from the list.
Partial Application
One important concept related to currying is partial application. Partial application refers to the process of fixing some arguments of a function to create a new function with fewer arguments. This can be accomplished by calling a curried function with some, but not all, of its arguments. The resulting function is a partially applied function that can be called later with the remaining arguments.
For example, suppose we have a curried function sumCurried that takes two arguments and returns their sum. We can create a new function add3 that adds 3 to any number by partially applying sumCurried with the argument 3 as follows:
Kotlin
funsumCurried(x: Int): (Int) -> Int = { y -> x + y }val add3 = sumCurried(3)
Now add3 is a new function that takes a single argument and returns its sum with 3. We can call add3 with any integer argument to get the sum with 3:
Kotlin
val result = add3(4) // result is 7
Partial application can be used to create more specialized functions from more general functions, without duplicating code.It can also be used to simplify complex functions by breaking them down into smaller, more manageable functions.
One of the benefits of partial application is that it allows for more flexible and composable code. For example, suppose we have a function power that takes a base and an exponent and returns the result of raising the base to the exponent:
We can use partial application to create new functions that calculate the square, cube, or any other power of a number without duplicating code. For example, we can define a function square that calculates the square of a number by partially applying power with an exponent of 2:
Kotlin
val square = { x: Double -> power(x, 2.0) }
Now square is a new function that takes a single argument and returns its square. We can call square with any double argument to get the square:
Kotlin
val result = square(3.0) // result is 9.0
Similarly, we can define a function cube that calculates the cube of a number by partially applying power with an exponent of 3:
Kotlin
val cube = { x: Double -> power(x, 3.0) }
Now cube is a new function that takes a single argument and returns its cube. We can call cube with any double argument to get the cube:
Kotlin
val result = cube(2.0) // result is 8.0
Partial application can also be used to create more specialized functions from more general functions, without duplicating code. For example, suppose we have a function sum that takes a list of integers and returns their sum:
Kotlin
funsum(numbers: List<Int>): Int {return numbers.sum()}
We can use partial application to create a new function sumEven that calculates the sum of even numbers in a list by partially applying sum with a filter function that selects even numbers:
Kotlin
val sumEven = { numbers: List<Int> -> sum(numbers.filter { it % 2 == 0 }) }
Now sumEven is a new function that takes a list of integers and returns their sum, but only for the even numbers in the list. We can call sumEven with any list of integers to get the sum of even numbers:
Kotlin
val result = sumEven(listOf(1, 2, 3, 4, 5, 6)) // result is 12
Function composition
Function composition is related to currying in Kotlin in that both techniques are used to combine functions into more complex operations. Function composition involves taking two or more functions and combining them into a single function that performs both operations. Currying, on the other hand, involves taking a function that takes multiple arguments and transforming it into a series of functions that each take a single argument.
Function composition can be thought of as a special case of currying, where the input to each function is the output of the previous function. In other words, function composition is a form of currying where the arity of the functions being composed is limited to two functions.
In Kotlin, function composition and currying can be used together to create powerful and expressive code. By composing and currying functions, you can build up complex operations from simpler building blocks, making your code more modular and easier to read and maintain.
For example, you might have two functions, add and multiply, that take two arguments each:
Kotlin
funadd(x: Int, y: Int): Int {return x + y}funmultiply(x: Int, y: Int): Int {return x * y}
You can use function composition to create a new function, addAndMultiply, that adds two numbers and then multiplies the result by a third number:
Kotlin
val addAndMultiply = { x: Int, y: Int, z: Int ->multiply(add(x, y), z)}
Alternatively, you could use currying to transform the add and multiply functions into unary functions that each take a single argument:
Kotlin
val addCurried = { x: Int -> { y: Int -> add(x, y) } }val multiplyCurried = { x: Int -> { y: Int -> multiply(x, y) } }
You can then use these curried functions to create a new function, addAndMultiplyCurried, that performs the same operation as the addAndMultiply function:
Kotlin
val addAndMultiplyCurried = { x: Int -> { y: Int -> { z: Int ->multiplyCurried(addCurried(x)(y))(z) } }}
In both cases, you end up with a new function that performs a complex operation by combining simpler functions using either function composition or currying.
No currying
“No currying” simply means that a programming language does not have built-in support for currying. In other words, you cannot use currying directly in the language syntax, but you can still implement it manually using language features like closures or higher-order functions.
Kotlin, for example, does not have built-in support for currying, but you can still create curried functions using higher-order functions and closures. For instance, you can create a curried version of a two-argument function by defining a function that takes the first argument and returns another function that takes the second argument:
Kotlin
fun <A, B, C> curry(f: (A, B) -> C): (A) -> (B) -> C {return { a: A -> { b: B -> f(a, b) } }}
This function takes a two-argument function f and returns a curried version of f that takes the first argument and returns another function that takes the second argument. You can then use this curried function like this:
Kotlin
funadd(a: Int, b: Int): Int = a + b
Kotlin
val curriedAdd = curry(::add)
Kotlin
val add3 = curriedAdd(3)val result = add3(4) // returns 7
In this example, curriedAdd is a curried version of the add function, which takes the first argument a and returns another function that takes the second argument b. You can then use curriedAdd to create a new function add3 that takes only one argument (a), and returns a function that adds a to 3. Finally, you can call add3 with the second argument 4 to get the result 7.
Uncurry in kotlin
In functional programming, uncurrying is the process of converting a curried function into a function that takes multiple arguments. In Kotlin, you can implement uncurrying manually using higher-order functions and lambdas.
For example, let’s say you have a curried function that takes two arguments and returns a result:
Kotlin
funadd(a: Int): (Int) -> Int = { b -> a + b }
This function takes an integer a and returns a lambda that takes another integer b and returns the sum of a and b.
To uncurry this function, you can define a higher-order function that takes a curried function and returns a function that takes multiple arguments. Here’s an example implementation:
Kotlin
fun <A, B, C> uncurry(f: (A) -> (B) -> C): (A, B) -> C {return { a: A, b: B -> f(a)(b) }}
This uncurry function takes a curried function f and returns a new function that takes two arguments (a and b) and applies them to f to get the result. You can then use this function to uncurry the add function like this:
Kotlin
val uncurriedAdd = uncurry(::add)val result = uncurriedAdd(3, 4) // returns 7
In this example, uncurriedAdd is the uncurried version of the add function, which takes two arguments a and b, and returns their sum. You can then call uncurriedAdd with the two arguments 3 and 4 to get the result 7.
Are ‘no currying’ and ‘uncurrying’ the same concept in Kotlin?
No, “no currying” and “uncurrying” are not the same concept in Kotlin. “No currying” simply means that Kotlin does not have built-in support for currying, meaning you cannot directly define a function that returns another function.
On the other hand, “uncurrying” is the process of converting a curried function into a function that takes multiple arguments. This can be done manually using higher-order functions and lambdas in Kotlin.
So, while “no currying” means that you cannot directly define a curried function in Kotlin, “uncurrying” is a way to convert a curried function into a non-curried function if you need to use it in that form.
Currying in the Kotlin Ecosystem
Currying is a technique that is commonly used in functional programming, which is a programming paradigm that is well-supported in the Kotlin ecosystem. As such, there are several libraries and frameworks in the Kotlin ecosystem that provide support for currying.
Here are a few examples:
Arrow: Arrow is a functional programming library for Kotlin that provides support for many functional programming concepts, including currying. Arrow provides a curried function that can be used to curry any function in Kotlin.
Kategory: Kategory is another functional programming library for Kotlin that provides support for currying. Kategory provides a curried function that can be used to curry any function in Kotlin, as well as several other utility functions for working with curried functions.
Kotlin stdlib: The Kotlin standard library includes several functions that can be used to curry functions. For example, the fun <P1, P2, R> Function2<P1, P2, R>.curried(): (P1) -> (P2) -> R extension function can be used to curry a two-argument function.
Koin: Koin is a popular dependency injection framework for Kotlin that supports currying. Koin provides a factory function that can be used to create a curried factory function that returns instances of a given type.
These are just a few examples of the many libraries and frameworks in the Kotlin ecosystem that support currying. With the increasing popularity of functional programming in Kotlin, it is likely that we will see even more support for currying in the future.
Advantages and Disadvantages
Here are some advantages and disadvantages of using currying in Kotlin:
Advantages:
Increased modularity: Currying allows you to break down complex functions into smaller, more modular functions. This makes your code easier to read, understand, and maintain.
Code reuse: By currying functions, you can create smaller, reusable functions that can be used in multiple contexts. This reduces code duplication and helps you write more concise and reusable code.
Improved type safety:Currying can help improve type safety by ensuring that each curried function takes exactly one argument of the correct type. This can help catch errors at compile time and make your code more robust.
Improved readability: By currying functions, you can create more readable code that clearly expresses the intent of the code. This can make your code easier to understand and maintain.
Disadvantages:
Performance overhead: Currying involves creating new functions for each argument, which can lead to performance overhead. In some cases, the performance overhead of currying may outweigh the benefits of modularity and code reuse.
Increased complexity: Currying can make code more complex, especially if you are not familiar with the technique. This can make it harder to debug and maintain your code.
Less intuitive: Currying can be less intuitive than traditional function calls, especially if you are used to imperative programming. This can make it harder to understand and reason about your code.
Potential for misuse: Currying can be a powerful technique, but it can also be misused. It is important to use currying judiciously and only when it makes sense for the specific use case.
Conclusion
In this blog post, we explored the concept of currying in Kotlin and how it can be used to write more concise and expressive code. We looked at several examples of curried functions, including adding numbers and filtering lists, to demonstrate how currying can simplify complex functions, promote reusability, and enable function composition. By leveraging the power of currying, Kotlin developers can write more modular, maintainable, and reusable code that is easier to test and debug.
Kotlin provides a concise way to reference a member of a class or an instance of a class without invoking it, called member reference. Member reference is a functional feature in Kotlin that allows you to pass a function reference as a parameter to another function, without actually invoking the function. It’s similar to method reference but works with properties and functions that are members of a class or an instance of a class.
In this article, we’ll explore how to use member reference in Kotlin, including syntax, examples, and use cases.
What is a Member Reference?
A member reference in Kotlin is a way to reference a member of a class or interface, such as a property or a method, without invoking it immediately. It is similar to a lambda expression, but instead of providing a block of code to execute, it provides a reference to a member of a class. Member references are useful when you want to pass a function or a property as an argument to another function or class constructor.
Kotlin provides two types of member references: property references and function references. Property references refer to properties of a class, while function references refer to methods of a class.
Property References
Property references allow you to reference a property of a class without invoking it immediately. You can create a property reference by prefixing the property name with the double colons (::) operator. For example, consider the following class:
Kotlin
classPerson(val name: String, val age: Int)
To create a property reference for the name property, you can use the following syntax:
Kotlin
val getName = Person::name
In this example, the getName variable is a property reference to the name property of the Person class. You can use this property reference in many contexts, such as passing it as an argument to a function:
In this example, the printName function takes a property reference to the name property of the Person class and a Person object. It then uses the property reference to print the name of the person.
Function References
Function references allow you to reference a method of a class without invoking it immediately. You can create a function reference by prefixing the method name with the double colons (::) operator. For example, consider the following class:
Kotlin
classCalculator {funadd(a: Int, b: Int): Int {return a + b }}
To create a function reference for the add method, you can use the following syntax:
Kotlin
val calculator = Calculator()val add = calculator::add
In this example, the add variable is a function reference to the add method of the Calculator class. You can use this function reference in many contexts, such as passing it as an argument to a function:
In this example, the performOperation function takes a function reference to the add method of the Calculator class and two integer values. It then uses the function reference to perform the addition operation and print the result.
Member References with Bound Receivers
In some cases, you may want to use a member reference with a bound receiver. A bound receiver is an instance of a class that is associated with the member reference. To create a member reference with a bound receiver, you can use the following syntax:
Kotlin
val calculator = Calculator()val add = calculator::add
In this example, the add variable is a function reference to the add method of the Calculator class, with a bound receiver of the calculator instance.
You can use a member reference with a bound receiver in many contexts, such as passing it as an argument to a function:
In this example, the performOperation function takes a function reference to the add method of the Calculator class, with a bound receiver of the Calculator class. It also takes a Calculator instance and two integer values. It then uses the function reference with the calculator instance to perform the addition operation and print the result.
Use Cases for Member Reference
Member reference can be used in many different contexts, such as passing functions as parameters to higher-order functions or creating a reference to a member function or property for later use. Here are some examples of how to use member reference in Kotlin.
1. Passing a member function as a parameter
One of the most common use cases for member reference is passing a member function as a parameter to a higher-order function. Higher-order functions are functions that take other functions as parameters or return functions as results. By passing a member function as a parameter, you can reuse the same functionality across different contexts.
Kotlin
classMyClass {funmyFunction(param: Int) {// function implementation }}funhigherOrderFunction(func: (Int) -> Unit) {// do something}funmain() {val myClassInstance = MyClass()higherOrderFunction(myClassInstance::myFunction)}
In this example, we have a class called MyClass with a member function called myFunction. We then create an instance of MyClass and store it in the myClassInstance variable. Finally, we pass a reference to the myFunction function using member reference to the higherOrderFunction, which takes a function with a single Int parameter and returns nothing.
2. Creating a reference to a member function for later use
Another use case for member reference is creating a reference to a member function that can be invoked later. This can be useful if you want to invoke a member function on an instance of a class without actually calling the function immediately.
Kotlin
classMyClass {funmyFunction(param: Int) {// function implementation }}funmain() {val myClassInstance = MyClass()val functionReference = myClassInstance::myFunction// ... functionReference.invoke(42) // invoke the function later}
In this example, we have a class called MyClass with a member function called myFunction. We then create an instance of MyClass and store it in the myClassInstance variable. Finally, we create a reference to the myFunction function using the double colon operator and store it in the functionReference variable. We can then use the invoke function to call the myFunction function on the myClassInstance object later.
3. Creating a reference to a member property for later use
In addition to member functions, you can also create a reference to a member property for later use. This can be useful if you want to access a member property on an instance of a class without actually accessing the property immediately.
Kotlin
classMyClass {var myProperty: String = ""}funmain() {val myClassInstance = MyClass()val propertyReference = myClassInstance::myProperty// ... propertyReference.set("softAai") // set the property latervalvalue = propertyReference.get() // get the property later}
In this example, we have a class called MyClass with a member property called myProperty. We then create an instance of MyClass and store it in the myClassInstance variable. Finally, we create a reference to the myProperty property using the double colon operator and store it in the propertyReference variable. We can then use the set and get functions to access the myProperty property on the myClassInstance object later.
4. Bound member reference
Bound member reference is a syntax for referencing a member function of a specific instance of a class. This is useful when you have a function that expects a specific instance of a class as a parameter.
Kotlin
classMyClass {funmyFunction(param: Int) {// function implementation }}funmain() {val myClassInstance = MyClass()val boundReference = myClassInstance::myFunction// ...boundReference(42) // call the function on myClassInstance}
In this example, we have a class called MyClass with a member function called myFunction. We then create an instance of MyClass and store it in the myClassInstance variable. Finally, we create a bound reference to the myFunction function using the double colon operator and store it in the boundReference variable. We can then call the myFunction function on the myClassInstance object later by simply invoking the boundReference function and passing in the necessary parameters.
Member References and Lambdas
In Kotlin, lambda expressions and member references can be used interchangeably in certain situations. This is because a lambda expression that takes an object and calls one of its methods can be replaced with a reference to that method using the double colon operator. This makes the code more concise and readable.
In this code, we have a list of strings and we want to create a new list containing the lengths of each string in the original list. We achieve this using the map function and a lambda expression that takes a string and returns its length.
Now, consider the following code, which achieves the same thing but uses a member reference instead of a lambda expression:
Kotlin
val myList = listOf("abc", "opq", "xyz")val lengthList = myList.map(String::length)
In this code, we use a member reference to reference the length function of the String class instead of the lambda expression. This is possible because the lambda expression only calls a single method on the object it receives, which is exactly what the member reference does.
Let’s take one more example, let’s say you have a class called Person with a method getName() that returns the person\’s name. You can define a lambda expression that calls this method as follows:
Kotlin
val p = Person("amol")val getNameLambda: (Person) -> String = { person -> person.getName() }
Alternatively, you can define a callable reference (method reference) to the same method as follows:
Kotlin
val getNameRef: (Person) -> String = Person::getName
In this case, getNameRef is a callable reference to the getName() method of the Person class, and it has the same type as getNameLambda. You can use either getNameLambda or getNameRef interchangeably in contexts where a function or method of type (Person) -> String is expected.
This interchangeability between lambdas and member references can be useful in situations where you have a lambda expression that only calls a single method on an object, as it can make the code more concise and readable. However, it’s important to note that this interchangeability only works in these specific situations and there may be cases where a lambda expression or a member reference is more appropriate.
Conclusion
Kotlin member references provide a concise and readable way to reference a class’s properties or methods, without invoking them immediately. They are useful when you want to pass a function or a property as an argument to another function or class constructor. Kotlin provides two types of member references: property references and function references. Property references refer to properties of a class, while function references refer to methods of a class. You can also create member references with bound receivers, which allows you to associate a member reference with a specific instance of a class. With member references, Kotlin makes it easy to write concise and readable code that is easy to maintain and understand.