Mastering Kotlin Collections: A Comprehensive Guide to Boosting Your Code Efficiency and Productivity
Kotlin, a modern programming language for the JVM, comes with a robust and expressive set of collection classes and functions. Kotlin collections provide a seamless way to work with data, enabling efficient data manipulation, transformation, and filtering. Whether you’re a beginner or an experienced Kotlin developer, understanding the various collection types, operations, and best practices is essential. In this article, we will explore Kotlin collections in depth, covering all aspects and providing practical examples to solidify your understanding.
What are Kotlin Collections?
In Kotlin, collections refer to data structures that can hold multiple elements. They provide a way to store, retrieve, and manipulate groups of related objects. Kotlin provides a rich set of collection classes and interfaces in its standard library, making it convenient to work with collections in various scenarios.
Here are some commonly used collection interfaces in Kotlin:
Collection: The root interface for read-only collections. It provides methods for accessing elements, such as iteration, size checking, and element presence checks.MutableCollection: Extends theCollectioninterface and adds methods for modifying the collection, such as adding and removing elements.List: Represents an ordered collection of elements. Elements can be accessed by their indices. Kotlin providesArrayListandLinkedListas implementations of theListinterface.MutableList: Extends theListinterface and adds methods for modifying the list, such as adding, removing, and modifying elements.Set: Represents a collection of unique elements, with no defined order. Kotlin providesHashSetandLinkedHashSetas implementations of theSetinterface.MutableSet: Extends theSetinterface and adds methods for modifying the set.Map: Represents a collection of key-value pairs. Each key in the map is unique, and you can retrieve the corresponding value using the key. Kotlin providesHashMapandLinkedHashMapas implementations of theMapinterface.MutableMap: Extends theMapinterface and adds methods for modifying the map.
These are just a few examples of collection interfaces in Kotlin. The standard library also includes other collection interfaces and their corresponding implementations, such as SortedSet, SortedMap, and Queue, along with various utility functions and extension functions to work with collections more efficiently.
Collections in Kotlin provide a convenient way to handle groups of data and perform common operations like filtering, mapping, sorting, and more. They play a vital role in many Kotlin applications and can greatly simplify data manipulation tasks.
Read-Only and Mutable Collections
Kotlin collection design separates interfaces for accessing and modifying data in collections. This design distinguishes between read-only and mutable interfaces, providing clarity and control over how collections are used and modified.
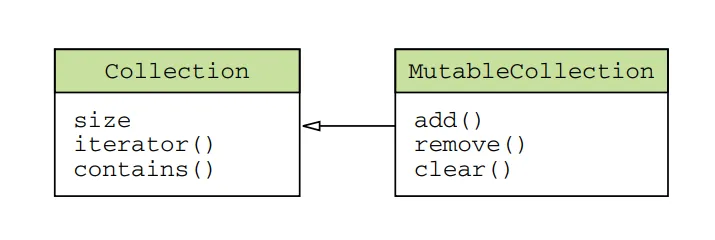
The kotlin.collections.Collection interface is used for accessing data in a collection. It allows you to iterate over the elements, obtain the size, check for the presence of specific elements, and perform other read operations. However, it does not provide methods for adding or removing elements.
fun printCollection(collection: Collection<Int>) {
    for (element in collection) {
        println(element)
    }
}

val myList = listOf(1, 2, 3)
printCollection(myList) // This works fine
To modify the data in a collection, you should use the kotlin.collections.MutableCollection interface. It extends the Collection interface and adds methods for adding and removing elements, clearing the collection, and other modification operations.
fun addToCollection(collection: MutableCollection<Int>, element: Int) {
    collection.add(element)
}

val myMutableList = mutableListOf(1, 2, 3)
addToCollection(myMutableList, 4) // This modifies the collection
Creating a defensive copy
By using read-only interfaces (Collection) throughout your code, you convey that the collection won’t be modified. If a function accepts a Collection parameter, you can be confident that it only reads data from the collection. On the other hand, when a function expects a MutableCollection, it indicates that the collection will be modified. If you have a collection that is part of your component’s internal state and needs to be passed to a function requiring a MutableCollection, you may need to create a defensive copy of that collection to ensure its integrity.
fun modifyCollection(collection: MutableCollection<Int>) {
    val defensiveCopy = collection.toList()
    // Perform modifications on the defensiveCopy
    // ...
}

val originalList = mutableListOf(1, 2, 3)
modifyCollection(originalList) // The original list remains unchanged
In this example, we have a function modifyCollection that takes a mutable collection as a parameter. However, if the collection is part of your component’s internal state and you want to ensure its integrity, you can create a defensive copy of the collection before passing it to the function.
By calling toList() on the original collection, we create a new read-only list defensiveCopy that contains the same elements. The modifyCollection function can then perform any modifications on the defensive copy without affecting the original collection.
This approach allows you to protect the original collection from unintended modifications, especially when it is part of the component’s internal state or when you want to ensure its immutability in certain scenarios.
Immutable Collections
Kotlin offers a variety of immutable collection types, such as lists, sets, and maps, that cannot be modified once created. These collections guarantee thread safety and immutability, ensuring data integrity in multi-threaded scenarios. Let’s see some examples:
val numbers = listOf(1, 2, 3, 4, 5)  // Immutable list
val setOfColors = setOf("red", "green", "blue")  // Immutable set
val mapOfUsers = mapOf(1 to "Alice", 2 to "Bob", 3 to "Charlie")  // Immutable map
However, it’s important to note that read-only collections are not necessarily immutable. A read-only collection interface can be one of many references to the same collection. Other references to the collection may have mutable interfaces, allowing modifications.
This means that if you have concurrent code or multiple references to the same collection, modifications from other codes can occur while you’re working with it. This can lead to issues such as ConcurrentModificationException errors. To handle such situations, you need to ensure proper synchronization of access to the data or use data structures that support concurrent access when working in a multi-threaded environment.
Consider the following code snippet:
val mutableList = mutableListOf(1, 2, 3)
val readOnlyList: List<Int> = mutableList

// Concurrent modification by another reference
mutableList.add(4)

// Accessing the read-only list
readOnlyList.forEach { println(it) }
In this example, we have a mutable list called mutableList and a read-only list called readOnlyList, which is a reference to the same underlying list. Initially, both lists contain elements [1, 2, 3].
However, the mutableList is mutable, so we can add an element (4) to it. After adding the element, the mutableList becomes [1, 2, 3, 4].
Now, let’s try to iterate over the elements in the readOnlyList using the forEach function. We might expect it to print [1, 2, 3], but what actually happens?
Since the readOnlyList is just a read-only view of the same underlying list, any modifications made to the mutableList will affect the readOnlyList as well. In this case, we added an element to the mutableList, causing the readOnlyList to contain [1, 2, 3, 4]. As a result, when we iterate over the elements in readOnlyList, it will print [1, 2, 3, 4] instead of [1, 2, 3].
This behavior can lead to unexpected results and even errors like ConcurrentModificationException. If you have concurrent code or multiple references to the same collection, modifications made by one reference can affect the others, potentially causing data inconsistencies or errors.
To handle such situations, you need to ensure proper synchronization of access to the data or use data structures that support concurrent access. For example, you can use synchronized blocks or locks to control access to the collection in a multi-threaded environment. Alternatively, you can use concurrent data structures provided by the Kotlin standard library, such as ConcurrentHashMap, which are designed to handle concurrent modifications safely.
It’s crucial to be aware of these considerations when working with read-only collections that are shared among multiple references or used in concurrent scenarios.
Kotlin collections and Java
In Kotlin, every collection type is an instance of the corresponding Java collection interface. This means that Kotlin collections seamlessly integrate with Java collections without requiring any conversion, wrappers, or data copying.
However, in Kotlin, each Java collection interface has two representations: a read-only version and a mutable version. The read-only interfaces mirror the structure of the Java collection interfaces but lack mutating methods, while the mutable interfaces extend their corresponding read-only interfaces and provide mutating methods.
For example, the Java class java.util.ArrayList is treated as if it inherited from the MutableList interface. This means that you can use an ArrayList instance in Kotlin as if it were a MutableList, and you can call the methods defined in the MutableList interface on an ArrayList object. Similarly, the Java class java.util.HashSet is treated as if it inherited from the MutableSet interface, allowing you to use a HashSet instance as a MutableSet.
Other Java collection implementations, such as LinkedList and SortedSet, have similar supertypes in Kotlin. This means that LinkedList is treated as if it inherited from a related interface, and SortedSet is also treated as if it inherited from a corresponding Kotlin interface. These interfaces provide a common set of methods that can be used across different implementations.
The purpose of treating Java classes as if they inherited from their corresponding Kotlin interfaces is to provide compatibility and allow seamless interoperability between Kotlin and Java collections. Kotlin provides both mutable and read-only interfaces, allowing for clear separation and appropriate usage of collections depending on whether you need to mutate them or not.
What about Map?
Similarly, the
Mapclass (which doesn’t extend Collection or Iterable) in Java has two versions in Kotlin:Map(read-only) andMutableMap(mutable). These versions provide different sets of functions for working with maps.
When calling a Java method that expects a collection as a parameter, you can pass a Kotlin collection directly without any extra steps. Kotlin handles the interoperability between Kotlin collections and Java collections seamlessly.
However, there is an important caveat to consider. Since Java does not distinguish between read-only and mutable collections, Java code can modify a collection even if it’s declared as read-only on the Kotlin side. The Kotlin compiler cannot fully analyze the modifications made by Java code, so Kotlin cannot reject a call passing a read-only collection to Java code that modifies it.
As a result, when writing a Kotlin function that passes a collection to Java code, it’s your responsibility to use the correct type for the parameter based on whether the Java code will modify the collection or not.
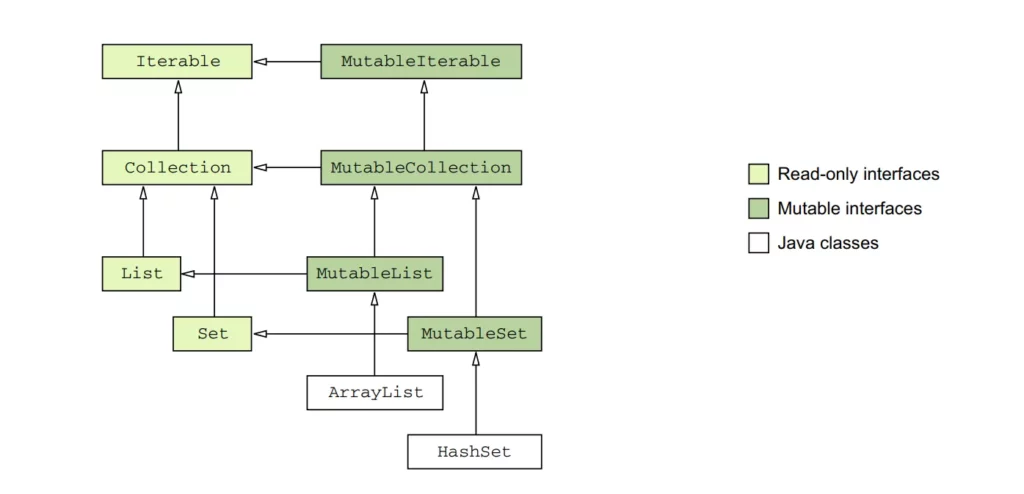
Kotlin collection interfaces
Now we will delve deep into the collection interfaces and explore their implementations, enabling you to leverage the full power of Kotlin collections in your projects.
Below is a diagram of the Kotlin collection interfaces:
Collection
The Collection<T> interface serves as the foundation of the collection hierarchy in Kotlin. It represents the common behavior of read-only collections and provides essential operations such as retrieving the size of the collection and checking if an item is present.
In addition, the Collection inherits from the Iterable<T> interface, which defines operations for iterating over elements in a collection. This allows you to use Collection as a parameter in functions that work with different collection types, providing a versatile way to handle collections in your code.
However, for more specific scenarios, it’s recommended to use the inheritors of Collection: List and Set. These inheritors offer additional functionality tailored to their respective purposes. Let’s see some examples:
// Using Collection as a parameter
fun printCollectionSize(collection: Collection<Int>) {
    println("Collection size: ${collection.size}")
}

val list: List<Int> = listOf(1, 2, 3, 4, 5)
val set: Set<Int> = setOf(1, 2, 3, 4, 5)

printCollectionSize(list)  // Output: Collection size: 5
printCollectionSize(set)  // Output: Collection size: 5

// Using List and Set directly
val listItems: List<String> = listOf("apple", "banana", "orange")
val setItems: Set<String> = setOf("apple", "banana", "orange")

println(listItems.size)  // Output: 3
println(setItems.contains("banana"))  // Output: true
In the example above, we demonstrate the usage of Collection as a parameter in the printCollectionSize function, which can accept both List and Set. Additionally, we directly use the List and Set interfaces to access their specific methods, such as retrieving the size or checking for item membership.
List
The List<T> interface in Kotlin stores elements in a specific order and provides indexed access to them. The indices start from zero, representing the first element, and go up to lastIndex, which is equal to (list.size — 1).
A List allows duplicate elements (including nulls), meaning it can contain any number of equal objects or occurrences of a single object. When comparing lists for equality, they are considered equal if they have the same sizes and structurally equal elements at the same positions.
The MutableList<T> interface extends List and provides additional write operations specifically designed for lists. These operations allow you to add or remove an element at a specific position within the list.
While lists share similarities with arrays, there is one crucial difference: an array’s size is fixed upon initialization and cannot be changed, whereas a list does not have a predefined size. Instead, a list’s size can be modified through write operations like adding, updating, or removing elements.
In Kotlin, the default implementation of MutableList is ArrayList, which can be visualized as a resizable array that dynamically adjusts its size based on the number of elements it contains. This provides flexibility and allows you to manipulate the list as needed.
Let’s illustrate the concepts with a simple example:
// Creating a list and accessing elements
val fruits: List<String> = listOf("apple", "banana", "orange")
println(fruits[1])  // Output: banana

// Creating a mutable list and modifying elements
val mutableFruits: MutableList<String> = mutableListOf("apple", "banana", "orange")
mutableFruits.add("grape")
mutableFruits[1] = "kiwi"
mutableFruits.removeAt(0)
println(mutableFruits)  // Output: [kiwi, orange, grape]
In the example above, we first create an immutable list of fruits. We can access individual elements using the indexing syntax (fruits[1]) and retrieve the element at the specified position.
Next, we create a mutable list of fruits using MutableList. This allows us to perform write operations on the list. We add a new element with add, update an element at index 1 using indexing assignment (mutableFruits[1] = "kiwi"), and remove an element at a specific position using removeAt. Finally, we print the modified list.
Set
The Set<T> interface in Kotlin stores unique elements, and their order is generally undefined. In a Set, duplicate elements are not allowed, except for a single occurrence of null. Comparing two sets for equality depends on their sizes and whether each element in one set has an equal element in the other set.
The MutableSet interface extends MutableCollection and provides write operations specific to sets. This allows you to add or remove elements from the set.
Let’s illustrate the concepts with an example:
// Creating a set and adding elements
val numbers: Set<Int> = setOf(1, 2, 3, 4, 5)
println(numbers)  // Output: [1, 2, 3, 4, 5]

// Creating a mutable set and modifying elements
val mutableNumbers: MutableSet<Int> = mutableSetOf(1, 2, 3, 4, 5)
mutableNumbers.add(6)
mutableNumbers.remove(3)
println(mutableNumbers)  // Output: [1, 2, 4, 5, 6]
In the example above, we first create an immutable set of numbers. Since sets store unique elements, any duplicate values are automatically eliminated.
Next, we create a mutable set of numbers using MutableSet. This allows us to perform write operations on the set. We add a new element with add and remove an element with remove. Finally, we print the modified set.
Set<T> interface provides a way to store unique elements without a specific order. The default implementation for MutableSet<T> is LinkedHashSet, which preserves the order of element insertion. This means that the elements in a LinkedHashSet are ordered based on the order in which they were added, ensuring predictable results when using functions like first() or last().
Let’s see an example to understand this behavior:
// Creating a LinkedHashSet
val linkedSet: MutableSet<String> = linkedSetOf("apple", "banana", "orange", "kiwi")
println(linkedSet.first())  // Output: apple
println(linkedSet.last())  // Output: kiwi
In the above example, we create a MutableSet using linkedSetOf, which creates a LinkedHashSet. The order of the elements in the set is preserved based on their insertion order. When we call first(), it returns the first element, which is “apple”. Similarly, last() returns the last element, which is “kiwi”. Since LinkedHashSet maintains the insertion order, these functions give predictable results.
On the other hand, the HashSet implementation does not guarantee any specific order of elements. Therefore, calling functions like first() or last() on a HashSet can yield unpredictable results. However, HashSet requires less memory compared to LinkedHashSet, making it more memory-efficient for storing the same number of elements.
Let’s see an example using HashSet:
// Creating a HashSet
val hashSet: MutableSet<String> = hashSetOf("apple", "banana", "orange", "kiwi")
println(hashSet.first())  // Output: unpredictable
println(hashSet.last())  // Output: unpredictable
In the above example, we create a MutableSet using hashSetOf, which creates a HashSet. The order of the elements in the set is not guaranteed. Therefore, calling first() or last() on a HashSet can give unpredictable results. The output can vary each time you run the code.
Map
The Map<K, V> interface in Kotlin is a collection type that stores key-value pairs, also known as entries. Unlike other collection interfaces, Map does not inherit from the Collection interface. However, it provides specific functions for accessing values by their corresponding keys, searching for keys and values, and more.
In a Map, keys are unique, meaning that each key can be associated with only one value. However, different keys can be paired with equal values. Comparing two maps for equality depends on the key-value pairs they contain, regardless of the order in which the pairs are stored.
fun main() {
    val numbersMap = mapOf("key1" to 1, "key2" to 2, "key3" to 3, "key4" to 1)
    val anotherMap = mapOf("key2" to 2, "key1" to 1, "key4" to 1, "key3" to 3)

    println("The maps are equal: ${numbersMap == anotherMap}")
}
The MutableMap interface extends Map and provides additional write operations specific to maps. These operations allow you to add new key-value pairs or update the value associated with a given key.
The default implementation of MutableMap is LinkedHashMap, which preserves the order of element insertion when iterating over the map. This means that when you iterate over a LinkedHashMap, the elements will be returned in the same order in which they were added. On the other hand, HashMap does not guarantee any specific order of elements and is more focused on performance and memory efficiency.
Let’s see an example to understand the concepts:
// Creating a map and accessing values by key
val ages: Map<String, Int> = mapOf("John" to 25, "Jane" to 30, "Alice" to 35)
println(ages["John"])  // Output: 25

// Creating a mutable map and modifying values
val mutableAges: MutableMap<String, Int> = mutableMapOf("John" to 25, "Jane" to 30, "Alice" to 35)
mutableAges["John"] = 26
mutableAges["Bob"] = 40
mutableAges.remove("Jane")
println(mutableAges)  // Output: {John=26, Alice=35, Bob=40}
In the above example, we first create an immutable map of ages, where each person’s name is paired with their age. We can access the values by providing the corresponding key (ages["John"]).
Next, we create a mutable map of ages using MutableMap. This allows us to perform write operations on the map. We update the value associated with the key “John” using indexing assignment (mutableAges["John"] = 26), add a new key-value pair with mutableAges["Bob"] = 40, and remove a key-value pair using remove. Finally, we print the modified map.
Commonly Used Collection Implementations
Kotlin provides several commonly used collection implementations that offer different characteristics and performance trade-offs. Let’s explore some of these implementations:
ArrayList
ArrayList is an implementation of the MutableList interface and provides dynamic arrays that can grow or shrink in size. It offers fast element retrieval by index and efficient random access operations.
val arrayList: ArrayList<String> = ArrayList()
arrayList.add("Apple")
arrayList.add("Banana")
arrayList.add("Orange")

println(arrayList)  // Output: [Apple, Banana, Orange]
LinkedList
LinkedList is an implementation of the MutableList interface that represents a doubly-linked list. It allows efficient element insertion and removal at both ends of the list but has slower random access compared to ArrayList.
val linkedList: LinkedList<String> = LinkedList()
linkedList.add("Apple")
linkedList.add("Banana")
linkedList.add("Orange")

println(linkedList)  // Output: [Apple, Banana, Orange]
HashSet
HashSet is an implementation of the MutableSet interface that stores elements in an unordered manner. It ensures the uniqueness of elements by using hash codes and provides fast membership checking.
val hashSet: HashSet<String> = HashSet()
hashSet.add("Apple")
hashSet.add("Banana")
hashSet.add("Orange")

println(hashSet)  // Output: [Apple, Banana, Orange]
TreeSet
TreeSet is an implementation of the MutableSet interface that stores elements in sorted order based on their natural order or a custom comparator. It provides efficient operations for retrieving elements in a sorted manner.
val treeSet: TreeSet<String> = TreeSet()
treeSet.add("Apple")
treeSet.add("Banana")
treeSet.add("Orange")

println(treeSet)  // Output: [Apple, Banana, Orange]
HashMap
HashMap is an implementation of the MutableMap interface that stores key-value pairs. It provides fast lookup and insertion operations based on the hash codes of keys.
val hashMap: HashMap<String, Int> = HashMap()
hashMap["Apple"] = 1
hashMap["Banana"] = 2
hashMap["Orange"] = 3

println(hashMap)  // Output: {Apple=1, Banana=2, Orange=3}
TreeMap
TreeMap is an implementation of the MutableMap interface that stores key-value pairs in a sorted order based on the natural order of keys or a custom comparator. It provides efficient operations for retrieving entries in a sorted manner.
val treeMap: TreeMap<String, Int> = TreeMap()
treeMap["Apple"] = 1
treeMap["Banana"] = 2
treeMap["Orange"] = 3

println(treeMap)  // Output: {Apple=1, Banana=2, Orange=3}
These are some of the commonly used collection implementations in Kotlin. Each implementation has its own characteristics and usage scenarios, so choose the one that best fits your requirements in terms of performance, order, uniqueness, or sorting.
Iterable
When working with collections in Kotlin, traversing through the elements is a common requirement. The Kotlin standard library provides mechanisms such as iterators and for loops to facilitate this traversal.
Iterators
Iterators are objects that allow sequential access to the elements of a collection without exposing the underlying structure of the collection. You can obtain an iterator for inheritors of the Iterable<T> interface, including Set and List, by calling the iterator() function on the collection.
Here’s an example of using an iterator to traverse a collection:
val numbers = listOf(1, 2, 3, 4, 5)
val iterator = numbers.iterator()

while (iterator.hasNext()) {
    val element = iterator.next()
    println(element)
}
In the above example, we create a List of numbers and obtain an iterator by calling iterator() on the list. We then use a while loop to iterate through the elements. The hasNext() function checks if there is another element, and next() retrieves the current element and moves the iterator to the next position. We can perform operations on each element, such as printing its value.
Alternatively, Kotlin provides a more concise way to iterate through a collection using the for loop:
val numbers = listOf(1, 2, 3, 4, 5)

for (element in numbers) {
    println(element)
}
In this case, the for loop implicitly obtains the iterator and iterates over the elements of the collection.
Additionally, the standard library provides the forEach() function, which simplifies iterating over a collection and executing code for each element:
val numbers = listOf(1, 2, 3, 4, 5)

numbers.forEach { element ->
    println(element)
}
The
forEach()function takes a lambda expression as an argument, and the code within the lambda is executed for each element in the collection.
ListIterator
For lists, there is a special iterator implementation called ListIterator. It supports iterating through lists in both forward and backward directions. The ListIterator provides functions such as hasPrevious(), previous(), nextIndex(), and previousIndex() to facilitate backward iteration and retrieve information about element indices.
val colors = listOf("red", "green", "blue")
val listIterator = colors.listIterator()

while (listIterator.hasNext()) {
    val element = listIterator.next()
    println(element)
}

while (listIterator.hasPrevious()) {
    val element = listIterator.previous()
    println(element)
}
In the above code, we create a list of colors and obtain a ListIterator by calling listIterator() on the list. We then use a while loop to iterate through the list in the forward direction using next().
After reaching the end of the list, we use another while loop to iterate in the backward direction using previous(). This allows us to traverse the list from the last element back to the first element.
MutableIterator
For mutable collections, there is MutableIterator, which extends Iterator and provides the remove() function. This allows you to remove elements from a collection while iterating over it. In addition, MutableListIterator allows the insertion and replacement of elements while iterating through a list.
val numbers = mutableListOf(1, 2, 3, 4, 5)
val iterator = numbers.iterator()

while (iterator.hasNext()) {
    val element = iterator.next()
    if (element % 2 == 0) {
        iterator.remove()
    }
}

println(numbers)  // Output: [1, 3, 5]
In the above code, we create a mutable list of numbers and obtain a MutableIterator by calling iterator() on the list. We iterate through the list using a while loop and remove the even numbers using remove() when encountered.
After iterating, we print the modified list, which now contains only the odd numbers.
By using ListIterator, you can traverse lists in both forward and backward directions, while MutableIterator allows you to remove elements from mutable collections during iteration. These iterators provide flexibility and control when working with lists and mutable collections in Kotlin.
Collection Creation Function In Kotlin
To create a collection in Kotlin, you can use the various collection classes provided by the Kotlin standard library, such as List, MutableList, Set, MutableSet, Map, and MutableMap. These classes have constructors and factory functions to create collections with initial elements.
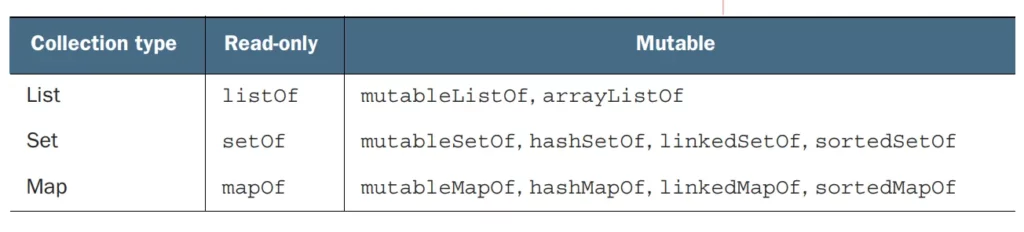
Here’s an example of how we can create different types of collections in Kotlin:
val list = listOf("apple", "banana", "orange")   // Creating a List

val mutableList = mutableListOf("apple", "banana", "orange")   // Creating a MutableList

val set = setOf("apple", "banana", "orange")   // Creating a Set

val mutableSet = mutableSetOf("apple", "banana", "orange")   // Creating a MutableSet

val map = mapOf(1 to "apple", 2 to "banana", 3 to "orange")   // Creating a Map

val mutableMap = mutableMapOf(1 to "apple", 2 to "banana", 3 to "orange")   // Creating a MutableMap
You can replace the initial elements with your own data or leave the collections empty if you want to populate them later.
Note: The examples above use immutable (
val) collections, which means you cannot modify their contents once created. If you need to modify the collection, you can use their mutable counterparts (MutableList,MutableSet,MutableMap) and add or remove elements as needed.
Empty collections
In Kotlin, there are convenient functions for creating empty collections: emptyList(), emptySet(), and emptyMap(). These functions allow you to create collections without any elements.
When using these functions, it’s important to specify the type of elements that the collection will hold. This helps the compiler infer the appropriate type for the collection and enables type safety during compile-time checks.
Here’s an example of using the emptyList() function:
val emptyStringList: List<String> = emptyList()In the above example, we create an empty List of Strings using emptyList(). By specifying the type parameter <String>, we ensure that the list can only hold String elements. This helps avoid type errors and provides type safety when working with the list.
Similarly, we can create an empty Set or an empty Map:
val emptyIntSet: Set<Int> = emptySet()<br>val emptyStringToIntMap: Map<String, Int> = emptyMap()In these examples, we create an empty Set of Integers using emptySet() and an empty Map from Strings to Integers using emptyMap(). By explicitly specifying the types <Int> and <String, Int>, respectively, we ensure that the sets and maps are appropriately typed and can only hold elements of the specified types.
Using these functions to create empty collections is especially useful in scenarios where you need to initialize a collection variable but don’t have any initial elements to add. It allows you to start with an empty collection of the desired type and later add or populate it as needed.
Kotlin Collection Operations
Kotlin collections provide a rich set of operations to manipulate, transform, and filter data efficiently. Let’s explore some commonly used operations:
Mapping: Transform each element in a collection using a mapping function.
val numbers = listOf(1, 2, 3, 4, 5)
val squaredNumbers = numbers.map { it * it }
Filtering: Select elements from a collection based on a given condition.
val numbers = listOf(1, 2, 3, 4, 5)
val evenNumbers = numbers.filter { it % 2 == 0 }
Reducing: Perform a reduction operation on a collection to obtain a single result.
val numbers = listOf(1, 2, 3, 4, 5)
val sum = numbers.reduce { acc, value -> acc + value }
Grouping: Group elements of a collection based on a given key.
val words = listOf("apple", "banana", "avocado", "blueberry")
val groupedWords = words.groupBy { it.first() }
Collection Operations with Predicates
Kotlin collections provide powerful operations that utilize predicates, enabling advanced data manipulation. Let’s explore some of these operations:
Checking if all elements satisfy a condition
val numbers = listOf(1, 2, 3, 4, 5)
val allPositive = numbers.all { it > 0 }
Checking if any element satisfies a condition
val numbers = listOf(1, 2, 3, 4, 5)
val hasNegative = numbers.any { it < 0 }
Finding the first element that satisfies a condition
val numbers = listOf(1, 2, 3, 4, 5)
val firstEven = numbers.firstOrNull { it % 2 == 0 }
Counting the number of elements that satisfy a condition
val numbers = listOf(1, 2, 3, 4, 5)
val countEven = numbers.count { it % 2 == 0 }
Extension Functions on Collections
One of the highlights of Kotlin collections is the ability to use extension functions, which allow you to add new functionality to existing collection classes. These functions enhance the readability and conciseness of your code. Let’s take a look at some examples:
Adding Custom Extension Functions
Checking if a list is sorted
fun <T : Comparable<T>> List<T>.isSorted(): Boolean {
    return this == this.sorted()
}

val numbers = listOf(1, 2, 3, 4, 5)
val sorted = numbers.isSorted()
Flattening a list of lists
fun <T> List<List<T>>.flatten(): List<T> {
    return this.flatMap { it }
}

val listOfLists = listOf(listOf(1, 2), listOf(3, 4), listOf(5, 6))
val flattenedList = listOfLists.flatten()
In the above code, we define an extension function called flatten for the List<List<T>> type. The function uses flatMap to concatenate all the inner lists into a single list, resulting in a flattened structure.
Commonly Used Extension Functions
sortBy(): Sorts the collection in ascending order based on a specified key selector.
val names = listOf("Alice", "Bob", "Charlie", "Dave")
val sortedNames = names.sortBy { it.length }

println(sortedNames)  // Output: [Bob, Dave, Alice, Charlie]
groupBy(): Groups the elements of a collection by a specified key selector and returns a map where the keys are the selected values and the values are lists of corresponding elements.
val names = listOf("Alice", "Bob", "Charlie", "Dave")
val namesByLength = names.groupBy { it.length }

println(namesByLength)  // Output: {5=[Alice, Charlie], 3=[Bob, Dav]}
By combining Kotlin collections with extension functions, you can perform a wide range of operations efficiently and with expressive code. These features make Kotlin a powerful language for working with data and collections.
Null Safety in Collections
Null safety is a crucial aspect of Kotlin that helps prevent null pointer exceptions and ensures more reliable code. Kotlin’s type system includes built-in null safety features for collections, which offer better control and safety when dealing with nullable elements.
In Kotlin collections, you can specify whether the collection itself or its elements can be nullable. Let’s explore how null safety works in collections:
Nullable Collections
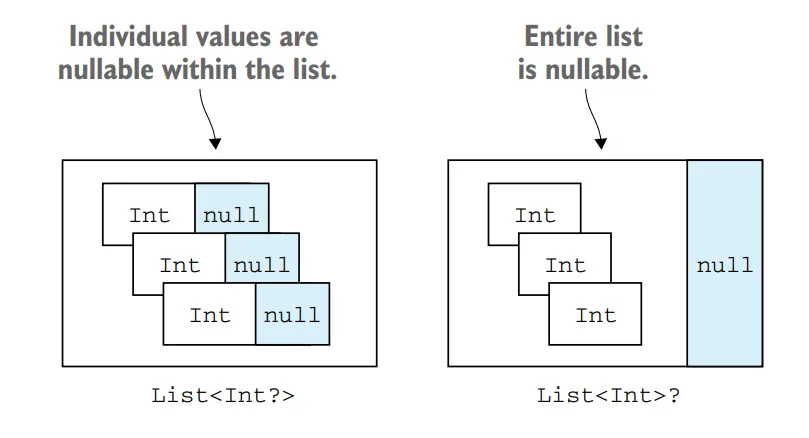
By default, Kotlin collections are non-nullable, meaning they cannot hold null values. For example, List<Int> represents a list that can only contain non-null integers. If you try to add a null value to a non-nullable collection, it will result in a compilation error.
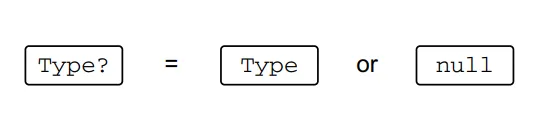
val list: List<Int> = listOf(1, 2, null) // Error: Null cannot be a value of a non-null type IntTo allow null values in a collection, you can specify a nullable type. For example, List<Int?> represents a list that can contain both non-null and nullable integers.
val list: List<Int?> = listOf(1, 2, null) // OkaySafe Access to Elements
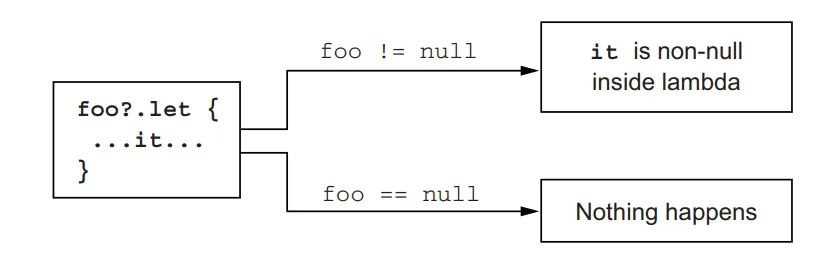
When working with collections that may contain null values, it’s essential to use safe access operators to prevent null pointer exceptions. Kotlin provides the safe access operator (?.) and the safe call operator (?.let) for this purpose.
val list: List<String?> = listOf("Alice", null, "Bob")

val firstElement: String? = list.firstOrNull()
val length: Int? = list.firstOrNull()?.length

// Safe access using the safe call operator
val uppercaseNames: List<String>? = list.map { it?.toUpperCase() }
In the above code, firstOrNull() is used to safely retrieve the first element of the list, which may be null. The safe access operator (?.) is used to access the length property of the first element, ensuring that a null value won’t result in a null pointer exception.
The safe call operator is also useful when performing transformations or operations on elements within the collection. In the example, the map function is called on the list, and the safe call operator is used to convert each element to uppercase. The result is a nullable list (List<String>?), which accounts for the possibility of null elements.
Filtering Nullable Elements
When working with collections that may contain null values, you may need to filter out the null elements. Kotlin provides the filterNotNull() function for this purpose.
val list: List<String?> = listOf("Alice", null, "Bob")
val filteredList: List<String> = list.filterNotNull()

println(filteredList)  // Output: [Alice, Bob]
In the above code, filterNotNull() is used to create a new list that excludes the null elements. The resulting filteredList is of type List<String>, guaranteeing non-null values.
Null safety in collections is an essential aspect of Kotlin that helps eliminate null pointer exceptions and provides more reliable code. By leveraging nullable types and safe access operators, you can handle nullable elements in collections and ensure safer and more robust code.
Collection Conversion
Converting between different collection types and arrays is a common requirement when working with data in Kotlin. Kotlin provides convenient functions for converting collections to different types and converting collections to arrays. Let’s explore these conversion mechanisms:
Converting Between Collection Types
Kotlin provides extension functions to convert between different collection types. Here are some commonly used conversion functions:
toList(): Converts a collection to a List.
val set: Set<Int> = setOf(1, 2, 3)
val list: List<Int> = set.toList()
toSet(): Converts a collection to a Set.
val list: List<Int> = listOf(1, 2, 3)
val set: Set<Int> = list.toSet()
toMutableList(): Converts a collection to a MutableList.
val set: Set<Int> = setOf(1, 2, 3)<br>val mutableList: MutableList<Int> = set.toMutableList()toMutableSet(): Converts a collection to a MutableSet.
val list: List<Int> = listOf(1, 2, 3)
val mutableSet: MutableSet<Int> = list.toMutableSet()
These conversion functions allow you to transform a collection into a different type based on your requirements. It’s important to note that the resulting collection is a new instance with the transformed elements.
Converting to Arrays
Kotlin also provides functions to convert collections to arrays. Here are the commonly used conversion functions:
toTypedArray(): Converts a collection to an array of the specified type.
val list: List<Int> = listOf(1, 2, 3)
val array: Array<Int> = list.toTypedArray()
toIntArray(): Converts a collection of integers to an IntArray.
val list: List<Int> = listOf(1, 2, 3)
val intArray: IntArray = list.toIntArray()
toCharArray(): Converts a collection of characters to a CharArray.
val set: Set<Char> = setOf('a', 'b', 'c')
val charArray: CharArray = set.toCharArray()
These conversion functions allow you to obtain arrays from collections, which can be useful when interacting with APIs that require array inputs or when specific array types are needed.
It’s important to note that arrays are fixed in size and cannot be dynamically resized like mutable collections. Therefore, the resulting arrays will have the same number of elements as the original collections.
By using these conversion functions, you can easily convert collections to different types or arrays based on your specific requirements in Kotlin.
Kotlin Standard Library Functions for Collections
The Kotlin Standard Library provides several useful functions that can be applied to collections to simplify and enhance their usage. Let’s explore two categories of these functions:
let, apply, also, and run
These functions allow you to perform operations on collections and access their elements in a concise and expressive manner.
let: Executes a block of code on a collection and returns the result.
val list: List<Int> = listOf(1, 2, 3)
val result: List<String> = list.let { collection ->
    // Perform operations on the collection
    collection.map { it.toString() }
}

println(result)  // Output: [1, 2, 3]
apply: Applies a block of code to a collection and returns the collection itself.
val list: MutableList<Int> = mutableListOf(1, 2, 3)
list.apply {
    // Perform operations on the collection
    add(4)
    removeAt(0)
}

println(list)  // Output: [2, 3, 4]
also: Performs additional operations on a collection and returns the collection itself.
val list: List<Int> = listOf(1, 2, 3)
val result: List<Int> = list.also { collection ->
    // Perform additional operations on the collection
    println("Size of the collection: ${collection.size}")
}

println(result)  // Output: [1, 2, 3]
run: Executes a block of code on a collection and returns the result.
val list: List<Int> = listOf(1, 2, 3)
val result: List<String> = run {
    // Perform operations on the collection
    list.map { it.toString() }
}

println(result)  // Output: [1, 2, 3]
These functions provide different ways to interact with collections, allowing you to perform operations, transform elements, or execute code on the collections themselves.
withIndex and zip
These functions enable you to work with the indices and combine multiple collections
withIndex: Provides access to the index and element of each item in a collection.
val list: List<String> = listOf("Apple", "Banana", "Orange")
for ((index, element) in list.withIndex()) {
    println("[$index] $element")
}

// Output:
// [0] Apple
// [1] Banana
// [2] Orange
zip: Combines elements from two collections into pairs.
val numbers: List<Int> = listOf(1, 2, 3)
val fruits: List<String> = listOf("Apple", "Banana", "Orange")

val pairs: List<Pair<Int, String>> = numbers.zip(fruits)
for ((number, fruit) in pairs) {
    println("$number - $fruit")
}

// Output:
// 1 - Apple
// 2 - Banana
// 3 - Orange
These functions provide convenient ways to work with indices and combine collections, making it easier to iterate through collections or create pairs of elements from different collections.
By utilizing these standard library functions, you can simplify your code, make it more expressive, and enhance the functionality of collections in Kotlin.
Collection Performance Considerations
When working with collections, it’s important to consider their performance characteristics to ensure efficient usage. Here are some considerations and best practices to keep in mind:
Choosing the Right Collection Type
Selecting the appropriate collection type for your specific use case can significantly impact performance. Consider the following factors:
- List vs. Set: Use a List when the order and duplicate elements are important. Choose a Set when uniqueness and fast membership checks are required.
- ArrayList vs. LinkedList: Use an ArrayList when you need efficient random access and iteration. Opt for a LinkedList when frequent insertion and removal at both ends of the list are required.
- HashSet vs. TreeSet: Choose a HashSet when order doesn’t matter, and uniqueness and fast membership checks are important. Use a TreeSet when elements need to be stored in sorted order.
- HashMap vs. TreeMap: Use a HashMap for fast key-value lookups and insertions without requiring sorted order. Choose a TreeMap when entries need to be stored in sorted order based on keys.
Consider the specific requirements and performance trade-offs of each collection type to make an informed decision.
Performance Tips and Best Practices
To optimize collection performance, consider the following tips:
- Minimize unnecessary operations: Avoid unnecessary operations like copying collections or converting them back and forth. Optimize your code to perform only the required operations.
- Use proper initial capacity: When creating collections, provide an appropriate initial capacity to avoid frequent resizing, especially for ArrayLists and HashMaps. Estimate the number of elements to be stored to improve performance.
- Prefer specific collection interfaces: Use more specific collection interfaces like List, Set, or Map instead of the general Collection interface to leverage their specialized operations and improve code readability.
- Be cautious with nested iterations: Avoid nested iterations over large collections as they can lead to performance issues. Consider alternative approaches like using index-based iterations or transforming data into more efficient data structures if possible.
- Utilize lazy operations: Take advantage of lazy operations like filter, map, and takeWhile to avoid unnecessary computations on large collections until they are actually needed.
- Use appropriate data structures: Choose the right data structure for your specific requirements. For example, if you frequently need to check for containment, consider using a HashSet instead of a List.
- Measure and profile performance: If performance is critical, measure and profile your code to identify bottlenecks and areas for optimization. Utilize tools like profilers to identify performance hotspots.
By considering these performance considerations and following best practices, you can ensure efficient usage of collections in your Kotlin code. Optimize your code based on specific requirements and evaluate performance trade-offs to achieve better performance.
Conclusion
Kotlin collections provide a powerful and intuitive way to handle data manipulation in your Kotlin applications. By understanding the different collection types, operations, extension functions, and performance considerations, you can write efficient and expressive code. In this article, we covered the various aspects of Kotlin collections, providing detailed explanations and examples for each topic. With this knowledge, you’re equipped to harness the full potential of Kotlin collections and optimize your data manipulation workflows. Start exploring Kotlin collections and elevate your Kotlin programming skills to new heights.