Kotlin Coroutines have revolutionized how we handle asynchronous programming in Android and server-side applications. They provide a structured and efficient way to manage background tasks without blocking threads. This in-depth guide explores Coroutines, their execution model, dispatchers, structured concurrency, and best practices with real-world examples. Why Kotlin Coroutines? Traditionally, Java developers relied on Threads, Executors,...
Variance determines how subtyping relationships work in a type hierarchy. There are two key types of variance in Kotlin:
Covariance (Out-projected types): A subtype can replace a supertype when reading values.
Contravariance (In-projected types): A supertype can replace a subtype when writing values.
Function Types and Variance
Kotlin functions can be represented as types, for example:
Kotlin
val func: (String) -> Int = { it.length }
Here, func is a function type that takes a String as input and returns an Int. Function types in Kotlin have two parts:
Parameter type(s) — What the function takes in.
Return type — What the function returns.
The variance in function types applies differently to parameters and return types.
Return types are covariant (out).
Parameter types are contravariant (in).
Now, let’s explore how these apply to Kotlin’s function type variance.
Covariance and Contravariance in Kotlin’s Function Types
In Kotlin, a class or interface can be covariant on one type parameter and contravariant on another. One of the classic examples of this is the Function interface. Let’s take a look at the declaration of the Function1 interface, which represents a one-parameter function:
To make the notation more readable, Kotlin provides an alternative syntax (P) -> R to represent Function1<P, R>. In this syntax, you’ll notice that P (the parameter type) is used only in the in position and is marked with the in keyword, while R (the return type) is used only in the out position and is marked with the out keyword.
This means that the subtyping relationship for the function type is reversed for the first type argument (P) and preserved for the second type argument (R).
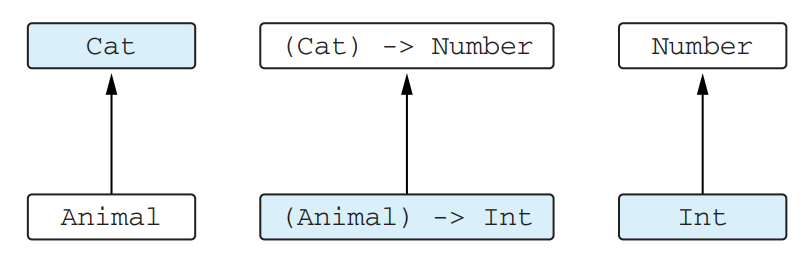
For example, let’s say you have a higher-order function called enumerateCats that accepts a lambda function taking a Cat parameter and returning a Number:
Kotlin
funenumerateCats(f: (Cat) -> Number) { ... }
Now, suppose you have a function called getIndex defined in the Animal class that returns an Int. You can pass Animal::getIndex as an argument to enumerateCats:
Kotlin
funAnimal.getIndex(): Int = ...enumerateCats(Animal::getIndex) // This code is legal in Kotlin. Animal is a supertype of Cat, and Int is a subtype of Number
In this case, the Animal::getIndex function is accepted because Animal is a supertype of Cat, and Int is a subtype of Number, the function type’s subtyping relationship allows it.
The function (T) -> R is contravariant on its argument and covariant on its return type
This illustration demonstrates how subtyping works for function types. The arrows indicate the subtyping relationship.
Function Type Variance in Kotlin’s Type System
As you now know, when working with function types in Kotlin, variance is explicitly defined:
This aligns with the natural logic of function type variance.
Conclusion
So in summary,
Covariance (out) applies to return types – A function returning a subtype can be assigned to a function returning a supertype.
Contravariance (in) applies to parameter types – A function taking a supertype can be assigned to a function taking a subtype.
Kotlin enforces these rules to ensure type safety and prevent runtime errors.
Understanding Kotlin’s Function Type Variance helps write flexible, reusable, and type-safe code, especially when designing APIs, lambda functions, and higher-order functions.
Kotlin has a robust type system, but one of the trickiest concepts to grasp is contravariance. If you’ve ever scratched your head wondering how contravariance works and why it’s useful, you’re in the right place. This blog will break it down in simple terms with examples so you can fully understand Kotlin contravariance and use it effectively in your projects.
Understanding Variance in Kotlin
Before diving into Kotlin contravariance, let’s briefly cover variance. Variance determines how subtyping relationships between generic types work. Kotlin has three main types:
Invariance (T) – No subtyping allowed.
Covariance (out T) – Allows a subtype to be returned but not consumed.
Contravariance (in T) – Allows a supertype to be accepted as input.
Contravariance is often misunderstood because it involves a reversed subtyping rule. Let’s break it down.
Contravariance: reversed subtyping relation
Contravariance is the opposite of covariance and it can be understood as a mirror image of covariance. When a class is contravariant, the subtyping relationship between its type arguments is the reverse of the subtyping relationship between the classes themselves.
To illustrate this concept, let’s consider the example of the Comparator interface. This interface has a single method called compare, which takes two objects and compares them:
Kotlin
interfaceComparator<inT> {funcompare(e1: T, e2: T): Int { ... }}
In this case, you’ll notice that the compare method only consumes values of type T. This means that the type parameter T is used in “in” positions only, indicating that it is a contravariant type. To indicate contravariance, the “in” keyword is placed before the declaration of T.
A comparator defined for values of a certain type can, of course, compare the values of any subtype of that type. For example, if you have a Comparator, you can use it to compare values of any specific type.
Kotlin
val anyComparator = Comparator<Any> { e1, e2 -> e1.hashCode() - e2.hashCode() }val strings: List<String> = listOf("abc","xyz")strings.sortedWith(anyComparator) // You can use the comparator for any objects to compare specific objects, such as strings.
Here, the sortedWith function expects a Comparator (a comparator that can compare strings), and it’s safe to pass one that can compare more general types. If you need to perform comparisons on objects of a certain type, you can use a comparator that handles either that type or any of its supertypes. This means Comparator<Any> is a subtype of Comparator<String>, where Any is a supertype of String. The subtyping relation between comparators for two different types goes in the opposite direction of the subtyping relation between those types.
What is contravariance?
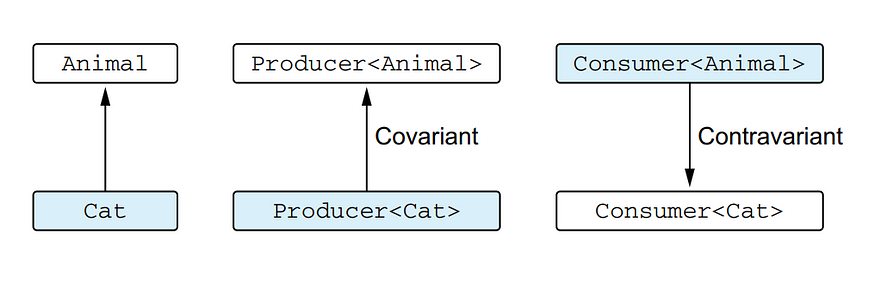
A class that is contravariant on the type parameter is a generic class (let’s consider Consumer<T> as an example) for which the following holds: Consumer<A> is a subtype of Consumer<B> if B is a subtype of A. The type arguments A and B changed places, so we say the subtyping is reversed. For example, Consumer<Animal> is a subtype of Consumer<Cat>.
In simple words, contravariance in Kotlin means that the subtyping relationship between two generic types is reversed compared to the normal inheritance hierarchy. If B is a subtype of A, then a generic class or interface that is contravariant on its type parameter T will have the relationship ClassName<A> is a subtype of ClassName<B>.
For a covariant type Producer, the subtyping is preserved, but for a contravariant type Consumer, the subtyping is reversed
Here, we see the difference between the subtyping relation for classes that are covariant and contravariant on a type parameter. You can see that for the Producer class, the subtyping relation replicates the subtyping relation for its type arguments, whereas for the Consumer class, the relation is reversed.
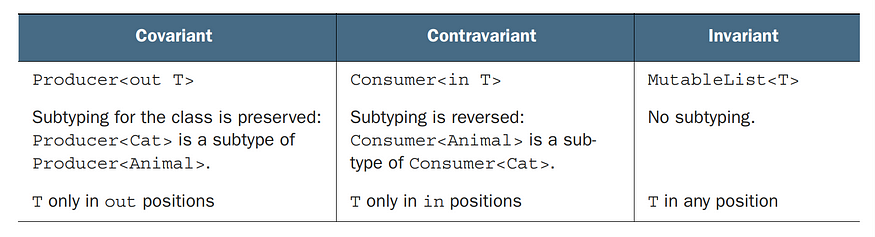
Covariant, contravariant, and invariant classes
The “in” keyword means values of the corresponding type are passed in to methods of this class and consumed by those methods. Similar to the covariant case, constraining use of the type parameter leads to the specific subtyping relation. The “in” keyword on the type parameter T means the subtyping is reversed and T can be used only in “in” positions.
When to Use Contravariance
Contravariance is useful when designing APIs that consume values. It is commonly used in:
Event handlers
Callbacks and listeners
Comparator implementations (Comparator<in T>)
Conclusion
Kotlin contravariance can be tricky at first, but once you understand its reversed subtyping rule, it becomes a powerful tool for designing flexible and reusable APIs. By using the in keyword, you allow broader types to be used while ensuring type safety.
Next time you design a consumer-style interface, consider whether Kotlin contravariance could make your code more robust.
Kotlin provides powerful collection functions that make data manipulation intuitive and efficient. Among them, fold and filter stand out as essential tools for transforming and processing collections. In this guide, we’ll explore these functions in depth, providing detailed explanations and practical examples to help you leverage their full potential. Understanding the fold Function in Kotlin The...
Kotlin Coroutines make asynchronous programming simpler and more efficient, but choosing the right dispatcher is crucial for performance and responsiveness. In this guide, we’ll explore Coroutine Dispatchers in Kotlin, focusing on Dispatchers.IO, Dispatchers.Main, Dispatchers.Default, and Dispatchers.Unconfined—when to use each, how they work, and best practices.
What Are Coroutine Dispatchers in Kotlin?
Coroutine Dispatchers determine the thread on which a coroutine runs. They help optimize task execution by assigning work to different threads based on the nature of the task (CPU-bound and IO-bound).
In Kotlin, the primary coroutine dispatchers include:
Dispatchers.Main — Runs on the main (UI) thread, ideal for updating UI components.
Dispatchers.IO — Optimized for disk and network operations.
Dispatchers.Default — Used for CPU-intensive tasks.
Dispatchers.Unconfined — Doesn’t confine execution to a specific thread.
Now, let’s dive into each dispatcher and see when and how to use them.
Dispatchers.Main: For UI Operations
When to Use It?
Use Dispatchers.Main for tasks that interact with UI components, such as updating text views, handling button clicks, or modifying layouts. Since it runs on the main thread, heavy tasks should not be performed here to avoid UI lag.
Kotlin
import kotlinx.coroutines.*funmain() { GlobalScope.launch(Dispatchers.Main) {// Update UI component, assuming this is an Android appupdateUI() }}suspendfunupdateUI() {println("Updating UI on thread: ${Thread.currentThread().name}")}
Why Use Dispatchers.Main?
Prevents UI freezes caused by long-running tasks.
Ensures UI components update properly.
Designed for lightweight operations like animations and displaying text.
Note:Dispatchers.Main is available in Android applications and requires adding kotlinx-coroutines-android dependency. Also, always switch to a background thread when doing intensive work to avoid blocking the UI.
Dispatchers.IO: For I/O Operations
Use Dispatchers.IO for tasks involving network requests, file reading/writing, and database queries. This dispatcher is optimized for I/O-bound operations by using a shared pool of threads.
Kotlin
import kotlinx.coroutines.*funmain() {CoroutineScope(Dispatchers.IO).launch {fetchDataFromNetwork() }}suspendfunfetchDataFromNetwork() {println("Fetching data on thread: ${Thread.currentThread().name}")// Simulate network calldelay(2000)println("Data fetched successfully")}
Why Use Dispatchers.IO?
Efficient for handling multiple I/O operations concurrently.
Prevents blocking the main thread.
Dynamically adjusts the thread pool size for optimal performance.
Best Practice: Always use withContext(Dispatchers.IO) {} when calling blocking I/O functions within a coroutine.
Kotlin
suspendfunreadFile() {withContext(Dispatchers.IO) {println("Reading file in background") }}
Dispatchers.Default: For CPU-Intensive Tasks
Use Dispatchers.Default for computationally intensive operations such as image processing, sorting large lists, and performing complex calculations. This dispatcher is optimized for CPU-bound tasks and utilizes a thread pool approximately equal to the number of CPU cores, scaling as needed for efficiency.
Kotlin
import kotlinx.coroutines.*funmain() {CoroutineScope(Dispatchers.Default).launch {performHeavyComputation() }}suspendfunperformHeavyComputation() {println("Performing computation on thread: ${Thread.currentThread().name}")val result = (1..1_000_000).sum() // Sum of numbers 1 to 1,000,000println("Computation result: $result")}
Why Use Dispatchers.Default?
Optimized for CPU-heavy tasks.
Prevents overloading the main thread.
Uses multiple CPU cores efficiently.
Note: Avoid using Dispatchers.Default for network or database tasks, as it’s not optimized for them.
Dispatchers.Unconfined : Runs on the Caller Thread Initially
Dispatchers.Unconfined starts a coroutine in the current thread but resumes it in a thread determined by the suspending function. It’s suitable for coroutines that neither consume CPU time nor update shared data confined to a specific thread.
When to Use:
Executing lightweight tasks that don’t require thread confinement.
Here, the coroutine starts on the caller thread but resumes execution on a different thread after delay(). This makes Dispatchers.Unconfined unpredictable, so it’s best used for specific cases like testing.
Switching Between Dispatchers
Sometimes, you may need to switch between dispatchers within a coroutine. Use withContext() to change dispatchers efficiently.
Selecting the appropriate dispatcher depends on the nature of the task:
UI Operations: Use Dispatchers.Main to ensure UI updates occur on the main thread.
I/O Operations: Use Dispatchers.IO for tasks involving file or network access.
CPU-Intensive Tasks: Use Dispatchers.Default for computations and data processing.
Lightweight, Non-Confined Tasks: Use Dispatchers.Unconfined for simple tasks that don’t require a specific thread.
Understanding and utilizing the correct dispatcher ensures that your Kotlin applications remain responsive and efficient.
Conclusion
Understanding Coroutine Dispatchers in Kotlin is essential for optimizing performance and preventing UI freezes. Use Dispatchers.Main for UI work, Dispatchers.IO for IO-heavy operations, Dispatchers.Default for CPU-bound tasks, and Dispatchers.Unconfined cautiously.
In modern Android and Kotlin development, handling asynchronous data streams efficiently is crucial. Whether you’re working with API responses, user input events, or real-time updates, Kotlin Flow provides a powerful, coroutine-based solution. In this guide, we’ll explore Kotlin Flow in-depth, covering its concepts, operators, builders, real-world use cases, and best practices.
What is Kotlin Flow?
Kotlin Flow is a cold, asynchronous, and reactive stream API introduced as part of Kotlin Coroutines. It is designed to handle sequential data streams efficiently, making it a great alternative to RxJava and LiveData.
Key Characteristics of Flow
Cold Stream — A Flow only starts emitting values when it is collected.
Sequential Execution — Emissions, transformations, and collections occur one after another.
Backpressure Support — Unlike RxJava, Flow automatically handles backpressure.
Coroutine Friendly — Works seamlessly with Kotlin Coroutines.
Basic Example of Flow
Kotlin
import kotlinx.coroutines.flow.*import kotlinx.coroutines.runBlockingfunsimpleFlow(): Flow<Int> = flow {for (i in1..5) {emit(i) // Emitting values one by one }}funmain() = runBlocking {simpleFlow().collect { value->println(value) }}
Output:
Kotlin
12345
Use Flow when dealing with data streams that require coroutine support and backpressure handling.
Flow Builders
1. flow {} – Custom Flow Creation
Kotlin
val customFlow: Flow<Int> = flow {for (i in1..3) {emit(i) // Emit values }}
2. flowOf() – Flow from Fixed Values
Kotlin
val numbersFlow = flowOf(1, 2, 3, 4, 5)
3. asFlow() – Convert Collections to Flow
Kotlin
val listFlow = listOf(1, 2, 3).asFlow()
Transforming Flow Data with Operators
1. map {} – Transform Each Element
Kotlin
simpleFlow().map { it * 2 }.collect { println(it) }
StateFlow always emits the latest value to collectors. It behaves like LiveData, and collectors receive the current state immediately upon subscription.
SharedFlow — Broadcasts Data to Multiple Collectors
Kotlin
import kotlinx.coroutines.*import kotlinx.coroutines.flow.*funmain() = runBlocking {// Create a MutableSharedFlow with a buffer capacity of 2val sharedFlow = MutableSharedFlow<Int>( replay = 0, extraBufferCapacity = 2 )val job1 = launch { sharedFlow.collect { value->println("Collector 1 received: $value") } }val job2 = launch { sharedFlow.collect { value->println("Collector 2 received: $value") } }// Delay to ensure collectors are active before emittingdelay(100) sharedFlow.emit(10) sharedFlow.emit(20)delay(500) job1.cancel() job2.cancel()}// OutputCollector 1 received: 10Collector 2 received: 10Collector 1 received: 20Collector 2 received: 20
By default, MutableSharedFlow has no buffer and replay = 0, meaning it won’t emit any value unless a collector is ready at the moment of emission.
We set extraBufferCapacity = 2, allowing SharedFlow to buffer a couple of values while the collectors start.
We add delay(100) before emitting, ensuring both collectors are already collecting.
This way, both collectors reliably receive all values.
SharedFlow broadcasts emitted values to all active collectors. It’s great for one-time events (like navigation, snackbars, etc.), and multiple collectors will receive the same emissions.
When to Use Kotlin Flow?
Fetching API data periodically
Streaming real-time UI updates
Handling user input events
Data transformation pipelines
Conclusion
Kotlin Flow is a modern, efficient, and coroutine-friendly way to handle asynchronous data streams. By using Flow builders, operators, exception handling, and StateFlow/SharedFlow, developers can build scalable, efficient applications.
Kotlin’s coroutines have revolutionized asynchronous programming by making concurrency more manageable and readable. But to truly harness their power, understanding Coroutine Scopes is essential. In this guide, we’ll break down what Coroutine Scopes are, why they matter, and how they fit into Kotlin’s concurrency model. What Are Coroutine Scopes? A Coroutine Scope defines the lifecycle...
Kotlin is a powerful and flexible programming language that introduces many advanced features to make development easier. One such feature is Use-Site Variance in Kotlin, which helps handle type variance effectively in generic programming. If you’ve ever struggled with understanding variance in Kotlin, this guide will break it down in a simple, easy-to-understand way.
What is Use-Site Variance in Kotlin?
In Kotlin, variance defines how different types relate to each other in a type hierarchy when dealing with generics. Generics allow you to create flexible and reusable code, but without proper variance handling, type safety issues may arise.
Kotlin provides two types of variance:
Declaration-Site Variance — Defined at the class level using out (covariance) and in (contravariance).
Use-Site Variance — Applied at the point where a generic class is used, rather than where it is declared.
Use-Site Variance is particularly useful when you don’t have control over the generic class declaration but still need to enforce type variance.
When to Use Use-Site Variance in Kotlin?
Use-Site Variance in Kotlin is useful in scenarios where:
You are working with a generic class that doesn’t specify variance at the declaration level.
You need to ensure type safety when passing a generic object to a function.
You want to restrict read and write operations based on the expected type.
Understanding when to use it is important because incorrect usage may lead to type mismatches and compilation errors.
BTW, How does use-site variance work in Kotlin?
Kotlin supports use-site variance, you can specify variance at the use site, which means you can indicate the variance for a specific occurrence of a type parameter, even if it can’t be declared as covariant or contravariant in the class declaration. Let’s break down the concepts and see how use-site works.
In Kotlin, many interfaces, like MutableList, are not covariant or contravariant by default because they can both produce and consume values of the types specified by their type parameters. However, in certain situations, a variable of that type may be used only as a producer or only as a consumer.
Consider the function copyData that copies elements from one collection to another:
Kotlin
fun <T> copyData(source: MutableList<T>, destination: MutableList<T>) {for (item in source) { destination.add(item) }}
In this function, both the source and destination collections have an invariant type. However, the source collection is only used for reading, and the destination collection is only used for writing. In this case, the element types of the collections don’t need to match exactly.
To make this function work with lists of different types, you can introduce a second generic parameter:
Kotlin
fun <T : R, R> copyData(source: MutableList<T>, destination: MutableList<R>) {for (item in source) { destination.add(item) }}
In this modified version, you declare two generic parameters representing the element types in the source and destination lists. The source element type (T) should be a subtype of the elements in the destination list (R).
However, Kotlin provides a more elegant way to express this using use-site variance. If the implementation of a function only calls methods that have the type parameter in the “out” position (as a producer) or only in the “in” position (as a consumer), you can add variance modifiers to the particular usages of the type parameter in the function definition.
For example, you can modify the copyData function as follows:
Kotlin
fun <T> copyData(source: MutableList<outT>, destination: MutableList<T>) {for (item in source) { destination.add(item) }}
In this version, you specify the out modifier for the source parameter, which means it’s a projected (restricted) MutableList. You can only call methods that return the generic type parameter (T) or use it in the “out” position. The compiler prohibits calling methods where the type parameter is used as an argument (“in” position).
When using use-site variance in Kotlin, there are limitations on the methods that can be called on a projected type. If you are using a projected type, you may not be able to call certain methods that require the type parameter to be used as an argument (“in” position) :
Kotlin
val list: MutableList<outNumber> = ...list.add(42) // Error: Out-projected type 'MutableList<out Number>' prohibits the use of 'fun add(element: E): Boolean'
Here, list is declared as a MutableList<out Number>, which is an out-projected type. The out projection restricts the type parameter Number to only be used in the “out” position, meaning it can only be used as a return type or read from. You cannot call the add method because it requires the type parameter to be used as an argument (“in” position).
If you need to call methods that are prohibited by the projection, you should use a regular type instead of a projection. In this case, you can use MutableList<Number> instead of MutableList<out Number>. By using the regular type, you can access all the methods available for that type.
Regarding the concept of using the in modifier, it indicates that in a particular location, the corresponding value acts as a consumer, and the type parameter can be substituted with any of its supertypes. This is similar to the contravariant position in Java’s bounded wildcards.
For example, the copyData function can be rewritten using an in-projection:
Kotlin
fun <T> copyData(source: MutableList<T>, destination: MutableList<inT>) {for (item in source) { destination.add(item) }}
In this version, the destination parameter is projected with the in modifier, indicating that it can consume elements of type T or any of its supertypes. This allows you to copy elements from the source list to a destination list with a broader type.
It’s important to note that use-site variance declarations in Kotlin correspond directly to Java’s bounded wildcards. MutableList<out T> in Kotlin is equivalent to MutableList<? extends T> in Java, while the in-projected MutableList<in T> corresponds to Java’s MutableList<? super T>.
Use-site projections in Kotlin can help widen the range of acceptable types and provide more flexibility when working with generic types, without the need for separate covariant or contravariant interfaces.
Conclusion
Use-Site Variance in Kotlin is a powerful feature that ensures type safety while working with generics. By using out when you only need to retrieve values and in when you only need to pass values, you can effectively manage type variance without modifying class declarations.
Understanding how and when to use Use-Site Variance in Kotlin can help you write cleaner, more flexible, and safer generic code. Start experimenting with it in your Kotlin projects and see how it simplifies handling type variance..!
Kotlin’s Flow API has transformed the way we think about asynchronous data streams. But when your app needs to hold state or broadcast events, two specialized types of Flows shine the brightest: StateFlow and SharedFlow.
In this guide, we’ll break down StateFlow and SharedFlow in a simple way. Whether you’re working with Jetpack Compose, MVVM, or traditional Android UI, you’ll understand when and how to use each one — with examples.
StateFlow — Holds a State
StateFlow is similar to LiveData and is used to store a single state that updates over time.
StateFlow always emits the latest value to collectors. It behaves like LiveData, and collectors receive the current state immediately upon subscription.
SharedFlow — Broadcasts Data to Multiple Collectors
Kotlin
import kotlinx.coroutines.*import kotlinx.coroutines.flow.*funmain() = runBlocking {// Create a MutableSharedFlow with a buffer capacity of 2val sharedFlow = MutableSharedFlow<Int>( replay = 0, extraBufferCapacity = 2 )val job1 = launch { sharedFlow.collect { value->println("Collector 1 received: $value") } }val job2 = launch { sharedFlow.collect { value->println("Collector 2 received: $value") } }// Delay to ensure collectors are active before emittingdelay(100) sharedFlow.emit(10) sharedFlow.emit(20)delay(500) job1.cancel() job2.cancel()}// OutputCollector 1 received: 10Collector 2 received: 10Collector 1 received: 20Collector 2 received: 20
By default, MutableSharedFlow has no buffer and replay = 0, meaning it won’t emit any value unless a collector is ready at the moment of emission.
We set extraBufferCapacity = 2, allowing SharedFlow to buffer a couple of values while the collectors start.
We add delay(100) before emitting, ensuring both collectors are already collecting.
This way, both collectors reliably receive all values.
SharedFlow broadcasts emitted values to all active collectors. It’s great for one-time events (like navigation, snackbars, etc.), and multiple collectors will receive the same emissions.
Conclusion
Kotlin’s StateFlow and SharedFlow are powerful tools to build reactive UIs that are predictable, scalable, and cleanly architected. Understanding the difference between state and event helps you choose the right flow for the right situation.
Building an Android app that fetches live weather data is a great way to get hands-on with networking, local storage, and clean architecture principles. In this guide, we’ll build a Weather App in Kotlin using MVVM, Retrofit for API calls, and Room for local caching. It’s a solid project for interviews or real-world use — especially if you’re still working with older setups and haven’t yet moved to Clean + MVVM Architecture, and Jetpack Compose.
Technical Disclaimer: The code snippets shared here are from an older codebase, so things like the API or the implementation might be different now. If you’re working with the latest tech stack, you’ll probably need to make a few tweaks to the code at different levels.
Weather AppProject Overview
Our Weather App will:
Fetch weather data from OpenWeatherMap API.
Use MVVM (Model-View-ViewModel) architecture for clean code separation.
Implement Retrofit for API communication.
Store data locally using Room Database for offline access.
Display a list of weather forecasts with RecyclerView.
This setup allows us to fetch weather data efficiently.
Note:- An API key is mandatory. Make sure to create a valid API key — if you use an invalid one or skip it entirely, the API will throw an error response like this:
JSON
{"cod": 401,"message": "Invalid API key. Please see https://openweathermap.org/faq#error401 for more info."}
This tutorial covers API integration, MVVM architecture, and local caching. By following these steps, you can build a solid Android app that fetches and stores weather data efficiently.
If you want to take it further, you can experiment with adding new features such as real-time updates, notifications, or even integrating Jetpack Compose for a more modern UI approach. The foundation is now set for you to keep exploring and improving your Android development skills..!