
Kotlin, an impressive and modern programming language, has rapidly gained popularity in the developer community since its release. One of its standout features is the ability to create Domain-Specific Languages (DSLs), which are specialized programming languages tailored to solve specific problems within particular domains. In this blog, we will delve into Kotlin DSLs in detail, exploring what they are, how they work, and why they are so beneficial. By the end, you’ll be equipped with a solid understanding of Kotlin DSLs and how to leverage them effectively in your projects.
At its core, the focus here is on designing expressive and idiomatic APIs using domain-specific languages (DSLs) in Kotlin. We will highlight the differences between traditional APIs and DSL-style APIs, emphasizing the advantages of using DSLs. Kotlin’s DSL design relies on two important language features:
- Lambdas with Receivers: Lambdas with receivers enable you to create a DSL structure by changing the name-resolution rules within code blocks. This allows for a more natural and concise syntax when working with DSLs, making the code more readable and expressive.
- Invoke Convention: The invoke convention is a powerful feature introduced in Kotlin. It enhances the flexibility of combining lambdas and property assignments in DSL code. The invoke convention allows you to call an object as if it were a function, making the code more intuitive and fluent.
Throughout the article, we will explore these language features in detail, explaining how they contribute to creating powerful and user-friendly DSLs. Moreover, we will demonstrate practical use cases of DSL-style APIs in various domains, including:
- Database Access: Simplify database interactions by crafting a DSL for database queries and transactions.
- HTML Generation: Build dynamic HTML content using a DSL to create templates and components.
- Testing: Create DSLs for writing concise and expressive test cases.
- Build Scripts: Design build scripts with a DSL that enhances readability and maintainability.
- Android UI Layouts: Develop DSLs to define Android UI layouts efficiently.
By the end of this article, you will have a strong grasp of Kotlin DSLs and be ready to leverage them in your projects. The combination of lambdas with receivers and the invoke convention will provide you with a powerful toolkit to design DSLs that are both intuitive and efficient. Building expressive and readable APIs in Kotlin will become second nature to you, enabling you to tackle various tasks with ease.
So, let’s start the journey of Kotlin DSLs, a thrilling adventure that will unlock the power of expressive APIs!
From APIs to DSLs
Before we delve into DSLs (Domain-Specific Languages), let’s first understand the problem we aim to solve. Our ultimate goal is to create code that is easy to read and maintain. To achieve this, we must not only focus on individual classes but also consider how these classes interact with one another, which means examining their APIs (Application Programming Interfaces).
The API of a class is like a contract that defines how other classes can communicate and work with it. Creating well-designed APIs is crucial not only for library authors but for every developer. Just like a library provides an interface for its usage, each class within an application offers ways for other classes to interact with it.
Ensuring that these interactions are easy to understand and expressed clearly is vital for maintaining a project over time. By prioritizing good API design, we can contribute to the overall readability and maintainability of our codebase.
Kotlin has various features that help create clean APIs for classes. But what does it mean for an API to be clean? There are two main aspects to it:
- Clarity: A clean API should make it easy for readers to understand what’s happening in the code. This is achieved through well-chosen names and concepts, which is crucial in any programming language.
- Conciseness: The code should look clean and straightforward, avoiding unnecessary syntax and boilerplate. This blog’s primary focus is on achieving this aspect of cleanliness. In fact, a clean API can even appear as if it’s a built-in feature of the language itself.
Kotlin provides several features that empower developers to design clean APIs. Some examples of these features include extension functions, infix calls (which enable a more natural and readable syntax for certain operations), shortcuts in lambda syntax (making lambda expressions more concise), and operator overloading (allowing operators to be used with custom types).
The below table shows how these features help reduce the amount of syntactic noise in the code.
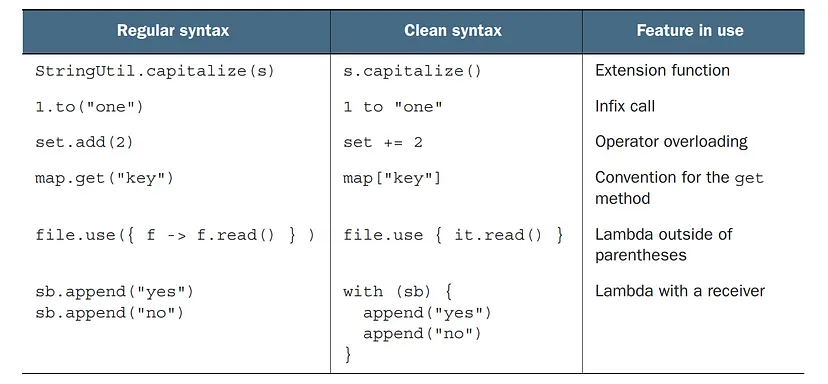
By leveraging these features effectively, developers can create APIs that are not only clear but also elegant and concise.
In this article, we will explore Kotlin’s support for constructing DSLs (Domain-Specific Languages). DSLs in Kotlin take advantage of the clean-syntax features we discussed earlier and go a step further by allowing you to create structured code using multiple method calls. This makes DSLs even more expressive and enjoyable to work with compared to APIs constructed solely with individual method calls.
An essential point to note is that Kotlin DSLs are fully statically typed, which means all the benefits of static typing, like catching errors at compile-time and improved IDE support, still apply when you use DSL patterns for your APIs.
To give you a quick preview of what Kotlin DSLs can achieve, consider these examples:
- To get the previous day, you can write:
val yesterday = 1.days.ago2. For generating an HTML table, you can use a function like this:
fun createSimpleTable() = createHTML().table {
    tr {
        td { +"cell" }
    }
}
Throughout the article, we will explore how these examples are built and understand the concepts behind DSLs. But before we dive into the details, let’s first explore what DSLs actually are in programming.
The concept of domain-specific languages
The concept of Domain-Specific Languages (DSLs) has been around for a long time, dating back almost as far as the idea of programming languages itself. When discussing DSLs, we distinguish between two types of languages:
- General-Purpose Programming Language: This type of language is designed to have a comprehensive set of capabilities, allowing it to solve virtually any problem that can be addressed with a computer. Examples of general-purpose programming languages include Java, Python, and C++.
- Domain-Specific Language: In contrast, a DSL is tailored to focus on a specific task or domain. It deliberately omits functionality that is irrelevant to that particular domain, which makes it more efficient and concise for tasks within its specialized scope.
Two well-known examples of DSLs are SQL (Structured Query Language) and regular expressions. SQL is excellent for working with databases, while regular expressions are designed for manipulating text strings. However, these DSLs are not suitable for building entire applications; they excel at their specific tasks but are limited when it comes to broader programming needs.
The strength of DSLs lies in their ability to effectively accomplish their objectives by reducing the set of available functionality. For instance, when writing SQL statements, you don’t start by declaring classes or functions. Instead, you begin with a keyword that specifies the type of operation you want to perform, and each operation has its own distinct syntax and set of keywords specific to its task.
Similarly, with regular expressions, you directly describe the text pattern you want to match using compact punctuation syntax, making it very concise compared to equivalent code in a general-purpose language.
An essential characteristic of DSLs is that they often follow a declarative approach, in contrast to the imperative nature of most general-purpose programming languages. The distinction lies in how they describe operations:
Imperative Languages
General-purpose languages are usually imperative, where you explicitly define the exact sequence of steps required to perform an operation. It specifies how to achieve a result through a series of commands or instructions.
Declarative Languages
On the other hand, DSLs tend to be declarative. They focus on describing the desired result rather than the step-by-step process to achieve it. The execution details are left to the underlying engine that interprets the DSL. This can lead to more efficient execution because optimizations are implemented once in the execution engine, while an imperative approach requires optimizations for each individual implementation of the operation.
However, there is a trade-off to consider with declarative DSLs. While they offer numerous benefits, they also come with a significant disadvantage: it can be challenging to seamlessly integrate them into a host application written in a general-purpose language. DSLs often have their own specific syntax, which cannot be directly embedded into programs written in another language. To use a program written in a DSL, you usually need to store it in a separate file or embed it as a string literal.
This separation can lead to difficulties in validating the correct interaction of the DSL with the host language at compile time, debugging the DSL program, and providing IDE code assistance when writing it. Additionally, the different syntax can make code harder to read and understand.
To address these challenges while retaining most of the benefits of DSLs, the concept of internal DSLs has gained popularity. Internal DSLs are designed to be embedded within a host language, taking advantage of the host language’s syntax and tools while still providing a domain-specific expressive power. This approach helps overcome the integration and tooling issues associated with traditional external DSLs.
What are external DSLs?
External Domain-Specific Languages (DSLs) are a type of domain-specific language that is distinct from the host programming language in which it is embedded. A domain-specific language is a language designed for a specific problem domain or application context, tailored to address the unique requirements and challenges of that domain.
External DSLs are created to facilitate a more intuitive and expressive way of defining solutions for specific domains. Instead of using the syntax and constructs of a general-purpose programming language, developers create a new language with syntax and semantics that are closely aligned with the problem domain. This allows users (often non-programmers) to express solutions using familiar terminology and concepts, making the code more readable and less error-prone.
Key characteristics of external DSLs include:
- Separation from host language: External DSLs have their own syntax and grammar, independent of the underlying host programming language. This means that the DSL code is not written directly in the host language but in a separate file or structure.
- Domain-specific abstractions: The syntax and semantics of the external DSL are tailored to the specific domain, making it more natural for domain experts to understand and work with the code.
- Readability and simplicity: External DSLs are designed to be easily readable and writable by domain experts, even if they do not have extensive programming knowledge.
- Specific scope and focus: Each external DSL is designed to tackle a particular problem domain, ensuring it remains concise and focused.
- Custom tools and parsers: To work with external DSLs, custom tools and parsers are developed to interpret and transform the DSL code into executable code or other desired outputs.
Examples of External DSLs:
- Regular expressions: Regular expressions are a classic example of an external DSL used for pattern matching in strings. They have a concise and domain-specific syntax for expressing text patterns.
- SQL (Structured Query Language): SQL is a popular external DSL used for querying and managing relational databases. It provides a language-specific syntax for expressing database operations.
- HTML (HyperText Markup Language): While HTML is commonly used within web development, it can be considered an external DSL as it has its own specific syntax and is used to describe the structure and content of web pages.
Creating an external DSL typically involves designing the language’s grammar, specifying the semantics, and building the necessary tools (e.g., parsers, interpreters, code generators) to work with the DSL effectively. External DSLs can be a powerful tool for improving productivity and collaboration between domain experts and programmers, as they allow domain experts to focus on their expertise without being overwhelmed by the complexities of a general-purpose programming language.
Internal DSLs
As opposed to external DSLs, which have their own independent syntax, An internal DSL (Domain-Specific Language) is a type of DSL that is embedded within a general-purpose programming language and utilizes the host language’s syntax and constructs. In other words, it’s not a separate language but rather a specific way of using the main language to achieve the benefits of DSLs with an independent syntax. The code written in an internal DSL looks and feels like regular code in the host language but is structured and designed to address a particular problem domain more intuitively and efficiently.
To compare the two approaches, let’s see how the same task can be accomplished with an external and an internal DSL. Imagine that you have two database tables, Customer and Country, and each Customer entry has a reference to the country the customer lives in. The task is to query the database and find the country where the majority of customers live. The external DSL you’re going to use is SQL; the internal one is provided by the Exposed framework (https://github.com/JetBrains/Exposed), which is a Kotlin framework for database access.
Here’s a comparison of the two approaches:
External DSL (SQL):
SELECT Country.name, COUNT(Customer.id)
FROM Country
JOIN Customer
ON Country.id = Customer.country_id
GROUP BY Country.name
ORDER BY COUNT(Customer.id) DESC
LIMIT 1
Internal DSL (Kotlin with Exposed):
(Country join Customer)
    .slice(Country.name, Count(Customer.id))
    .selectAll()
    .groupBy(Country.name)
    .orderBy(Count(Customer.id), isAsc = false)
    .limit(1)
As you can see, the internal DSL version in Kotlin closely resembles regular Kotlin code, and the operations like slice, selectAll, groupBy, and orderBy are just regular Kotlin methods provided by the Exposed framework. The query is expressed using these methods, making it easier to read and write than the SQL version. Additionally, the results of the query are directly delivered as native Kotlin objects, eliminating the need to manually convert data from SQL query result sets to Kotlin objects.
The internal DSL approach provides the advantages of DSLs, such as improved readability and expressiveness for the specific domain, while leveraging the familiarity and power of the host language. This combination makes the code more maintainable, less error-prone and allows domain experts to work more effectively without the need to learn a completely separate syntax.
Structure of DSLs
Generally speaking, there’s no well-defined boundary between a DSL and a regular API. The distinction between a Domain-Specific Language (DSL) and a regular Application Programming Interface (API) can be somewhat subjective, often relying on an “I know it’s a DSL when I see it” intuition. DSLs often utilize language features commonly used in other contexts, like infix calls and operator overloading. However, DSLs possess a key characteristic that sets them apart: a well-defined structure or grammar.
A typical library consists of many methods, and the client uses the library by calling the methods one by one. There’s no inherent structure in the sequence of calls, and no context is maintained between one call and the next. Such an API is sometimes called a command-query API. In contrast, the method calls in a DSL exist in a larger structure, defined by the grammar of the DSL. In a Kotlin DSL, structure is most commonly created through the nesting of lambdas or through chained method calls. You can clearly see this in the previous SQL example: executing a query requires a combination of method calls describing the different aspects of the required result set, and the combined query is much easier to read than a single method call taking all the arguments you’re passing to the query.
This grammar is what allows us to call an internal DSL a language. In a natural language such as English, sentences are constructed out of words, and the rules of grammar govern how those words can be combined with one another. Similarly, in a DSL, a single operation can be composed out of multiple function calls, and the type checker ensures that the calls are combined in a meaningful way. In effect, the function names usually act as verbs (groupBy, orderBy), and their arguments fulfill the role of nouns (Country.name).
An internal Domain-Specific Language (DSL) offers several advantages, one of which is the ability to reuse context across multiple function calls, avoiding unnecessary repetition.
For instance, consider the Kotlin DSL used to describe dependencies in Gradle build scripts(https://github.com/gradle/gradle-script-kotlin).
dependencies {
    compile("junit:junit:4.11")
    compile("com.google.inject:guice:4.1.0")
}
With the DSL structure, you can list dependencies without repeating the “compile” keyword for each one. This results in cleaner and more concise code.
On the other hand, when using a regular command-query API for the same purpose, you would have to duplicate the “compile” keyword for each dependency. This leads to more verbose and less readable code.
project.dependencies.add("compile", "junit:junit:4.11")
project.dependencies.add("compile", "com.google.inject:guice:4.1.0")
Chained method calls are another way DSLs create structure, as seen in test frameworks. They allow you to split assertions into multiple method calls, making the code more readable.
In the example from kotlintest (https://github.com/ kotlintest/kotlintest), the DSL syntax allows you to express the assertion concisely using the “should” keyword:
str should startWith("kot") // Structure through chained method callswhile the equivalent code using regular JUnit APIs is more cumbersome and harder to comprehend:
assertTrue(str.startsWith("kot"))Now let’s look at an example of an internal DSL in more detail.
Building HTML with an internal DSL
At the beginning of this article, we use a DSL for building HTML pages also. In this section, we will discuss it in more detail. The API used here comes from the kotlinx.html library (https://github.com/Kotlin/kotlinx.html). Here is a small snippet that creates a table with a single cell:
import kotlinx.html.*
import kotlinx.html.stream.createHTML

fun createSimpleTable(): String = createHTML().table {
    tr {
        td { +"cell" }
    }
}
The generated HTML:
<table>
    <tr>
        <td>cell</td>
    </tr>
</table>
BTW, Why would you want to build this HTML with Kotlin code, rather than write it as text? here are the answers:
By building HTML with Kotlin code rather than writing it as plain text, you gain several advantages. Firstly, the Kotlin version is type-safe, ensuring that you use the correct HTML tags in their appropriate contexts. For instance, the td tag can only be used inside a tr tag; otherwise, the code won’t compile, preventing common HTML structure mistakes.
The main advantage of DSLs is that they are regular code, allowing you to leverage the full power of the Kotlin language constructs. This means you can generate HTML elements dynamically based on conditions or data, making your code more flexible and expressive.
To illustrate this, consider the createAnotherTable() function. It generates an HTML table containing data from a map, where each entry in the map corresponds to a table row with two cells. By using a loop and Kotlin constructs, you can easily create the table structure and populate it with the desired data in a concise and readable manner.
here is an example of creating a table with dynamic content from a map:
import kotlinx.html.*
import kotlinx.html.stream.createHTML

fun createAnotherTable(): String = createHTML().table {
    val numbers = mapOf(1 to "one", 2 to "two")
    for ((num, string) in numbers) {
        tr {
            td { +"$num" }
            td { +string }
        }
    }
}
The generated HTML:
<table>
    <tr>
        <td>1</td>
        <td>one</td>
    </tr>
    <tr>
        <td>2</td>
        <td>two</td>
    </tr>
</table>
The example showcased HTML as a canonical markup language, but the same approach can be used for other languages with a similar structure, such as XML. This demonstrates the versatility of DSLs in Kotlin, as you can adapt the concept to various contexts and languages.
To create DSLs in Kotlin, one key feature that aids in establishing the grammar and syntax is “lambdas with receivers.” This feature allows you to define lambdas in a way that they can access the properties and functions of a designated receiver object within their scope. In the HTML DSL example, the table function is the receiver, enabling the nested lambdas for tr and td to access its properties and construct the HTML elements in a natural, hierarchical way.
The use of DSLs in these examples not only results in more readable and expressive code but also provides type safety and error checking. By leveraging the language’s features, like lambdas with receivers, you can create custom syntaxes that make your code more readable, maintainable, and error-resistant. Whether it’s for generating HTML, XML, or other structured languages. DSLs are a powerful tool in the Kotlin developer’s arsenal.
Building structured APIs: lambdas with receivers in DSLs
Lambdas with receivers are a helpful tool in Kotlin that lets you design APIs with a clear structure. We’ve talked about how having structure is important in making Domain-Specific Languages (DSLs) different from normal APIs. Now, let’s take a closer look at this concept and explore some DSL examples that make use of it.
Lambdas with receivers and extension function types
In Kotlin programming, lambdas with receivers and extension function types are powerful concepts. They allow you to manipulate objects within a lambda expression’s scope, and they’re often used in conjunction with standard library functions like buildString, with, apply, and custom extension functions. Now, we’ll see how they work by looking at the buildString function as an example. This function lets you create a string by putting together different parts of content into a temporary StringBuilder.
To start, let’s understand the buildString function. It takes a regular lambda as input:
fun buildString(
    builderAction: (StringBuilder) -> Unit      // Declares a parameter of a function type
): String {
    val sb = StringBuilder()
    builderAction(sb)                // Passes a StringBuilder as an argument to the lambda
    return sb.toString()
}

fun main() {
    val s = buildString {
        it.append("Hello, ")    // Uses “it” to refer to the StringBuilder instance
        it.append("World!")
    }
    println(s) // Output: Hello, World!
}
This function takes a lambda as an argument, allowing you to manipulate a StringBuilder within the lambda’s scope and then return the resulting string.
Let’s first see how the code works for better understanding, so here is a breakdown of the code working:
- The
buildStringfunction is defined, which takes a lambda namedbuilderActionas an argument. The lambda has a single parameter of typeStringBuilderand returnsUnit(void). - Inside the
buildStringfunction, aStringBuildernamedsbis created. - The
builderActionlambda is invoked with thesbStringBuilderas its argument. This lambda is where you can manipulate theStringBuilderto build the desired string content. - Finally, the
StringBuilder‘s contents are converted to a string usingsb.toString()and returned by thebuildStringfunction. - Outside the
buildStringfunction, the code snippet demonstrates how to use it. A lambda is passed tobuildStringusing the trailing lambda syntax. This lambda appends “Hello, ” and “World!” to theStringBuilder. - The resulting string is assigned to the variable
s. - The
printlnstatement outputs the value ofs, which contains “Hello, World!”.
This code is quite understandable, but it seems a bit more complex to use than we’d prefer. Notice that you have to use “it” inside the lambda to refer to the StringBuilder instance. You could use your own parameter name instead of “it,” but it still needs to be explicit.
The main goal of the lambda is to fill the StringBuilder with text. So, it would be better to remove the repeated “it.” prefixes and directly use the StringBuilder methods like “append” instead of “it.append.”
To achieve this, you can transform the lambda into a lambda with a receiver. Essentially, you can give one of the lambda’s parameters a special role as a receiver. This lets you refer to its parts directly without needing any qualifier. The following example demonstrates how you can do this:
fun buildString(
    builderAction: StringBuilder.() -> Unit   // Declares a parameter of a function type with a receiver
): String {
    val sb = StringBuilder()
    sb.builderAction()            // Passes a StringBuilder as a receiver to the lambda
    return sb.toString()
}

fun main() {
    val s = buildString {
        this.append("Hello, ")    // The “this” keyword refers to the StringBuilder instance.
        append("World!")   // Alternatively, you can omit “this” and refer to StringBuilder implicitly
    }
    println(s) // Output: Hello, World!
}
In this version:
- The
builderActionlambda is defined with a receiver type ofStringBuilder. This means that the lambda can directly access and manipulate the functions and properties of theStringBuilderinstance that it is called on. - Inside the
buildStringfunction, aStringBuildernamedsbis created. - The
builderActionlambda is invoked on thesbStringBuilderinstance, which allows you to use theappendfunction directly within the lambda’s scope. - The resulting string is returned by the
buildStringfunction and printed usingprintln.
Both versions of the
buildStringfunction achieve the same goal: creating a string by manipulating aStringBuilderinstance within a lambda’s scope.
Let’s break down those differences:
First, let’s focus on the improvements in how you use buildString. In the first version, you were passing a regular lambda as an argument. This means you needed to use “it” inside the lambda to refer to the StringBuilder instance. However, in the second version, you’re passing a lambda with a receiver. This allows you to get rid of “it” within the lambda’s body. So instead of “it.append()”, you simply use “append()”. The full form could be “this.append()”, but typically, “this” is only used for clarification when needed (Like regular members of a class, you typically use the explicit keyword ‘this’ only to remove ambiguity).
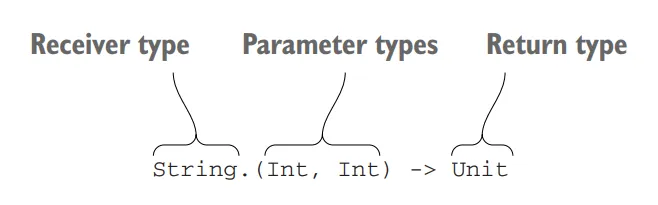
Now, let’s look at the change in how the buildString function is declared. In the first version, you used a regular function type for the parameter type. In the second version, you use an extension function type instead. This involves taking one of the function type’s parameters out of the parentheses and placing it in front, separated by a dot. In this case, you replace (StringBuilder) -> Unit with StringBuilder.() -> Unit. This special type is referred to as the “receiver type.” The value of this type that’s passed to the lambda becomes the “receiver object”.
For a more intricate extension function type declaration, take a look at the below Figure.
Have you ever wondered why to use an extension function type?
Think about accessing parts of another type without needing a clear label. This might remind you of extension functions, which let you add your own methods to classes from different parts of the code. Both extension functions and lambdas with receivers work with a receiver object. You provide this object when you call the function, and it’s available inside the function’s code. In simple terms, an extension function type describes a block of code that can be used like an extension function.
When you change a variable from a regular function type to an extension function type, the way you use it also changes. Instead of passing an object as an argument, you treat the lambda variable like an extension function. With a regular lambda, you pass a StringBuilder instance like this: builderAction(sb). But with a lambda having a receiver, it becomes: sb.builderAction(). Here, builderAction isn’t a method declared in the StringBuilder class. It’s a parameter of a function type, and you call it using the same style as extension functions.
Consider the relationship between an argument and a parameter in the buildString function. This helps you see the idea better. It also shows how the receiver in the lambda body comes into play. You can take a look at the below Figure for a visual representation of this concept. It clarifies how the lambda body is called on the receiver.
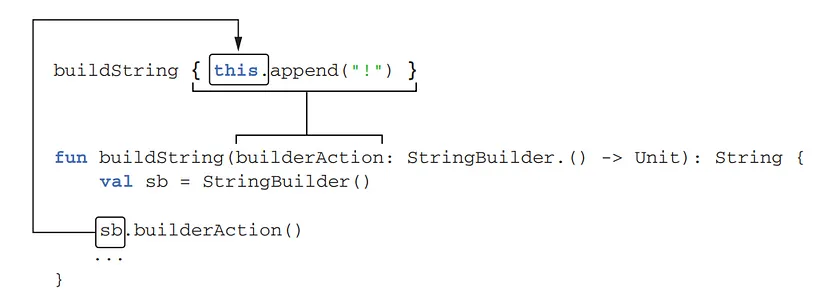
The argument of the buildString function (a lambda with a receiver) corresponds to the parameter of the extension function type (builderAction). The receiver (sb) becomes an implicit receiver (this) when the lambda body is invoked. This means that in the buildString function with a lambda that has a receiver, the argument you provide corresponds to the parameter in the extension function type (builderAction). When you call the lambda’s body, the receiver (sb) becomes an implicit receiver (this).
You can also declare a variable of an extension function type, as shown in the following example. Once you do that, you can either invoke it as an extension function or pass it as an argument to a function that expects a lambda with a receiver.
val appendExcl: StringBuilder.() -> Unit = {     //appendExcl is a value of an extension function type.
    this.append("!")
}

fun main() {
    val stringBuilder = StringBuilder("Hi")
    stringBuilder.appendExcl()             // You can call appendExcl as an extension function.
    println(stringBuilder)

    val result = buildString(appendExcl)   // You can also pass appendExcl as an argument
    println(result)
}
This example code defines a lambda with a receiver, stores it in a variable appendExcl, and demonstrates its usage with a StringBuilder instance as well as the buildString function.
Distinguishing Lambda with Receiver
It’s important to know that a lambda with a receiver and a regular lambda looks the same in the source code. To figure out if a lambda has a receiver, you should examine the function where you’re using the lambda. Check its signature to see if the lambda has a receiver and what type that receiver is. For instance, you can analyze the buildString declaration or look it up in your coding tool (IDE). Seeing that it accepts a lambda of type StringBuilder.() -> Unit, you’ll realize that within the lambda, you can directly use StringBuilder methods without needing a qualifier.
The buildString function shown above is even simpler in the standard library. The implementation of the standard library’s buildString is more concise. Instead of directly calling builderAction, it’s provided as an argument to the apply function. This approach condenses the function into just one line.
fun buildString(builderAction: StringBuilder.() -> Unit): String =
    StringBuilder().apply(builderAction).toString()
The apply and with Functions
The apply function works by using the object it’s called on (like a new StringBuilder) as a hidden receiver to execute the provided function or lambda (like builderAction). It’s defined as an extension function to that receiver.
inline fun <T> T.apply(block: T.() -> Unit): T {
    block()       // Equivalent to this.block(); invokes the lambda with the receiver of “apply” as the receiver object
    return this // Returns the receiver
}
The with function does a similar thing. It takes the receiver as its first argument and applies the function or lambda to it. The key difference is that apply returns the receiver itself, while with returns the result of the lambda.
inline fun <T, R> with(receiver: T, block: T.() -> R): R =
    receiver.block()
Interchangeability of apply and with
If you don’t need the result of the operation, you can use either apply or with interchangeably. For example:
val map = mutableMapOf(1 to "one")
map.apply { this[2] = "two" }
with(map) { this[3] = "three" }
println(map)   // {1=one, 2=two, 3=three}
In Kotlin, both apply and with functions are frequently used due to their concise nature. They can make our code cleaner and more efficient.
Using lambdas with receivers in HTML builders
We’ve discussed lambdas with receivers and extension function types. Now, let’s explore how these concepts are applied in the context of DSLs (Domain Specific Languages).
A Kotlin DSL for HTML is usually called an HTML builder, and it represents a broader concept called type-safe builders. Initially, the idea of builders gained popularity in the Groovy community. Builders offer a method to create an organized structure of objects in a descriptive manner, which is helpful for creating things like XML or arranging UI components.
Kotlin adopts this idea but makes it type-safe. This approach makes these builders more user-friendly, secure, and in a way, more appealing compared to Groovy’s dynamic builders. Now, let’s delve into the specifics of how HTML builders work in Kotlin.
Here we are creating a basic HTML table using a Kotlin HTML builder:
import kotlinx.html.*
import kotlinx.html.stream.createHTML

fun createSimpleTable(): String = createHTML().html {
    body {
        table {
            tr {
                td { +"cell" }
            }
        }
    }
}

fun main() {
    val tableHtml = createSimpleTable()
    println(tableHtml)
}
This is standard Kotlin code; there’s no specialized template language involved. The functions table, tr, and td are regular functions. Each of them is a higher-order function, meaning they take a lambda with a receiver as input.
What’s fascinating is that these lambdas alter the way names are understood. Inside the lambda given to the table function, you can use the tr function to create an HTML <tr> tag. Outside of this lambda, the tr function wouldn’t be recognized. Similarly, the td function is only accessible within the tr function. (The API design enforces adherence to the HTML language structure.)
The naming context within each block is determined by the receiver type of the lambda. The lambda for table has a receiver of a special type TABLE, which defines the tr method. Similarly, the tr function expects an extended lambda for TR.
The following listing is a greatly simplified view of the declarations of these classes and methods. Here we are declaring tag classes for the HTML builder
// Placeholder for the Tag class
open class Tag

// Define the TABLE class
class TABLE : Tag {
    // Define a function to add TR tags to TABLE
    fun tr(init: TR.() -> Unit) {                      // The tr function expects a lambda with a receiver of type TR
        // Implementation of tr function
    }
}

// Define the TR class
class TR : Tag {
    // Define a function to add TD tags to TR
    fun td(init: TD.() -> Unit) {                  // The tr function expects a lambda with a receiver of type TR
        // Implementation of td function
    }
}

// Define the TD class
class TD : Tag {
    // Implementation of TD class
}
In this code, you are creating a basic structure for building an HTML table using Kotlin’s DSL-like capabilities. The Tag class (whose implementation is not shown in the above code snippet) likely serves as a base class or interface for HTML tags. The TABLE class has a function tr that accepts a lambda expression as an argument, allowing you to configure TR elements. Similarly, the TR class has a function td that accepts a lambda expression to configure TD elements.
The classes TABLE, TR, and TD are utility classes that don’t need to be directly mentioned in the code. That’s why they are in uppercase letters. They all inherit from the Tag superclass. Each of these classes defines methods for generating tags that are allowed within them. For instance, TABLE has the tr method, while TR has the td method.
Pay attention to the types of the
initparameters in thetrandtdfunctions: they are extension function typesTR.() -> UnitandTD.() -> Unit. These determine the types of receivers expected in the argument lambdas:TRandTD, respectively.
To make the process clearer, you can rewrite the previous example while being explicit about all the receivers. Just remember, you can access the lambda’s receiver argument in the foo function by using this@foo.
fun createSimpleTable() = createHTML().table {
    (this@table).tr {
        (this@tr).td {
            +"cell"
        }
    }
}
The most important things to understand here are,
table { ... }: This block defines the structure of the HTML table. It’s a lambda expression that’s executed within the context of thetabletag.(this@table).tr { ... }: Inside thetableblock, there’s a call to thetrfunction.(this@table)refers to the currenttabletag instance, and thetrfunction is called within its context.(this@tr).td { ... }: Similarly, within thetrblock, thetdfunction is called with the context of the currenttrtag instance.
Advantages of Lambdas with Receivers
Using regular lambdas instead of lambdas with receivers for builders would result in less readable code. You’d need to use the “it” reference to call tag-creation methods or assign new parameter names for each lambda. Making the receiver implicit and hiding the “this” reference is what makes the builder syntax clean and similar to the original HTML.
Nested Lambdas and Receivers
If you have one lambda with a receiver nested within another one (as seen in the above example), the receiver defined in the outer lambda remains accessible in the inner lambda. For instance, within the lambda argument of the td function, you have access to all three receivers: this@table, this@tr, and this@td. However, starting from Kotlin 1.1, you can use the @DslMarker annotation to control the availability of outer receivers in Lambdas.
Generating HTML to a string
We’ve explained how HTML builder syntax is built upon the concept of lambdas with receivers. Next, we’ll delve into how the desired HTML content is actually generated.
The above example uses functions from the kotlinx.html library. Now, we’ll create a simpler version of an HTML builder library. We’ll extend the declarations of TABLE, TR, and TD tags, and add support for generating the resulting HTML. Our starting point will be a top-level table function, which will generate an HTML fragment with <table> as the top tag.
import kotlinx.html.*
import kotlinx.html.stream.createHTML

fun createTable(): String = createHTML().table {
    tr {
        td {
            // You can add content or other HTML elements here
        }
    }
}

fun main() {
    val tableHtml = createTable()
    println(tableHtml)      // <table><tr><td></td></tr></table>
}
The table function creates a fresh instance of the TABLE tag, initializes it (by calling the function provided as the init parameter on it), and then returns it. Here’s how it’s done:
fun table(init: TABLE.() -> Unit) = TABLE().apply(init)In the createTable example, the lambda given as an argument to the table function contains the call to the tr function. To make everything as clear as possible, you could rewrite the call like this: table(init = { this.tr { ... } }). This will result in the tr function being invoked on the newly created TABLE instance, similar to writing TABLE().tr { ... }.
In this simplified example,
<table>is the top-level tag, and other tags are nested inside it. Each tag keeps a list of references to its children. Because of this, thetrfunction needs to not only create a newTRtag instance but also add it to the list of children of the outer tag.
Defining a tag builder function:
fun tr(init: TR.() -> Unit) {
    val tr = TR()
    tr.init()
    children.add(tr)
}
Let’s break down what’s happening in this code:
fun tr(init: TR.() -> Unit): This defines a function calledtrthat takes a lambda as a parameter. The lambda takes an instance ofTRas its receiver and has a return type ofUnit(i.e., it doesn’t return any value).val tr = TR(): This creates an instance of theTRclass, which represents an HTML table row.tr.init(): This invokes the lambda passed to thetrfunction. The lambda is invoked in the context of thetrinstance, allowing you to configure the properties of thetrelement using the lambda’s receiver (i.e.,this).children.add(tr): This adds the configuredtrinstance as a child to some parent element. Thechildrenproperty likely refers to a list of child elements that the parent element contains.
The logic of initializing a tag and adding it to the children of the outer tag is shared among all tags. So, it’s possible to extract this logic into a doInit member method within the Tag superclass. The doInit function has two responsibilities: storing the reference to the child tag and executing the lambda provided as an argument. Then, different tags can call it. For instance, the tr function generates a new TR class instance and then hands it over to the doInit function, along with the init lambda: doInit(TR(), init).
Here’s the complete code implementation that demonstrates how the desired HTML is generated:
open class Tag(val name: String) {
    private val children = mutableListOf<Tag>()    // Stores all nested tags

    // Function to initialize a child tag and add it to the children list
    protected fun <T : Tag> doInit(child: T, init: T.() -> Unit) {
        child.init() // Call the init lambda on the child tag and Initializes the child tag
        children.add(child) // Add the child tag to the list and Store a reference to the child tag
    }

    // Generate the HTML representation of the tag and its children
    override fun toString() =
        "<$name>${children.joinToString("")}</$name>"   // Returns the resulting HTML as String
}

// Function to create a top-level <table> tag
fun table(init: TABLE.() -> Unit) = TABLE().apply(init)

// Subclass representing the <table> tag
class TABLE : Tag("table") {
    // Function to add a <tr> tag as a child
    fun tr(init: TR.() -> Unit) = doInit(TR(), init)  // Creates, initializes, and adds to the children of TABLE a new instance of the TR tag
}

// Subclass representing the <tr> tag
class TR : Tag("tr") {
    // Function to add a <td> tag as a child
    fun td(init: TD.() -> Unit) = doInit(TD(), init)  // Adds a new instance of the TD tag to the children of TR
}

// Subclass representing the <td> tag
class TD : Tag("td")

// Function to create the HTML table structure
fun createTable() =
    table {
        tr {
            td {
                // No content here
            }
        }
    }

fun main() {
    println(createTable()) // Output the generated HTML
}
The output of println(createTable()) is:
<table><tr><td></td></tr></table>Each tag in this simplified implementation maintains a list of nested tags and renders itself accordingly. When rendered, it displays its name and recursively includes all the nested tags. It’s important to note that this version doesn’t handle text inside tags or tag attributes. For a complete and comprehensive implementation, you can explore the kotlinx.html library as mentioned earlier.
Also, it’s worth mentioning that the tag-creation functions are designed to automatically add the appropriate tag to the list of children of its parent. This allows you to dynamically generate tags, enhancing the flexibility of the HTML builder.
Generating tags dynamically with an HTML builder
fun createAnotherTable() = table {
    for (i in 1..2) {
        tr {
            td {
                // No content here
            }
        }
    }
}

fun main() {
    println(createAnotherTable()) // Output the generated HTML
}
When you run this code and call createAnotherTable(), the output will be:
<table><tr><td></td></tr><tr><td></td></tr></table>As you’ve seen, Lambdas with receivers are highly valuable for constructing DSLs. By altering the name-resolution context within a code block, they enable you to establish a structured API. This capability is a fundamental aspect that sets DSLs apart from mere sequences of method calls.
Kotlin builders: enabling abstraction and reuse
Now, let’s delve into the advantages of integrating such DSLs within statically typed programming languages.
Code Reusability with Internal DSLs
In regular programming, you can avoid repetition and enhance code readability by extracting repetitive chunks into separate functions with meaningful names. However, this might not be straightforward for languages like SQL or HTML. However, by utilizing internal DSLs in Kotlin, you can achieve the same goal of abstracting repeated code into new functions and reusing them effectively.
Example: Adding Drop-Down Lists with Bootstrap
Let’s consider an example from the Bootstrap library, a popular framework for web development. The example involves adding drop-down lists to a web application. When you want to include such a list in an HTML page, you usually copy the required snippet and paste it where needed. This snippet typically includes references and titles for the items in the drop-down menu.
Here’s a simplified version of building a drop-down menu in HTML using Bootstrap:
<div class="dropdown">
    <button class="btn dropdown-toggle">
        Dropdown
        <span class="caret"></span>
    </button>
    <ul class="dropdown-menu">
        <li><a href="#">Action</a></li>
        <li><a href="#">Another action</a></li>
        <li role="separator" class="divider"></li>
        <li class="dropdown-header">Header</li>
        <li><a href="#">Separated link</a></li>
    </ul>
</div>
This HTML code snippet demonstrates the creation of a dropdown menu using Bootstrap classes. It includes a button that triggers the dropdown, a list of menu items, separators, and a dropdown header. This manual approach is the standard way to create such dropdowns in HTML and CSS.
Next, we’ll see how Kotlin’s internal DSL can help streamline the process of generating this kind of HTML code.
Building a drop-down menu using a Kotlin HTML builder
In Kotlin with the kotlinx.html library, you can replicate the same HTML structure using functions like div, button, ul, li, and more. This is the power of Kotlin’s internal DSL approach for creating structured content like HTML. It allows you to build the same structure as the provided HTML code using functions that closely resemble the HTML tags and attributes. This approach can lead to cleaner and more maintainable code.
fun buildDropdown() = createHTML().div(classes = "dropdown") {
    button(classes = "btn dropdown-toggle") {
        +"Dropdown"        // This adds the text "Dropdown" to the button element
        span(classes = "caret")
    }
    ul(classes = "dropdown-menu") {
        li { a("#") { +"Action" } }
        li { a("#") { +"Another action" } }
        li { role = "separator"; classes = setOf("divider") }
        li { classes = setOf("dropdown-header"); +"Header" }
        li { a("#") { +"Separated link" } }
    }
}
Building a drop-down menu with helper functions
You can enhance the readability and reusability of the code by extracting repetitive logic into separate functions. This approach makes the code more concise and easier to maintain. Here’s the improved version of the code:
fun dropdownExample() = createHTML().dropdown {
    dropdownButton { +"Dropdown" }
    dropdownMenu {
        item("#", "Action")
        item("#", "Another action")
        divider()
        dropdownHeader("Header")
        item("#", "Separated link")
    }
}
In this code, you’ve encapsulated the entire dropdown creation logic using functions that closely mimic the HTML structure. This approach enhances readability and reduces repetition, leading to more maintainable and modular code. The code now clearly expresses the intention of creating a dropdown, a dropdown button, dropdown menu items, a divider, and a dropdown header. This example shows how Kotlin’s internal DSL can greatly improve the way structured content is created in a statically typed programming language.
Now, let’s explore the implementation of the item function and how it simplifies the code.
The item function is designed to add a new list item to the dropdown menu. Inside the function, it uses the existing li function (which is an extension to the UL class) to create a list item with an anchor (a) element containing the provided reference and name.
Here’s the code snippet demonstrating the item function’s implementation:
fun UL.item(href: String, name: String) = li { a(href) { +name } }By defining the item function as an extension to the UL class, you can call it within any UL tag, and it will generate a new instance of a LI tag containing the anchor element. This encapsulates the creation of dropdown menu items and simplifies the code.
This approach allows you to transform the original version of the code into a cleaner and more readable version, all while maintaining the generated HTML structure. This showcases the power of Kotlin’s internal DSLs in abstracting away implementation details and creating more expressive APIs.
Using the item function for drop-down menu construction
ul {
    classes = setOf("dropdown-menu")
    item("#", "Action")
    item("#", "Another action")
    li { role = "separator"; classes = setOf("divider") }
    li { classes = setOf("dropdown-header"); +"Header" }
    item("#", "Separated link")
}
In this version, the code looks cleaner and more declarative. The item function abstracts the creation of list items with anchor elements, and the rest of the code clearly represents the structure of the dropdown menu. The use of the li and ul functions provided by the kotlinx.html library allows you to create the desired structure while hiding low-level implementation details.
The extension functions defined on the
ULclass follow a consistent pattern, which allows you to easily replace the remaininglitags with more specialized functions. This pattern involves encapsulating the creation of specific list items using extension functions that leverage the power of Kotlin’s internal DSL.
By providing functions like item, divider, and dropdownHeader as extensions to the UL class, you’re able to abstract away the lower-level HTML tag creation and attributes. This not only enhances the readability of the code but also promotes code reusability and maintainability.
"divider” Function
This function creates a list item with the role attribute set to “separator” and a class of “divider.” It adds the list item using the li function.
fun UL.divider() = li { role = "separator"; classes = setOf("divider") }"dropdownHeader" Function
This function creates a list item with a class of “dropdown-header” and the provided text as its content. It also adds the list item using the li function.
fun UL.dropdownHeader(text: String) =
    li { classes = setOf("dropdown-header"); +text }
Now, let’s explore the implementation of the dropdownMenu function, which creates a ul tag with the specified dropdown-menu class and takes a lambda with a receiver as an argument to fill the tag with content. This approach enables you to build the dropdown menu content using a more concise and structured syntax.
dropdownMenu {
    item("#", "Action")
    // ... other menu items
}
In this code, you’re calling the dropdownMenu function and providing a lambda with a receiver as its argument. Inside this lambda, you’re able to use specialized functions like item, divider, and dropdownHeader to construct the content of the dropdown menu.
Certainly, you’re referring to the concept of using extension lambdas within the dropdownMenu function. This approach allows you to keep the same context and easily call functions that were defined as extensions to the UL class, such as UL.item. Here’s the declaration and usage of the dropdownMenu function:
fun DIV.dropdownMenu(block: UL.() -> Unit) = ul("dropdown-menu", block)In this declaration, the dropdownMenu function takes a lambda with a receiver of type UL.() -> Unit as an argument. This lambda can contain calls to functions like item, divider, and dropdownHeader that were defined as extensions to the UL class. The ul function creates the actual <ul> tag with the “dropdown-menu” class, and the provided lambda fills the content of the dropdown menu.
The dropdownButton function is implemented similarly. While we’re not providing the details here, you can find the complete implementation in the samples available for the kotlinx.html library.
Now, let’s explore the dropdown function. This function is more versatile since it can be used with any HTML tag. It allows you to place drop-down menus anywhere within your code.
The top-level function for building a drop-down menu
fun StringBuilder.dropdown(block: DIV.() -> Unit): String =
    div("dropdown", block)
In this implementation, the dropdown function is defined as an extension function on StringBuilder. It takes a lambda with a receiver of type DIV.() -> Unit as an argument. This lambda is used to construct the content of the dropdown menu within a DIV container.
Inside the function, you’re calling the div function provided by the kotlinx.html library. The first argument is the class name “dropdown”, which applies the necessary styling. The second argument is the lambda with a receiver that you pass into the div function. This lambda allows you to construct the content of the dropdown menu within the context of the DIV tag.
This version is simplified for printing HTML as a string. In the complete implementation in kotlinx.html, an abstract TagConsumer class is used as the receiver, allowing support for various destinations for the resulting HTML output. This example highlights how abstraction and reuse can enhance your code and make it more comprehensible.
More flexible block nesting with the “invoke” convention
The “invoke convention” lets you treat custom objects like functions. Just like you can call functions by using parentheses (like function()), this convention allows you to call your own objects in a similar way.
This might not be something you use all the time, because it can make your code confusing. For example, writing something like 1() doesn’t make much sense. However, there are cases where it’s helpful, especially when creating Domain-Specific Languages (DSLs) which are specialized languages for specific tasks. We’ll explain why this is useful, but before that, let’s talk more about how this convention works.
The “invoke” convention: objects callable as functions
As we know Kotlin’s “conventions” are special functions with specific names. These functions are used in a different way than regular methods. For instance, we know the “get” convention that lets you use the index operator to access objects. If you have a variable called “foo” of a type called “Foo,” writing “foo[bar]” is the same as calling “foo.get(bar).” This works if the “get” function is defined as part of the “Foo” class or as an extra function attached to “Foo.”
Now, the “invoke” convention is similar, but it uses parentheses instead of brackets. When a class has an “invoke” method with the “operator” keyword, you can call an object of that class as if it were a function. Here’s an example to help understand this concept better.
class Greeter(val greeting: String) {
    operator fun invoke(name: String) {       // Defines the “invoke” method on Greeter
        println("$greeting, $name!")
    }
}

fun main() {
    val bavarianGreeter = Greeter("Hello")
    bavarianGreeter("softAai")   // Calls the Greeter instance as a function
}
This code introduces the “invoke” method in the context of the “Greeter” class. This method allows you to treat instances of “Greeter” as if they were functions. Behind the scenes, when you write something like bavarianGreeter("softAai"), it’s actually translated to the method call bavarianGreeter.invoke("softAai"). It’s not complicated; it’s just like a normal rule: it lets you swap a wordy expression with a shorter and clearer one.
The “invoke” method isn’t limited to any specific setup. You can define it with any number of inputs and any output type. You can even make multiple versions of the “invoke” method with different types of inputs. When you use the class instance like a function, you can choose any of those versions for the call. Now, let’s examine when this approach is practically used. First, we’ll look at its usage in regular programming situations and then in a Domain-Specific Language (DSL) scenario.
The “invoke” convention and functional types
We can call a variable that holds a nullable function type by using the syntax “lambda?.invoke()”. This is done with the safe-call technique, combining the “invoke” method name.
Now that you’re familiar with the “invoke” convention, it should make sense that the regular way of calling a lambda (using parentheses like “lambda()”) is essentially an application of this convention. When not inlined, lambdas are turned into classes that implement functional interfaces like “Function1” and others. These interfaces define the “invoke” method with the appropriate number of parameters:
interface Function2<in P1, in P2, out R> {      // This interface denotes a function that takes exactly two arguments
    operator fun invoke(p1: P1, p2: P2): R
}
When you treat a lambda like a function and call it, this action is transformed into a call to the “invoke” method, thanks to the convention we’ve been discussing. Why is this knowledge valuable? It offers a way to break down a complex lambda into multiple methods, while still allowing you to use it along with functions that require parameters of a function type.
To achieve this, you can create a class that implements an interface for a function type. You can define the base interface explicitly, such as “FunctionN,” or you can use a more concise format like “(P1, P2) -> R,” as shown in the following example. In this example, a class is used to filter a list of issues based on a complicated condition:
data class Issue(
    val id: String, val project: String, val type: String,
    val priority: String, val description: String
)

class ImportantIssuesPredicate(val project: String)
    : (Issue) -> Boolean {
    override fun invoke(issue: Issue): Boolean {
        return issue.project == project && issue.isImportant()
    }

    private fun Issue.isImportant(): Boolean {
        return type == "Bug" &&
               (priority == "Major" || priority == "Critical")
    }
}

fun main() {
    val i1 = Issue("IDEA-154446", "IDEA", "Bug", "Major", "Save settings failed")
    val i2 = Issue("KT-12183", "Kotlin", "Feature", "Normal", "Intention: convert several calls on the same receiver to with/apply")

    val predicate = ImportantIssuesPredicate("IDEA")

    for (issue in listOf(i1, i2).filter(predicate)) {
        println(issue.id)
    }
}
Let’s first break down the code step by step:
Data Class Definition (Issue):
data class Issue(
    val id: String, val project: String, val type: String,
    val priority: String, val description: String
)
This defines a data class called Issue. Data classes are used to store and manage data. In this case, each Issue has properties like id, project, type, priority, and description.
Custom Function-Like Class Definition (ImportantIssuesPredicate):
class ImportantIssuesPredicate(val project: String)
    : (Issue) -> Boolean {
    override fun invoke(issue: Issue): Boolean {
        return issue.project == project && issue.isImportant()
    }

    private fun Issue.isImportant(): Boolean {
        return type == "Bug" &&
               (priority == "Major" || priority == "Critical")
    }
}
The ImportantIssuesPredicate class implements the (Issue) -> Boolean function type, which means it can be treated as a function taking an Issue parameter and returning a Boolean.
- The class constructor takes a
projectparameter and initializes it. - The
invokefunction is overridden from the(Issue) -> Booleanfunction type. It checks whether the issue’sprojectmatches the instance’sprojectand whether the issue is important using theisImportantfunction. - The
isImportantfunction checks if an issue’stypeis “Bug” and if thepriorityis “Major” or “Critical”.
Main Function (main):
fun main() {
    val i1 = Issue("IDEA-154446", "IDEA", "Bug", "Major", "Save settings failed")
    val i2 = Issue("KT-12183", "Kotlin", "Feature", "Normal", "Intention: convert several calls on the same receiver to with/apply")

    val predicate = ImportantIssuesPredicate("IDEA")

    for (issue in listOf(i1, i2).filter(predicate)) {
        println(issue.id)
    }
}- In the
mainfunction, two instances ofIssueare created:i1andi2. - An instance of the
ImportantIssuesPredicateclass is created with the project name “IDEA”. - The
filterfunction is used with thepredicateto filter the list of issues (i1andi2) and retrieve those that match the predicate’s condition. - In the loop, the
idof each filtered issue is printed.
When the code is run, it filters the issues and prints the id of the important issues from the “IDEA” project:
IDEA-154446In this case, the logic within the predicate is too intricate to fit into a single lambda. So, we divide it into several methods to ensure each check has a clear purpose. Transforming a lambda into a class that implements a function type interface and then overriding the “invoke” method is a way to perform this kind of improvement. This method offers a key benefit: the methods you extract from the lambda body have the smallest possible scope. They are only visible within the predicate class. This is advantageous when there’s substantial logic both within the predicate class and surrounding code. This separation of concerns helps maintain a clean distinction between different aspects of the code.
The “invoke” convention in DSLs: declaring dependencies in Gradle
Now, let’s explore how the “invoke” convention can enhance the flexibility of creating structures for your Domain-Specific Languages (DSLs).
Let’s see the example of the Gradle DSL for configuring the dependencies of a module. Here’s the code :
dependencies {
    compile("junit:junit:4.11")
}
You might often need to support two different ways of organizing your code using either a nested block structure or a flat call structure within the same API. In simpler terms, you’d like to enable both of the following approaches:
dependencies.compile("junit:junit:4.11")

dependencies {
     compile("junit:junit:4.11")
}
In this design, users of the DSL can employ the nested block structure when configuring multiple items, and the flat call structure to keep the code concise when configuring only one thing.
For the first case, they call the compile method on the dependencies variable. The second notation can be expressed by defining the invoke method on dependencies to accept a lambda as an argument. This call looks like dependencies.invoke({ ... }).
The dependencies object is an instance of the DependencyHandler class, which defines both the compile and invoke methods. The invoke method takes a lambda with a receiver as an argument, and the type of receiver for this method is once again DependencyHandler. Inside the lambda’s body, you’re working with a DependencyHandler as the receiver, allowing you to directly call methods like compile on it. Here’s a simple example illustrating how this part of DependencyHandler might be implemented:
Custom DependencyHandler Class:
class DependencyHandler {
    fun compile(coordinate: String) {
        println("Added dependency on $coordinate")
    }

    operator fun invoke(body: DependencyHandler.() -> Unit) {
        body()
    }
}
In this code, you define a class named DependencyHandler. This class has two main functions:
- The
compilefunction takes acoordinateparameter, which represents a dependency coordinate (e.g., “org.jetbrains.kotlin:kotlin-stdlib:1.0.0”). It prints a message indicating that a dependency has been added. - The
invokefunction takes a lambda with receiver of typeDependencyHandler. This lambda allows you to use a block of code with a different syntax for adding dependencies.
Using the Custom DSL-like Syntax:
val dependencies = DependencyHandler()

dependencies.compile("org.jetbrains.kotlin:kotlin-stdlib:1.0.0")

dependencies {
    compile("org.jetbrains.kotlin:kotlin-reflect:1.0.0")
}- You create an instance of
DependencyHandlernameddependencies. - You use the
compilefunction directly on thedependenciesinstance to add a dependency on"org.jetbrains.kotlin:kotlin-stdlib:1.0.0". - You use the custom syntax made possible by the
invokefunction. Inside the block, you use thecompilefunction as if it were a regular method, passing the dependency coordinate"org.jetbrains.kotlin:kotlin-reflect:1.0.0".
As a result, when you run this code, you’ll see the following output:
Added dependency on org.jetbrains.kotlin:kotlin-stdlib:1.0.0
Added dependency on org.jetbrains.kotlin:kotlin-reflect:1.0.0
When you add the first dependency, you directly call the compile method. The second call, on the other hand, is essentially transformed into the following:
dependencies.invoke({
    this.compile("org.jetbrains.kotlin:kotlin-reflect:1.0.0")
})
In simpler terms, what’s happening is that you’re treating the dependencies as a function and providing a lambda as an input. This lambda’s parameter type is a function type with a “receiver,” where the receiver type is the same as the DependencyHandler type. The invoke method then executes this lambda. Since it’s a method of the DependencyHandler class, an instance of that class is automatically available as a kind of “hidden” receiver, so you don’t have to mention it explicitly when you call body() within the lambda.
By making this small change and redefining the invoke method, you’ve significantly increased the flexibility of the DSL API. This pattern is versatile and can be reused in your own DSLs with minimal adjustments.
Kotlin DSLs in practice
By now, you’ve become acquainted with various Kotlin features that are employed when creating DSLs. Some of these features, like extensions and infix calls, should be familiar to you. Others, such as lambdas with receivers, were thoroughly explained in this article. It’s time to apply all this knowledge and explore a range of practical examples for constructing DSLs. Our examples will cover a variety of topics, including testing, expressing dates more intuitively, querying databases, and building user interfaces for Android applications.
Chaining infix calls: “should” in test frameworks
As we’ve previously mentioned, one of the key characteristics of an internal DSL is its clean syntax, achieved by minimizing punctuation in the code. Most internal DSLs essentially come down to chains of method calls. Any features that help reduce unnecessary symbols in these method calls are highly valuable. In Kotlin, these features include the shorthand syntax for invoking lambdas (which we’ve discussed in detail) and infix function calls. Here we’ll focus on their application within DSLs.
Let’s consider an example that uses the DSL of “kotlintest,” a testing library inspired by Scalatest. You encountered this library earlier in this article.
Expressing an assertion with the kotlintest DSL:
s should startWith("kot")This call will fail with an assertion if the value of the s variable doesn’t start with “kot”. The code reads almost like English: “The s string should start with this constant.” To accomplish this, you declare the should function with the infix modifier.
Implementing the should function
infix fun <T> T.should(matcher: Matcher<T>) = matcher.test(this)The function should requires a Matcher instance, which is a versatile interface used for making assertions about values. The function startWith is a specific implementation of this Matcher interface. It verifies if a given string begins with a particular substring.
Defining a matcher for the kotlintest DSL
interface Matcher<T> {
    fun test(value: T)
}

class StartsWith(val prefix: String) : Matcher<String> {
    override fun test(value: String) {
        if (!value.startsWith(prefix)) {
            throw AssertionError("String '$value' does not start with '$prefix'")
        }
    }
}

fun main() {
    val startsWithHello: Matcher<String> = StartsWith("Hello")

    try {
        startsWithHello.test("Hello, World!") // No exception will be thrown.
        startsWithHello.test("Hi there!")     // Throws an AssertionError.
    } catch (e: AssertionError) {
        println("Assertion error: ${e.message}")
    }
}
In regular code, you usually capitalize class names like “StartWith.” However, in DSLs, naming rules can be different. In above code, using infix calls in the DSL context is easy and makes your code less cluttered. With some clever tricks, you can make it even cleaner. The kotlintest DSL allows for this.
Chaining calls in the kotlintest DSL
"kotlin" should start with "kot"At first glance, this doesn’t look like Kotlin. To understand how it works, let’s convert the infix calls to regular ones.
"kotlin".should(start).with("kot")This demonstrates that there were two infix calls in a row. The term “start” was the argument for the first call. Specifically, “start” represents the declaration of an object. On the other hand, “should” and “with” are functions that are used with infix notation.
The “should” function has a unique version that takes the “start” object as a parameter type. It then returns an intermediate wrapper on which you can utilize the “with” method.
Defining the API to support chained infix calls
object start

infix fun String.should(x: start): StartWrapper = StartWrapper(this)

class StartWrapper(val value: String) {
    infix fun with(prefix: String) {
        if (!value.startsWith(prefix)) {
            throw AssertionError("String does not start with $prefix: $value")
        }
    }
}

fun main() {
    val testString = "Hello, World!"

    testString should start with "Hello"
}
The object being passed (start) is utilized not to transmit data to the function, but rather to play a role in the grammar of the DSL. By providing start as an argument, you can select the appropriate overload of the should function and obtain an instance of StartWrapper as the result. The StartWrapper class includes the with member, which takes the actual value as an argument.
The library supports other matchers as well, and they all read as English:
"kotlin" should end with "in"
"kotlin" should have substring "otl"
To enable this functionality, the should function offers additional overloads that accept object instances like end and have, and they return instances of EndWrapper and HaveWrapper, respectively.
This example might have seemed a bit tricky, but the outcome is so elegant that it’s worth understanding how this approach functions. The combination of infix calls and object instances empowers you to build relatively intricate grammatical structures for your DSLs. Consequently, you can use these DSLs with a clear and concise syntax. Additionally, it’s important to note that the DSL remains fully statically typed. If there’s an incorrect combination of functions and objects, your code won’t even compile.
Defining extensions on primitive types: handling dates
val yesterday = 1.days.ago
val tomorrow = 1.days.fromNow
To implement this DSL using the Java 8 java.time API and Kotlin, you need just a few lines of code. Here’s the relevant part of the implementation.
Defining a date manipulation DSL
val Int.days: Period
    get() = Period.ofDays(this)

val Period.ago: LocalDate
    get() = LocalDate.now() - this

val Period.fromNow: LocalDate
    get() = LocalDate.now() + this

fun main() {
    println(1.days.ago)      // Prints a date 1 day ago.
    println(1.days.fromNow)  // Prints a date 1 day from now.
}
In this code snippet, the days property is an extension property on the Int type. Kotlin allows you to define extension functions on a wide range of types, including primitive types and constants. The days property returns a value of the Period type, which is a type from the JDK 8’s java.time API representing an interval between two dates.
To complete the functionality and accommodate the use of the word “ago,” you’ll need to define another extension property, this time on the Period class. The type of this property is a LocalDate, which represents a specific date. It’s worth noting that the use of the - (minus) operator in the implementation of the ago property doesn’t rely on any Kotlin-specific extensions. The LocalDate class from the JDK includes a method called minus with a single parameter, which matches the Kotlin convention for the - operator. Kotlin maps the operator usage to that method automatically.
Now that you have a grasp of how this straightforward DSL operates, let’s progress to a more intricate challenge: the creation of a DSL for database queries.
If you’re interested in exploring the complete implementation of the library, which supports various time units beyond just days, you can find it in the “kxdate” library on GitHub at this link: https://github.com/yole/kxdate.
Member extension functions: internal DSL for SQL
In DSL design, extension functions play a significant role. In this section, we’ll explore a further technique we’ve mentioned before: declaring extension functions and extension properties within a class. Such functions or properties are both members of their containing class and extensions to other types simultaneously. We refer to these functions and properties as “member extensions.”
Let’s explore a couple of examples of member extensions from the internal DSL for SQL using the Exposed framework that we mentioned earlier. Before we delve into those examples, let’s first understand how Exposed allows you to define the structure of a database.
When working with SQL tables using the Exposed framework, you’re required to declare them as objects that extend the Table class. Here’s an example declaration of a simple Country table with two columns.
Declaring a table in Exposed
object Country : Table() {
    val id = integer("id").autoIncrement().primaryKey()
    val name = varchar("name", 50)
}
The declaration you provided corresponds to a table in a database. To actually create this table, you can use the SchemaUtils.create(Country) method. When you invoke this method, it generates the appropriate SQL statement based on the structure you’ve declared for the table. This SQL statement is then used to create the table in the database.
CREATE TABLE IF NOT EXISTS Country (
    id INT AUTO_INCREMENT NOT NULL,
    name VARCHAR(50) NOT NULL,
    CONSTRAINT pk_Country PRIMARY KEY (id)
);
Just like when generating HTML, you can observe how the declarations in the original Kotlin code become integral components of the generated SQL statement.
When you inspect the types of the properties within the Country object, you’ll notice that they have the type Column with the appropriate type argument: id has the type Column<Int>, and name has the type Column<String>.
In the Exposed framework, the Table class defines various types of columns that you can declare for your table. This includes the column types we’ve just seen:
class Table {
    fun integer(name: String): Column<Int> {
        // Simulates creating an 'integer' column with the given name
        // and returning a Column<Int> instance.
    }

    fun varchar(name: String, length: Int): Column<String> {
        // Simulates creating a 'varchar' column with the given name and length
        // and returning a Column<String> instance.
    }

    // Other methods for defining columns could be here...
}
The integer and varchar methods are used to create new columns specifically meant for storing integers and strings, respectively.
Now, let’s delve into specifying properties for these columns. This is where member extensions come into action:
val id = integer("id").autoIncrement().primaryKey()Methods like autoIncrement and primaryKey are utilized to define the properties of each column. Each of these methods can be invoked on a Column instance and returns the same instance it was called on. This design allows you to chain these methods together. Here are simplified declarations of these functions:
class Table {
    fun <T> Column<T>.primaryKey(): Column<T> {
        // Adds primary key behavior to the column and returns the same column.
    }

    fun Column<Int>.autoIncrement(): Column<Int> {
        // Adds auto-increment behavior to an integer column and returns the same column.
    }

    // Other extension functions for columns could be here...
}
These functions are part of the Table class, which means you can only use them within the scope of this class. This explains why it’s logical to declare methods as member extensions: doing so confines their usability to a specific context. You can’t specify column properties outside the context of a table because the required methods won’t be accessible.
Another excellent aspect of extension functions comes into play here — the ability to limit the receiver type. While any column within a table could potentially be a primary key, only numeric columns can be designated as auto-incremented. This constraint can be expressed in the API by declaring the autoIncrement method as an extension on Column<Int>. If you attempt to mark a column of a different type as auto-incremented, it will not compile.
Furthermore, when you designate a column as a primary key, this information is stored within the containing table. By having this function declared as a member of the Table class, you can directly store this information in the table instance.
Member extensions are still members
Member extensions indeed come with a notable limitation: the lack of extensibility. Since they’re part of the class, you can’t easily define new member extensions on the side.
Consider this example: Let’s say you want to expand Exposed’s capabilities to support a new type of database that introduces additional attributes for columns. Achieving this would require modifying the
Tableclass definition and incorporating the member extension functions for the new attributes directly there. Unlike regular (non-member) extensions, you wouldn’t be able to add these necessary declarations without altering the original class. This is because the extensions wouldn’t have access to theTableinstance where they could store the new definitions.
Overall, while member extensions provide clear advantages by keeping the context constrained and enhancing the syntax, they do come with the trade-off of reduced extensibility.
Let’s look at another member extension function that can be found in a simple SELECT query. Imagine that you’ve declared two tables, Customer and Country, and each Customer entry stores a reference to the country the customer is from. The following code prints the names of all customers living in the USA.
Joining two tables in Exposed
val result = (Country join Customer)
    .select { Country.name eq "USA" }

result.forEach { println(it[Customer.name]) }
The select method can be invoked on a Table or on a join of two tables. It takes a lambda argument that specifies the condition for selecting the desired data.
The eq method is used as an infix function here. It takes the argument "USA". As you might have guessed, it’s another member extension.
In this case, you’re encountering another extension function, this time on Column. Just like before, it’s a member extension, so it can only be used in the appropriate context. For example, when defining the condition for the select method. The simplified declarations of the select and eq methods are as follows:
fun Table.select(where: SqlExpressionBuilder.() -> Op<Boolean>): QueryNow, let’s look at the SqlExpressionBuilder object:
object SqlExpressionBuilder {
    infix fun <T> Column<T>.eq(t: T): Op<Boolean>
}
The SqlExpressionBuilder object offers various ways to express conditions in the Exposed framework. These include comparing values, checking for null values, performing arithmetic operations, and more. While you won’t explicitly refer to it in your code, you’ll frequently invoke its methods with it as an implicit receiver.
In the select function, a lambda with a receiver is used as an argument. Inside this lambda, the SqlExpressionBuilder object serves as an implicit receiver. This means you can utilize all the extension functions defined within this object, such as eq.
You’ve encountered two kinds of extensions on columns: those meant to declare a Table, and those intended for comparing values within conditions. If it weren’t for member extensions, you’d need to declare all of these functions as either extensions or members of Column. This would allow you to use them in any context. However, the approach of using member extensions enables you to exercise control over their scope and application.
Note: Delegated properties are a powerful concept that often plays a significant role in DSLs. I already discussed Kotlin Delegation & Delegated Properties in detail. The Exposed framework provides a great illustration of how delegated properties can be applied effectively within DSL design.
While we won’t reiterate the discussion on delegated properties here, it’s worth remembering this feature if you’re enthusiastic about crafting your own DSL or enhancing your API to make it more concise and readable. Delegated properties offer a convenient and flexible mechanism to simplify code and improve the user experience when working with DSLs or other specialized APIs.
Anko: creating Android UIs dynamically
Let’s explore how the Anko library can simplify the process of building user interfaces for Android applications by utilizing a DSL-like structure.
To illustrate, let’s take a look at how Anko can wrap Android APIs in a more DSL-like manner. The following example showcases the definition of an alert dialog using Anko, which displays a somewhat annoying message along with two options (to continue or to halt the operation).
Using Anko to show an Android alert dialog
fun Activity.showAreYouSureAlert(process: () -> Unit) {
    alert(title = "Are you sure?", message = "Are you really sure?") {
        positiveButton("Yes") { process() }
        negativeButton("No") { cancel() }
    }
}
Let’s identify the three lambdas in the above code snippet:
- The first lambda is the third argument of the
alertfunction. It is used to build the content of the alert dialog. - The second lambda is passed as an argument to the
positiveButtonfunction. It defines the action to be taken when the positive button is clicked. - The third lambda is passed as an argument to the
negativeButtonfunction. It specifies the action to be executed when the negative button is clicked.
The receiver type of the first (outer) lambda is AlertDialogBuilder. This means that you can access members of the AlertDialogBuilder class within this lambda to add elements to the alert dialog. In the code, you don’t explicitly mention the name of the AlertDialogBuilder class; instead, you interact with its members directly.
Declarations of the alert API
import android.content.Context
import android.content.DialogInterface

class AlertDialogBuilder {
    fun positiveButton(text: String, callback: DialogInterface.() -> Unit) {
        // Simulate positive button configuration
        println("Configured positive button: $text")
    }

    fun negativeButton(text: String, callback: DialogInterface.() -> Unit) {
        // Simulate negative button configuration
        println("Configured negative button: $text")
    }
}

fun Context.alert(
    message: String,
    title: String,
    init: AlertDialogBuilder.() -> Unit
) {
    val builder = AlertDialogBuilder()
    builder.init()

    // Simulate displaying the alert with configured options
    println("Alert title: $title")
    println("Alert message: $message")
}

fun main() {
    val context: Context = /* Obtain a context from your Android application */

    context.alert("Are you sure?", "Confirmation") {
        positiveButton("Yes") {
            // Simulate positive button action
            println("User clicked 'Yes'")
        }

        negativeButton("No") {
            // Simulate negative button action
            println("User clicked 'No'")
        }
    }
}
You add two buttons to the alert dialog. If the user clicks the Yes button, the process action will be called. If the user isn’t sure, the operation will be canceled. The cancel method is a member of the DialogInterface interface, so it’s called on an implicit receiver of this lambda.
import android.content.Context
import android.content.DialogInterface

class AlertDialogBuilder {
    fun positiveButton(text: String, callback: DialogInterface.() -> Unit) {
        // Simulate positive button configuration
        println("Configured positive button: $text")
    }

    fun negativeButton(text: String, callback: DialogInterface.() -> Unit) {
        // Simulate negative button configuration
        println("Configured negative button: $text")
    }
}

fun Context.alert(
    message: String,
    title: String,
    process: () -> Unit
) {
    val builder = AlertDialogBuilder()
    builder.positiveButton("Yes") {
        process()
    }
    builder.negativeButton("No") {
        cancel()
    }

    // Simulate displaying the alert with configured options
    println("Alert title: $title")
    println("Alert message: $message")
}

fun main() {
    val context: Context = /* Obtain a context from your Android application */

    context.alert("Are you sure?", "Confirmation") {
        // Simulate positive button action
        println("User clicked 'Yes' and the process action is executed.")
    }
}
Now let’s look at a more complex example where the Anko DSL acts as a complete replacement for a layout definition in XML. The next listing declares a simple form with two editable fields: one for entering an email address and another for putting in a password. At the end, you add a button with a click handler.
Using Anko to define a simple activity
verticalLayout {
    val email = editText {
        hint = "Email"
    }
    val password = editText {
        hint = "Password"
        transformationMethod = PasswordTransformationMethod.getInstance()
    }
    button("Log In") {
        onClick {
            logIn(email.text, password.text)
        }
    }
}
In this code:
verticalLayout { ... }: This defines a vertical layout. All the UI components within the curly braces will be arranged vertically.val email = editText { ... }: This creates anEditTextfor entering an email. Thehintattribute sets the placeholder text to “Email”. Theemailvariable will hold a reference to thisEditText.val password = editText { ... }: This creates anEditTextfor entering a password. Thehintattribute sets the placeholder text to “Password”. ThetransformationMethodis set to hide the password characters. Thepasswordvariable will hold a reference to thisEditText.button("Log In") { ... }: This creates a “Log In” button. TheonClickblock specifies what should happen when the button is clicked. In this case, thelogInfunction (assumed to be defined elsewhere) is called with the email and password text from theEditTextfields.
The Anko library simplifies Android UI creation by providing a DSL that closely resembles the structure of UI components. It enhances readability and reduces the amount of boilerplate code needed for UI creation. Please note that you need to include the Anko library in your project to use these DSL functions.
Lambdas with receivers are a powerful tool in creating concise and structured UI elements. By declaring these elements in code instead of XML files, you can extract and reuse repetitive logic. This approach empowers you to distinctly separate the UI design and the underlying business logic into separate components, all within the realm of Kotlin code. This alignment results in more maintainable and versatile codebases for your Android applications.
Conclusion
In conclusion, Kotlin DSLs are a powerful tool that enables developers to build expressive, concise, and type-safe code for specific problem domains. By leveraging Kotlin’s features such as extension functions, lambda expressions, and infix notation, you can design a DSL that reads like a natural language, improving code readability and maintainability. Whether you’re developing Android apps, configuring build scripts, or building web applications, mastering Kotlin DSLs will undoubtedly boost your productivity and make your code more elegant and efficient. So, go ahead and explore the world of Kotlin DSLs to take your programming skills to new heights!