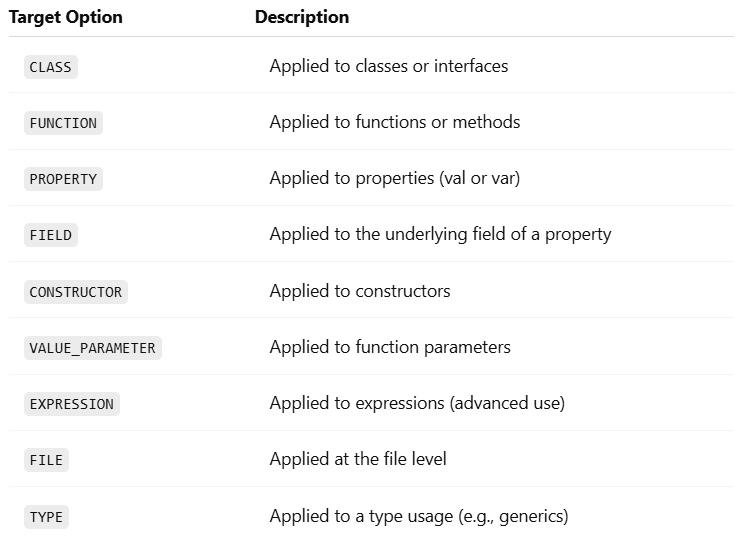
In Kotlin, annotations can target multiple elements of a declaration — such as a field, getter, or constructor parameter. When you apply an annotation without explicitly specifying a use-site target (e.g., @MyAnnotation instead of @field:MyAnnotation), Kotlin tries to infer the most appropriate placement. This default behavior often works well — but in some cases, especially when interoperating with Java...
Annotations are a powerful feature in Kotlin that let you add metadata to your code. Whether you’re working with frameworks like Spring, Dagger, or Jetpack Compose, or building your own tools, knowing how to apply annotations in Kotlincan drastically improve your code’s readability, structure, and behavior.
In this guide, we’ll walk through everything step by step, using real examples to show how annotations work in Kotlin. You’ll see how to use them effectively, with clean code and clear explanations along the way..
What Are Annotations in Kotlin?
Annotations are like sticky notes for the compiler. They don’t directly change the logic of your code but tell tools (like compilers, IDEs, and libraries) how to handle certain elements.
If you use @JvmStatic, Kotlin will generate a static method that Java can call without needing to create an object. It helps bridge Kotlin and Java more smoothly.?
This makes printMessage() callable from Java without creating an instance of Utils.
How to Apply Annotations in Kotlin
To apply an annotation in Kotlin, you use the @ symbol followed by the annotation’s name at the beginning of the declaration you want to annotate. You can apply annotations to functions, classes, and other code elements. Let’s see some examples:
Here’s an example using the JUnit framework, where a test method is marked with the @Test annotation:
In Kotlin, annotations can have parameters. Let’s take a look at the @Deprecated annotation as a more interesting example. It has a replaceWith parameter, which allows you to provide a replacement pattern to facilitate a smooth transition to a new version of the API. The following code demonstrates the usage of annotation arguments, including a deprecation message and a replacement pattern:
In this case, when someone uses the remove function in their code, the IDE will not only show a suggestion to use removeAt instead, but it will also offer a quick fix to automatically replace the remove function with removeAt. This makes it easier to update your code and follow the recommended practices.
Annotations in Kotlin can have arguments of specific types, such as primitive types, strings, enums, class references, other annotation classes, and arrays of these types. The syntax for specifying annotation arguments is slightly different from Java:
To specify a class as an annotation argument, use the ::class syntax:
When you want to specify a class as an argument for an annotation, you can use the ::class syntax.
Kotlin
@MyAnnotation(MyClass::class)
In this case, let’s say you have a custom annotation called @MyAnnotation, and you want to pass a class called MyClass as an argument to that annotation. In this case, you can use the ::class syntax like this: @MyAnnotation(MyClass::class).
By using ::class, you are referring to the class itself as an object. It allows you to pass the class reference as an argument to the annotation, indicating which class the annotation is associated with.
To specify another annotation as an argument, don’t use the @ character before the annotation name:
when specifying an annotation as an argument for another annotation, you don’t need to use the “@” symbol before the annotation name.
In the above example, the @Deprecated annotation. It allows you to provide a replacement pattern using the ReplaceWith annotation. In this case, you simply specify the ReplaceWith annotation without the “@” symbol when using it as an argument for @Deprecated .
By omitting the “@” symbol, you indicate that the argument is another annotation.
To specify an array as an argument, use the arrayOf function:
if you want to specify an array as an argument for an annotation, you can use the arrayOf function.
For example, let’s say you have an annotation called @RequestMapping with a parameter called path, and you want to pass an array of strings ["/foo", "/bar"] as the value for that parameter. In this case, you can use the arrayOf function like this:
Kotlin
@RequestMapping(path = arrayOf("/foo", "/bar"))
However, if the annotation class is declared in Java, you don’t need to use the arrayOf function. In Java, the parameter named value in the annotation is automatically converted to a vararg parameter if necessary. This means you can directly provide the values without using the arrayOf function.
To use a property as an annotation argument, you need to mark it with a const modifier:
In Kotlin, annotation arguments need to be known at compile time, which means you cannot refer to arbitrary properties as arguments. However, you can use the const modifier to mark a property as a compile-time constant, allowing you to use it as an annotation argument.
To use a property as an annotation argument, follow these steps:
Declare the property using the const modifier at the top level of a file or inside an object.
Initialize the property with a value of a primitive type or a String.
Here’s an example using JUnit’s @Test annotation that specifies a timeout for a test:
In this example, TEST_TIMEOUT is declared as a const property with a value of 100L. The timeout parameter of the @Test annotation is then set to the value of TEST_TIMEOUT. This allows you to specify the timeout value as a constant that can be reused and easily changed if needed.
Remember that properties marked with const need to be declared at the top level of a file or inside an object, and they must be initialized with values of primitive types or String. Using regular properties without the const modifier will result in a compilation error with the message “Only ‘const val’ can be used in constant expressions.”
Best Practices for Using Annotations
Using annotations the right way keeps your Kotlin code clean and powerful. Here are some tips:
1. Use Target and Retention Wisely
@Target specifies where your annotation can be applied: classes, functions, properties, etc.
@Retention controls how long the annotation is kept: source code only, compiled classes, or runtime.
Use RUNTIME if your annotation will be read by reflection.
2. Keep Annotations Lightweight
Avoid stuffing annotations with too many parameters. Use defaults whenever possible to reduce clutter.
Kotlin
annotationclassAudit(val user: String = "system")
3. Document Custom Annotations
Treat annotations like part of your public API. Always include comments and KDoc.
Kotlin
/** * Indicates that the method execution time should be logged. */@Target(AnnotationTarget.FUNCTION)@Retention(AnnotationRetention.RUNTIME)annotationclassLogExecutionTime
Example: Logging Execution Time
Let’s say you want to log how long your functions take to execute. You can create a custom annotation and use reflection to handle it.
Here, @Module, @Provides, and @InstallIn drive the dependency injection system. Once you learn how to apply annotations in Kotlin, libraries like Dagger become far less intimidating.
Conclusion
Annotations in Kotlin are more than decoration — they’re metadata with a purpose. Whether you’re customizing behavior, interfacing with Java, or using advanced frameworks, knowing how to apply annotations in Kotlin gives you a real edge.
Quick Recap:
Use annotations to add metadata.
Apply built-in annotations to boost interoperability and performance.
Create your own annotations for clean, reusable logic.
Follow best practices: target, retention, defaults, and documentation.
With the right approach, annotations make your Kotlin code smarter, cleaner, and easier to scale.
Kotlin is known for being expressive, concise, and fully interoperable with Java. But when working with annotations in Kotlin, especially when defining your own, you might encounter something called @Target. If you’re wondering what @Target in Kotlin is, why it matters, and how to use it effectively—this guide is for you.
Let’s break it down, step-by-step.
What Is @Target in Kotlin?
In Kotlin, @Target is a meta-annotation. That means it’s an annotation used to annotate other annotations. It specifies where your custom annotation can be applied in the code.
For example, can your annotation be used on a class? A function? A property? That’s what @Target defines.
Kotlin uses the AnnotationTarget enum to list all possible valid locations.
This lets you use @AuditLog on multiple types of declarations.
Example: Creating a Custom Annotation
Let’s say you’re building a system where you want to mark certain functions as “experimental”.
Step 1: Define the Annotation
Kotlin
@Target(AnnotationTarget.FUNCTION)@Retention(AnnotationRetention.RUNTIME)annotationclassExperimentalFeature(val message: String = "This is experimental")
@Target(AnnotationTarget.FUNCTION): Only allows this annotation on functions.
@Retention(RUNTIME): Keeps the annotation at runtime (optional but useful).
Step 2: Use the Annotation
Kotlin
@ExperimentalFeature("Might be unstable in production")funnewAlgorithm() {println("Running experimental algorithm...")}
Step 3: Read the Annotation at Runtime (Optional)
Kotlin
funcheckExperimentalAnnotations() {val method = ::newAlgorithmvalannotation = method.annotations.find { it is ExperimentalFeature } as? ExperimentalFeatureif (annotation != null) {println("Warning: ${annotation.message}") }}
This prints:
Kotlin
Warning: Mightbeunstableinproduction
Tips for Using @Target in Kotlin
Be specific: The more targeted your annotation, the less chance of misuse.
Use multiple targets wisely: Don’t overgeneralize.
Pair with @Retention: Decide whether your annotation should be available at runtime, compile time, or source level.
Think Java Interop: If you’re interoperating with Java, know that @Target in Kotlin maps to @Target in Java too.
Conclusion
@Target in Kotlin is more than just a syntactic detail. It controls how annotations behave, where they’re valid, and how your tools (including the compiler and IDE) handle them.
If you’re building libraries, frameworks, or just want clean annotation usage, understanding @Target in Kotlin is essential. With the right @Target settings, your custom annotations stay safe, purposeful, and powerful.
New to Kotlin and wondering what the @ symbol means? That symbol introduces Kotlin annotations — a simple yet powerful feature that adds useful metadata to your code, making it smarter, cleaner, and easier to manage.
This quick guide will show you what Kotlin annotations are, why they matter, and how to use them effectively. No complex jargon, just the essentials — all in under 10 minutes.
What Are Kotlin Annotations?
Annotations in Kotlin are a way to attach metadata to code elements such as classes, functions, properties, and parameters. Metadata is like extra information about the code that can be used by the compiler, libraries, or even runtime frameworks.
Think of Kotlin annotations as digital sticky notes. They’re not actual instructions for logic, but they tell tools how to treat your code.
Kotlin
@Deprecated("Use newFunction() instead", ReplaceWith("newFunction()"))funoldFunction() {println("This function is deprecated.")}
Here,
@Deprecated tells both the developer and the compiler that oldFunction() shouldn’t be used.
@Nullable and @NonNull — help with null safety, especially in Java interop.
@Parcelize — works with Kotlin’s Parcelize plugin to simplify Parcelable implementation.
Kotlin
@ParcelizedataclassUser(val name: String, val age: Int) : Parcelable
This eliminates boilerplate, making Android dev smoother.
Best Practices When Using Kotlin Annotations
Be intentional. Don’t slap annotations on everything. Know what they do.
Check retention policies. Source-retained annotations won’t be available at runtime.
Avoid clutter. Annotations should clarify, not complicate.
Test interop. If you’re writing code to be used in Java, test how annotations behave.
Conclusion
Kotlin annotations might seem like just extra syntax, but they play a powerful role in shaping how your code behaves, communicates, and integrates with other systems.
They reduce boilerplate, enforce contracts, and help the compiler help you.
Whether you’re building Android apps, writing libraries, or just learning the ropes, understanding Kotlin annotations will make you a stronger, more fluent Kotlin developer.
Unit testing in Kotlin isn’t just about making sure your code works. It’s about writing tests that prove your code works, stays reliable over time, and catches bugs before they hit production. Google engineers treat testing as a core development skill, not an afterthought. And you can do the same. In this guide, we’ll break...
Gradle has long been the go-to build tool for JVM projects, especially Android. But if you’ve been around for a while, you probably remember the old Groovy-based build.gradle files. They got the job done, but let’s be honest—they were hard to read, easy to mess up, and even harder to debug. Now, Kotlin DSL (Domain-Specific...
Ever heard the phrase “don’t fix what isn’t broken”? In coding, a similar mindset applies: don’t load what you don’t need. This is where Lazy Initialization in Kotlin comes in — a slick way to optimize performance, cut unnecessary processing, and keep your codebase clean.
In this post, we’ll break down what lazy initialization is, how it works in Kotlin, and why it can be a game-changer for your Android apps or any Kotlin-based project.
What Is Lazy Initialization?
Lazy initialization is a technique where you delay the creation of an object or the execution of code until it’s actually needed.
Instead of doing this:
Kotlin
val userProfile = loadUserProfile() // called immediately
You can do this:
Kotlin
val userProfile bylazy { loadUserProfile() } // called only when accessed
That one small change tells Kotlin: “Hey..!, don’t run this until someone actually tries to use userProfile.”
Why Use Lazy Initialization in Kotlin?
Kotlin makes lazy initialization incredibly simple and safe. Here are a few reasons to use it:
Improved performance: Avoid heavy operations at startup.
Memory efficiency: Delay creating large objects until necessary.
Cleaner code: Encapsulate logic without creating unnecessary setup.
Now the ViewModel only gets initialized when you first access viewModel, which can save resources if your fragment has optional UI states or features.
How Lazy Works Under the Hood
When you use by lazy { ... }, Kotlin creates a delegate object that handles initialization. The first time the variable is accessed, the lambda runs and the result is stored. Every future access returns that cached value.
SYNCHRONIZED: Safe for multithreaded access. Overhead of synchronization.
PUBLICATION: May run initializer multiple times on concurrent access, but only one result is stored.
NONE: No thread safety. Fastest, but use only in single-threaded contexts.
Custom Lazy Initialization
Want full control? You can create your own lazy-like delegate:
Kotlin
classCustomLazy<T>(val initializer: () -> T) {// 1. Private backing field to hold the actual valueprivatevar _value: T? = null// 2. Public property to access the value, with a custom gettervalvalue: Tget() {// 3. Check if the value has been initialized yetif (_value == null) {// 4. If not, execute the initializer lambda _value = initializer() }// 5. Return the (now initialized) valuereturn _value!! // !! asserts that _value is not null }}val config = CustomLazy { loadConfig() }.value///////////////////////////////////////////////////////////////////////////////////////////////////// Working Code////////////////////////////////////// 1. Define your CustomLazy classclassCustomLazy<T>(val initializer: () -> T) {privatevar _value: T? = nullvalvalue: Tget() {if (_value == null) {println("--- Calling initializer (loadConfig()) for the first time... ---") _value = initializer()println("--- Initializer finished. ---") } else {println("--- Value already initialized, returning cached value. ---") }return _value!! }}// 2. A sample function that simulates loading configuration// (e.g., from a file, network, or complex calculation)funloadConfig(): String {println(">>> Executing actual loadConfig() function... (This is an expensive operation)")// Simulate some delay or heavy computation Thread.sleep(1000) // Sleep for 1 secondreturn"Application Configuration Data Loaded!"}// 3. Main function to demonstrate the usagefunmain() {println("Application starting...")// This line creates the CustomLazy object, but loadConfig() is NOT called yet.// The lambda { loadConfig() } is merely stored.val lazyConfigInstance = CustomLazy { loadConfig() }println("\nCustomLazy instance created, but config is not loaded yet.")println("You can do other things here before accessing config...\n") Thread.sleep(500) // Simulate some workprintln("Now, let's access the config value for the first time.")// This is where .value is accessed, triggering loadConfig()val config1 = lazyConfigInstance.valueprintln("Config (first access): \"$config1\"")println("\n------------------------------------------------------")println("Accessing config value again (should be instant and not re-run loadConfig())...")// This access will use the cached value; loadConfig() will NOT be called again.val config2 = lazyConfigInstance.valueprintln("Config (second access): \"$config2\"")println("------------------------------------------------------\n")// Another example: If you create a new CustomLazy instance,// loadConfig() will run again when its value is first accessed.println("Creating another CustomLazy instance and accessing it immediately...")val configImmediatelyLoaded = CustomLazy { loadConfig() }.valueprintln("Config (immediately loaded): \"$configImmediatelyLoaded\"")println("\nApplication finished.")}
This is just for learning purposes — Kotlin’s built-in lazy does the job better in most cases.
Pitfalls to Watch Out For
Heavy lambdas: If the initializer does too much, you’re just delaying pain.
Non-idempotent initializers: The initializer should always produce the same result or be side-effect free.
Overuse: Don’t lazy-initialize everything. Use it where it adds real benefit.
Conclusion
Lazy Initialization in Kotlin is a powerful yet simple tool. It shines when you want to keep your app responsive and your code clean. Whether you’re building Android apps, desktop tools, or backend services, Kotlin’s by lazy is an elegant way to write smarter code.
Try it out in your project. Start small. Refactor a few variables. You’ll likely see performance gains with very little effort. And that’s the beauty of Kotlin: it lets you do more with less.
When working with strings in Kotlin — especially dynamic ones that embed variables — developers have long enjoyed the flexibility of string interpolation. But if you’ve ever had to include literal dollar signs in multiline strings, you’ve likely run into messy workarounds that hurt readability and feel clunky. With the release of Kotlin 2.2.0-RC, JetBrains has introduced a powerful...
Kotlin has always been loved for its expressive syntax and focus on developer productivity. With Kotlin 2.2, JetBrains continues that tradition by introducing several enhancements — and one of the most impactful is support for guard conditions in when expressions with a subject (when guards). If you’ve ever wished you could use if-style conditions inside a when...
If you’re diving into Kotlin Multiplatform Mobile (KMM) development in 2025, chances are you’ve already come across tools like Android Studio, Xcode, and Gradle. But there’s one small, powerful tool that can make or break your setup experience: KDoctor. In this blog, we’ll explore what KDoctor is, why it’s a must-have for Kotlin Multiplatform developers,...