Kotlin

Linked List

How to Create a Linked List in Kotlin: Easy Step-by-Step Tutorial

If you’re diving into the world of Kotlin and exploring data structures, you’ve probably come across linked lists. While arrays and lists are common in Kotlin development, understanding linked lists can open up new levels of flexibility in your coding journey. In this guide, we’ll unravel what linked lists are, why you might need them, and most importantly, how to create and use linked lists in Kotlin.

What is a Linked List?

A Linked List is a data structure consisting of a sequence of elements, called nodes. 

Each node has two components:

  • Data: The value we want to store.
  • Next: A reference to the next node in the sequence.

Unlike arrays, Linked Lists are dynamic in size, offering efficient insertions and deletions at any position in the list.

In a linked list, each node stores a value and points to the next node in the chain. The last node in the sequence points to “null,” indicating the end of the list.

Linked lists have several advantages over arrays or ArrayLists in Kotlin:

  • Quick insertions and removals at the front of the list.
  • Consistent performance for operations, especially for inserting or removing elements anywhere in the list.

Types of Linked Lists

  1. Singly Linked List — Each node points to the next node in the sequence (we’ll focus on this one).
  2. Doubly Linked List — Each node has a reference to both the next and the previous node.
  3. Circular Linked List — The last node points back to the first node, forming a loop.

Building a Singly Linked List in Kotlin

Kotlin doesn’t offer a built-in linked list class like Java does. But no worries! We’re going to create our own custom Singly Linked List step-by-step. Let’s create a linked list from scratch! We’ll start by defining the Node class and then build a LinkedList class to manage the nodes.

Defining the Node Class

Each node needs to store data and a reference to the next node. Here’s our Node class:

Kotlin
// We define a node of the linked list as a data class, where it holds a value and a reference to the next node.

data class Node<T>(var value: T, var next: Node<T>? = null) {
    override fun toString(): String {
        return if (next != null) "$value -> ${next.toString()}" else "$value"
    }
}

fun main() {
    val node1 = Node(value = 1)
    val node2 = Node(value = 2)
    val node3 = Node(value = 3)

    node1.next = node2
    node2.next = node3   //here node3 points to null at last, as per our code we only print its value
    println(node1)
}

//OUTPUT

1 -> 2 -> 3

Here, we defined a generic Node class for a linked list in Kotlin. Each Node holds a value of any type (T) and a reference to the next Node, which can be null. The toString() method provides a custom string representation for the node, recursively displaying the value of the node followed by the values of subsequent nodes, separated by ->. If the node is the last in the list, it simply shows its value.

Have you observed how we constructed the list above? We essentially created a chain of nodes by linking their ‘next’ references. However, building lists in this manner becomes impractical as the list grows larger. To address this, we can use a LinkedList, which simplifies managing the nodes and makes the list easier to work with. Let’s explore how we can implement this in Kotlin.

Creating the LinkedList Class

Let’s create our LinkedList class and add core functionalities like adding nodes and displaying the list.

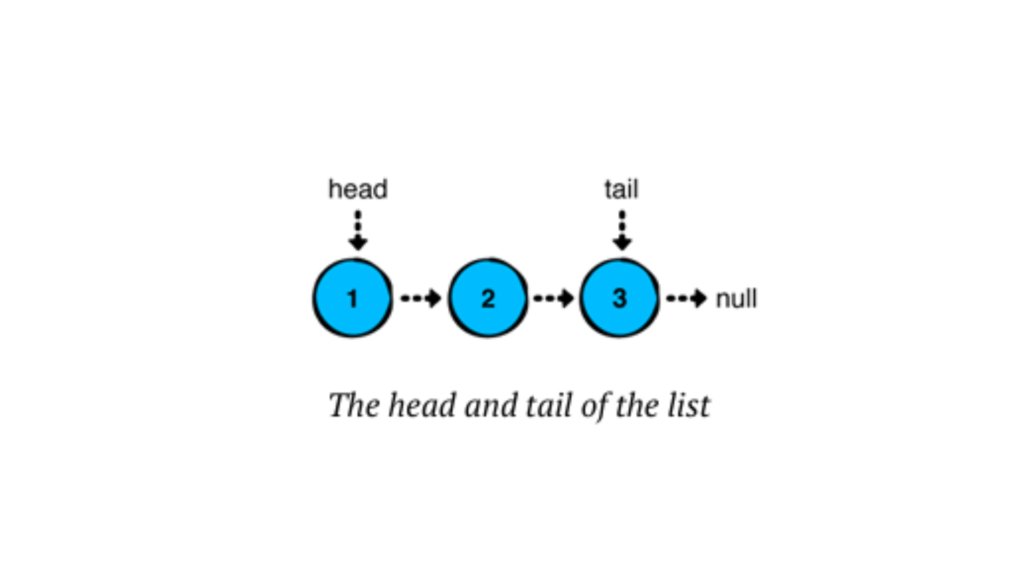
Basically, a linked list has a ‘head’ (the first node) and a ‘tail’ (the last node). In a singly linked list, we usually only deal with the head node, although the tail node can also be relevant, especially when adding elements at the end. The tail node becomes more important in doubly linked lists or circular linked lists, where it supports bidirectional traversal or maintains circular references. However, here, we will use both nodes in a singly linked list.

Kotlin
class LinkedList<T> {
    private var head: Node<T>? = null
    private var tail: Node<T>? = null
    private var size = 0

    // Method to check if the list is empty
    fun isEmpty(): Boolean = size == 0
    
     // to print nodes in linkedlist
    override fun toString(): String {
        if (isEmpty()) {
            return "Empty list"
        } else {
            return head.toString()
        }
    }
}

Here, a linked list has a ‘head’ (the first node) and a ‘tail’ (the last node). We’ll also store the list’s size in a ‘size’ property.

Now, to use this linked list, we need to store or add some values to it. Otherwise, we’d only be using an empty list. There are three major operations for adding values to a linked list, and we’ll explore each one in more details in the next blog. First, let’s see how to add a new value (or node) to the linked list and then print the result.

Kotlin
// Method to add a new node at the beginning
fun addFirst(data: T) {
    val newNode = Node(data)
    newNode.next = head
    head = newNode
    size++
}

Here, we first create a new node with the passed value. Then, the new node’s next points to the head, and finally, we update the head to point to the newly created node. The same process is repeated whenever we add a new value.

Note: Whenever a new value is added, the list size increases. Therefore, we need to increment the size accordingly.

Now, let’s look at the complete code.

Kotlin
class LinkedList<T> {
    private var head: Node<T>? = null
    private var tail: Node<T>? = null
    private var size = 0

    // Method to check if the list is empty
    fun isEmpty(): Boolean = size == 0

    // to print nodes in linkedlist
    override fun toString(): String {
        if (isEmpty()) {
            return "Empty list"
        } else {
            return head.toString()
        }
    }

    // Method to add a new node at the beginning
    fun addFirst(data: T) {
        val newNode = Node(data)
        newNode.next = head
        head = newNode
        size++
    }
}

Using the Linked List in Kotlin

Let’s put our linked list to the test! Here’s how we can use the LinkedList class:

Kotlin
fun main() {
    val myList = LinkedList<String>()

    println("Is the list empty? ${myList.isEmpty()}")

    myList.addFirst("Kotlin")
    myList.addFirst("Hello")
   
    println(myList) // Output: Hello -> Kotlin -> null

    println("Is the list empty? ${myList.isEmpty()}")
}

Output

Kotlin
Is the list empty? true
Hello -> Kotlin
Is the list empty? false

Conclusion

We’ve explored the key insertion operations in linked lists, along with the foundational concepts and structure that make them an essential part of data management. Understanding these operations provides a solid base for working with linked lists in various scenarios. 

Linked lists might seem daunting, but with a bit of practice, you’ll be using them like a pro.

Internal DSLs

Building Internal DSLs in Your Favorite Programming Language

Software isn’t just about solving problems — it’s about making solutions expressive and readable. One powerful way to do this is by building Internal DSLs (Domain-Specific Languages).

If you’ve ever wished your code could read more like English (or your team’s own domain language), then an internal DSL might be the tool you’re looking for.

What Are Internal DSLs?

An Internal DSL is a mini-language built inside a general-purpose programming language.
 Instead of creating a brand-new compiler or parser, you use your existing language’s syntax, features, and runtime to express domain logic in a more natural way.

Think of it as customizing your language for your project’s needs without leaving the language ecosystem.

Internal DSLs vs. External DSLs

It’s easy to confuse between them:

  • External DSLs → standalone languages (e.g., SQL, HTML) with their own parser.
  • Internal DSLs → embedded within another language (e.g., a Ruby RSpec test reads like plain English).

Internal DSLs are faster to implement because you don’t reinvent the wheel — you leverage the host language.

Why Build an Internal DSL?

  • Improved readability — Code speaks the language of the domain.
  • Fewer mistakes — Constraints baked into the syntax reduce errors.
  • Faster onboarding — New developers learn the DSL instead of the whole codebase first.
  • Reusability — The same DSL can be applied across multiple projects.

Internal DSLs

As opposed to external DSLs, which have their own independent syntax, An internal DSL (Domain-Specific Language) is a type of DSL that is embedded within a general-purpose programming language and utilizes the host language’s syntax and constructs. In other words, it’s not a separate language but rather a specific way of using the main language to achieve the benefits of DSLs with an independent syntax. The code written in an internal DSL looks and feels like regular code in the host language but is structured and designed to address a particular problem domain more intuitively and efficiently.

To compare the two approaches, let’s see how the same task can be accomplished with an external and an internal DSL. Imagine that you have two database tables, Customer and Country, and each Customer entry has a reference to the country the customer lives in. The task is to query the database and find the country where the majority of customers live. The external DSL you’re going to use is SQL; the internal one is provided by the Exposed framework (https://github.com/JetBrains/Exposed), which is a Kotlin framework for database access.

Here’s a comparison of the two approaches:

External DSL (SQL):

SQL
SELECT Country.name, COUNT(Customer.id)
FROM Country
JOIN Customer
ON Country.id = Customer.country_id
GROUP BY Country.name
ORDER BY COUNT(Customer.id) DESC
LIMIT 1

Internal DSL (Kotlin with Exposed):

Kotlin
(Country join Customer)
    .slice(Country.name, Count(Customer.id))
    .selectAll()
    .groupBy(Country.name)
    .orderBy(Count(Customer.id), isAsc = false)
    .limit(1)

As you can see, the internal DSL version in Kotlin closely resembles regular Kotlin code, and the operations like slice, selectAll, groupBy, and orderBy are just regular Kotlin methods provided by the Exposed framework. The query is expressed using these methods, making it easier to read and write than the SQL version. Additionally, the results of the query are directly delivered as native Kotlin objects, eliminating the need to manually convert data from SQL query result sets to Kotlin objects.

The internal DSL approach provides the advantages of DSLs, such as improved readability and expressiveness for the specific domain, while leveraging the familiarity and power of the host language. This combination makes the code more maintainable, less error-prone and allows domain experts to work more effectively without the need to learn a completely separate syntax.

A Kotlin HTML Builder DSL

Kotlin’s syntax is well-suited for DSLs:

Kotlin
html {
    head {
        title { +"My Page" }
    }
    body {
        h1 { +"Hello World" }
        p { +"This is my internal DSL example." }
    }
}

Why this works well:

  • Extension functions make the code feel like part of the language.
  • Lambda with receiver allows nesting that mirrors HTML structure.

Common Pitfalls

  • Overcomplication — If your DSL is harder to learn than the original language, it fails its purpose.
  • Poor documentation — DSLs still need guides and examples.
  • Leaky abstractions — Avoid exposing too much of the host language if it breaks immersion.

Picking the Right Language

Some languages are more DSL-friendly due to flexible syntax and operator overloading:

  • Ruby — Very popular for DSLs (e.g., Rails migrations).
  • Scala — Strong type system + functional features.
  • Kotlin — Extension functions + lambda with receiver make DSLs clean.
  • Python — Simple syntax and dynamic typing make it easy to prototype.
  • JavaScript — Template literals and functional style work well.

That said — you can build an internal DSL in almost any language.

Real-World Examples of Internal DSLs

  • RSpec (Ruby) — Readable test cases.
  • Gradle Kotlin DSL — Build scripts that feel native in Kotlin.
  • Jinja Filters in Python — Embedded in templates but powered by Python.

Conclusion

Building Internal DSLs is about making code read like conversation — clear, concise, and tuned to the domain.
 Whether you’re writing tests, building configs, or defining workflows, a well-crafted DSL can cut cognitive load and boost productivity.

Start small, test ideas, and grow your DSL as your team uses it. Before long, you might find that the DSL becomes one of the most beloved parts of your codebase.

Fibonacci in Kotlin

Fibonacci in Kotlin: Recursion, Loops & Dynamic Programming (Complete Guide)

The Fibonacci sequence isn’t just math trivia — it’s a timeless example used in coding interviews, algorithm practice, and real-world software optimization. In this guide, we’ll explore how to implement Fibonacci in Kotlin using: Recursion — Easy to grasp, but not the fastest. Loops — Simple and efficient. Dynamic Programming — Optimized for large numbers. What is the Fibonacci Sequence? The Fibonacci sequence...

Membership Required

You must be a member to access this content.

View Membership Levels

Already a member? Log in here
External DSLs

The Power of External DSLs: Definition, Benefits, and Use Cases

In today’s fast-evolving software landscape, building systems that are both powerful and easy to maintain is crucial. One concept gaining increasing attention in software development is External Domain-Specific Languages, or External DSLs

This blog will explore what External DSLs are, their benefits, and practical use cases.

What are external DSLs?

External Domain-Specific Languages (DSLs) are a type of domain-specific language that is distinct from the host programming language in which it is embedded. A domain-specific language is a language designed for a specific problem domain or application context, tailored to address the unique requirements and challenges of that domain.

External DSLs are created to facilitate a more intuitive and expressive way of defining solutions for specific domains. Instead of using the syntax and constructs of a general-purpose programming language, developers create a new language with syntax and semantics that are closely aligned with the problem domain. This allows users (often non-programmers) to express solutions using familiar terminology and concepts, making the code more readable and less error-prone.

Key characteristics of external DSLs include:

  1. Separation from host language: External DSLs have their own syntax and grammar, independent of the underlying host programming language. This means that the DSL code is not written directly in the host language but in a separate file or structure.
  2. Domain-specific abstractions: The syntax and semantics of the external DSL are tailored to the specific domain, making it more natural for domain experts to understand and work with the code.
  3. Readability and simplicity: External DSLs are designed to be easily readable and writable by domain experts, even if they do not have extensive programming knowledge.
  4. Specific scope and focus: Each external DSL is designed to tackle a particular problem domain, ensuring it remains concise and focused.
  5. Custom tools and parsers: To work with external DSLs, custom tools and parsers are developed to interpret and transform the DSL code into executable code or other desired outputs.

Examples of External DSLs:

  • Regular expressions: Regular expressions are a classic example of an external DSL used for pattern matching in strings. They have a concise and domain-specific syntax for expressing text patterns.
  • SQL (Structured Query Language): SQL is a popular external DSL used for querying and managing relational databases. It provides a language-specific syntax for expressing database operations.
  • HTML (HyperText Markup Language): While HTML is commonly used within web development, it can be considered an external DSL as it has its own specific syntax and is used to describe the structure and content of web pages.

Creating an external DSL typically involves designing the language’s grammar, specifying the semantics, and building the necessary tools (e.g., parsers, interpreters, code generators) to work with the DSL effectively. External DSLs can be a powerful tool for improving productivity and collaboration between domain experts and programmers, as they allow domain experts to focus on their expertise without being overwhelmed by the complexities of a general-purpose programming language.

Conclusion

External DSLs bring a unique power to software development by creating dedicated languages tailored to specific domains. They promote clarity, ease of use, and collaboration across teams. While crafting an External DSL requires upfront effort in designing and implementing the language tools, the long-term gains in productivity, maintainability, and alignment with business goals make them a compelling choice for many projects.

Whenever you encounter complex domain logic that can benefit from clearer expression and better separation from core code, consider the transformative potential of External DSLs.

By embracing External DSLs, you harness the power of specialization, making software more intuitive, agile, and aligned with the real-world domain it serves.

Domain-Specific Language

The Power of Domain-Specific Languages: From Theory to Practical Implementation

If you’ve ever used SQL to query a database, CSS to style a webpage, or Markdown to format text, you’ve already worked with a Domain-Specific Language (DSL).

In this post, we’ll unpack what DSLs are, why they’re so powerful, and how you can create one yourself in Kotlin.

What Are Domain-Specific Languages?

A Domain-Specific Language is a programming or specification language dedicated to a particular problem space (or domain).
 Unlike general-purpose languages (Java, Python, C++), DSLs are narrowly focused, making them simpler to use in their intended area.

Think of it this way:

  • General-purpose languages = Swiss Army knife (does many things, but you have to know how to use each tool).
  • Domain-Specific Languages = Laser cutter (does one thing extremely well).

Why Use a DSL?

The appeal of DSLs comes down to efficiency, clarity, and maintainability.

  • Efficiency — Fewer lines of code, faster to write.
  • Clarity — Code looks like the problem you’re solving.
  • Maintainability — Domain experts can read and even edit DSL scripts without being full-time programmers.

In short, DSLs bring code closer to human language — bridging the gap between developers and domain experts.

Types of DSLs

Before building one, it’s useful to know the main categories:

  1. External DSLs — Have their own syntax and parser (e.g., SQL, HTML).
  2. Internal DSLs — Embedded within a host language, leveraging its syntax and features (e.g., Kotlin DSL for Gradle).

We’ll focus on internal DSLs because they’re easier to implement and integrate into existing projects.

Why Kotlin Is Great for DSLs

Kotlin is a dream for building DSLs because of:

  • Type safety — Catch mistakes at compile-time.
  • Extension functions — Add new functionality without modifying existing code.
  • Lambdas with receivers — Enable a clean, natural syntax.
  • Named parameters and default values — Keep DSL calls readable.

These features let you make DSLs that read like plain English but are still fully backed by type-safe, compiled code.

Building a Simple Kotlin DSL: Example

Let’s say we’re building a DSL for describing a pizza order.

Define the Data Model

Kotlin
data class Pizza(
    var size: String = "Medium",
    val toppings: MutableList<String> = mutableListOf()
)

This Pizza class will hold the order’s details.

Create the DSL Functions

Kotlin
fun pizza(block: Pizza.() -> Unit): Pizza {
    val pizza = Pizza()
    pizza.block()
    return pizza
}

fun Pizza.addTopping(topping: String) {
    toppings.add(topping)
}
  • pizza is the entry point for the DSL.
  • block: Pizza.() -> Unit lets us write code as if we’re inside the Pizza object.
  • addTopping is an extension function so it reads naturally.

Use the DSL

Kotlin
val myOrder = pizza {
    size = "Large"
    addTopping("Cheese")
    addTopping("Pepperoni")
    addTopping("Olives")
}

println(myOrder)

Output:

Kotlin
Pizza(size=Large, toppings=[Cheese, Pepperoni, Olives])

How It Works

  1. The pizza function creates a new Pizza object.
  2. The block lets you configure it inline, without extra boilerplate.
  3. The syntax is declarative — it says what you want, not how to do it.

The result: Code that’s easy to read, easy to change, and safe from common errors.

Real-World Applications of DSLs

  • Build tools — Gradle’s Kotlin DSL for project configuration.
  • Infrastructure — Terraform’s HCL for cloud provisioning.
  • Testing — BDD frameworks like Cucumber for writing test scenarios.
  • UI Design — Jetpack Compose uses a Kotlin DSL to declare UI elements.

Once you notice them, DSLs are everywhere — silently powering productivity.

Best Practices When Creating DSLs

  1. Keep it domain-focused — Avoid turning your DSL into a general-purpose language.
  2. Prioritize readability — Domain experts should understand it at a glance.
  3. Validate inputs — Provide clear error messages when something’s wrong.
  4. Document with examples — DSLs shine when paired with clear, real-world use cases.

Conclusion

Domain-Specific Languages aren’t just a fancy programming concept — they’re practical tools for simplifying complex workflows, improving collaboration, and reducing errors.

With Kotlin, you can design internal DSLs that are safe, concise, and expressive.
 Whether you’re streamlining build scripts, creating testing frameworks, or automating configuration, DSLs can turn tedious tasks into elegant solutions.

Generate All Permutations of a String

How to Generate All Permutations of a String in Kotlin — Fast O(n) Approach (Handles Duplicates + Large Input Tips)

When most developers search for Generate All Permutations of a String, they find solutions that work but are often slow, overly complex, or hard to read.

Today, we’re going to cut through the noise and build a simple, fast, and easy-to-understand Kotlin solution that runs in O(n) time per permutation — which is as efficient as it gets.

We’ll cover:

  • What permutations actually are
  • Why naive solutions are slow
  • The O(n) approach using in-place swapping
  • Clean Kotlin code with full explanation

What Is a String Permutation?

A permutation is simply a different arrangement of the same characters.

For example, the string "ABC" has these permutations:

Kotlin
ABC, ACB, BAC, BCA, CAB, CBA

If a string has n unique characters, there are exactly n! permutations.

e.g 4!=4×3×2×1=24

That means 3 characters → 6 permutations, 4 characters → 24 permutations, and so on.

Why We Need an O(n) Approach

Many beginner solutions to generate all permutations of a string use recursion with string concatenation. That works, but it creates a lot of unnecessary string objects in memory — making it slow for larger strings.

We can do better by:

  • Avoiding extra strings (working on a mutable list of characters instead)
  • Swapping in-place to generate permutations
  • Recursing efficiently without repeated slicing or copying

This gives us O(n) work per permutation instead of heavier O(n²) string-building overhead.

The In-Place Swapping Algorithm

Here’s the idea:

  1. Convert the string into a mutable character array.
  2. Recursively swap the current index with each possible next character.
  3. When we reach the end, print or store the permutation.
  4. Swap back to restore the original state (backtracking).

By doing swaps in-place, we avoid creating new arrays or strings at each step.

Kotlin Implementation

Kotlin
fun generateUniquePermutations(str: String) {
    val chars = str.toCharArray().sortedArray() // Sort to group duplicates
    permuteUnique(chars, 0)
}

private fun permuteUnique(chars: CharArray, index: Int) {
    if (index == chars.size - 1) {
        println(String(chars))
        return
    }

    val seen = mutableSetOf<Char>()

    for (i in index until chars.size) {
        if (chars[i] in seen) continue // Skip duplicate characters
        seen.add(chars[i])
        swap(chars, index, i)          // Place chosen char at 'index'
        permuteUnique(chars, index + 1) // Recurse
        swap(chars, index, i)          // Backtrack
    }
}

private fun swap(chars: CharArray, i: Int, j: Int) {
    val temp = chars[i]
    chars[i] = chars[j]
    chars[j] = temp
}

fun main() {
    generateUniquePermutations("AAB")
}

How This Code Works

Let’s break it down:

generatePermutations

  • Converts the input string to a CharArray so we can modify it directly.
  • Starts recursion from the first index.

permute

  • Base case: If index is at the last character, we’ve found a full permutation, so we print it.
  • Loop: Swap the current index with every possible position (including itself).
  • Recursion: Move to the next index and repeat.
  • Backtrack: Swap back so the next iteration starts with the original order.

swap

  • Simple character swap using a temporary variable.
  • Works in constant time O(1).

Time Complexity

This program generates all permutations of a given string.
 If the string length is n:

  • The number of permutations = n!

For each permutation, the code does:

  • A series of swaps (O(1) each)
  • Recursive calls that together visit all permutations.

The total work is proportional to n × n! because:

  • At each permutation, you spend O(n) to print the result (constructing String(chars) is O(n)).
  • The recursive structure ensures we visit all n! permutations.

So:

T(n)=O(n×n!)

Space Complexity

There are two aspects:

Auxiliary space (call stack):

  • The recursion depth is n (one frame for each index position).
  • Each frame holds constant space aside from parameters and local variables.
  • So the recursion stack = O(n).

Extra storage:

  • You store the characters in a CharArray (size n).
  • No extra big data structures are used.
  • Output printing doesn’t count toward auxiliary space complexity (it’s external).

Thus:

S(n)=O(n)

(excluding the space needed for the output itself).

Why This Is O(n) Per Permutation

Each recursive level only requires:

  • One swap (O(1))
  • One swap back (O(1))
  • A constant amount of work for printing or storing

That’s O(n) for each permutation generated, which is optimal — you can’t generate n! permutations faster than that.

Benefits of This Approach

 Fast — avoids extra string copies
 Memory efficient — works in-place
 Readable — short and clear code
 Scalable — handles larger strings without choking your CPU

Output

Running generatePermutations("ABC") gives:

Kotlin
ABC
ACB
BAC
BCA
CBA
CAB

Exactly all possible permutations — no duplicates, no missing ones.

Handling Duplicate Characters

Without extra care, "AAB" will produce duplicate outputs.

To fix this:

  • Sort the characters first so duplicates are adjacent.
  • At each recursion level, use a Set<Char> to skip duplicates.

Kotlin Implementation (Fast + Duplicate-Safe)

Kotlin
fun generateUniquePermutations(str: String) {
    val chars = str.toCharArray().sortedArray() // Sort to group duplicates
    permuteUnique(chars, 0)
}

private fun permuteUnique(chars: CharArray, index: Int) {
    if (index == chars.size - 1) {
        println(String(chars))
        return
    }

    val seen = mutableSetOf<Char>()

    for (i in index until chars.size) {
        if (chars[i] in seen) continue // Skip duplicate characters
        seen.add(chars[i])
        swap(chars, index, i)          // Place chosen char at 'index'
        permuteUnique(chars, index + 1) // Recurse
        swap(chars, index, i)          // Backtrack
    }
}

private fun swap(chars: CharArray, i: Int, j: Int) {
    val temp = chars[i]
    chars[i] = chars[j]
    chars[j] = temp
}

fun main() {
    generateUniquePermutations("AAB")
}

For "AAB", output is:

Kotlin
AAB
ABA
BAA

— unique, no duplicates.

Wait, what if we used all 26 characters? Hmm… actually, let’s just go with 25. 

There are a few limitations we need to talk about.

Limitations & Large Input Handling

Even with an O(n) per permutation algorithm, the total permutations grow as n! (factorial).


 For "ABCDEFGHIJKLMNOPQRSTUWXYZ" (25 characters):

25!≈1.55×10²⁵ permutations

This number is so huge that:

  • You can’t generate all permutations in your lifetime.
  • You can’t store them — it would require trillions of terabytes.
  • Even printing them will eventually cause OutOfMemoryError in the JVM because the output stream and StringBuilder can’t keep up.

How to Avoid Crashes for Large Strings

  1. Generate Lazily (Streaming)
     Use Kotlin sequences to yield one permutation at a time:
Kotlin
fun permutationsSequence(chars: CharArray, index: Int = 0): Sequence<String> = sequence {
    if (index == chars.size - 1) {
        yield(String(chars))
    } else {
        for (i in index until chars.size) {
            swap(chars, index, i)
            yieldAll(permutationsSequence(chars, index + 1))
            swap(chars, index, i)
        }
    }
}

With this, you process each permutation immediately, instead of storing them.

2. Limit Output
 If you just need the first k permutations:

Kotlin
var count = 0
val maxCount = 1000
for (p in permutationsSequence("ABCDEFGHIJKLMNOP".toCharArray())) {
    println(p)
    if (++count >= maxCount) break
}

3. Use Next-Permutation Algorithm
 Instead of generating all permutations at once, generate only the next one on demand — useful for lexicographic iteration without memory blow-up.

Why This Approach Stands Out

O(n) time per permutation — optimal.
Memory-friendly with in-place swaps.
Duplicate-safe.
Large input advice so you don’t crash your program.

Conslusion

If you need to generate all permutations of a string in Kotlin, the in-place swapping method is your best friend for performance and readability. But remember — factorial growth is unavoidable, so for very large strings, think streaming, limiting, or on-demand generation instead of trying to produce everything at once.

With this, you’ve got a production-ready, safe, and scalable solution for permutations in Kotlin.

Fibonacci in Kotlin Using Dynamic Programming

Fibonacci in Kotlin Using Dynamic Programming: The Ultimate Guide

If you’ve ever dived into programming, chances are you’ve come across the famous Fibonacci sequence. It’s a classic problem that teaches us a lot about algorithms and optimization techniques. In this ultimate guide, we’ll explore Fibonacci in Kotlin Using Dynamic Programming in a friendly and easy-to-understand way. Whether you’re a beginner or an experienced Kotlin...

Membership Required

You must be a member to access this content.

View Membership Levels

Already a member? Log in here
Fibonacci Using Loops in Kotlin

Fibonacci Using Loops in Kotlin: A Simple & Efficient Approach

If you’ve just started learning Kotlin and want to practice loops in a real-world example, generating the Fibonacci series is a perfect choice. It’s simple enough to grasp, yet teaches you how to handle variables, loops, and logic in Kotlin efficiently.

In this guide, we’ll explore Fibonacci Using Loops in Kotlin, break down the code step-by-step, and keep it beginner-friendly — without skipping important details.

What is the Fibonacci Sequence?

The Fibonacci sequence is a series of numbers where each number is the sum of the two before it.

It starts like this:

Kotlin
0, 1, 1, 2, 3, 5, 8, 13, 21, 34...

Mathematically:

Kotlin
F(n) = F(n-1) + F(n-2)

Where:

  • F(0) = 0
  • F(1) = 1

Why Use Loops Instead of Recursion?

While recursion can generate Fibonacci numbers, it’s less efficient for large sequences because:

  • It repeats calculations unnecessarily.
  • It uses more memory due to function calls.

Using loops in Kotlin:
 Saves memory.
 Runs faster.
 Easier to understand for beginners.

That’s why Fibonacci Using Loops in Kotlin is both simple and efficient.

Kotlin Program for Fibonacci Using Loops

Here’s the complete Kotlin code:

Kotlin
fun main() {
    val terms = 10  // Number of Fibonacci numbers to print
    var first = 0
    var second = 1

    println("Fibonacci Series using loops:")

    for (i in 1..terms) {
        print("$first ")
        // Calculate the next number
        val next = first + second
        first = second
        second = next
    }
}

Step-by-Step Code Explanation

Let’s break it down so you truly understand:

1. Declaring Variables

Kotlin
fun main() {
    val terms = 10  // Number of Fibonacci numbers to print
    var first = 0
    var second = 1

    println("Fibonacci Series using loops:")

    for (i in 1..terms) {
        print("$first ")
        // Calculate the next number
        val next = first + second
        first = second
        second = next
    }
}
  • terms → how many numbers you want to print.
  • first and second → the first two Fibonacci numbers.

2. Using a Loop

Kotlin
for (i in 1..terms) {
    print("$first ")
    val next = first + second
    first = second
    second = next
}
  • Loop runs from 1 to terms → controls how many numbers are printed.
  • print("$first ") → displays the current number.
  • val next = first + second → calculates the next Fibonacci number.

We then shift the values:

  • first becomes the old second.
  • second becomes the new next.

Not clear — let’s dry run it for better understanding.

Iteration 1 (i = 1)

  • Print first → prints 0
  • next = first + second = 0 + 1 = 1
  • Update:
     first = second = 1
     second = next = 1

Output: 0

Iteration 2 (i = 2)

  • Print first → prints 1
  • next = 1 + 1 = 2
  • Update:
     first = 1
     second = 2

Output: 0 1

Iteration 3 (i = 3)

  • Print first → prints 1
  • next = 1 + 2 = 3
  • Update:
     first = 2
     second = 3

Output: 0 1 1

Iteration 4 (i = 4)

  • Print first → prints 2
  • next = 2 + 3 = 5
  • Update:
     first = 3
     second = 5

Output: 0 1 1 2

Iteration 5 (i = 5)

  • Print first → prints 3
  • next = 3 + 5 = 8
  • Update:
     first = 5
     second = 8

Output: 0 1 1 2 3

Iteration 6 (i = 6)

  • Print first → prints 5
  • next = 5 + 8 = 13
  • Update:
     first = 8
     second = 13

Output: 0 1 1 2 3 5

Iteration 7 (i = 7)

  • Print first → prints 8
  • next = 8 + 13 = 21
  • Update:
     first = 13
     second = 21

Output: 0 1 1 2 3 5 8

Iteration 8 (i = 8)

  • Print first → prints 13
  • next = 13 + 21 = 34
  • Update:
     first = 21
     second = 34

Output: 0 1 1 2 3 5 8 13

Iteration 9 (i = 9)

  • Print first → prints 21
  • next = 21 + 34 = 55
  • Update:
     first = 34
     second = 55

Output: 0 1 1 2 3 5 8 13 21

Iteration 10 (i = 10)

  • Print first → prints 34
  • next = 34 + 55 = 89
  • Update:
     first = 55
     second = 89

Output: 0 1 1 2 3 5 8 13 21 34

Final Output

If terms = 10, output will be:

Kotlin
Fibonacci Series using loops:
0 1 1 2 3 5 8 13 21 34

Tips to Make It Even Better

  • User Input: Instead of hardcoding terms, ask the user how many numbers they want.
Kotlin
print("Enter the number of terms: ")
   
val n = readLine()!!.toInt()
  • Formatting: Add commas or line breaks for readability.
  • Performance: This loop method already runs in O(n) time, making it efficient even for large terms.

Why This Approach Works Well

The Fibonacci Using Loops in Kotlin approach is ideal for:

  • Beginners learning loops.
  • Anyone needing quick and efficient Fibonacci generation.
  • Avoiding recursion stack overflow for large sequences.

It’s clean, easy to debug, and performs well.

Conclusion

The Fibonacci sequence is a timeless example for learning programming logic. By using loops in Kotlin, you get the perfect balance between simplicity and efficiency. Whether you’re practicing for interviews or just improving your coding skills, this method will serve you well.

Next time you think about Fibonacci, remember — you don’t always need recursion. A good old loop can do the job beautifully.

Kotlin Flow

Kotlin Flow vs LiveData: Why Android Developers Are Moving On (And How to Migrate Smoothly)

If you’ve been building Android apps for a few years, you’ve probably written your fair share of LiveData. For a long time, it was the go-to choice for exposing observable data from a ViewModel to the UI. It solved an important problem: lifecycle awareness.

But the Android world has changed. Kotlin coroutines have become the default for async programming, and along with them, Flow and StateFlow have emerged as powerful, coroutine-native reactive streams. Many developers are now replacing LiveData entirely.

In this article, I’ll explain why the shift is happening, what makes Flow and StateFlow better in modern Android development, and give you a practical, code-focused migration guide that won’t break your existing architecture.

LiveData’s Origin and Limitations

LiveData was introduced back in 2017 as part of Android Architecture Components. At that time:

  • Kotlin coroutines were experimental.
  • Most apps used callbacks or RxJava for reactive streams.
  • We needed something lifecycle-aware to avoid leaks and crashes from background updates.

LiveData solved these problems well for the time, but it has some hard limitations:

  • It’s Android-specific (not usable in Kotlin Multiplatform projects).
  • It has very few transformation operators (map, switchMap).
  • Integration with coroutines feels bolted on via adapters.
  • You can’t use it directly in non-UI layers without bringing in Android dependencies.

Why Flow and StateFlow are Taking Over

Flow is platform-agnostic

Flow comes from the kotlinx.coroutines library — meaning it works in Android, server-side Kotlin, desktop apps, and KMP projects. It’s not tied to the Android lifecycle or framework.

Rich operator support

Flow offers powerful operators like map, filter, combine, debounce, retry, flatMapLatest, and more. These allow you to build complex data pipelines with minimal boilerplate.

Kotlin
repository.getUsersFlow()
    .debounce(300)
    .map { users -> users.filter { it.isActive } }
    .flowOn(Dispatchers.IO)
    .collect { activeUsers ->
        // Update UI
    }

Doing this in LiveData would be awkward at best.

Coroutine-native

Flow integrates directly with coroutines:

  • You can collect it in a coroutine scope.
  • Context switching is built in (flowOn).
  • Structured concurrency ensures proper cleanup.

LiveData requires a bridge (asLiveData or liveData {}) to fit into coroutine-based code.

Lifecycle awareness without coupling

While Flow itself isn’t lifecycle-aware, you can make it so with repeatOnLifecycle or launchWhenStarted:

Kotlin
lifecycleScope.launch {
    repeatOnLifecycle(Lifecycle.State.STARTED) {
        viewModel.dataFlow.collect { data ->
            render(data)
        }
    }
}

This cancels the collection automatically when the UI stops, just like LiveData.

Works for hot and cold streams

  • Cold streams: Only emit when collected (default Flow behavior).
  • Hot streams: Always active, emit latest values (StateFlow, SharedFlow).

LiveData is always “hot” and always keeps the last value.

Why Google is Leaning Toward Flow

Many Jetpack libraries have switched to Flow-first APIs:

  • Room: Can return Flow<T> directly.
  • DataStore: Uses Flow for reading values.
  • Paging 3: Exposes Flow<PagingData<T>> as the default.

The trend is clear — Flow is becoming the reactive backbone of Android development.

StateFlow: The Modern LiveData

For most UI state, the direct replacement for LiveData is StateFlow:

  • Always holds a current value (.value).
  • Hot stream — new collectors get the latest value instantly.
  • Fully coroutine-native.

With a small helper like repeatOnLifecycle, you get the same lifecycle safety as LiveData, but with more control and flexibility.

Migration Guide: LiveData → StateFlow

Basic property migration

Before (LiveData):

Kotlin
private val _name = MutableLiveData<String>()
val name: LiveData<String> = _name

After (StateFlow):

Kotlin
private val _name = MutableStateFlow("")
val name: StateFlow<String> = _name

Observing in the UI

Before:

Kotlin
viewModel.name.observe(viewLifecycleOwner) { name ->
    binding.textView.text = name
}

After:

Kotlin
lifecycleScope.launch {
    repeatOnLifecycle(Lifecycle.State.STARTED) {
        viewModel.name.collect { name ->
            binding.textView.text = name
        }
    }
}

Transformations

map:

Kotlin
val upperName: StateFlow<String> =
    name.map { it.uppercase() }
        .stateIn(viewModelScope, SharingStarted.Eagerly, "")

switchMapflatMapLatest:

Kotlin
val user: StateFlow<User?> =
    userId.flatMapLatest { id ->
        repository.getUserFlow(id)
    }.stateIn(viewModelScope, SharingStarted.Lazily, null)

MediatorLiveData → combine

Kotlin
val combined: StateFlow<Pair<String, Int>> =
    combine(name, age) { n, a -> n to a }
        .stateIn(viewModelScope, SharingStarted.Eagerly, "" to 0)

SingleLiveEvent → SharedFlow

Kotlin
private val _events = MutableSharedFlow<String>()
val events: SharedFlow<String> = _events

fun sendEvent(msg: String) {
    viewModelScope.launch { _events.emit(msg) }
}

UI:

Kotlin
lifecycleScope.launch {
    repeatOnLifecycle(Lifecycle.State.STARTED) {
        viewModel.events.collect { showSnackbar(it) }
    }
}

Best Practices

  • Use StateFlow for UI state, SharedFlow for events.
  • Wrap mutable flows in immutable StateFlow/SharedFlow when exposing from ViewModel.
  • Always collect flows inside repeatOnLifecycle in UI components to avoid leaks.
  • For background layers, use Flow freely without lifecycle bindings.

Conclusion

LiveData isn’t “bad” — it still works fine for many apps. But the Android ecosystem has moved on. With coroutines and Flow, you get a unified, powerful, cross-platform reactive framework that covers more cases with less friction.

If you start new projects today, building with Flow and StateFlow from the ground up will keep your architecture modern and future-proof. And if you’re migrating an existing app, the step-by-step transformations above should make it painless.

Fibonacci Sequence in Kotlin Using Recursion

Fibonacci Sequence in Kotlin Using Recursion — From Theory to Code

If you’ve ever been fascinated by numbers that seem to appear everywhere in nature — from the petals of flowers to the spirals in seashells — then you’ve already met the Fibonacci sequence.

In this blog, we’ll explore Fibonacci Sequence in Kotlin Using Recursion step by step. We’ll start with the theory, then move into writing simple yet powerful Kotlin code. Everything will be easy to follow, and beginner-friendly.

Understanding the Fibonacci Sequence

The Fibonacci sequence is a series of numbers where:

Kotlin
F(n) = F(n-1) + F(n-2)

with:

Kotlin
F(0) = 0
F(1) = 1

So, the sequence begins like this:

Kotlin
0, 1, 1, 2, 3, 5, 8, 13, 21, ...

Each term is the sum of the previous two terms. It’s a simple rule with surprisingly deep applications — mathematics, art, computer science, and even stock market analysis.

Why Use Recursion?

Recursion is when a function calls itself to solve smaller parts of a problem.
 In the case of the Fibonacci sequence, recursion works naturally because the definition of Fibonacci is already recursive in nature:

  • To find F(n), you find F(n-1) and F(n-2) and add them.
  • Each of those smaller problems breaks down further until you hit the base case (F(0) or F(1)).

Think of it like climbing stairs:

  • To reach the nth step, you must have come from either step (n-1) or (n-2).
  • You keep breaking it down until you reach the first or second step.

Writing Fibonacci Sequence in Kotlin Using Recursion

Here’s the code:

Kotlin
fun fibonacci(n: Int): Int {
    // Base cases: when n is 0 or 1
    if (n == 0) return 0
    if (n == 1) return 1

// Recursive call
    return fibonacci(n - 1) + fibonacci(n - 2)
}

fun main() {
    val terms = 10

    println("Fibonacci sequence up to $terms terms:")

    for (i in 0 until terms) {
        print("${fibonacci(i)} ")
    }
}

Code Explanation

1. Base Cases

Kotlin
if (n == 0) return 0
if (n == 1) return 1

These are our stopping points. If n is 0 or 1, we simply return the value without further calculations.

2. Recursive Step

Kotlin
return fibonacci(n - 1) + fibonacci(n - 2)

The function calls itself twice:

  • Once for the previous term (n-1)
  • Once for the term before that (n-2)
     It then adds them together to produce the nth term.

3. Main Function

Kotlin
for (i in 0 until terms) {
    print("${fibonacci(i)} ")
}

We loop through and print the first terms Fibonacci numbers, giving us a clean, readable sequence.

A Note on Performance

While Fibonacci Sequence in Kotlin Using Recursion is elegant and easy to understand, pure recursion can be slow for large n because it recalculates the same values multiple times.

Example:

  • fibonacci(5) calls fibonacci(4) and fibonacci(3).
  • But fibonacci(4) again calls fibonacci(3) — we’re repeating work.

Solution: Use memoization or dynamic programming to store results and avoid recalculations. But for learning recursion, the basic approach is perfect.

Real-World Applications

  • Algorithm practice: Great for learning recursion and problem-solving.
  • Mathematical modeling: Growth patterns in populations or financial data.
  • Computer graphics: Spiral designs and procedural patterns.

Key Takeaways

  • The Fibonacci sequence is naturally suited to recursion because of its self-referential definition.
  • Kotlin makes it clean and readable with its concise syntax.
  • For small inputs, recursion works perfectly, but for larger inputs, optimization is needed.

Conclusion

Recursion is like magic — it hides complexity behind a few lines of code. With the Fibonacci Sequence in Kotlin Using Recursion, you get both an elegant algorithm and a deep understanding of how problems can solve themselves step by step.

error: Content is protected !!