Understanding the Observer Design Pattern in Kotlin: A Comprehensive Guide
The Observer Design Pattern is a behavioral design pattern commonly used to build systems where multiple objects need to stay updated about changes in another object. This pattern promotes loose coupling and efficient communication between components, making it a staple in event-driven programming.
In this blog, we’ll explore how the Observer pattern works, its use cases, and its implementation in Kotlin. We’ll break down the pattern step by step, provide code examples, and explain each part for clarity.
Observer Design Pattern
The Observer design pattern is used to keep parts of a program in sync. It works by having subjects (the components being watched) notify observers (the components watching) whenever something changes. This creates a system where multiple observers can automatically update themselves when the subject’s state changes. It’s like a group chat where everyone gets notified when someone sends a message, keeping everyone updated.
In the Observer pattern, a subject keeps track of a list of observers and notifies them whenever there’s a change in its state. This is the most common use case, where one subject is observed by many observers.
However, there are a few other use cases, which we will now explore briefly, one by one.
Single Subject — Single Observer
In this case, an observer can only observe one subject, and the subject is only watched by one observer. This setup is called a 1:1 association, where a notification about a change in the subject’s state is sent to the corresponding observer.
Single Subject — Multiple Observers
This is the most common use of the Observer pattern, where a single subject is observed by multiple observers of different types. Whenever the subject’s state changes, all the observers are notified. For example, if a central database changes its data, all the applications that depend on this database are notified.
Multiple Subjects — Single Observer
In this case, a single observer watches several subjects at once. For example, a weather station might monitor different subjects like temperature, humidity, wind, etc. This is an m:1 association, where the observer watches multiple subjects.
Multiple Subjects — Multiple Observers
This scenario covers all the previous cases in an m:n association, where multiple observers watch multiple subjects. It happens when several observers want to observe many subjects at once.
In a weather monitoring system, there are multiple subjects such as a temperature sensor, humidity sensor, and rainfall sensor. These sensors provide real-time data about different weather conditions. Several observers are interested in this data: a weather app that displays updates to users, an agriculture system that monitors temperature and humidity to help with farming decisions, and a flood detection system that tracks rainfall to assess the risk of flooding. In this scenario, each observer monitors different subjects or a combination of them, receiving notifications whenever the sensors update their data. This is a typical example of Multiple Subjects — Multiple Observers, where several subjects are being watched by different observers, each interested in specific data for different purposes.
Now that we’ve covered enough of the theory, let’s move on to the structure and implementation of the observer pattern. From here, we’ll focus on the most common and practical use case in programming: Single Subject — Multiple Observers.
Observer Design Pattern Structure
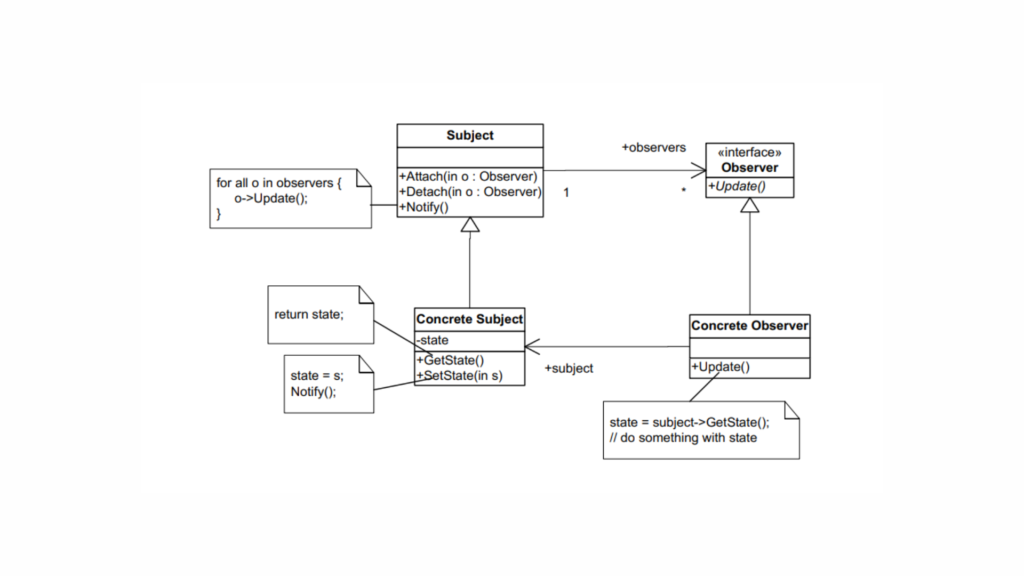
The key components of the Observer pattern are:
- Subject: The object that holds the state and notifies observers of changes.
- Observer: The object that wants to be notified about changes in the subject.
- Concrete Subject: A specific implementation of the subject.
- Concrete Observer: A specific implementation of the observer.
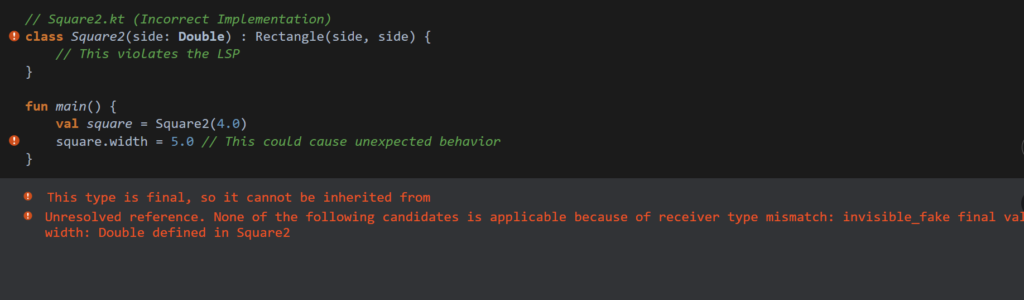
Implementation
// Subject Interface
interface Subject {
    fun attach(observer: Observer)
    fun detach(observer: Observer)
    fun notifyObservers()
}

// Observer Interface
interface Observer {
    fun update()
}

// Concrete Subject
class ConcreteSubject : Subject {
    private val observers = mutableListOf<Observer>()
    var state: String = ""
        set(value) {
            field = value
            notifyObservers()
        }

    // Attach an observer
    override fun attach(observer: Observer) {
        observers.add(observer)
        println("Observer added.")
    }

    // Detach an observer
    override fun detach(observer: Observer) {
        observers.remove(observer)
        println("Observer removed.")
    }

    // Notify all observers of a state change
    override fun notifyObservers() {
        println("Notifying observers...")
        observers.forEach { it.update() }
    }
}

// Concrete Observer
class ConcreteObserver(private val id: String, private val subject: ConcreteSubject) : Observer {
    private var observerState: String = ""

    // Update the observer's state
    override fun update() {
        observerState = subject.state
        println("Observer $id state updated to: $observerState")
    }
}

// Main function to demonstrate
fun main() {
    // Create a concrete subject
    val subject = ConcreteSubject()

    // Create observers
    val observer1 = ConcreteObserver("1", subject)
    val observer2 = ConcreteObserver("2", subject)

    // Attach observers to the subject
    subject.attach(observer1)
    subject.attach(observer2)

    // Change the subject's state and notify observers
    subject.state = "State 1"
    subject.state = "State 2"

    // Detach an observer and change the state
    subject.detach(observer1)
    subject.state = "State 3"
}
Output
Observer added.
Observer added.
Notifying observers...
Observer 1 state updated to: State 1
Observer 2 state updated to: State 1
Notifying observers...
Observer 1 state updated to: State 2
Observer 2 state updated to: State 2
Observer removed.
Notifying observers...
Observer 2 state updated to: State 3
Here,
- Both observers (
observer1andobserver2) are attached to the subject. - When the state changes to “State 1”, both observers receive the update.
- When the state changes to “State 2”, both observers again receive the update.
observer1is detached, so onlyobserver2receives the update when the state changes to “State 3”.
Real-World Example: Weather Station
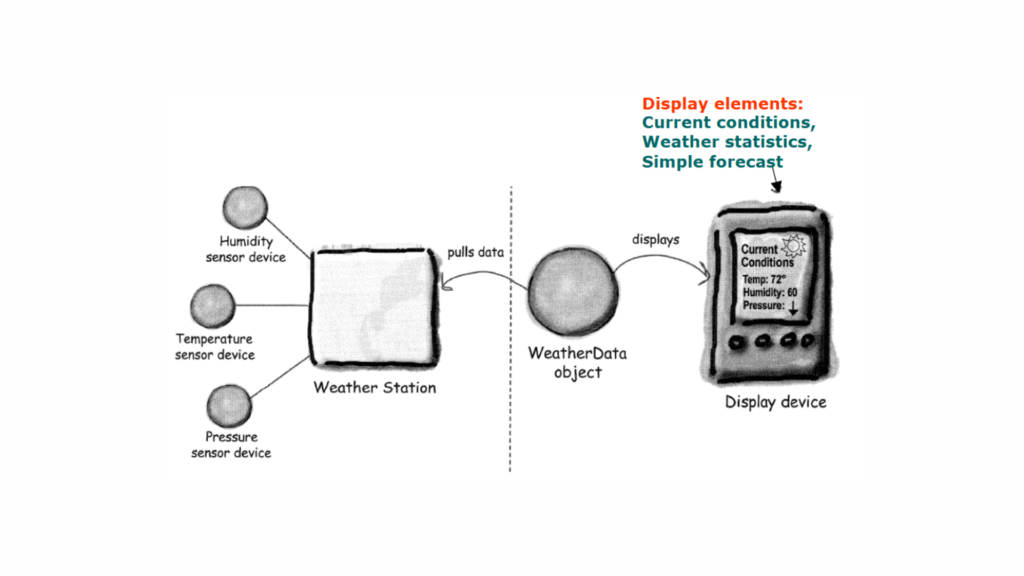
Let’s implement a simple weather station where the WeatherStation acts as the Subject, and different displays (e.g., MobileDisplay, WebDisplay) act as Observers.
Define the Observer Interface
The Observer interface defines the contract for all Observers.
interface Observer {
    fun update(temperature: Float, humidity: Float, pressure: Float)
}
Define the Subject Interface
The Subject interface declares methods for managing Observers.
interface Subject {
    fun addObserver(observer: Observer)
    fun removeObserver(observer: Observer)
    fun notifyObservers()
}
Implement the WeatherStation (ConcreteSubject)
The WeatherStation keeps track of weather data and notifies Observers whenever data changes.
class WeatherStation : Subject {
    private val observers = mutableListOf<Observer>()
    private var temperature: Float = 0.0f
    private var humidity: Float = 0.0f
    private var pressure: Float = 0.0f

    override fun addObserver(observer: Observer) {
        observers.add(observer)
    }

    override fun removeObserver(observer: Observer) {
        observers.remove(observer)
    }

    override fun notifyObservers() {
        for (observer in observers) {
            observer.update(temperature, humidity, pressure)
        }
    }

    fun setMeasurements(temperature: Float, humidity: Float, pressure: Float) {
        this.temperature = temperature
        this.humidity = humidity
        this.pressure = pressure
        notifyObservers()
    }
}
Implement Concrete Observers
Each Observer implements the Observer interface and reacts to changes.
Mobile Display
class MobileDisplay(private val weatherStation: Subject) : Observer {
    init {
        weatherStation.addObserver(this)
    }

    override fun update(temperature: Float, humidity: Float, pressure: Float) {
        println("Mobile Display - Temperature: $temperature, Humidity: $humidity, Pressure: $pressure")
    }
}
Web Display
class WebDisplay(private val weatherStation: Subject) : Observer {
    init {
        weatherStation.addObserver(this)
    }

    override fun update(temperature: Float, humidity: Float, pressure: Float) {
        println("Web Display - Temperature: $temperature, Humidity: $humidity, Pressure: $pressure")
    }
}
Let’s Test the Implementation
fun main() {
    val weatherStation = WeatherStation()

    val mobileDisplay = MobileDisplay(weatherStation)
    val webDisplay = WebDisplay(weatherStation)

    // Simulate weather updates
    weatherStation.setMeasurements(25.0f, 65.0f, 1013.0f)
    weatherStation.setMeasurements(28.0f, 70.0f, 1012.0f)

    // Remove a display
    weatherStation.removeObserver(mobileDisplay)
    weatherStation.setMeasurements(30.0f, 75.0f, 1011.0f)
}
Output
Mobile Display - Temperature: 25.0, Humidity: 65.0, Pressure: 1013.0
Web Display - Temperature: 25.0, Humidity: 65.0, Pressure: 1013.0
Mobile Display - Temperature: 28.0, Humidity: 70.0, Pressure: 1012.0
Web Display - Temperature: 28.0, Humidity: 70.0, Pressure: 1012.0
Web Display - Temperature: 30.0, Humidity: 75.0, Pressure: 1011.0
Here,
Subject-Observer Relationship:
WeatherStationacts as the Subject and maintains a list of Observers (MobileDisplayandWebDisplay).- When
setMeasurementsis called, the Subject notifies all registered Observers about the state change.
Dynamic Subscription:
- Observers like
MobileDisplayandWebDisplaycan dynamically register or unregister themselves from the Subject.
Loose Coupling:
- The Subject and Observers interact only through their interfaces, ensuring loose coupling.
Real-Time Updates:
- Observers are automatically updated whenever the Subject’s state changes.
Here’s another example to help clarify the observer pattern: our publication’s newsletter system.
softAai Blogs Newsletter System
As we subscribe to YouTube channels to get the latest updates and videos, similarly, we have newsletters on Medium.com. This is a perfect example of the observer pattern, which is already in place. Let’s dissect it using our softAai Blogs newsletter and try to build a similar system with the observer pattern.

The idea is to notify subscribers of Medium publication, softAai Blogs, whenever I publish new articles. Our subscribers — whether developers, learners, or tech enthusiasts — can unsubscribe if they no longer want updates, or new readers can subscribe at any time.
Let’s design this system (hypothetically) using the Observer Pattern. Here’s how it works:
- softAai Blogs (Subject): Publishes new articles.
- Subscribers (Observers): Get notified of the new articles.
Let’s translate this real-life scenario into code using Kotlin.
Create the Subject Interface
interface Newsletter {
    fun addSubscriber(subscriber: Subscriber)
    fun removeSubscriber(subscriber: Subscriber)
    fun notifySubscribers()
}
Here, the Newsletter interface defines methods to manage subscribers and send updates.
Create the Observer Interface
interface Subscriber {
    fun receiveUpdate(articleTitle: String)
}
The Subscriber interface ensures all subscribers can handle updates (e.g., receiving a new article’s title).
Implement the Concrete Subject
class softAaiNewsletter : Newsletter {
    private val subscribers = mutableListOf<Subscriber>() // List of subscribers
    private var latestArticle: String = ""

    override fun addSubscriber(subscriber: Subscriber) {
        subscribers.add(subscriber)
    }

    override fun removeSubscriber(subscriber: Subscriber) {
        subscribers.remove(subscriber)
    }

    override fun notifySubscribers() {
        for (subscriber in subscribers) {
            subscriber.receiveUpdate(latestArticle)
        }
    }

    // Publish a new article
    fun publishArticle(title: String) {
        latestArticle = title
        println("New article published: $latestArticle")
        notifySubscribers() // Notify all subscribers
    }
}
The softAaiNewsletter class maintains a list of subscribers and notifies them whenever a new article is published.
Implement the Concrete Observer
class BlogSubscriber(private val name: String) : Subscriber {
    override fun receiveUpdate(articleTitle: String) {
        println("$name received the update: New article published - \"$articleTitle\"")
    }
}
Each BlogSubscriber reacts to updates by printing the notification they receive.
Bringing It All Together
Here’s how we connect everything.
fun main() {
    // Create the newsletter
    val softAaiNewsletter = softAaiNewsletter()

    // Create subscribers
    val subscriber1 = BlogSubscriber("amol")
    val subscriber2 = BlogSubscriber("akshay")
    val subscriber3 = BlogSubscriber("swapnil")

    // Add subscribers
    softAaiNewsletter.addSubscriber(subscriber1)
    softAaiNewsletter.addSubscriber(subscriber2)
    softAaiNewsletter.addSubscriber(subscriber3)

    // Publish an article
    softAaiNewsletter.publishArticle("Observer Pattern in Kotlin Explained")

    // Remove one subscriber
    softAaiNewsletter.removeSubscriber(subscriber2)

    // Publish another article
    softAaiNewsletter.publishArticle("Artificial Superintelligence (ASI): Unveiling the Genius")
}
Output
New article published: Observer Pattern in Kotlin Explained
amol received the update: New article published - "Observer Pattern in Kotlin Explained"
akshay received the update: New article published - "Observer Pattern in Kotlin Explained"
swapnil received the update: New article published - "Observer Pattern in Kotlin Explained"
New article published: Artificial Superintelligence (ASI): Unveiling the Genius
amol received the update: New article published - "Artificial Superintelligence (ASI): Unveiling the Genius"
swapnil received the update: New article published - "Artificial Superintelligence (ASI): Unveiling the Genius"
How It Relates to softAai Blogs
- softAaiNewsletter (Subject): Represents our Medium newsletter system where new articles are published.
- BlogSubscriber (Observer): Represents our readers who subscribe to the newsletter.
- Publish Articles (Notify): Sends notifications to all subscribers about new articles.
Other Use Cases for the Observer Pattern
The Observer pattern is widely used in various domains, including:
- Graphical User Interfaces (GUIs): To update multiple components (e.g., text fields, labels) whenever the underlying data changes.
- Event-driven Programming: For handling notifications such as click events, state changes, or messaging updates.
- Event Systems: GUI libraries like Swing or JavaFX utilize the Observer pattern to manage event listeners effectively.
- Data Binding: Frameworks like Android’s LiveData or RxJava apply similar concepts to update UI components reactively.
- Real-time Applications: To implement features like chat apps, stock market tickers, or dynamic news feeds.
Advantages of the Observer Pattern
- Loose Coupling: Subjects and observers are independent of each other, promoting modularity.
- Reusability: Observers can be reused across different subjects.
- Scalability: Easily add or remove observers without affecting the subject.
Limitations of the Observer Pattern
- Potential for Performance Issues: With many observers, frequent updates may impact performance.
- Complexity: Managing dependencies between subjects and observers can become tricky in large systems.
- Notification Overhead: Inefficient if only a subset of observers needs updates.
Conclusion
The Observer pattern is a cornerstone of effective software design, and Kotlin’s language features make it easy to implement. By using this pattern, we achieve a clean separation of concerns, enabling more modular and maintainable code.
I hope this guide has given you a solid understanding of the Observer pattern. Whether you’re building a notification system, implementing event-driven architectures, or working on real-time updates, this pattern will undoubtedly serve you well.