Android

vehicle hal

Understanding Android’s Automotive Vehicle HAL: A Comprehensive Guide

In-vehicle Networks(IVN)

Android’s Vehicle Hardware Abstraction Layer (HAL) is a crucial component that facilitates communication between Android applications and the various sensors and signals within a vehicle. The Vehicle HAL stores information in the form of Vehicle Properties, which are often associated with signals on the vehicle bus. This blog will delve into the fundamental aspects of the Vehicle HAL, including Vehicle Properties, System Property Identifiers, extending VehicleProperty, and the essential functions defined in IVehicle.

Vehicle Hardware Abstraction Layer (Vehicle HAL / VHAL)

The Vehicle Hardware Abstraction Layer (VHAL) is like a bridge between Android software and the hardware inside a vehicle. It helps Android applications communicate with the different sensors and functions in a standardized way.

Think of the VHAL as a set of rules that the vehicle follows, telling it how to communicate with Android. These rules are called “properties.” Each property represents a specific function or piece of information inside the vehicle.

For example, one property could be the vehicle’s speed, another property could be the temperature setting for the heating system, and so on.

Properties have certain characteristics, like whether they contain whole numbers (integers) or decimal numbers (floats) and how they can be changed or accessed.

There are different ways to interact with properties:

  1. Read: You can ask the vehicle for the current value of a property. For instance, you can read the speed property to know how fast the vehicle is going.
  2. Write: You can set the value of a property programmatically. For example, you can write a new temperature setting to control the vehicle’s heating system.
  3. Subscribe: You can subscribe to changes in a property, which means you will get notified whenever that property’s value changes. For instance, if you subscribe to the speed property, you will receive updates whenever the vehicle’s speed changes.

The VHAL interface provides a list of properties that vehicle manufacturers (OEMs) can implement in their vehicles. It also contains information about each property, such as what type of data it holds (int or float) and what change modes are allowed (e.g., reading, writing, or subscribing).

By following the VHAL rules and using properties, Android applications can communicate with the vehicle’s hardware without needing to know the specific details of each vehicle model. This abstraction makes it easier for developers to create apps that work across different types of vehicles, improving compatibility and user experience.

Vehicle properties

Vehicle Properties are pieces of information that represent various aspects of a vehicle’s hardware and functionality. Each property is uniquely identified by an integer (int32) key, which acts as its unique identifier.

Read-Only Properties

  • Definition: Read-only properties are those from which you can only retrieve information; you cannot change their values.
  • Usage: These properties provide information about the vehicle’s state or status, such as its current speed or fuel level.
  • Examples: The vehicle’s speed (FLOAT type), engine status (BOOLEAN type), or current timestamp (EPOCH_TIME type) are read-only properties.

Write-Only Properties

  • Definition: Write-only properties are used to send information to the Vehicle HAL; you cannot read their values.
  • Usage: These properties allow applications to pass data to the vehicle’s hardware or control certain functionalities.
  • Examples: Sending a command to turn on the headlights or adjusting the HVAC(Heating, Ventilation and Air Conditioning)system’s fan speed are actions facilitated by write-only properties.

Read-Write Properties

  • Definition: Read-write properties support both reading and writing operations, allowing you to both retrieve and change their values.
  • Usage: These properties enable two-way communication between applications and the vehicle’s hardware.
  • Examples: Setting the target temperature for the HVAC system (FLOAT type), adjusting the volume of the audio system (INT32 type), or configuring custom preferences (STRING type) are read-write properties.

Value Types

Vehicle Properties can have different value types, indicating the data format they use to store information. Some common value types include:

  1. BYTES: Represents a sequence of raw binary data.
  2. BOOLEAN: Represents a true/false value.
  3. EPOCH_TIME: Represents a timestamp in the Unix Epoch time format (number of seconds since January 1, 1970).
  4. FLOAT: Represents a single decimal number.
  5. FLOAT[]: Represents an array of decimal numbers.
  6. INT32: Represents a single whole number (integer).
  7. INT32[]: Represents an array of whole numbers (integers).
  8. INT64: Represents a single large whole number (long integer).
  9. INT64[]: Represents an array of large whole numbers (long integers).
  10. STRING: Represents a sequence of characters, such as text or words.
  11. MIXED: Represents a combination of different data types within a single property.

Zoned Properties

Some properties are zoned, meaning they can have multiple values based on the number of zones supported. For example, a zoned property related to tire pressure may have different values for each tire. Zoned properties help account for variations across different parts of the vehicle.

Vehicle Properties in the Vehicle HAL can be read-only, write-only, or read-write, and each property has a specific value type associated with it. Zoned properties allow for multiple values based on the number of zones supported, catering to various parts or areas of the vehicle. Together, these properties facilitate seamless communication between Android applications and the vehicle’s hardware, enabling better control and monitoring of vehicle functionalities.
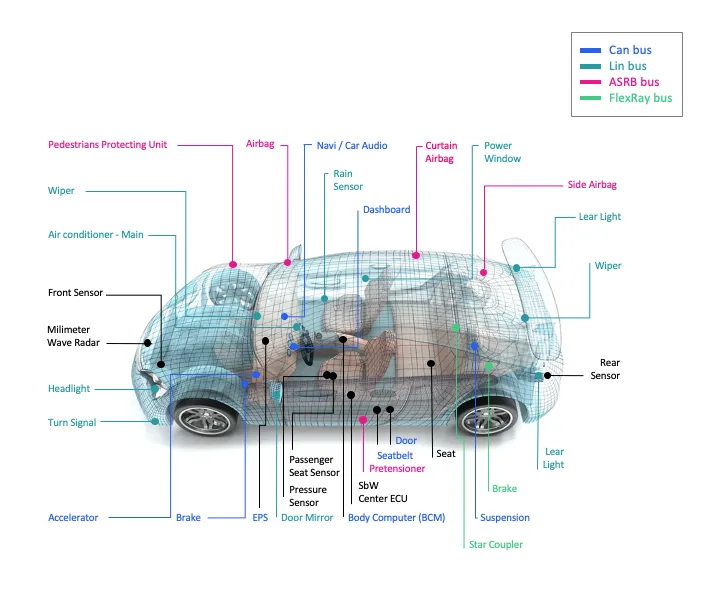
Area Types

Area Types in the Vehicle HAL define different areas within the vehicle, such as windows, mirrors, seats, doors, and wheels. Each area type serves as a category to organize and address specific parts of the vehicle.

The available Area Types are as follows:

  1. GLOBAL: This area type represents a singleton area, which means it is a single entity with no multiple sub-areas.
  2. WINDOW: This area type is based on windows and uses the VehicleAreaWindow enumeration to identify different window areas, such as front and rear windows.
  3. MIRROR: This area type is based on mirrors and uses the VehicleAreaMirror enumeration to identify different mirror areas, such as left and right mirrors.
  4. SEAT: This area type is based on seats and uses the VehicleAreaSeat enumeration to identify different seat areas, such as the front and rear seats.
  5. DOOR: This area type is based on doors and uses the VehicleAreaDoor enumeration to identify different door areas, such as front and rear doors.
  6. WHEEL: This area type is based on wheels and uses the VehicleAreaWheel enumeration to identify different wheel areas, such as the front-left and rear-right wheels.

Each zoned property must use a pre-defined area type, and each area type has a set of bit flags defined in its respective enum (e.g., VehicleAreaSeat has flags like ROW_1_LEFT, ROW_1_CENTER, ROW_1_RIGHT, etc.).

For example, the SEAT area defines VehicleAreaSeat enums:

  • ROW_1_LEFT = 0x0001
  • ROW_1_CENTER = 0x0002
  • ROW_1_RIGHT = 0x0004
  • ROW_2_LEFT = 0x0010
  • ROW_2_CENTER = 0x0020
  • ROW_2_RIGHT = 0x0040
  • ROW_3_LEFT = 0x0100

Area IDs

Zoned properties are addressed through Area IDs, which represent specific combinations of flags from their respective enum. Each zoned property may support one or more Area IDs to define the relevant areas within the vehicle.

Area IDs

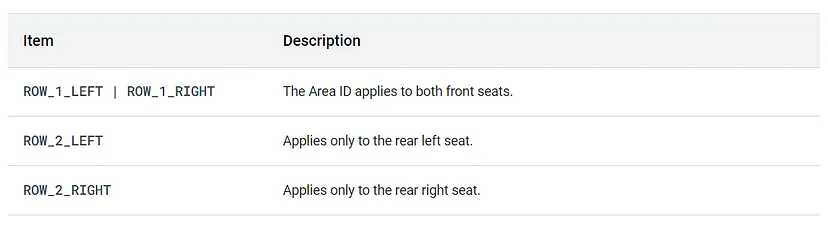
For example, if a property uses the VehicleAreaSeat area type, it might use the following Area IDs:

  1. ROW_1_LEFT | ROW_1_RIGHT: This Area ID applies to both front seats, combining the flags for the left and right seats in the first row.
  2. ROW_2_LEFT: This Area ID applies only to the rear left seat in the second row.
  3. ROW_2_RIGHT: This Area ID applies only to the rear right seat in the second row.

By using Area IDs, zoned properties can target specific areas within the vehicle, allowing for more granular control and monitoring of different parts of the vehicle separately.

Property Status

Property Status in the Vehicle HAL indicates the current condition of a property’s value. Each property value is accompanied by a VehiclePropertyStatus value, which informs about the property’s availability and validity.

Every property value comes with a VehiclePropertyStatus value. This indicates the current status of the property:

Property Status

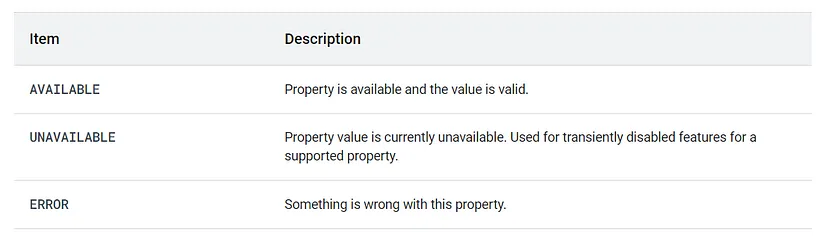
Available Values of VehiclePropertyStatus:

  1. AVAILABLE: This status indicates that the property is supported by the vehicle and the current value is valid and accessible. It means the property is ready to be read or written to.
  2. UNAVAILABLE: When a property has the UNAVAILABLE status, it means the property value is currently unavailable or not accessible. This status is typically used for transient conditions, where a supported property might be temporarily disabled or unavailable. It is not meant to indicate that the property is unsupported in general.
  3. ERROR: The ERROR status indicates that something is wrong with the property. This status might be used when there is a problem with retrieving or setting the property’s value, such as a communication issue or an internal error.

Important Note: It is essential to remember that if a property is not supported by the vehicle, it should not be included in the Vehicle HAL at all. In other words, unsupported properties should not be part of the VHAL interface. It is not acceptable to set the property status to UNAVAILABLE permanently just to denote an unsupported property.

Configuring a property

Configuring a property in the Vehicle HAL involves using the VehiclePropConfig structure to provide important configuration information for each property. This information includes various variables that help define how the property can be accessed, monitored, and controlled.

Use VehiclePropConfig to provide configuration information for each property. Information includes:

Configuring Property

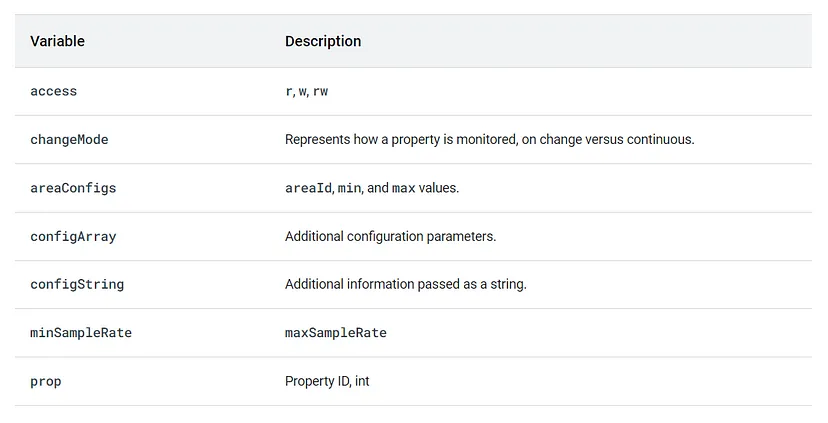
Below are the details of the variables used in the configuration:

access

  • Description: The ‘access’ variable specifies the type of access allowed for the property.
  • Values: It can be set to one of the following:

1. Read-only access (Value: ‘r’):

  • Description: The property can be read but not modified.
  • Access Type: Read-only.

2. Write-only access (Value: ‘w’):

  • Description: The property can be written but not read.
  • Access Type: Write-only.

3. Read-write access (Value: ‘rw’):

  • Description: The property supports both reading and writing.
  • Access Type: Read-write.

changeMode

  • Description: The ‘changeMode’ variable represents how the property is monitored for changes.
  • Values: It can be set to either ‘ON_CHANGE’ or ‘CONTINUOUS.’
  • ‘ON_CHANGE’: The property triggers an event only when its value changes.
  • ‘CONTINUOUS’: The property is constantly changing, and the subscriber is notified at the sampling rate set.

areaConfigs

  • Description: The ‘areaConfigs’ variable contains configuration information for different areas associated with the property.
  • Information: It includes areaId, min, and max values.
  • areaId: Represents the Area ID associated with the property (e.g., ROW_1_LEFT, ROW_2_RIGHT).
  • min: Specifies the minimum valid value for the property.
  • max: Specifies the maximum valid value for the property.

configArray

  • Description: The ‘configArray’ variable is used to hold additional configuration parameters for the property.
  • Information: It can store an array of specific data related to the property.

configString

  • Description: The ‘configString’ variable is used to provide additional information related to the property as a string.
  • Information: It can hold any extra details or specifications for the property.

minSampleRate, maxSampleRate

  • Description: These variables specify the minimum and maximum sampling rates (measurement frequency) for the property when monitoring changes.
  • Information: They define how often the property values are checked for updates.

prop

  • Description: The ‘prop’ variable is the Property ID, an integer that uniquely identifies the property in the Vehicle HAL.
  • Information: Each property in the Vehicle HAL is assigned a specific Property ID, which acts as its unique identifier. This ID is used to access, configure, and interact with the property within the Vehicle HAL interface. It ensures that each property can be referenced uniquely, even if there are multiple properties with similar or related functionalities.

System Property Identifiers

System Property Identifiers in the Vehicle HAL are unique labels used to categorize and identify specific properties. They are marked with the tag “VehiclePropertyGroup:SYSTEM” to distinguish them from other types of properties.

In Android 12, there are more than 150 such identifiers. Each identifier represents a different property related to the vehicle’s system and functionalities. For example, one of these identifiers is “HVAC_TEMPERATURE_SET,” which stands for the target temperature set for the vehicle’s HVAC system.

Let’s break down the details of the “HVAC_TEMPERATURE_SET” identifier:

  • Property Name: HVAC_TEMPERATURE_SET
  • Description: Represents the target temperature set for the HVAC (Heating, Ventilation, and Air Conditioning) system in the vehicle.
  • Change Mode: The property is monitored in the “ON_CHANGE” mode, which means an event is triggered whenever the target temperature changes.
  • Access: The property can be both read and written, allowing applications to retrieve the current target temperature and update it programmatically.
  • Unit: The temperature values are measured in Celsius (°C).

System Property Identifiers in the Vehicle HAL are unique labels that categorize different properties related to the vehicle’s system. They provide standardized access to various functionalities, such as setting the target temperature for the HVAC system. By using these identifiers, Android applications can seamlessly interact with the vehicle’s hardware, enhancing user experience and control over various vehicle features.

Handling zone properties

Handling zone properties involves dealing with collections of multiple properties, where each part can be accessed using a specific Area ID value. Here’s how the different calls work:

Get Calls:

  • When you make a “get” call for a zoned property, you must include the Area ID in the request.
  • As a result, only the current value for the requested Area ID is returned.
  • If the property is global (applies to all zones), the Area ID is set to 0.

Set Calls:

  • For a “set” call on a zoned property, you need to specify the Area ID.
  • This means that only the value for the requested Area ID will be changed.

Subscribe Calls:

  • A “subscribe” call generates events for all Area IDs associated with the property.
  • This means that whenever there is a change in any Area ID’s value, the subscribed function will be notified.

When dealing with zoned properties, using the Area ID allows you to access specific parts of the collection. “Get” calls return the current value for a specified Area ID, “Set” calls change the value for a requested Area ID, and “Subscribe” calls generate events for all Area IDs associated with the property.

Now, let’s look at specific scenarios for Get and Set calls:
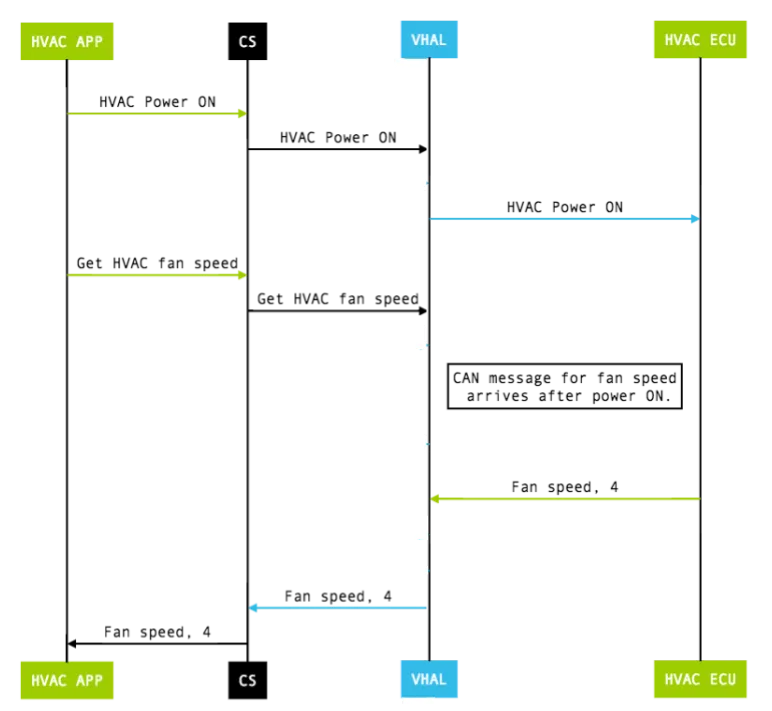
Get Calls

  • During initialization, the value of the property may not be available yet due to pending vehicle network messages. In this case, the “get” call should return a special code, -EAGAIN, indicating that the value is not available yet.
  • Some properties, like HVAC (Heating, Ventilation, and Air Conditioning), have separate power properties to turn them on/off. When you “get” a property like HVAC Temperature and it’s powered off, it should return a status of UNAVAILABLE instead of an error.
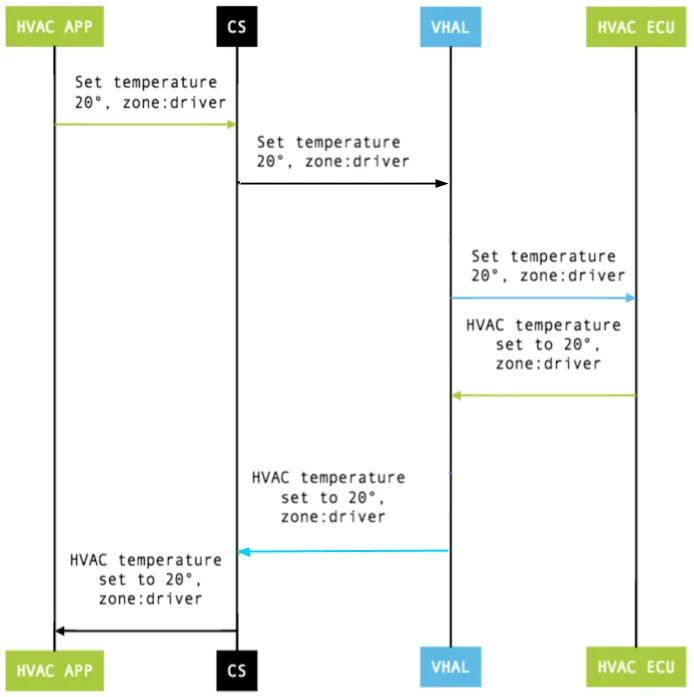
Get HVAC temperature (CS = CarService, VHAL = Vehicle HAL)

Set Calls

  • A “set” call usually triggers a change request across the vehicle network. It’s ideally an asynchronous operation, returning as soon as possible, but it can also be synchronous if needed.
  • In some cases, a “set” call might require initial data that isn’t available during initialization. In such situations, the “set” call should return StatusCode#TRY_AGAIN to indicate that you should try again later.
  • For properties with separate power states (on and off), if the property is powered off and the “set” can’t be done, it should return StatusCode#NOT_AVAILABLE or StatusCode#NOT_AVAILABLE_DISABLED.
  • Until the “set” operation is complete and effective, the “get” call might not necessarily return the same value as what was set. For example, if you “set” the HVAC Temperature, the “get” call might not immediately reflect the new value until the change takes effect.
Set HVAC temperature (CS = CarService, VHAL = Vehicle HAL)

Handling custom properties

To support partner-specific needs, the VHAL allows custom properties that are restricted to system apps. Use the following guidelines when working with custom properties:

Property ID Generation:

  • Use the following format to generate the Property ID: VehiclePropertyGroup:VENDOR.
  • The VENDOR group should be used exclusively for custom properties.

Vehicle Area Type:

  • Select an appropriate area type(VehicleArea type) that best represents the scope of the custom property within the vehicle.

Vehicle Property Type:

  • Choose the proper data type for the custom property.
  • For most cases, the BYTES type is sufficient, allowing the passing of raw data.
  • Be cautious when adding a big payload, as frequently sending large data through custom properties can slow down the entire vehicle network access.

Property ID Format:

  • Choose a four-nibble ID for the custom property.
  • The format should consist of four hexadecimal characters.

Avoid Replicating Existing Vehicle Properties:

  • To prevent ecosystem fragmentation, do not use custom properties to replicate vehicle properties that already exist in the VehiclePropertyIds SDK.
  • In the VehiclePropConfig.configString field, provide a short description of the custom property. This helps sanity check tools flag accidental replication of existing vehicle properties. For example, you can use a description like “hazard light state.”

Accessing Custom Properties:

  • Access custom properties through CarPropertyManager for Java components or through the Vehicle Network Service API for native components.
  • Avoid modifying other car APIs to prevent future compatibility issues.

Permissions for Vendor Properties:

  • After implementing vendor properties, select only the permissions list in the VehicleVendorPermission enum for vendor properties.
  • Avoid mapping vendor permissions to system properties to prevent breaking the Compatibility Test Suite (CTS) and Vendor Test Suite (VTS).

By following these guidelines, you can create and manage custom properties in the VHAL effectively while ensuring compatibility and preventing fragmentation within the ecosystem.

Handling HVAC properties

Handling HVAC properties in the VHAL (Vehicle Hardware Abstraction Layer) involves controlling various aspects of the HVAC system in a vehicle. Most HVAC properties are zoned properties, meaning they can be controlled separately for different zones or areas in the vehicle. However, some properties are global, affecting the entire vehicle’s HVAC system.

HVAC properties

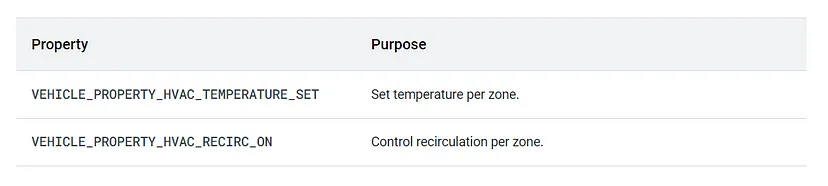
Above two sample-defined HVAC properties are:

  1. VEHICLE_PROPERTY_HVAC_TEMPERATURE_SET: This property is used to set the temperature per zone in the vehicle.
  2. VEHICLE_PROPERTY_HVAC_RECIRC_ON: This property is used to control recirculation per zone.

To see a complete list of available HVAC properties, you can search for properties starting with VEHICLE_PROPERTY_HVAC_* in the types.hal file.

When the HVAC property uses VehicleAreaSeat, there are additional rules for mapping a zoned HVAC property to Area IDs. Each available seat in the car must be part of an Area ID in the Area ID array.

Let’s take two examples to better understand how to map HVAC_TEMPERATURE_SET to Area IDs:

Example One:

  • Car Configuration: The car has two front seats (ROW_1_LEFT, ROW_1_RIGHT) and three back seats (ROW_2_LEFT, ROW_2_CENTER, ROW_2_RIGHT).
  • HVAC Units: The car has two temperature control units: one for the driver side and one for the passenger side.

A valid mapping set of Area IDs for HVAC_TEMPERATURE_SET is:

  • Driver side temperature control: ROW_1_LEFT | ROW_2_LEFT
  • Passenger side temperature control: ROW_1_RIGHT | ROW_2_CENTER | ROW_2_RIGHT

An alternative mapping for the same hardware configuration is:

  • Driver side temperature control: ROW_1_LEFT | ROW_2_LEFT | ROW_2_CENTER
  • Passenger side temperature control: ROW_1_RIGHT | ROW_2_RIGHT

Example Two:

  • Car Configuration: The car has three seat rows with two seats in the front row (ROW_1_LEFT, ROW_1_RIGHT), three seats in the second row (ROW_2_LEFT, ROW_2_CENTER, ROW_2_RIGHT), and three seats in the third row (ROW_3_LEFT, ROW_3_CENTER, ROW_3_RIGHT).
  • HVAC Units: The car has three temperature control units: one for the driver side, one for the passenger side, and one for the rear.

A reasonable way to map HVAC_TEMPERATURE_SET to Area IDs is as a three-element array:

  • Driver side temperature control: ROW_1_LEFT
  • Passenger side temperature control: ROW_1_RIGHT
  • Rear temperature control: ROW_2_LEFT | ROW_2_CENTER | ROW_2_RIGHT | ROW_3_LEFT | ROW_3_CENTER | ROW_3_RIGHT

Keep in mind that the exact mapping of HVAC properties to Area IDs may vary based on the vehicle’s hardware configuration and the HVAC system’s design. The examples provided above demonstrate how different seat configurations and HVAC units can influence the mapping of HVAC properties to specific zones in the vehicle.

Handling sensor properties

VHAL sensor properties are a way for apps to access real sensor data or policy information from the vehicle. Some sensor information, such as driving status and day/night mode, is accessible by any app without restriction. This is because this data is mandatory to build a safe vehicle application. Other sensor information, such as vehicle speed, is more sensitive and requires specific permissions that users can manage.

The supported sensor properties are defined in the types.hal file. This file lists all of the available sensor properties, along with their type, access permissions, and other metadata.

To access a VHAL sensor property, an app must first obtain a reference to the IVehicle interface. This interface provides methods for reading, writing, and subscribing to sensor properties.

Once the app has a reference to the IVehicle interface, it can use the get method to read the value of a sensor property. The get method takes the property ID as an argument and returns the value of the property.

The app can also use the set method to write the value of a sensor property. The set method takes the property ID and the new value as arguments.

To subscribe to a sensor property, the app can use the subscribe method. The subscribe method takes the property ID and a callback as arguments. The callback will be invoked whenever the value of the property changes.

Here is an example of how to access a VHAL sensor property:

// Get a reference to the IVehicle interface.
IVehicle vehicle = VehicleManager.getVehicle();

// Get the value of the driving status property.
int drivingStatus = vehicle.get(VehiclePropertyIds.DRIVING_STATUS);

// If the vehicle is driving, turn on the headlights.
if (drivingStatus == 1) {
vehicle.set(VehiclePropertyIds.HEADLIGHTS, 1);
}

HAL interfaces

The Vehicle Hardware Abstraction Layer (VHAL) is a HAL interface that allows apps to access vehicle properties. The VHAL provides a number of interfaces that can be used to read, write, and subscribe to vehicle properties.

The getAllPropConfigs() interface returns a list of all the properties that are supported by the VHAL. The getPropConfigs() interface returns the configuration of a specific property. The set() interface allows you to write a value to a property. The subscribe() interface allows you to subscribe to a property so that you are notified when its value changes.

The VHAL also provides two callback interfaces: onPropertyEvent() and onPropertySetError(). The onPropertyEvent() interface is called whenever the value of a property that you are subscribed to changes. The onPropertySetError() interface is called if an error occurs when you try to set the value of a property.

Here is just a recap of the above example of how to use the VHAL to read the value of the driving status property:

// Get a reference to the IVehicle interface.
IVehicle vehicle = VehicleManager.getVehicle();

// Get the value of the driving status property.
int drivingStatus = vehicle.get(VehiclePropertyIds.DRIVING_STATUS);

Here is a brief explanation of the HAL interfaces:

VHAL Interfaces:

IVehicle.hal file

Please note that the below .hal files are not Java, C++ or scss files (I selected auto mode so it will take Java, C++, or scss)

BTW, What is .hal file?

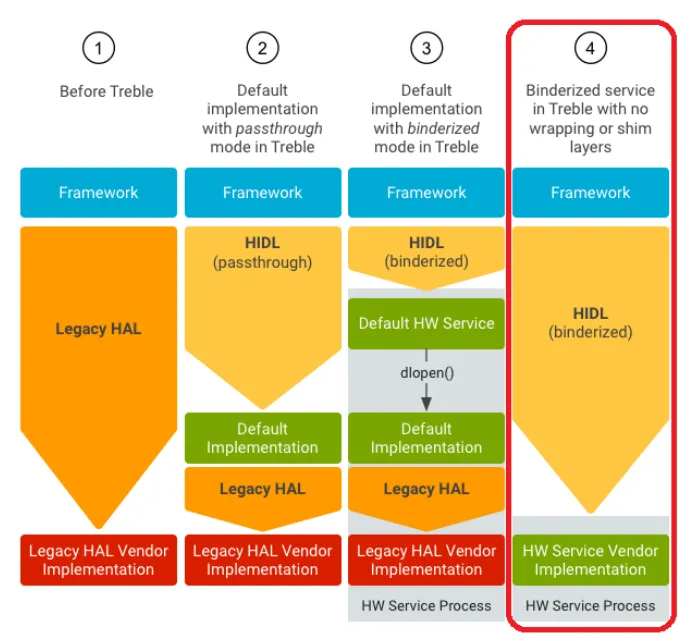
A .hal file is a Hardware Abstraction Layer (HAL) file that defines the interface between a hardware device and the Android operating system. HAL files are written in the Hardware Interface Description Language (HIDL), which is a language for describing hardware interfaces in a platform-independent way.

package [email protected];
import IVehicleCallback;
interface IVehicle {
  /**
   * Returns a list of all property configurations supported by this vehicle
   * HAL.
   */
  getAllPropConfigs() generates (vec<VehiclePropConfig> propConfigs);
  /**
   * Returns a list of property configurations for given properties.
   *
   * If requested VehicleProperty wasn't found it must return
   * StatusCode::INVALID_ARG, otherwise a list of vehicle property
   * configurations with StatusCode::OK
   */
  getPropConfigs(vec<int32_t> props)
          generates (StatusCode status, vec<VehiclePropConfig> propConfigs);
  /**
   * Get a vehicle property value.
   *
   * For VehiclePropertyChangeMode::STATIC properties, this method must always
   * return the same value always.
   * For VehiclePropertyChangeMode::ON_CHANGE properties, it must return the
   * latest available value.
   *
   * Some properties like AUDIO_VOLUME requires to pass additional data in
   * GET request in VehiclePropValue object.
   *
   * If there is no data available yet, which can happen during initial stage,
   * this call must return immediately with an error code of
   * StatusCode::TRY_AGAIN.
   */
  get(VehiclePropValue requestedPropValue)
          generates (StatusCode status, VehiclePropValue propValue);
  /**
   * Set a vehicle property value.
   *
   * Timestamp of data must be ignored for set operation.
   *
   * Setting some properties require having initial state available. If initial
   * data is not available yet this call must return StatusCode::TRY_AGAIN.
   * For a property with separate power control this call must return
   * StatusCode::NOT_AVAILABLE error if property is not powered on.
   */
  set(VehiclePropValue propValue) generates (StatusCode status);
  /**
   * Subscribes to property events.
   *
   * Clients must be able to subscribe to multiple properties at a time
   * depending on data provided in options argument.
   *
   * @param listener This client must be called on appropriate event.
   * @param options List of options to subscribe. SubscribeOption contains
   *                information such as property Id, area Id, sample rate, etc.
   */
  subscribe(IVehicleCallback callback, vec<SubscribeOptions> options)
          generates (StatusCode status);
  /**
   * Unsubscribes from property events.
   *
   * If this client wasn't subscribed to the given property, this method
   * must return StatusCode::INVALID_ARG.
   */
  unsubscribe(IVehicleCallback callback, int32_t propId)
          generates (StatusCode status);
  /**
   * Print out debugging state for the vehicle hal.
   *
   * The text must be in ASCII encoding only.
   *
   * Performance requirements:
   *
   * The HAL must return from this call in less than 10ms. This call must avoid
   * deadlocks, as it may be called at any point of operation. Any synchronization
   * primitives used (such as mutex locks or semaphores) must be acquired
   * with a timeout.
   *
   */
  debugDump() generates (string s);
};

getAllPropConfigs():

This interface returns a list of all the properties that are supported by the VHAL. This list includes the property ID, property type, and other metadata.

  • Generates (vec<VehiclePropConfig> propConfigs).
  • Lists the configuration of all properties supported by the VHAL.
  • CarService uses supported properties only.

getPropConfigs(vec<int32_t> props):

This interface returns the configuration of a specific property. The configuration includes the property ID, property type, access permissions, and other metadata.

  • Generates (StatusCode status, vec<VehiclePropConfig> propConfigs).
  • Returns the configuration of selected properties.
  • Allows querying the configuration of specific properties.

set(VehiclePropValue propValue):

This interface allows you to write a value to a property. The value that you write must be of the correct type for the property.

  • Generates (StatusCode status).
  • Writes a value to a property.
  • The result of the write operation is defined per property.

subscribe(IVehicleCallback callback, vec<SubscribeOptions> options):

This interface allows you to subscribe to a property so that you are notified when its value changes. The callback that you provide will be called whenever the value of the property changes.

  • Generates (StatusCode status).
  • Starts monitoring a property value change.
  • For zoned properties, there is an additional unsubscribe(IVehicleCallback callback, int32_t propId) method to stop monitoring a specific property for a given callback.

VHAL Callback Interfaces:

IVehicleCallback.hal

package [email protected];
interface IVehicleCallback {
    /**
     * Event callback happens whenever a variable that the API user has
     * subscribed to needs to be reported. This may be based purely on
     * threshold and frequency (a regular subscription, see subscribe call's
     * arguments) or when the IVehicle#set method was called and the actual
     * change needs to be reported.
     *
     * These callbacks are chunked.
     *
     * @param values that has been updated.
     */
    oneway onPropertyEvent(vec<VehiclePropValue> propValues);
    /**
     * This method gets called if the client was subscribed to a property using
     * SubscribeFlags::SET_CALL flag and IVehicle#set(...) method was called.
     *
     * These events must be delivered to subscriber immediately without any
     * batching.
     *
     * @param value Value that was set by a client.
     */
    oneway onPropertySet(VehiclePropValue propValue);
    /**
     * Set property value is usually asynchronous operation. Thus even if
     * client received StatusCode::OK from the IVehicle::set(...) this
     * doesn't guarantee that the value was successfully propagated to the
     * vehicle network. If such rare event occurs this method must be called.
     *
     * @param errorCode - any value from StatusCode enum.
     * @param property - a property where error has happened.
     * @param areaId - bitmask that specifies in which areas the problem has
     *                 occurred, must be 0 for global properties
     */
    oneway onPropertySetError(StatusCode errorCode,
                              int32_t propId,
                              int32_t areaId);
};

After seeing this file you might be wondering about, what is a oneway method.

A oneway method in a HAL file is a method that does not require a response from the hardware device. Oneway methods are typically used for asynchronous operations, such as sending a command to the hardware device or receiving a notification from the hardware device.

Here is an example of a oneway method in a HAL file:

oneway void setBrightness(int brightness);

This method sets the brightness of the hardware device to the specified value. The method does not require a response from the hardware device, so the caller does not need to wait for the method to complete before continuing.

Oneway methods are often used in conjunction with passthrough HALs. Passthrough HALs are HALs that run in the same process as the calling application. This means that oneway methods in passthrough HALs can be invoked directly by the calling application, without the need for a binder call.

onPropertyEvent(vec<VehiclePropValue> propValues):

This callback is called whenever the value of a property that you are subscribed to changes. The callback will be passed a list of the properties that have changed and their new values.

  • A one-way callback function.
  • Notifies vehicle property value changes to registered callbacks.
  • This function should be used only for properties that have been subscribed to for monitoring.

onPropertySetError(StatusCode errorCode, int32_t propId, int32_t areaId):

This callback is called if an error occurs when you try to set the value of a property. The callback will be passed the error code and the property ID that was being set.

  • A one-way callback function.
  • Notifies errors that occurred during property write operations.
  • The error can be related to the VHAL level or specific to a property and an area (in the case of zoned properties).

These interfaces and callbacks form the core communication mechanism between the VHAL and other components, such as CarService and applications, allowing for the configuration, querying, writing, and monitoring of vehicle properties. The usage of these interfaces may vary depending on the specific implementation of the VHAL in different systems or platforms.

Properties Monitoring and Notification

In the context of the Vehicle Hardware Abstraction Layer (VHAL) and its properties, the IVehicle::subscribe method and IVehicleCallback::onChange callback are used for monitoring changes in vehicle properties. Additionally, there is a ChangeMode enum that defines how the properties behave in terms of their update frequency.

IVehicle::subscribe

  • The IVehicle::subscribe method is used to register a callback (implementing IVehicleCallback) to receive updates when the subscribed properties change.
  • This method allows applications to start monitoring specific vehicle properties for value changes.

IVehicleCallback::onChange

  • The IVehicleCallback::onChange callback function is invoked when there are updates to the subscribed properties.
  • When a property changes and the VHAL detects the change, it notifies all registered callbacks using this callback function.

ChangeMode Enum

  • The ChangeMode enum defines how a particular property behaves in terms of its update frequency. It has the following possible values:
  • STATIC: The property never changes.
  • ON_CHANGE: The property only signals an event when its value changes.
  • CONTINUOUS: The property constantly changes and is notified at a sampling rate set by the subscriber.

These definitions allow applications to subscribe to properties with different update behaviors based on their specific needs. For example, if an application is interested in monitoring the vehicle speed, it may subscribe to the speed property with the CONTINUOUS change mode to receive a continuous stream of speed updates at a certain sampling rate. On the other hand, if an application is interested in the vehicle’s daytime/nighttime mode, it may subscribe with the ON_CHANGE change mode to receive updates only when the mode changes from day to night or vice versa.

The use of these definitions and methods allows for efficient monitoring and notification of changes in vehicle properties, ensuring that applications can stay up-to-date with the latest data from the vehicle’s sensors and systems.

Conclusion

The Vehicle HAL is a critical component of the Android operating system that facilitates seamless communication between Android applications and a vehicle’s hardware and sensors. By utilizing Vehicle Properties and the various functions defined in the IVehicle interface, developers can access and control essential aspects of a vehicle’s state and functioning. Furthermore, the ability to extend Vehicle Properties using custom identifiers offers developers the flexibility to tailor their applications to specific vehicle hardware and functionalities, thereby enhancing the overall user experience. As Android continues to evolve, the Vehicle HAL is expected to play an even more significant role in shaping the future of automotive technology.

project treble

Exploring Project Treble and Modular Advancements in Android Automotive OS for Enhanced Performance: Revolutionizing the Drive

In the ever-evolving landscape of technology, where innovation and adaptability are paramount, Android has emerged as a dominant force. Beyond smartphones, Android’s influence has extended into various industries, including the automotive sector. A pivotal development in this journey has been the introduction of Project Treble and its subsequent integration into Android Automotive OS, ushering in a new era of modular advancements. This article delves into the essence of Project Treble and how its modular approach has transformed Android’s foray into the automotive realm.

Project Treble and Android Automotive OS

Project Treble is an initiative by Google introduced in Android 8.0 Oreo to address the challenges of Android fragmentation(Here Fragmentation refers to the situation where many Android devices run different versions of the operating system) and make it easier for device manufacturers to update their devices to newer Android versions. It separates the Android OS framework from the hardware-specific components, allowing manufacturers to update the Android OS without modifying the lower-level hardware drivers and firmware.

Project Treble

In the context of Android Automotive OS, Project Treble has a similar goal but is adapted to the specific needs of automotive infotainment systems. Android Automotive OS is built on top of the regular Android OS but is optimized for use in vehicles. It provides a customized user interface and integrates with car-specific hardware and features.

Project Treble in Android Automotive OS helps automotive manufacturers (OEMs) update their in-car infotainment systems more efficiently. Separating the Android OS framework from the hardware-specific components, allows OEMs to focus on developing and updating their unique infotainment features without being held back by delays caused by complex hardware integration.

Android Open Source Project (AOSP) Architecture

In the Android Open Source Project (AOSP) architecture, everything above the Android System Services is known as the “Android Framework,” and it is provided by Google. This includes various components like the user interface, app development framework, and system-level services.

AOSP Architecture

On the other hand, the Hardware Abstraction Layer (HALs) and the Kernel are provided by System on a Chip (SoC) and hardware vendors. The HALs act as a bridge between the Android Framework and the specific hardware components, allowing the Android system to work efficiently with different hardware configurations.

In a groundbreaking move, Google extended the Android Open Source Project (AOSP) to create a complete in-vehicle infotainment operating system(we will look in detail later). Here’s a simple explanation of the extensions:

  1. Car System Applications: Google added specific applications designed for in-car use, such as music players, navigation apps, and communication tools. These applications are optimized for easy and safe use while driving.
  2. Car APIs: Google introduced specialized Application Programming Interfaces (APIs) that allow developers to access car-specific functionalities. These APIs provide standardized ways for apps to interact with car features like sensors and controls.
  3. Car Services: Car Services are system-level components that handle car-specific functionalities, such as managing car sensors, audio systems, and climate controls. These services provide a consistent and secure way for apps to interact with car hardware.
  4. Vehicle Hardware Abstraction Layer: To interact with the unique hardware components of different vehicles, Google developed the Vehicle Hardware Abstraction Layer (HAL). It acts as a bridge between the Android system and the specific hardware, enabling a seamless and consistent experience across various cars.

By combining these extensions with the existing Android system, Google created a fully functional and adaptable in-vehicle infotainment operating system. This system can be used in different vehicles without the need for significant modifications, offering a unified and user-friendly experience for drivers and passengers.

Treble Components

Project Treble introduced several new components to the Android architecture to enhance modularity and streamline the update process for Android devices.

Showing what’s newly added by Treble

Let’s briefly explain each of these components:

  1. New HAL types: These are Hardware Abstraction Layers (HALs) that help the Android system communicate with various hardware components in a standardized way. They allow easier integration of different hardware into the Android system.
  2. Hardware Interface Definition Language (HIDL): HIDL is a language used to define interfaces between HALs and the Android framework. It makes communication between hardware and software more efficient.
  3. New Partitions: Treble introduced new partitions in the Android system, like the /vendor partition. These partitions help separate different parts of the system, making updates easier and faster.
  4. ConfigStore HAL: This component manages configuration settings for hardware components. It provides a standardized way to access and update configuration data.
  5. Device Tree Overlays: Device Tree Overlays enable changes to hardware configuration without having to modify the kernel. It allows for easier customization of hardware.
  6. Vendor NDK: The Vendor Native Development Kit (NDK) provides tools and libraries for device manufacturers to develop software specific to their hardware. It simplifies the integration of custom functionalities.
  7. Vendor Interface Object: The Vendor Interface Object (VINTF) defines a stable interface between the Android OS and the vendor’s HAL implementations. It ensures compatibility and smooth updates.
  8. Vendor Test Suite (VTS): VTS is a testing suite that ensures HAL implementations work correctly with the Android framework. It helps in verifying the compatibility and reliability of devices.

Project Treble’s components make Android more modular, efficient, and customizable. They streamline communication with hardware, separate system components, and allow device manufacturers to update and optimize their devices more easily, resulting in a better user experience and faster Android updates.

Modularity in Android Automotive with Treble

Thanks to the architectural changes brought about by Project Treble and the expanded use of partitions, the future of Android Automotive has become significantly more flexible and adaptable. This enhancement extends beyond just the Human-Machine Interface (HMI) layer and allows for potential replacements of the Android framework, Board Support Package (BSP), and even the hardware if necessary.

In simpler terms, the core components of the Android Automotive system have been made more independent and modular. This means that manufacturers now have the freedom to upgrade or customize specific parts of the system without starting from scratch. The result is a highly future-proof system that can readily embrace emerging technologies and cater to evolving user preferences.

Let’s delve into the transition and see how this modularity was achieved after the implementation of Project Treble:

HALs before Treble

Before Project Treble, HAL interfaces were defined as C header files located in the hardware/libhardware folder of the Android system. Each new version of Android required the HAL to support a new interface, which meant significant effort and changes for hardware vendors.

HALs before Treble

In simpler terms, HALs used to be tightly coupled with the Android framework, and whenever a new Android version was released, hardware vendors had to update their HALs to match the new interfaces. This process was time-consuming and complex, leading to delays in device updates and making it difficult to keep up with the latest Android features.

Project Treble addressed this issue by introducing the Hardware Interface Definition Language (HIDL). With HIDL, HAL interfaces are now defined in a more standardized and independent way, making it easier for hardware vendors to implement and update their HALs to support new Android versions. This change has significantly improved the efficiency of Android updates and allowed for a more flexible and future-ready Android ecosystem.

Pass-through HALs

In the context of Android Automotive, Pass-through HALs are special Hardware Abstraction Layers (HALs) that use the Hardware Interface Definition Language (HIDL) interface. The unique aspect of Pass-through HALs is that you can directly call them from your application’s process, without going through the usual Binder communication.

Pass-through HALs

To put it simply, when an app wants to interact with a regular HAL, it communicates using the Binder mechanism, which involves passing messages between different processes. However, with Pass-through HALs, you can directly communicate with the HAL from your app’s process. This direct calling approach can offer certain advantages in terms of efficiency and performance for specific tasks in the automotive context. It allows apps to access hardware functionalities with reduced overhead and faster response times.

Binderized HALs

In the Android Automotive context, Binderized HALs run in their dedicated processes and are accessible only through Binder Inter-Process Communication (IPC) calls. This setup ensures that the communication between the Android system and the HALs is secure and efficient.

Binderized HALs

Regarding Legacy HALs, Google has already created a wrapper to make them work in a Binderized environment. This wrapper acts as an intermediary layer, allowing the existing Legacy HALs to communicate with the Android framework through the Binder IPC mechanism. As a result, these Legacy HALs can seamlessly function alongside Binderized HALs, ensuring compatibility and a smooth transition to the new architecture.

In essence, the wrapper provides a bridge between the legacy hardware components and the modern Android system, enabling Legacy HALs to work cohesively in the Binderized environment. This approach ensures that the Android Automotive system can benefit from the improved performance and security of Binderized HALs while still supporting and integrating with older hardware that relies on Legacy HALs.

Ideal HALs

In an ideal scenario, Binderized HALs are the preferred approach for Hardware Abstraction Layers (HALs) in Android. Binderized HALs run in their dedicated processes and are accessed through the secure Binder Inter-Process Communication (IPC) mechanism. This design ensures efficient communication, better security, and separation of hardware functionalities from the Android system.

Ideal HALs

However, for some reasons, we didn’t bother implementing Binderized HALs as intended. Instead, we are using a different approach, possibly using legacy HALs that were not originally designed for Binder IPC. While this alternative approach may work, it might not provide the full benefits of Binderized HALs, such as improved performance and security.

It’s important to recognize that sticking to the ideal Binderized HALs offers several advantages and aligns with the best practices recommended by Google. If possible, it’s better to consider transitioning to Binderized HALs for a more robust and efficient Android Automotive system.

Detailed Architecture

Now, as you know, in Android 8.0, the Android operating system underwent a re-architecture to establish clear boundaries between the device-independent Android platform and device- or vendor-specific code. Before this update, Android had already defined interfaces called HAL interfaces, which were written in C headers located in hardware/libhardware.

With the re-architecture, these HAL interfaces were replaced by a new concept called HIDL (HAL Interface Definition Language). HIDL offers stable and versioned interfaces, which can be either written in Java or as client- and server-side HIDL interfaces in C++.

Detailed Architecture C++

The primary purpose of HIDL interfaces is to be used from native code, especially focused on enabling the auto-generation of efficient C++ code. This is because native code is generally faster and more efficient for low-level hardware interactions. However, to maintain compatibility and support various Android subsystems, some HIDL interfaces are also exposed directly to Java code.

Detailed Architecture / Java

For instance, certain Android subsystems like Telephony utilize Java HIDL interfaces to interact with underlying hardware components. This allows them to benefit from the stable and versioned interface definitions provided by HIDL, ensuring seamless communication between the device-independent Android platform and device-specific code.

Conclusion

Project Treble’s modular approach and Android Automotive OS’s tailored architecture have revolutionized Android’s adaptability for both devices and vehicles. By separating hardware-specific components, manufacturers can efficiently update their systems. The integration of specialized APIs and services in Android Automotive OS streamlines infotainment, while Project Treble’s HAL enhancements and modularity ensure seamless hardware communication. These advancements collectively promise a future-proof, user-friendly experience for both drivers and passengers.

car service and car manager

Driving Innovation: Exploring Android Automotive for Car Service and Empowering Third-Party App Development

The automotive industry is rapidly evolving, and with the integration of technology into vehicles, the concept of Android Automotive has gained significant traction. Android Automotive is an operating system designed to run directly on vehicles’ infotainment systems, providing a seamless user experience. In this comprehensive blog, we’ll delve into the core components of Android Automotive, focusing on the Car Service and Car Manager aspects. Additionally, we’ll explore the opportunities and challenges in developing third-party apps for this platform.

The Vehicle Hardware Abstraction Layer (HAL)

At the core of the Car Data Framework lies the Vehicle Hardware Abstraction Layer (HAL), a foundational native service layer. The HAL acts as a bridge between the hardware of the vehicle and the software framework. Its primary role is to implement communication plugins tailored to collect specific vehicle data and map them to predefined Vehicle property types defined in types.hal. Notably, the types.hal file establishes a standardized list of property IDs recognized by the Google framework.

Customizing the HAL

The flexibility of the Car Data Framework allows customization of the HAL to accommodate unique hardware configurations. This involves extending or modifying the types.hal file to introduce product-specific property IDs. These custom property IDs are marked as VENDOR, indicating that they are subject to VENDOR level policy enforcement. In essence, this facilitates the management and access control of data that is specific to a particular product.

For example, Let’s define a new property VENDOR_FOO as a VENDOR Property with property id as 0xf100.

 
enum VehicleProperty: @2.0::VehicleProperty {
VENDOR_FOO= (
0xf100
| VehiclePropertyGroup:VENDOR
| VehiclePropertyType:STRING
| VehicleArea:GLOBAL),
};
// types.hal

In this code snippet, we’re defining a custom vehicle property named VENDOR_FOO within the VehicleProperty enumeration. Let’s break down each component:

  1. enum VehicleProperty: @2.0::VehicleProperty { ... }: This line declares an enumeration named VehicleProperty with a version annotation of @2.0::VehicleProperty. It suggests that this enumeration is part of version 2.0 of the Vehicle HAL (Hardware Abstraction Layer).
  2. VENDOR_FOO = (...): This defines a specific property within the enumeration named VENDOR_FOO.
  3. 0xf100: This hexadecimal value, 0xf100, is the unique identifier assigned to the VENDOR_FOO property. It distinguishes this property from others and can be used to reference it programmatically.
  4. | VehiclePropertyGroup:VENDOR: This component indicates that the property belongs to the VENDOR group. Vehicle property groups are used to categorize properties based on their purpose or functionality.
  5. | VehicleArea:GLOBAL: This indicates that the property is applicable to the entire vehicle, encompassing all areas. It suggests that the property’s relevance is not limited to a specific part of the vehicle.
  6. | VehiclePropertyType:STRING: This part specifies that the data type of the property is STRING. This suggests that the property holds text-based information.

In short, this code snippet defines a custom vehicle property named VENDOR_FOO. This property has a unique identifier of 0xf100, belongs to the VENDOR group, holds text-based data of type STRING, and is applicable to the entire vehicle.

Diverse Car-Related Services

Sitting atop the HAL is the framework layer, which provides a comprehensive set of services and APIs for applications to access vehicle data efficiently. The android.car package plays a pivotal role in this layer by offering the car service, which acts as a conduit to the Vehicle HAL.

The framework encompasses a diverse range of car-related services, each catering to specific subsystems within the vehicle:

  • CarHVACManager: This service manages HVAC-related properties, allowing applications to interact with heating, ventilation, and air conditioning systems.
  • CarSensorManager: Facilitates the handling of various sensor-related data, providing insights into the vehicle’s environment.
  • CarPowerManager: Manages power modes and states, enabling applications to optimize power consumption.
  • CarInputService: Captures button events, making it possible for applications to respond to user inputs effectively.

In addition to subsystem-specific services, the VehiclePropertyService offers a generic interface for querying and altering data associated with PropertyIDs.

Understanding Android’s Car Service

At its core, Android’s Car Service is a system service that encapsulates vehicle properties and exposes them through a set of APIs. These APIs serve as valuable resources for applications to access and utilize vehicle-related data seamlessly. Whether it’s information about the vehicle’s speed, fuel consumption, or tire pressure, the Car Service provides a standardized way for apps to interact with these metrics.

Detailed architecture view

Implementation and Naming Conventions

The Car Service is implemented as a system service within the Android framework. It resides in a persistent system application named “com.android.car.” This naming convention ensures that the service is dedicated to handling vehicle-related functionalities without getting mixed up with other system or user apps.

To interact with the Car Service, developers can use the “android.car.ICar” interface. This interface defines the methods and communication protocols that allow applications to communicate with the Car Service effectively. By adhering to this interface, developers can ensure compatibility and seamless integration with the Android ecosystem.

Exploring the Inner Workings

To gain deeper insights into the Car Service’s functioning, the “dumpsys car_service” command proves to be invaluable. This command provides a detailed snapshot of the service’s current state, including active connections, APIs in use, and various operational metrics. Developers and enthusiasts can utilize this command to diagnose issues, monitor performance, and optimize their applications’ interactions with the Car Service.

The “-h” option of the “dumpsys car_service” command provides a list of available options, unlocking a plethora of diagnostic tools and information. This empowers developers to fine-tune their app’s interactions with the Car Service, ensuring a smooth user experience and efficient resource utilization.

Enhancing User Experience through Car Service APIs

The Car Service’s APIs offer a wide range of possibilities for enhancing the user experience within the vehicle. Applications can tap into these APIs to provide real-time information, create interactive dashboards, and even integrate voice commands for hands-free control. For instance, navigation apps can utilize the Car Service to display turn-by-turn directions on the vehicle’s infotainment system, while music apps can use it to provide a seamless playback experience.

Car Manager Interfaces: A Brief Overview

The Car Manager encompasses an array of 23 distinct interfaces, each tailored to manage specific aspects of the vehicle’s digital infrastructure. These interfaces serve as pathways through which different services and applications communicate, collaborate, and coexist harmoniously. From input management to diagnostic services, the Car Manager interfaces span a spectrum of functionalities that collectively enhance the driving experience.

Car Manager provides these 23 interfaces

PROPERTY_SERVICE

The PROPERTY_SERVICE interface plays a crucial role in the Car Manager ecosystem. It serves as a gateway to access and manage various vehicle properties. These properties encompass a wide range of information, including vehicle speed, fuel level, engine temperature, and more. Applications and services can tap into this interface to gather real-time data, enabling them to offer users valuable insights into their vehicle’s performance.

Developers can utilize the PROPERTY_SERVICE interface to create engaging dashboard applications, present personalized notifications based on vehicle conditions, and even optimize driving behaviors by leveraging real-time data.

INFO_SERVICE

The INFO_SERVICE interface serves as an information hub within the Car Manager framework. It facilitates the exchange of data related to the vehicle’s status, health, and performance. This interface enables applications to access diagnostic information, maintenance schedules, and any potential issues detected within the vehicle.

By leveraging the INFO_SERVICE interface, developers can design applications that provide proactive maintenance reminders, offer detailed insights into the vehicle’s health, and assist drivers in making informed decisions about their vehicle’s upkeep.

CAR_UX_RESTRICTION_SERVICE

As safety and user experience take center stage in the automotive industry, the CAR_UX_RESTRICTION_SERVICE interface emerges as a critical player. This interface is designed to manage and enforce user experience restrictions while the vehicle is in motion. It ensures that applications adhere to safety guidelines, preventing distractions that could compromise the driver’s focus on the road.

By integrating the CAR_UX_RESTRICTION_SERVICE interface, developers can create applications that seamlessly adapt to driving conditions. This ensures that drivers are presented with relevant and non-distracting information, enhancing both safety and user experience.

Diving Deeper: Exploring PROPERTY_SERVICE Car Manager Interfaces

Let’s dive deep into the functionality of the PROPERTY_SERVICE interface, exploring its role, capabilities, and underlying mechanisms.

Understanding PROPERTY_SERVICE (CarPropertyManager)

The PROPERTY_SERVICE, also known as CarPropertyManager, plays a pivotal role in the Car Manager ecosystem. It acts as a simple yet powerful wrapper for the Vehicle Hardware Abstraction Layer (HAL) properties. This interface offers developers a standardized way to enumerate, retrieve, modify, and monitor vehicle properties. These properties encompass a wide range of data, including vehicle speed, fuel level, engine status, and more.

The key methods provided by the CarPropertyManager include:

  1. Enumerate: Developers can use this method to obtain a list of all available vehicle properties. This enables them to explore the diverse range of data points they can access and utilize within their applications.
  2. Get: The “get” method allows applications to retrieve the current value of a specific vehicle property. This real-time data access empowers developers to provide users with accurate and up-to-date information about their vehicle’s performance.
  3. Set: Developers can utilize the “set” method to modify the value of a vehicle property, facilitating the execution of specific commands or actions within the vehicle’s systems.
  4. Listen: The “listen” method enables applications to register listeners for specific vehicle properties. This functionality is particularly useful for creating real-time monitoring and notification systems.

Permissions and Security

One crucial aspect of the PROPERTY_SERVICE interface is its robust permission system. Access to vehicle properties is regulated, ensuring that applications adhere to strict security measures. Each property is associated with specific permissions that must be granted for an app to access it.

For instance, vendor-specific properties may require apps to possess the “PERMISSION_VENDOR_EXTENSION” permission at the “signature|privileged” level. This layered approach to permissions ensures that sensitive vehicle data remains protected and is only accessible to authorized applications.

Code and Implementation

The core functionality of the PROPERTY_SERVICE (CarPropertyManager) is implemented in the “CarPropertyManager.java” file, which resides within the “packages/services/Car/car-lib/src/android/car/hardware/property/” directory. This file encapsulates the methods, data structures, and logic required to facilitate seamless communication between applications and vehicle properties.

Diving Deeper: Exploring INFO_SERVICE Car Manager Interfaces

Let’s dive deep into the functionality of the INFO_SERVICE interface, exploring its role, capabilities, and underlying mechanisms.

Understanding INFO_SERVICE (CarInfoManager)

The INFO_SERVICE, more formally known as CarInfoManager, is a pivotal component within the Car Manager ecosystem. Its primary function is to facilitate the retrieval of static vehicle information, offering applications access to a wealth of data that encompasses various aspects of the vehicle’s identity and characteristics.

Key functionalities provided by the CarInfoManager include:

  1. Vehicle Identification (VID): The CarInfoManager enables applications to obtain a unique identifier for the vehicle. This identifier, known as the Vehicle Identification Number (VIN), plays a crucial role in differentiating individual vehicles and accessing specific information related to them.
  2. Model and Year: Developers can retrieve detailed information about the vehicle’s model and manufacturing year. This data provides context about the vehicle’s design, technology, and vintage.
  3. Fuel Type: The CarInfoManager allows applications to access information about the type of fuel the vehicle utilizes. This data is essential for creating applications that offer insights into fuel efficiency, emissions, and sustainability.
  4. Additional Static Details: Beyond the aforementioned attributes, the CarInfoManager can provide a plethora of additional static information, such as the vehicle’s make, body type, engine specifications, and more.

Permissions and Security

To ensure the security and privacy of vehicle information, the CarInfoManager enforces a robust permission system. Access to static vehicle information is governed by the “PERMISSION_CAR_INFO” permission, granted at the “normal” level. This approach guarantees that only authorized applications can access critical data about the vehicle.

Code and Implementation

The core functionality of the CarInfoManager is encapsulated within the “CarInfoManager.java” file. This file resides in the “packages/services/Car/car-lib/src/android/car/” directory and contains the methods, structures, and logic necessary for retrieving and presenting static vehicle information to applications.

Diving Deeper: Exploring CAR_UX_RESTRICTION_SERVICE Car Manager Interfaces

Let’s know more about CAR_UX_RESTRICTION_SERVICE interface, exploring its role, capabilities, and underlying mechanisms.

Understanding the CAR_UX_RESTRICTION_SERVICE

The CAR_UX_RESTRICTION_SERVICE, represented by the CarUxRestrictionsManager, is an integral part of the Android Automotive ecosystem. Its primary function is to provide a mechanism for assessing and communicating the level of distraction optimization required for the driving experience. Distraction optimization involves tailoring the in-car interactions to minimize distractions and cognitive load on the driver, thus enhancing safety.

Key Features and Functions:

  1. Distraction Optimization Indication: The CarUxRestrictionsManager utilizes information from the CarDrivingStateManager to determine whether the driving conditions necessitate a higher level of distraction optimization. It then communicates this information to relevant components and applications.
  2. Integration with CarDrivingStateManager: The CarDrivingStateManager provides crucial input to the CarUxRestrictionsManager. By analyzing factors such as vehicle speed, driving mode, and other contextual cues, the manager determines the appropriate level of distraction optimization required.
  3. Promoting Safe Driving Practices: The primary aim of the CAR_UX_RESTRICTION_SERVICE is to promote safe driving practices by limiting potentially distracting activities when the driving conditions warrant it. This can include restricting certain in-car interactions or presenting information in a way that minimizes cognitive load.
  4. Enhancing Driver Focus: By dynamically adjusting the user experience based on the current driving context, the CarUxRestrictionsManager ensures that drivers can focus on the road while still accessing essential information and functionalities.

Implementation and Code: CarUxRestrictionsManager.java

The core functionality of the CarUxRestrictionsManager is implemented in the CarUxRestrictionsManager.java file. This file can be found in the following directory: packages/services/Car/car-lib/src/android/car/drivingstate/. Within this file, you\’ll find the logic, methods, and data structures that facilitate the communication between the CarDrivingStateManager and other relevant components.

Design Structure of CarService

The CarService plays a crucial role in the Android Car Data Framework, providing a structured and organized approach to accessing a range of car-specific services. Here we aim to dissect the architecture and design of the CarService, focusing on its implementation and the interaction of various components. We’ll use the CarProperty service as an example to illustrate the design pattern, recognizing that a similar approach is adopted for other CarServices within the CarImpl.

The car-lib makes use of the reference to the CarProperty Android service by calling the getCarServices(“property”) AIDL method, as provided by ICar. This very generic and simple method is implemented by the CarService in ICarImpl to return the specific service requested through the getCarService method, specified with the name of the service as its parameter. Thus, ICarImpl follows the Factory pattern implementation, which returns the IBinder object for the requested service. Within the car-lib, Car.Java will obtain the service reference by calling the specific client interface using ICarProperty.Stub.asInterface(binder). With the returned service reference, the CarPropertyManager will access the methods as implemented by the CarPropertyService. As a result, the car service framework-level service access is abstracted following this implementation pattern, and applications will include car-lib and utilize Car.Java to return respective Manager class objects.

Here is a short summary of the flow:

  • Your application (car-lib) uses the Car service framework to access specific vehicle functionalities.
  • You request a specific service (e.g., CarProperty) using the getCarService method provided by ICarImpl.
  • ICarImpl returns a Binder object representing the requested service.
  • You convert this Binder object into an interface using .asInterface(binder).
  • This interface allows your application to interact with the service (e.g., CarPropertyService) in a more abstract and user-friendly manner.

Understanding the pattern of classes and their relationships is important when adding new services under CarServices or making modifications to existing service implementations, such as extending CarMediaService to add new capabilities or updating CarNavigationServices to enhance navigation information data.

Car Properties and Permissions

Accessing car properties through the Android Car Data Framework provides developers with a wealth of vehicle-specific data, enhancing the capabilities of automotive applications. However, certain properties are protected by permissions, requiring careful consideration and interaction with user consent. Let’s jump into the concepts of car properties, permissions, and the nuanced landscape of access within the CarService framework.

Understanding Car Properties

Car properties encapsulate various aspects of vehicle data, ranging from basic information like the car’s VIN (Vehicle Identification Number) to more intricate details.

String vin = propertyManager.getProperty<String>(INFO_VIN, VEHICLE_AREA_TYPE_GLOBAL)?.value

All of the car properties are defined in the VehiclePropertyIds file. They can be read with CarPropertyManager. However, when trying to read the car VIN, a SecurityException is thrown. This means the app needs to request user permission to access this data.

Car Permissions

Just like a bouncer at a club, Android permissions control which apps can access specific services. This ensures that only the right apps get the keys to the digital kingdom. When it comes to the Car Service, permissions play a crucial role in determining which apps can tap into its features.

However, the Car Service is quite selective about who gets what. Here are a few permissions that 3rd party apps can ask for and possibly receive:

  1. CAR_INFO: Think of this as your car’s digital diary. Apps with this permission can access general information about your vehicle, like its make, model, and year.
  2. READ_CAR_DISPLAY_UNITS: This permission lets apps gather data about your car’s display units, such as screen size and resolution. It’s like letting apps know how big the stage is.
  3. CONTROL_CAR_DISPLAY_UNITS: With this permission, apps can actually tweak your car’s display settings. It’s like allowing them to adjust the stage lighting to set the perfect ambiance.
  4. CAR_ENERGY_PORTS: Apps with this permission can monitor the energy ports in your car, like charging points for electric vehicles. It’s like giving them the backstage pass to your car’s energy sources.
  5. CAR_EXTERIOR_ENVIRONMENT: This permission allows apps to access data about the external environment around your car, like temperature and weather conditions. It’s like giving them a sensor to feel the outside world.
  6. CAR_POWERTRAIN, CAR_SPEED, CAR_ENERGY: These permissions grant apps access to your car’s powertrain, speed, and energy consumption data. It’s like letting them peek under the hood and see how your car performs.

Now, here’s the twist: some permissions are VIP exclusive. They’re marked as “signature” or “privileged,” and only apps that are built by the original equipment manufacturer (OEM) and shipped with the platform can get them. These are like the golden tickets reserved for the chosen few — they unlock advanced features and deeper integrations with the Car Service.

Vehicle Property Permissions

In a vehicle system, properties are defined in a way that groups them as either SYSTEM or VENDOR properties. For example, as mentioned initially, consider the property VENDOR_FOO in the code snippet below. This property is assigned to the VENDOR group.

enum VehicleProperty: @2.0::VehicleProperty {
VENDOR_FOO = (
0xf100
| VehiclePropertyGroup:VENDOR
| VehiclePropertyType:STRING
| VehicleArea:GLOBAL
),
};
// types.hal

For properties in the VENDOR group, specific permissions are applied using the VENDOR_EXTENSION permissions, which can be of type Signature or System. This allows applications to access a special channel for vendor-specific information exchange.

<!-- Allows an application to access the vehicle vendor channel to exchange vendor-specific information. -->
<!-- <p>Protection level: signature|privileged -->

<permission
    android:name="android.car.permission.CAR_VENDOR_EXTENSION"
    android:protectionLevel="signature|privileged"
    android:label="@string/car_permission_label_vendor_extension"
    android:description="@string/car_permission_desc_vendor_extension" />

For properties not associated with the VENDOR group, permissions are set based on the property’s group. This is managed by adding the property to a permission group, as shown in the code snippet below.

/*
Permissions are defined in other files:

packages/services/Car/service/src/com/android/car/hal/PropertyHalServiceIds.java

Helper class to define which property IDs are used by PropertyHalService.
This class binds the read and write permissions to the property ID.
*/

mProps.put(VehicleProperty.INFO_VIN, new Pair<>(
Car.PERMISSION_IDENTIFICATION,
Car.PERMISSION_IDENTIFICATION));
mProps.put(VehicleProperty.INFO_MAKE, new Pair<>(
Car.PERMISSION_CAR_INFO,
Car.PERMISSION_CAR_INFO));

In simpler terms, permissions control access to different vehicle properties. To access the property INFO_VIN, you need the PERMISSION_IDENTIFICATION permission. Similarly, INFO_MAKE requires PERMISSION_CAR_INFO permission. There’s a clear connection between the application service layer (VehiclePropertyIds.java) and the HAL layer (PropertyHalServiceIds.java) for all properties.

Navigating Permissions

Permissions serve as a gatekeeper, regulating access to sensitive car property data. The association between properties and permissions is defined through multiple layers:

VehiclePropertyIds: This file links properties to specific permissions using comments like:

/**
* Door lock
* Requires permission: {@link Car#PERMISSION_CONTROL_CAR_DOORS}.
*/
public static final int DOOR_LOCK = 371198722;

Car.java: Permissions are defined as strings within Car.java. For example:

/**
* Permission necessary to control the car's door.
* @hide
*/
@SystemApi
public static final String PERMISSION_CONTROL_CAR_DOORS = "android.car.permission.CONTROL_CAR_DOORS";

car.service.AndroidManifest.xml: Permissions are declared in the AndroidManifest.xml file, specifying protection levels and attributes:

<permission
    android:name="android.car.permission.CONTROL_CAR_DOORS"
    android:protectionLevel="signature|privileged"
    android:label="@string/car_permission_label_control_car_doors"
    android:description="@string/car_permission_desc_control_car_doors" />

Permission Types

Three levels of permissions exist:

  1. Normal: Default permissions granted without user intervention.
  2. Dangerous: Permissions requiring user consent at runtime.
  3. Signature|Privileged: Restricted to system apps only.

Gaining Access to Signature|Privileged Properties

Properties protected by signature|privileged permissions are accessible solely to system apps. To emulate this access for your application, consider these steps:

Build Keys: Sign your application with the same build keys as the system apps. This method effectively disguises your app as a system app, enabling access to signature|privileged properties.

It’s essential to exercise caution when attempting to gain access to restricted properties, as this might lead to security risks and unintended consequences. Ensure that your intentions align with best practices and adhere to privacy and security principles.

ADB Commands for Car-Related Services

The Car System Service is a pivotal component within the Android Car Data Framework, providing a comprehensive platform for managing and interacting with various car-related services. Leveraging the power of Android Debug Bridge (ADB), developers gain the ability to access and manipulate car properties directly through the command line.

Accessing Car System Service via ADB

The Car System Service can be accessed through ADB commands, providing a direct line of communication to car-related services. The command structure follows the pattern:

adb shell dumpsys car_service <command> [options]

Let’s explore how this works in practice by querying a car property, specifically the door lock property:

adb shell dumpsys car_service get-property-value 16200B02 1

In the above command:

  • get-property-value specifies the action to retrieve the value of a car property.
  • 16200B02 is the hex value corresponding to the door lock property (371198722 in decimal).
  • 1 indicates the vehicle area type, which could be VEHICLE_AREA_TYPE_GLOBAL in this case.

For further insights into available commands and options, you can utilize the -h flag:

adb shell dumpsys car_service -h

Car Apps

Here we will look into the diverse world of car apps, taking a closer look at their functionalities and the exciting possibilities they offer. We’ll explore a selection of these apps, each contributing to a seamless and immersive driving journey.

Diverse Range of Car Apps

Car apps form an integral part of the connected car ecosystem, enabling drivers and passengers to access a wide variety of features and services. These apps cater to different aspects of the driving experience, from entertainment and communication to navigation and vehicle control. Let’s explore some noteworthy examples of car apps:

  1. CarLauncher: Serving as the car’s home screen, CarLauncher provides an intuitive interface that allows users to access various apps and features seamlessly. It serves as the digital command center for interacting with different functionalities within the vehicle.
  2. CarHvacApp: This app takes control of the vehicle’s heating, ventilation, and air conditioning systems, ensuring optimal comfort for all occupants. Users can adjust temperature settings and airflow preferences to create a pleasant driving environment.
  3. CarRadioApp: CarRadioApp brings the traditional radio experience to the digital realm, allowing users to tune in to their favorite radio stations and enjoy a wide range of content while on the road.
  4. CarDialerApp: Designed specifically for in-car communication, CarDialerApp offers a safe and convenient way to make and receive calls while driving. Its user-friendly interface ensures that drivers can stay connected without compromising safety.
  5. CarMapsPlaceholder: While not specified in detail, CarMapsPlaceholder hints at the integration of navigation services, providing drivers with real-time directions and ensuring they reach their destinations efficiently.
  6. LocalMediaPlayer: This media player app allows users to enjoy their favorite music, podcasts, and audio content directly from their vehicle’s infotainment system, providing entertainment during their journeys.
  7. CarMessengerApp: Keeping drivers informed and connected, CarMessengerApp handles messages and notifications, ensuring that essential communications are accessible without distractions.
  8. CarSettings: CarSettings brings customization to the forefront, enabling users to tailor their driving experience by configuring various vehicle settings, preferences, and options.
  9. EmbeddedKitchenSinkApp: As its name suggests, EmbeddedKitchenSinkApp is a comprehensive demo app that showcases a wide range of features, serving as a platform for testing and experimentation.

Third-Party Apps

In the dynamic realm of Android Automotive, third-party apps have emerged as a significant avenue for innovation and enhanced driving experiences. However, these apps operate within a carefully orchestrated ecosystem, designed to ensure driver safety and minimize distractions. Here, we delve into the intricate landscape of third-party apps for Android Automotive, exploring their access restrictions, design considerations, and the pivotal role they play in enhancing driver safety.

Access Restrictions and the Play Store for Auto

Unlike traditional Android apps, third-party apps for Android Automotive do not have direct access to the system APIs. This approach is a deliberate design choice aimed at maintaining system stability and safeguarding against potential security vulnerabilities. Apps available on the Play Store for Android Automotive OS and Android Auto undergo thorough scrutiny to ensure compliance with stringent design requirements. This ensures that apps meet specific standards of quality, functionality, and safety before being listed for users.

Minimizing Driver Distraction: A Core Principle

Driver distraction is a paramount concern in the development of third-party apps for Android Automotive. Given the potential risks associated with diverting a driver’s attention from the road, Google places significant emphasis on creating a distraction-free environment. Apps must adhere to strict guidelines to minimize any potential interference with the driver’s focus.

Key principles for minimizing driver distraction include:

  1. Design Consistency: Apps must follow consistent design patterns that prioritize clarity and ease of use. Intuitive navigation and minimalistic interfaces ensure that users can interact with the app without confusion.
  2. Voice Interaction: Voice commands are a pivotal aspect of reducing distraction. Apps should integrate voice-based interactions to allow drivers to perform tasks without taking their hands off the wheel.
  3. Limited Visual Engagement: Apps should limit the frequency and complexity of visual interactions. Displaying large amounts of information or requiring frequent glances can divert the driver’s attention from the road.
  4. Contextual Relevance: App content and notifications should be contextually relevant to the driving experience. This ensures that only essential and non-distracting information is presented.
  5. Appropriate Testing and Evaluation: Developers are encouraged to rigorously test and evaluate their apps in simulated driving scenarios to identify potential distractions and address them before deployment.

Supported App Categories: Revolutionizing the Drive

Third-party apps for Android Automotive have expanded the possibilities of in-car technology, offering users diverse functionalities that seamlessly integrate into the driving experience. The following app categories are supported, each adding a layer of convenience and engagement to the road:

  1. Media (Audio) Apps: These apps turn vehicles into personalized entertainment hubs, allowing users to enjoy their favorite music, podcasts, and audio content while on the go. The integration of media apps ensures a dynamic and enjoyable driving experience.
  2. Messaging Apps: Messaging apps take communication to the next level by using text-to-speech and voice input technologies. Drivers can stay connected and informed through voice-enabled interactions, minimizing distraction and enhancing safety.
  3. Navigation, Parking, and Charging Apps: These apps provide valuable support for drivers. Navigation apps offer real-time directions, while parking apps help locate available parking spaces. Charging apps aid electric vehicle drivers in finding charging stations, adding a layer of convenience to sustainable travel.

Impact on the Driving Experience

Third-party apps wield the power to reshape the driving experience, infusing it with innovation and convenience. Media apps transform mundane journeys into immersive musical experiences, while messaging apps ensure that communication remains seamless and hands-free. Navigation, parking, and charging apps not only guide drivers efficiently but also contribute to a greener and more sustainable travel ecosystem.

Guidelines for Quality and Safety

Google places paramount importance on quality and safety when it comes to third-party apps for Android Automotive. Google has provided a set of references and guidelines for developers:

  1. Getting Started with Car Apps: https://developer.android.com/training/cars/start
  2. Quality Guidelines for Car Apps: https://developer.android.com/docs/quality-guidelines/car-app-quality
  3. Navigation Guidelines for Car Apps: https://developer.android.com/training/cars/navigation

Developers are encouraged to adhere to the quality guidelines outlined in the Android documentation. These guidelines ensure that apps are user-friendly, visually consistent, and minimize driver distraction.

Developing for Android Automotive

The realm of Android development has extended its reach beyond smartphones and tablets, embracing the automotive landscape with open arms. Developers now have the opportunity to create apps that enhance the driving experience, making vehicles smarter, safer, and more connected. In this context, let’s delve into exploring the tools, requirements, and considerations that drive this exciting endeavor.

Android Studio: The Gateway to Automotive Development

For developers venturing into the world of Android Automotive, Android Studio serves as an indispensable companion. This development environment provides dedicated Software Development Kits (SDKs) for Android versions R/11 and beyond, empowering developers to craft innovative applications tailored to vehicles’ unique needs.

Key highlights of developing for Android Automotive include:

  1. SDK Availability: Android Studio offers automotive SDKs for Android versions R/11, S/12, and T/13. These SDKs extend their capabilities to the automotive domain, providing developers with the tools and resources they need to create engaging and functional automotive apps.
  2. Minimum Android Studio Version: To develop automotive apps, developers need Android Studio version 4.2 or higher. This version includes the necessary tools and resources for automotive development, such as the Automotive Gradle plugin and the Automotive SDK.
  3. Transition to Stability: Android Studio version 4.2 transitioned to a stable release in May 2021. This means that it is the recommended version for automotive development. However, developers can also use the latest preview versions of Android Studio, which include even more features and improvements for automotive development.

Automotive AVD for Android Automotive Car Service Development

The Automotive AVD (Android Virtual Device) provides developers with a platform to emulate Android Automotive systems, facilitating the refinement of apps and services before deployment to physical vehicles. Let’s explore the key components and aspects of the Automotive AVD.

SDK and System Image

The Automotive AVD operates within the Android 10.0 (Q) (latest T/13) software development kit (SDK). This SDK version is specifically tailored to the needs of Android Automotive Car Service. The AVD utilizes the “Automotive with Google Play Intel x86 Atom” system image, replicating the architecture and features of an Android Automotive environment on Intel x86-based hardware.

AVD Configuration

The AVD configuration is structured around the “Automotive (1024p landscape) API 29” and in the latest “Automotive (1024p landscape) API 32” setup. This configuration mimics a landscape-oriented 1024p (pixels) display, which is representative of the infotainment system commonly found in vehicles. This choice of resolution and orientation ensures that developers can accurately assess how their apps will appear and function within the context of an automotive display.

Additional Features

The Automotive AVD also includes a number of additional features that can be helpful for developers, such as:

  • Support for multiple displays: The Automotive AVD can be configured to support multiple displays, which is useful for developing apps that will be used in vehicles with large infotainment systems.
  • Support for sensors: The Automotive AVD can be configured to simulate a variety of sensors, such as the accelerometer, gyroscope, and magnetometer. This allows developers to test how their apps will behave in response to changes in the environment.
  • Support for connectivity: The Automotive AVD can be configured to connect to a variety of networks, such as Wi-Fi, cellular, and Bluetooth. This allows developers to test how their apps will behave when connected to the internet or other devices.

Testing and Experimentation

Developers can utilize the Automotive AVD for a range of purposes:

  • App Development: The AVD allows developers to test how their apps interact with the Android Automotive Car Service interface, ensuring compatibility and optimal performance.
  • User Experience: User interface elements, such as touch controls and voice interactions, can be evaluated in a simulated automotive environment.
  • Feature Integration: Developers can experiment with integrating their apps with Android Automotive Car Service features like navigation, voice commands, and media playback.

Advantages of Automotive AVD

  1. Cost-Efficient: The Automotive AVD eliminates the need for dedicated physical hardware for testing, reducing costs and resource requirements.
  2. Efficiency: Developers can rapidly iterate and debug apps within a controlled virtual environment.
  3. Realistic Testing: The AVD closely emulates the behavior and constraints of an actual Android Automotive system, providing a realistic testing environment.
  4. Customization: AVD configurations can be fine-tuned to match specific hardware and software requirements.

Embracing the Future: Considerations for Automotive Development

Developing for Android Automotive requires a strategic approach that takes into account the unique context of the driving environment. While the tools and SDKs provide a solid foundation, developers must also consider:

  1. Driver Safety: Safety is paramount in the automotive domain. Apps should be designed with minimal driver distraction in mind, favoring voice interactions and intuitive interfaces that prioritize safe driving.
  2. Contextual Relevance: The driving experience is distinct from other contexts. Apps should deliver information and services that are relevant to the road, such as navigation guidance, vehicle status, and communication functionalities.
  3. User-Centric Design: User experience is key. Design apps that align with drivers’ needs, making interactions seamless and intuitive even in a dynamic and ever-changing driving environment.

Conclusion

Android Automotive represents a transformative leap in the automotive industry, seamlessly integrating technology into vehicles. The Car Service and Car Manager components facilitate communication between applications and the vehicle’s hardware, enhancing the user experience. As developers, exploring this ecosystem opens doors to innovative in-car applications while adhering to strict guidelines to ensure driver safety. With Android Automotive’s rapid advancement, the future promises even more exciting opportunities for both developers and car enthusiasts alike.

Android Automotive Audio System

Exploring the Intricacies of Android Automotive Audio Systems for Enhanced Driving Experiences

In the modern world, vehicles are no longer just modes of transportation; they have transformed into mobile entertainment hubs and communication centers. The integration of advanced audio systems in vehicles has revolutionized the driving experience, providing drivers and passengers with a seamless blend of music, navigation guidance, voice commands, and much more. However, what makes the audio in vehicles truly special goes beyond just the melodies and beats. In this blog, we delve into the intricacies of automotive audio systems, exploring the unique features that make them stand out.

What is special about audio in vehicles?

Automotive Audio is a feature of Android Automotive OS (AAOS) that allows vehicles to play infotainment sounds, such as media, navigation, and communications. AAOS is not responsible for chimes and warnings that have strict availability and timing requirements, as these sounds are typically handled by the vehicle’s hardware.

Here are some of the things that are special about audio in vehicles:

Many audio channels with special behaviors

In a vehicle, there can be many different audio channels, each with its own unique purpose. For example, there may be a channel for music, a channel for navigation instructions, a channel for phone calls, and a channel for warning sounds. Each of these channels needs to behave in a specific way in order to be effective. For example, the music channel should not be interrupted by the navigation instructions, and the warning sounds should be audible over all other channels.

Critical chimes and warning sounds

In a vehicle, it is important to be able to hear critical chimes and warning sounds clearly, even over loud music or other noise. This is why these sounds are often played through a separate set of speakers, or through the speakers at a higher volume.

Interactions between audio channels

The audio channels in a vehicle can interact with each other in a variety of ways. For example, the music channel may be muted when the navigation instructions are spoken, or the warning sounds may override all other channels. These interactions need to be carefully designed in order to ensure that the audio system is safe and effective.

Lots of speakers

In order to provide good sound quality in a vehicle, there are often many speakers installed. This is because the sound waves need to be able to reach all parts of the vehicle, even if the driver and passengers are not sitting directly in front of the speakers.

In addition to these special features, audio in vehicles is also subject to a number of challenges, such as:

Noise

There is often a lot of noise in a vehicle, from the engine, the road, and the wind. This noise can make it difficult to hear the audio system, especially the critical chimes and warning sounds.

Vibration

The vehicle can vibrate, which can also make it difficult to hear the audio system.

Temperature

The temperature in a vehicle can vary greatly, from very hot to very cold. This can also affect the performance of the audio system.

Despite these challenges, audio in vehicles is an important safety feature and can also be a great way to enjoy music and entertainment while driving.

Automotive Sounds and Streams

The world of automotive sounds and streams is a testament to the intersection of technology, design, and human experience. The symphony of sounds within a vehicle, coupled with the seamless integration of streaming services, creates a holistic journey that engages our senses and transforms the act of driving into an unforgettable adventure

In car audio systems using Android, different sounds and streams are managed:

Stream-centric architecture diagram

Logical Streams

Logical streams are the streams of audio data that are generated by Android apps. These streams are tagged with AudioAttributes, which provide details like where they come from, and information about the type of audio, such as its importance, latency requirements, and desired output devices.

Physical Streams

Physical streams are the streams of audio data that are output by the vehicle’s audio hardware. These are the actual sounds that come out of the speakers. These streams are not tagged with AudioAttributes, as they are not controlled by Android. They are made by mixing logical streams together. Some sounds, like important warnings, are managed separately from Android.

The main difference between logical streams and physical streams is that logical streams are controlled by Android, while physical streams are not. This means that Android can control the volume, routing, and focus of logical streams, but it cannot control the volume, routing, or focus of physical streams.

Android App Sounds

Apps make sounds, like music or navigation. These sounds are sent to a mixer and then to the speakers. The mixer combines different sounds and makes them into one.

External Sounds

External sounds are sounds that are generated by sources other than Android apps, such as seatbelt warning chimes. These sounds are managed outside of Android and are not subject to the same audio policies as Android sounds. Some sounds shouldn’t go through Android, so they go directly to the mixer. The mixer can ask Android to pause other sounds when these important sounds play.

External sounds are typically managed outside of Android because they have strict timing requirements or because they are safety-critical. For example, a seatbelt warning chime must be played immediately when the seatbelt is not buckled, and it must be audible over any other sounds that are playing. This is why external sounds are typically handled by the vehicle’s hardware, rather than by Android software.

Contexts

Contexts are used to identify the purpose of the audio data. This information is used by the system to determine how to present the audio, such as the volume level, the priority, and whether or not it should be interrupted by other sounds.

Buses

Buses are logical groups of physical streams that are routed to the same output device. This allows the system to mix multiple audio streams together before sending them to the speakers.

Audio Flinger

AudioFlinger is the system service that manages the audio output. It uses the context to mix logical streams down to physical streams called buses. This allows multiple logical streams to be mixed together, even if they are in different formats or have different priorities.

The IAudioControl::getBusForContext method maps from context to bus. This method is used by applications to get the bus that is associated with a particular context. This information can be used to route the audio output to the desired speakers.

For example, the NAVIGATION context could be routed to the driver’s side speakers. This would ensure that the navigation instructions are always audible, even if the music is playing.

The physical streams, contexts, and buses are an important part of the Android audio system. They allow the system to intelligently manage the audio output and ensure that the most important sounds are always audible.

Output Devices

Audio Flinger is like the conductor of an orchestra. It takes the different streams from each context and mixes them together into something called a “bus.” Think of a bus as a big container for mixed sounds.

In the Audio HAL (the part of the system that handles audio), there’s something called “AUDIO_DEVICE_OUT_BUS.” It’s like a general way to send sounds to the speakers in a car. The AUDIO_DEVICE_OUT_BUS device type is the only supported output device type in Android Automotive OS. This is because it allows for the most flexibility in terms of routing and mixing audio streams.

A system implementation can choose to use one bus port for all Android sounds, or it can use one bus port for each CarAudioContext. A CarAudioContext is a set of audio attributes that define the type of audio, such as its importance, latency requirements, and desired output devices.

If a system implementation uses one bus port for all Android sounds, then Android will mix everything together and deliver it as one stream. This is the simplest approach, but it may not be ideal for all use cases. For example, if you want to be able to play different sounds from different apps at the same time, then you will need to use one bus port for each CarAudioContext.

The assignment of audio contexts to output devices is done through the car_audio_configuration.xml file. This file is used to define the audio routing and mixing policies for the vehicle.

Microphone Input

When we want to record audio (like using a microphone), the Audio HAL gets a request called “openInputStream.” This request includes a way to process the microphone sound.

There’s a special type called “VOICE_RECOGNITION.” This is used for things like the Google Assistant. It needs sound from two microphones (stereo) and can cancel echoes. Other processing is done by the Assistant.

If there are more than two microphones, we use a special setting called “channel index mask.” This setting helps handle multiple microphones properly.

Here’s a simple example of how to set this up in code:

Java
// Setting up the microphone format
AudioFormat audioFormat = new AudioFormat.Builder()
    .setEncoding(AudioFormat.ENCODING_PCM_16BIT)
    .setSampleRate(44100)
    .setChannelIndexMask(0xf /* 4 channels, 0..3 */)
    .build();

// Creating an AudioRecord object with the format
AudioRecord audioRecord = new AudioRecord.Builder()
    .setAudioFormat(audioFormat)
    .build();

// Choosing a specific microphone device (optional)
audioRecord.setPreferredDevice(someAudioDeviceInfo);

If both “setChannelMask” and “setChannelIndexMask” are used, then “setChannelMask” (maximum of two channels) wins.

Starting from Android 10, the Android system can record from different sources at the same time, but there are rules to protect privacy. Some sources, like FM radio, can be recorded along with regular sources like the microphone. Apps using specific devices like bus microphones need to tell the system which one to use explicitly.

Audio Context

Audio contexts are groups of audio usages that are used to simplify the configuration of audio in Android Automotive OS. Let’s first discuss audio usage

Audio Usage

In Android Automotive OS (AAOS), AudioAttributes.AttributeUsages are like labels for sounds. They help control where the sound goes, how loud it is, and who has control over it. Each sound or request for focus needs to have a specific usage defined. If no usage is set, it’s treated as a general media sound.

Android 11 introduced system usages, which are special labels that require specific permissions to use. These are:

  1. USAGE_EMERGENCY
  2. USAGE_SAFETY
  3. USAGE_VEHICLE_STATUS
  4. USAGE_ANNOUNCEMENT

To set a system usage, you use AudioAttributes.Builder#setSystemUsage. If you try to mix regular usage with system usage, it won’t work.

Java
package com.softaai.automotive.audio


import android.media.AudioAttributes;

/**
 * Created by amoljp19 on 8/12/2023.
 * softAai Apps.
 */
public class AudioAttributesExample {

    public static void main(String[] args) {
        // Constructing AudioAttributes with system usage
        AudioAttributes.Builder attributesBuilder = new AudioAttributes.Builder()
                .setSystemUsage(AudioAttributes.USAGE_ALARM); // Set a system usage (alarm)

        // You can also set a general usage, but not both a system usage and a general usage
        // attributesBuilder.setUsage(AudioAttributes.USAGE_MEDIA); // Uncommenting this line would cause an error

        // Building the AudioAttributes instance
        AudioAttributes audioAttributes = attributesBuilder.build();

        // Checking the associated system usage or usage
        int systemUsage = audioAttributes.getSystemUsage();
        System.out.println("Associated System Usage: " + systemUsage);

    }
}

In this example:

  1. We use AudioAttributes.Builder to create an instance of audio attributes.
  2. We use setSystemUsage to specify a system context for the audio, in this case, an alarm usage.
  3. Attempting to set both a system usage and a general usage using setUsage would result in an error, so that line is commented out.
  4. We then build the AudioAttributes instance using attributesBuilder.build().
  5. Finally, we use audioAttributes.getSystemUsage() to retrieve the associated system usage and print it.

Audio Context

Audio contexts are used in Android to identify the purpose of a sound. This information is used by the system to determine how to present the sound, such as the volume level, the priority, and whether or not it should be interrupted by other sounds.

The following are the audio contexts that are currently defined in Android:

  1. MUSIC: This is for playing music in the vehicle, like your favorite songs.
  2. NAVIGATION: These are the directions your vehicle’s navigation system gives you to help you find your way.
  3. VOICE_COMMAND: When you talk to the vehicle, like telling it to change settings or do something for you.
  4. CALL_RING: When someone is calling you, this is the ringing sound you hear.
  5. CALL: This is for when you’re having a conversation with someone on the phone while in the vehicle.
  6. ALARM: A loud sound that might go off if something needs your immediate attention.
  7. NOTIFICATION: These are little messages or reminders from the vehicle’s systems.
  8. SYSTEM_SOUND: The sounds you hear when you press buttons or interact with the vehicle’s controls.

The following table summarizes the mapping between audio contexts and usages in Android Automotive OS:

The audio contexts in Android 11

The audio context for a sound can be specified by the application that is playing the sound. This is done by setting the context property of the AudioAttributes object that is used to create the sound.

The system uses the audio context to determine how to present the sound. For example, the volume level of a sound may be higher for the MUSIC context than for the NOTIFICATION context. The system may also choose to interrupt a sound of a lower priority with a sound of a higher priority.

Audio contexts are an important part of the Android audio system. They allow the system to intelligently manage the audio output and ensure that the most important sounds are always audible.

Multi-zone Audio

In cars, multiple people might want to listen to different things at the same time. Multi-zone audio makes this possible. For instance, the driver could be playing music in the front while passengers watch a video in the back.

Starting from Android 10, car makers (OEMs) can set up separate audio zones in the vehicle. Each zone is like a specific area with its own volume control, sound settings, and ways to switch between different things playing.

Imagine the main cabin is one zone, and the screens and headphone jacks in the back are another zone.

This setup is done using a special file called “car_audio_configuration.xml.” A part of the car’s system reads this and decides how sounds should move between zones. When you start a music or video player, the system knows where to send the sound based on the zone and what you’re doing.

Each zone can focus on its own sounds, so even if two people are listening to different things, their sounds won’t interfere with each other. This makes sure everyone gets their own audio experience.

Configure multi-zone audio
  • Zones are collections of devices within the vehicle that are grouped together for audio routing and focus management. Each zone has its own volume groups, routing configuration for contexts, and focus management.
  • The zones are defined in car_audio_configuration.xml. This file is used to define the audio routing and focus policies for the vehicle.
  • When a player is created, CarAudioService determines for which zone the player is associated with. This is done based on the player’s uid and the audio context of the stream that it is playing.
  • Focus is also maintained independently for each audio zone. This means that applications in different zones can independently produce audio without interfering with each other.
  • CarZonesAudioFocus within CarAudioService is responsible for managing focus for each zone. This ensures that only one application can have an audio focus in a given zone at a time.

In a simpler way, multi-zone audio lets different parts of the car play different sounds at the same time, so everyone can enjoy what they want to hear.

Audio HAL

In automotive audio, the Android system uses something called the Audio HAL to manage audio devices. This helps control how sounds are sent to speakers and received from microphones.

Audio HAL Components:

  1. IDevice.hal: Handles creating sound streams, controlling volume, and muting. It uses “createAudioPatch” to connect different devices for sound.
  2. IStream.hal: Manages the actual streaming of audio to and from the hardware, both for input and output.

Automotive Device Types:

Here are some device types that matter for cars:

  • AUDIO_DEVICE_OUT_BUS: Main output for all Android sounds in the car.
  • AUDIO_DEVICE_OUT_TELEPHONY_TX: For sending audio to the phone for calls. Here “TX” stands for “transmit”. In general, TX refers to the device that is sending data.
  • AUDIO_DEVICE_IN_BUS: Used for inputs that don’t fit other categories.
  • AUDIO_DEVICE_IN_FM_TUNER: Only for radio input.
  • AUDIO_DEVICE_IN_LINE: For things like AUX input.
  • AUDIO_DEVICE_IN_BLUETOOTH_A2DP: For music from Bluetooth.
  • AUDIO_DEVICE_IN_TELEPHONY_RX: For audio from phone calls. Here “RX” stands for “receive.” In general, RX refers to the device that is receiving data.

Configuring Audio Devices:

To make audio devices work with Android, they must be defined in a file called “audio_policy_configuration.xml”.

XML
<audioPolicyConfiguration version="1.0" xmlns:xi="http://www.w3.org/2001/XInclude">
    <modules>
        <module name="primary" halVersion="3.0">
            <attachedDevices>
                <item>bus0_phone_out</item>
<defaultOutputDevice>bus0_phone_out</defaultOutputDevice>
            <mixPorts>
                <mixPort name="mixport_bus0_phone_out"
                         role="source"
                         flags="AUDIO_OUTPUT_FLAG_PRIMARY">
                    <profile name="" format="AUDIO_FORMAT_PCM_16_BIT"
                            samplingRates="48000"
                            channelMasks="AUDIO_CHANNEL_OUT_STEREO"/>
                </mixPort>
            </mixPorts>
            <devicePorts>
                <devicePort tagName="bus0_phone_out"
                            role="sink"
                            type="AUDIO_DEVICE_OUT_BUS"
                            address="BUS00_PHONE">
                    <profile name="" format="AUDIO_FORMAT_PCM_16_BIT"
                            samplingRates="48000"
                            channelMasks="AUDIO_CHANNEL_OUT_STEREO"/>
                    <gains>
                        <gain name="" mode="AUDIO_GAIN_MODE_JOINT"
                                minValueMB="-8400"
                                maxValueMB="4000"
                                defaultValueMB="0"
                                stepValueMB="100"/>
                    </gains>
                </devicePort>
            </devicePorts>
            <routes>
                <route type="mix" sink="bus0_phone_out"
                       sources="mixport_bus0_phone_out"/>
            </routes>
        </module>
    </modules>
</audioPolicyConfiguration>

This file has parts like:

  • module name: It specifies the type of device, like “primary” for automotive.
  • devicePorts: This is where you define different input and output devices with their settings.
  • mixPorts: It lists the different streams for audio, like what’s coming from apps.
  • routes: These are connections between devices and streams.

For example, you can define an output device called “bus0_phone_outthat mixes all Android sounds. You can also set the volume levels for it.

In simpler words, the Audio HAL helps manage how sounds come out of speakers and go into microphones in cars. Devices and settings are defined in a special file to make everything work correctly.

Chimes and warnings

Chimes and warnings within vehicles serve as auditory cues that communicate vital information to the driver and occupants. From seatbelt reminders to collision warnings, these sounds are designed to promptly draw attention to situations that require immediate action. These auditory cues enhance situational awareness and contribute to the overall safety of the driving experience.

Android’s Role in Automotive Audio

While Android has become a ubiquitous operating system for various devices, it presents certain considerations when it comes to automotive safety. Android, in its standard form, is not classified as a safety-critical operating system. Unlike dedicated safety-critical systems found in vehicles, Android’s primary focus is on delivering a versatile and user-friendly platform.

The Absence of an Early Audio Path

In the context of chimes and warnings, Android lacks an early audio path that is essential for producing regulatory and safety-related sounds. An early audio path would involve direct access to the audio hardware, ensuring that these crucial sounds are played promptly and without interruption. Android, being a multifunctional operating system, may not possess the mechanisms required for such instantaneous audio playback.

Regulatory Sounds Beyond Android

Given the critical nature of regulatory chimes and warnings, generating and delivering these sounds falls outside the Android operating system. To ensure that these sounds are reliable and timely, they are often generated and mixed independently from Android, later integrating into the vehicle’s overall audio output chain. This approach guarantees that regulatory sounds maintain their integrity, even in scenarios where Android might face limitations due to its primary focus on versatility.

Safety-Critical Considerations

The absence of an early audio path within Android highlights a broader concern related to the safety-critical nature of automotive audio. As vehicles continue to integrate advanced technologies, including infotainment systems and connectivity features, the challenge lies in finding the balance between innovation and safety. Regulatory bodies and automotive manufacturers collaborate to ensure that safety-critical elements, such as chimes and warnings, are given the utmost attention and reliability.

The Road Ahead: Safety and Technology Integration

The integration of technology, including operating systems like Android, into vehicles is a testament to the dynamic evolution of the automotive landscape. As the industry continues to innovate, addressing safety concerns remains paramount. The future promises advancements that bridge the gap between safety-critical needs and technological capabilities. This may involve further synchronization between Android and the vehicle’s safety systems, ensuring that critical alerts and warnings are delivered seamlessly and without compromise.

In short, the realm of chimes and warnings in automotive audio underscores the delicate balance between safety and technology. While Android contributes significantly to the modern driving experience, there are specific safety-critical aspects, such as regulatory sounds, that demand specialized attention. The collaborative efforts of regulatory bodies, automotive manufacturers, and technology providers will continue to shape a safer and more immersive driving journey for all.

Conclusion

The audio systems in modern vehicles have evolved far beyond their humble beginnings as simple radios. They have become intricate orchestras, harmonizing various audio contexts to provide an engaging and safe driving experience. The integration of multiple audio channels, critical warning sounds, seamless context interactions, and an abundance of speakers all contribute to the unique symphony that accompanies us on our journeys. As technology continues to advance, we can only anticipate further innovations that will elevate the in-car audio experience to new heights.

Android Automotive os & IVI

Unleashing the Power of Android OS with Android Automotive on the Road: Empower Your Drive

The Polestar 2 is the first car with Android Automotive OS Get ready for an incredible driving experience as I unlock the secrets of Android Automotive! Just like your beloved gadgets and apps, now your car can deliver the same easy and exciting journey you’ve come to love. Picture this: seamless integration with your personal...

Membership Required

You must be a member to access this content.

View Membership Levels

Already a member? Log in here
android 14

Discovering Android 14’s Exciting New Features for an Enhanced Mobile Experience

In the ever-evolving world of Android, each version brings its own set of enhancements and improvements. The past couple of Android versions brought some of the major upgrades Android has gotten since its inception. Android 12 introduced Material You, which brought much-needed UI changes, and Android 13 added quality-of-life improvements over Android 12, making it a more polished experience. Much like Android 13, Android 14 may seem like an incremental upgrade, but you would be surprised by just how many internal changes it brings to improve the overall Android experience.

Throughout this blog post, we will delve into the Android 14 new things you need to know as an Android developer in this fast-paced world. Here, we’ll explore how Android 14 empowers you to create exceptional experiences for your users effortlessly.

So, buckle up and get ready to embark on a thrilling adventure into the future of Android development, as we unravel the wonders of Google I/O 2023 and unveil the exciting world of Android 14!

Android 14 New Features

Android 14 is the latest version of Google’s mobile operating system, and it’s packed with new features for both users and developers. Here’s a look at some of the highlights:

Photo Picker

Say goodbye to privacy concerns when it comes to granting access to your photo library! In the past, apps would request access to your entire photo collection even if you just wanted to upload a single picture. This raised legitimate privacy worries since handing over access to all your photos wasn’t the safest option.

Luckily, Android 14 introduces a game-changing solution known as the Photo Picker feature. With this new interface, you have full control over which photos an app can access. Instead of granting unrestricted access, you can now select and share specific photos without compromising your privacy. This means that apps only get access to the photos you choose, ensuring that your entire photo library remains secure.

Thanks to Android 14’s Photo Picker, you can confidently enjoy the convenience of sharing photos while maintaining control over your privacy. It’s a small but significant step towards a safer and more personalized app experience.

Notification Flashes

Android 14 introduces a handy feature called “Notification Flashes” that proves invaluable in noisy environments or for individuals with hearing difficulties. If you often find yourself in situations where you can’t hear your phone’s notifications, this feature has got you covered.

To enable or disable Notification Flashes, follow these simple steps:

  1. Open your phone’s Settings.
  2. Look for the “Display” option and tap on it.
  3. Scroll down and find “Flash notifications.”
  4. You’ll see two toggle options: “Camera Flash” and “Screen Flash.” Toggle them on or off based on your preference.

If you choose to use Screen Flashes, you can even customize the color of the flash. Here’s how:

  1. Within the “Flash notifications” menu, tap on “Screen Flash.”
  2. You’ll be presented with a selection of colors to choose from.
  3. Tap on a color to preview how it will look.
  4. Once you’re satisfied with your choice, simply close the prompt.

With Notification Flashes, you can stay informed about incoming notifications, even in noisy environments or if you have difficulty hearing. It’s a simple yet powerful feature that enhances accessibility and ensures you never miss an important update.

Camera and Battery Life Improvements

Android 14 doesn’t just bring exciting new features but also focuses on enhancing the overall user experience. Google has made significant quality-of-life improvements to ensure a smoother and optimized performance.

One area of improvement is battery consumption. Android 14 is designed to be more efficient, helping to prolong your device’s battery life. This means you can enjoy using your phone for longer periods without worrying about running out of power.

Moreover, both the user interface (UI) and internal workings of Android 14 have been refined to provide a seamless experience. You can expect a smoother and more responsive interface, making navigation and app usage more enjoyable.

In addition to the general improvements, Android 14 introduces new camera extensions. These extensions optimize the post-processing time and enhance the quality of the images captured. If you have a Pixel device powered by the Tensor G2 chip, you’ll notice an even greater improvement in the camera department. The Tensor G2 chip brings significant advancements that further enhance the camera capabilities, resulting in stunning photos with reduced processing time.

With Android 14, you can look forward to a more efficient and polished experience, along with impressive camera enhancements, especially on Pixel devices powered by the Tensor G2 chip. Get ready to enjoy a smoother and more captivating Android journey!

Upcoming Features

As Android 14 is still in the development stage(currently in beta), the upcoming stable version may include or discard these proposed upcoming features.

LockScreen Customizations

One of the exciting features coming to Android 14 is the ability to customize your lock screen. This means you can personalize how your lock screen appears, including changing the clock style and customizing the app shortcuts located at the lower corners. This feature draws some inspiration from iOS 16.

These lock screen customizations are expected to be available in the stable Android 14 release, which is scheduled to launch next month if everything goes as planned for Google. However, it’s worth noting that the lock screen clock styles showcased at Google I/O 2023 weren’t particularly appealing, appearing somewhat flat. Hopefully, the final versions will have more vibrant and engaging styles to choose from.

Magic Compose

Google has an exciting feature called “Magic Compose” coming to the Messages app this summer. It works similarly to the AI generative features demonstrated at Google I/O 2023, which will be added to Google’s Workspace apps. Magic Compose helps you write text messages with different moods and styles. From the preview showcased at I/O, it looks really cool.

For example, if you type “Wanna grab dinner,” Magic Compose offers various rewrites that add excitement, lyrical flair, or even Shakespearean language. It’s a clever feature that adds fun and creativity to your messages. We hope it will eventually be available on Gboard as well. It seems like Google’s way of encouraging more people to use RCS and Google Messages in general. However, please note that Magic Compose is currently limited to Pixel devices.

Emoji, Generative AI, and Cinematic Wallpapers

Android has always been known for its customization options, and Android 14 takes it a step further with the addition of Emoji, Generative AI, and Cinematic wallpapers.

The Emoji wallpaper picker lets you create a unique and interactive wallpaper by selecting a few emoji and a dominant color. It combines them to create a fun and personalized wallpaper that reflects your favorite emoji.

The AI Generative Wallpaper feature is particularly exciting. It allows you to input a few words describing the type of wallpaper you want and then generates a selection of unique wallpapers exclusively for your device. These wallpapers are completely one-of-a-kind and tailored to your preferences.

Cinematic wallpapers bring depth and a parallax effect to your photos using AI. You can choose a photo and the feature will add a dynamic effect that responds to your device’s movements. It’s similar to the Cinematic feature in Google Photos, adding a captivating visual element to your device’s wallpaper.

With these customizable features, Android 14 offers even more ways to personalize your device and make it truly your own. Whether it’s through emoji mashups, generative wallpapers, or dynamic effects, Android 14 provides an enhanced level of customization for a unique and enjoyable user experience.

New Find My Device Experience

The Find My Device app on Android has received a fresh new look to match the latest design language. In addition, it will be receiving some exciting new features this fall. One of the notable additions is the expanded device support, allowing you to locate not only your phones but also accessories using other Android devices on the network.

This enhancement is a welcome addition to Android, as Apple has been a leader in the Find My iPhone experience. Furthermore, if you want to track larger objects like bicycles, manufacturers such as Tile and Chipolo will offer tracker tags that can be used with the Find My Device app.

With these updates, Android users can enjoy a more comprehensive and convenient way to locate their devices and belongings. It’s a great step forward in enhancing the Find My Device experience on Android.

Tracker Prevention and Alerts

Although Google’s efforts to convince Apple to adopt RCS have not been successful, both companies have collaborated on enhancing privacy measures, particularly with Tracker Prevention alerts.

BTW, RCS (Rich Communication Services) is an advanced messaging protocol replacing SMS, offering additional features and capabilities. Some of the features offered by RCS include read receipts, typing indicators, high-quality media sharing, group chats, and the ability to send messages over Wi-Fi or mobile data.

Regardless of the Android device you’re using, if an unidentified tracker is monitoring your activities, your Android device will provide a warning and assist you in locating the source. This collaboration between Google and Apple in the privacy department is a significant achievement, ensuring enhanced privacy and security for Android users.

Using your Android device as a Webcam

If you’re disappointed with the low-quality webcam on your laptop, hold off on buying an external webcam just yet. Android 14 might come with a fantastic feature that allows you to use your Android device as an external camera and stream in high-definition at 1080p.

To use this feature, simply connect your Android device to your PC and a menu will pop up. From there, select “webcam” to switch to using your phone’s camera. Currently, this feature is not available in the operating system, even as an experimental option, but it’s expected to be included in Android 14 if Google deems it ready for release.

With Android 14, you could potentially transform your Android device into a high-quality webcam, eliminating the need for an external camera. Keep an eye out for this exciting feature, which aims to provide a better video conferencing and streaming experience for Android users.

App Cloning

App Cloning is undoubtedly one of the most highly anticipated features in Android. In the past, users had to resort to downloading third-party app cloning utilities that often came bundled with spyware. However, with Android 14, Google plans to address this by introducing a native App Cloning utility.

App Cloning allows you to have two instances of the same app on your device. This feature is particularly useful for users with dual SIM phones who want to use multiple accounts of apps like WhatsApp simultaneously. By cloning the app and logging in with a secondary SIM card, you can have two separate accounts running concurrently.

Google initially hinted at the App Cloning feature during the Android 14 Developer Preview 1. However, there haven’t been any recent updates regarding its development. It is speculated that App Cloning may not be included in the initial stable release of Android 14. However, it is expected to be introduced in future Android 14 feature drop updates, specifically for Pixel users.

The addition of a native App Cloning utility will bring convenience and ease of use to Android users who require multiple instances of certain apps. While its exact timeline for availability remains uncertain, it is an exciting feature to look forward to in future updates of Android 14.

Predictive Back Gestures

Predictive back gestures were introduced in Android 14 Developer Preview 2 but were later removed in the following preview. These gestures allowed users to perform a slow back swipe to reveal the underlying app layer. This was particularly useful when you couldn’t remember the previous page or layer you were on.

By using predictive back gestures, you could check the layer below without losing the contents of the current page. It gave you the flexibility to verify if the previous layer was the one you intended to navigate to.

Initially, this feature was only supported in the Settings app and a few other system apps. However, it remains uncertain whether predictive back gestures will be included in the first stable release of Android 14. If not, there’s a possibility that it will be added in future feature updates.

While the fate of predictive back gestures in Android 14 is unclear, it presented an interesting way to navigate within apps and explore layers. We will have to wait and see if it becomes a part of the official release or is introduced in future updates.

App Pair

During Google I/O 2023, Google unveiled a feature called App Pair, which will be introduced in Android 14 later this year. This feature, showcased during the Pixel Fold announcement, allows users to pair and use apps together in split screens. You can also minimize or maximize them simultaneously.

At first glance, App Pair may not appear particularly useful for smartphones. However, with the increasing popularity of tablets, this feature could be a game-changer. It offers a compelling reason why Android tablets are no longer considered inferior to iPads.

With App Pair, users will have the ability to multitask more effectively on larger screens. By pairing apps in split screens, you can simultaneously use two apps side by side, enhancing productivity and convenience. Whether it’s taking notes while reading, watching a video while browsing the web, or messaging while referencing another app, App Pair makes multitasking on Android tablets a seamless experience.

The inclusion of App Pair in Android 14 demonstrates Google’s commitment to enhancing the tablet experience and bridging the gap between Android tablets and their competitors. It opens up new possibilities for users who rely on tablets for work, entertainment, or any other tasks that require multitasking.

With this upcoming feature, Android tablets are poised to offer a more compelling and competitive alternative to iPads, providing users with a powerful multitasking experience. Look forward to the release of Android 14 to enjoy the benefits of App Pair on compatible devices.

Partial Screen Recorder

In Android 14, a new screen recording feature called “Partial Screen Recording” may be introduced. Despite its name, it doesn’t mean recording only a selected area of the screen. Instead, it allows you to record a specific app without capturing any UI elements or notifications that might appear on the screen.

This feature works similarly to how Discord handles screen sharing. When you switch to view another app or the home screen during the recording, the recorded content will appear black. However, as soon as you switch back to the app you want to record, the content will be visible again. It’s a clever and convenient way to focus solely on recording the app without any distractions.

While the availability of the Partial Screen Recording feature in the official release of Android 14 is not confirmed, it is an exciting addition that can enhance the screen recording experience for users. So, keep an eye out for this neat feature in future Android updates.

Drag and Drop Text and Images to Different Apps

One exciting feature that Android 14 is expected to bring is the ability to drag and drop text and images between apps, similar to what iOS 15 offers. In the Android 14 Beta 3 build, you can already experience this feature with text, and it works seamlessly.

To use the text drag and drop feature, simply select the text you want to move, long press on it, and then drag it to another app where you want to paste the text. With your other hand, switch to the desired app and drop the text into the text area. It’s a convenient way to transfer text quickly and easily between different apps.

While the current beta version only supports text drag and drop, it is anticipated that the final Android 14 release will also include the ability to drag and drop images. This will allow you to effortlessly move images from one app to another, enhancing your productivity and ease of use.

Keep an eye out for the official Android 14 update to enjoy the full drag and drop functionality, making it simpler and more convenient to transfer both text and images between apps on your Android device.

Forced Themed Icons

One of the challenges with adaptive mono icons in Android 12 is that app developers need to add support for them. Without proper support, the overall experience may feel incomplete. However, in Android 13, Google introduced a feature that automatically converts icons to themed icons if they are not supported by developers. This helpful feature may also make its way to Android 14.

Currently, the Pixel launcher has a hidden flag that allows users to force themed icons, which has been present since Android 13 QPR Beta 3. This suggests that Google might enable this feature in the future. If enabled, it will contribute to a seamless and intuitive Android experience, ensuring that the icons match the overall theme of the device.

With automatic icon conversion, users won’t have to worry about inconsistent or mismatched icons on their devices. Android 14 aims to enhance the visual cohesiveness of the user interface, making it more polished and pleasing to the eye.

Keep an eye out for this feature in the upcoming Android 14 release, as it has the potential to improve the overall aesthetic and user experience on your Android device.

Conclusion

Android 14 introduces a range of features and improvements that enhance user experience. It offers customization options like LockScreen customizations and Emoji wallpaper pickers, along with privacy enhancements such as Tracker Prevention alerts. Quality of life improvements includes the Photo Picker feature and Notification Flashes. The update brings camera advancements, App Cloning utility, predictive back gestures, and the ability to use Android devices as external cameras. Android 14 promises a seamless and personalized experience, focusing on user customization and functionality.

clean architecture mvvm

Mastering Clean Architecture: A Comprehensive Guide to Building Movies App with MVVM and Jetpack Compose

Clean Architecture and MVVM Architecture are two popular architectural patterns for building robust, maintainable, and scalable Android applications. In this article, we will discuss how to implement Clean Architecture and MVVM Architecture in an Android application using Kotlin. We will cover all aspects of both architectures in-depth and explain how they work together to create...

Membership Required

You must be a member to access this content.

View Membership Levels

Already a member? Log in here
TCA

Architecting Success: A Comprehensive Guide to TCA Architecture in Android Development

I had the opportunity to work with the TCA (The Composable Architecture) in the past and would like to share my knowledge about it with our community. This architecture has gained popularity as a reliable way to create robust and scalable applications. TCA is a composable, unidirectional, and predictable architecture that helps developers to build applications that are easy to test, maintain and extend. In this blog, we’ll explore TCA in Android and how it can be implemented using Kotlin code.

What is TCA?

The Composable Architecture is a pattern that is inspired by Redux and Elm. It aims to simplify state management and provide a clear separation of concerns. TCA achieves this by having a strict unidirectional data flow and by breaking down the application into smaller, reusable components.

The basic components of TCA are:

  • State: The single source of truth for the application’s data.
  • Action: A description of an intent to change the state.
  • Reducer: A pure function that takes the current state and an action as input and returns a new state.
  • Effect: A description of a side-effect, such as fetching data from an API or showing a dialog box.
  • Environment: An object that contains dependencies that are needed to perform side-effects.

TCA uses a unidirectional data flow, meaning that the flow of data in the application goes in one direction. Actions are dispatched to the reducer, which updates the state, and effects are executed based on the updated state. This unidirectional flow makes the architecture predictable and easy to reason about.

Implementing TCA in Android using Kotlin

To implement TCA in Android using Kotlin, we will use the following libraries:

  • Kotlin Coroutines: For handling asynchronous tasks.
  • Kotlin Flow: For creating reactive streams of data.
  • Compose: For building the UI.

Let’s start by creating a basic TCA structure for our application.

1. State

The State is the single source of truth for the application’s data. In this example, we will create a simple counter app, where the state will contain an integer value representing the current count.

Kotlin
data class CounterState(val count: Int = 0)

2. Action

Actions are descriptions of intents to change the state. In this example, we will define two actions, one to increment the count and another to decrement it.

Kotlin
sealed class CounterAction {
    object Increment : CounterAction()
    object Decrement : CounterAction()
}

3. Reducer

Reducers are pure functions that take the current state and an action as input and return a new state. In this example, we will create a reducer that updates the count based on the action.

Kotlin
fun counterReducer(state: CounterState, action: CounterAction): CounterState {
    return when (action) {
        is CounterAction.Increment -> state.copy(count = state.count + 1)
        is CounterAction.Decrement -> state.copy(count = state.count - 1)
    }
}

4. Effect

Effects are descriptions of side-effects, such as fetching data from an API or showing a dialog box. In this example, we don’t need any effects.

Kotlin
sealed class CounterEffect

5. Environment

The Environment is an object that contains dependencies that are needed to perform side-effects. In this example, we don’t need any dependencies.

Kotlin
class CounterEnvironment

6. Store

The Store is the central component of TCA. It contains the state, the reducer, the effect handler, and the environment. It also provides a way to dispatch actions and subscribe to state changes.

Kotlin
class CounterStore : CoroutineScope {
    private val job = Job()
    override val coroutineContext: CoroutineContext
        get() = Dispatchers.Main + job

    private val _state = MutableStateFlow(CounterState())
    val state: StateFlow<CounterState> = _state.asStateFlow()

    fun dispatch(action: CounterAction) {
        val newState = counterReducer(_state.value, action)
        _state.value = newState
    }

    fun dispose() {
        job.cancel()
    }
}

We create a MutableStateFlow to hold the current state of the application. We also define a StateFlow to provide read-only access to the state. The dispatch function takes an action, passes it to the reducer, and updates the state accordingly. Finally, the dispose function cancels the job to clean up any ongoing coroutines when the store is no longer needed.

7. Compose UI

Now that we have our TCA components in place, we can create a simple UI to interact with the counter store. We will use Compose to create the UI, which allows us to define the layout and behavior of the UI using declarative code.

Kotlin
@Composable
fun CounterScreen(store: CounterStore) {
    val state = store.state.collectAsState()

    Column {
        Text(text = "Counter: ${state.value.count}")
        Row {
            Button(onClick = { store.dispatch(CounterAction.Increment) }) {
                Text(text = "+")
            }
            Button(onClick = { store.dispatch(CounterAction.Decrement) }) {
                Text(text = "-")
            }
        }
    }
}

We define a CounterScreen composable function that takes a CounterStore as a parameter. We use the collectAsState function to create a state holder for the current state of the store. Inside the Column, we display the current count and two buttons to increment and decrement the count. When a button is clicked, we dispatch the corresponding action to the store.

8. Putting it all together

To put everything together, we can create a simple MainActivity that creates a CounterStore and displays the CounterScreen.

Kotlin
class MainActivity : ComponentActivity() {
    private val store = CounterStore()

    override fun onCreate(savedInstanceState: Bundle?) {
        super.onCreate(savedInstanceState)

        setContent {
            CounterScreen(store)
        }
    }

    override fun onDestroy() {
        store.dispose()
        super.onDestroy()
    }
}

We create a CounterStore instance and pass it to the CounterScreen composable function in the setContent block. We also call disposeon the store when the activity is destroyed to clean up any ongoing coroutines.


Let’s take a look at a real-world example to gain a clearer understanding of this concept in action and see how it can be applied to solve practical problems.

Here’s another example of TCA in action using a Weather App an example.

1. State

Let’s start by defining the state of our weather app:

Kotlin
data class WeatherState(
    val location: String,
    val temperature: Double,
    val isFetching: Boolean,
    val error: String?
)

Our state consists of the current location, the temperature at that location, a flag indicating whether the app is currently fetching data, and an error message if an error occurs.

2. Action

Next, we define the actions that can be performed in our weather app:

Kotlin
sealed class WeatherAction {
    data class UpdateLocation(val location: String) : WeatherAction()
    object FetchData : WeatherAction()
    data class DataFetched(val temperature: Double) : WeatherAction()
    data class Error(val message: String) : WeatherAction()
}

We define four actions: UpdateLocation to update the current location, FetchData to fetch the weather data for the current location, DataFetched to update the temperature after the data has been fetched, and Error to handle errors that occur during the fetch.

3. Reducer

Our reducer takes the current state and an action and returns a new state based on the action:

Kotlin
fun weatherReducer(state: WeatherState, action: WeatherAction): WeatherState {
    return when (action) {
        is WeatherAction.UpdateLocation -> state.copy(location = action.location)
        WeatherAction.FetchData -> state.copy(isFetching = true, error = null)
        is WeatherAction.DataFetched -> state.copy(
            temperature = action.temperature,
            isFetching = false,
            error = null
        )
        is WeatherAction.Error -> state.copy(isFetching = false, error = action.message)
    }
}

Our reducer updates the state based on the action that is dispatched. We use the copy function to create a new state object with updated values.

4. Effects

Our effect is responsible for fetching the weather data for the current location:

Kotlin
fun fetchWeatherData(location: String): Flow<WeatherAction> = flow {
    try {
        val temperature = getTemperatureForLocation(location)
        emit(WeatherAction.DataFetched(temperature))
    } catch (e: Exception) {
        emit(WeatherAction.Error(e.message ?: "Unknown error"))
    }
}

Our effect uses a suspend function getTemperatureForLocation to fetch the weather data for the current location. We emit a DataFetched action if the data is fetched successfully and an Error action if an exception occurs.

5. Environment

Our environment provides dependencies required by our effect:

Kotlin
interface WeatherEnvironment {
    suspend fun getTemperatureForLocation(location: String): Double
}

class WeatherEnvironmentImpl : WeatherEnvironment {
    override suspend fun getTemperatureForLocation(location: String): Double {
        // implementation omitted
    }
}

Our environment defines a single function getTemperatureForLocation which is implemented by WeatherEnvironmentImpl.

Kotlin
import okhttp3.OkHttpClient
import okhttp3.Request

class WeatherEnvironmentImpl : WeatherEnvironment {
    
    private val client = OkHttpClient()
    
    override suspend fun getTemperatureForLocation(location: String): Double {
        val url = "https://api.openweathermap.org/data/2.5/weather?q=$location&appid=API_KEY&units=metric"
        val request = Request.Builder().url(url).build()

        val response = client.newCall(request).execute()
        val jsonResponse = response.body()?.string()
        val json = JSONObject(jsonResponse)
        val main = json.getJSONObject("main")
        return main.getDouble("temp")
    }
}

In this implementation, we’re using the OkHttpClient library to make an HTTP request to the OpenWeatherMap API. The API returns a JSON response, which we parse using the JSONObject class from the org.json package. We then extract the temperature from the JSON response and return it as a Double.

Note that the API_KEY placeholder in the URL should be replaced with a valid API key obtained from OpenWeatherMap.

6. Store

Our store holds the current state and provides functions to dispatch actions and read the current state:

Kotlin
class WeatherStore(environment: WeatherEnvironment) {
    private val _state = MutableStateFlow(WeatherState("", 0.0, false, null))
    val state: StateFlow<WeatherState> = _state.asStateFlow()

    private val job = Job()
    private val scope = CoroutineScope(job + Dispatchers.IO)

    fun dispatch(action: WeatherAction) {
        val newState = weatherReducer(_state.value, action)
        _state.value = newState

        when (action) {
            is WeatherAction.UpdateLocation -> {
                scope.launch {
                    val weatherAction = fetchWeatherData(newState.location).first()
                    dispatch(weatherAction)
                }
            }
            WeatherAction.FetchData -> {
                scope.launch {
                    val weatherAction = fetchWeatherData(newState.location).first()
                    dispatch(weatherAction)
                }
            }
            else -> Unit
        }
    }

    init {
        scope.launch {
            val weatherAction = fetchWeatherData(_state.value.location).first()
            dispatch(weatherAction)
        }
    }
}

Our store initializes the state with default values and provides a dispatch function to update the state based on actions. We use a CoroutineScope to run our effects and dispatch new actions as required.

In the init block, we fetch the weather data for the current location and dispatch a DataFetched action with the temperature.

In the dispatch function, we update the state based on the action and run our effect to fetch the weather data. If an UpdateLocation or FetchData action is dispatched, we launch a new coroutine to run our effect and dispatch a new action based on the result.

That’s a simple example of how TCA can be used in a real-world application. By using TCA, we can easily manage the state of our application and handle complex interactions between different components.


Testing in TCA

In TCA, the reducer is the most important component as it is responsible for managing the state of the application. Hence, unit testing the reducer is essential. However, there are other components in TCA such as actions, environment, and effects that can also be tested.

Actions can be tested to ensure that they are constructed correctly and have the intended behavior when dispatched to the reducer. Environment can be tested to ensure that it provides the necessary dependencies to the reducer and effects. Effects can also be tested to ensure that they produce the expected results when executed.

Unit Testing For Reducer

Kotlin
import kotlinx.coroutines.test.TestCoroutineDispatcher
import org.junit.Assert.assertEquals
import org.junit.Test

class WeatherReducerTest {

    private val testDispatcher = TestCoroutineDispatcher()

    @Test
    fun `update location action should update location in state`() {
        val initialState = WeatherState(location = "Satara")
        val expectedState = initialState.copy(location = "Pune")

        val actualState = weatherReducer(
            initialState,
            WeatherAction.UpdateLocation("Pune")
        )

        assertEquals(expectedState, actualState)
    }

    @Test
    fun `fetch data action should update fetching state and clear error`() {
        val initialState = WeatherState(isFetching = false, error = "Some error")
        val expectedState = initialState.copy(isFetching = true, error = null)

        val actualState = weatherReducer(initialState, WeatherAction.FetchData)

        assertEquals(expectedState, actualState)
    }

    @Test
    fun `data fetched action should update temperature and reset fetching state`() {
        val initialState = WeatherState(isFetching = true, temperature = 0.0)
        val expectedState = initialState.copy(isFetching = false, temperature = 20.0)

        val actualState = weatherReducer(
            initialState,
            WeatherAction.DataFetched(20.0)
        )

        assertEquals(expectedState, actualState)
    }

    @Test
    fun `error action should update error and reset fetching state`() {
        val initialState = WeatherState(isFetching = true, error = null)
        val expectedState = initialState.copy(isFetching = false, error = "Some error")

        val actualState = weatherReducer(
            initialState,
            WeatherAction.Error("Some error")
        )

        assertEquals(expectedState, actualState)
    }

    @Test
    fun `fetch data effect should emit data fetched action with temperature`() {
        val initialState = WeatherState(isFetching = false, temperature = 0.0)
        val expectedState = initialState.copy(isFetching = false, temperature = 20.0)

        val fetchTemperature = { 20.0 }

        val actualState = performActionWithEffect(
            initialState,
            WeatherAction.FetchData,
            fetchTemperature,
            testDispatcher
        )

        assertEquals(expectedState, actualState)
    }

    @Test
    fun `fetch data effect should emit error action with message`() {
        val initialState = WeatherState(isFetching = false, error = null)
        val expectedState = initialState.copy(isFetching = false, error = "Failed to fetch temperature")

        val fetchTemperature = { throw Exception("Failed to fetch temperature") }

        val actualState = performActionWithEffect(
            initialState,
            WeatherAction.FetchData,
            fetchTemperature,
            testDispatcher
        )

        assertEquals(expectedState, actualState)
    }
}

In this example, we test each case of the when expression in the weatherReducer function using different test cases. We also test the effect that is dispatched when the FetchData action is dispatched. We create an initial state and define an expected state after each action is dispatched or effect is performed. We then call the weatherReducer function with the initial state and action to obtain the updated state. Finally, we use assertEquals to compare the expected and actual states.

To test the effect, we define a function that returns a value or throws an exception, depending on the test case. We then call the performActionWithEffect function, passing in the initial state, action, and effect function, to obtain the updated state after the effect is performed. We then use assertEquals to compare the expected and actual states.

Furthermore, integration testing can also be performed to test the interactions between the components of the TCA architecture. For example, integration testing can be used to test the flow of data between the reducer, effects, and the environment.

Overall, while the reducer is the most important component in TCA, it is important to test all components to ensure the correctness and robustness of the application.


Advantages:

  1. Predictable state management: TCA provides a strict, unidirectional data flow, which makes it easy to reason about the state of your application. This helps reduce the possibility of unexpected bugs and makes it easier to maintain and refactor your codebase.
  2. Testability: The unidirectional data flow in TCA makes it easier to write tests for your application. You can test your reducers and effects independently, which can help you catch bugs earlier in the development process.
  3. Modularity: With TCA, your application is broken down into small, composable pieces that can be easily reused across your codebase. This makes it easier to maintain and refactor your codebase as your application grows.
  4. Error handling: TCA provides a clear path for error handling, which makes it easier to handle exceptions and recover from errors in your application.

Disadvantages:

  1. Learning curve: TCA has a steep learning curve, especially for developers who are new to functional programming. You may need to invest some time to learn the concepts and get comfortable with the syntax.
  2. Overhead: TCA can introduce some overhead, especially if you have a small application. The additional boilerplate code required to implement TCA can be a barrier to entry for some developers.
  3. More verbose code: The strict, unidirectional data flow of TCA can lead to more verbose code, especially for more complex applications. This can make it harder to read and maintain your codebase.
  4. Limited tooling: TCA is a relatively new architecture, so there is limited tooling and support available compared to more established architectures like MVP or MVVM. This can make it harder to find solutions to common problems or get help when you’re stuck.

Summary

In summary, each architecture has its own strengths and weaknesses, and the best architecture for your project depends on your specific needs and requirements. TCA can be a good choice for projects that require predictable state management, testability, and modularity, but it may not be the best fit for every project.

new plugin convention

New Plugin Convention: Embracing the Positive Shift with Android Studio’s New Plugin Convention

Plugins are modules that provide additional functionality to the build system in Android Studio. They can help you perform tasks such as code analysis, testing, or building and deploying your app.

New Plugin Convention

The new plugin convention for Android Studio was introduced in version 3.0 of the Android Gradle plugin, which was released in 2017. While the new plugin convention was officially introduced in Android Studio 3.0, it is still being used and recommended in recent versions of Android Studio.

To define plugins in the build.gradle file, you can add the plugin’s ID to the plugins block.

Groovy
// Top-level build file where you can add configuration options common to all sub-projects/modules.
plugins {
    id 'com.android.application' version '7.4.2' apply false
    id 'com.android.library' version '7.4.2' apply false
    id 'org.jetbrains.kotlin.android' version '1.8.0' apply false
}

In this example, the plugins block is used to define three different plugins: ‘com.android.application’, ‘com.android.library’, and ‘org.jetbrains.kotlin.android’. Each plugin is identified by its unique ID, and a specific version is specified as well. The ‘apply false’ statement means that the plugin is not applied to the current module yet — it will only be applied when explicitly called later on in the file.

Once you’ve defined your plugins in the build.gradle file, you can fetch them from the settings file. The settings file is typically located in the root directory of your project, and is named settings.gradle. You can add the following code to the settings.gradle file to fetch your plugins:

Groovy
pluginManagement {
    repositories {
        gradlePluginPortal()
        google()
        mavenCentral()
    }
}
dependencyResolutionManagement {
    repositoriesMode.set(RepositoriesMode.FAIL_ON_PROJECT_REPOS)
    repositories {
        google()
        mavenCentral()
    }
}
rootProject.name = "AutoSilentDriveMvvm"
include ':app'

This is an example of the new convention for the settings.gradle file in Android Studio, which includes the pluginManagement and dependencyResolutionManagement blocks.

In the pluginManagement block, repositories are defined where Gradle can search for plugin versions. In this example, gradlePluginPortal(), google(), and mavenCentral() are included as repositories. These repositories provide access to a wide range of plugins that can be used in your Android project.

In the dependencyResolutionManagement block, repositories for dependency resolution are defined. The repositoriesMode is set to FAIL_ON_PROJECT_REPOS, which means that if a repository is defined in a module’s build.gradle file that conflicts with one of the repositories defined here, the build will fail. This helps to ensure that dependencies are resolved consistently across all modules in the project.

Finally, the rootProject.name and include statements are used to specify the name of the root project and the modules that are included in the project. In this example, there is only one module, :app, but you can include multiple modules by adding additional include statements.

Advantages Over Traditional Way

The new convention of defining plugins in the build.gradle file and fetching them from the settings file in Android Studio was introduced to improve the modularity and maintainability of the build system.

Traditionally, plugins were defined in a separate file called “buildscript.gradle” and fetched from a separate “build.gradle” file. This approach made it difficult to manage and update plugins, especially in large projects with many dependencies.

By defining plugins in the build.gradle file, the build system becomes more modular and easier to maintain. Each module can specify its own set of plugins, and the build system can handle transitive dependencies automatically.

Fetching plugins from the settings file also provides a central location for managing and updating plugin versions. This approach ensures that all modules use the same version of a plugin, which helps to avoid conflicts and makes it easier to upgrade to newer versions of a plugin.

Disadvantages

  1. Complexity: The new convention adds some complexity to the build system, especially for developers who are not familiar with Gradle or Android Studio. This complexity can make it harder to understand and troubleshoot issues that arise during the build process.
  2. Learning Curve: The new convention requires developers to learn a new way of managing plugins, which can take time and effort. Developers who are used to the traditional approach may find it challenging to adapt to the new convention.
  3. Migration: Migrating an existing project from the traditional approach to the new convention can be time-consuming and error-prone. Developers may need to update multiple files and dependencies, which can introduce new issues and require extensive testing.
Android Product Flavors and Build Variants

A Deep Dive into Android Product Flavors and Build Variants for Enhanced App Development

In Android development, product flavors allow you to create different versions of your app with different configurations, resources, and code, but with the same base functionality. Product flavors are used when you want to create multiple versions of the same app that differ in some way, such as a free and a paid version, or versions for different countries or languages.

For example, suppose you are creating a language-learning app that supports multiple languages, such as English, Spanish, and French. You could create three different product flavors, one for each language, and configure each flavor to include the appropriate language resources, such as strings, images, and audio files. Each flavor would share the same core codebase but would have different resources and configurations (or consider ABC 123 Learn and Akshar Learn apps, for which I am handling these use cases).

Android Product Flavors

Product flavors are defined in the build.gradle file of your app module. You can define the configuration for each flavor, including things like applicationId, versionName, versionCode, and buildConfigField values. You can also specify which source sets to include for each flavor, which allows you to create different versions of the app with different code, resources, or assets.

Build variants, on the other hand, are different versions of your app that are created by combining one or more product flavors with a build type. Build types are used to specify the build configuration, such as whether to enable debugging or optimize for size, while product flavors are used to specify the app’s functionality and resources.

For example, if you have two product flavors, “free” and “paid”, and two build types, “debug” and “release”, you would have four different build variants: “freeDebug”, “freeRelease”, “paidDebug”, and “paidRelease”. Each build variant would have its own configuration, resources, and code, and could be signed with a different key or configured for different deployment channels.

Resource Merging & Flavor Dimensions

Resource merging is an important part of using product flavors in Android development. When you have multiple product flavors with their own resources, such as layouts, strings, and images, the Android build system needs to merge them together to create the final APK.

Here’s an example of how resource merging works with product flavors:

Kotlin
android {
    // Define the flavor dimensions
    flavorDimensions "language", "version"
    
    // Define the product flavors
    productFlavors {
        englishFree {
            dimension "language"
            applicationId "com.softaai.app.en"
            resValue "string", "app_name", "My App (English)"
        }
        spanishFree {
            dimension "language"
            applicationId "com.softaai.app.es"
            resValue "string", "app_name", "Mi Aplicación (Español)"
        }
        pro {
            dimension "version"
            applicationId "com.softaai.app.pro"
            resValue "string", "app_name", "My App Pro"
        }
        free {
            dimension "version"
            applicationId "com.softaai.app.free"
            resValue "string", "app_name", "My App Free"
        }
    }
}

In this example, we have two flavor dimensions, “language” and “version”. We define four product flavors, “englishFree”, “spanishFree”, “pro”, and “free”, each with their own application ID and app name.

Well, What is Flavor Dimension?

Flavor dimension is a concept in Android Gradle build system that allows the grouping of related product flavors. It is used when an app has multiple sets of product flavors that need to be combined together. For example, if an app is available in multiple countries and each country has multiple build types, then we can use flavor dimensions to group the country-specific flavors together

When we build the app, the Android build system will merge the resources for each product flavor into the final APK. For example, if we have a layout file called “activity_main.xml” in the “res/layout” folder for both “englishFree” and “spanishFree”, the build system will merge them into a single “activity_main.xml” file that includes the appropriate resources for each language.

Now, let’s take a look at how we can use flavor dimensions to create more complex combinations of product flavors:

Kotlin
android {
    // Define the flavor dimensions
    flavorDimensions "language", "version"
    
    // Define the product flavors
    productFlavors {
        en {
            dimension "language"
            applicationId "com.softaai.app.en"
            resValue "string", "app_name", "My App (English)"
        }
        es {
            dimension "language"
            applicationId "com.softaai.app.es"
            resValue "string", "app_name", "Mi Aplicación (Español)"
        }
        pro {
            dimension "version"
            applicationId "com.softaai.app.pro"
            resValue "string", "app_name", "My App Pro"
        }
        free {
            dimension "version"
            applicationId "com.softaai.app.free"
            resValue "string", "app_name", "My App Free"
        }
        enPro {
            dimension "language"
            dimension "version"
            applicationId "com.softaai.app.enpro"
            resValue "string", "app_name", "My App Pro (English)"
        }
        esPro {
            dimension "language"
            dimension "version"
            applicationId "com.softaai.app.espro"
            resValue "string", "app_name", "Mi Aplicación Pro (Español)"
        }
    }
}

In this example, we have two flavor dimensions, “language” and “version”, and six product flavors. The “en” and “es” flavors represent the English and Spanish versions of the app, while the “pro” and “free” flavors represent the paid and free versions of the app. We also define two additional product flavors, “enPro” and “esPro”, which combine both language and version dimensions.

When we build the app, the Android build system will merge the resources for each product flavor into the final APK. For example, if we have a layout file called “activity_main.xml” in the “res/layout” folder for both “en” and “es” flavors, the build system will merge them into a single “activity_main.xml” file that includes the appropriate resources for each language. Similarly, if we have a string resource called “app_name” in the “pro” and “en” flavors, the build system will merge them into a single “app_name” resource that includes the appropriate version and language.

We can also use flavor dimensions to create more complex combinations of product flavors. In the example above, we define two additional product flavors, “enPro” and “esPro”, which combine both language and version dimensions. This means that we can create four different versions of the app: “enFree”, “esFree”, “enPro”, and “esPro”, each with their own application ID and app name.

Here’s an example of how we can reference resources for different flavor dimensions in our code:

Kotlin
// Get the app name for the current flavor
String appName = getResources().getString(R.string.app_name);

// Get the app name for the "enPro" flavor
String enProAppName = getResources().getString(R.string.app_name, "en", "pro");

// Get the app name for the "esFree" flavor
String esFreeAppName = getResources().getString(R.string.app_name, "es", "free");

In this example, we use the getResources() method to get a reference to the app’s resources. We then use the getString() method to get the app name for the current flavor, as well as for the “enPro” and “esFree” flavors, which have different values for the “language” and “version” dimensions.

Pre-Variant Dependencies

When we use product flavors and flavor dimensions to create different variants of our app, we may also need to use different dependencies for each variant. This is where pre-variant dependencies come into play.

Pre-variant dependencies are dependencies that are defined outside of the product flavors and flavor dimensions. These dependencies are applied to all variants of the app, regardless of the product flavor or flavor dimension. We can define pre-variant dependencies in the build.gradle file, outside of the productFlavors and flavorDimensions blocks.

Here’s an example of how we can define pre-variant dependencies:

Kotlin
dependencies {
    // Pre-variant dependencies
    implementation 'com.google.android.material:material:1.5.0'
    implementation 'androidx.appcompat:appcompat:1.4.1'

    // Flavor-specific dependencies
    flavorDimensions 'version', 'language'
    productFlavors {
        pro {
            dimension 'version'
        }
        free {
            dimension 'version'
        }
        en {
            dimension 'language'
        }
        es {
            dimension 'language'
        }
    }

    // Dependencies for specific flavor dimensions
    enImplementation 'com.squareup.retrofit2:retrofit:2.9.0'
    esImplementation 'com.squareup.okhttp3:okhttp:4.9.3'
    proImplementation 'com.google.firebase:firebase-crashlytics:18.4.1'
}

In this example, we define two pre-variant dependencies: com.google.android.material:material:1.5.0 and androidx.appcompat:appcompat:1.4.1. These dependencies will be applied to all variants of the app, regardless of the product flavor or flavor dimension.

We then define four product flavors, two for the “version” dimension and two for the “language” dimension. We also define flavor-specific dependencies for each flavor dimension. For example, we define enImplementation 'com.squareup.retrofit2:retrofit:2.9.0' for the “en” flavor, which means that this dependency will only be applied to variants that include the “en” flavor.

Finally, we define a pro-variant dependency using the proImplementation keyword. This dependency will be applied only to variants that include the “pro” flavor.

Summary

Overall, product flavors and build variants provide a powerful and flexible way to create different versions of our Android app for different use cases. By combining different flavors and types, we can create highly customizable builds that meet the specific needs of our users.

error: Content is protected !!