Have you ever felt overwhelmed by complex systems in your software projects? You’re not alone! The Composite Design Pattern is here to help simplify those tangled webs, but surprisingly, it often gets overlooked. Many of us miss out on its benefits simply because we aren’t familiar with its basics or how to apply it in real-life scenarios.
But don’t worry—I’ve got your back! In this blog, I’ll walk you through the essentials of the Composite Design Pattern, breaking down its structure and showing you practical, real-world examples. By the end, you’ll see just how powerful this pattern can be for streamlining your code. So let’s jump right in and start making your design process easier and more efficient!
Composite Design Pattern
The Composite Design Pattern is a structural pattern that allows you to treat individual objects and compositions of objects uniformly. The pattern is particularly useful when you have a tree structure of objects, where individual objects and groups of objects need to be treated in the same way.
In short, it lets you work with both single objects and groups of objects in a similar manner, making your code more flexible and easier to maintain.
When to Use the Composite Design Pattern
The Composite pattern is super handy when you’re working with a bunch of objects that fit into a part-whole hierarchy.
Wait, what’s a part-whole hierarchy?
A part-whole hierarchy is basically a structure where smaller parts come together to form a larger system. It’s a way of organizing things so that each part can function on its own, but also as part of something bigger. Think of it like a tree or a set of nested boxes — each piece can be treated individually, but they all fit into a larger whole.
In software design, this idea is key to the Composite Design Pattern. It lets you treat both individual objects and collections of objects in the same way. Here’s how it works:
Leaf objects: These are the basic, standalone parts that don’t contain anything else.
Composite objects: These are more complex and can hold other parts, both leaf and composite, forming a tree-like structure.
You’ll find this in many places, like:
UI Components: A window might have buttons, text fields, and panels. A panel can have more buttons or even nested panels inside.
File Systems: Files and directories share similar operations — open, close, getSize, etc. Directories can hold files or other directories.
Drawing Applications: A simple shape, like a circle or rectangle, can stand alone or be part of a bigger graphic made up of multiple shapes.
Now, let’s look at a simple example.
Imagine we’re building a graphic editor that works with different shapes — simple ones like circles, rectangles, and lines. But we also want to create more complex drawings by grouping these shapes together. The tricky part is that we want to treat both individual shapes and groups of shapes the same way. That’s where the Composite Pattern comes in handy.
Structure of the Composite Pattern
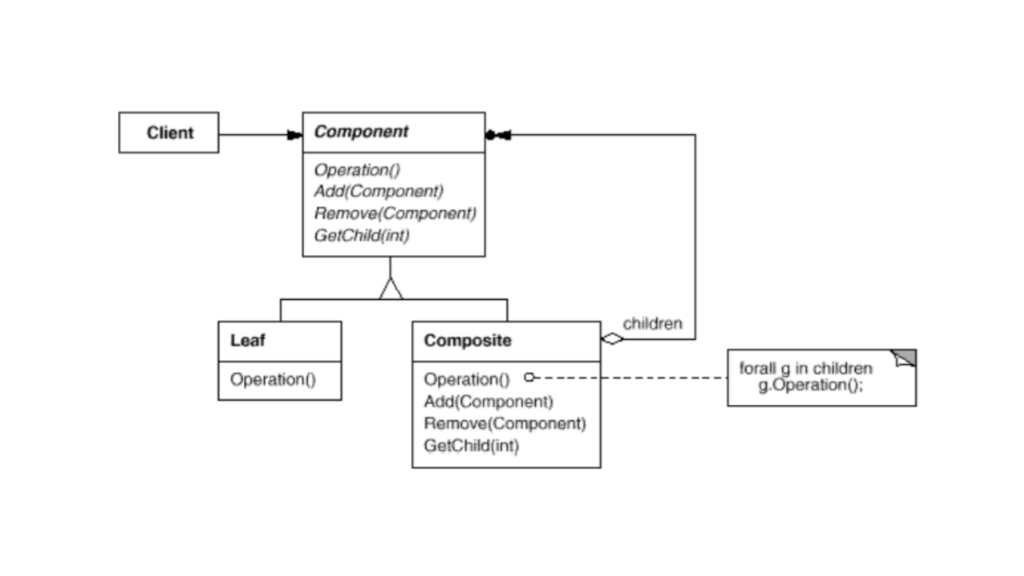
Composite Pattern Structure
In the Composite Pattern, there are usually three key pieces:
Component: This is an interface or abstract class that lays out the common operations that both simple objects and composite objects can perform.
Leaf: This represents an individual object in the structure. It’s a basic part of the system and doesn’t have any children.
Composite: This is a group of objects, which can include both leaves and other composites. It handles operations by passing them down to its children.
Composite Design Pattern in Kotlin
Now, let’s dive into how to implement the Composite Pattern in Kotlin.
We’ll model a graphics system where shapes like circles and rectangles are treated as Leaf components, and a group of shapes (like a drawing) is treated as a Composite.
Step 1: Defining the Component Interface
The first step is to define a Shape interface that all shapes (both individual and composite) will implement.
Kotlin
interfaceShape {fundraw()}
Step 2: Creating the Leaf Components
Now, let’s implement two basic shape classes: Circle and Rectangle. These classes will be the Leaf nodes in our Composite structure, meaning they do not contain any other shapes.
Here, both Circle and Rectangle implement the Shape interface. They only define the draw() method because these are basic shapes.
Step 3: Creating the Composite Component
Next, we will create a Composite class called Drawing, which can hold a collection of shapes (both Circle and Rectangle, or even other Drawing objects).
Kotlin
classDrawing : Shape {privateval shapes = mutableListOf<Shape>()// Add a shape to the drawingfunaddShape(shape: Shape) { shapes.add(shape) }// Remove a shape from the drawingfunremoveShape(shape: Shape) { shapes.remove(shape) }// Drawing the entire group of shapesoverridefundraw() {println("Drawing a group of shapes:")for (shape in shapes) { shape.draw() // Delegating the draw call to child components } }}
Here’s what’s happening:
Drawing class implements Shape and contains a list of Shape objects.
It allows adding and removing shapes.
When draw() is called on the Drawing, it delegates the drawing task to all the shapes in its list.
Step 4: Bringing It All Together
Now, let’s look at an example that demonstrates how the Composite pattern works in action.
Kotlin
funmain() {// Create individual shapesval circle1 = Circle("Circle 1")val circle2 = Circle("Circle 2")val rectangle1 = Rectangle("Rectangle 1")// Create a composite drawing of shapesval drawing1 = Drawing() drawing1.addShape(circle1) drawing1.addShape(rectangle1)// Create another drawing with its own shapesval drawing2 = Drawing() drawing2.addShape(circle2) drawing2.addShape(drawing1) // Adding a drawing within a drawing// Draw the second drawing, which contains a nested structure drawing2.draw()}
Output
Kotlin
Drawing a group of shapes:Drawing a Circle: Circle2Drawing a group of shapes:Drawing a Circle: Circle1Drawing a Rectangle: Rectangle1
We first create individual Circle and Rectangle shapes.We then create a Drawing (composite) that contains circle1 and rectangle1.Finally, we create another composite Drawing that includes circle2 and even the previous Drawing. This shows how complex structures can be built from simpler components.
Real-World Examples
Now, let’s go further and explore a few more real-world examples.
Composite Pattern in Shopping Cart System
We’ll create a system to represent a product catalog, where a product can be either a single item (leaf) or a bundle of items (composite).
Step 1: Define the Component Interface
The Component defines the common operations. Here, the Product interface will have a method showDetails to display the details of each product.
Kotlin
// ComponentinterfaceProduct {funshowDetails()}
Step 2: Implement the Leaf Class
The Leaf class represents individual products, like a single item in our catalog.
We first create individual products (laptop, mouse, keyboard).
Then, we group them into a bundle (computerSet).
We create another bundle (officeSupplies).
Finally, we add both bundles to a master bundle (shoppingCart).
When calling shoppingCart.showDetails(), the Composite Pattern allows us to display all the products, both single and grouped, using the same showDetails() method.
Output
Kotlin
Shopping Cart contains the following products:Computer Set contains the following products:Laptop: 1000.0Mouse: 25.0Keyboard: 75.0Office Supplies contains the following products:Notebook: 10.0Pen: 2.0
Composite Pattern in File System
Let’s implement the Composite Design Pattern in a file system where files and directories share common operations like opening, deleting, and renaming. In this scenario:
Files are treated as individual objects (leaf nodes).
Directories can contain both files and other directories (composite nodes).
Step 1: Define the FileSystemComponent Interface
The Component will be an interface that defines the common operations for both files and directories. We’ll include methods like open, delete, rename, and showDetails.
The File class is a leaf node in the composite pattern. It represents individual files that implement the common operations defined in the FileSystemComponent interface.
Kotlin
// LeafclassFile(privatevar name: String) : FileSystemComponent {overridefunopen() {println("Opening file: $name") }overridefundelete() {println("Deleting file: $name") }overridefunrename(newName: String) {println("Renaming file from $name to $newName") name = newName }overridefunshowDetails() {println("File: $name") }}
Step 3: Implement the Directory Class (Composite)
The Directory class is the composite node in the pattern. It can hold a collection of files and other directories. The directory class implements the same operations as files but delegates actions to its child components (files or directories).
Kotlin
// CompositeclassDirectory(privatevar name: String) : FileSystemComponent {privateval contents = mutableListOf<FileSystemComponent>()funadd(component: FileSystemComponent) { contents.add(component) }funremove(component: FileSystemComponent) { contents.remove(component) }overridefunopen() {println("Opening directory: $name")for (component in contents) { component.open() } }overridefundelete() {println("Deleting directory: $name and its contents:")for (component in contents) { component.delete() } contents.clear() // Remove all contents after deletion }overridefunrename(newName: String) {println("Renaming directory from $name to $newName") name = newName }overridefunshowDetails() {println("Directory: $name contains:")for (component in contents) { component.showDetails() } }}
Step 4: Putting It All Together
Now, let’s use the File and Directory classes to simulate a file system where directories contain files and possibly other directories.
Kotlin
funmain() {// Create individual filesval file1 = File("file1.txt")val file2 = File("file2.txt")val file3 = File("file3.txt")// Create a directory and add files to itval dir1 = Directory("Documents") dir1.add(file1) dir1.add(file2)// Create another directory and add files and a subdirectory to itval dir2 = Directory("Projects") dir2.add(file3) dir2.add(dir1) // Adding the Documents directory to the Projects directory// Display the structure of the file system dir2.showDetails()// Perform operations on the file systemprintln("\n-- Opening the directory --") dir2.open()println("\n-- Renaming file and directory --") file1.rename("new_file1.txt") dir1.rename("New_Documents")// Show updated structure dir2.showDetails()println("\n-- Deleting directory --") dir2.delete()// Try to show the structure after deletionprintln("\n-- Trying to show details after deletion --") dir2.showDetails()}
Here,
We create individual files (file1.txt, file2.txt, and file3.txt).
We create a directory Documents and add file1 and file2 to it.
We create another directory Projects, add file3 and also add the Documents directory to it, demonstrating that directories can contain both files and other directories.
We display the contents of the Projects directory, which includes the Documents directory and its files.
We perform operations like open, rename, and delete on the files and directories.
After deletion, we attempt to show the details again to verify that the contents are removed.
Output
Kotlin
Directory: Projectscontains:File: file3.txtDirectory: Documentscontains:File: file1.txtFile: file2.txt-- Opening the directory --Opening directory: ProjectsOpening file: file3.txtOpening directory: DocumentsOpening file: file1.txtOpening file: file2.txt-- Renaming file and directory --Renaming file from file1.txt to new_file1.txtRenaming directory from Documents to New_DocumentsDirectory: Projectscontains:File: file3.txtDirectory: New_Documentscontains:File: new_file1.txtFile: file2.txt-- Deleting directory --Deleting directory: Projectsanditscontents:Deleting file: file3.txtDeleting directory: New_Documentsanditscontents:Deleting file: new_file1.txtDeleting file: file2.txt-- Trying to show details after deletion --Directory: Projectscontains:
The Composite Pattern allows us to treat directories (composite objects) just like files (leaf objects). This means that operations such as opening, renaming, deleting, and showing details can be handled uniformly for both files and directories. The hierarchy can grow naturally, supporting nested structures where directories can contain files or even other directories. Overall, this implementation showcases how the Composite Design Pattern effectively models a real-world file system in Kotlin, allowing files and directories to share common behavior while maintaining flexibility and scalability.
Benefits of the Composite Pattern
Simplicity: You can treat individual objects and composites in the same way.
Flexibility: Adding or removing components is easy since they follow a consistent interface.
Transparency: Clients don’t need to worry about whether they’re working with a single item or a composite.
Drawbacks
Complexity: The pattern can introduce complexity, especially if it’s used in scenarios that don’t involve a natural hierarchy.
Overhead: If not carefully implemented, it may lead to unnecessary overhead when dealing with very simple structures.
When to Use the Composite Pattern?
When you want to represent part-whole hierarchies of objects.
When you want clients to be able to treat individual objects and composite objects uniformly.
When you need to build complex structures out of simpler objects but still want to treat the whole structure as a single entity.
Conclusion
And there you have it! We’ve unraveled the Composite Design Pattern together, and I hope you’re feeling inspired to give it a try in your own projects. It’s all about simplifying those complex systems and making your life a little easier as a developer.
As you move forward, keep an eye out for situations where this pattern can come in handy. The beauty of it is that once you start using it, you’ll wonder how you ever managed without it!
Thanks for hanging out with me today. I’d love to hear about your experiences with the Composite Design Pattern or any cool projects you’re working on. Happy coding, and let’s make our software as clean and efficient as possible!
A few days ago, I shared my thoughts on the Adapter Design Pattern—where I noticed it seamlessly bridges the gap between different systems. Now, as I dive into the Bridge Design Pattern, I see it’s more than just about bridging gaps; it’s about creating flexibility, decoupling abstraction from implementation, and making your code as adaptable as possible.
In this blog, we’ll explore:
What exactly is the Bridge Design Pattern?
Its structure and how it works under the hood
Practical, real-world examples that bring the concept to life
And perhaps most importantly, how it differs from the Adapter Pattern (because, yes, there’s a key difference!).
So, let’s dive in and discover what makes the Bridge Design Pattern a game-changer in clean, scalable software architecture.
What is the Bridge Design Pattern?
Let’s start with the basics: the Bridge Design Pattern is a structural pattern designed to decouple an abstraction from its implementation. By separating these two components, you can vary them independently, which enhances the system’s flexibility and scalability. This means you can extend either the abstraction or the implementation without disrupting the existing system.
In simpler terms, the Bridge Pattern allows you to modify what your code does without affecting how it does it. If that sounds confusing, don’t worry; it will become clearer as we go on.
Essentially, the Bridge Pattern promotes object composition over inheritance, making it particularly useful when dealing with complex class hierarchies that can lead to a proliferation of subclasses as variations increase.
Why is this important? As your project grows, you might find that every new feature requires adjustments to existing code, which can quickly lead to chaos. The Bridge Pattern helps you avoid this mess by keeping your code flexible and easier to manage.
Why Use the Bridge Design Pattern?
Here’s an example you might relate to: imagine you’re building a simple drawing app. You have different shapes—let’s say Circle and Rectangle. You also want to paint them in different colors, like Red and Green. Sounds easy, right? But if you approach this by creating classes like RedCircle, GreenRectangle, GreenCircle, etc., you’ll quickly end up with a ton of redundant classes.
Shape | ---------------|----------------- | |Rectangle (Color) Circle (Color) -------- Color ---------- | | Red Green
Enter the Bridge Pattern. It allows you to keep the Shape and Color separate so that you can easily mix and match them without creating dozens of new classes. It’s like having a separate “shape drawer” and “color palette” that you can combine however you like.
Components of the Bridge Design Pattern
The Bridge Design Pattern is a structural pattern that decouples an abstraction from its implementation, allowing them to vary independently. This pattern is particularly useful when you want to avoid a proliferation of classes that arise from combining multiple variations of abstractions and implementations.
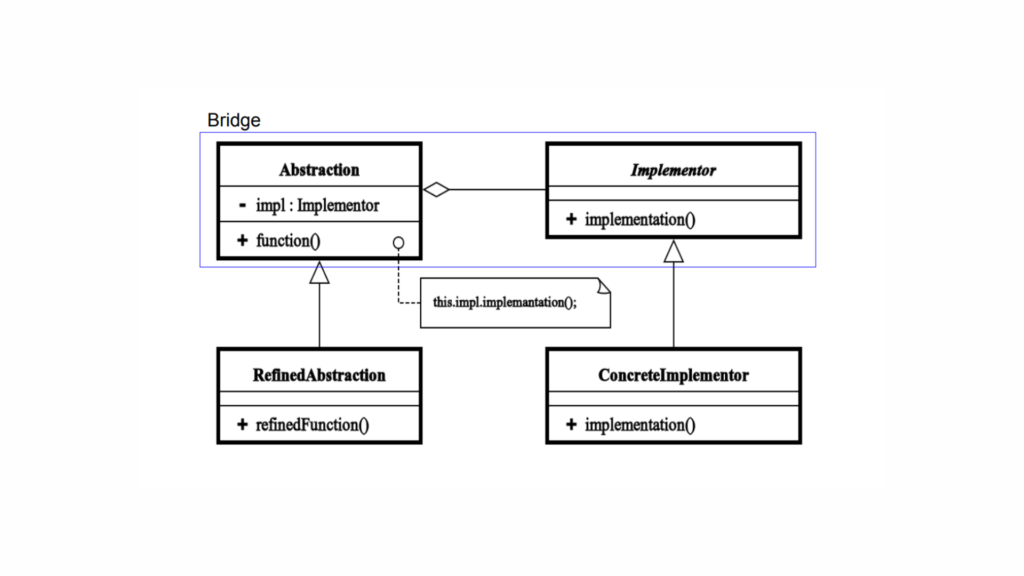
Structure of Bridge Design Pattern
Here,
Abstraction: This defines the abstract interface and contains a reference to the implementer. The abstraction typically provides a higher-level interface that clients use.
Refined Abstraction: This extends the abstraction and may provide additional functionality or specificity. It can also override behaviors defined in the abstraction.
Implementer: This defines the interface for the implementation classes. It does not have to match the abstraction interface; in fact, it can be quite different. The implementer interface can have multiple implementations.
Concrete Implementers: These are specific implementations of the implementer interface. Each concrete implementer provides a different implementation of the methods defined in the implementer interface.
How the Bridge Pattern Works
Decoupling: The Bridge Pattern decouples the abstraction from the implementation. This means that you can change or extend either side independently.
Client Interaction: The client interacts with the abstraction interface, and the abstraction can delegate calls to the implementation without the client needing to know about it.
Flexibility: You can add new abstractions and implementations without modifying existing code, promoting adherence to the Open/Closed Principle.
Let’s take a more detailed example to illustrate how the Bridge Pattern works.
Example: Shapes and Colors
Scenario: You are building a drawing application that allows users to create shapes with different colors.
Abstraction: Shape
Methods: draw()
Refined Abstraction: Circle and Rectangle
Each shape has a draw() method that uses the color implementation.
Implementer: Color
Method: fill()
Concrete Implementers: Red and Green
Each color has a specific implementation of the fill() method.
Kotlin
// Implementer interfaceinterfaceColor {funfill()}// Concrete ImplementersclassRed : Color {overridefunfill() {println("Filling with Red color.") }}classGreen : Color {overridefunfill() {println("Filling with Green color.") }}// AbstractionabstractclassShape(protectedval color: Color) {abstractfundraw()}// Refined AbstractionclassCircle(color: Color) : Shape(color) {overridefundraw() {print("Drawing Circle. ") color.fill() }}classRectangle(color: Color) : Shape(color) {overridefundraw() {print("Drawing Rectangle. ") color.fill() }}// Client Codefunmain() {val redCircle: Shape = Circle(Red()) redCircle.draw() // Output: Drawing Circle. Filling with Red color.val greenRectangle: Shape = Rectangle(Green()) greenRectangle.draw() // Output: Drawing Rectangle. Filling with Green color.}
Separation of Concerns: The Bridge Pattern promotes separation of concerns by dividing the abstraction from its implementation.
Flexibility and Extensibility: It provides flexibility and extensibility, allowing new abstractions and implementations to be added without modifying existing code.
Avoiding Class Explosion: It helps in avoiding class explosion that occurs when you have multiple variations of abstractions and implementations combined together.
The Bridge Design Pattern is particularly useful in scenarios where you want to manage multiple dimensions of variability, providing a clean and maintainable code structure.
Real World Example
Let’s consider a scenario where we are building a notification system. We have different types of notifications (e.g., Email, SMS, Push Notification), and each notification can be sent for different platforms (e.g., Android, iOS).
If we don’t use the Bridge pattern, we might end up with a class hierarchy like this:
AndroidEmailNotification
IOSEmailNotification
AndroidSMSNotification
IOSMSNotification
…
This quickly becomes cumbersome and difficult to maintain as the number of combinations increases. The Bridge Design Pattern helps us to handle such cases more efficiently by separating the notification type (abstraction) from the platform (implementation).
Before implementing, here’s a quick recap of what the components of the Bridge Pattern are.
Abstraction: Defines the high-level interface.
Refined Abstraction: Extends the abstraction and adds additional operations.
Implementor: Defines the interface for implementation classes.
Concrete Implementor: Provides concrete implementations of the implementor interface.
Let’s implement the Bridge Design Pattern in Kotlin for our notification system.
Step 1: Define the Implementor (Platform Interface)
The NotificationSender interface acts as the Implementor. It defines the method sendNotification() that will be implemented by concrete platform-specific classes.
Here, EmailNotification and SMSNotification extend the Notification class and specify the type of notification. They use the sender to send the actual message via the appropriate platform.
Step 5: Putting It All Together
Let’s see how we can use the Bridge Design Pattern in action:
Email Notification:Sending notification to Android device: You've got mail!SMS Notification:Sending notification to iOS device: You've got a message!
What’s happening here?
We created an AndroidNotificationSender and IOSNotificationSender for the platforms.
Then, we created EmailNotification and SMSNotification to handle the type of message.
Finally, we sent notifications to both Android and iOS devices using the same abstraction, but different platforms.
Advantages of Bridge Design Pattern
The Bridge Design Pattern provides several advantages:
Decoupling Abstraction and Implementation: You can develop abstractions and implementations independently. Changes to one won’t affect the other.
Improved Flexibility: The pattern allows you to extend either the abstraction or the implementation without affecting the rest of the codebase.
Reduced Class Explosion: It prevents an explosion of subclasses that would otherwise occur with direct inheritance.
Better Maintainability: Since abstraction and implementation are separated, code becomes cleaner and easier to maintain.
Adapter & Bridge: Difference in Intent
When it comes to design patterns, understanding the difference between the Adapter and Bridge patterns is crucial for effective software development. The Adapter pattern focuses on resolving incompatibilities between two existing interfaces, allowing them to work together seamlessly. In this scenario, the two interfaces operate independently, enabling them to evolve separately over time. However, the coupling between them can be unforeseen, which may lead to complications down the road. On the other hand, the Bridge pattern takes a different approach by connecting an abstraction with its various implementations. This pattern ensures that the evolution of the implementations aligns with the base abstraction, creating a more cohesive structure. In this case, the coupling between the abstraction and its implementations is well-defined and intentional, promoting better maintainability and flexibility. By understanding these distinctions, developers can choose the right pattern based on their specific needs, leading to more robust and adaptable code.
When to Use the Bridge Pattern
Consider using the Bridge Pattern in the following scenarios:
When your system has multiple dimensions of variations (like different shapes and colors), and you want to minimize subclassing.
When you need to decouple abstraction from implementation, allowing both to evolve independently.
When you want to reduce the complexity of a class hierarchy that would otherwise grow out of control with multiple subclasses.
Conclusion
The Bridge Design Pattern is a lifesaver when you have multiple dimensions that need to change independently. By separating the abstraction (what you want to do) from the implementation (how you do it), this pattern ensures your code remains flexible, clean, and easy to extend.
In our notification system example, we applied the pattern, but it can also be used in countless other scenarios, such as database drivers, payment gateways, or even UI frameworks.
Hopefully, this guide has given you a solid understanding of the Bridge Pattern in Kotlin. I encourage you to implement it in your projects and feel free to adapt it as needed!
The Adapter Design Pattern is a developer’s secret weapon when it comes to making incompatible systems work together smoothly without altering their original code. Acting as a bridge, it allows different components to communicate effortlessly. If you’ve ever hit a roadblock where two pieces of code just wouldn’t “talk” to each other, then you’ve faced the exact challenge that the Adapter Pattern is designed to solve!
In this blog, we’re diving deep into everything about the Adapter Design Pattern—its structure, types (like Class and Object adapters), examples, real-world use cases, and how it’s applied in Android development. Whether you’re working with legacy systems or building new features, this pattern is key to simplifying integration and boosting code flexibility.
Grab a coffee mug—this blog’s going to be a big one! Get ready for a complete guide that will take your understanding of design patterns to the next level. Let’s get started!
What is the Adapter Design Pattern?
The Adapter Design Pattern helps connect two things that wouldn’t normally work together because they don’t “fit” or communicate the same way. It acts as a bridge that makes an existing class compatible with another class you need, without changing either one.
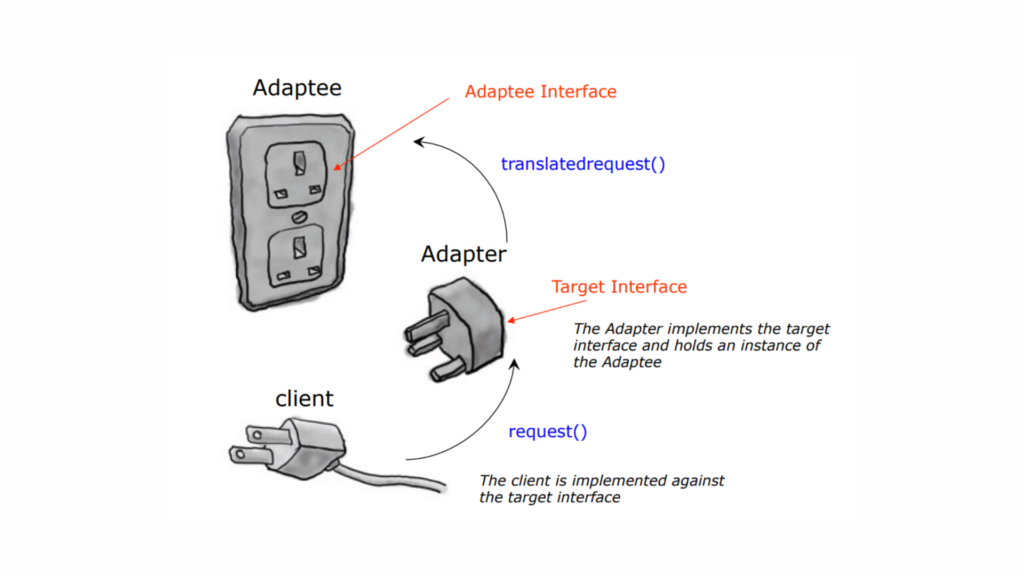
Think of it like using an adapter to plug something into an outlet that has a different shape—it allows them to work together without altering either the plug or the outlet.
Imagine you’re traveling in Europe with your US laptop. The European wall outlet provides 220 volts, while your laptop’s power adapter is designed for a standard AC plug and expects 110 volts. They’re incompatible, right? That’s where a power adapter steps in, converting the European outlet’s power to match what your laptop needs.
In software, the Adapter Pattern works in the same way. It allows two incompatible interfaces to work together without changing their core functionality. Just like the power adapter converts the outlet’s power, a software adapter “translates” between systems to make them compatible.
Instead of rewriting code, you create an adapter class that bridges the gap—keeping everything working smoothly.
In short, the Adapter Pattern is your go-to solution for making incompatible systems work together, just like your handy travel adapter!
Defination of Adapter Design Pattern
The Adapter design pattern (one of thestructural design patterns) acts as a bridge between two incompatible interfaces. It allows an existing class (which has a specific interface) to be used with another class (which expects a different interface), without changing their existing code. It does this by creating an intermediary adapter class that translates the method calls from one interface to the other.
Why is the Adapter called ‘glue’ or ‘wrapper’?
Sometimes, a class has the features a client needs, but its way of interacting (interface) doesn’t match what the client expects. In these cases, we need to transform the existing interface into a new one that the client can work with, while still utilizing the original class.
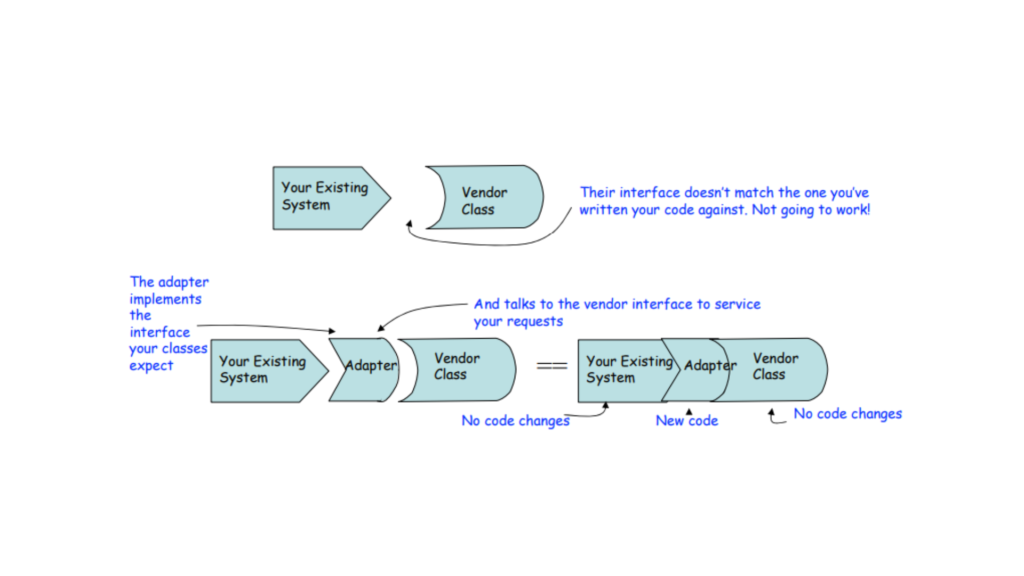
Suppose you have an existing software system that requires integrating a new vendor library, but the new vendor has designed their interfaces differently from the previous vendor. What should you do? Write a class that adapts the new vendor’s interface to the one you’re expecting.
The Adapter Pattern helps us achieve this by creating a wrapper class around the original object. This wrapper is called an adapter, and the original object is known as the adaptee. The adapter acts as a bridge, allowing the client to use the adaptee’s functionality in a way that meets their needs.
To expand on this, the adapter is often referred to as “glue” because it metaphorically binds together two different interfaces, making them work smoothly as one. Similarly, it is called a “wrapper” because it encloses the original object (the adaptee) and presents a modified interface that the client can use without needing to change the original object.
The Structure of Adapter Pattern
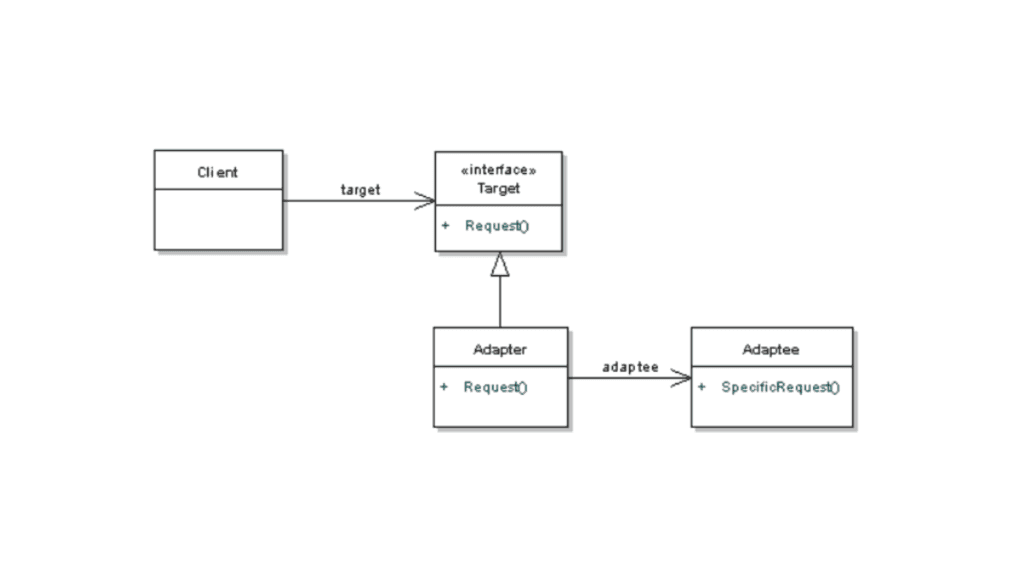
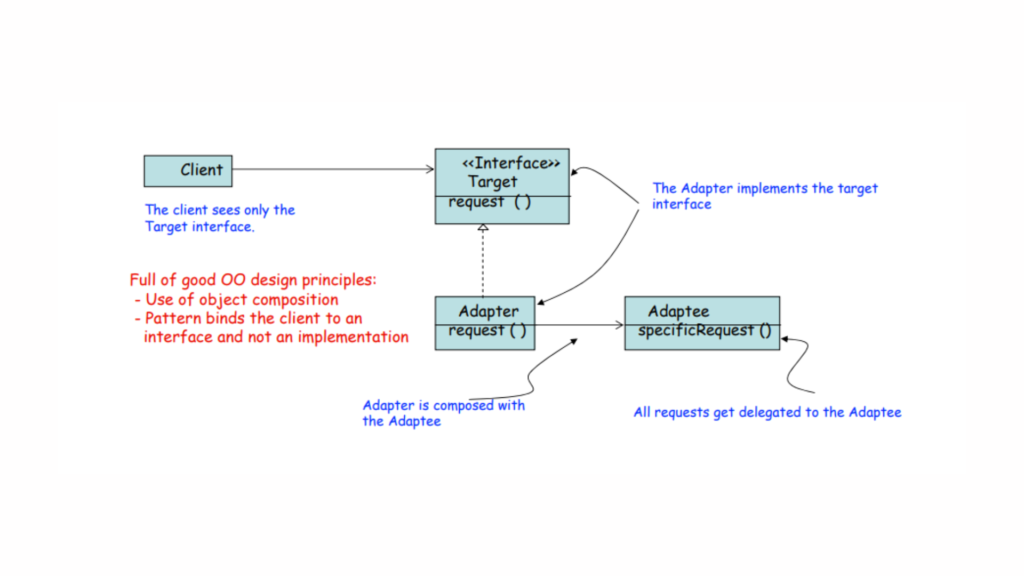
The Adapter Design Pattern involves four components:
Target (Interface): The desired interface that the client expects.
Adaptee: The existing class that has the behavior we want to use but with an incompatible interface.
Adapter: A wrapper class that implements the Target interface and translates the requests from the client to the Adaptee.
Client: The entity that interacts with the Target interface.
Let’s revisit our example of a European wall socket and a US laptop’s AC plug for better understanding.
Adaptee Interface: This is the existing interface or system that needs to be adapted. It has its own methods that may not be compatible with what the client expects.
Target Interface: This is the interface that the client is designed to work with. The client will call methods from this interface.
Request Method: This is the method defined in the target interface that the client will use.
Adapter: The adapter acts as a bridge between the target interface and the adaptee interface. It implements the target interface and holds a reference to an instance of the adaptee. The adapter translates calls from the target interface into calls to the adaptee interface.
Translated Request Method: This method in the adapter takes the request from the client and converts it into a format that the adaptee can understand.
Now, we have a EuropeanWallSocket that provides electricity in a format incompatible with a US laptop. We will create an adapter to make them compatible.
Step 1: Define the Adaptee Interface
This is the existing interface that represents the European wall socket.
Kotlin
// Adaptee interfaceinterfaceEuropeanWallSocket {funprovideElectricity(): String// Provides electricity in European format}// Implementation of the adapteeclassEuropeanWallSocketImpl : EuropeanWallSocket {overridefunprovideElectricity(): String {return"220V AC from European wall socket" }}
Step 2: Define the Target Interface
This is the interface that our US laptop expects.
Kotlin
// Target interfaceinterfaceUSLaptop {funplugIn(): String// Expects a method to plug in}
Step 3: Create the Adapter
The adapter will implement the target interface and use an instance of the adaptee.
Kotlin
// Adapter classclassSocketAdapter(privateval europeanWallSocket: EuropeanWallSocket) : USLaptop {overridefunplugIn(): String {// Adapt the European socket output for the US laptopval electricity = europeanWallSocket.provideElectricity()return"Adapting: $electricity to 110V AC for US laptop" }}
Step 4: Client Code
Now, the client can use the USLaptop interface without worrying about the underlying EuropeanWallSocket.
Kotlin
funmain() {// Create an instance of the adaptee (European socket)val europeanSocket = EuropeanWallSocketImpl()// Use the adapter to connect the US laptopval socketAdapter = SocketAdapter(europeanSocket)// Plug in the US laptop using the adapterprintln(socketAdapter.plugIn())}
Here,
Adaptee: The EuropeanWallSocket interface and its implementation, EuropeanWallSocketImpl, represent a wall socket that provides electricity in the European format (220V AC).
Target: The USLaptop interface defines the method the laptop uses to connect to a power source.
Adapter: The SocketAdapter class implements the USLaptop interface and contains an instance of EuropeanWallSocket. It adapts the output from the European wall socket to a format that the US laptop can understand (converting it to 110V AC).
Client: In the main function, we create an instance of the EuropeanWallSocketImpl, wrap it in the SocketAdapter, and call the plugIn method to simulate plugging in the US laptop.
This example is only for demonstration purposes, illustrating how the Adapter Pattern allows a US laptop to work with a European wall socket by adapting the interface, making the systems compatible without altering their original functionality.
Bridging the Gap: How the Adapter Pattern Facilitates Communication
Have you ever wondered how the Adapter Pattern bridges the gap? The answer lies in the use of object composition and the principle that the pattern binds the client to an interface rather than an implementation.
Delegation serves as the vital link that connects an Adapter to its Adaptee, facilitating seamless communication between the two. Meanwhile, interface inheritance defines the contract that the Adapter class must follow, ensuring clarity and consistency in its interactions.
Look at the previous example above: the client code binds to the USLaptop interface, not to the specific implementation of the adapter or the Adaptee. This design allows for flexibility; if you need to adapt to a different type of socket in the future, you can create a new adapter that implements the same USLaptop interface without changing the client code.
The Target and the Adaptee—often an older, legacy system—are established before the Adapter is introduced. The Adapter acts as a bridge, allowing the Target to utilize the Adaptee’s functionality without modifying its original structure. This approach not only enhances flexibility, but also elegantly encapsulates complexity, enabling developers to create more adaptable systems.
Adapter Pattern Variants
There are two common variants of the Adapter pattern:
Object Adapter: The adapter holds an instance of the adaptee and delegates requests to it.
Class Adapter: The adapter inherits from both the target and adaptee classes. However, Kotlin (like Java) does not support multiple inheritance, so this variant is less commonly used in Kotlin.
Object Adapters and Class Adapters use two different methods to adapt the Adaptee: composition and inheritance.
Let’s look at each one individually and discuss their differences.
Object Adapter Pattern
In the Object Adapter Pattern, the adapter contains an instance of the adaptee and implements the interface expected by the client. It “adapts” the methods of the adaptee to fit the expected interface.
Structure of Object Adapter Pattern
Client: The class that interacts with the target interface.
Target Interface: The interface that the client expects.
Adaptee: The class with an incompatible interface that needs to be adapted.
Adapter: The class that implements the target interface and holds a reference to the adaptee, enabling the two incompatible interfaces to work together.
In this UML diagram of the Object Adapter Pattern,
Client → Depends on → Target Interface
Adapter → Implements → Target Interface
Adapter → Has a reference to → Adaptee
Adaptee → Has methods incompatible with the Target Interface
Key Points:
Object Adapter uses composition (by containing the adaptee) instead of inheritance, which makes it more flexible and reusable.
The adapter doesn’t alter the existing Adaptee class but makes it compatible with the Target Interface.
Simple Example of Object Adapter Pattern
Let’s consider a simple scenario where we want to charge different types of phones, but their charging ports are incompatible.
The Client is a phone charger that expects to use a USB type-C charging port.
The Adaptee is an old phone that uses a micro-USB charging port.
The Adapter bridges the difference by converting the micro-USB interface to a USB type-C interface.
Step 1: Define the Target Interface
The charger (client) expects all phones to implement this interface (USB Type-C).
Kotlin
// Target interface that the client expectsinterfaceUsbTypeCCharger {funchargeWithUsbTypeC()}
Step 2: Define the Adaptee
This is the old phone, which only has a Micro-USB port. The charger can’t directly use this interface.
Kotlin
// Adaptee class that uses Micro-USB for chargingclassMicroUsbPhone {funrechargeWithMicroUsb() {println("Micro-USB phone: Charging using Micro-USB port") }}
Step 3: Create the Adapter
The adapter will “adapt” the Micro-USB phone to make it compatible with the USB Type-C charger. It wraps the MicroUsbPhone and translates the charging request.
Kotlin
// Adapter that makes Micro-USB phone compatible with USB Type-C chargerclassMicroUsbToUsbTypeCAdapter(privateval microUsbPhone: MicroUsbPhone) : UsbTypeCCharger {overridefunchargeWithUsbTypeC() {println("Adapter: Converting USB Type-C to Micro-USB") microUsbPhone.rechargeWithMicroUsb() // Delegating the charging to the Micro-USB phone }}
Step 4: Implement the Client
The client (charger) works with the target interface (UsbTypeCCharger). It can now charge a phone with a Micro-USB port by using the adapter.
Kotlin
funmain() {// Old phone with a Micro-USB port (Adaptee)val microUsbPhone = MicroUsbPhone()// Adapter that makes the Micro-USB phone compatible with USB Type-C chargerval usbTypeCAdapter = MicroUsbToUsbTypeCAdapter(microUsbPhone)// Client (USB Type-C Charger) charges the phone using the adapterprintln("Client: Charging phone using USB Type-C charger") usbTypeCAdapter.chargeWithUsbTypeC()}
Output:
Kotlin
Client: ChargingphoneusingUSBType-C chargerAdapter: ConvertingUSBType-C to Micro-USBMicro-USB phone: ChargingusingMicro-USB port
Here,
Client: The charger expects all phones to be charged using a USB Type-C port, so it calls chargeWithUsbTypeC().
Adapter: The adapter receives the request from the client to charge using USB Type-C. It converts this request and adapts it to the MicroUsbPhone by calling rechargeWithMicroUsb() internally.
Adaptee (MicroUsbPhone): The phone knows how to charge itself using Micro-USB. The adapter simply makes it compatible with the client’s expectation.
Now, let’s look at another type, the Class Adapter Pattern.
Class Adapter Pattern
The Class Adapter Pattern is another type of adapter design pattern where an adapter class inherits from both the target interface and the Adaptee class. Unlike the Object Adapter Pattern, which uses composition (holding an instance of the Adaptee), the Class Adapter Pattern employs multiple inheritance to directly connect the client and the Adaptee.
In languages like Kotlin, which do not support true multiple inheritance, we simulate this behavior by using interfaces. The adapter implements the target interface and extends the Adaptee class to bridge the gap between incompatible interfaces.
Before going into much detail, let’s first understand the structure of the Class Adapter Pattern.
Structure of Class Adapter Pattern
Client: The class that interacts with the target interface.
Target Interface: The interface that the client expects to interact with.
Adaptee: The class with an incompatible interface that needs to be adapted.
Adapter: A class that inherits from both the target interface and the adaptee, adapting the adaptee to be compatible with the client.
In this UML diagram of the Class Adapter Pattern,
Client → Depends on → Target Interface
Adapter → Inherits from → Adaptee
Adapter → Implements → Target Interface
Adaptee → Has methods incompatible with the target interface
Key Points:
The Class Adapter pattern relies on inheritance to connect the Adaptee and the Target Interface.
The adapter inherits from the adaptee and implements the target interface, thus combining both functionalities.
Simple Example of Class Adapter Pattern
Now, let’s look at an example of the Class Adapter Pattern. We’ll use the same scenario: a charger that expects a USB Type-C interface but has an old phone that only supports Micro-USB.
Step 1: Define the Target Interface
This is the interface that the client (charger) expects.
Kotlin
// Target interface that the client expectsinterfaceUsbTypeCCharger {funchargeWithUsbTypeC()}
Step 2: Define the Adaptee
This is the class that needs to be adapted. It’s the old phone with a Micro-USB charging port.
Kotlin
// Adaptee class that uses Micro-USB for chargingclassMicroUsbPhone {funrechargeWithMicroUsb() {println("Micro-USB phone: Charging using Micro-USB port") }}
Step 3: Define the Adapter (Class Adapter)
The Adapter inherits from the MicroUsbPhone (adaptee) and implements the UsbTypeCCharger (target interface). It adapts the MicroUsbPhone to be compatible with the UsbTypeCCharger interface.
Kotlin
// Adapter that inherits from MicroUsbPhone and implements UsbTypeCChargerclassMicroUsbToUsbTypeCAdapter : MicroUsbPhone(), UsbTypeCCharger {// Implement the method from UsbTypeCChargeroverridefunchargeWithUsbTypeC() {println("Adapter: Converting USB Type-C to Micro-USB")// Call the inherited method from MicroUsbPhonerechargeWithMicroUsb() // Uses the Micro-USB method to charge }}
Step 4: Client Usage
The Client only interacts with the UsbTypeCCharger interface and charges the phone through the adapter.
Kotlin
funmain() {// Adapter that allows charging a Micro-USB phone with a USB Type-C chargerval usbTypeCAdapter = MicroUsbToUsbTypeCAdapter()// Client (USB Type-C Charger) charges the phone through the adapterprintln("Client: Charging phone using USB Type-C charger") usbTypeCAdapter.chargeWithUsbTypeC()}
Output:
Kotlin
Client: ChargingphoneusingUSBType-C chargerAdapter: ConvertingUSBType-C to Micro-USBMicro-USB phone: ChargingusingMicro-USB port
Here,
Client: The client expects all phones to be charged using the UsbTypeCCharger interface.
Adapter: The adapter class inherits the behavior of the MicroUsbPhone (adaptee) and implements the UsbTypeCCharger interface. It converts the USB Type-C charging request and delegates it to the inherited rechargeWithMicroUsb() method.
Adaptee (Micro-USB phone): The MicroUsbPhone class has a method to recharge using Micro-USB, which is directly called by the adapter.
Class Adapter Vs. Object Adapter
The main difference between the Class Adapter and the Object Adapter lies in how they achieve compatibility between the Target and the Adaptee. In the Class Adapter pattern, we use inheritance by subclassing both the Target interface and the Adaptee class, which allows the adapter to directly access the Adaptee’s behavior. This means the adapter is tightly coupled to both the Target and the Adaptee at compile-time.
On the other hand, the Object Adapter pattern relies on composition, meaning the adapter holds a reference to an instance of the Adaptee rather than inheriting from it. This approach allows the adapter to forward requests to the Adaptee, making it more flexible because the Adaptee instance can be changed or swapped without modifying the adapter. The Object Adapter pattern is generally preferred when more flexibility is needed, as it loosely couples the adapter and Adaptee.
In short, the key difference is that the Class Adapter subclasses both the Target and the Adaptee, while the Object Adapter uses composition to forward requests to the Adaptee.
Real-World Examples
We’ll look at more real-world examples soon, but before that, let’s first explore a structural example of the Adapter Pattern to ensure a smooth understanding.
Adapter Pattern: Structural Example
Since we’ve already seen many code examples, there’s no rocket science here. Let’s jump straight into the code and then go over its explanation.
Kotlin
// Target interface that the client expectsinterfaceTarget {funrequest()}// Adaptee class that has an incompatible methodclassAdaptee {fundelegatedRequest() {println("This is the delegated method.") }}// Adapter class that implements Target and adapts AdapteeclassAdapter : Target {privateval delegate = Adaptee() // Composition: holding an instance of Adaptee// Adapting the request method to call Adaptee's delegatedRequestoverridefunrequest() { delegate.delegatedRequest() }}// Test class to demonstrate the Adapter Patternfunmain() {val client: Target = Adapter() // Client interacts with the Adapter through the Target interface client.request() // Calls the adapted method}////////////////////////////////////////////////////////////// OUTPUT// This is the delegated method.
In the code above,
Target interface: The interface that the client expects to interact with.
Adaptee class: Contains the method delegatedRequest(), which needs to be adapted to the Target interface.
Adapter class: Implements the Target interface and uses composition to hold an instance of Adaptee. It adapts the request() method to call delegatedRequest().
Client: Uses the adapter by interacting through the Target interface.
Here, the Adapter adapts the incompatible interface (Adaptee) to the interface the client expects (Target), allowing the client to use the Adaptee without modification.
Adapting an Enumeration to an Iterator
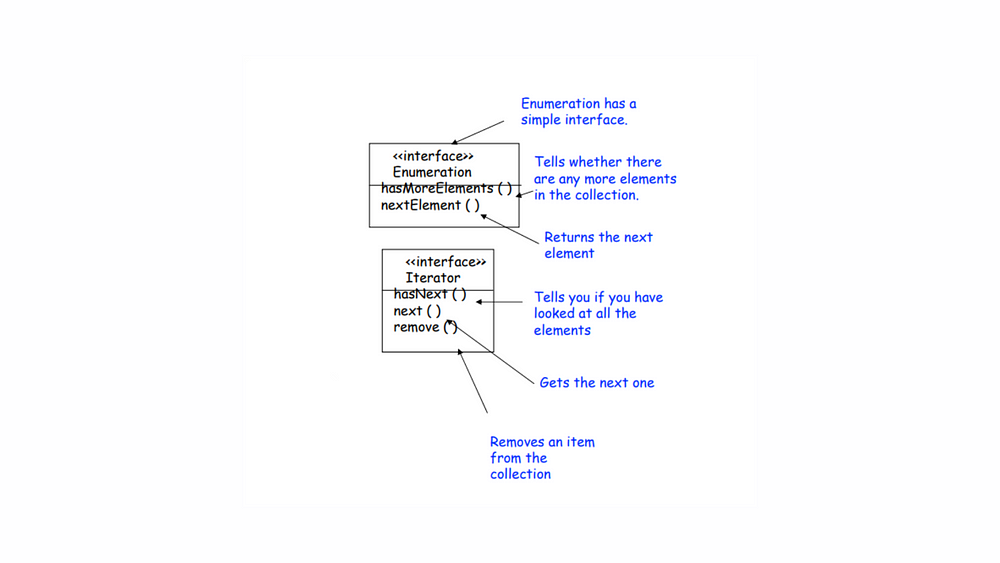
In the landscape of programming, particularly when dealing with collections in Kotlin and Java, we often navigate between legacy enumerators and modern iterators. In Java, the legacy Enumeration interface features straightforward methods like hasMoreElements() to check for remaining elements and nextElement() to retrieve the next item, representing a simpler time. In contrast, the modern Iterator interface—found in both Java and Kotlin—introduces a more robust approach, featuring hasNext(), next(), and even remove() (In Kotlin, the remove() method is part of the MutableIterator<out T> interface) for effective collection management.
Old world Enumerators & New world Iterators
Despite these advancements, many applications still rely on legacy code that exposes the Enumeration interface. This presents developers with a dilemma: how to seamlessly integrate this outdated system with newer code that prefers iterators. This is where the need for an adapter emerges, bridging the gap and allowing us to leverage the strengths of both worlds. By creating an adapter that implements the Iterator interface while wrapping an Enumeration instance, we can provide a smooth transition to modern coding practices without discarding the functionality of legacy systems.
Let’s examine the two interfaces
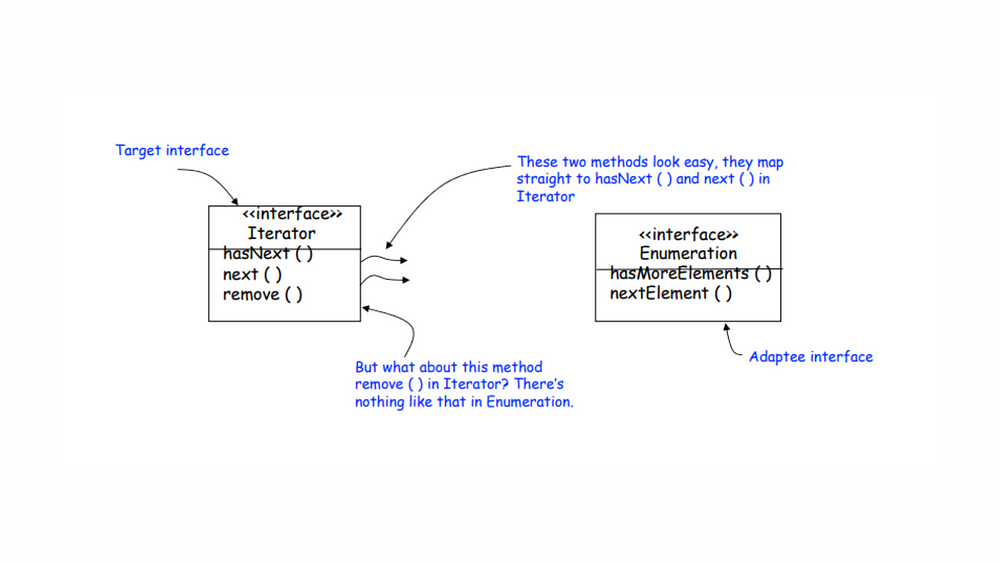
Adapting an Enumeration to an Iterator begins with examining the two interfaces. The Iterator interface includes three essential methods: hasNext(), next(), and remove(), while the older Enumeration interface features hasMoreElements() and nextElement(). The first two methods from Enumeration map easily to Iterator‘s counterparts, making the initial adaptation straightforward. However, the real challenge arises with the remove() method in Iterator, which has no equivalent in Enumeration. This disparity highlights the complexities involved in bridging legacy code with modern practices, emphasizing the need for an effective adaptation strategy to ensure seamless integration of the two interfaces.
Designing the Adapter
To effectively bridge the gap between the old-world Enumeration and the new-world Iterator, we will utilize methods from both interfaces. The Iterator interface includes hasNext(), next(), and remove(), while the Enumeration interface offers hasMoreElements() and nextElement(). Our goal is to create an adapter class, EnumerationIterator, which implements the Iterator interface while internally working with an existing Enumeration. This design allows our new code to leverage Iterators, even though an Enumeration operates beneath the surface. In essence, EnumerationIterator serves as the adapter, transforming the legacy Enumeration into a modern Iterator for your codebase, ensuring seamless integration and enhancing compatibility.
Dealing with the remove() Method
The Enumeration interface is a “read-only” interface that does not support the remove() method. This limitation implies that there is no straightforward way to implement a fully functional remove() method in the adapter. The best approach is to throw a runtime exception, as the Iterator designers anticipated this need and implemented an UnsupportedOperationException for such cases.
EnumerationIterator Adapter Code
Now, let’s look at how we can convert all of this into code.
Kotlin
import java.util.Enumerationimport java.util.Iterator// EnumerationIterator class implementing Iterator// Since we are adapting Enumeration to Iterator, // the EnumerationIterator must implement the Iterator interface // -- it has to look like the Iterator.classEnumerationIterator<T>(privateval enumeration: Enumeration<T>) : Iterator<T> {// We are adapting the Enumeration, using composition to store it in an instance variable.// hasNext() and next() are implemented by delegating to the corresponding methods in the Enumeration. // Checks if there are more elements in the enumerationoverridefunhasNext(): Boolean {return enumeration.hasMoreElements() }// Retrieves the next element from the enumerationoverridefunnext(): T {return enumeration.nextElement() }// For remove(), we simply throw an exception.overridefunremove() {throwUnsupportedOperationException("Remove operation is not supported.") }}
Here,
Generic Type: The EnumerationIterator class is made generic with <T> to handle different types of enumerations.
Constructor: The constructor takes an Enumeration<T> object as a parameter.
hasNext() Method: This method checks if there are more elements in the enumeration.
next() Method: This method retrieves the next element from the enumeration.
remove() Method: This method throws an UnsupportedOperationException, indicating that the remove operation is not supported.
Here, you can see how the EnumerationIterator can be utilized to iterate over the elements of an Enumeration. Please note that the elements() method is specific to classes like Vector or Stack, so ensure you have a valid Enumeration instance to test this example.
While the adapter may not be perfect, it provides a reasonable solution as long as the client is careful and the adapter is well-documented. This clarity ensures that developers understand the limitations and can work with the adapter effectively.
Adapting an Integer Set to an Integer Priority Queue
Transforming an Integer Set into a Priority Queue might sound tricky since a Set inherently doesn’t maintain order, while a Priority Queue relies on element priority. However, by using the Adapter pattern, we can bridge this gap. The Adapter serves as an intermediary, allowing the Set to be used as if it were a Priority Queue. It adds the necessary functionality by reordering elements based on their priority when accessed. This way, you maintain the uniqueness of elements from the Set, while enabling the prioritized behavior of a Priority Queue, all without modifying the original structures. This approach enhances code flexibility and usability.
I know some of you might still be a little confused. Before we dive into the adapter code, let’s quickly revisit the basics of priority queues and integer sets. After that, we’ll walk through how we design the adapter, followed by the code and explanations.
What is a Priority Queue?
A Priority Queue is a type of queue in which elements are dequeued based on their priority, rather than their insertion order. In a typical queue (like a regular line), the first element added is the first one removed, which is known as FIFO (First In, First Out). However, in a priority queue, elements are removed based on their priority—typically the smallest (or sometimes largest) value is removed first.
Example of Priority Queue Behavior: Imagine a hospital emergency room. Patients aren’t necessarily treated in the order they arrive; instead, the most critical cases (highest priority) are treated first. Similarly, in a priority queue, elements with the highest (or lowest) priority are processed first.In a min-priority queue, the smallest element is dequeued first. In a max-priority queue, the largest element is dequeued first.
What is an Integer Set?
A Set is a collection of unique elements. In programming, an Integer Set is simply a set of integers. The key characteristic of a set is that it does not allow duplicate elements and typically has no specific order.
Example of Integer Set Behavior: If you add the integers 3, 7, 5, 3 to a set, the set will only contain 3, 7, 5, as the duplicate 3 will not be added again.
How Does the Integer Set Adapt to Priority Queue Behavior?
A Set by itself does not have any priority-based behavior. However, with the help of the Adapter pattern, we can make the set behave like a priority queue. The Adapter pattern is useful when you have two incompatible interfaces and want to use one in place of the other.
Here, the Set itself doesn’t manage priorities, but we build an adapter around the set that makes it behave like a Priority Queue. Specifically, we implement methods that will:
Add elements to the set (add() method).
Remove the smallest element (which gives it the behavior of a min-priority queue).
Check the size of the set, mimicking the size() behavior of a queue.
PriorityQueueAdapter : Code
Now, let’s see the code and its explanations
Kotlin
// Define a PriorityQueue interfaceinterfacePriorityQueue {funadd(element: Any)funsize(): IntfunremoveSmallest(): Any?}// Implement the PriorityQueueAdapter that adapts a Set to work like a PriorityQueueclassPriorityQueueAdapter(privatevalset: MutableSet<Int>) : PriorityQueue {// Add an element to the Setoverridefunadd(element: Any) {if (element is Int) {set.add(element) } }// Get the size of the Setoverridefunsize(): Int {returnset.size }// Find and remove the smallest element from the SetoverridefunremoveSmallest(): Int? {// If the set is empty, return nullif (set.isEmpty()) returnnull// Find the smallest element using Kotlin's built-in functionsval smallest = set.minOrNull()// Remove the smallest element from the setif (smallest != null) {set.remove(smallest) }// Return the smallest elementreturn smallest }}
PriorityQueue Interface:
We define an interface PriorityQueue with three methods:
add(element: Any): Adds an element to the queue.
size(): Returns the number of elements in the queue.
removeSmallest(): Removes and returns the smallest element from the queue.
PriorityQueueAdapter Class:
This is the adapter that makes a MutableSet<Int> work as a PriorityQueue. It adapts the Set behavior to match the PriorityQueue interface.
It holds a reference to a MutableSet of integers, which will store the elements.
add() method:
Adds an integer to the Set. Since Set ensures that all elements are unique, duplicate values will not be added.
size() method:
Returns the current size of the Set, which is the number of elements stored.
removeSmallest() method:
This method first checks if the set is empty; if so, it returns null.
If not, it uses the built-in Kotlin method minOrNull() to find the smallest element in the set.
Once the smallest element is found, it is removed from the set using remove(), and the smallest element is returned.
PriorityQueueAdapter: How It Works
Let’s walk through how the PriorityQueueAdapter works by using a simple example, followed by detailed explanations.
Kotlin
funmain() {// Create a mutable set of integersval integerSet = mutableSetOf(15, 3, 7, 20)// Create an instance of PriorityQueueAdapter using the setval priorityQueue: PriorityQueue = PriorityQueueAdapter(integerSet)// Add elements to the PriorityQueue priorityQueue.add(10) priorityQueue.add(5)// Print the size of the PriorityQueueprintln("Size of the PriorityQueue: ${priorityQueue.size()}") // Expected: 6 (15, 3, 7, 20, 10, 5)// Remove the smallest elementval smallest = priorityQueue.removeSmallest()println("Smallest element removed: $smallest") // Expected: 3 (which is the smallest in the set)// Check the size of the PriorityQueue after removing the smallest elementprintln("Size after removing smallest: ${priorityQueue.size()}") // Expected: 5 (remaining: 15, 7, 20, 10, 5)// Remove the next smallest elementval nextSmallest = priorityQueue.removeSmallest()println("Next smallest element removed: $nextSmallest") // Expected: 5// Final state of the PriorityQueueprintln("Remaining elements in the PriorityQueue: $integerSet") // Expected: [15, 7, 20, 10]}
Initialization:
We create a MutableSet of integers with values: 15, 3, 7, and 20.The PriorityQueueAdapter is initialized with this set.
Adding Elements:
We add two new integers, 10 and 5, using the add() method of the PriorityQueueAdapter.After adding these, the set contains the following elements: [15, 3, 7, 20, 10, 5].
Size of the PriorityQueue:
We check the size of the queue using the size() method. Since we have six unique elements in the set, the size returned is 6.
Removing the Smallest Element:
The removeSmallest() method is called.The method scans the set and finds 3 to be the smallest element.It removes 3 from the set and returns it.After removal, the set becomes: [15, 7, 20, 10, 5].
Size After Removal:
The size is checked again, and it returns 5, since one element (3) was removed.
Removing the Next Smallest Element:
The removeSmallest() method is called again.This time, it finds 5 as the smallest element in the set.It removes 5 and returns it.After removal, the set is now: [15, 7, 20, 10].
Final State of the Queue:
The final remaining elements in the set are printed, showing the updated state of the set: [15, 7, 20, 10].
The PriorityQueueAdapter demonstrates how we can transform a Set (which does not naturally support priority-based operations) into something that behaves like a PriorityQueue, using the Adapter design pattern. By implementing additional functionality (finding and removing the smallest element), this adapter provides a simple and effective solution to integrate a set into contexts that require a priority queue behavior.
Adapter Design Pattern in Android
The primary goal of the Adapter pattern is to enable communication between two incompatible interfaces. This becomes particularly valuable in Android development, where you frequently need to bridge data sources — such as arrays, lists, or databases — with UI components like RecyclerView, ListView, or Spinner.
So, the Adapter pattern is widely utilized in Android development. Let’s explore its applications one by one.
RecyclerView Adapter
The RecyclerView is a flexible view for providing a limited window into a large data set. The RecyclerView.Adapter serves as the bridge that connects the data to the RecyclerView, allowing for efficient view recycling and performance optimization.
Before RecyclerView, ListView was the primary component for displaying lists of data. The ArrayAdapter and SimpleAdapter are classic examples of adapters used with ListView. They help convert data into views.
A Spinner is a dropdown list that allows the user to select an item from a list. The Adapter pattern is also applied here, typically through ArrayAdapter or a custom adapter to provide data to the Spinner.
In ViewPager, the adapter is used to manage the pages of content. The PagerAdapter (or its subclass FragmentPagerAdapter) allows developers to create and manage the fragments that are displayed in the ViewPager.
Kotlin
classMyPagerAdapter(fm: FragmentManager) : FragmentPagerAdapter(fm) {privateval fragments = listOf(Fragment1(), Fragment2(), Fragment3())overridefungetItem(position: Int): Fragment = fragments[position]overridefungetCount(): Int = fragments.size}// In your activityval viewPager: ViewPager = findViewById(R.id.view_pager)val adapter = MyPagerAdapter(supportFragmentManager)viewPager.adapter = adapter
Custom Adapter for Data Binding
As developers, we often create custom adapters to directly bind data to views. This approach is especially beneficial when working with frameworks like Android Data Binding or when connecting complex data models to UI components.
Kotlin
// Custom Binding Adapter@BindingAdapter("app:loadImage")funloadImage(view: ImageView, url: String?) {// Load image using a library like Glide or Picasso Glide.with(view.context).load(url).into(view)}
The Adapter pattern is prevalent in various components of Android development, from UI elements like ListView, Spinner, and ViewPager to more complex data binding scenarios. It is essential for facilitating seamless communication between data sources and UI components. By implementing various adapters, we enhance code organization, reusability, and flexibility, allowing developers to create responsive and dynamic applications more efficiently.
Conclusion
The Adapter Design Pattern is a powerful tool that every developer should have in their toolkit. By bridging the gap between incompatible systems, it allows for smoother integration and greater code flexibility. Whether you’re using the Class Adapter or Object Adapter, understanding these types can significantly enhance the adaptability of your projects.
From real-world examples to its use in Android development, the Adapter Design Pattern shows its versatility in solving common coding challenges. As we’ve explored, it’s not just about making systems work together—it’s about doing so in a way that’s clean, maintainable, and future-proof.
So next time you face a compatibility issue, remember that the Adapter Pattern is here to save the day. Keep this pattern in mind, and you’ll find yourself writing more robust, adaptable, and efficient code. Now that you’ve finished your coffee, it’s time to apply what you’ve learned—happy coding!
In Java and Kotlin development, efficiently managing collections often requires adapting one data structure to another. A common scenario is converting an Integer Set into an Integer Priority Queue. The PriorityQueueAdapter simplifies this process, enabling developers to leverage the unique features of both data structures—fast access and automatic ordering.
In this blog, we will delve into thePriorityQueueAdapter, exploring its purpose, structure, and implementation. We’ll demonstrate how to seamlessly adapt an Integer Set to an Integer Priority Queue with practical examples and insights. By the end of this article, you’ll understand how this adapter enhances your code’s flexibility and performance in Java and Kotlin applications.
Adapting an Integer Set to an Integer Priority Queue
Adapting an Integer Set to work like a Priority Queue might seem like trying to fit a square peg into a round hole, but the Adapter pattern makes this transformation both possible and practical. In the original form, an Integer Set doesn’t support the behavior of a Priority Queue because it’s unordered, whereas a Priority Queue is all about organizing elements based on priority. By implementing an Adapter, you can create a layer that acts as a bridge between these two incompatible structures. The Adapter can introduce methods that reorder the Set elements, ensuring they are retrieved based on priority, just like a Priority Queue. This way, you can enjoy the benefits of the Set’s unique element constraint while also incorporating the functionality of a priority-based retrieval system. The key here is that the Adapter provides a seamless interface, allowing the underlying Set to work in a completely different context, opening doors for more flexible and maintainable code.
I know some of you might still be a little confused. Before we dive into the adapter code, let’s quickly revisit the basics of priority queues and integer sets. After that, we’ll walk through how we design the adapter, followed by the code and explanations.
What is a Priority Queue?
A Priority Queue is a type of queue in which elements are dequeued based on their priority, rather than their insertion order. In a typical queue (like a regular line), the first element added is the first one removed, which is known as FIFO (First In, First Out). However, in a priority queue, elements are removed based on their priority—typically the smallest (or sometimes largest) value is removed first.
Example of Priority Queue Behavior: Imagine a hospital emergency room. Patients aren’t necessarily treated in the order they arrive; instead, the most critical cases (highest priority) are treated first. Similarly, in a priority queue, elements with the highest (or lowest) priority are processed first.In a min-priority queue, the smallest element is dequeued first. In a max-priority queue, the largest element is dequeued first.
What is an Integer Set?
A Set is a collection of unique elements. In programming, an Integer Set is simply a set of integers. The key characteristic of a set is that it does not allow duplicate elements and typically has no specific order.
Example of Integer Set Behavior: If you add the integers 3, 7, 5, 3 to a set, the set will only contain 3, 7, 5, as the duplicate 3 will not be added again.
How Does the Integer Set Adapt to Priority Queue Behavior?
A Set by itself does not have any priority-based behavior. However, with the help of the Adapter pattern, we can make the set behave like a priority queue. The Adapter pattern is useful when you have two incompatible interfaces and want to use one in place of the other.
Here, the Set itself doesn’t manage priorities, but we build an adapter around the set that makes it behave like a Priority Queue. Specifically, we implement methods that will:
Add elements to the set (add() method).
Remove the smallest element (which gives it the behavior of a min-priority queue).
Check the size of the set, mimicking the size() behavior of a queue.
PriorityQueueAdapter : Code
Now, let’s see the code and its explanations
Kotlin
// Define a PriorityQueue interfaceinterfacePriorityQueue {funadd(element: Any)funsize(): IntfunremoveSmallest(): Any?}// Implement the PriorityQueueAdapter that adapts a Set to work like a PriorityQueueclassPriorityQueueAdapter(privatevalset: MutableSet<Int>) : PriorityQueue {// Add an element to the Setoverridefunadd(element: Any) {if (element is Int) {set.add(element) } }// Get the size of the Setoverridefunsize(): Int {returnset.size }// Find and remove the smallest element from the SetoverridefunremoveSmallest(): Int? {// If the set is empty, return nullif (set.isEmpty()) returnnull// Find the smallest element using Kotlin's built-in functionsval smallest = set.minOrNull()// Remove the smallest element from the setif (smallest != null) {set.remove(smallest) }// Return the smallest elementreturn smallest }}
PriorityQueue Interface:
We define an interface PriorityQueue with three methods:
add(element: Any): Adds an element to the queue.
size(): Returns the number of elements in the queue.
removeSmallest(): Removes and returns the smallest element from the queue.
PriorityQueueAdapter Class:
This is the adapter that makes a MutableSet<Int> work as a PriorityQueue. It adapts the Set behavior to match the PriorityQueue interface.
It holds a reference to a MutableSet of integers, which will store the elements.
add() method:
Adds an integer to the Set. Since Set ensures that all elements are unique, duplicate values will not be added.
size() method:
Returns the current size of the Set, which is the number of elements stored.
removeSmallest() method:
This method first checks if the set is empty; if so, it returns null.
If not, it uses the built-in Kotlin method minOrNull() to find the smallest element in the set.
Once the smallest element is found, it is removed from the set using remove(), and the smallest element is returned.
Key Points
Adapter Pattern: The class PriorityQueueAdapter acts as an adapter, allowing the Set to behave like a PriorityQueue. The set keeps unique elements, but the adapter adds additional functionality to behave like a priority queue by tracking and removing the smallest element.
Flexibility: This approach enables you to use a Set in scenarios that require a PriorityQueue without altering the original Set structure. The adapter adds the priority-based behavior without modifying the Set itself.
PriorityQueueAdapter: How It Works
Let’s walk through how the PriorityQueueAdapter works by using a simple example, followed by detailed explanations.
Kotlin
funmain() {// Create a mutable set of integersval integerSet = mutableSetOf(15, 3, 7, 20)// Create an instance of PriorityQueueAdapter using the setval priorityQueue: PriorityQueue = PriorityQueueAdapter(integerSet)// Add elements to the PriorityQueue priorityQueue.add(10) priorityQueue.add(5)// Print the size of the PriorityQueueprintln("Size of the PriorityQueue: ${priorityQueue.size()}") // Expected: 6 (15, 3, 7, 20, 10, 5)// Remove the smallest elementval smallest = priorityQueue.removeSmallest()println("Smallest element removed: $smallest") // Expected: 3 (which is the smallest in the set)// Check the size of the PriorityQueue after removing the smallest elementprintln("Size after removing smallest: ${priorityQueue.size()}") // Expected: 5 (remaining: 15, 7, 20, 10, 5)// Remove the next smallest elementval nextSmallest = priorityQueue.removeSmallest()println("Next smallest element removed: $nextSmallest") // Expected: 5// Final state of the PriorityQueueprintln("Remaining elements in the PriorityQueue: $integerSet") // Expected: [15, 7, 20, 10]}
Initialization:
We create a MutableSet of integers with values: 15, 3, 7, and 20.
The PriorityQueueAdapter is initialized with this set.
Adding Elements:
We add two new integers, 10 and 5, using the add() method of the PriorityQueueAdapter.
After adding these, the set contains the following elements: [15, 3, 7, 20, 10, 5].
Size of the PriorityQueue:
We check the size of the queue using the size() method. Since we have six unique elements in the set, the size returned is 6.
Removing the Smallest Element:
The removeSmallest() method is called.
The method scans the set and finds 3 to be the smallest element.
It removes 3 from the set and returns it.
After removal, the set becomes: [15, 7, 20, 10, 5].
Size After Removal:
The size is checked again, and it returns 5, since one element (3) was removed.
Removing the Next Smallest Element:
The removeSmallest() method is called again.
This time, it finds 5 as the smallest element in the set.
It removes 5 and returns it.
After removal, the set is now: [15, 7, 20, 10].
Final State of the Queue:
The final remaining elements in the set are printed, showing the updated state of the set: [15, 7, 20, 10].
So, the add() method in the PriorityQueueAdapter is responsible for adding elements to the internal set. Since sets do not allow duplicate elements, only unique items are added; if an attempt is made to add an element that already exists in the set, it will not be added again. The removeSmallest() method scans the set to identify the smallest element, removes it, and returns its value. This method utilizes the built-in minOrNull() function to efficiently find the smallest element during each iteration, ensuring that the set is modified appropriately. The adapter employs a MutableSet as the underlying data structure, allowing it to function like a priority queue by focusing on adding elements and removing the smallest ones. Additionally, the design of the PriorityQueueAdapter ensures that the set is effectively utilized as a priority queue without altering its inherent behavior.
Conclusion
The PriorityQueueAdapter offers a straightforward and effective way to convert an Integer Set into an Integer Priority Queue, enhancing your data management capabilities in Java and Kotlin. By utilizing this adapter, you can take advantage of the automatic ordering and efficient retrieval features of a priority queue, all while maintaining the unique characteristics of a set.
Whether you’re optimizing algorithms or simply looking for a better way to handle integer data, the PriorityQueueAdapter serves as a valuable tool in your development toolkit. Implementing this adapter will streamline your collection handling, allowing your applications to operate more efficiently and effectively. Embrace the power of the PriorityQueueAdapter in your projects and elevate your coding practices!
In Kotlin and Java development, working with legacy code often requires bridging the gap between outdated interfaces like Enumeration and modern ones like Iterator. To address this challenge, the EnumerationIterator Adapter is a useful tool that allows developers to seamlessly convert an Enumeration into an Iterator.
In this blog, we’ll dive into what the EnumerationIteratorAdapter is, how it works, and why it’s essential for maintaining or updating legacy Java applications—as well as its use in Kotlin. Through simple examples and practical insights, you’ll discover how this adapter enhances code flexibility and makes working with older systems more efficient.
Adapting an Enumeration to an Iterator
In the landscape of programming, particularly when dealing with collections in Kotlin and Java, we often navigate between legacy enumerators and modern iterators. In Java, the legacy Enumeration interface features straightforward methods like hasMoreElements() to check for remaining elements and nextElement() to retrieve the next item, representing a simpler time. In contrast, the modern Iterator interface—found in both Java and Kotlin—introduces a more robust approach, featuring hasNext(), next(), and even remove() (In Kotlin, the remove() method is part of the MutableIterator<out T> interface) for effective collection management.
Old world Enumerators & New world Iterators
Despite these advancements, many applications still rely on legacy code that exposes the Enumeration interface. This presents developers with a dilemma: how to seamlessly integrate this outdated system with newer code that prefers iterators. This is where the need for an adapter emerges, bridging the gap and allowing us to leverage the strengths of both worlds. By creating an adapter that implements the Iterator interface while wrapping an Enumeration instance, we can provide a smooth transition to modern coding practices without discarding the functionality of legacy systems.
Let’s examine the two interfaces
Adapting an Enumeration to an Iterator begins with examining the two interfaces. The Iterator interface includes three essential methods: hasNext(), next(), and remove(), while the older Enumeration interface features hasMoreElements() and nextElement(). The first two methods from Enumeration map easily to Iterator‘s counterparts, making the initial adaptation straightforward. However, the real challenge arises with the remove() method in Iterator, which has no equivalent in Enumeration. This disparity highlights the complexities involved in bridging legacy code with modern practices, emphasizing the need for an effective adaptation strategy to ensure seamless integration of the two interfaces.
Designing the Adapter
To effectively bridge the gap between the old-world Enumeration and the new-world Iterator, we will utilize methods from both interfaces. The Iterator interface includes hasNext(), next(), and remove(), while the Enumeration interface offers hasMoreElements() and nextElement(). Our goal is to create an adapter class, EnumerationIterator, which implements the Iterator interface while internally working with an existing Enumeration. This design allows our new code to leverage Iterators, even though an Enumeration operates beneath the surface. In essence, EnumerationIterator serves as the adapter, transforming the legacy Enumeration into a modern Iterator for your codebase, ensuring seamless integration and enhancing compatibility.
Dealing with the remove() Method
The Enumeration interface is a “read-only” interface that does not support the remove() method. This limitation implies that there is no straightforward way to implement a fully functional remove() method in the adapter. The best approach is to throw a runtime exception, as the Iterator designers anticipated this need and implemented an UnsupportedOperationException for such cases.
EnumerationIterator Adapter Code
Now, let’s look at how we can convert all of this into code.
Kotlin
import java.util.Enumerationimport java.util.Iterator// EnumerationIterator class implementing Iterator// Since we are adapting Enumeration to Iterator, // the EnumerationIterator must implement the Iterator interface // -- it has to look like the Iterator.classEnumerationIterator<T>(privateval enumeration: Enumeration<T>) : Iterator<T> {// We are adapting the Enumeration, using composition to store it in an instance variable.// hasNext() and next() are implemented by delegating to the corresponding methods in the Enumeration. // Checks if there are more elements in the enumerationoverridefunhasNext(): Boolean {return enumeration.hasMoreElements() }// Retrieves the next element from the enumerationoverridefunnext(): T {return enumeration.nextElement() }// For remove(), we simply throw an exception.overridefunremove() {throwUnsupportedOperationException("Remove operation is not supported.") }}
Here,
Generic Type: The EnumerationIterator class is made generic with <T> to handle different types of enumerations.
Constructor: The constructor takes an Enumeration<T> object as a parameter.
hasNext() Method: This method checks if there are more elements in the enumeration.
next() Method: This method retrieves the next element from the enumeration.
remove() Method: This method throws an UnsupportedOperationException, indicating that the remove operation is not supported.
Here, you can see how the EnumerationIterator can be utilized to iterate over the elements of an Enumeration. Please note that the elements() method is specific to classes like Vector or Stack, so ensure you have a valid Enumeration instance to test this example.
While the adapter may not be perfect, it provides a reasonable solution as long as the client is careful and the adapter is well-documented. This clarity ensures that developers understand the limitations and can work with the adapter effectively.
Conclusion
The EnumerationIterator Adapter offers a smooth and efficient way to modernize legacy Java code and Kotlin applications without sacrificing functionality. By converting an Enumeration to an Iterator, you can enhance compatibility with newer Java collections and APIs, as well as leverage Kotlin’s powerful collection functions, all while keeping your code clean and maintainable.
Whether you’re refactoring legacy systems in Java or Kotlin, or ensuring compatibility with modern practices, the EnumerationIterator Adapter provides a simple yet powerful solution. By incorporating this adapter into your projects, you’ll streamline your development process and make your code more adaptable for the future.
The Adapter Design Pattern is a fundamental concept in software engineering that allows incompatible interfaces to work together seamlessly. In a world where systems and components often need to communicate despite their differences, understanding the various types of Adapter Design Patterns becomes essential for developers. By acting as a bridge between disparate systems, these patterns enhance code reusability and maintainability.
In this blog, we will explore the different types of Adapter Design Patterns, including the Class Adapter and Object Adapter, and their respective roles in software development. We’ll break down their structures, provide practical examples, and discuss their advantages and potential drawbacks. By the end, you’ll have a clearer understanding of how to effectively implement these patterns in your projects, making your codebase more adaptable and robust. Let’s dive into the world of Adapter Design Patterns!
Object Adapter Pattern Definition
The Object Adapter Pattern is a structural design pattern that allows objects with incompatible interfaces to collaborate by using composition rather than inheritance. Instead of modifying the existing class (adaptee), the adapter creates a bridge between the client and the adaptee by holding a reference to the adaptee. This approach enables flexible and reusable solutions without altering existing code.
In the Object Adapter Pattern, the adapter contains an instance of the adaptee and implements the interface expected by the client. It “adapts” the methods of the adaptee to fit the expected interface.
Structure of Object Adapter Pattern
Client: The class that interacts with the target interface.
Target Interface: The interface that the client expects.
Adaptee: The class with an incompatible interface that needs to be adapted.
Adapter: The class that implements the target interface and holds a reference to the adaptee, enabling the two incompatible interfaces to work together.
In this UML diagram of the Object Adapter Pattern,
Client → Depends on → Target Interface
Adapter → Implements → Target Interface
Adapter → Has a reference to → Adaptee
Adaptee → Has methods incompatible with the Target Interface
Key Points:
Object Adapter uses composition (by containing the adaptee) instead of inheritance, which makes it more flexible and reusable.
The adapter doesn’t alter the existing Adaptee class but makes it compatible with the Target Interface.
Simple Example of Object Adapter Pattern
Let’s consider a simple scenario where we want to charge different types of phones, but their charging ports are incompatible.
The Client is a phone charger that expects to use a USB type-C charging port.
The Adaptee is an old phone that uses a micro-USB charging port.
The Adapter bridges the difference by converting the micro-USB interface to a USB type-C interface.
Step 1: Define the Target Interface
The charger (client) expects all phones to implement this interface (USB Type-C).
Kotlin
// Target interface that the client expectsinterfaceUsbTypeCCharger {funchargeWithUsbTypeC()}
Step 2: Define the Adaptee
This is the old phone, which only has a Micro-USB port. The charger can’t directly use this interface.
Kotlin
// Adaptee class that uses Micro-USB for chargingclassMicroUsbPhone {funrechargeWithMicroUsb() {println("Micro-USB phone: Charging using Micro-USB port") }}
Step 3: Create the Adapter
The adapter will “adapt” the Micro-USB phone to make it compatible with the USB Type-C charger. It wraps the MicroUsbPhone and translates the charging request.
Kotlin
// Adapter that makes Micro-USB phone compatible with USB Type-C chargerclassMicroUsbToUsbTypeCAdapter(privateval microUsbPhone: MicroUsbPhone) : UsbTypeCCharger {overridefunchargeWithUsbTypeC() {println("Adapter: Converting USB Type-C to Micro-USB") microUsbPhone.rechargeWithMicroUsb() // Delegating the charging to the Micro-USB phone }}
Step 4: Implement the Client
The client (charger) works with the target interface (UsbTypeCCharger). It can now charge a phone with a Micro-USB port by using the adapter.
Kotlin
funmain() {// Old phone with a Micro-USB port (Adaptee)val microUsbPhone = MicroUsbPhone()// Adapter that makes the Micro-USB phone compatible with USB Type-C chargerval usbTypeCAdapter = MicroUsbToUsbTypeCAdapter(microUsbPhone)// Client (USB Type-C Charger) charges the phone using the adapterprintln("Client: Charging phone using USB Type-C charger") usbTypeCAdapter.chargeWithUsbTypeC()}
Output:
Kotlin
Client: ChargingphoneusingUSBType-C chargerAdapter: ConvertingUSBType-C to Micro-USBMicro-USB phone: ChargingusingMicro-USB port
Here,
Client: The charger expects all phones to be charged using a USB Type-C port, so it calls chargeWithUsbTypeC().
Adapter: The adapter receives the request from the client to charge using USB Type-C. It converts this request and adapts it to the MicroUsbPhone by calling rechargeWithMicroUsb() internally.
Adaptee (MicroUsbPhone): The phone knows how to charge itself using Micro-USB. The adapter simply makes it compatible with the client’s expectation.
What’s Happening in Each Step
Client: The charger (client) is asking to charge a phone via USB Type-C.
Adapter: The adapter intercepts this request and converts it to something the old phone understands, which is charging via Micro-USB.
Adaptee (Micro-USB phone): The old phone proceeds with charging using its Micro-USB port.
Basically, the Object Adapter Pattern is a powerful and flexible way to make incompatible interfaces work together. By using composition in Kotlin, you can create an adapter that wraps an existing class (the Adaptee) and makes it compatible with the client’s expected interface without changing the original code. This approach ensures better maintainability, flexibility, and reusability of your code.
Class Adapter Pattern
The Class Adapter Pattern is another type of adapter design pattern where an adapter class inherits from both the target interface and the Adaptee class. Unlike the Object Adapter Pattern, which uses composition (holding an instance of the Adaptee), the Class Adapter Pattern employs multiple inheritance to directly connect the client and the Adaptee.
In languages like Kotlin, which do not support true multiple inheritance, we simulate this behavior by using interfaces. The adapter implements the target interface and extends the Adaptee class to bridge the gap between incompatible interfaces.
Before going into much detail, let’s first understand the structure of the Class Adapter Pattern.
Structure of Class Adapter Pattern
Client: The class that interacts with the target interface.
Target Interface: The interface that the client expects to interact with.
Adaptee: The class with an incompatible interface that needs to be adapted.
Adapter: A class that inherits from both the target interface and the adaptee, adapting the adaptee to be compatible with the client.
In this UML diagram of the Class Adapter Pattern,
Client → Depends on → Target Interface
Adapter → Inherits from → Adaptee
Adapter → Implements → Target Interface
Adaptee → Has methods incompatible with the target interface
Key Points:
The Class Adapter pattern relies on inheritance to connect the Adaptee and the Target Interface.
The adapter inherits from the adaptee and implements the target interface, thus combining both functionalities.
Simple Example of Class Adapter Pattern
Now, let’s look at an example of the Class Adapter Pattern. We’ll use the same scenario: a charger that expects a USB Type-C interface but has an old phone that only supports Micro-USB.
Step 1: Define the Target Interface
This is the interface that the client (charger) expects.
Kotlin
// Target interface that the client expectsinterfaceUsbTypeCCharger {funchargeWithUsbTypeC()}
Step 2: Define the Adaptee
This is the class that needs to be adapted. It’s the old phone with a Micro-USB charging port.
Kotlin
// Adaptee class that uses Micro-USB for chargingclassMicroUsbPhone {funrechargeWithMicroUsb() {println("Micro-USB phone: Charging using Micro-USB port") }}
Step 3: Define the Adapter (Class Adapter)
The Adapter inherits from the MicroUsbPhone (adaptee) and implements the UsbTypeCCharger (target interface). It adapts the MicroUsbPhone to be compatible with the UsbTypeCCharger interface.
Kotlin
// Adapter that inherits from MicroUsbPhone and implements UsbTypeCChargerclassMicroUsbToUsbTypeCAdapter : MicroUsbPhone(), UsbTypeCCharger {// Implement the method from UsbTypeCChargeroverridefunchargeWithUsbTypeC() {println("Adapter: Converting USB Type-C to Micro-USB")// Call the inherited method from MicroUsbPhonerechargeWithMicroUsb() // Uses the Micro-USB method to charge }}
Step 4: Client Usage
The Client only interacts with the UsbTypeCCharger interface and charges the phone through the adapter.
Kotlin
funmain() {// Adapter that allows charging a Micro-USB phone with a USB Type-C chargerval usbTypeCAdapter = MicroUsbToUsbTypeCAdapter()// Client (USB Type-C Charger) charges the phone through the adapterprintln("Client: Charging phone using USB Type-C charger") usbTypeCAdapter.chargeWithUsbTypeC()}
Output:
Kotlin
Client: ChargingphoneusingUSBType-C chargerAdapter: ConvertingUSBType-C to Micro-USBMicro-USB phone: ChargingusingMicro-USB port
Here,
Client: The client expects all phones to be charged using the UsbTypeCCharger interface.
Adapter: The adapter class inherits the behavior of the MicroUsbPhone (adaptee) and implements the UsbTypeCCharger interface. It converts the USB Type-C charging request and delegates it to the inherited rechargeWithMicroUsb() method.
Adaptee (Micro-USB phone): The MicroUsbPhone class has a method to recharge using Micro-USB, which is directly called by the adapter.
What’s Happening in Each Step
Client: The client attempts to charge a phone using the chargeWithUsbTypeC() method.
Adapter: The adapter intercepts this request and converts it to the rechargeWithMicroUsb() method, which it inherits from the MicroUsbPhone class.
Adaptee: The phone charges using the rechargeWithMicroUsb() method, fulfilling the request.
Actually, the Class Adapter Pattern allows you to make incompatible interfaces work together by using inheritance. In Kotlin, this involves implementing the target interface and extending the Adaptee class. While this approach is simple and performant, it’s less flexible than the Object Adapter Pattern because it binds the adapter directly to the Adaptee.
This pattern works well when you need a tight coupling between the adapter and the Adaptee, but for more flexibility, the Object Adapter Pattern is often the better choice.
Class Adapter Vs. Object Adapter
The main difference between the Class Adapter and the Object Adapter lies in how they achieve compatibility between the Target and the Adaptee. In the Class Adapter pattern, we use inheritance by subclassing both the Target interface and the Adaptee class, which allows the adapter to directly access the Adaptee’s behavior. This means the adapter is tightly coupled to both the Target and the Adaptee at compile-time.
On the other hand, the Object Adapter pattern relies on composition, meaning the adapter holds a reference to an instance of the Adaptee rather than inheriting from it. This approach allows the adapter to forward requests to the Adaptee, making it more flexible because the Adaptee instance can be changed or swapped without modifying the adapter. The Object Adapter pattern is generally preferred when more flexibility is needed, as it loosely couples the adapter and Adaptee.
In short, the key difference is that the Class Adapter subclasses both the Target and the Adaptee, while the Object Adapter uses composition to forward requests to the Adaptee.
Conclusion
Adapter Design Pattern plays a crucial role in facilitating communication between incompatible interfaces, making it an invaluable tool in software development. By exploring the various types of adapters—such as the Class Adapter and Object Adapter—you can enhance the flexibility and maintainability of your code.
As we’ve seen, each type of adapter has its unique structure, advantages, and challenges. Understanding these nuances allows you to choose the right adapter for your specific needs, ultimately leading to more efficient and cleaner code. As you continue to develop your projects, consider how the Adapter Design Pattern can streamline integration efforts and improve your software architecture. Embrace these patterns, and empower your code to adapt and thrive in an ever-evolving technological landscape. Happy coding!
In software development, we frequently face challenges when trying to connect different systems or components. One design pattern that can facilitate this integration is the Class Adapter Pattern. Despite its potential, many developers overlook this pattern in their day-to-day coding due to the complexities of multiple inheritance. However, with the right approach—by cleverly extending and implementing—we can harness its power effectively.
In this blog, we will explore the Class Adapter Pattern in detail. We’ll break down its structure and functionality, walk through a straightforward example, and discuss the advantages and disadvantages of using this pattern. By the end, you’ll have a solid understanding of how to apply the Class Adapter Pattern in your projects, empowering you to create more flexible and maintainable code. Let’s dive in and unlock the possibilities of the Class Adapter Pattern together!
Class Adapter Pattern
The Class Adapter Pattern is a structural design pattern where an adapter class inherits from both the target interface and the adaptee class. Unlike the Object Adapter Pattern, which uses composition (holding an instance of the adaptee), the Class Adapter Pattern uses multiple inheritance to directly connect the client and the adaptee.
In languages like Kotlin, which do not support true multiple inheritance, we simulate it by using interfaces. The adapter will implement the target interface and extend the adaptee class to bridge the gap between incompatible interfaces.
Before going into much detail, let’s first understand the structure of the Class Adapter Pattern.
Structure of Class Adapter Pattern
Client: The class that interacts with the target interface.
Target Interface: The interface that the client expects to interact with.
Adaptee: The class with an incompatible interface that needs to be adapted.
Adapter: A class that inherits from both the target interface and the adaptee, adapting the adaptee to be compatible with the client.
In this UML diagram of the Class Adapter Pattern,
Client → Depends on → Target Interface
Adapter → Inherits from → Adaptee
Adapter → Implements → Target Interface
Adaptee → Has methods incompatible with the target interface
Key Points:
The Class Adapter pattern relies on inheritance to connect the Adaptee and the Target Interface.
The adapter inherits from the adaptee and implements the target interface, thus combining both functionalities.
Simple Example of Class Adapter Pattern
Now, let’s look at an example of the Class Adapter Pattern. We’ll use the same scenario: a charger that expects a USB Type-C interface but has an old phone that only supports Micro-USB.
Step 1: Define the Target Interface
This is the interface that the client (charger) expects.
Kotlin
// Target interface that the client expectsinterfaceUsbTypeCCharger {funchargeWithUsbTypeC()}
Step 2: Define the Adaptee
This is the class that needs to be adapted. It’s the old phone with a Micro-USB charging port.
Kotlin
// Adaptee class that uses Micro-USB for chargingclassMicroUsbPhone {funrechargeWithMicroUsb() {println("Micro-USB phone: Charging using Micro-USB port") }}
Step 3: Define the Adapter (Class Adapter)
The Adapter inherits from the MicroUsbPhone (adaptee) and implements the UsbTypeCCharger (target interface). It adapts the MicroUsbPhone to be compatible with the UsbTypeCCharger interface.
Kotlin
// Adapter that inherits from MicroUsbPhone and implements UsbTypeCChargerclassMicroUsbToUsbTypeCAdapter : MicroUsbPhone(), UsbTypeCCharger {// Implement the method from UsbTypeCChargeroverridefunchargeWithUsbTypeC() {println("Adapter: Converting USB Type-C to Micro-USB")// Call the inherited method from MicroUsbPhonerechargeWithMicroUsb() // Uses the Micro-USB method to charge }}
Step 4: Client Usage
The Client only interacts with the UsbTypeCCharger interface and charges the phone through the adapter.
Kotlin
funmain() {// Adapter that allows charging a Micro-USB phone with a USB Type-C chargerval usbTypeCAdapter = MicroUsbToUsbTypeCAdapter()// Client (USB Type-C Charger) charges the phone through the adapterprintln("Client: Charging phone using USB Type-C charger") usbTypeCAdapter.chargeWithUsbTypeC()}
Output:
Kotlin
Client: ChargingphoneusingUSBType-C chargerAdapter: ConvertingUSBType-C to Micro-USBMicro-USB phone: ChargingusingMicro-USB port
Here,
Client: The client expects all phones to be charged using the UsbTypeCCharger interface.
Adapter: The adapter class inherits the behavior of the MicroUsbPhone (adaptee) and implements the UsbTypeCCharger interface. It converts the USB Type-C charging request and delegates it to the inherited rechargeWithMicroUsb() method.
Adaptee (Micro-USB phone): The MicroUsbPhone class has a method to recharge using Micro-USB, which is directly called by the adapter.
What’s Happening in Each Step
Client: The client attempts to charge a phone using the chargeWithUsbTypeC() method.
Adapter: The adapter intercepts this request and converts it to the rechargeWithMicroUsb() method, which it inherits from the MicroUsbPhone class.
Adaptee: The phone charges using the rechargeWithMicroUsb() method, fulfilling the request.
Class Adapter Pattern Short Recap
Class Adapter pattern uses inheritance to connect the adaptee and target interface.
The adapter inherits the functionality of the adaptee and implements the target interface, converting the incompatible interface.
In this pattern, the adapter can directly access the methods of the adaptee class because it extends it, which may provide better performance in certain situations but can also lead to more coupling between the classes.
Advantages of Class Adapter Pattern
Simplicity: Since the adapter inherits from the adaptee, there’s no need to explicitly manage the adaptee object.
Performance: Direct inheritance avoids the overhead of composition (no need to hold a reference to the adaptee), potentially improving performance in certain cases.
Code Reusability: You can extend the adapter functionality by inheriting additional methods from the adaptee.
Disadvantages of Class Adapter Pattern
Less Flexibility: Since the adapter inherits from the adaptee, it is tightly coupled to it. It cannot be used to adapt multiple adaptees (unlike the Object Adapter Pattern, which can wrap different adaptees).
Single Adaptee: It only works with one adaptee due to inheritance, whereas the Object Adapter can work with multiple adaptees by holding references to different objects.
Conclusion
Class Adapter Pattern is a valuable design tool that can simplify the integration of diverse components in your software projects. While it may seem complex due to the challenges of multiple inheritance, understanding its structure and application can unlock significant benefits.
By leveraging the Class Adapter Pattern, you can create more adaptable and maintainable code, enabling seamless communication between different interfaces. As we’ve explored, this pattern offers unique advantages, but it’s essential to weigh its drawbacks in your specific context.
As you continue your development journey, consider how the Class Adapter Pattern can enhance your solutions. Embracing such design patterns not only improves your code quality but also equips you with the skills to tackle increasingly complex challenges with confidence.
In the fast-paced world of software development, it’s easy to overlook some of the powerful design patterns that can streamline our code and enhance its flexibility. One such pattern is the Object Adapter Design Pattern. While many developers use it in their projects, it often gets sidelined amid tight deadlines and urgent tasks. However, understanding this pattern can significantly improve the quality of our software architecture.
In this blog, we’ll dive into the Object Adapter Design Pattern, exploring its structure and purpose. I’ll guide you through a simple example to illustrate its implementation, showcasing how it can bridge the gap between incompatible interfaces. By the end, you’ll see why this pattern is an essential tool in your development toolkit—making your code not only more adaptable but also easier to maintain and extend. Let’s unlock the potential of the Object Adapter Design Pattern together!
Object Adapter Pattern Definition
The Object Adapter Pattern is a structural design pattern that allows objects with incompatible interfaces to collaborate by using composition rather than inheritance. Instead of modifying the existing class (adaptee), the adapter creates a bridge between the client and the adaptee by holding a reference to the adaptee. This approach enables flexible and reusable solutions without altering existing code.
In the Object Adapter Pattern, the adapter contains an instance of the adaptee and implements the interface expected by the client. It “adapts” the methods of the adaptee to fit the expected interface.
Structure of Object Adapter Pattern
Client: The class that interacts with the target interface.
Target Interface: The interface that the client expects.
Adaptee: The class with an incompatible interface that needs to be adapted.
Adapter: The class that implements the target interface and holds a reference to the adaptee, enabling the two incompatible interfaces to work together.
In this UML diagram of the Object Adapter Pattern,
Client → Depends on → Target Interface
Adapter → Implements → Target Interface
Adapter → Has a reference to → Adaptee
Adaptee → Has methods incompatible with the Target Interface
Key Points:
Object Adapter uses composition (by containing the adaptee) instead of inheritance, which makes it more flexible and reusable.
The adapter doesn’t alter the existing Adaptee class but makes it compatible with the Target Interface.
Simple Example
Let’s consider a simple scenario where we want to charge different types of phones, but their charging ports are incompatible.
The Client is a phone charger that expects to use a USB type-C charging port.
The Adaptee is an old phone that uses a micro-USB charging port.
The Adapter bridges the difference by converting the micro-USB interface to a USB type-C interface.
Step 1: Define the Target Interface
The charger (client) expects all phones to implement this interface (USB Type-C).
Kotlin
// Target interface that the client expectsinterfaceUsbTypeCCharger {funchargeWithUsbTypeC()}
Step 2: Define the Adaptee
This is the old phone, which only has a Micro-USB port. The charger can’t directly use this interface.
Kotlin
// Adaptee class that uses Micro-USB for chargingclassMicroUsbPhone {funrechargeWithMicroUsb() {println("Micro-USB phone: Charging using Micro-USB port") }}
Step 3: Create the Adapter
The adapter will “adapt” the Micro-USB phone to make it compatible with the USB Type-C charger. It wraps the MicroUsbPhone and translates the charging request.
Kotlin
// Adapter that makes Micro-USB phone compatible with USB Type-C chargerclassMicroUsbToUsbTypeCAdapter(privateval microUsbPhone: MicroUsbPhone) : UsbTypeCCharger {overridefunchargeWithUsbTypeC() {println("Adapter: Converting USB Type-C to Micro-USB") microUsbPhone.rechargeWithMicroUsb() // Delegating the charging to the Micro-USB phone }}
Step 4: Implement the Client
The client (charger) works with the target interface (UsbTypeCCharger). It can now charge a phone with a Micro-USB port by using the adapter.
Kotlin
funmain() {// Old phone with a Micro-USB port (Adaptee)val microUsbPhone = MicroUsbPhone()// Adapter that makes the Micro-USB phone compatible with USB Type-C chargerval usbTypeCAdapter = MicroUsbToUsbTypeCAdapter(microUsbPhone)// Client (USB Type-C Charger) charges the phone using the adapterprintln("Client: Charging phone using USB Type-C charger") usbTypeCAdapter.chargeWithUsbTypeC()}
Output:
Kotlin
Client: ChargingphoneusingUSBType-C chargerAdapter: ConvertingUSBType-C to Micro-USBMicro-USB phone: ChargingusingMicro-USB port
Here,
Client: The charger expects all phones to be charged using a USB Type-C port, so it calls chargeWithUsbTypeC().
Adapter: The adapter receives the request from the client to charge using USB Type-C. It converts this request and adapts it to the MicroUsbPhone by calling rechargeWithMicroUsb() internally.
Adaptee (MicroUsbPhone): The phone knows how to charge itself using Micro-USB. The adapter simply makes it compatible with the client’s expectation.
What’s Happening in Each Step
Client: The charger (client) is asking to charge a phone via USB Type-C.
Adapter: The adapter intercepts this request and converts it to something the old phone understands, which is charging via Micro-USB.
Adaptee (Micro-USB phone): The old phone proceeds with charging using its Micro-USB port.
This structure makes the responsibilities of each component clearer:
The adapter’s job is to convert between incompatible interfaces.
The client only works with the UsbTypeCCharger interface, while the old phone uses its own rechargeWithMicroUsb() method.
Object Adapter Pattern Short Recap
Object Adapter relies on composition rather than inheritance to adapt one interface to another.
It is used when you need to integrate an existing class (adaptee) with an interface that it does not implement.
This pattern ensures that you do not need to modify the adaptee class to make it compatible with a new system.
Advantages of Object Adapter Pattern
Flexibility: By using composition, the adapter pattern allows multiple adaptees to be wrapped by the same adapter without modifying the adaptee classes.
Code Reusability: The adapter allows reusing existing classes even if their interfaces do not match the required one.
Separation of Concerns: The client is decoupled from the adaptee, making the system easier to maintain and extend.
Conclusion
The Object Adapter Design Pattern serves as a powerful solution for integrating incompatible interfaces, making it a vital asset in our software development arsenal. By facilitating communication between different classes without modifying their source code, this pattern promotes flexibility and reusability, ultimately leading to cleaner, more maintainable code.
As we’ve explored, implementing the Object Adapter not only simplifies complex interactions but also enhances the scalability of your applications. Whether you’re working on legacy systems or integrating new functionalities, the Object Adapter Design Pattern can help you tackle challenges with ease.
Embracing design patterns like the Object Adapter allows us to write code that is not just functional, but also elegant and robust. So, the next time you find yourself in a hurry, take a moment to consider how the Object Adapter can streamline your solution. By investing a little time to understand and apply this pattern, you’ll be well-equipped to create software that stands the test of time. Happy coding!
As a Kotlin developer, you’re no stranger to the numerous architectural patterns in Android app development. From the well-established MVP (Model-View-Presenter) to the widely-used MVVM (Model-View-ViewModel), and now, the emerging MVI (Model-View-Intent), it’s easy to feel lost in the sea of choices. But here’s the thing: MVI is rapidly becoming the go-to architecture for many, and it might just be the game changer you need in your next project.
If you’re feeling overwhelmed by all the buzzwords — MVP, MVVM, and now MVI — you’re not alone. Understanding which architecture fits best often feels like decoding an exclusive developer language. But when it comes to MVI, things are simpler than they seem.
In this blog, we’ll break down MVI architecture in Kotlin step-by-step, showing why it’s gaining popularity and how it simplifies Android app development. By the end, you’ll not only have a solid grasp of MVI, but you’ll also know how to integrate it into your Kotlin projects seamlessly — without the complexity.
What is MVI, and Why Should You Care?
You’re probably thinking, “Oh no, not another architecture pattern!” I get it. With all these patterns out there, navigating Android development can feel like a never-ending quest for the perfect way to manage UI, data, and state. But trust me, MVI is different.
MVI stands for Model-View-Intent. It’s an architecture designed to make your app’s state management more predictable, easier to test, and scalable. MVI addresses several common issues found in architectures like MVP and MVVM, such as:
State Management: What’s the current state of the UI?
Complex UI Flows: You press a button, but why does the app behave unexpectedly?
Testing: How do you test all these interactions without conjuring a wizard?
Challenges in Modern Android App Development
Before we dive into the core concepts of MVI, let’s first examine some challenges faced in contemporary Android app development:
Heavy Asynchronicity: Managing various asynchronous sources like REST APIs, WebSockets, and push notifications can complicate state management.
State Updates from Multiple Sources: State changes can originate from different components, leading to confusion and potential inconsistencies.
Large App Sizes: Modern applications can become cumbersome in size, impacting performance and user experience.
Asynchronicity and Size: Combining asynchronous operations with large applications can lead to unexpected issues when changes occur in one part of the app.
Debugging Difficulties: Tracing back to identify the root cause of errors or unexpected behavior can be incredibly challenging, often leaving developers frustrated.
The Core Idea Behind MVI
MVI architecture has its roots in functional and reactive programming. Inspired by patterns like Redux, Flux, and Cycle.js, it focuses on state management and unidirectional data flow, where all changes in the system flow in one direction, creating a predictable cycle of state updates.
In MVI, the UI is driven by a single source of truth: the Model, which holds the application’s state. Each user interaction triggers an Intent, which updates the Model, and the Model, in turn, updates the View. This clear cycle makes it easier to reason about how the UI evolves over time and simplifies debugging.
Think of your app as a state machine: the UI exists in a specific state, and user actions (or intents) cause the state to change. By having a single source of truth, tracking and debugging UI behavior becomes more predictable and manageable.
Here’s a simple breakdown of the key components:
Model: Stores the application’s state.
View: Displays the current state and renders the UI accordingly.
Intent: Represents user-triggered actions or events, such as button presses or swipes.
Key Principles of MVI:
Unidirectional Data Flow: Data flows in a single direction—from Intent → Model → View, ensuring a clear and predictable cycle.
Immutable State: The state of the UI is immutable, meaning that a new instance of the state is created with every change.
Cyclic Process: The interaction forms a loop, as each new Intent restarts the process, making the UI highly reactive to user inputs.
MVI vs MVVM: Why Choose MVI?
You might be thinking, “Hey, I’ve been using MVVM for years and it works fine. Why should I switch to MVI?” Good question! Let’s break it down.
Bidirectional Binding (MVVM): While MVVM is widely popular, it has one potential pitfall—bidirectional data binding. The ViewModel updates the View, and the View can update the ViewModel. While this flexibility is powerful, it can lead to unpredictable behaviors if not managed carefully, with data flying everywhere like confetti at a party. You think you’re just updating the username, but suddenly the whole form resets. Debugging that can be a real headache!
Unidirectional Flow (MVI): On the other hand, MVI simplifies things with a strict, unidirectional data flow. Data only goes one way—no confusion, no loops. It’s like having a traffic cop ensuring no one drives the wrong way down a one-way street.
State Management: In MVVM, LiveData is often used to manage state, but if not handled carefully, it can lead to inconsistencies. MVI, however, uses a single source of truth (the State), which ensures consistency across your app. If something breaks, you know exactly where to look.
In the end, MVI encourages writing cleaner, more maintainable code. It might require a bit more structure upfront, but once you embrace it, you’ll realize it saves you from a nightmare of state-related bugs and debugging sessions.
Now that you understand the basics of MVI, let’s dive deeper into how each of these components works in practice.
The Model (Where the Magic Happens)
In most architectures like MVP and MVVM, the Model traditionally handles only the data of your application. However, in more modern approaches like MVI (and even in MVVM, where we’re starting to adapt this concept), the Model also manages the app’s state. But what exactly is state?
In reactive programming paradigms, state refers to how your app responds to changes. Essentially, the app transitions between different states based on user interactions or other triggers. For example, when a button is clicked, the app moves from one state (e.g., waiting for input) to another (e.g., processing input).
State represents the current condition of the UI, such as whether it’s loading, showing data, or displaying an error message. In MVI, managing state explicitly and immutably is key. This means that once a state is defined, it cannot be modified directly — a new state is created if changes occur. This ensures the UI remains predictable, easier to understand, and simpler to debug.
So, unlike older architectures where the Model focuses primarily on data handling, MVI treats the Model as the central point for both data and state management. Every change in the app’s flow — whether it’s loading, successful, or in error — is encapsulated as a distinct, immutable state.
Loading: This represents the state when the app is in the process of fetching data (e.g., waiting for a response from an API).
Success: This state occurs when the data has been successfully fetched and is ready to be displayed to the user.
Error: This represents a state where something went wrong during data fetching or processing (e.g., a network failure or unexpected error).
The View (The thing people see)
The View is, well, your UI. It’s responsible for displaying the current state of the application. In MVI, the View does not hold any logic. It just renders whatever state it’s given. The idea here is to decouple the logic from the UI.
Imagine you’re watching TV. The TV itself doesn’t decide what show to put on. It simply displays the signal it’s given. It doesn’t throw a tantrum if you change the channel either.
In Kotlin, you could write a function like this in your fragment or activity:
Simple, right? The view just listens for a state and reacts accordingly.
The Intent (Let’s do this!)
The Intent represents the user’s actions. It’s how the user interacts with the app. Clicking a button, pulling to refresh, typing in a search bar — these are all intents.
The role of the Intent in MVI is to communicate what the user wants to do. Intents are then translated into state changes.
Notice that these intents describe what the user is trying to do. They don’t define how to do it — that’s left to the business logic. It’s like placing an order at a restaurant. You don’t care how they cook your meal; you just want the meal!
Components of MVI Architecture
Model: Managing UI State
In MVI, the Model is responsible for representing the entire state of the UI. Unlike in other patterns, where the model might focus on data management, here it focuses on the UI state. This state is immutable, meaning that whenever there is a change, a new state object is created rather than modifying the existing one.
The model can represent various states, such as:
Loading: When the app is fetching data.
Loaded: When the data is successfully retrieved and ready to display.
Error: When an error occurs (e.g., network failure).
UI interactions: Reflecting user actions like clicks or navigations.
Each state is treated as an individual entity, allowing the architecture to manage complex state transitions more clearly.
The View in MVI acts as the visual representation layer that users interact with. It observes the current state from the model and updates the UI accordingly. Whether implemented in an Activity, Fragment, or custom view, the view is a passive component that merely reflects the current state—it doesn’t handle logic.
In other words, the view doesn’t make decisions about what to show. Instead, it receives updated states from the model and renders the UI based on these changes. This ensures that the view remains as a stateless component, only concerned with rendering.
The Intent in MVI represents user actions or events that trigger changes in the application. This might include events like button clicks, swipes, or data inputs. Unlike traditional Android intents, which are used for launching components like activities, MVI’s intent concept is broader—it refers to the intentions of the user, such as trying to load data or submitting a form.
When a user action occurs, it generates an Intent that is sent to the model. The model processes the intent and produces the appropriate state change, which the view observes and renders.
The strength of MVI lies in its clear, predictable flow of data.
Here’s a step-by-step look at how the architecture operates:
User Interaction (Intent Generation): The cycle begins when the user interacts with the UI. For instance, the user clicks a button to load data, which generates an Intent (e.g., LoadData).
Intent Triggers Model Update: The Intent is then passed to the Model, which processes it. Based on the action, the Model might load data, update the UI state, or handle errors.
Model Updates State: After processing the Intent, the Model creates a new UI state (e.g., Loading, DataLoaded, or Error). The state is immutable, meaning the Model doesn’t change but generates a new state that the system can use.
View Renders State: The View observes the state changes in the Model and updates the UI accordingly. For example, if the state is DataLoaded, the View will render the list of data on the screen. If it’s Error, it will display an error message.
Cycle Repeats: The cycle continues as long as the user interacts with the app, creating new intents and triggering new state changes in the Model.
This flow ensures that data moves in one direction, from Intent → Model → View, without circular dependencies or ambiguity. If the user performs another action, the cycle starts again.
Let’s walk through a simple example of how MVI would be implemented in an Android app to load data:
User Intent: The user opens the app and requests to load a list of items.
Model Processing: The Model receives the LoadData intent, fetches data from the repository, and updates the state to DataLoaded with the retrieved data.
View Rendering: The View observes the new state and displays the list of items to the user. If the data fetch fails, the state would instead be set to Error, and the View would display an error message.
This cycle keeps the UI responsive and ensures that the user always sees the correct, up-to-date information.
Let’s Build an Example: A Simple MVI App
Alright, enough theory. Let’s roll up our sleeves and build a simple MVI-based Kotlin app that fetches and displays a list of pasta recipes (because who doesn’t love pasta?).
Step 1: Define Our ViewState
We’ll start by defining our ViewState. This will represent the possible states of the app.
For now, we just have one intent: the user wants to load recipes.
Step 3: Create the Reducer (Logic for Mapping Intents to State)
Now comes the fun part — the reducer! This is where the magic happens. The reducer takes the user’s intent and processes it into a new state.
Think of it as the person in the kitchen cooking the pasta. You give them the recipe (intent), and they deliver you a nice plate of pasta (state). Hopefully, it’s not overcooked.
Here’s a simple reducer implementation:
Kotlin
funreducer(intent: RecipeIntent): RecipeViewState {returnwhen (intent) {is RecipeIntent.LoadRecipes -> {// Simulating a loading state RecipeViewState.Loading } }}
Right now, it just shows the loading state, but don’t worry. We’ll add more to this later.
Step 4: Set Up the View
The View in MVI is pretty straightforward. It listens for state changes and updates the UI accordingly.
Kotlin
funrender(viewState: RecipeViewState) {when (viewState) {is RecipeViewState.Loading -> {// Show a loading spinnerprintln("Loading recipes... 🍝") }is RecipeViewState.Success -> {// Display the list of recipesprintln("Here are all your pasta recipes: ${viewState.recipes}") }is RecipeViewState.Error -> {// Show an error messageprintln("Oops! Something went wrong: ${viewState.message}") } }}
The ViewModel
In an MVI architecture, the ViewModel plays a crucial role in coordinating everything. It handles intents, processes them, and emits the corresponding state to the view.
The processIntent function handles the user’s intent and updates the state.
We simulate a network call using a coroutine, which fetches a list of pasta recipes (again, we love pasta).
Finally, we update the view state to Success and send the list of recipes back to the view.
Bringing It All Together
Here’s how we put everything together:
Kotlin
funmain() {val viewModel = RecipeViewModel()// Simulate the user intent to load recipes viewModel.processIntent(RecipeIntent.LoadRecipes)// Observe state changes viewModel.getState().observeForever { viewState ->render(viewState) }// Let's give the network call some time to simulate fetching Thread.sleep(3000)}
This will:
Trigger the LoadRecipes intent.
Show a loading spinner (or in our case, print “Loading recipes… 🍝”).
After two seconds (to simulate a network call), it will print a list of pasta recipes.
And there you have it! A simple MVI-based app that fetches and displays recipes, built with Kotlin.
Let’s Build One More App: A Simple To-Do List App
To get more clarity and grasp the concept, I’ll walk through a simple example of a To-Do List App using MVI in Kotlin.
These are actions the user can trigger, such as loading todos, adding a task, or deleting one.
Step 3: Create a Reducer
The reducer is the glue that connects the intent to the state. It transforms the current state based on the intent. Think of it as the brain of your MVI architecture.
The reducer function takes in the current state and an intent, and spits out a new state. Notice how it doesn’t modify the old state but instead returns a fresh one, keeping things immutable.
Step 4: View Implementation
Now, let’s create our View, which will render the state:
Kotlin
classToDoView {funrender(state: ToDoState) {when (state) {is ToDoState.Loading ->println("Loading todos...")is ToDoState.Data ->println("Here are all your todos: ${state.todos}")is ToDoState.Error ->println("Oops! Error: ${state.message}") } }}
The view listens to state changes and updates the UI accordingly.
Step 5: ViewModel (Managing Intents)
Finally, we need a ViewModel to handle incoming intents and manage state transitions.
The ToDoViewModel takes the intent, runs it through the reducer to update the state, and then calls render() on the view to display the result.
Common Pitfalls And How to Avoid Them
MVI is awesome, but like any architectural pattern, it has its challenges. Here are a few common pitfalls and how to avoid them:
1. Overengineering the State
The whole idea of MVI is to simplify state management, but it’s easy to go overboard and make your states overly complex. Keep it simple! You don’t need a million different states—just enough to represent the core states of your app.
2. Complex Reducers
Reducers are great, but they can get messy if you try to handle too many edge cases inside them. Split reducers into smaller functions if they start becoming unmanageable.
3. Ignoring Performance
Immutable states are wonderful, but constantly recreating new states can be expensive if your app has complex data. Try using Kotlin’s data class copy() method to create efficient, shallow copies.
4. Not Testing Your Reducers
Reducers are pure functions—they take an input and always produce the same output. This makes them perfect candidates for unit testing. Don’t skimp on this; test your reducers to ensure they behave predictably!
Benefits of Using MVI Architecture
The MVI pattern offers several key advantages in modern Android development, especially for managing complex UI states:
Unidirectional Data Flow: By maintaining a clear, single direction for data to flow, MVI eliminates potential confusion about how and when the UI is updated. This makes the architecture easier to understand and debug.
Predictable UI State: With MVI, every possible state is predefined in the Model, and the state is immutable. This predictability means that the developer can always anticipate how the UI will react to different states, reducing the likelihood of UI inconsistencies.
Better Testability: Because each component in MVI (Model, View, and Intent) has clearly defined roles, it becomes much easier to test each in isolation. Unit tests can easily cover different user intents and state changes, making sure the application behaves as expected.
Scalability: As applications grow in complexity, maintaining a clean and organized codebase becomes essential. MVI’s clear separation of concerns (Intent, Model, View) ensures that the code remains maintainable and can be extended without introducing unintended side effects.
State Management: Managing UI state is notoriously challenging in Android apps, especially when dealing with screen rotations, background tasks, and asynchronous events. MVI’s approach to handling state ensures that the app’s state is always consistent and correct.
Conclusion
MVI is a robust architecture that offers clear benefits when it comes to managing state, handling user interactions, and decoupling UI logic. The whole idea is to make your app’s state predictable, manageable, and testable — so no surprises when your app is running in production!
We built a simple apps today with MVI using Kotlin, and hopefully, you saw just how powerful and intuitive it can be. While MVI might take a bit more setup than other architectures, it provides a solid foundation for apps that need to scale and handle complex interactions.
MVI might not be the best choice for every app (especially simple ones), but for apps where state management and user interactions are complex, it’s a lifesaver.
Mobile app architecture is one of the most crucial aspects of app development. It’s like building a house; if your foundation is shaky, no matter how fancy the decorations are, the house will collapse eventually. In this blog post, We’ll discuss the mobile app architecture goals, with an emphasis on creating systems that are independent of frameworks, user interfaces (UI), databases, and external systems—while remaining easily testable.
Why Mobile App Architecture Matters
Imagine building a chair out of spaghetti noodles. Sure, it might hold up for a minute, but eventually, it’ll crumble.
Mobile app architecture is the thing that prevents our app from turning into a noodle chair.
Scalability: It can handle more users, data, or features without falling apart.
Maintainability: Updates, debugging, and improvements are easy to implement.
Testability: You can test components in isolation, without worrying about dependencies like databases, APIs, or third-party services.
Reusability: Common features can be reused across different apps or parts of the same app.
Separation of Concerns: This keeps things neat and organized by dividing your code into separate components, each with a specific responsibility. (Nobody likes spaghetti code!)
Let’s break down how we can achieve these goals.
The Core Mobile App ArchitectureGoals
To achieve an optimal mobile application architecture, we developers should aim for the following goals:
Independence from Frameworks
Independence of User Interface (UI)
Independence from Databases
Independence from External Systems
Independently Testable Components
Let’s look at them one by one.
Independence from Frameworks
You might be tempted to tightly couple your app’s architecture with a particular framework because, let’s face it, frameworks are super convenient. But frameworks are like fashion trends—today it’s skinny jeans, tomorrow, it’s wide-leg pants. Who knows what’s next? The key to a long-lasting mobile app architecture is to ensure it’s not overly dependent on any one framework.
When we say an architecture should be independent of frameworks, we mean the core functionality of the app shouldn’t rely on specific libraries or frameworks. Instead, frameworks should be viewed as tools that serve business needs. This independence allows business use cases to remain flexible and not restricted by the limitations of a particular library.
Why is this important?
Frameworks can become outdated or obsolete, and replacing them could require rebuilding your entire app.
Frameworks often impose restrictions or force you to structure your app in certain ways, limiting flexibility.
How to achieve framework independence?
Separate your business logic (the core functionality of your app) from the framework-specific code. Think of your app like a car: the engine (your business logic) should function independently of whether you’re using a stick shift or automatic transmission (the framework).
Example:
Imagine your app calculates taxes. The logic for calculating tax should reside in your business layer, completely isolated from how it’s presented (UI) or how the app communicates with the network.
This tax calculation has nothing to do with your UI framework (like SwiftUI for iOS or Jetpack Compose for Android). It can work anywhere because it’s self-contained.
Independence of User Interface (UI)
A well-designed architecture allows the UI to change independently from the rest of the system. This means the underlying business logic stays intact even if the presentation layer undergoes significant changes. For example, if you switch your app from an MVP (Model-View-Presenter) architecture to MVVM (Model-View-ViewModel), the business rules shouldn’t be affected.
Your app’s UI is like the icing on a cake, but the cake itself should taste good with or without the icing. By separating your app’s logic from the UI, you make your code more reusable and testable.
Why does UI independence matter?
UIs tend to change more frequently than business logic.
It allows you to test business logic without needing a polished front-end.
You can reuse the same logic for different interfaces: mobile, web, voice, or even a smart toaster (yes, they exist!).
How to achieve UI independence?
Create a layer between your business logic and the UI, often called a “Presentation Layer” or “ViewModel.” This layer interacts with your business logic and converts it into something your UI can display.
Example:
Let’s revisit our TaxCalculator example. The UI should only handle displaying the tax result, not calculating it.
Here, the TaxViewModel is responsible for preparing the data for the UI. If your boss suddenly wants the tax displayed as an emoji (💰), you can change that in the TaxViewModel without touching the core calculation logic.
Independence from the Database
Databases are like refrigerators. They store all your precious data (your milk and leftovers). But just like you wouldn’t glue your fridge to the kitchen floor (hopefully!), you shouldn’t tie your business logic directly to a specific database. Someday you might want to switch from SQL to NoSQL or even a cloud storage solution.
Independence from databases is a crucial goal in mobile application architecture. Business logic should not be tightly coupled with the database technology, allowing developers to swap out database solutions with minimal friction. For instance, transitioning from SQLite to Realm or using Room ORM instead of a custom DAO layer should not affect the core business rules.
Why does database independence matter?
Databases may change over time as your app scales or business requirements evolve.
Separating logic from the database makes testing easier. You don’t need to run a real database to verify that your tax calculations work.
How to achieve database independence?
Use a repository pattern or an abstraction layer to hide the details of how data is stored and retrieved.
In this case, you can swap out the database object for a real database, a mock database, or even a file. Your business logic won’t care because it talks to the repository, not directly to the database.
Independence from External Systems
Apps often rely on external systems like APIs, cloud services, or third-party libraries. But like a bad internet connection, you can’t always rely on them to be there. If you make your app overly dependent on these systems, you’re setting yourself up for trouble.
Why does external system independence matter?
External services can change, break, or be temporarily unavailable.
If your app is tightly coupled to external systems, a single outage could bring your entire app down.
How to achieve external system independence?
The solution is to use abstractions and dependency injection. In layman’s terms, instead of calling the external system directly, create an interface or a contract that your app can use, and inject the actual implementation later.
Example:
Kotlin
interfaceTaxServiceInterface {fungetCurrentTaxRate(): Double}classExternalTaxService : TaxServiceInterface {overridefungetCurrentTaxRate(): Double {// Call to external API for tax ratereturn api.fetchTaxRate() }}
Now your app only knows about TaxServiceInterface. Whether the data comes from an API or from a local file doesn’t matter. You could swap them without the app noticing a thing!
Testability
Testing is like flossing your teeth. Everyone knows they should do it, but too many skip it because it seems like extra effort. But when your app crashes in production, you’ll wish you’d written those tests.
Testability is crucial to ensure that your app functions correctly, especially when different components (like databases and APIs) aren’t playing nice. Independent and modular architecture makes it easier to test components in isolation.
How to achieve testability?
Write small, independent functions that can be tested without requiring other parts of the app.
Use mocks and stubs for databases, APIs, and other external systems.
Write unit tests for business logic, integration tests for how components work together, and UI tests for checking the user interface.
Example:
Kotlin
classTaxCalculatorTest {@TestfuntestCalculateTax() {val calculator = TaxCalculator()val result = calculator.calculateTax(100.0, 0.05)assertEquals(5.0, result, 0.0) // expected value, actual value, delta }}
In this test, you’re only testing the tax calculation logic. You don’t need to worry about the UI, database, or external systems, because they’re decoupled.
Note:0.0 is the delta, which represents the tolerance level for comparing floating-point values, as floating-point arithmetic can introduce small precision errors. The delta parameter in assertEquals is used for comparing floating-point numbers (such as Double in Kotlin) to account for minor precision differences that may occur during calculations. This is a common practice in testing frameworks like JUnit.
Before wrapping it all up, let’s build a sample tax calculator app with these architectural goals in mind.
Building a Sample Tax Calculator App
Now that we’ve established the architectural goals, let’s create a simple tax calculator app in Kotlin. We’ll follow a modular approach, ensuring independence from frameworks, UI, databases, and external systems, while also maintaining testability.
Mobile App Architecture for Tax Calculation
We’ll build the app using the following layers:
Domain Layer – Tax calculation logic.
Data Layer – Data sources for tax rates, income brackets, etc.
Presentation Layer – The ViewModel that communicates between the domain and UI.
Let’s dive into each layer,
Domain Layer: Tax Calculation Logic
The Domain Layer encapsulates the core business logic of the application, specifically the tax calculation logic. It operates independently of any frameworks, user interfaces, databases, or external systems, ensuring a clear separation of concerns.
Independence from Frameworks: The implementation of CalculateTaxUseCaseImpl does not rely on any specific framework, allowing it to be easily swapped or modified without impacting the overall architecture.
Independence of User Interface (UI): This layer is agnostic to the UI, focusing solely on business logic and allowing the UI layer to interact with it without any coupling.
Data Layer: Fetching Tax Rates
The Data Layer is responsible for providing the necessary data (like tax rates) to the domain layer without any dependencies on how that data is sourced.
Kotlin
// Data LayerinterfaceTaxRepository {fungetTaxRates(): List<TaxRate>}// Implementation that fetches from a remote sourceclassRemoteTaxRepository(privateval apiService: ApiService) : TaxRepository {overridefungetTaxRates(): List<TaxRate> {return apiService.fetchTaxRates() // Fetch from API }}// Implementation that fetches from a local databaseclassLocalTaxRepository(privateval taxDao: TaxDao) : TaxRepository {overridefungetTaxRates(): List<TaxRate> {return taxDao.getAllTaxRates() // Fetch from local database }}
Independence from Databases: The TaxRepository interface allows for different implementations (remote or local) without the domain layer needing to know the source of the data. This separation facilitates future changes, such as switching databases or APIs, without affecting business logic.
Tax Rule Engine: Applying Tax Rules
The Tax Rule Engine handles the application of tax rules based on the user’s income and tax rates, maintaining a clear focus on the calculation itself.
Independence from External Systems: The logic in the TaxRuleEngine does not depend on external systems or how tax data is retrieved. It focuses purely on calculating taxes based on the given rates.
Independence of External Systems (Somewhat Confusing): A robust architecture should also be agnostic to the interfaces and contracts of external systems. This means that any external services, whether APIs, databases, or third-party libraries, should be integrated through adapters. This modular approach ensures that external systems can be swapped out without affecting the business logic.
For example, if an application initially integrates with a REST API, later switching to a GraphQL service should require minimal changes to the core application logic. Here’s how you can design a simple adapter for an external service in Kotlin:
Kotlin
// External Service InterfaceinterfaceUserService {funfetchUser(userId: Int): User}// REST API ImplementationclassRestUserService : UserService {overridefunfetchUser(userId: Int): User {// Logic to fetch user from REST APIreturnUser(userId, "amol pawar") // Dummy data for illustration }}// GraphQL ImplementationclassGraphQLUserService : UserService {overridefunfetchUser(userId: Int): User {// Logic to fetch user from GraphQL APIreturnUser(userId, "akshay pawal") // Dummy data for illustration }}// UsagefungetUser(userService: UserService, userId: Int): User {return userService.fetchUser(userId)}
In this example, we can easily switch between different implementations of UserService without changing the business logic that consumes it.
In our tax calculation app case, we can apply this principle by allowing for flexible data source selection. Your application can seamlessly switch between different data providers without impacting the overall architecture.
Switching between data sources (local vs. remote):
Kotlin
// Switching between data sources (local vs remote)val taxRepository: TaxRepository = if (useLocalData) {LocalTaxRepository(localDatabase.taxDao())} else {RemoteTaxRepository(apiService)}
Independence from Databases and External Systems: The decision on which data source to use is made at runtime, ensuring that the business logic remains unaffected regardless of the data source configuration.
Presentation Layer: ViewModel for Tax Calculation
The Presentation Layer interacts with the domain layer to provide results to the UI while remaining independent of the specific UI implementation.
Independently Testable Components: The TaxViewModel can be easily tested in isolation by providing a mock implementation of CalculateTaxUseCase, allowing for focused unit tests without relying on actual data sources or UI components.
Testing the Architecture
The architecture promotes independently testable components by isolating each layer’s functionality. For example, you can test the CalculateTaxUseCase using a mock TaxRepository, ensuring that you can validate the tax calculation logic without relying on actual data fetching.
Kotlin
classCalculateTaxUseCaseTest {privateval mockTaxRepository = mock(TaxRepository::class.java)privateval taxRuleEngine = TaxRuleEngine()privateval calculateTaxUseCase = CalculateTaxUseCaseImpl(mockTaxRepository, taxRuleEngine)@Testfun`should calculate correct tax for income`() {// Setup tax ratesval taxRates = listOf(TaxRate(0.0, 10000.0, 0.1), // 10% for income from 0 to 10,000TaxRate(10000.0, 20000.0, 0.2) // 20% for income from 10,001 to 20,000 )// Mock the repository to return the defined tax rates`when`(mockTaxRepository.getTaxRates()).thenReturn(taxRates)// Calculate tax for an income of 15,000val result = calculateTaxUseCase.execute(15000.0)// Assert the total tax is correctly calculated// For $15,000, tax should be:// 10% on the first $10,000 = $1,000// 20% on the next $5,000 = $1,000// Total = $1,000 + $1,000 = $2,000assertEquals(2000.0, result.totalTax, 0.0) }}
This architecture not only adheres to the specified goals but also provides a clear structure for future enhancements and testing.
Conclusion
Mobile app architecture is like building a castle in the sky—you need to make sure your app’s components are well-structured, independent, and testable. By following the goals outlined here:
Framework independence means you can switch frameworks without rewriting everything.
UI independence ensures your business logic can work on any platform.
Database independence lets you change how you store data without affecting how you process it.
External system independence allows for flexibility in changing third-party services.
Testability guarantees your app doesn’t break when you add new features.
Remember: A good app architecture is invisible when done right, but painfully obvious when done wrong. So, avoid the spaghetti code, keep your components decoupled, and, of course, floss regularly! 😄