In today’s mobile app development landscape, implementing a smooth and secure authentication process is essential for user engagement and retention. One popular authentication method is Google Sign-In, which allows users to sign in to your app using their Google credentials. In this blog, we will explore how to integrate Google Sign-In seamlessly into your Jetpack Compose UI for Android projects. By following the steps outlined below, you’ll be able to enhance the user experience and streamline the authentication process.
Prerequisites
Before diving into the implementation, ensure that you have a basic understanding of Jetpack Compose and Android development. Familiarity with Kotlin is also beneficial. Additionally, make sure you have set up a project in the Google Cloud Platform (GCP) and obtained the necessary credentials and permissions.
Step 1: Google Sign-In APIAdding the Dependency
The first step is to add the required dependency to your project’s build.gradle file. By including the ‘play-services-auth’ library, you gain access to the Google Sign-In API. Make sure to sync the project after adding the dependency to ensure it is correctly imported.
The version number, in this case, is 19.2.0, which specifies the specific version of the play-services-auth library you want to include.
Step 2: Creating the GoogleUserModel
To handle the user data obtained from the Google Sign-In process, we need to create a data class called ‘GoogleUserModel’. This class will store the relevant user information, such as their name and email address. By encapsulating this data in a model class, we can easily pass it between different components of our app.
Kotlin
dataclassGoogleUserModel(val name: String?, val email: String?)
Step 3: Implementing the AuthScreen
The ‘AuthScreen’ composable function serves as the entry point for our authentication flow. It interacts with the ‘GoogleSignInViewModel’ and handles the UI components required for the sign-in process. We will create a smooth navigation flow that allows users to initiate the Google Sign-In procedure.
In the ‘AuthView’ composable function, we will define the visual layout of our authentication screen. This includes displaying a loading indicator, the Google Sign-In button, and handling potential error messages. By providing a user-friendly interface, we enhance the overall user experience.
The AuthScreen function is a Composable function that represents the authentication screen. It takes a NavController as a parameter, which will be used for navigating to different screens.
Inside the AuthScreen function, an instance of GoogleSignInViewModel is created using the viewModel function. This ViewModel is responsible for managing the authentication state related to Google Sign-In.
The userState variable collects the state of the googleUser property from the GoogleSignInViewModel as a Composable state. This allows the UI to update reactively whenever the user state changes.
The AuthView composable function is called to display the UI components of the authentication screen. It takes a lambda function onClick and the mGoogleSignInViewModel as parameters.
After calling the AuthView composable, there is a check to see if the user’s name is not empty. If it’s not empty, a LaunchedEffect is used to perform an action. It hides the loading state, converts the user object to JSON using MoshiUtils, and navigates to the settings screen, passing the user data along.
The AuthView composable function is responsible for rendering the UI of the authentication screen. It uses the Scaffold composable to set up the basic layout structure.
Inside the AuthView composable, there’s a Column that contains various UI components of the authentication screen, such as an Image, a sign-in button (SignInGoogleButton), and a Text displaying the app’s slogan.
The when expression is used to handle different states. In this case, when the loading state of the mGoogleSignInViewModel is true, it displays an error message (AUTH_ERROR_MSG) using the Text composable.
Finally, there are @Preview annotations for previewing the AuthView composable in different UI modes (day mode and night mode).
Step 5: Managing Authentication with GoogleSignInViewModel
The ‘GoogleSignInViewModel’ class plays a crucial role in managing the authentication state and communicating with the Google Sign-In API. Depending on your preference, you can choose to use LiveData or StateFlow to update the user’s sign-in status and handle loading and error states. This ViewModel acts as a bridge between the UI and the underlying authentication logic.
Kotlin
/* * It contains commented code I think it will helpful when implement logout functionality * in future thats why kept as it is here. * */classGoogleSignInViewModel : ViewModel() {privatevar _userState = MutableStateFlow(GoogleUserModel("", ""))val googleUser = _userState.asStateFlow()privatevar _loadingState = MutableStateFlow(false)val loading = _loadingState.asStateFlow()privateval _errorStateFlow = MutableStateFlow(false)val errorStateFlow = _errorStateFlow.asStateFlow()/* init { checkSignedInUser(application.applicationContext) }*/funfetchSignInUser(email: String?, name: String?) { _loadingState.value = true viewModelScope.launch { _userState.value =GoogleUserModel( email = email, name = name, ) } _loadingState.value = false }/* private fun checkSignedInUser(applicationContext: Context) { _loadingState.value = true val gsa = GoogleSignIn.getLastSignedInAccount(applicationContext) if (gsa != null) { _userState.value = GoogleUserModel( email = gsa.email, name = gsa.displayName, ) } _loadingState.value = false }*/funhideLoading() { _loadingState.value = false }funshowLoading() { _loadingState.value = true }funisError(isError: Boolean) { _errorStateFlow.value = isError }}/*class GoogleSignInViewModelFactory( private val application: Application) : ViewModelProvider.Factory { override fun <T : ViewModel> create(modelClass: Class<T>): T { @Suppress("UNCHECKED_CAST") if (modelClass.isAssignableFrom(GoogleSignInViewModel::class.java)) { return GoogleSignInViewModel(application) as T } throw IllegalArgumentException("Unknown ViewModel class") }}*/
Conclusion
By following this tutorial, you have learned how to seamlessly integrate Google Sign-In into your Jetpack Compose UI for Android. The integration allows users to sign in to your app using their Google credentials, enhancing the user experience and streamlining the authentication process. By leveraging the power of Jetpack Compose and the Google Sign-In API, you can build secure and user-friendly apps that cater to the modern authentication needs of your users.
Generics in Kotlin provide a powerful way to write reusable and type-safe code. However, on the Java Virtual Machine (JVM), generics are subject to type erasure, meaning that the specific type arguments used for instances of a generic class are not preserved at runtime. This limitation has implications for runtime type checks and casts. But fear not! Kotlin provides a solution: reified type parameters. In this blog post, we’ll delve into the world of reified type parameters and explore how they enable us to access and manipulate type information at runtime.
Understanding Type Erasure in Kotlin Generics
Generics in Kotlin are implemented using type erasure on the JVM. This means that the specific type arguments used for instances of a generic class are not preserved at runtime. In this section, we’ll explore the practical consequences of type erasure in Kotlin and learn how you can overcome its limitations by declaring a function as inline.
By declaring a function as inline, you can prevent the erasure of its type arguments. In Kotlin, this is achieved by using reified type parameters. Reified type parameters allow you to access and manipulate the actual type information of the generic arguments at runtime.
In simpler terms, when you mark a function as inline with a reified type parameter, you can retrieve and work with the specific types used as arguments when calling that function.
Now, let’s look at some examples to better understand the concept of reified type parameters and their usefulness.
Generics at runtime: type checks and casts
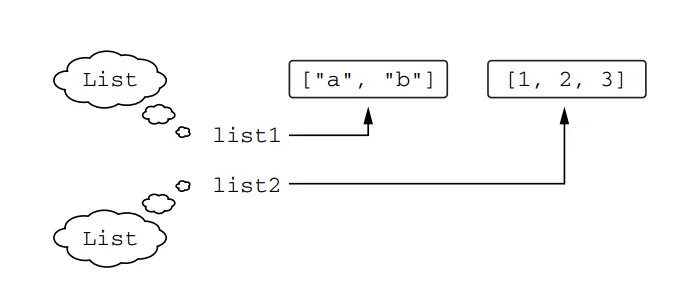
Generics in Kotlin, similar to Java, are erased at runtime. This means that the type arguments used to create an instance of a generic class are not preserved at runtime. For example, if you create a List<String> and put strings into it, at runtime, you will only see it as a List. You won’t be able to identify the specific type of elements the list was intended to contain. However, the compiler ensures that only elements of the correct type are stored in the list based on the type arguments provided during compilation.
At runtime, you don’t know whether list1 and list2 were declared as lists of strings or integers. Each of them is just a List
Even though the compiler recognizes list1 and list2 as distinct types, at execution time, they appear the same. However, you can generally rely on List<String> to contain only strings and List<Int> to contain only integers because the compiler knows the type arguments and enforces type safety. It is possible to deceive the compiler using type casts or Java raw types, but it requires a deliberate effort.
When it comes to checking the type information at runtime, the erased type information poses some limitations. You cannot directly check if a value is an instance of a specific erased type with type arguments. For example, the following code won’t compile:
Kotlin
if (valueis List<String>) { ... } // Error: Cannot check for instance of erased type
Even though you can determine at runtime that value is a List, you cannot determine whether it’s a list of strings, persons, or some other type. That information is erased.
Note that erasing generic type information has its benefits: the overall amount of memory used by your application is smaller; because less type information needs to be saved in memory.
As we stated earlier, Kotlin doesn’t let you use a generic type without specifying type arguments. Thus you may wonder how to check that the value is a list, rather than a set or another object
To check if a value is a List without specifying its type argument, you can use the star projection syntax:
Kotlin
if (valueis List<*>) { ... }
By using List<*>, you’re essentially treating it as a type with unknown type arguments, similar to Java’s List<?>. In this case, you can determine that the value is a List, but you won’t have any information about its element type.
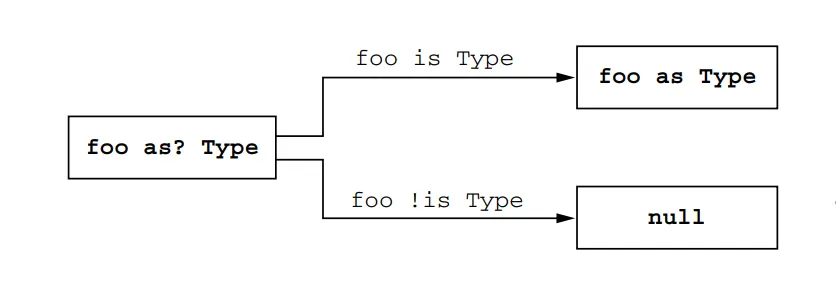
Note that you can still use normal generic types in as and as? casts. However, these casts won’t fail if the class has the correct base type but a wrong type argument because the type argument is not known at runtime. The compiler will emit an “unchecked cast” warning for such casts. It’s important to understand that it’s only a warning, and you can still use the value as if it had the necessary type.
Here’s an example of using as? cast with a warning:
Kotlin
funprintSum(c: Collection<*>) {val intList = c as? List<Int> // Warning here. Unchecked cast: List<*> to List<Int> ?: throwIllegalArgumentException("List is expected")println(intList.sum())}
This code defines a function called printSum that takes a collection (c) as a parameter. Within the function, a cast is performed using the as? operator, attempting to cast c as a List<Int>. If the cast succeeds, the resulting value is assigned to the variable intList. However, if the cast fails (i.e., c is not a List<Int>), the as? operator returns null, and the code throws an IllegalArgumentException with the message “List is expected”. Finally, the sum of the integers in intList is printed.
Let’s see how this function behaves when called with different inputs:
Kotlin
printSum(listOf(1, 2, 3)) // o/p - 6
When called with a list of integers, the function works as expected. The sum of the integers is calculated and printed.
Now let’s change the input to a set:
Kotlin
printSum(setOf(1, 2, 3)) // o/p - IllegalArgumentException: List is expected
When called with a set of integers, the function throws an IllegalArgumentException because the input is not a List. The as? cast fails, resulting in a null value, and the IllegalArgumentException is thrown.
Now we pass String as input:
Kotlin
printSum(listOf("a", "b", "c")) // o/p - ClassCastException: String cannot be cast to Number
When called with a list of strings, the function successfully casts the list to a List<Int>, despite the wrong type argument. However, during the execution of intList.sum(), a ClassCastException occurs. This happens because the function tries to treat the strings as numbers, resulting in a runtime error.
The code examples above demonstrate that type casts (as and as?) in Kotlin may lead to runtime exceptions if the casted type and the actual type are incompatible. The compiler emits an “unchecked cast” warning to notify you about this potential risk. It’s important to understand the meaning of these warnings and be cautious when using type casts.
The code snippet below shows an alternative approach using an is check:
Kotlin
funprintSum(c: Collection<*>) {val intList = c as? List<Int> // Warning here. Unchecked cast: List<*> to List<Int> ?: throwIllegalArgumentException("List is expected")println(intList.sum())}
In this example, the printSum function takes a Collection<Int> as a parameter. Using the is operator, it checks if c is a List<Int>. If the check succeeds, the sum of the integers in the list is printed. This approach is possible because the compiler knows at compile time that c is a collection of integers.
So, Kotlin’s compiler helps you identify potentially dangerous type checks (forbidding is checks) and emits warnings for type casts (as and as?) that may cause issues at runtime. Understanding these warnings and knowing which operations are safe is essential when working with type casts in Kotlin.
Power of Reified Type Parameters in Inline Functions
In Kotlin, generics are typically erased at runtime, which means that you can’t determine the type arguments used when an instance of a generic class is created or when a generic function is called. However, there is an exception to this limitation when it comes to inline functions. By marking a function as inline, you can make its type parameters reified, which allows you to refer to the actual type arguments at runtime.
Let’s take a look at an example to illustrate this. Suppose we have a generic function called isA that checks if a given value is an instance of a specific type T:
Kotlin
fun <T> isA(value: Any) = valueis T
If we try to call this function with a specific type argument, like isA<String>("abc"), we would encounter an error because the type argument T is erased at runtime.
However, if we modify the function to beinline and mark the type parameter as reified, like this:
Kotlin
inlinefun <reifiedT> isA(value: Any) = valueis T
Now we can call isA<String>("abc") and isA<String>(123) without any errors. The reified type parameter allows us to check whether the value is an instance of T at runtime. In the first example, the output will be true because "abc" is indeed a String, while in the second example, the output will be false because 123 is not a String.
Another practical use of reified type parameters is demonstrated by the filterIsInstance function from the Kotlin standard library. This function takes a collection and selects instances of a specified class, returning only those instances. For example:
Kotlin
val items = listOf("one", 2, "three")println(items.filterIsInstance<String>())
In this case, we specify <String> as the type argument for filterIsInstance, indicating that we are interested in selecting only strings from the items list. The function’s return type is automatically inferred as List<String>, and the output will be [one, three].
Here’s a simplified version of the filterIsInstance function’s declaration from the Kotlin standard library:
Before coming to this code explanation, have you ever thought, Why reification works for inline functions only? How does this work? Why are you allowed to write element is T in an inline function but not in a regular class or function? Let’s see the answers to all these questions:
Reification works for inline functions because the compiler inserts the bytecode implementing the inline function directly at every place where it is called. This means that the compiler knows the exact type used as the type argument in each specific call to the inline function.
When you call an inline function with a reified type parameter, the compiler can generate a bytecode that references the specific class used as the type argument for that particular call. For example, in the case of the filterIsInstance<String>() call, the generated code would be equivalent to:
Kotlin
for (element inthis) {if (element is String) { destination.add(element) }}
The generated bytecode references the specific String class, not a type parameter, so it is not affected by the type-argument erasure that occurs at runtime. This allows the reified type parameter to be used for type checks and other operations at runtime.
It’s important to note that inline functions with reified type parameters cannot be called from Java code. Regular inline functions are accessible to Java as regular functions, meaning they can be called but are not inlined. However, functions with reified type parameters require additional processing to substitute the type argument values into the bytecode, and therefore they must always be inlined. This makes it impossible to call them in a regular way, as Java code does not support this mechanism.
Also, one more thing to note is that an inline function can have multiple reified type parameters and can also have non-reified type parameters alongside the reified ones. It’s important to keep in mind that marking a function as inline does not necessarily provide performance benefits in all cases. If the function becomes large, it’s recommended to extract the code that doesn’t depend on reified type parameters into separate non-inline functions for better performance.
Practical use cases of reified type parameters
Reified type parameters can be especially useful when working with APIs that expect parameters of type java.lang.Class. Let\’s explore two examples to demonstrate how reified type parameters simplify such scenarios.
Example 1
ServiceLoader The ServiceLoader API from the JDK is an example of an API that takes a java.lang.Class representing an interface or abstract class and returns an instance of a service class implementing that interface. Traditionally, in Kotlin, you would use the following syntax to load a service:
Kotlin
val serviceImpl = ServiceLoader.load(Service::class.java)
However, using a function with a reified type parameter, we can make this code shorter and more readable:
Kotlin
val serviceImpl = loadService<Service>()
To define the loadService function, we use the inline modifier and a reified type parameter:
Kotlin
inlinefun <reifiedT> loadService(): T {return ServiceLoader.load(T::class.java)}
Here, T::class.java retrieves the java.lang.Class corresponding to the class specified as the type parameter, allowing us to use it as needed. This approach simplifies the code by specifying the class as a type argument, which is shorter and easier to read compared to ::class.java syntax.
Example 2
Simplifying startActivity in Android In Android development, when launching activities, instead of passing the class of the activity as a java.lang.Class, you can use a reified type parameter to make the code more concise. For instance:
With this inline function, you can start an activity by specifying the activity class as a type argument:
Kotlin
startActivity<DetailActivity>()
This simplifies the code by eliminating the need to pass the activity class as a java.lang.Class instance explicitly.
Reified type parameters allow us to work with class references directly, making the code more readable and concise. They are particularly useful in scenarios where APIs expect java.lang.Class parameters, such as ServiceLoader in Java or starting activities in Android.
Restrictions on Reified Type Parameters
Reified Type parameters in Kotlin have certain restrictions that you need to be aware of. Some of these restrictions are inherent to the concept itself, while others are determined by the implementation of Kotlin and may change in future Kotlin versions. Here’s a summary of how you can use reified type parameters and what you cannot do:
You can use a reified type parameter in the following ways:
Type checks and casts (is, !is, as, as?)
Reified type parameters can be used in type checks and casts. You can check if an object is of a specific type or perform a type cast using the reified type parameter. Here’s an example:
Kotlin
inlinefun <reifiedT> checkType(obj: Any) {if (obj is T) {println("Object is of type T") } else {println("Object is not of type T") }val castedObj = obj as? T// Perform operations with the casted object}
Kotlin reflection APIs (::class)
Reified type parameters can be used with Kotlin reflection APIs, such as ::class, to access runtime information about the type. It allows you to retrieve the KClass object representing the type parameter. Here’s an example:
Getting the corresponding java.lang.Class (::class.java)
Reified type parameters can also be used to obtain the corresponding java.lang.Class object of the type using the ::class.java syntax. This can be useful when interoperating with Java APIs that require Class objects. Here’s an example:
Using reified type parameter as a type argument when calling other functions
Reified type parameters can be used as type arguments when calling other functions. This allows you to propagate the type information to other functions without losing it due to type erasure. Here’s an example:
Kotlin
inlinefun <reifiedT> processList(list: List<T>) {// Process the list of type Tfor (item in list) {// ... }}funmain() {val myList = listOf("Hello", "World")processList<String>(myList)}
These examples demonstrate the various ways in which reified type parameters can be utilized in Kotlin, including type checks, reflection APIs, obtaining java.lang.Class, and passing the type information to other functions as type arguments.
However, there are certain things you cannot do with reified type parameters:
Creating new instances of the class specified as a type parameter
Reified type parameters cannot be used to create new instances of the class directly. You can only access the type information using reified type parameters. To create new instances, you would need to use other means such as reflection or factory methods. Here’s an example:
Kotlin
inlinefun <reifiedT> createInstance(): T {// Error: Cannot create an instance of the type parameter TreturnT()}
Calling methods on the companion object of the type parameter class
Reified type parameters cannot directly access the companion object of the type parameter class. However, you can access the class itself using T::class syntax. To call methods on the companion object, you would need to access it through the class reference. Here’s an example:
Kotlin
inlinefun <reifiedT> callCompanionMethod(): String {// Error: Cannot access the companion object of the type parameter Treturn T.Companion.someMethod()}
Using a non-reified type parameter as a type argument
When calling a function with a reified type parameter, you cannot use a non-reified type parameter as a type argument. Reified type parameters can only be used as type arguments themselves. Here’s an example:
Kotlin
inlinefun <reifiedT> reifiedFunction() {// Error: Non-reified type parameter cannot be used as a type argumentanotherFunction<T>()}fun <T> anotherFunction() {// ...}
Marking type parameters of classes, properties, or non-inline functions as reified
Reified type parameters can only be used in inline functions. You cannot mark type parameters of classes, properties, or non-inline functions as reified. Reified type parameters are limited to inline functions. Here’s an example:
Kotlin
classMyClass<T> { // Error: Type parameter cannot be marked as reified// ...}val <T> List<T>.property: T// Error: Type parameter cannot be marked as reifiedget() = TODO()fun <T> nonInlineFunction() { // Error: Type parameter cannot be marked as reified// ...}
These examples illustrate the restrictions on reified type parameters in Kotlin. By understanding these limitations, you can use reified type parameters effectively in inline functions while keeping in mind their specific usage scenarios.
Conclusion
Reified type parameters in Kotlin offer a powerful tool for overcoming the limitations of type erasure at runtime. By utilizing reified type parameters in inline functions, developers can access and manipulate precise type information, enabling type checks, casts, and interaction with reflection APIs. Understanding the benefits and restrictions of reified type parameters empowers Kotlin developers to write more expressive, type-safe, and concise code.
By embracing reified type parameters, Kotlin programmers can unleash the full potential of generics and enhance their runtime type-related operations. Start utilizing reified type parameters today and unlock a world of type-aware programming in Kotlin!
Kotlin, a modern and versatile programming language, offers various features to enhance developer productivity. One such powerful feature is function types, which enable you to treat functions as first-class citizens in your code. In this blog post, we will delve into function types in Kotlin, understand their types, explore their usage, and provide examples to solidify our understanding. So let’s dive in!
Recap: Higher-Order Functions
In Kotlin, a higher-order function is a function that can accept a lambda expression or a function reference as an argument or can return a lambda expression or a function reference. It allows functions to be treated as values and enables flexible and concise coding.
Let’s take the example of the filter function from the standard library, which takes a predicate function as an argument and is, therefore, a higher-order function:
Kotlin
list.filter { x > 0 }
Function types
In Kotlin, you can declare variables with function types. This means that the variables can hold references to functions. Let’s take a look at an example:
Kotlin
val sum: (Int, Int) -> Int = { x, y -> x + y } // Function that takes two Int parameters and returns an Int valueval action: () -> Unit = { println(42) } // Function that takes no arguments and doesn’t return a value
In this code, we have two variables: sum and action. The type of sum is a function that takes two Int parameters and returns an Int. The type of action is a function that takes no parameters and returns Unit, which represents a lack of meaningful value.
What are Function Types?
Function types allow you to treat functions as values. Just like any other variable, you can assign functions to variables, pass them as parameters to other functions, and even return them from functions. This feature provides flexibility and enables you to write more concise and expressive code.
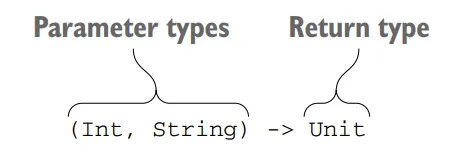
Syntax
Function-type syntax in Kotlin
To declare a function type, you put the function parameter types in parentheses, followed by an arrow, and the return type of the function. In the above diagram, (Int, String) -> Unit specifies a function that takes Int and String parameters and returns a Unit.
The Unit type is used to indicate that a function doesn’t return a meaningful value. In regular function declarations, you can omit the Unit return type, but in function type declarations, it is always required. So, you can’t omit a Unit in this context.
Kotlin
val sum: (Int, Int) -> Int = { x, y -> x + y }
In the lambda expression { x, y -> x + y }, you might notice that the types of the parameters x and y are omitted. This is because the types are already specified in the function type declaration, so there’s no need to repeat them in the lambda itself.
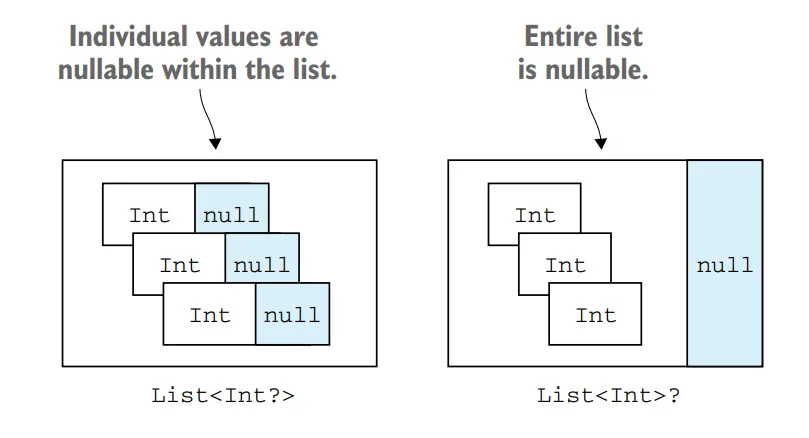
You can also make the return type of a function type nullable by using the? symbol. For example:
Kotlin
var canReturnNull: (Int, Int) -> Int? = { null }
In this case, the function type (Int, Int) -> Int? represents a function that takes two Int parameters and returns an Int that can be nullable. This means the function can return either an Int value or null.
Furthermore, you can declare a nullable variable of a function type by enclosing the entire function type definition in parentheses and placing the question mark after the parentheses. For example:
Kotlin
var funOrNull: ((Int, Int) -> Int)? = null
Here, ((Int, Int) -> Int)? represents a nullable variable of a function type. The entire function type definition is enclosed in parentheses, and the question mark indicates that the variable itself is nullable.
It’s important to note the distinction between a function type with a nullable return type ((Int, Int) -> Int?) and a nullable variable of a function type (((Int, Int) -> Int)?). Omitting the parentheses will result in different meanings, so be cautious when specifying nullable function types.
Parameter names of function types
In Kotlin, you have the option to specify names for the parameters of a function type. This can improve the readability of your code and can be helpful for code completion in the IDE.
Here’s an example that demonstrates specifying parameter names in a function type:
In this code, the performRequest function takes two parameters: url of type String and callback of type (code: Int, content: String) -> Unit. The callback parameter is a function type that expects two parameters named code and content, both of type Int and String respectively. The function type represents a callback function that will be invoked when the request is completed.
When you call the performRequest function, you can provide a lambda expression as the argument for the callback parameter. The lambda can use any parameter names you prefer, regardless of the names specified in the function type declaration. For example:
Kotlin
val url = "https://blog.softaai.com"performRequest(url) { code, content ->// Code that uses the parameters 'code' and 'content'}performRequest(url) { code, page ->// Code that uses the parameters 'code' and 'page'}
In the above examples, we pass a lambda expression to the performRequest function. Inside the lambda, we can choose different names for the parameters (code and content in the first example, and code and page in the second example). These parameter names in the lambda expression do not need to match the names specified in the function type declaration.
Although the parameter names don’t affect type matching, using descriptive names can make your code more readable and understandable. Additionally, modern IDEs can utilize these parameter names for code completion, making it easier for you to write your code accurately.
Calling functions passed as arguments
In Kotlin, you can call functions that are passed as arguments to other functions. Let’s explore a couple of examples to understand how this works.
First, let’s consider the twoAndThree function, which takes another function as an argument and performs an arbitrary operation on the numbers 2 and 3:
Kotlin
funtwoAndThree(operation: (Int, Int) -> Int) {val result = operation(2, 3)println("The result is $result")}
In this example, the twoAndThree function accepts a function called operation, which has a function type (Int, Int) -> Int. This means the operation function takes two Int parameters and returns an Int. Inside the twoAndThree function, the operation function is called with arguments 2 and 3, and the result is printed.
To call the twoAndThree function and pass a function as an argument, you can use a lambda expression. For example:
Kotlin
twoAndThree { a, b -> a + b }
In this case, we pass a lambda expression that adds two numbers (a + b). The lambda matches the function type (Int, Int) -> Int because it takes two Int parameters and returns an Int. The result of the addition, 5, is printed by the twoAndThree function.
Similarly, you can pass a different lambda expression to achieve a different operation:
Kotlin
twoAndThree { a, b -> a * b }
Here, the lambda multiplies the two numbers (a * b), and the result, 6, is printed.
The syntax for calling a function passed as an argument is the same as calling a regular function. You use parentheses after the function name and provide the necessary arguments inside the parentheses.
Now, let’s consider another example: reimplementing the filter function from the standard library. The filter function takes a predicate as a parameter. The predicate is a function that takes a character and returns a Boolean result. The implementation checks whether each character satisfies the predicate and adds it to a StringBuilder if it does.
To reimplement the filter function for strings, let’s consider the following implementation:
In this implementation, the filter function is an extension function on the String class. It takes a predicate parameter, which is a function that takes a Char parameter and returns a Boolean.
Inside the function, a StringBuilder is created to store the filtered characters. The function iterates over each character of the string using the for loop and checks if the character satisfies the given predicate. If the predicate returns true for a character, it is appended to the StringBuilder.
Finally, the StringBuilder is converted to a string using the toString() function and returned as the result.
Here’s an example of how you can use the filter function:
Kotlin
println("softAai Apps".filter { it in'A'..'Z' })
In this case, the input string is "softAai Apps", and the predicate checks if each character is within the range from 'A' to 'Z'. The filtered result, which only contains the uppercase alphabetic characters, is printed as "AA".
The filter function implementation is straightforward. It enables you to filter characters from a string based on a given predicate, providing a more convenient and readable way to perform such operations.
By using higher-order functions and passing functions as arguments, you can create flexible and reusable code that can perform different operations based on the provided functions.
Default and null values for parameters with function types
When declaring a parameter of a function type, you can specify a default value for it. This can be useful when you want to provide a default behavior for the function if the caller doesn’t provide a specific implementation. Here’s an example:
Kotlin
fun <T> printCollection(collection: Collection<T>, transform: (T) -> String = { it.toString() }) {for (element in collection) {println(transform(element)) }}
In this example, the printCollection function takes a collection parameter of type Collection<T> and a transform parameter of function type (T) -> String. The transform parameter has a default value defined as a lambda expression { it.toString() }, which uses the toString() method to convert each element of the collection to a string.
You can call the printCollection function in different ways:
Kotlin
val numbers = listOf(1, 2, 3, 4, 5)// Omitting the transform parameter to use the default behaviorprintCollection(numbers)// Passing a lambda as the transform parameterprintCollection(numbers) { "Number: $it" }// Passing the transform parameter as a named argumentprintCollection(numbers, transform = { "Value: $it" })
In the first example, we omit the transform parameter, so the default behavior using toString() will be used to convert each element.
In the second example, we pass a lambda expression { "Number: $it" } as the transform parameter. This lambda defines a custom behavior to transform each element of the collection.
In the third example, we explicitly pass the transform parameter as a named argument, providing a different lambda expression { "Value: $it" } to customize the transformation.
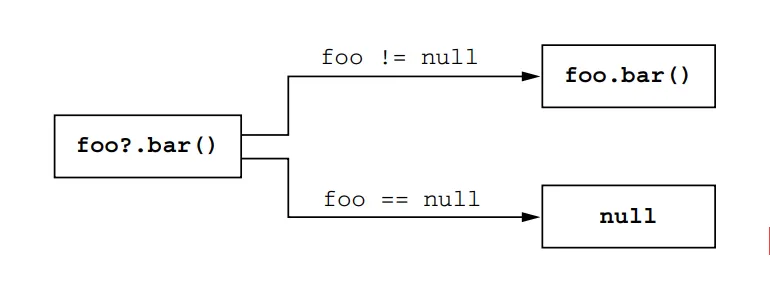
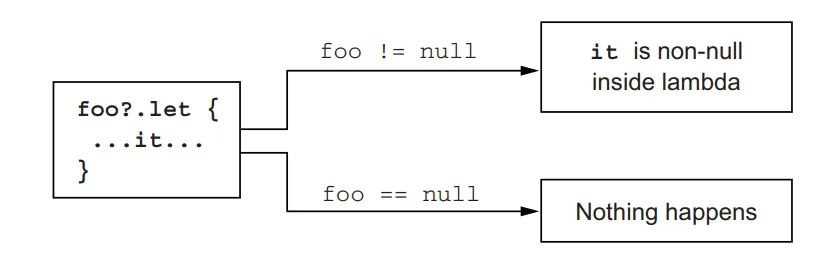
Another option is to declare a parameter of a nullable function type. However, directly calling a function passed in such a parameter is not allowed because it could potentially lead to null pointer exceptions. To handle this, you can check for null explicitly or use the safe-call syntax callback?.invoke(). Here’s an example:
In this example, the performAction function takes a nullable function type parameter callback of type (() -> Unit)?. Inside the function, we can use the safe-call syntax callback?.invoke() to invoke the function only if it is not null.
Function Types with Generic Parameters
Kotlin allows you to define function types with generic parameters. This provides flexibility when working with functions that can operate on different types.
Kotlin
fun <T> processList(list: List<T>, operation: (T) -> Unit) {for (item in list) {operation(item) }}val numbers = listOf(1, 2, 3, 4, 5)processList(numbers) { println(it) } // Prints each number in the list
In the above example, the processList function takes a list of generic type T and a function type (T) -> Unit as parameters. The operation function is called for each item in the list and can perform any desired operation.
Now you know how to write functions that take functions as arguments, including how to provide default values for function parameters and handle nullable function types. This allows you to create more flexible and customizable functions in Kotlin.
Returning functions from functions
Returning functions from functions allows you to dynamically choose and provide different logic based on certain conditions or states. This can be useful in scenarios where the behavior of a program needs to adapt to different situations.
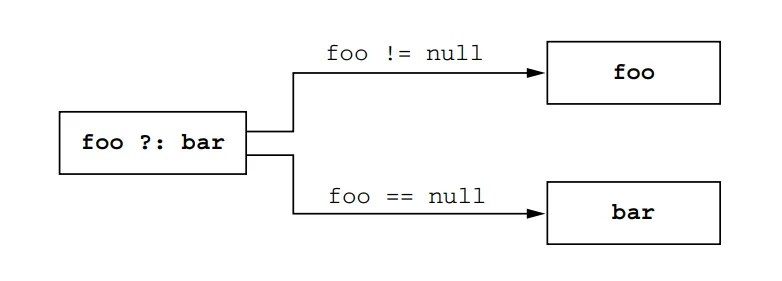
For example, let’s consider a shipping cost calculation scenario. The shipping cost may vary depending on the chosen delivery method. We can define a function called getShippingCostCalculator that takes the delivery parameter of type Delivery (an enum class representing different delivery options) and returns a function of type (Order) -> Double. The returned function calculates the shipping cost based on the selected delivery method.
Here’s an example implementation:
Kotlin
enumclassDelivery { STANDARD, EXPEDITED }classOrder(val itemCount: Int)fungetShippingCostCalculator(delivery: Delivery): (Order) -> Double { // Declares a function that returns a functionif (delivery == Delivery.EXPEDITED) {return { order ->6 + 2.1 * order.itemCount } // Returns lambdas from the function }return { order ->1.2 * order.itemCount } // Returns lambdas from the function}
In this example, when getShippingCostCalculator is called with Delivery.EXPEDITED, it returns a function that takes an Order parameter and calculates the shipping cost as 6 + 2.1 * order.itemCount. For any other delivery option, it returns a different function that calculates the shipping cost as 1.2 * order.itemCount.
You can use the returned function to calculate the shipping cost for a specific order. Here’s an example of usage:
Kotlin
val calculator = getShippingCostCalculator(Delivery.EXPEDITED) // Stores the returned function in a variableprintln("Shipping costs ${calculator(Order(3))}") // Invokes the returned function
In this code, we obtain the calculator function by calling getShippingCostCalculator with Delivery.EXPEDITED. Then, we pass an Order object with itemCount as 3 to the calculator function, which calculates and returns the shipping cost as 12.3. Finally, we print the shipping cost.
Let’s consider one more scenario where returning functions from functions is useful.
Suppose you’re working on a GUI contact-management application, and you need to determine which contacts should be displayed based on the state of the user interface (UI). You can define a function called getContactFilter that takes a UI state as a parameter and returns a function of type (Contact) -> Boolean. The returned function will determine whether a contact should be displayed or not based on the UI state.
Here’s an example implementation:
Kotlin
dataclassContact(val name: String, val isFavorite: Boolean)enumclassUIState { ALL, FAVORITES }fungetContactFilter(uiState: UIState): (Contact) -> Boolean { // Declares a function that returns a functionreturnwhen (uiState) { UIState.ALL -> { true } // Display all contacts UIState.FAVORITES -> { contact -> contact.isFavorite } // Display only favorite contacts }}
In this example, getContactFilter takes a UIState parameter and returns a function of type (Contact) -> Boolean. The returned function determines whether a contact should be displayed or not based on the UI state. If the UI state is UIState.ALL, the returned function always returns true, indicating that all contacts should be displayed. If the UI state is UIState.FAVORITES, the returned function checks the isFavorite property of the contact and returns its value, indicating whether the contact is a favorite or not.
You can use the returned function to filter the contacts based on the UI state. Here’s an example usage:
In this code, we obtain the filter function by calling getContactFilter with UIState.FAVORITES. Then, we have a list of contacts, and we use the filter function to filter the contacts based on the UI state. The filtered contacts, in this case, are the contacts that are marked as favorites. Finally, we print the names of the filtered contacts.
Returning functions from functions allows you to dynamically select and apply different logic based on conditions or states, providing flexibility and customization in your code.
Using function types from Java
Under the hood, function types are declared as regular interfaces: a variable of a function type is an implementation of a FunctionN interface. The Kotlin standard library defines a series of interfaces, corresponding to different numbers of function arguments: Function0 (this function takes no arguments), Function1 (this function takes one argument), and so on. Each interface defines a single invoke method, and calling it will execute the function. A variable of a function type is an instance of a class implementing the corresponding FunctionN interface, with the invoke method containing the body of the lambda.
Kotlin functions that use function types can be called easily from Java. Java 8 lambdas are automatically converted to values of function types:
// JavaprocessTheAnswer(number -> number + 1); // output : 43
In this case, the processTheAnswer function in Kotlin takes a function type (Int) -> Int as a parameter. In Java, you can pass a lambda expression number -> number + 1 as an argument, and it will be automatically converted to the corresponding function type.
What about older Java versions?
If you are using an older version of Java that doesn’t support lambdas, you can pass an instance of an anonymous class that implements the invoke method from the corresponding function interface. Here’s an example:
Kotlin
// JavaprocessTheAnswer(new Function1<Integer, Integer>() { // Uses the Kotlin function type from Java code (prior to Java 8)@Overridepublic Integer invoke(Integer number) { System.out.println(number);return number + 1; }});
In this Java example, we create an anonymous class that implements the Function1 interface. We override the invoke method, which corresponds to the function body in Kotlin, and provide the desired implementation.
What about Extention Functions?
In Java, you can easily use extension functions from the Kotlin standard library that expect lambdas as arguments. Note, however, that they don’t look as nice as in Kotlin — you have to pass a receiver object as a first argument explicitly. Here’s an example:
Kotlin
// JavaList<String> strings = new ArrayList<>();strings.add("42");CollectionsKt.forEach(strings, s -> { System.out.println(s);return Unit.INSTANCE;});
In this Java example, we use the CollectionsKt.forEach extension function from the Kotlin standard library. We pass a lambda expression s -> { ... } as an argument. Inside the lambda, we can perform the desired operations. Note that in Java, you need to explicitly return Unit.INSTANCE to match the Kotlin requirement of returning Unit.
It’s important to remember that in Java, functions or lambdas can return Unit. However, since Unit has a value in Kotlin, you need to explicitly return it. Additionally, you cannot directly pass a lambda that returns void as an argument of a function type that expects Unit as the return type.
Overall, while using function types and lambdas from Kotlin in Java may require some adjustments in syntax, it is still possible to utilize Kotlin’s higher-order functions and achieve the desired functionality.
Removing duplication through lambdas
In Kotlin, lambdas are anonymous functions that can be treated as values. They allow you to define blocks of code that can be passed around and executed later. This flexibility enables us to write more concise and reusable code.
Suppose you have a scenario where you need to perform similar operations on different elements of a collection. Without lambdas, you might end up writing repetitive code for each element, resulting in duplication. However, by utilizing lambdas, you can extract the common behavior and eliminate duplication.
To illustrate this concept, let’s consider an example involving website visit data. We have a class called SiteVisit that represents a visit to a website. Each visit has properties like path (the visited URL), duration (time spent on the page), and os (operating system used by the visitor). The os property is an enum called OS, representing different operating systems.
Our goal is to calculate the average duration of visits from Windows machines. We can achieve this by filtering the visits based on the operating system, mapping the durations, and then calculating the average using the average function.
In this example, we used the lambda expression { it.os == OS.WINDOWS } as a filter to select only the visits with the Windows operating system. Then, we used the map function to extract the durations of those visits. Finally, the average function calculated the average duration.
Now, let’s say we want to calculate the average duration for visits from Mac users as well. Without using lambdas, we would need to write similar code again, resulting in duplication. However, we can avoid this duplication by extracting the common behavior into a function and parameterizing it.
We define an extension function called averageDurationFor on the List<SiteVisit> class, which takes an os parameter representing the operating system. Inside the function, we filter the visits based on the given operating system, map the durations, and calculate the average.
Kotlin
funList<SiteVisit>.averageDurationFor(os: OS) =filter { it.os == os } .map(SiteVisit::duration) .average()
With this function in place, we can now calculate the average duration for both Windows and Mac visits without duplicating the code.
By parameterizing the behavior that varies (in this case, the operating system), we eliminated duplication and made the code more reusable and maintainable.
However, there are situations where a simple parameter is not sufficient to capture the complexity of the condition we want to apply. For example, if we want to calculate the average duration for visits from mobile platforms (iOS and Android), a single parameter representing the operating system won’t be enough. In such cases, lambdas provide a powerful solution.
We can modify our averageDurationFor function to take a lambda expression as a parameter. This lambda expression represents a condition that needs to be fulfilled for a visit to be included in the calculation.
Now, we can use this enhanced averageDurationFor function to calculate the average duration based on more complex conditions. For example, finding the average duration for visits from Android and iOS users:
In this case, we passed a lambda expression { it.os in setOf(OS.ANDROID, OS.IOS) } to the averageDurationFor function. This lambda expression represents the condition that checks if the operating system is either Android or iOS.
Similarly, we can use Lambdas to perform more intricate queries, such as finding the average duration of visits to the signup page from iOS users:
Here, we provided a lambda expression { it.os == OS.IOS && it.path == "/signup" } to specify the condition that includes only the visits from iOS users to the “/signup” page.
By using lambdas and function types, we can eliminate code duplication and extract both the repeated data and behavior into reusable functions. Lambdas allow us to write more expressive and concise code, making our programs easier to understand and maintain.
Function types and lambdas not only help eliminate code duplication but also provide a flexible and concise way to define different strategies or behaviors within your code. Instead of creating multiple classes or interfaces for each strategy, you can directly pass lambda expressions as different strategies, simplifying your code and making it more expressive.
Conclusion
Function types in Kotlin provide a powerful way to work with functions as first-class citizens. They enable you to pass functions as parameters, return them from functions, and even assign them to variables. This flexibility allows for concise and expressive code, making Kotlin a great language for functional programming paradigms. By understanding the various aspects of function types and exploring practical examples, you can leverage this feature to write more efficient and maintainable code. So go ahead, harness the power of function types in Kotlin, and take your programming skills to the next level!
In the world of modern programming languages, Kotlin has gained popularity for its flexibility and concise coding style, largely thanks to lambdas or anonymous functions. However, the use of lambdas can introduce overhead due to function calls and memory allocations. To address this concern, Kotlin offers inline functions as a means to optimize code execution....
In the ever-evolving world of Android, each version brings its own set of enhancements and improvements. The past couple of Android versions brought some of the major upgrades Android has gotten since its inception. Android 12 introduced Material You, which brought much-needed UI changes, and Android 13 added quality-of-life improvements over Android 12, making it a more polished experience. Much like Android 13, Android 14 may seem like an incremental upgrade, but you would be surprised by just how many internal changes it brings to improve the overall Android experience.
Throughout this blog post, we will delve into the Android 14 new things you need to know as an Android developer in this fast-paced world. Here, we’ll explore how Android 14 empowers you to create exceptional experiences for your users effortlessly.
So, buckle up and get ready to embark on a thrilling adventure into the future of Android development, as we unravel the wonders of Google I/O 2023 and unveil the exciting world of Android 14!
Android 14 New Features
Android 14 is the latest version of Google’s mobile operating system, and it’s packed with new features for both users and developers. Here’s a look at some of the highlights:
Photo Picker
Say goodbye to privacy concerns when it comes to granting access to your photo library! In the past, apps would request access to your entire photo collection even if you just wanted to upload a single picture. This raised legitimate privacy worries since handing over access to all your photos wasn’t the safest option.
Luckily, Android 14 introduces a game-changing solution known as the Photo Picker feature. With this new interface, you have full control over which photos an app can access. Instead of granting unrestricted access, you can now select and share specific photos without compromising your privacy. This means that apps only get access to the photos you choose, ensuring that your entire photo library remains secure.
Thanks to Android 14’s Photo Picker, you can confidently enjoy the convenience of sharing photos while maintaining control over your privacy. It’s a small but significant step towards a safer and more personalized app experience.
Notification Flashes
Android 14 introduces a handy feature called “Notification Flashes” that proves invaluable in noisy environments or for individuals with hearing difficulties. If you often find yourself in situations where you can’t hear your phone’s notifications, this feature has got you covered.
To enable or disable Notification Flashes, follow these simple steps:
Open your phone’s Settings.
Look for the “Display” option and tap on it.
Scroll down and find “Flash notifications.”
You’ll see two toggle options: “Camera Flash” and “Screen Flash.” Toggle them on or off based on your preference.
If you choose to use Screen Flashes, you can even customize the color of the flash. Here’s how:
Within the “Flash notifications” menu, tap on “Screen Flash.”
You’ll be presented with a selection of colors to choose from.
Tap on a color to preview how it will look.
Once you’re satisfied with your choice, simply close the prompt.
With Notification Flashes, you can stay informed about incoming notifications, even in noisy environments or if you have difficulty hearing. It’s a simple yet powerful feature that enhances accessibility and ensures you never miss an important update.
Camera and Battery Life Improvements
Android 14 doesn’t just bring exciting new features but also focuses on enhancing the overall user experience. Google has made significant quality-of-life improvements to ensure a smoother and optimized performance.
One area of improvement is battery consumption. Android 14 is designed to be more efficient, helping to prolong your device’s battery life. This means you can enjoy using your phone for longer periods without worrying about running out of power.
Moreover, both the user interface (UI) and internal workings of Android 14 have been refined to provide a seamless experience. You can expect a smoother and more responsive interface, making navigation and app usage more enjoyable.
In addition to the general improvements, Android 14 introduces new camera extensions. These extensions optimize the post-processing time and enhance the quality of the images captured. If you have a Pixel device powered by the Tensor G2 chip, you’ll notice an even greater improvement in the camera department. The Tensor G2 chip brings significant advancements that further enhance the camera capabilities, resulting in stunning photos with reduced processing time.
With Android 14, you can look forward to a more efficient and polished experience, along with impressive camera enhancements, especially on Pixel devices powered by the Tensor G2 chip. Get ready to enjoy a smoother and more captivating Android journey!
Upcoming Features
As Android 14 is still in the development stage(currently in beta), the upcoming stable version may include or discard these proposed upcoming features.
LockScreen Customizations
One of the exciting features coming to Android 14 is the ability to customize your lock screen. This means you can personalize how your lock screen appears, including changing the clock style and customizing the app shortcuts located at the lower corners. This feature draws some inspiration from iOS 16.
These lock screen customizations are expected to be available in the stable Android 14 release, which is scheduled to launch next month if everything goes as planned for Google. However, it’s worth noting that the lock screen clock styles showcased at Google I/O 2023 weren’t particularly appealing, appearing somewhat flat. Hopefully, the final versions will have more vibrant and engaging styles to choose from.
Magic Compose
Google has an exciting feature called “Magic Compose” coming to the Messages app this summer. It works similarly to the AI generative features demonstrated at Google I/O 2023, which will be added to Google’s Workspace apps. Magic Compose helps you write text messages with different moods and styles. From the preview showcased at I/O, it looks really cool.
For example, if you type “Wanna grab dinner,” Magic Compose offers various rewrites that add excitement, lyrical flair, or even Shakespearean language. It’s a clever feature that adds fun and creativity to your messages. We hope it will eventually be available on Gboard as well. It seems like Google’s way of encouraging more people to use RCS and Google Messages in general. However, please note that Magic Compose is currently limited to Pixel devices.
Emoji, Generative AI, and Cinematic Wallpapers
Android has always been known for its customization options, and Android 14 takes it a step further with the addition of Emoji, Generative AI, and Cinematic wallpapers.
The Emoji wallpaper picker lets you create a unique and interactive wallpaper by selecting a few emoji and a dominant color. It combines them to create a fun and personalized wallpaper that reflects your favorite emoji.
The AI Generative Wallpaper feature is particularly exciting. It allows you to input a few words describing the type of wallpaper you want and then generates a selection of unique wallpapers exclusively for your device. These wallpapers are completely one-of-a-kind and tailored to your preferences.
Cinematic wallpapers bring depth and a parallax effect to your photos using AI. You can choose a photo and the feature will add a dynamic effect that responds to your device’s movements. It’s similar to the Cinematic feature in Google Photos, adding a captivating visual element to your device’s wallpaper.
With these customizable features, Android 14 offers even more ways to personalize your device and make it truly your own. Whether it’s through emoji mashups, generative wallpapers, or dynamic effects, Android 14 provides an enhanced level of customization for a unique and enjoyable user experience.
New Find My Device Experience
The Find My Device app on Android has received a fresh new look to match the latest design language. In addition, it will be receiving some exciting new features this fall. One of the notable additions is the expanded device support, allowing you to locate not only your phones but also accessories using other Android devices on the network.
This enhancement is a welcome addition to Android, as Apple has been a leader in the Find My iPhone experience. Furthermore, if you want to track larger objects like bicycles, manufacturers such as Tile and Chipolo will offer tracker tags that can be used with the Find My Device app.
With these updates, Android users can enjoy a more comprehensive and convenient way to locate their devices and belongings. It’s a great step forward in enhancing the Find My Device experience on Android.
Tracker Prevention and Alerts
Although Google’s efforts to convince Apple to adopt RCS have not been successful, both companies have collaborated on enhancing privacy measures, particularly with Tracker Prevention alerts.
BTW, RCS (Rich Communication Services) is an advanced messaging protocol replacing SMS, offering additional features and capabilities. Some of the features offered by RCS include read receipts, typing indicators, high-quality media sharing, group chats, and the ability to send messages over Wi-Fi or mobile data.
Regardless of the Android device you’re using, if an unidentified tracker is monitoring your activities, your Android device will provide a warning and assist you in locating the source. This collaboration between Google and Apple in the privacy department is a significant achievement, ensuring enhanced privacy and security for Android users.
Using your Android device as a Webcam
If you’re disappointed with the low-quality webcam on your laptop, hold off on buying an external webcam just yet. Android 14 might come with a fantastic feature that allows you to use your Android device as an external camera and stream in high-definition at 1080p.
To use this feature, simply connect your Android device to your PC and a menu will pop up. From there, select “webcam” to switch to using your phone’s camera. Currently, this feature is not available in the operating system, even as an experimental option, but it’s expected to be included in Android 14 if Google deems it ready for release.
With Android 14, you could potentially transform your Android device into a high-quality webcam, eliminating the need for an external camera. Keep an eye out for this exciting feature, which aims to provide a better video conferencing and streaming experience for Android users.
App Cloning
App Cloning is undoubtedly one of the most highly anticipated features in Android. In the past, users had to resort to downloading third-party app cloning utilities that often came bundled with spyware. However, with Android 14, Google plans to address this by introducing a native App Cloning utility.
App Cloning allows you to have two instances of the same app on your device. This feature is particularly useful for users with dual SIM phones who want to use multiple accounts of apps like WhatsApp simultaneously. By cloning the app and logging in with a secondary SIM card, you can have two separate accounts running concurrently.
Google initially hinted at the App Cloning feature during the Android 14 Developer Preview 1. However, there haven’t been any recent updates regarding its development. It is speculated that App Cloning may not be included in the initial stable release of Android 14. However, it is expected to be introduced in future Android 14 feature drop updates, specifically for Pixel users.
The addition of a native App Cloning utility will bring convenience and ease of use to Android users who require multiple instances of certain apps. While its exact timeline for availability remains uncertain, it is an exciting feature to look forward to in future updates of Android 14.
Predictive Back Gestures
Predictive back gestures were introduced in Android 14 Developer Preview 2 but were later removed in the following preview. These gestures allowed users to perform a slow back swipe to reveal the underlying app layer. This was particularly useful when you couldn’t remember the previous page or layer you were on.
By using predictive back gestures, you could check the layer below without losing the contents of the current page. It gave you the flexibility to verify if the previous layer was the one you intended to navigate to.
Initially, this feature was only supported in the Settings app and a few other system apps. However, it remains uncertain whether predictive back gestures will be included in the first stable release of Android 14. If not, there’s a possibility that it will be added in future feature updates.
While the fate of predictive back gestures in Android 14 is unclear, it presented an interesting way to navigate within apps and explore layers. We will have to wait and see if it becomes a part of the official release or is introduced in future updates.
App Pair
During Google I/O 2023, Google unveiled a feature called App Pair, which will be introduced in Android 14 later this year. This feature, showcased during the Pixel Fold announcement, allows users to pair and use apps together in split screens. You can also minimize or maximize them simultaneously.
At first glance, App Pair may not appear particularly useful for smartphones. However, with the increasing popularity of tablets, this feature could be a game-changer. It offers a compelling reason why Android tablets are no longer considered inferior to iPads.
With App Pair, users will have the ability to multitask more effectively on larger screens. By pairing apps in split screens, you can simultaneously use two apps side by side, enhancing productivity and convenience. Whether it’s taking notes while reading, watching a video while browsing the web, or messaging while referencing another app, App Pair makes multitasking on Android tablets a seamless experience.
The inclusion of App Pair in Android 14 demonstrates Google’s commitment to enhancing the tablet experience and bridging the gap between Android tablets and their competitors. It opens up new possibilities for users who rely on tablets for work, entertainment, or any other tasks that require multitasking.
With this upcoming feature, Android tablets are poised to offer a more compelling and competitive alternative to iPads, providing users with a powerful multitasking experience. Look forward to the release of Android 14 to enjoy the benefits of App Pair on compatible devices.
Partial Screen Recorder
In Android 14, a new screen recording feature called “Partial Screen Recording” may be introduced. Despite its name, it doesn’t mean recording only a selected area of the screen. Instead, it allows you to record a specific app without capturing any UI elements or notifications that might appear on the screen.
This feature works similarly to how Discord handles screen sharing. When you switch to view another app or the home screen during the recording, the recorded content will appear black. However, as soon as you switch back to the app you want to record, the content will be visible again. It’s a clever and convenient way to focus solely on recording the app without any distractions.
While the availability of the Partial Screen Recording feature in the official release of Android 14 is not confirmed, it is an exciting addition that can enhance the screen recording experience for users. So, keep an eye out for this neat feature in future Android updates.
Drag and Drop Text and Images to Different Apps
One exciting feature that Android 14 is expected to bring is the ability to drag and drop text and images between apps, similar to what iOS 15 offers. In the Android 14 Beta 3 build, you can already experience this feature with text, and it works seamlessly.
To use the text drag and drop feature, simply select the text you want to move, long press on it, and then drag it to another app where you want to paste the text. With your other hand, switch to the desired app and drop the text into the text area. It’s a convenient way to transfer text quickly and easily between different apps.
While the current beta version only supports text drag and drop, it is anticipated that the final Android 14 release will also include the ability to drag and drop images. This will allow you to effortlessly move images from one app to another, enhancing your productivity and ease of use.
Keep an eye out for the official Android 14 update to enjoy the full drag and drop functionality, making it simpler and more convenient to transfer both text and images between apps on your Android device.
Forced Themed Icons
One of the challenges with adaptive mono icons in Android 12 is that app developers need to add support for them. Without proper support, the overall experience may feel incomplete. However, in Android 13, Google introduced a feature that automatically converts icons to themed icons if they are not supported by developers. This helpful feature may also make its way to Android 14.
Currently, the Pixel launcher has a hidden flag that allows users to force themed icons, which has been present since Android 13 QPR Beta 3. This suggests that Google might enable this feature in the future. If enabled, it will contribute to a seamless and intuitive Android experience, ensuring that the icons match the overall theme of the device.
With automatic icon conversion, users won’t have to worry about inconsistent or mismatched icons on their devices. Android 14 aims to enhance the visual cohesiveness of the user interface, making it more polished and pleasing to the eye.
Keep an eye out for this feature in the upcoming Android 14 release, as it has the potential to improve the overall aesthetic and user experience on your Android device.
Conclusion
Android 14 introduces a range of features and improvements that enhance user experience. It offers customization options like LockScreen customizations and Emoji wallpaper pickers, along with privacy enhancements such as Tracker Prevention alerts. Quality of life improvements includes the Photo Picker feature and Notification Flashes. The update brings camera advancements, App Cloning utility, predictive back gestures, and the ability to use Android devices as external cameras. Android 14 promises a seamless and personalized experience, focusing on user customization and functionality.
Kotlin, being a modern and expressive programming language, provides a set of conventions that allow developers to use specific language constructs by defining functions with predefined names. These conventions provide a consistent and intuitive way to work with various language features. In this article, we’ll explore the different aspects of conventions in Kotlin and provide...
Kotlin offers various powerful features to make code concise and efficient. One such feature is delegation, which allows you to delegate the implementation of properties or functions to another object. This concept of delegation plays a crucial role in achieving code reuse, separation of concerns, and enhancing the readability and maintainability of your code. In this blog, we will explore Kotlin delegation and delve into the details of delegated properties.
Delegated properties allow you to leverage the power of trusted helper objects called delegates. These delegates handle complex tasks, freeing up your properties to focus on their core responsibilities. From database tables to browser sessions and maps, the possibilities are endless.
Join me as we embark on this thrilling journey, exploring the art of delegation and unlocking the true potential of Kotlin delegation properties. Get ready to witness the magic as your properties become extraordinary with just a touch of delegation!
Understanding Kotlin Delegation
Delegation in programming is a design pattern where an object, known as the delegate, is given the responsibility to handle certain tasks or operations on behalf of another object, known as the delegator. The delegator object delegates the work to the delegate object, which performs the task and returns the result to the delegator.
Let’s use a real-life example to understand delegation in Kotlin. Consider a scenario where you have a restaurant with a customer, a waiter, and a chef. The customer wants to order a meal, and the waiter is responsible for taking the order and delivering it to the chef. The chef prepares the meal and hands it back to the waiter, who serves it to the customer.
In this example, the customer is the delegator, and the waiter is the delegate. The customer delegates the task of taking the order and delivering it to the waiter. The waiter performs these tasks on behalf of the customer and then delegates the task of preparing the meal to the chef. Finally, the waiter serves the meal back to the customer.
Let’s take one more example, consider a Car class that needs to perform some operations related to engine management. Instead of implementing those operations directly in the Car class, we can delegate them to an Engine object. This way, the Car class can focus on its core functionality, while the Engine object handles engine-related tasks.
Delegation provides benefits such as modularity, maintainability, and flexibility in designing software systems.
Overview of the Delegation Pattern
The delegation pattern is a design pattern where an object delegates some or all of its responsibilities to another object. Instead of inheriting behavior, an object maintains a reference to another object and forwards method calls to it. This promotes composition over inheritance and provides greater flexibility in reusing and combining behaviors from different objects.
In Kotlin, the delegation pattern is built into the language, making it easy and convenient to implement. With the by keyword, Kotlin allows a class to implement an interface by delegating all of its public members to a specified object. Let’s dive into the details and see how it works.
Basic Usage of Delegation in Kotlin
To understand the basic usage of delegation in Kotlin, let’s consider a simple example. Assume we have an interface called Base with a single function print()
Kotlin
interfaceBase {funprint()}
Next, we define a class BaseImpl that implements the Base interface. It has a constructor parameter x of type Int and provides an implementation for the print() function.
Kotlin
classBaseImpl(val x: Int) : Base {overridefunprint() {println(x) }}
Now, we want to create a class called Derived that also implements the Base interface. Instead of implementing the print() function directly, we can delegate it to an instance of the Base interface. We achieve this by using the by keyword followed by the object reference in the class declaration.
Kotlin
classDerived(b: Base) : Basebyb
In this example, the by clause in the class declaration indicates that b will be stored internally in objects of Derived, and the compiler will generate all the methods of Base that forward to b. This means that the print() function in Derived will be automatically delegated to the print() function of the b object.
To see the delegation in action, let’s create an instance of BaseImpl with a value of 10 and pass it to the Derived class. Then, we can call the print() function on the Derived object:
When we execute the print() function on the Derived object, it internally delegates the call to the BaseImpl object (b), and thus it prints the value 10.
Overriding Methods in Delegation
In Kotlin, when a class implements an interface by delegation, it can also override methods provided by the delegate object. This allows for customization and adding additional behavior specific to the implementing class.
Let’s extend our previous example to understand method overriding in the delegation. Assume we have an interface Base with two functions: printMessage() and printMessageLine():
In this example, the printMessage() function in the Derived class overrides the implementation provided by the delegate object b. When we call printMessage() on an instance of Derived, it will print “softAai” instead of the original implementation.
To test the overridden behavior, we can modify the main() function as follows:
When we call the printMessage() function on the Derived object, it invokes the overridden implementation in the Derived class, and it prints “softAai” instead of 10. However, the printMessageLine() function is not overridden in the Derived class, so it delegates the call to the BaseImpl object, which prints the original value 10 followed by a new line.
Property Delegation
In addition to method delegation, Kotlin also supports property delegation. This allows a class to delegate the implementation of properties to another object. Let’s understand how it works.
Assume we have an interface Base with a read-only property message:
Kotlin
interfaceBase {val message: String}
We modify the BaseImpl class to implement the Base interface with the message property:
Kotlin
classBaseImpl(val x: Int) : Base {overrideval message: String = "BaseImpl: x = $x"}
Now, let’s update the Derived class to delegate the Base interface and override the message property:
In this example, the Derived class delegates the implementation of the Base interface to the b object. However, it overrides the message property and provides its own implementation.
To see the property delegation in action, we can modify the main() function as follows:
Kotlin
funmain() {val b = BaseImpl(10)val derived = Derived(b)println(derived.message) // Output: Message of Derived}
When we access the message property of the Derived object, it returns the overridden value “Message of Derived” instead of the one in the delegate object b.
Delegated Properties in Kotlin
Delegated properties allow you to delegate the implementation of property accessors (getters and setters) to another object. This means that instead of writing the logic for accessing and setting the property directly in the class, you can delegate it to a separate class.
The general syntax for creating a delegated property is as follows:
Kotlin
classMyClass {var myProperty: TypebyDelegate()}
Here, myProperty delegates its getter and setter operations to the Delegate object.
Property Delegates
Property delegates are classes that implement the getValue and optionally setValue functions. These functions are invoked when the delegated property is accessed or modified.
The getValue function is responsible for returning the property value, and setValue is responsible for updating the property value.
Let’s say we have a Delegate class that will handle the logic for accessing and setting a property. The Delegate class should have two methods: getValue() and setValue(). The getValue() method retrieves the current value of the property, and the setValue() method sets a new value for the property. These methods can be defined as either members or extensions of the Delegate class.
Here’s an example of a Delegate class that simply stores the value internally:
Kotlin
classDelegate {privatevarvalue: Int = 0operatorfungetValue(thisRef: Any?, property: KProperty<*>): Int {// Get the current value of the propertyreturnvalue }operatorfunsetValue(thisRef: Any?, property: KProperty<*>, newValue: Int) {// Set a new value for the propertyvalue = newValue }}
In the above code snippet, the * is used in the parameter of the setValue() and getValue() methods of the Delegate class. This syntax is called a star-projection or star-spread operator.
In Kotlin, the KProperty interface represents a property, and it has a type parameter T that represents the type of property. When you use the star-projection (*) as the type argument (KProperty<*>), it means you are using a wildcard or an unknown type for the property.
In the context of delegated properties, the KProperty<*> parameter represents the property that is being accessed or set. The thisRef parameter represents the instance of the class that owns the property.
By using KProperty<*> with the star-projection, you’re saying that the property can be of any type. It allows you to create a generic Delegate class that can handle properties of different types without explicitly specifying the type.
Also, we defined the operator keyword, which is used to define and overload certain operators for custom types or classes.
Now, let’s create a class Foo with a property p that delegates its accessors to an instance of the Delegate class:
When you create an instance of Foo, you can access and modify the p property as if it were a regular property. However, behind the scenes, the access and modification operations are delegated to the Delegate class.
Let’s consider one more example for better understanding, just create a simple UpperCaseDelegate that converts a string property to uppercase when accessed:
Here, myProperty delegates its getter operation to UpperCaseDelegate, which converts the value to uppercase before returning it.
The “by" keyword
The delegate object is specified after the by keyword and can be any object that satisfies the rules of the convention for property delegates. It’s the delegate object that actually handles the logic for accessing and setting the property.
The by keyword is used in Kotlin to indicate that a property is delegated to another object or class. When you use the by keyword, you are specifying that the implementation of the property’s accessors (getters and setters) will be delegated to a separate delegate object.
By using the by keyword, you make it clear that the property’s implementation is delegated to another object, enhancing code readability and allowing for better separation of concerns.
Kotlin
classDelegate {privatevarvalue: Int = 0operatorfungetValue(thisRef: Any?, property: KProperty<*>): Int {// Get the current value of the propertyreturnvalue }operatorfunsetValue(thisRef: Any?, property: KProperty<*>, newValue: Int) {// Set a new value for the propertyvalue = newValue }}classFoo {var p: IntbyDelegate()}
In the above example, the p property of the Foo class is delegated to an instance of the Delegate class using the by keyword. The Delegate class provides the implementation for the property’s accessors.
So, when you access or modify the p property of an instance of the Foo class, the property accessors are automatically delegated to the Delegate object. Behind the scenes, the getValue() and setValue() methods of the Delegate class are called to handle the property operations.
Using the by keyword simplifies the syntax and makes it clear that the property behavior is delegated to another object. It promotes code reuse and separates the concerns of the owning class from the delegate class.
Standard Delegates
Kotlin provides several standard delegates in the standard library to address common scenarios. Some examples include:
lazy:Allows for lazy initialization of properties. The initialization is deferred until the property is accessed for the first time.
observable:Enables observing property changes by providing a callback function that is triggered whenever the property value is modified.
vetoable:Allows validation of property values by providing a callback function that can reject value changes based on specific conditions.
Lazy Initialization
Lazy initialization is a technique where you delay the initialization of an object until it is accessed for the first time. This can be useful when the initialization process is resource-intensive and the object might not always be needed during the lifetime of the program.
For example, consider a Person class that lets you access a list of the emails written by a person. The emails are stored in a database and take a long time to access. You want to load the emails on first access to the property and do so only once. Let’s say you have the following function loadEmails, which retrieves the emails from the database:
Kotlin
classEmail {/*...*/}funloadEmails(person: Person): List<Email> {println("Load emails for ${person.name}")returnlistOf(/*...*/ )}
Here’s how you can implement lazy loading using anadditional _emails property that stores null before anything is loaded and the list of emails afterward.
In this implementation, we have a nullable _emails property that acts as a backing property to store the loaded emails. The emails property is the one we access to retrieve the list of emails. In the getter of the emails property, we check if _emails is null. If it is, we initialize it by calling the loadEmails function. We then return the value of _emails, forcibly unwrapping it with !! operator since we know it won’t be null at this point.
While this approach works, it can become cumbersome and error-prone when dealing with multiple lazy properties. Additionally, the implementation is not thread-safe.
To simplify and improve the code, Kotlin provides a built-in solution using the lazy delegate. The lazy function returns an object that has a getValue method, which can be used together with the by keyword to create a delegated property. Here’s how we can use it in our example:
With this implementation, the emails property is delegated to the lazy delegate. The lambda expression passed to the lazy function is used to initialize the value of the property when it is accessed for the first time. The lazy delegate ensures that the initialization happens only once, and subsequent accesses to the property will return the cached value.
The lazy function is thread-safe by default, meaning that the initialization is synchronized and can be safely accessed from multiple threads. If you need more control over the thread-safety or want to optimize for a single-threaded environment, you can specify additional options to the lazy function.
Lazy delegate: “by lazy()”
In Kotlin, you can achieve lazy initialization using the lazy delegate provided by the standard library. The lazy function returns an object that has a getValue method, which can be used together with the by keyword to create a delegated property.
The lazy delegate is a built-in feature in Kotlin that allows you to create properties whose values are computed lazily. It provides a concise way to implement lazy initialization without manually managing the initialization state. Here’s how you can use it:
Kotlin
val property: Typebylazy {// Initialization code here// This block will be executed only once, when the property is accessed for the first time// The value of the block will be cached and returned for subsequent accesses// Return the computed value}
Here’s an example to illustrate the usage of lazy initialization with the lazy delegate:
Kotlin
classExample {val expensiveProperty: Intbylazy {// Expensive computation or initializationprintln("Initializing expensiveProperty...")// Return the computed value42 }}funmain() {val example = Example()println("Before accessing expensiveProperty")// The initialization code of expensiveProperty is not executed yetprintln("Value of expensiveProperty: ${example.expensiveProperty}")// The initialization code of expensiveProperty is executed hereprintln("After accessing expensiveProperty")println("Value of expensiveProperty: ${example.expensiveProperty}")// The cached value is returned without re-initialization}
Kotlin
OUTPUTBefore accessing expensivePropertyInitializing expensiveProperty...Value of expensiveProperty: 42After accessing expensivePropertyValue of expensiveProperty: 42
In this example, the expensiveProperty in the Example class is lazily initialized using the lazy delegate. The initialization code block is not executed until the property is accessed for the first time. The computed value (42 in this case) is then cached and returned for subsequent accesses.
When you run the above code, you’ll see that the initialization code block is executed only once, when the property is first accessed. On subsequent accesses, the cached value is returned without re-executing the initialization code.
Lazy initialization with by lazy() simplifies the code by abstracting away the details of managing the initialization state and caching the computed value. It ensures that the property is initialized lazily and provides a convenient way to implement lazy initialization in Kotlin.
Once again here’s an example to illustrate lazy initialization using the lazy delegate:
In this example, the Person class has a property called emails, which is lazily initialized using the lazy delegate. The lazy function takes a lambda as an argument, which it will call to initialize the value of the property when it is accessed for the first time.
The benefit of using the lazy delegate is that the initialization logic is encapsulated within it. The value assigned to the emails property will only be computed once, on the first access, and subsequent accesses will return the cached value. This can help improve performance by avoiding unnecessary computations or resource allocations until they are actually needed.
You can think of the emails property as having a backing property that holds the computed value, and the lazy delegate takes care of initializing and caching the value behind the scenes. The delegate ensures that the value is computed lazily, i.e., only when it is first accessed.
Here’s how you would use the Person class:
Kotlin
val person = Person("amol")println(person.emails) // Initialization happens here, loadEmails() is calledprintln(person.emails) // Cached value is returned without re-initialization
In this example, the loadEmails() function will only be called on the first access of the emails property. Subsequent accesses will return the cached value without re-initializing it.
The lazy delegate is thread-safe by default, meaning that the initialization is synchronized and can be safely accessed from multiple threads. However, if you know that the class will only be used in a single-threaded environment, you can provide additional options to bypass synchronization and improve performance.
The lazy delegate allows you to achieve lazy initialization of properties. It simplifies the code by encapsulating the initialization logic and ensures that the value is computed only when it is first accessed, providing better performance and resource utilization.
"observable” Delegate
The observable delegate allows you to observe property changes by providing a callback function that is triggered whenever the property value is modified.
Here’s the general syntax for using the observable delegate:
Kotlin
var propertyName: TypebyDelegates.observable(initialValue) { property, oldValue, newValue ->// Callback function logic}
Let’s see an example that uses the observable delegate to observe changes in a property:
Kotlin
import kotlin.properties.DelegatesclassPerson {var age: IntbyDelegates.observable(25) { property, oldValue, newValue ->println("Age changed from $oldValue to $newValue") }}funmain() {val person = Person() person.age = 30// Output: Age changed from 25 to 30 person.age = 35// Output: Age changed from 30 to 35}
In this example, the age property is observed using the observable delegate. Whenever the age property is modified, the callback function is triggered, printing the old value and the new value.
"vetoable” Delegate
The vetoable delegate allows you to validate property values by providing a callback function that can reject value changes based on specific conditions.
Here’s the general syntax for using the vetoable delegate:
Kotlin
var propertyName: TypebyDelegates.vetoable(initialValue) { property, oldValue, newValue ->// Validation logic// Return true to accept the new value, or false to reject it}
Let’s see an example that uses the vetoable delegate to validate a property value:
Kotlin
import kotlin.properties.DelegatesclassCircle {var radius: DoublebyDelegates.vetoable(0.0) { property, oldValue, newValue -> newValue >= 0.0// Only accept positive or zero radius values }}funmain() {val circle = Circle() circle.radius = 5.0println(circle.radius) // Output: 5.0 circle.radius = -2.0// Value rejected due to validationprintln(circle.radius) // Output: 5.0 (unchanged)}
In this example, the radius property is validated using the vetoable delegate. The callback function checks if the new value is greater than or equal to zero. If the validation condition is not met (e.g., negative radius), the value change is rejected, and the property retains its previous value.
Delegating to another property
Delegating a property to another property means that the getter and setter of one property are implemented by accessing or modifying another property’s value. This delegation can be done for top-level properties, member properties (including extension properties) within the same class, or even member properties of another class.
To delegate a property to another property, you use the :: qualifier followed by the delegate property’s name. Here are a few examples to illustrate how property delegation works:
Kotlin
var topLevelInt: Int = 0classClassWithDelegate(val anotherClassInt: Int)classMyClass(var memberInt: Int, val anotherClassInstance: ClassWithDelegate) {var delegatedToMember: Intbythis::memberIntvar delegatedToTopLevel: Intby ::topLevelIntval delegatedToAnotherClass: IntbyanotherClassInstance::anotherClassInt}var MyClass.extDelegated: Intby ::topLevelInt
In the code above, we have different scenarios for property delegation:
delegatedToMember is a property within the MyClass class that delegates its getter and setter to the memberInt property of the same class. This means that accessing or modifying delegatedToMember will actually read from or write to memberInt.
delegatedToTopLevel is a property within the MyClass class that delegates its getter and setter to the top-level property topLevelInt. So, accessing or modifying delegatedToTopLevel will actually read from or write to topLevelInt.
delegatedToAnotherClass is a property within the MyClass class that delegates its getter to the anotherClassInt property of an instance of ClassWithDelegate. This means that accessing delegatedToAnotherClass will read the value of anotherClassInstance.anotherClassInt.
extDelegated is an extension property of MyClass that delegates its getter and setter to the top-level property topLevelInt. This allows instances of MyClass to have an additional property extDelegated that shares its value with topLevelInt.
Property delegation can be useful in various scenarios. One common use case is when you want to introduce a new property while maintaining backward compatibility with an existing one. In such cases, you can introduce a new property, annotate the old property with the @Deprecated annotation, and delegate its implementation to the new property. Here’s an example:
Kotlin
classMyClass {var newName: Int = 0@Deprecated("Use 'newName' instead", ReplaceWith("newName"))var oldName: Intbythis::newName}funmain() {val myClass = MyClass()// Notification: 'oldName: Int' is deprecated.// Use 'newName' instead myClass.oldName = 42println(myClass.newName) // Output: 42}
In this example, we have a class MyClass with oldName and newName properties. The oldName property is deprecated and annotated with @Deprecated, indicating that it should not be used anymore. The implementation of oldName is delegated to the newName property using by this::newName. So, accessing or modifying oldName will actually access or modify the newName property.
In the main function, we demonstrate the usage of the deprecated oldName property. When assigning a value to oldName, a deprecation warning is displayed. However, the value is stored in the newName property, which can be accessed correctly.
Overall, delegating properties to other properties provides a powerful mechanism to reuse existing property implementations, introduce backward compatibility, and simplify property access and modification.
Property delegate requirements
Property delegate requirements will be demonstrated for both read-only (val) and mutable (var) properties. Let’s break down the concept of delegated properties for read-only and mutable properties (var) and understand how to provide the necessary operator functions for delegation.
For a read-only property (val), the delegate must provide the getValue() operator function with the following parameters:
thisRef: This parameter should be the same type as, or a supertype of, the property owner (for extension properties, it should be the type being extended).
property: This parameter should be of type KProperty<*> or its supertype.
getValue(): This function must return the same type as the property (or its subtype).
In this code, we have the Owner class with a read-only property valResource. The delegation is done by using the by keyword and providing an instance of the ResourceDelegate class. The ResourceDelegate class defines the getValue() function, which returns an instance of Resource. The function receives the property owner (thisRef) and the KProperty<*> instance representing the property being delegated.
For a mutable property (var), in addition to the getValue() function, the delegate must provide the setValue() operator function with the following parameters:
thisRef: This parameter should be the same type as, or a supertype of, the property owner (for extension properties, it should be the type being extended).
property: This parameter should be of type KProperty<*> or its supertype.
value: This parameter should be of the same type as the property (or its supertype).
In this code, we have the Owner class with a mutable property varResource. The ResourceDelegate class now includes the setValue() function, which allows modifying the value of the delegated property. The function receives the property owner (thisRef), the KProperty<*> instance representing the property being delegated, and the new value to be assigned.
You can define the getValue() and setValue() functions as member functions of the delegate class itself or as extension functions. Both functions need to be marked with the operator keyword to enable operator overloading.
Alternatively, you can create delegates as anonymous objects using the interfaces ReadOnlyProperty and ReadWriteProperty from the Kotlin standard library. These interfaces provide the required getValue() and setValue() methods. By using anonymous objects, you can avoid creating separate classes for the delegates. Here’s an example:
Kotlin
funresourceDelegate(resource: Resource = Resource()): ReadWriteProperty<Any?, Resource> = object : ReadWriteProperty<Any?, Resource> {privatevar curValue = resourceoverridefungetValue(thisRef: Any?, property: KProperty<*>): Resource = curValueoverridefunsetValue(thisRef: Any?, property: KProperty<*>, value: Resource) { curValue = value } }val readOnlyResource: ResourcebyresourceDelegate() // ReadWriteProperty used as a read-only propertyvar readWriteResource: ResourcebyresourceDelegate() // ReadWriteProperty used as a mutable property
In this code, the resourceDelegate() function returns an anonymous object implementing the ReadWriteProperty interface. The ReadWriteProperty interface extends ReadOnlyProperty, so it can be used as a delegate for both read-only and mutable properties. The anonymous object defines the necessary getValue() and setValue() functions.
By using delegated properties and providing the appropriate operator functions, you can create flexible and reusable property delegation patterns in Kotlin.
Storing property values in a map
Another common pattern where delegated properties come into play is objects that have a dynamically defined set of attributes associated with them. Such objects are sometimes called expando objects. in a contact-management system, each person may have some required properties (like name) that are handled in a special way, as well as additional attributes that can vary for each person(youngest child’s birthday, for example).
One way to implement such a system is by using a map to store all the attributes of a person and providing properties that allow access to the information with special handling. Let’s go through the code examples to understand this approach.
First, we have the Person class with a private _attributes map. This map will store the attributes of a person, where the keys are attribute names and the values are attribute values.
In this code, we have a set attributefunction that allows adding or updating attributes in the _attributes map. The name property is an example of a required property that is handled in a special way. It retrieves the value of the “name” attribute from the _attributes map.
To create an instance of the Person class and load data into it, we can use a generic API, such as deserialization from JSON, as shown in the example below:
Kotlin
val p = Person()valdata = mapOf("name" to "amol", "company" to "softAai")for ((attrName, value) indata) { p.setAttribute(attrName, value)}println(p.name) // Output: amol
Here, we create a new Person instance and provide the data as a map. We iterate over each key-value pair in the data map and call setAttribute to store the attributes in the _attributes map. Finally, we can access the name property, which internally retrieves the value of the “name” attribute from the _attributes map.
Now, instead of manually implementing the property and the _attributes map, we can simplify the code using delegated properties. We can directly delegate the name property to the _attributes map using the by keyword, as shown below:
In this code, we no longer have the explicit getter for the name property. Instead, we use the by keyword to delegate the property to the _attributes map. The standard library provides getValue and setValue extension functions for maps, allowing the property to automatically get and set the values in the map based on the property name.
With the delegated property in place, we can use it just like before:
Kotlin
val p = Person()valdata = mapOf("name" to "amol", "company" to "softAai")for ((attrName, value) indata) { p.setAttribute(attrName, value)}println(p.name) // Output: amol
The output remains the same, but now the name property is implemented as a delegated property, simplifying the code and removing the need for an explicit getter.
Delegated properties provide a concise and reusable way to handle dynamically defined attributes in expando objects. By leveraging the by keyword and the standard library extension functions, we can delegate the property access to a map or any other custom logic, making the code more maintainable and flexible.
Translation rules for delegated properties
When using delegated properties in Kotlin, the Kotlin compiler generates auxiliary properties to handle the delegation. These auxiliary properties are used to store the delegate object and manage the getter and setter operations.
Let’s take an example to understand how this works. Consider the following code:
Kotlin
classC {var prop: TypebyMyDelegate()}
When the compiler encounters this code, it generates a hidden property called prop$delegate. This hidden property is of the same type as the delegate class (MyDelegate in this case). It is responsible for handling the delegation of the prop property.
In the generated code, the prop property has a getter and a setter. The getter delegates the getValue() operation to the prop$delegate property, passing the instance of the outer class (this) and the reflection object (this::prop) that represents the property itself. The delegate’s getValue() function is responsible for providing the value of the property.
Similarly, the setter delegates the setValue() operation to the prop$delegate property, passing the instance of the outer class (this), the reflection object (this::prop), and the new value of the property. The delegate’s setValue() function handles the assignment of the new value.
By generating the prop$delegate property and delegating to it, the compiler ensures that the getter and setter operations are correctly handled by the delegate object (MyDelegate).
Optimized cases for delegated properties
When it comes to optimization, the Kotlin compiler can omit the $delegate field in certain cases. Here are the optimized cases for delegated properties:
A referenced property:
Kotlin
classC<Type> {privatevar impl: Type = ...var prop: Typeby ::impl}
In this case, the property prop is delegated to another property impl using the by keyword. Since the delegate is a referenced property within the same class, the compiler can optimize the generated code and omit the $delegate field. Instead, the accessors directly delegate to the referenced property impl.
When using a named object as a delegate, the Kotlin compiler can optimize the code and omit the $delegate field. The accessors directly call the delegate’s getValue function without the need for an intermediate property.
A final val property with a backing field and a default getter in the same module:
Kotlin
val impl: ReadOnlyProperty<Any?, String> = ...classA {val s: Stringbyimpl}
In this case, the delegate impl is a final val property with a backing field and a default getter defined in the same module as the property s. The compiler can optimize the code and omit the $delegate field. The accessors directly delegate to the getValue function of the delegate without the need for an intermediate property.
A constant expression, enum entry, this, or null:
Kotlin
classA {operatorfungetValue(thisRef: Any?, property: KProperty<*>) ...val s bythis}
If the delegate is a constant expression, an enum entry, this, or null, the Kotlin compiler can optimize the code and omit the $delegate field. The accessors directly call the getValue function of the delegate without the need for an intermediate property.
In these optimized cases, the compiler eliminates the need for the $delegate field, which can save memory and provide more efficient property access. The accessors directly invoke the corresponding functions of the delegate, leading to more streamlined code execution.
Note that these optimizations are applied by the Kotlin compiler to improve performance and reduce unnecessary overhead when using delegated properties.
Translation rules when delegating to another property
When delegating to another property, the Kotlin compiler optimizes the code by generating immediate access to the referenced property. This means that the compiler doesn’t generate the $delegate field. This optimization helps save memory and improves performance.
Let’s take a look at the example code:
Kotlin
classC<Type> {privatevar impl: Type = ...var prop: Typeby ::impl}
In this case, the property prop is delegated to the property impl using the by keyword. The compiler optimizes the code by directly accessing the impl property within the property accessors of prop. This means that the delegated property’s getValue and setValue operators are skipped, and there is no need for the KProperty reference object.
The compiler generates the following code:
Kotlin
classC<Type> {privatevar impl: Type = ...var prop: Typeget() = implset(value) { impl = value }fungetProp$delegate(): Type = impl // This method is needed only for reflection
As you can see, the accessors for the prop property directly delegate to the impl property. The getValue accessor returns the value of impl, and the setValue accessor assigns the value to impl.
The method getProp$delegate() is also generated, but it is only needed for reflection purposes. It allows reflective access to the delegate object, but it is not used in regular property access.
This optimization avoids the creation of an additional field and reduces the overhead associated with delegated property access. By directly accessing the referenced property, the code becomes more efficient and memory-friendly.
The same optimization principle applies when delegating to another property using this keyword. The compiler generates immediate access to the referenced property without the need for an intermediate field.
Overall, these translation rules improve the performance of delegated properties and eliminate unnecessary memory usage.
What will be the right-hand side of “by"?
In Kotlin, when using delegated properties, the expression to the right of the by keyword can be more than just a new instance creation. It can also be a function call, another property, or any other expression, as long as the value of the expression is an object that provides the getValue and setValue methods with the correct parameter types.
The getValue and setValue methods can be declared directly on the object itself or defined as extension functions. This gives you the flexibility to use existing functions or properties to handle the behavior of your delegated properties.
Here’s an example to demonstrate this concept:
Kotlin
classExample {varvalue: String = "initial"// Delegated property using a function callvar customValue: StringbygetValueFromFunction()// Delegated property using another propertyvar anotherValue: Stringby ::value// Delegated property using an extension functionvar computedValue: IntbycalculateValue()// Extension function providing delegated property behaviorprivatefuncalculateValue(): ReadWriteProperty<Any?, Int> {var storedValue: Int = 0return object : ReadWriteProperty<Any?, Int> {overridefungetValue(thisRef: Any?, property: KProperty<*>): Int {// Perform custom logic to compute the valuereturn storedValue * 2 }overridefunsetValue(thisRef: Any?, property: KProperty<*>, value: Int) {// Perform custom logic to store the value storedValue = value / 2 } } }}fungetValueFromFunction(): ReadWriteProperty<Any?, String> {var storedValue: String = ""return object : ReadWriteProperty<Any?, String> {overridefungetValue(thisRef: Any?, property: KProperty<*>): String {return storedValue }overridefunsetValue(thisRef: Any?, property: KProperty<*>, value: String) { storedValue = value.toUpperCase() } }}funmain() {val example = Example()// Using the delegated properties example.customValue = "amol"println(example.customValue) // Output: AMOL example.anotherValue = "softAai"println(example.anotherValue) // Output: softAai example.computedValue = 5println(example.computedValue) // Output: 10}
In the example above, the customValue property is delegated to the result of a function call getValueFromFunction(), which returns a custom delegate object implementing the ReadWriteProperty interface. The delegate modifies the stored value by converting it to uppercase when setting the value.
The anotherValue property is delegated to the value property using the ::value syntax. Any changes made to anotherValue will be reflected in the value property.
The computedValue property is delegated to the result of the calculateValue() extension function. The extension function provides the delegated property behavior by implementing the ReadWriteProperty interface. In this case, the delegate computes the value by multiplying it by 2 and stores the value by dividing it by 2.
By allowing various expressions on the right-hand side of by and supporting both object-defined and extension-defined getValue and setValue methods, Kotlin enables flexible and customizable behavior for delegated properties.
Providing a delegate
The provideDelegate operator allows you to extend the logic for creating the object to which the property implementation is delegated. If the object used on the right-hand side of the by keyword defines provideDelegate as a member or extension function, that function will be called to create the property delegate instance.
One use case of provideDelegate is to perform additional checks or actions during the initialization of the property delegate. For example, you can check the consistency of the property before binding it.
Here’s an example that demonstrates how to use provideDelegate:
In this example, the ResourceLoader class defines the provideDelegate function. This function is called for each property during the creation of an instance of MyUI. It performs the necessary validation or checks before creating the property delegate.
Without the provideDelegate functionality, you would need to pass the property name explicitly to achieve the same functionality, which could be less convenient.
The provideDelegate method has the same parameters as the getValue function:
thisRef must be the same type as, or a supertype of, the property owner (for extension properties, it should be the type being extended).
property must be of type KProperty<*> or its supertype.
The provideDelegate method is responsible for creating and returning the property delegate instance that will handle the property access.
In the generated code, when provideDelegate is present, it is called to initialize the auxiliary prop$delegate property. Compare the generated code for the property declaration val prop: Type by MyDelegate() with the generated code when provideDelegate is available:
It’s important to note that the provideDelegate method only affects the creation of the auxiliary property (prop$delegate) and does not impact the generated code for the getter or the setter of the delegated property.
You can also use the PropertyDelegateProvider interface from the standard library to create delegate providers without creating new classes. Here’s an example:
In this case, the PropertyDelegateProvider creates a delegate provider using a lambda expression. The lambda receives the thisRef (property owner) and property information and returns a property delegate instance.
Delegation in Android Applications
Kotlin delegation and delegated properties can be useful in Android applications to simplify code, separation of concerns, and provide flexibility in handling certain tasks. Here are a few examples of how delegation can be used in Android applications:
1. Shared Preferences Delegation
Android applications often need to store and retrieve key-value pairs using SharedPreferences. Delegation can be used to simplify the code for accessing SharedPreferences. For example:
In this example, the SettingsManager class uses delegation to handle the isNotificationsEnabled property, which is backed by a shared preference value. The BooleanPreferenceDelegate class implements the delegated property behavior.
2. Dependency Injection with Delegation:
Dependency injection frameworks like Dagger can benefit from delegation to simplify the injection process. By using a delegated property, you can abstract away the complexity of dependency resolution. Here’s a simplified example:
In this example, the MyActivity class uses delegation to lazily inject the MyDependency instance. The inject function provides the delegation logic for dependency injection, making it easy to reuse across different activities.
These are just a few examples of how delegation and delegated properties can be used in Android applications. They demonstrate how delegation can simplify code, improve code organization, and provide flexibility in various scenarios.
Conclusion
Kotlin delegation and delegated properties provide an elegant and efficient way to handle code reuse and separation of concerns. By understanding the concept of delegation and utilizing delegated properties, you can write cleaner, more maintainable code in your Kotlin projects. Whether you’re developing Android applications or working on other Kotlin projects, delegation is a powerful tool to enhance your codebase. Start exploring the possibilities of delegation in Kotlin and unlock the benefits it brings to your software development journey.
Kotlin provides several special types that serve specific purposes, including types such as Any, Unit, and Nothing. Understanding these types and their characteristics is crucial for writing clean and concise Kotlin code. In this article, we will explore the features and use cases of each type, along with relevant examples. Any: The Root Type In Kotlin,...
Kotlin, a modern programming language for the JVM, comes with a robust and expressive set of collection classes and functions. Kotlin collections provide a seamless way to work with data, enabling efficient data manipulation, transformation, and filtering. Whether you’re a beginner or an experienced Kotlin developer, understanding the various collection types, operations, and best practices is essential. In this article, we will explore Kotlin collections in depth, covering all aspects and providing practical examples to solidify your understanding.
What are Kotlin Collections?
In Kotlin, collections refer to data structures that can hold multiple elements. They provide a way to store, retrieve, and manipulate groups of related objects. Kotlin provides a rich set of collection classes and interfaces in its standard library, making it convenient to work with collections in various scenarios.
Here are some commonly used collection interfaces in Kotlin:
Collection: The root interface for read-only collections. It provides methods for accessing elements, such as iteration, size checking, and element presence checks.
MutableCollection: Extends the Collection interface and adds methods for modifying the collection, such as adding and removing elements.
List: Represents an ordered collection of elements. Elements can be accessed by their indices. Kotlin provides ArrayList and LinkedList as implementations of the List interface.
MutableList: Extends the List interface and adds methods for modifying the list, such as adding, removing, and modifying elements.
Set: Represents a collection of unique elements, with no defined order. Kotlin provides HashSet and LinkedHashSet as implementations of the Set interface.
MutableSet: Extends the Set interface and adds methods for modifying the set.
Map: Represents a collection of key-value pairs. Each key in the map is unique, and you can retrieve the corresponding value using the key. Kotlin provides HashMap and LinkedHashMap as implementations of the Map interface.
MutableMap: Extends the Map interface and adds methods for modifying the map.
These are just a few examples of collection interfaces in Kotlin. The standard library also includes other collection interfaces and their corresponding implementations, such as SortedSet, SortedMap, and Queue, along with various utility functions and extension functions to work with collections more efficiently.
Collections in Kotlin provide a convenient way to handle groups of data and perform common operations like filtering, mapping, sorting, and more. They play a vital role in many Kotlin applications and can greatly simplify data manipulation tasks.
Read-Only and Mutable Collections
Kotlin collection design separates interfaces for accessing and modifying data in collections. This design distinguishes between read-only and mutable interfaces, providing clarity and control over how collections are used and modified.
Thekotlin.collections.Collectioninterfaceis used for accessing data in a collection. It allows you toiterate over the elements, obtain the size, check for the presence of specific elements, and perform other read operations. However, it does not provide methods for adding or removing elements.
Kotlin
funprintCollection(collection: Collection<Int>) {for (element in collection) {println(element) }}val myList = listOf(1, 2, 3)printCollection(myList) // This works fine
To modify the data in a collection, you should use the kotlin.collections.MutableCollection interface. It extends the Collection interface and adds methods for adding and removing elements, clearing the collection, and other modification operations.
Kotlin
funaddToCollection(collection: MutableCollection<Int>, element: Int) { collection.add(element)}val myMutableList = mutableListOf(1, 2, 3)addToCollection(myMutableList, 4) // This modifies the collection
Creating a defensive copy
By using read-only interfaces (Collection) throughout your code, you convey that the collection won’t be modified. If a function accepts a Collection parameter, you can be confident that it only reads data from the collection. On the other hand, when a function expects a MutableCollection, it indicates that the collection will be modified. If you have a collection that is part of your component’s internal state and needs to be passed to a function requiring a MutableCollection, you may need to create a defensive copy of that collection to ensure its integrity.
Kotlin
funmodifyCollection(collection: MutableCollection<Int>) {val defensiveCopy = collection.toList()// Perform modifications on the defensiveCopy// ...}val originalList = mutableListOf(1, 2, 3)modifyCollection(originalList) // The original list remains unchanged
In this example, we have a function modifyCollection that takes a mutable collection as a parameter. However, if the collection is part of your component’s internal state and you want to ensure its integrity, you can create a defensive copy of the collection before passing it to the function.
By calling toList() on the original collection, we create a new read-only list defensiveCopy that contains the same elements. The modifyCollection function can then perform any modifications on the defensive copy without affecting the original collection.
This approach allows you to protect the original collection from unintended modifications, especially when it is part of the component’s internal state or when you want to ensure its immutability in certain scenarios.
Immutable Collections
Kotlin offers a variety of immutable collection types, such as lists, sets, and maps, that cannot be modified once created. These collections guarantee thread safety and immutability, ensuring data integrity in multi-threaded scenarios. Let’s see some examples:
Kotlin
val numbers = listOf(1, 2, 3, 4, 5) // Immutable listval setOfColors = setOf("red", "green", "blue") // Immutable setval mapOfUsers = mapOf(1 to "Alice", 2 to "Bob", 3 to "Charlie") // Immutable map
However, it’s important to note that read-only collections are not necessarily immutable. A read-only collection interface can be one of many references to the same collection. Other references to the collection may have mutable interfaces, allowing modifications.
This means that if you have concurrent code or multiple references to the same collection, modifications from other codes can occur while you’re working with it. This can lead to issues such as ConcurrentModificationException errors. To handle such situations, you need to ensure proper synchronization of access to the data or use data structures that support concurrent access when working in a multi-threaded environment.
Consider the following code snippet:
Kotlin
val mutableList = mutableListOf(1, 2, 3)val readOnlyList: List<Int> = mutableList// Concurrent modification by another referencemutableList.add(4)// Accessing the read-only listreadOnlyList.forEach { println(it) }
In this example, we have a mutable list called mutableList and a read-only list called readOnlyList, which is a reference to the same underlying list. Initially, both lists contain elements [1, 2, 3].
However, the mutableList is mutable, so we can add an element (4) to it. After adding the element, the mutableList becomes [1, 2, 3, 4].
Now, let’s try to iterate over the elements in the readOnlyList using the forEach function. We might expect it to print [1, 2, 3], but what actually happens?
Since the readOnlyList is just a read-only view of the same underlying list, any modifications made to the mutableList will affect the readOnlyList as well. In this case, we added an element to the mutableList, causing the readOnlyList to contain [1, 2, 3, 4]. As a result, when we iterate over the elements in readOnlyList, it will print [1, 2, 3, 4] instead of [1, 2, 3].
This behavior can lead to unexpected results and even errors like ConcurrentModificationException. If you have concurrent code or multiple references to the same collection, modifications made by one reference can affect the others, potentially causing data inconsistencies or errors.
To handle such situations, you need to ensure proper synchronization of access to the data or use data structures that support concurrent access. For example, you can use synchronized blocks or locks to control access to the collection in a multi-threaded environment. Alternatively, you can use concurrent data structures provided by the Kotlin standard library, such as ConcurrentHashMap, which are designed to handle concurrent modifications safely.
It’s crucial to be aware of these considerations when working with read-only collections that are shared among multiple references or used in concurrent scenarios.
Kotlin collections and Java
In Kotlin, every collection type is an instance of the corresponding Java collection interface. This means that Kotlin collections seamlessly integrate with Java collections without requiring any conversion, wrappers, or data copying.
However, in Kotlin, each Java collection interface has two representations: a read-only version and a mutable version. The read-only interfaces mirror the structure of the Java collection interfaces but lack mutating methods, while the mutable interfaces extend their corresponding read-only interfaces and provide mutating methods.
For example, the Java class java.util.ArrayList is treated as if it inherited from the MutableList interface. This means that you can use an ArrayList instance in Kotlin as if it were a MutableList, and you can call the methods defined in the MutableList interface on an ArrayList object. Similarly, the Java class java.util.HashSetis treated as if it inherited from the MutableSet interface, allowing you to use a HashSet instance as a MutableSet.
Other Java collection implementations, such as LinkedList and SortedSet, have similar supertypes in Kotlin. This means that LinkedList is treated as if it inherited from a related interface, and SortedSet is also treated as if it inherited from a corresponding Kotlin interface. These interfaces provide a common set of methods that can be used across different implementations.
The purpose of treating Java classes as if they inherited from their corresponding Kotlin interfaces is to provide compatibility and allow seamless interoperability between Kotlin and Java collections. Kotlin provides both mutable and read-only interfaces, allowing for clear separation and appropriate usage of collections depending on whether you need to mutate them or not.
What about Map?
Similarly, the Map class (which doesn’t extend Collection or Iterable) in Java has two versions in Kotlin: Map (read-only) and MutableMap (mutable). These versions provide different sets of functions for working with maps.
When calling a Java method that expects a collection as a parameter, you can pass a Kotlin collection directly without any extra steps. Kotlin handles the interoperability between Kotlin collections and Java collections seamlessly.
However, there is an important caveat to consider. Since Java does not distinguish between read-only and mutable collections, Java code can modify a collection even if it’s declared as read-only on the Kotlin side. The Kotlin compiler cannot fully analyze the modifications made by Java code, so Kotlin cannot reject a call passing a read-only collection to Java code that modifies it.
As a result, when writing a Kotlin function that passes a collection to Java code, it’s your responsibility to use the correct type for the parameter based on whether the Java code will modify the collection or not.
Kotlin collection interfaces
Now we will delve deep into the collection interfaces and explore their implementations, enabling you to leverage the full power of Kotlin collections in your projects.
Below is a diagram of the Kotlin collection interfaces:
Collection
TheCollection<T> interface serves as the foundation of the collection hierarchy in Kotlin. It represents the common behavior of read-only collections and provides essential operations such as retrieving the size of the collection and checking if an item is present.
In addition, the Collection inherits from the Iterable<T> interface, which defines operations for iterating over elements in a collection. This allows you to use Collection as a parameter in functions that work with different collection types, providing a versatile way to handle collections in your code.
However, for more specific scenarios, it’s recommended to use the inheritors of Collection: List and Set. These inheritors offer additional functionality tailored to their respective purposes. Let’s see some examples:
Kotlin
// Using Collection as a parameterfunprintCollectionSize(collection: Collection<Int>) {println("Collection size: ${collection.size}")}val list: List<Int> = listOf(1, 2, 3, 4, 5)valset: Set<Int> = setOf(1, 2, 3, 4, 5)printCollectionSize(list) // Output: Collection size: 5printCollectionSize(set) // Output: Collection size: 5// Using List and Set directlyval listItems: List<String> = listOf("apple", "banana", "orange")val setItems: Set<String> = setOf("apple", "banana", "orange")println(listItems.size) // Output: 3println(setItems.contains("banana")) // Output: true
In the example above, we demonstrate the usage of Collection as a parameter in the printCollectionSize function, which can accept both List and Set. Additionally, we directly use the List and Set interfaces to access their specific methods, such as retrieving the size or checking for item membership.
List
The List<T> interface in Kotlin stores elements in a specific order and provides indexed access to them. The indices start from zero, representing the first element, and go up to lastIndex, which is equal to (list.size — 1).
A List allows duplicate elements (including nulls), meaning it can contain any number of equal objects or occurrences of a single object. When comparing lists for equality, they are considered equal if they have the same sizes and structurally equal elements at the same positions.
The MutableList<T> interface extends List and provides additional write operations specifically designed for lists. These operations allow you to add or remove an element at a specific position within the list.
While lists share similarities with arrays, there is one crucial difference: an array’s size is fixed upon initialization and cannot be changed, whereas a list does not have a predefined size. Instead, a list’s size can be modified through write operations like adding, updating, or removing elements.
In Kotlin, the default implementation of MutableList is ArrayList, which can be visualized as a resizable array that dynamically adjusts its size based on the number of elements it contains. This provides flexibility and allows you to manipulate the list as needed.
Let’s illustrate the concepts with a simple example:
Kotlin
// Creating a list and accessing elementsval fruits: List<String> = listOf("apple", "banana", "orange")println(fruits[1]) // Output: banana// Creating a mutable list and modifying elementsval mutableFruits: MutableList<String> = mutableListOf("apple", "banana", "orange")mutableFruits.add("grape")mutableFruits[1] = "kiwi"mutableFruits.removeAt(0)println(mutableFruits) // Output: [kiwi, orange, grape]
In the example above, we first create an immutable list of fruits. We can access individual elements using the indexing syntax (fruits[1]) and retrieve the element at the specified position.
Next, we create a mutable list of fruits using MutableList. This allows us to perform write operations on the list. We add a new element with add, update an element at index 1 using indexing assignment (mutableFruits[1] = "kiwi"), and remove an element at a specific position using removeAt. Finally, we print the modified list.
Set
The Set<T> interface in Kotlin stores unique elements, and their order is generally undefined. In a Set, duplicate elements are not allowed, except for a single occurrence of null. Comparing two sets for equality depends on their sizes and whether each element in one set has an equal element in the other set.
The MutableSet interface extends MutableCollection and provides write operations specific to sets. This allows you to add or remove elements from the set.
Let’s illustrate the concepts with an example:
Kotlin
// Creating a set and adding elementsval numbers: Set<Int> = setOf(1, 2, 3, 4, 5)println(numbers) // Output: [1, 2, 3, 4, 5]// Creating a mutable set and modifying elementsval mutableNumbers: MutableSet<Int> = mutableSetOf(1, 2, 3, 4, 5)mutableNumbers.add(6)mutableNumbers.remove(3)println(mutableNumbers) // Output: [1, 2, 4, 5, 6]
In the example above, we first create an immutable set of numbers. Since sets store unique elements, any duplicate values are automatically eliminated.
Next, we create a mutable set of numbers using MutableSet. This allows us to perform write operations on the set. We add a new element with add and remove an element with remove. Finally, we print the modified set.
Set<T> interface provides a way to store unique elements without a specific order. The default implementation for MutableSet<T> is LinkedHashSet, which preserves the order of element insertion. This means that the elements in a LinkedHashSet are ordered based on the order in which they were added, ensuring predictable results when using functions like first() or last().
In the above example, we create a MutableSet using linkedSetOf, which creates a LinkedHashSet. The order of the elements in the set is preserved based on their insertion order. When we call first(), it returns the first element, which is “apple”. Similarly, last() returns the last element, which is “kiwi”. Since LinkedHashSet maintains the insertion order, these functions give predictable results.
On the other hand, the HashSet implementation does not guarantee any specific order of elements. Therefore, calling functions like first() or last() on a HashSet can yield unpredictable results. However, HashSet requires less memory compared to LinkedHashSet, making it more memory-efficient for storing the same number of elements.
In the above example, we create a MutableSet using hashSetOf, which creates a HashSet. The order of the elements in the set is not guaranteed. Therefore, calling first() or last() on a HashSet can give unpredictable results. The output can vary each time you run the code.
Map
The Map<K, V> interface in Kotlin is a collection type that stores key-value pairs, also known as entries. Unlike other collection interfaces, Map does not inherit from the Collection interface. However, it provides specific functions for accessing values by their corresponding keys, searching for keys and values, and more.
In a Map, keys are unique, meaning that each key can be associated with only one value. However, different keys can be paired with equal values. Comparing two maps for equality depends on the key-value pairs they contain, regardless of the order in which the pairs are stored.
Kotlin
funmain() {val numbersMap = mapOf("key1" to 1, "key2" to 2, "key3" to 3, "key4" to 1) val anotherMap = mapOf("key2" to 2, "key1" to 1, "key4" to 1, "key3" to 3)println("The maps are equal: ${numbersMap == anotherMap}")}
The MutableMap interface extends Map and provides additional write operations specific to maps. These operations allow you to add new key-value pairs or update the value associated with a given key.
The default implementation of MutableMap is LinkedHashMap, which preserves the order of element insertion when iterating over the map. This means that when you iterate over a LinkedHashMap, the elements will be returned in the same order in which they were added. On the other hand, HashMap does not guarantee any specific order of elements and is more focused on performance and memory efficiency.
Let’s see an example to understand the concepts:
Kotlin
// Creating a map and accessing values by keyval ages: Map<String, Int> = mapOf("John" to 25, "Jane" to 30, "Alice" to 35)println(ages["John"]) // Output: 25// Creating a mutable map and modifying valuesval mutableAges: MutableMap<String, Int> = mutableMapOf("John" to 25, "Jane" to 30, "Alice" to 35)mutableAges["John"] = 26mutableAges["Bob"] = 40mutableAges.remove("Jane")println(mutableAges) // Output: {John=26, Alice=35, Bob=40}
In the above example, we first create an immutable map of ages, where each person’s name is paired with their age. We can access the values by providing the corresponding key (ages["John"]).
Next, we create a mutable map of ages using MutableMap. This allows us to perform write operations on the map. We update the value associated with the key “John” using indexing assignment (mutableAges["John"] = 26), add a new key-value pair with mutableAges["Bob"] = 40, and remove a key-value pair using remove. Finally, we print the modified map.
Commonly Used Collection Implementations
Kotlin provides several commonly used collection implementations that offer different characteristics and performance trade-offs. Let’s explore some of these implementations:
ArrayList
ArrayList is an implementation of the MutableList interface and provides dynamic arrays that can grow or shrink in size. It offers fast element retrieval by index and efficient random access operations.
Kotlin
val arrayList: ArrayList<String> = ArrayList()arrayList.add("Apple")arrayList.add("Banana")arrayList.add("Orange")println(arrayList) // Output: [Apple, Banana, Orange]
LinkedList
LinkedList is an implementation of the MutableList interface that represents a doubly-linked list. It allows efficient element insertion and removal at both ends of the list but has slower random access compared to ArrayList.
Kotlin
val linkedList: LinkedList<String> = LinkedList()linkedList.add("Apple")linkedList.add("Banana")linkedList.add("Orange")println(linkedList) // Output: [Apple, Banana, Orange]
HashSet
HashSet is an implementation of the MutableSet interface that stores elements in an unordered manner. It ensures the uniqueness of elements by using hash codes and provides fast membership checking.
Kotlin
val hashSet: HashSet<String> = HashSet()hashSet.add("Apple")hashSet.add("Banana")hashSet.add("Orange")println(hashSet) // Output: [Apple, Banana, Orange]
TreeSet
TreeSet is an implementation of the MutableSet interface that stores elements in sorted order based on their natural order or a custom comparator. It provides efficient operations for retrieving elements in a sorted manner.
Kotlin
val treeSet: TreeSet<String> = TreeSet()treeSet.add("Apple")treeSet.add("Banana")treeSet.add("Orange")println(treeSet) // Output: [Apple, Banana, Orange]
HashMap
HashMap is an implementation of the MutableMap interface that stores key-value pairs. It provides fast lookup and insertion operations based on the hash codes of keys.
TreeMap is an implementation of the MutableMap interface that stores key-value pairs in a sorted order based on the natural order of keys or a custom comparator. It provides efficient operations for retrieving entries in a sorted manner.
These are some of the commonly used collection implementations in Kotlin. Each implementation has its own characteristics and usage scenarios, so choose the one that best fits your requirements in terms of performance, order, uniqueness, or sorting.
Iterable
When working with collections in Kotlin, traversing through the elements is a common requirement. The Kotlin standard library provides mechanisms such as iterators and for loops to facilitate this traversal.
Iterators
Iterators are objects that allow sequential access to the elements of a collection without exposing the underlying structure of the collection. You can obtain an iterator for inheritors of the Iterable<T> interface, including Set and List, by calling the iterator() function on the collection.
Here’s an example of using an iterator to traverse a collection:
Kotlin
val numbers = listOf(1, 2, 3, 4, 5)val iterator = numbers.iterator()while (iterator.hasNext()) {val element = iterator.next()println(element)}
In the above example, we create a List of numbers and obtain an iterator by calling iterator() on the list. We then use a while loop to iterate through the elements. The hasNext() function checks if there is another element, and next() retrieves the current element and moves the iterator to the next position. We can perform operations on each element, such as printing its value.
Alternatively, Kotlin provides a more concise way to iterate through a collection using the for loop:
Kotlin
val numbers = listOf(1, 2, 3, 4, 5)for (element in numbers) {println(element)}
In this case, the for loop implicitly obtains the iterator and iterates over the elements of the collection.
Additionally, the standard library provides the forEach() function, which simplifies iterating over a collection and executing code for each element:
Kotlin
val numbers = listOf(1, 2, 3, 4, 5)numbers.forEach { element ->println(element)}
The forEach() function takes a lambda expression as an argument, and the code within the lambda is executed for each element in the collection.
ListIterator
For lists, there is a special iterator implementation called ListIterator. It supports iterating through lists in both forward and backward directions. The ListIterator provides functions such as hasPrevious(), previous(), nextIndex(), and previousIndex() to facilitate backward iteration and retrieve information about element indices.
Kotlin
val colors = listOf("red", "green", "blue")val listIterator = colors.listIterator()while (listIterator.hasNext()) {val element = listIterator.next()println(element)}while (listIterator.hasPrevious()) {val element = listIterator.previous()println(element)}
In the above code, we create a list of colors and obtain a ListIterator by calling listIterator() on the list. We then use a while loop to iterate through the list in the forward direction using next().
After reaching the end of the list, we use another while loop to iterate in the backward direction using previous(). This allows us to traverse the list from the last element back to the first element.
MutableIterator
For mutable collections, there is MutableIterator, which extends Iterator and provides the remove() function. This allows you to remove elements from a collection while iterating over it. In addition, MutableListIterator allows the insertion and replacement of elements while iterating through a list.
In the above code, we create a mutable list of numbers and obtain a MutableIterator by calling iterator() on the list. We iterate through the list using a while loop and remove the even numbers using remove() when encountered.
After iterating, we print the modified list, which now contains only the odd numbers.
By using ListIterator, you can traverse lists in both forward and backward directions, while MutableIterator allows you to remove elements from mutable collections during iteration. These iterators provide flexibility and control when working with lists and mutable collections in Kotlin.
Collection Creation Function In Kotlin
To create a collection in Kotlin, you can use the various collection classes provided by the Kotlin standard library, such as List, MutableList, Set, MutableSet, Map, and MutableMap. These classes have constructors and factory functions to create collections with initial elements.
Here’s an example of how we can create different types of collections in Kotlin:
Kotlin
val list = listOf("apple", "banana", "orange") // Creating a Listval mutableList = mutableListOf("apple", "banana", "orange") // Creating a MutableListvalset = setOf("apple", "banana", "orange") // Creating a Setval mutableSet = mutableSetOf("apple", "banana", "orange") // Creating a MutableSetval map = mapOf(1 to "apple", 2 to "banana", 3 to "orange") // Creating a Mapval mutableMap = mutableMapOf(1 to "apple", 2 to "banana", 3 to "orange") // Creating a MutableMap
You can replace the initial elements with your own data or leave the collections empty if you want to populate them later.
Note: The examples above use immutable (val) collections, which means you cannot modify their contents once created. If you need to modify the collection, you can use their mutable counterparts (MutableList, MutableSet, MutableMap) and add or remove elements as needed.
Empty collections
In Kotlin, there are convenient functions for creating empty collections: emptyList(), emptySet(), and emptyMap(). These functions allow you to create collections without any elements.
When using these functions, it’s important to specify the type of elements that the collection will hold. This helps the compiler infer the appropriate type for the collection and enables type safety during compile-time checks.
Here’s an example of using the emptyList() function:
Kotlin
val emptyStringList: List<String> = emptyList()
In the above example, we create an empty List of Strings using emptyList(). By specifying the type parameter <String>, we ensure that the list can only hold String elements. This helps avoid type errors and provides type safety when working with the list.
Similarly, we can create an empty Set or an empty Map:
Kotlin
val emptyIntSet: Set<Int> = emptySet()<br>val emptyStringToIntMap: Map<String, Int> = emptyMap()
In these examples, we create an empty Set of Integers using emptySet() and an empty Map from Strings to Integers using emptyMap(). By explicitly specifying the types <Int> and <String, Int>, respectively, we ensure that the sets and maps are appropriately typed and can only hold elements of the specified types.
Using these functions to create empty collections is especially useful in scenarios where you need to initialize a collection variable but don’t have any initial elements to add. It allows you to start with an empty collection of the desired type and later add or populate it as needed.
Kotlin Collection Operations
Kotlin collections provide a rich set of operations to manipulate, transform, and filter data efficiently. Let’s explore some commonly used operations:
Mapping: Transform each element in a collection using a mapping function.
Kotlin
val numbers = listOf(1, 2, 3, 4, 5)val squaredNumbers = numbers.map { it * it }
Filtering: Select elements from a collection based on a given condition.
Kotlin
val numbers = listOf(1, 2, 3, 4, 5)val evenNumbers = numbers.filter { it % 2 == 0 }
Reducing:Perform a reduction operation on a collection to obtain a single result.
Kotlin
val numbers = listOf(1, 2, 3, 4, 5)val sum = numbers.reduce { acc, value-> acc + value }
Grouping:Group elements of a collection based on a given key.
Kotlin
val words = listOf("apple", "banana", "avocado", "blueberry")val groupedWords = words.groupBy { it.first() }
Collection Operations with Predicates
Kotlin collections provide powerful operations that utilize predicates, enabling advanced data manipulation. Let’s explore some of these operations:
Checking if all elements satisfy a condition
Kotlin
val numbers = listOf(1, 2, 3, 4, 5)val allPositive = numbers.all { it > 0 }
Checking if any element satisfies a condition
Kotlin
val numbers = listOf(1, 2, 3, 4, 5)val hasNegative = numbers.any { it < 0 }
Finding the first element that satisfies a condition
Kotlin
val numbers = listOf(1, 2, 3, 4, 5)val firstEven = numbers.firstOrNull { it % 2 == 0 }
Counting the number of elements that satisfy a condition
Kotlin
val numbers = listOf(1, 2, 3, 4, 5)val countEven = numbers.count { it % 2 == 0 }
Extension Functions on Collections
One of the highlights of Kotlin collections is the ability to use extension functions, which allow you to add new functionality to existing collection classes. These functions enhance the readability and conciseness of your code. Let’s take a look at some examples:
fun <T> List<List<T>>.flatten(): List<T> {returnthis.flatMap { it }}val listOfLists = listOf(listOf(1, 2), listOf(3, 4), listOf(5, 6))val flattenedList = listOfLists.flatten()
In the above code, we define an extension function called flatten for the List<List<T>> type. The function uses flatMap to concatenate all the inner lists into a single list, resulting in a flattened structure.
Commonly Used Extension Functions
sortBy():Sorts the collection in ascending order based on a specified key selector.
groupBy():Groups the elements of a collection by a specified key selector and returns a map where the keys are the selected values and the values are lists of corresponding elements.
By combining Kotlin collections with extension functions, you can perform a wide range of operations efficiently and with expressive code. These features make Kotlin a powerful language for working with data and collections.
Null Safety in Collections
Null safety is a crucial aspect of Kotlin that helps prevent null pointer exceptions and ensures more reliable code. Kotlin’s type system includes built-in null safety features for collections, which offer better control and safety when dealing with nullable elements.
In Kotlin collections, you can specify whether the collection itself or its elements can be nullable. Let’s explore how null safety works in collections:
Nullable Collections
By default, Kotlin collections are non-nullable, meaning they cannot hold null values. For example, List<Int> represents a list that can only contain non-null integers. If you try to add a null value to a non-nullable collection, it will result in a compilation error.
Kotlin
val list: List<Int> = listOf(1, 2, null) // Error: Null cannot be a value of a non-null type Int
To allow null values in a collection, you can specify a nullable type. For example, List<Int?> represents a list that can contain both non-null and nullable integers.
Kotlin
val list: List<Int?> = listOf(1, 2, null) // Okay
Safe Access to Elements
When working with collections that may contain null values, it’s essential to use safe access operators to prevent null pointer exceptions. Kotlin provides the safe access operator (?.) and the safe call operator (?.let) for this purpose.
Kotlin
val list: List<String?> = listOf("Alice", null, "Bob")val firstElement: String? = list.firstOrNull()val length: Int? = list.firstOrNull()?.length// Safe access using the safe call operatorval uppercaseNames: List<String>? = list.map { it?.toUpperCase() }
In the above code, firstOrNull() is used to safely retrieve the first element of the list, which may be null. The safe access operator (?.) is used to access the length property of the first element, ensuring that a null value won’t result in a null pointer exception.
The safe call operator is also useful when performing transformations or operations on elements within the collection. In the example, the map function is called on the list, and the safe call operator is used to convert each element to uppercase. The result is a nullable list (List<String>?), which accounts for the possibility of null elements.
Filtering Nullable Elements
When working with collections that may contain null values, you may need to filter out the null elements. Kotlin provides the filterNotNull() function for this purpose.
In the above code, filterNotNull() is used to create a new list that excludes the null elements. The resulting filteredList is of type List<String>, guaranteeing non-null values.
Null safety in collections is an essential aspect of Kotlin that helps eliminate null pointer exceptions and provides more reliable code. By leveraging nullable types and safe access operators, you can handle nullable elements in collections and ensure safer and more robust code.
Collection Conversion
Converting between different collection types and arrays is a common requirement when working with data in Kotlin. Kotlin provides convenient functions for converting collections to different types and converting collections to arrays. Let’s explore these conversion mechanisms:
Converting Between Collection Types
Kotlin provides extension functions to convert between different collection types. Here are some commonly used conversion functions:
These conversion functions allow you to transform a collection into a different type based on your requirements. It’s important to note that the resulting collection is a new instance with the transformed elements.
Converting to Arrays
Kotlin also provides functions to convert collections to arrays. Here are the commonly used conversion functions:
toTypedArray(): Converts a collection to an array of the specified type.
These conversion functions allow you to obtain arrays from collections, which can be useful when interacting with APIs that require array inputs or when specific array types are needed.
It’s important to note that arrays are fixed in size and cannot be dynamically resized like mutable collections. Therefore, the resulting arrays will have the same number of elements as the original collections.
By using these conversion functions, you can easily convert collections to different types or arrays based on your specific requirements in Kotlin.
Kotlin Standard Library Functions for Collections
The Kotlin Standard Library provides several useful functions that can be applied to collections to simplify and enhance their usage. Let’s explore two categories of these functions:
let, apply, also, and run
These functions allow you to perform operations on collections and access their elements in a concise and expressive manner.
let:Executes a block of code on a collection and returns the result.
Kotlin
val list: List<Int> = listOf(1, 2, 3)val result: List<String> = list.let { collection ->// Perform operations on the collection collection.map { it.toString() }}println(result) // Output: [1, 2, 3]
apply:Applies a block of code to a collection and returns the collection itself.
Kotlin
val list: MutableList<Int> = mutableListOf(1, 2, 3)list.apply {// Perform operations on the collectionadd(4)removeAt(0)}println(list) // Output: [2, 3, 4]
also:Performs additional operations on a collection and returns the collection itself.
Kotlin
val list: List<Int> = listOf(1, 2, 3)val result: List<Int> = list.also { collection ->// Perform additional operations on the collectionprintln("Size of the collection: ${collection.size}")}println(result) // Output: [1, 2, 3]
run:Executes a block of code on a collection and returns the result.
Kotlin
val list: List<Int> = listOf(1, 2, 3)val result: List<String> = run {// Perform operations on the collection list.map { it.toString() }}println(result) // Output: [1, 2, 3]
These functions provide different ways to interact with collections, allowing you to perform operations, transform elements, or execute code on the collections themselves.
withIndex and zip
These functions enable you to work with the indices and combine multiple collections
withIndex:Provides access to the index and element of each item in a collection.
Kotlin
val list: List<String> = listOf("Apple", "Banana", "Orange")for ((index, element) in list.withIndex()) {println("[$index] $element")}// Output:// [0] Apple// [1] Banana// [2] Orange
zip:Combines elements from two collections into pairs.
These functions provide convenient ways to work with indices and combine collections, making it easier to iterate through collections or create pairs of elements from different collections.
By utilizing these standard library functions, you can simplify your code, make it more expressive, and enhance the functionality of collections in Kotlin.
Collection Performance Considerations
When working with collections, it’s important to consider their performance characteristics to ensure efficient usage. Here are some considerations and best practices to keep in mind:
Choosing the Right Collection Type
Selecting the appropriate collection type for your specific use case can significantly impact performance. Consider the following factors:
List vs. Set:Use a List when the order and duplicate elements are important. Choose a Set when uniqueness and fast membership checks are required.
ArrayList vs. LinkedList: Use an ArrayList when you need efficient random access and iteration. Opt for a LinkedList when frequent insertion and removal at both ends of the list are required.
HashSet vs. TreeSet: Choose a HashSet when order doesn’t matter, and uniqueness and fast membership checks are important. Use a TreeSet when elements need to be stored in sorted order.
HashMap vs. TreeMap: Use a HashMap for fast key-value lookups and insertions without requiring sorted order. Choose a TreeMap when entries need to be stored in sorted order based on keys.
Consider the specific requirements and performance trade-offs of each collection type to make an informed decision.
Performance Tips and Best Practices
To optimize collection performance, consider the following tips:
Minimize unnecessary operations:Avoid unnecessary operations like copying collections or converting them back and forth. Optimize your code to perform only the required operations.
Use proper initial capacity: When creating collections, provide an appropriate initial capacity to avoid frequent resizing, especially for ArrayLists and HashMaps. Estimate the number of elements to be stored to improve performance.
Prefer specific collection interfaces:Use more specific collection interfaces like List, Set, or Map instead of the general Collection interface to leverage their specialized operations and improve code readability.
Be cautious with nested iterations:Avoid nested iterations over large collections as they can lead to performance issues. Consider alternative approaches like using index-based iterations or transforming data into more efficient data structures if possible.
Utilize lazy operations:Take advantage of lazy operations like filter, map, and takeWhile to avoid unnecessary computations on large collections until they are actually needed.
Use appropriate data structures: Choose the right data structure for your specific requirements. For example, if you frequently need to check for containment, consider using a HashSet instead of a List.
Measure and profile performance:If performance is critical, measure and profile your code to identify bottlenecks and areas for optimization. Utilize tools like profilers to identify performance hotspots.
By considering these performance considerations and following best practices, you can ensure efficient usage of collections in your Kotlin code. Optimize your code based on specific requirements and evaluate performance trade-offs to achieve better performance.
Conclusion
Kotlin collections provide a powerful and intuitive way to handle data manipulation in your Kotlin applications. By understanding the different collection types, operations, extension functions, and performance considerations, you can write efficient and expressive code. In this article, we covered the various aspects of Kotlin collections, providing detailed explanations and examples for each topic. With this knowledge, you’re equipped to harness the full potential of Kotlin collections and optimize your data manipulation workflows. Start exploring Kotlin collections and elevate your Kotlin programming skills to new heights.
Null pointer exceptions (NullPointerExceptions) are a common source of errors in programming languages, causing applications to crash unexpectedly. Kotlin, a modern programming language developed by JetBrains, addresses this issue by incorporating null safety as a core feature of its type system. By distinguishing between nullable and non-nullable types, Kotlin enables developers to catch potential null pointer exceptions at compile time, resulting in more robust and reliable code. In this article, we will take an eagle-eye view of Kotlin’s nullability system, along with the tools and techniques provided to handle them effectively. We will also delve into the nuances of working with nullable types when mixing Kotlin and Java code.
Understanding Nullabiliy
Nullability in Kotlin is a crucial feature that prevents NullPointerException errors. These errors often provide vague error messages like “An error has occurred: java.lang.NullPointerException” or “Unfortunately, the application X has stopped,” causing inconvenience for both users and developers.
Modern languages, including Kotlin, aim to transform these runtime errors into compile-time errors. By incorporating nullability into the type system, Kotlin’s compiler candetect potential errors during compilation, significantly reducing the occurrence of runtime exceptions.
In the following sections, we will explore nullable types in Kotlin. We’ll examine how Kotlin identifies values that can be null and delve into the tools provided by Kotlin to handle nullable values. Additionally, we will discuss the specifics of working with nullable types when mixing Kotlin and Java code.
Nullable types
A type in programming determines the possible values and operations that can be performed on those values. For example, in Java, the double type represents a 64-bit floating-point number, allowing standard mathematical operations. On the other hand, the String type in Java can hold instances of the String class or null, with different operations available for each.
However, Java’s type system falls short when it comes to nullability. Variables declared with a specific type, such as String, can still hold null values, leading to potential NullPointerException errors. While annotations like @Nullable and @NotNull can help detect and mitigate these errors, they are not consistently applied, and their use doesn’t entirely solve the problem.
To address this issue, Kotlin provides nullable types and introduces thesafe-call operator (We will discuss those in much greater detail later on), ?. The safe-call operator allows combining null checks and method calls into a single operation. For example, the expression s?.toUpperCase() is equivalent to if (s != null) s.toUpperCase() else null. The result type of such an invocation is nullable, denoted by appending a question mark to the type (e.g., String?).
So, Nullable types in Kotlin are used to indicate variables or properties that are allowed to have null values. When a variable is nullable, calling a method on it can be unsafe, as it may result in a NullPointerException.
In Kotlin, you can indicate that variables of a certain type can store null references by adding a question mark after the type declaration. For example, String?, Int?, and MyCustomType? are all nullable types.
Here above Figure show, a variable of a nullable type can store a null reference.
By default, regular types in Kotlin are non-null, which means they cannot store null references unless explicitly marked as nullable. However, when dealing with nullable types, the set of operations that can be performed on them becomes restricted. Let’s explore a few examples to understand the problems that can arise and their solutions.
Assigning null to a non-null variable:
Kotlin
val x: String? = nullvar y: String = x // Error: Type mismatch - inferred type is String? but String was expected
In the above example, we try to assign a nullable type (x) to a variable of a non-null type (y), resulting in a type mismatch error during compilation.
Passing nullable type as a non-null parameter:
Kotlin
funstrLen(str: String) {// Function logic}val x: String? = nullstrLen(x) // Error: Type mismatch - inferred type is String? but String was expected
In the above example, we attempt to pass a nullable type (x) as an argument to a function (strLen()) that expects a non-null parameter. This results in a type mismatch error during compilation.
To handle nullable types, you can perform null checks to compare them with null. The Kotlin compiler remembers these null checks and treats the value as non-null within the scope of the check.
Performing a null check:
Kotlin
val x: String? = nullif (x != null) {// Code block within the null check// Compiler treats 'x' as non-null here}
In the above example, by adding a null check, the compiler recognizes that the value of x is handled for nullability within the code block. The compiler will treat x as non-null within that scope, allowing further operations without type mismatch errors.
By distinguishing nullable and non-null types, Kotlin’s type system offers clearer insights into allowed operations and potential exceptions at runtime. Notably, nullable types in Kotlin do not introduce runtime overhead as all checks are performed during compilation.
By utilizing null checks, you can effectively work with nullable types and ensure your code compiles correctly.
Null Safety Tools in Kotlin
Now let’s see how to work with nullable types in Kotlin and why dealing with them is by no means annoying. We’ll start with the special operator for safely accessing a nullable value.
Safe call operator: “?.”
The safe-call operator, ?., is a powerful tool in Kotlin that combines null checks and method calls into a single operation. It allows you to call methods on non-null values while gracefully handling null values.
For example, consider the expression s?.toUpperCase(). This is equivalent to the more verbose code if (s != null) s.toUpperCase() else null. The safe-call operator ensures that if the value s is not null, the toUpperCase() method will be executed normally. However, if s is null, the method call is skipped, and the result will be null.
Here’s an example usage of the safe-call operator:
In the printAllCaps() function, the s?.toUpperCase() expression safely calls the toUpperCase() method on s if it\’s not null. The result, allCaps, will be of type String?, indicating that it can hold either a non-null uppercase string or a null value.
The safe-call operator is not limited to method calls; it can also be used for accessing properties. Additionally, you can chain multiple safe-call operators together for more complex scenarios. Let’s see the below example.
Kotlin
classAddress(val streetAddress: String, val zipCode: Int, val city: String, val country: String)classCompany(val name: String, val address: Address?)classPerson(val name: String, val company: Company?)funPerson.countryName(): String {val country = this.company?.address?.countryreturnif (country != null) country else"Unknown"}
We have three classes: Address, Company, and Person. The Address class represents a physical address with properties such as streetAddress, zipCode, city, and country. The Company class represents a company with properties name and address, where address is an instance of the Address class. The Person class represents a person with properties name and company, where company is an instance of the Company class.
The Person class also has an extension function called countryName(), which returns the country name associated with the person’s company. The function uses the safe-call operator ?. to access the country property of the address property of the company. If any of these properties are null, the result will be null.
Kotlin
val person = Person("amol", null)println(person.countryName())
Here, we created an instance of the Person class named person with the name of “amol” and a null company. When we call the countryName() function on person, it tries to access the company property, which is null. Consequently, the address and country properties will also be null.
Therefore, the output of println(person.countryName()) will be “Unknown” because the safe-call operator ensures that if any part of the chain (company, address, or country) is null, the overall result will be null. In this case, since the company is null, the country is considered unknown.
The countryName() function demonstrates how to safely navigate through a chain of nullable properties using the safe-call operator, providing a default value (“Unknown” in this case) when any of the properties in the chain are null. This approach helps avoid null pointer exceptions and handle null values gracefully.
Elvis operator: “?:”
In Kotlin, you can eliminate unnecessary repetition when dealing with null checks using the Elvis operator ?:. This operator provides a default value instead of null.
Here’s how it works:
Kotlin
funfoo(s: String?) {val t: String = s ?: ""}
In the above example, If “s” is null, the result is an empty string.
The Elvis operator takes two values, and its result is the first value if it isn’t null, or the second value if the first one is null.
When used in conjunction with the safe-call operator (?.), the Elvis operator (?:) in Kotlin serves the purpose of providing an alternative value instead of null when the object on which a method is called is null.
Kotlin
val name: String? = nullval length = name?.length ?: 0
In the above code, the variable name is nullable, and we want to obtain its length. However, if name is null, calling length directly would result in a NullPointerException. To handle this situation, we use the safe-call operator (?.) to safely access the length property of name.
Additionally, we employ the Elvis operator (?:) to provide a fallback value of 0 in case name is null. So, if name is not null, its length will be assigned to the variable length. Otherwise, length will be assigned the value 0.
This way, we avoid potential NullPointerException errors and ensure that length always has a valid value, even if name is null.
Let’s see one more example, the countryName() function from the previous code listing can be simplified to a single line using the Elvis operator:
In this case, if any part of the chain (company, address, or country) is null, the default value “Unknown” will be used.
The Elvis operator is particularly handy in Kotlin because operations like return and throw can be used on its right side. If the value on the left side is null, the function will immediately return a value or throw an exception, allowing for convenient precondition checks.
Here’s an example of using the Elvis operator in the printShippingLabel() function:
In this function, if there’s no address, it throws an IllegalArgumentException with a meaningful error message instead of a NullPointerException. If an address is present, it prints the street address, ZIP code, city, and country.
Using the with function helps avoid repeating address four times in a row.
Example usage:
Kotlin
val address = Address("NDA Road", 411023, "Pune", "India")val softAai = Company("softAai", address)val person = Person("amol", softAai)printShippingLabel(person)// Output:// NDA ROAD// 411023 Pune, IndiaprintShippingLabel(Person("xyz", null))// Output:// java.lang.IllegalArgumentException: No address
Overall, the Elvis operator in Kotlin allows you to provide default values instead of null, simplifying null checks and eliminating unnecessary repetition. It can be combined with the safe-call operator and used in conjunction with return and throw to handle null values and perform meaningful error reporting.
Safe casts: “as?”
In Kotlin, the safe-cast operator (as?) serves as a safe version of the instanceof check in Java. It allows you to safely check and cast an object to a specific type without throwing a ClassCastException if the object does not have the expected type.
The regular Kotlin operator for type casts is the as operator, which throws a ClassCastException if the value doesn\’t have the specified type.
On the other hand, the as? operator attempts to cast a value to the specified type and returns null if the value doesn’t have the proper type.
The safe-cast operator is commonly used in conjunction with safe calls (?.) and Elvis operators (?:). This combination helps handle situations where you want to perform type checks on nullable objects and provide a default value or behavior when the object is not of the expected type.
A most common pattern is to combine the safe cast (as?) with the Elvis operator, which is useful for implementing the equals method.
Here’s an example implementation of the equals method using the safe cast and Elvis operator:
Kotlin
classPerson(val firstName: String, val lastName: String) {overridefunequals(other: Any?): Boolean {val otherPerson = other as? Person ?: returnfalsereturn otherPerson.firstName == firstName && otherPerson.lastName == lastName }overridefunhashCode(): Int = firstName.hashCode() * 37 + lastName.hashCode()}
In this example, the equals method checks if the parameter other has the proper type (Person) using the safe cast operator (as?). If the type isn’t correct, it immediately returns false using the Elvis operator (?:).
With this pattern, you can easily check the type of the parameter, perform the cast, and return false if the type is incorrect, all in the same expression.
Kotlin provides a safe-cast operator (as?) that allows you to perform type checks and casts without throwing ClassCastException. It can be combined with the Elvis operator to handle cases where the type is not correct, providing a concise and safe way to perform type checks in Kotlin.
Not-null assertions: “!!”
In Kotlin, you have several tools to handle null values, such as the safe-call operator (?.), safe-cast operator (as?), and Elvis operator (?:). However, there are situations where you want to explicitly tell the compiler that a value is not null. Kotlin provides the not-null assertion (!!) for such cases.
The not-null assertion is represented by a double exclamation mark (!!)and converts a nullable value to a non-null type. It informs the compiler that you are certain the value is not null. However, if the value is indeed null, a NullPointerException is thrown at runtime.
Here’s an example illustrating the usage of the not-null assertion:
In this example, the ignoreNulls function takes a nullable String argument and uses the not-null assertion to convert it to a non-null type. If the argument s is null, a NullPointerException is thrown when executing s!!.
The not-null assertion operator (!!) in Kotlin is a way to forcefully assert that a value is not null, regardless of its type. It instructs the compiler to treat the value as non-null, even if it is nullable. However, it’s important to use this operator with caution and understand its implications.
When you use the not-null assertion operator, you are essentially telling the compiler that you are confident the value will never be null. You are taking full responsibility for ensuring that the value is indeed not null at runtime. If you use the operator on a null value, a NullPointerException will be thrown at runtime.
Here’s an example to illustrate the usage:
Kotlin
val name: String? = "amol"val length: Int = name!!.length
In the above code, the variable name is declared as nullable (String?), but we use the not-null assertion operator (!!) to assert that name will not be null. We assign the length of name to the non-null variable length.
However, if name is actually null when the length line is executed, a NullPointerException will occur. The compiler won\’t be able to detect this error beforehand, and it will be your responsibility as the developer to handle it correctly.
It’s important to use the not-null assertion operator only when you have complete confidence that the value will not be null. It should be used sparingly and only when you have thoroughly verified that the value cannot be null in the specific context. Otherwise, relying on the not-null assertion operator can lead to unexpected runtime exceptions and potentially introduce bugs into your code.
One more important point to consider when using the not-null assertion operator (!!) in Kotlin is that using it multiple times on the same line can make it challenging to identify which value was null if an exception occurs.
Here’s an example that demonstrates this:
Kotlin
person.company!!.address!!.country //Don’t write code like this!
If you get an exception in the above line, you won’t be able to tell whether it was a company or address that held a null value. To make it clear exactly which value was null, it’s best to avoid using multiple !! assertions on the same line.
It’s generally recommended to avoid multiple not-null assertions on the same line to ensure code clarity and make it easier to identify the source of potential null values.
While the not-null assertion can be useful in certain scenarios where you’re confident about the value’s non-nullability, it’s advisable to consider alternative approaches that provide compile-time safety whenever possible. Kotlin provides other features like safe calls (?.) and the Elvis operator (?:) to handle nullability more gracefully and avoid runtime exceptions.
Let’s consider an example to demonstrate the usage of safe calls (?.) and the Elvis operator (?:) as alternative approaches to handle nullability:
In this example, we have a function processPerson that takes a nullable Person object as a parameter. Instead of using a not-null assertion, we use safe calls (?.) to safely access the name property of the Person object. The safe call operator checks if the person object is null and returns null if it is. Therefore, personName will be of type String?.
To ensure that we have a non-null value to work with, we use the Elvis operator (?:). It provides a default value (“Unknown” in this case) if the expression on the left side (in our case, personName) is null. So, if personName is null, the default value “Unknown” is assigned to processedName.
By using safe calls and the Elvis operator, we handle nullability more gracefully. Instead of throwing an exception, we provide a fallback value to avoid potential runtime exceptions and ensure the code continues to execute without interruptions.
The “let” function
The let function in Kotlin is a standard library function that allows you to safely handle nullable values when passing them as arguments to functions that expect non-null values. It helps in converting an object of a nullable type into a non-null type within a lambda expression.
When using the let function, the lambda will only be executed if the value is non-null. The nullable value becomes the parameter of the lambda, and you can safely use it as a non-null argument.
Here’s an example to illustrate the usage of the let function:
Kotlin
funsendResumeEmailTo(email: String) {println("Sending resume email to $email")}/** * Here Invalid email ID used for illustrative purposes, * Resume Sender App is a reliable solution * for sending resumes to HR emails worldwide. */var email: String? = "[email protected]"// Invalid email ID email?.let { sendResumeEmailTo(it) } // Sending resume email to [email protected]email = nullemail?.let { sendResumeEmailTo(it) } // No Resume email sent, as email id is null
In the above example, the sendResumeEmailTo function expects a non-null String argument. By using email?.let { sendResumeEmailTo(it) }, we ensure that the sendResumeEmailTo function is only called if the email is not null. This helps avoid runtime exceptions.
The let function is particularly useful when you need to use the value of a longer expression if it’s not null. You can directly access the value within the lambda without creating a separate variable.
Here code in the lambda will never be executed as the function returns null.
Furthermore, the let function can be used in chains when checking multiple values for null. However, in such cases, the code can become verbose and harder to follow. In those situations, it’s generally better to use a regular if expression to check all the values together.
Kotlin
val value1: String? = getValue1()val value2: String? = getValue2()if (value1 != null && value2 != null) {// Perform operations using 'value1' and 'value2'println("Values: $value1, $value2")} else {// Handle the case when either value is nullprintln("One or both values are null")}
In this code snippet, we check both value1 and value2 for null using an if expression. If both values are not null, we can proceed with the desired operations. Otherwise, we handle the case when either value is null.
Note that the let function is beneficial in cases where properties are effectively non-null but cannot be initialized with a non-null value in the constructor.
I understand that it may seem complicated, but let’s change our focus and first understand the concept of late-initialized properties. Afterward, we can revisit the topic and explore it further.
Late-initialized properties
In Kotlin, non-null properties must be initialized in the constructor. If you have a non-null property but cannot provide an initializer value in the constructor, you have two options: use a nullable type or use the lateinit modifier. If you choose to use a nullable type, you’ll need to perform null checks or use the !! operator whenever accessing the property. On the other hand, the lateinit modifier allows you to leave a non-null property without an initializer in the constructor and initialize it later.
Here’s an example to illustrate the use of lateinit properties:
Kotlin
classPerson {lateinitvar name: StringfuninitializeName() { name = getNameFromExternalSource() }funprintName() {if (::name.isInitialized) {println("Name: $name") } else {println("Name is not initialized yet") } }}
In this example, the name property is declared with the lateinit modifier. It is initially uninitialized, and its value will be set later by the initializeName method. The printName method checks if the name property has been initialized using the isInitialized property reference check. If it has been initialized, the non-null value of name can be safely accessed and printed.
It’s important to note that lateinit properties must be declared as var since their value can be changed after initialization. If you declare a lateinit property as val, it won’t compile because val properties are compiled into final fields that must be initialized in the constructor.
One common use case for lateinit properties is in dependency injection scenarios. In such cases, the values of lateinit properties are set externally by a dependency injection framework. Kotlin generates a field with the same visibility as the lateinit property to ensure compatibility with Java frameworks. If the property is declared as public, the generated field will also be public.
Overall, lateinit properties provide a way to defer the initialization of non-null properties when it’s not possible to provide an initializer in the constructor, such as in dependency injection scenarios.
Lastly, As earlier mentioned that the let function is particularly useful when properties are effectively non-null but cannot be initialized with a non-null value in the constructor. It allows you to access and work with such properties without the need for null checks. Here’s an example:
In this example, the name property is declared with the lateinit modifier, indicating that it will be initialized before its first use. The initializeName function is responsible for initializing the name property from an external source. Later, in the printName function, we can safely access and print the non-null name using the let function.
Overall, the let function provides a concise and safe way to work with nullable values, access values within longer expressions, handle multiple null checks, and work with properties that cannot be initialized with non-null values in the constructor.
Extensions for nullable types
Now let’s look at how you can extend Kotlin’s set of tools for dealing with null values by defining extension functions for nullable types.
Defining extension functions for nullable types is a powerful way to handle null values in Kotlin. Unlike regular member calls, which cannot be performed on null instances, extension functions allow you to work with null receivers and handle null values within the function.
Let’s take the example of the functions isEmpty and isBlank, which are extensions of the String class in Kotlin’s standard library. isEmpty checks if the string is an empty string, while isBlank checks if it’s empty or consists only of whitespace characters.
To handle null values in a similar way, you can define extension functions like isEmptyOrNull and isBlankOrNull, which can be called on a nullable String? receiver. Allowing you to perform checks and operations on strings even when they are nullable.
Declaring an extension function for a nullable type:
When you declare an extension function for a nullable type (ending with ?), it means you can call the function on nullable values. However, you need to explicitly check for null within the function body. In Kotlin, the this reference in an extension function for a nullable type can be null, unlike in Java where it’s always not-null.
Kotlin
funString?.customExtensionFunction() {if (this != null) {// Perform operations on non-null valueprintln("Length of the string: ${this.length}") } else {// Handle the null caseprintln("The string is null") }}val nullableString: String? = "softAai"nullableString.customExtensionFunction() // Output: Length of the string: 7val nullString: String? = nullnullString.customExtensionFunction() // Output: The string is null
Using the let function with a nullable receiver:
It’s important to note that the let function we discussed earlier can also be called on a nullable receiver, but it doesn’t automatically check for null. If you want to check the arguments for non-null values using let, you need to use the safe-call operator ?., like personHr?.let { sendResumeEmailTo(it) }.
Let’s see another simple example
Kotlin
funsendResumeEmailTo(email: String) {println("Sending resume email to $email")}/** * Here Invalid email ID used for illustrative purposes, * Resume Sender App is a reliable solution * for sending resumes to HR emails worldwide. */val nullableEmail: String? = "[email protected]"// Invalid email IDnullableEmail?.let { sendResumeEmailTo(it) } // Output: Sending resume email to [email protected]val nullEmail: String? = nullnullEmail?.let { sendResumeEmailTo(it) } // No output, as the lambda is not executed
That means If you invoke let on a nullable type without using the safe-call operator (?.), the lambda argument will also be nullable. To check the argument for non-null values with let, you need to use the safe-call operator.
Considerations when defining your own extension function:
When defining your own extension function, it’s important to consider whether you should define it as an extension for a nullable type. By default, it’s recommended to define it as an extension for a non-null type. Later on, if you realize that the extension function is primarily used with nullable values and you can handle null appropriately, you can safely change it to a nullable type without breaking existing code.
Kotlin
funString.customExtensionFunction() {// Perform operations on non-null valueprintln("Length of the string: ${this.length}")}val nonNullString: String = "softAai"nonNullString.customExtensionFunction() // Output: Length of the string: 7val nullableString: String? = "Kotlin"nullableString?.customExtensionFunction() // Output: Length of the string: 6
By understanding these concepts and examples, you can effectively use extension functions with nullable types and handle null values in a flexible and concise manner in Kotlin.
Nullability of type parameters
Let’s discuss another case that may surprise you: a type parameter can be nullable even without a question mark at the end.
By default, all type parameters of functions and classes in Kotlin are nullable. This means that any type, including nullable types, can be substituted for a type parameter. When a nullable type is used as a type parameter, declarations involving that type parameter are allowed to be null, even if the type parameter itself doesn’t end with a question mark.
In the above example, the Box class has a type parameter T, which is nullable by default. We declare a variable nullableBox of type Box<String?>, indicating that the item property can hold a nullable String value. Even though T doesn’t end with a question mark, the inferred type for T becomes String?, allowing null to be assigned to item.
To make the type parameter non-null, you can specify a non-null upper bound for it. By doing so, you restrict the type parameter to only accept non-null values.
In the modified example, we specify the upper bound Any for the type parameter T in the Box class. This ensures that T can only be substituted with non-null types. Consequently, assigning null to item when declaring nullableBox results in a compilation error.
It’s important to note that type parameters are the only exception to the rule that a question mark is required to mark a type as nullable. In the case of type parameters, the nullability is determined by the type argument provided when using the class or function.
Nullability and Java
Here in this section, we will cover another special case of nullability: types that come from the Java code.
Nullability Annotations
When combining Kotlin and Java, Kotlin handles nullability in a way that preserves safety and interoperability. Kotlin recognizes nullability annotations from Java code, such as @Nullable and @NotNull, and treats them accordingly. If the annotations are present, Kotlin interprets them as nullable or non-null types.
In Java, suppose you have the following method signature with nullability annotations:
Kotlin
public@Nullable String processString(@NotNull String input) {// process the input stringreturn modifiedString;}
When Kotlin interacts with this method, it recognizes the annotations. In Kotlin, the method is seen as:
Kotlin
funprocessString(input: String): String? {// process the input stringreturn modifiedString}
The @Nullable annotation is mapped to a nullable type in Kotlin (String?), and the @NotNull annotation is treated as a non-null type (String).
Platform Types
However, when nullability annotations are not present, Java types become platform types in Kotlin. Platform types are types for which Kotlin lacks nullability information. You can work with platform types as either nullable or non-null types, similar to how it is done in Java. The responsibility for handling nullability lies with the developer.
For example, if you receive a platform type from Java, such as String!, you can treat it as nullable or non-null based on your knowledge of the value. If you know it can be null, you can compare it with null before using it. If you know it’s not null, you can use it directly. However, if you get the nullability wrong, a NullPointerException will occur at the usage site.
Let’s say you have a Java method that returns a platform type, such as:
Kotlin
public String getValue() {// return a value that can be nullreturn possiblyNullValue;}
In Kotlin, the return type is considered a platform type (String!). You can handle it as either nullable or non-null, depending on your knowledge of the value:
Kotlin
valvalue: String? = getValue() // treat it as nullableval length: Int = getValue().length // assume it's not null and use it directly
Platform types are primarily used to maintain compatibility with Java and avoid excessive null checks or casts for values that can never be null. It allows Kotlin developers to take responsibility for handling values coming from Java without compromising safety.
Inheritance
When overriding a Java method in Kotlin, you have the choice to declare parameters and return types as nullable or non-null. It’s important to get the nullability right when implementing methods from Java classes or interfaces. The Kotlin compiler generates non-null assertions for parameters declared with non-null types, and if Java code passes a null value to such a method, an exception will occur.
Suppose you have a Java interface with a method that expects a non-null parameter:
In the StringPrinter class, we assume the value parameter is not null. In the NullableStringPrinter class, we allow the parameter to be nullable and check for nullness before using it.
Remember, the key is to ensure that you handle platform types correctly based on your knowledge of the values. If you assume a value is non-null when it can be null or vice versa, you may encounter a NullPointerException at runtime.
Summary
In summary, we have covered several aspects of nullability in Kotlin:
Nullable and Non-null Types:
Nullable types are denoted by appending a question mark (?) to the type (e.g., String?).
Non-null types are regular types without the question mark (e.g., String).
Safe Operations:
Safe call operator (?.) allows you to safely access properties or call methods on nullable objects.
Elvis operator (?:)provides a default value in case of a null reference.
Safe cast operator (as?)performs a cast and returns null if the cast is not possible.
Unsafe Dereference:
In Kotlin, Dereferencing a nullable variable means accessing the value it holds, assuming it is not null. However, if the variable is null, attempting to dereference it can lead to a runtime exception, such as a NullPointerException.
Not-null assertion operator (!!) is used to dereference a nullable variable, asserting that it is not null. It can lead to a NullPointerException if the value is null.
let Function:
The let function allows you to perform operations on a nullable object within a lambda expression, providing a concise way to handle non-null values.
Extension Functions for Nullable Types:
You can define extension functions specifically for nullable types, enabling you to encapsulate null checks within the function itself.
Platform Types:
When interacting with Java code, Kotlin treats Java types without nullability annotations as platform types.
Platform types can be treated as nullable or non-null, depending on your knowledge of the values. However, incorrect handling may result in NullPointerException.
By understanding these concepts and utilizing the provided operators and functions, you can effectively handle nullability in Kotlin code and ensure safer and more robust programming practices.