In the ever-evolving landscape of technology, where innovation and adaptability are paramount, Android has emerged as a dominant force. Beyond smartphones, Android’s influence has extended into various industries, including the automotive sector. A pivotal development in this journey has been the introduction of Project Treble and its subsequent integration into Android Automotive OS, ushering in a new era of modular advancements. This article delves into the essence of Project Treble and how its modular approach has transformed Android’s foray into the automotive realm.
Project Treble and Android Automotive OS
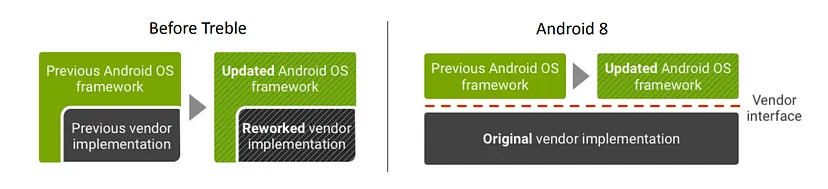
Project Treble is an initiative by Google introduced in Android 8.0 Oreo to address the challenges of Android fragmentation(Here Fragmentation refers to the situation where many Android devices run different versions of the operating system) and make it easier for device manufacturers to update their devices to newer Android versions. It separates the Android OS framework from the hardware-specific components, allowing manufacturers to update the Android OS without modifying the lower-level hardware drivers and firmware.
Project Treble
In the context of Android Automotive OS, Project Treble has a similar goal but is adapted to the specific needs of automotive infotainment systems. Android Automotive OS is built on top of the regular Android OS but is optimized for use in vehicles. It provides a customized user interface and integrates with car-specific hardware and features.
Project Treble in Android Automotive OS helps automotive manufacturers (OEMs) update their in-car infotainment systems more efficiently. Separating the Android OS framework from the hardware-specific components, allows OEMs to focus on developing and updating their unique infotainment features without being held back by delays caused by complex hardware integration.
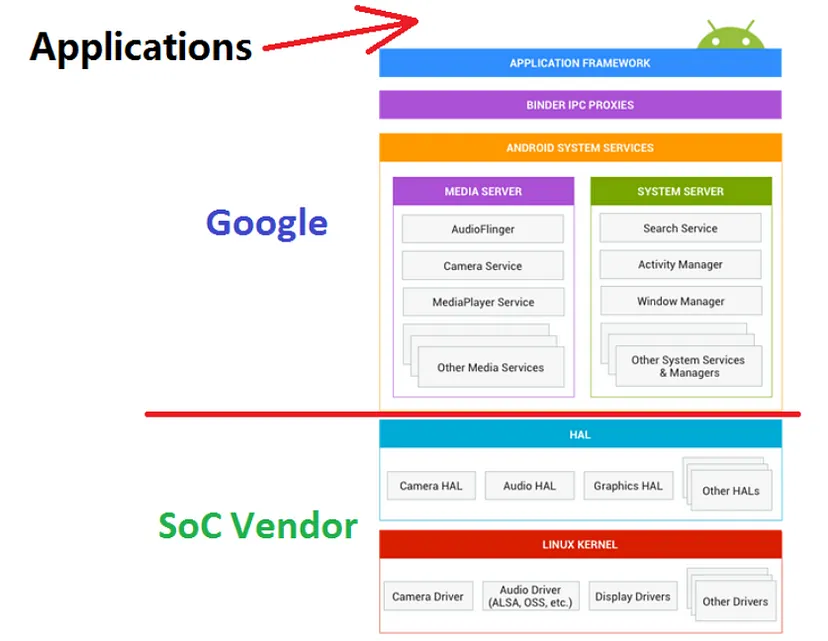
Android Open Source Project (AOSP) Architecture
In the Android Open Source Project (AOSP) architecture, everything above the Android System Services is known as the “Android Framework,” and it is provided by Google. This includes various components like the user interface, app development framework, and system-level services.
AOSP Architecture
On the other hand, the Hardware Abstraction Layer (HALs) and the Kernel are provided by System on a Chip (SoC) and hardware vendors. The HALs act as a bridge between the Android Framework and the specific hardware components, allowing the Android system to work efficiently with different hardware configurations.
In a groundbreaking move, Google extended the Android Open Source Project (AOSP) to create a complete in-vehicle infotainment operating system(we will look in detail later). Here’s a simple explanation of the extensions:
Car System Applications:Google added specific applications designed for in-car use, such as music players, navigation apps, and communication tools. These applications are optimized for easy and safe use while driving.
Car APIs:Google introduced specialized Application Programming Interfaces (APIs) that allow developers to access car-specific functionalities. These APIs provide standardized ways for apps to interact with car features like sensors and controls.
Car Services:Car Services are system-level components that handle car-specific functionalities, such as managing car sensors, audio systems, and climate controls. These services provide a consistent and secure way for apps to interact with car hardware.
Vehicle Hardware Abstraction Layer:To interact with the unique hardware components of different vehicles, Google developed the Vehicle Hardware Abstraction Layer (HAL). It acts as a bridge between the Android system and the specific hardware, enabling a seamless and consistent experience across various cars.
By combining these extensions with the existing Android system, Google created a fully functional and adaptable in-vehicle infotainment operating system. This system can be used in different vehicles without the need for significant modifications, offering a unified and user-friendly experience for drivers and passengers.
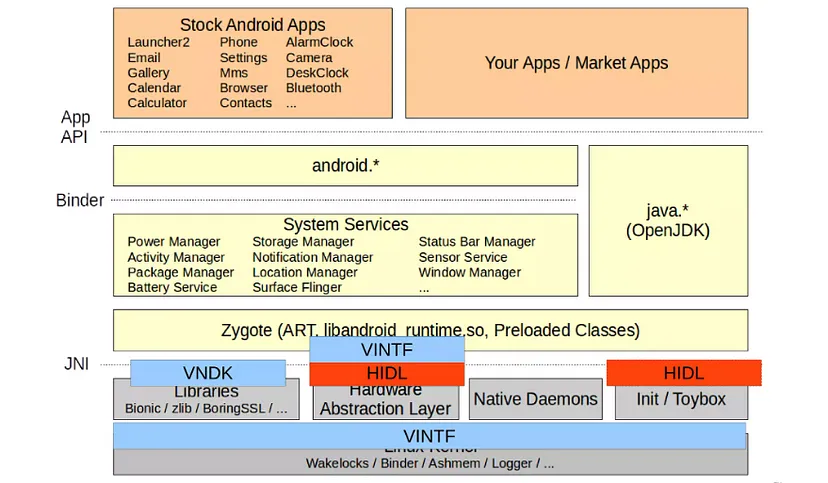
Treble Components
Project Treble introduced several new components to the Android architecture to enhance modularity and streamline the update process for Android devices.
Showing what’s newly added by Treble
Let’s briefly explain each of these components:
New HAL types: These are Hardware Abstraction Layers (HALs) that help the Android system communicate with various hardware components in a standardized way. They allow easier integration of different hardware into the Android system.
Hardware Interface Definition Language (HIDL):HIDL is a language used to define interfaces between HALs and the Android framework. It makes communication between hardware and software more efficient.
New Partitions:Treble introduced new partitions in the Android system, like the /vendor partition. These partitions help separate different parts of the system, making updates easier and faster.
ConfigStore HAL:This component manages configuration settings for hardware components. It provides a standardized way to access and update configuration data.
Device Tree Overlays:Device Tree Overlays enable changes to hardware configuration without having to modify the kernel. It allows for easier customization of hardware.
Vendor NDK: The Vendor Native Development Kit (NDK) provides tools and libraries for device manufacturers to develop software specific to their hardware. It simplifies the integration of custom functionalities.
Vendor Interface Object:The Vendor Interface Object (VINTF) defines a stable interface between the Android OS and the vendor’s HAL implementations. It ensures compatibility and smooth updates.
Vendor Test Suite (VTS):VTS is a testing suite that ensures HAL implementations work correctly with the Android framework. It helps in verifying the compatibility and reliability of devices.
Project Treble’s components make Android more modular, efficient, and customizable. They streamline communication with hardware, separate system components, and allow device manufacturers to update and optimize their devices more easily, resulting in a better user experience and faster Android updates.
Modularity in Android Automotive with Treble
Thanks to the architectural changes brought about by Project Treble and the expanded use of partitions, the future of Android Automotive has become significantly more flexible and adaptable. This enhancement extends beyond just the Human-Machine Interface (HMI) layer and allows for potential replacements of the Android framework, Board Support Package (BSP), and even the hardware if necessary.
In simpler terms, the core components of the Android Automotive system have been made more independent and modular. This means that manufacturers now have the freedom to upgrade or customize specific parts of the system without starting from scratch. The result is a highly future-proof system that can readily embrace emerging technologies and cater to evolving user preferences.
Let’s delve into the transition and see how this modularity was achieved after the implementation of Project Treble:
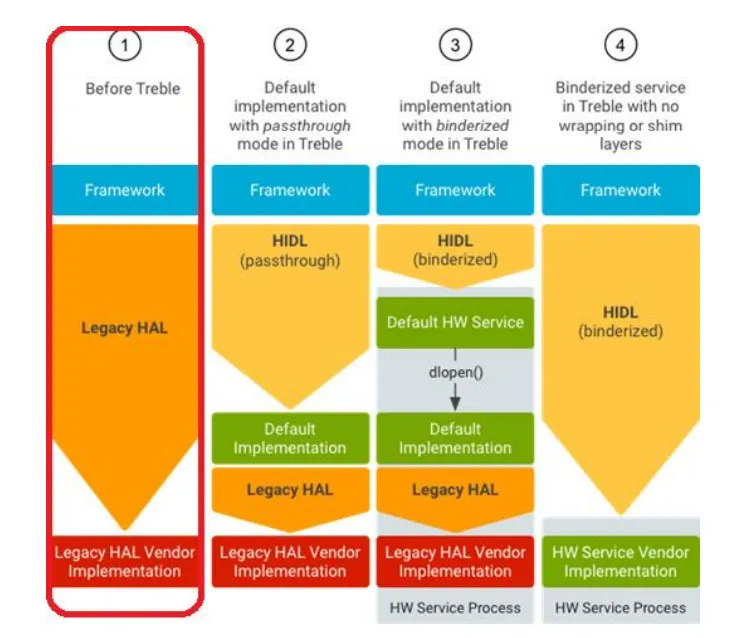
HALs before Treble
Before Project Treble, HAL interfaces were defined as C header files located in the hardware/libhardware folder of the Android system. Each new version of Android required the HAL to support a new interface, which meant significant effort and changes for hardware vendors.
HALs before Treble
In simpler terms, HALs used to be tightly coupled with the Android framework, and whenever a new Android version was released, hardware vendors had to update their HALs to match the new interfaces. This process was time-consuming and complex, leading to delays in device updates and making it difficult to keep up with the latest Android features.
Project Treble addressed this issue by introducing the Hardware Interface Definition Language (HIDL). With HIDL, HAL interfaces are now defined in a more standardized and independent way, making it easier for hardware vendors to implement and update their HALs to support new Android versions. This change has significantly improved the efficiency of Android updates and allowed for a more flexible and future-ready Android ecosystem.
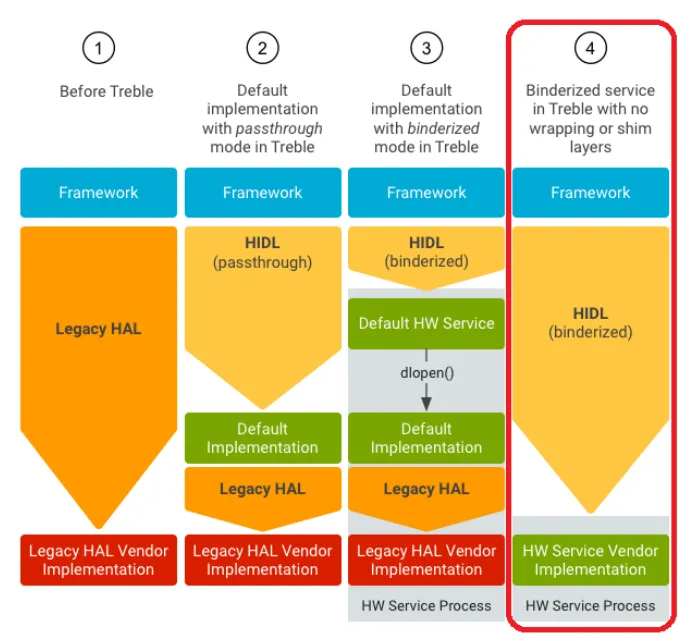
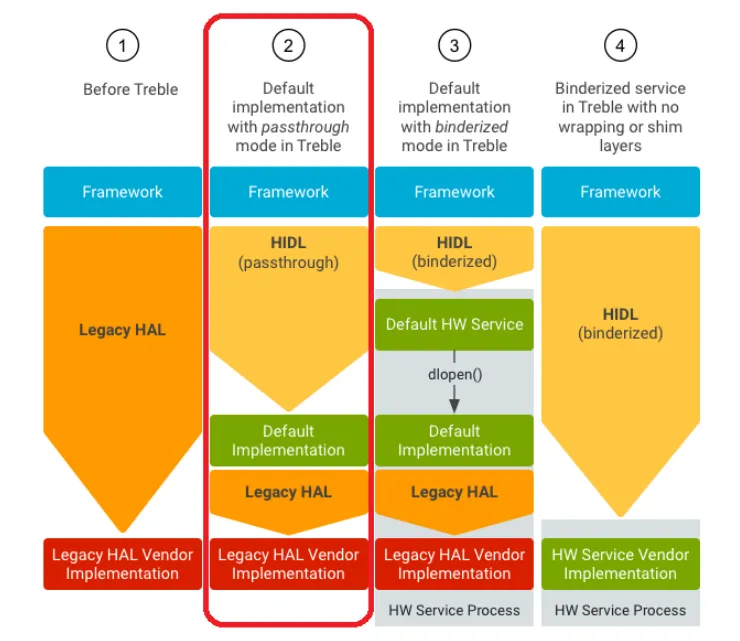
Pass-through HALs
In the context of Android Automotive, Pass-through HALs are special Hardware Abstraction Layers (HALs) that use the Hardware Interface Definition Language (HIDL) interface. The unique aspect of Pass-through HALs is that you can directly call them from your application’s process, without going through the usual Binder communication.
Pass-through HALs
To put it simply, when an app wants to interact with a regular HAL, it communicates using the Binder mechanism, which involves passing messages between different processes. However, with Pass-through HALs, you can directly communicate with the HAL from your app’s process. This direct calling approach can offer certain advantages in terms of efficiency and performance for specific tasks in the automotive context. It allows apps to access hardware functionalities with reduced overhead and faster response times.
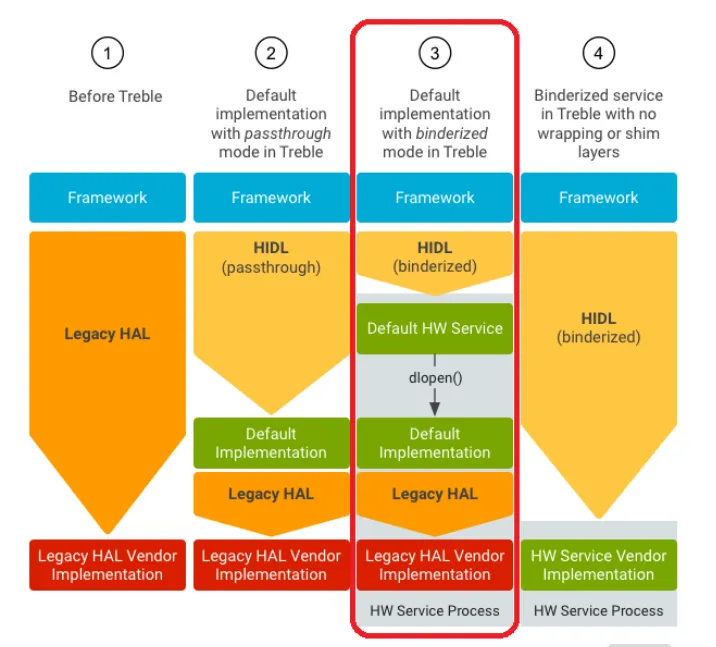
Binderized HALs
In the Android Automotive context, Binderized HALs run in their dedicated processes and are accessible only through Binder Inter-Process Communication (IPC) calls. This setup ensures that the communication between the Android system and the HALs is secure and efficient.
Binderized HALs
Regarding Legacy HALs, Google has already created a wrapper to make them work in a Binderized environment. This wrapper acts as an intermediary layer, allowing the existing Legacy HALs to communicate with the Android framework through the Binder IPC mechanism. As a result, these Legacy HALs can seamlessly function alongside Binderized HALs, ensuring compatibility and a smooth transition to the new architecture.
In essence, the wrapper provides a bridge between the legacy hardware components and the modern Android system, enabling Legacy HALs to work cohesively in the Binderized environment. This approach ensures that the Android Automotive system can benefit from the improved performance and security of Binderized HALs while still supporting and integrating with older hardware that relies on Legacy HALs.
Ideal HALs
In an ideal scenario, Binderized HALs are the preferred approach for Hardware Abstraction Layers (HALs) in Android. Binderized HALs run in their dedicated processes and are accessed through the secure Binder Inter-Process Communication (IPC) mechanism. This design ensures efficient communication, better security, and separation of hardware functionalities from the Android system.
Ideal HALs
However, for some reasons, we didn’t bother implementing Binderized HALs as intended. Instead, we are using a different approach, possibly using legacy HALs that were not originally designed for Binder IPC. While this alternative approach may work, it might not provide the full benefits of Binderized HALs, such as improved performance and security.
It’s important to recognize that sticking to the ideal Binderized HALs offers several advantages and aligns with the best practices recommended by Google. If possible, it’s better to consider transitioning to Binderized HALs for a more robust and efficient Android Automotive system.
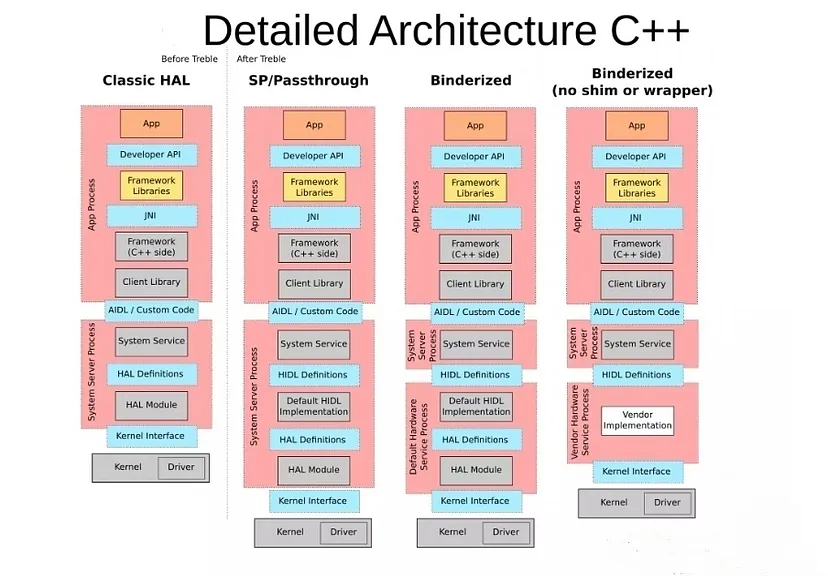
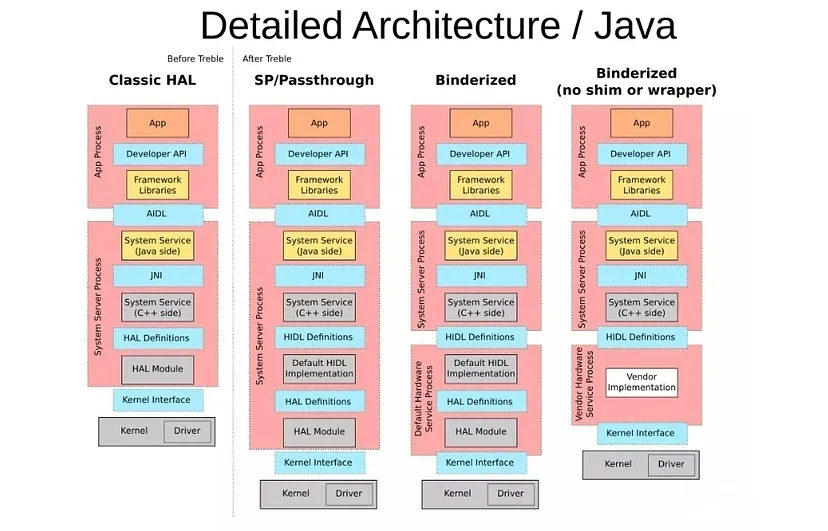
Detailed Architecture
Now, as you know, in Android 8.0, the Android operating system underwent a re-architecture to establish clear boundaries between the device-independent Android platform and device- or vendor-specific code. Before this update, Android had already defined interfaces called HAL interfaces, which were written in C headers located in hardware/libhardware.
With the re-architecture, these HAL interfaces were replaced by a new concept called HIDL (HAL Interface Definition Language). HIDL offers stable and versioned interfaces, which can be either written in Java or as client- and server-side HIDL interfaces in C++.
Detailed Architecture C++
The primary purpose of HIDL interfaces is to be used from native code, especially focused on enabling the auto-generation of efficient C++ code. This is because native code is generally faster and more efficient for low-level hardware interactions. However, to maintain compatibility and support various Android subsystems, some HIDL interfaces are also exposed directly to Java code.
Detailed Architecture / Java
For instance, certain Android subsystems like Telephony utilize Java HIDL interfaces to interact with underlying hardware components. This allows them to benefit from the stable and versioned interface definitions provided by HIDL, ensuring seamless communication between the device-independent Android platform and device-specific code.
Conclusion
Project Treble’s modular approach and Android Automotive OS’s tailored architecture have revolutionized Android’s adaptability for both devices and vehicles. By separating hardware-specific components, manufacturers can efficiently update their systems. The integration of specialized APIs and services in Android Automotive OS streamlines infotainment, while Project Treble’s HAL enhancements and modularity ensure seamless hardware communication. These advancements collectively promise a future-proof, user-friendly experience for both drivers and passengers.
The automotive industry is rapidly evolving, and with the integration of technology into vehicles, the concept of Android Automotive has gained significant traction. Android Automotive is an operating system designed to run directly on vehicles’ infotainment systems, providing a seamless user experience. In this comprehensive blog, we’ll delve into the core components of Android Automotive, focusing on the Car Service and Car Manager aspects. Additionally, we’ll explore the opportunities and challenges in developing third-party apps for this platform.
The Vehicle Hardware Abstraction Layer (HAL)
At the core of the Car Data Framework lies the Vehicle Hardware Abstraction Layer (HAL), a foundational native service layer. The HAL acts as a bridge between the hardware of the vehicle and the software framework. Its primary role is to implement communication plugins tailored to collect specific vehicle data and map them to predefined Vehicle property types defined in types.hal. Notably, the types.hal file establishes a standardized list of property IDs recognized by the Google framework.
Customizing the HAL
The flexibility of the Car Data Framework allows customization of the HAL to accommodate unique hardware configurations. This involves extending or modifying the types.hal file to introduce product-specific property IDs. These custom property IDs are marked as VENDOR, indicating that they are subject to VENDOR level policy enforcement. In essence, this facilitates the management and access control of data that is specific to a particular product.
For example, Let’s define a new property VENDOR_FOO as a VENDOR Property with property id as 0xf100.
In this code snippet, we’re defining a custom vehicle property named VENDOR_FOO within the VehicleProperty enumeration. Let’s break down each component:
enum VehicleProperty: @2.0::VehicleProperty { ... }:This line declares an enumeration named VehicleProperty with a version annotation of @2.0::VehicleProperty. It suggests that this enumeration is part of version 2.0 of the Vehicle HAL (Hardware Abstraction Layer).
VENDOR_FOO = (...):This defines a specific property within the enumeration named VENDOR_FOO.
0xf100: This hexadecimal value, 0xf100, is the unique identifier assigned to the VENDOR_FOO property. It distinguishes this property from others and can be used to reference it programmatically.
| VehiclePropertyGroup:VENDOR:This component indicates that the property belongs to the VENDOR group. Vehicle property groups are used to categorize properties based on their purpose or functionality.
| VehicleArea:GLOBAL:This indicates that the property is applicable to the entire vehicle, encompassing all areas. It suggests that the property’s relevance is not limited to a specific part of the vehicle.
| VehiclePropertyType:STRING:This part specifies that the data type of the property is STRING. This suggests that the property holds text-based information.
In short, this code snippet defines a custom vehicle property named VENDOR_FOO. This property has a unique identifier of 0xf100, belongs to the VENDOR group, holds text-based data of type STRING, and is applicable to the entire vehicle.
Diverse Car-Related Services
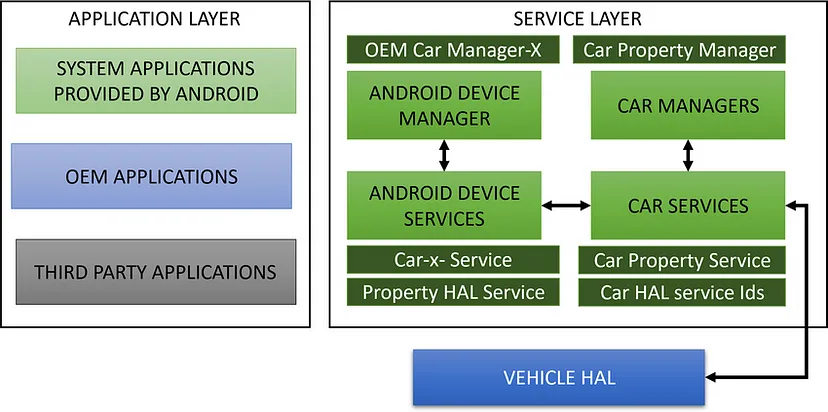
Sitting atop the HAL is the framework layer, which provides a comprehensive set of services and APIs for applications to access vehicle data efficiently. The android.car package plays a pivotal role in this layer by offering the car service, which acts as a conduit to the Vehicle HAL.
The framework encompasses a diverse range of car-related services, each catering to specific subsystems within the vehicle:
CarHVACManager: This service manages HVAC-related properties, allowing applications to interact with heating, ventilation, and air conditioning systems.
CarSensorManager: Facilitates the handling of various sensor-related data, providing insights into the vehicle’s environment.
CarPowerManager: Manages power modes and states, enabling applications to optimize power consumption.
CarInputService:Captures button events, making it possible for applications to respond to user inputs effectively.
In addition to subsystem-specific services, the VehiclePropertyService offers a generic interface for querying and altering data associated with PropertyIDs.
Understanding Android’s Car Service
At its core, Android’s Car Service is a system service that encapsulates vehicle properties and exposes them through a set of APIs. These APIs serve as valuable resources for applications to access and utilize vehicle-related data seamlessly. Whether it’s information about the vehicle’s speed, fuel consumption, or tire pressure, the Car Service provides a standardized way for apps to interact with these metrics.
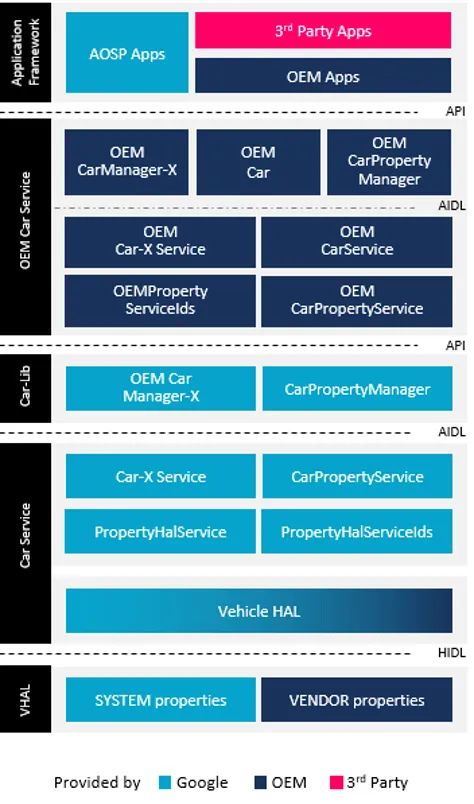
Detailed architecture view
Implementation and Naming Conventions
The Car Service is implemented as a system service within the Android framework. It resides in a persistent system application named “com.android.car.” This naming convention ensures that the service is dedicated to handling vehicle-related functionalities without getting mixed up with other system or user apps.
To interact with the Car Service, developers can use the “android.car.ICar” interface. This interface defines the methods and communication protocols that allow applications to communicate with the Car Service effectively. By adhering to this interface, developers can ensure compatibility and seamless integration with the Android ecosystem.
Exploring the Inner Workings
To gain deeper insights into the Car Service’s functioning, the “dumpsys car_service” command proves to be invaluable. This command provides a detailed snapshot of the service’s current state, including active connections, APIs in use, and various operational metrics. Developers and enthusiasts can utilize this command to diagnose issues, monitor performance, and optimize their applications’ interactions with the Car Service.
The “-h” option of the “dumpsys car_service” command provides a list of available options, unlocking a plethora of diagnostic tools and information. This empowers developers to fine-tune their app’s interactions with the Car Service, ensuring a smooth user experience and efficient resource utilization.
Enhancing User Experience through Car Service APIs
The Car Service’s APIs offer a wide range of possibilities for enhancing the user experience within the vehicle. Applications can tap into these APIs to provide real-time information, create interactive dashboards, and even integrate voice commands for hands-free control. For instance, navigation apps can utilize the Car Service to display turn-by-turn directions on the vehicle’s infotainment system, while music apps can use it to provide a seamless playback experience.
Car Manager Interfaces: A Brief Overview
The Car Manager encompasses an array of 23 distinct interfaces, each tailored to manage specific aspects of the vehicle’s digital infrastructure. These interfaces serve as pathways through which different services and applications communicate, collaborate, and coexist harmoniously. From input management to diagnostic services, the Car Manager interfaces span a spectrum of functionalities that collectively enhance the driving experience.
Car Manager provides these 23 interfaces
PROPERTY_SERVICE
The PROPERTY_SERVICE interface plays a crucial role in the Car Manager ecosystem. It serves as a gateway to access and manage various vehicle properties. These properties encompass a wide range of information, including vehicle speed, fuel level, engine temperature, and more. Applications and services can tap into this interface to gather real-time data, enabling them to offer users valuable insights into their vehicle’s performance.
Developers can utilize the PROPERTY_SERVICE interface to create engaging dashboard applications, present personalized notifications based on vehicle conditions, and even optimize driving behaviors by leveraging real-time data.
INFO_SERVICE
The INFO_SERVICE interface serves as an information hub within the Car Manager framework. It facilitates the exchange of data related to the vehicle’s status, health, and performance. This interface enables applications to access diagnostic information, maintenance schedules, and any potential issues detected within the vehicle.
By leveraging the INFO_SERVICE interface, developers can design applications that provide proactive maintenance reminders, offer detailed insights into the vehicle’s health, and assist drivers in making informed decisions about their vehicle’s upkeep.
CAR_UX_RESTRICTION_SERVICE
As safety and user experience take center stage in the automotive industry, the CAR_UX_RESTRICTION_SERVICE interface emerges as a critical player. This interface is designed to manage and enforce user experience restrictions while the vehicle is in motion. It ensures that applications adhere to safety guidelines, preventing distractions that could compromise the driver’s focus on the road.
By integrating the CAR_UX_RESTRICTION_SERVICE interface, developers can create applications that seamlessly adapt to driving conditions. This ensures that drivers are presented with relevant and non-distracting information, enhancing both safety and user experience.
Diving Deeper: Exploring PROPERTY_SERVICE Car Manager Interfaces
Let’s dive deep into the functionality of the PROPERTY_SERVICE interface, exploring its role, capabilities, and underlying mechanisms.
The PROPERTY_SERVICE, also known as CarPropertyManager, plays a pivotal role in the Car Manager ecosystem. It acts as a simple yet powerful wrapper for the Vehicle Hardware Abstraction Layer (HAL) properties. This interface offers developers a standardized way to enumerate, retrieve, modify, and monitor vehicle properties. These properties encompass a wide range of data, including vehicle speed, fuel level, engine status, and more.
The key methods provided by the CarPropertyManager include:
Enumerate:Developers can use this method to obtain a list of all available vehicle properties. This enables them to explore the diverse range of data points they can access and utilize within their applications.
Get:The “get” method allows applications to retrieve the current value of a specific vehicle property. This real-time data access empowers developers to provide users with accurate and up-to-date information about their vehicle’s performance.
Set: Developers can utilize the “set” method to modify the value of a vehicle property, facilitating the execution of specific commands or actions within the vehicle’s systems.
Listen:The “listen” method enables applications to register listeners for specific vehicle properties. This functionality is particularly useful for creating real-time monitoring and notification systems.
Permissions and Security
One crucial aspect of the PROPERTY_SERVICE interface is its robust permission system. Access to vehicle properties is regulated, ensuring that applications adhere to strict security measures. Each property is associated with specific permissions that must be granted for an app to access it.
For instance, vendor-specific properties may require apps to possess the “PERMISSION_VENDOR_EXTENSION” permission at the “signature|privileged” level. This layered approach to permissions ensures that sensitive vehicle data remains protected and is only accessible to authorized applications.
Code and Implementation
The core functionality of the PROPERTY_SERVICE (CarPropertyManager) is implemented in the “CarPropertyManager.java” file, which resides within the “packages/services/Car/car-lib/src/android/car/hardware/property/” directory. This file encapsulates the methods, data structures, and logic required to facilitate seamless communication between applications and vehicle properties.
Diving Deeper: Exploring INFO_SERVICE Car Manager Interfaces
Let’s dive deep into the functionality of the INFO_SERVICE interface, exploring its role, capabilities, and underlying mechanisms.
Understanding INFO_SERVICE (CarInfoManager)
The INFO_SERVICE, more formally known as CarInfoManager, is a pivotal component within the Car Manager ecosystem. Its primary function is to facilitate the retrieval of static vehicle information, offering applications access to a wealth of data that encompasses various aspects of the vehicle’s identity and characteristics.
Key functionalities provided by the CarInfoManager include:
Vehicle Identification (VID):The CarInfoManager enables applications to obtain a unique identifier for the vehicle. This identifier, known as the Vehicle Identification Number (VIN), plays a crucial role in differentiating individual vehicles and accessing specific information related to them.
Model and Year:Developers can retrieve detailed information about the vehicle’s model and manufacturing year. This data provides context about the vehicle’s design, technology, and vintage.
Fuel Type: The CarInfoManager allows applications to access information about the type of fuel the vehicle utilizes. This data is essential for creating applications that offer insights into fuel efficiency, emissions, and sustainability.
Additional Static Details:Beyond the aforementioned attributes, the CarInfoManager can provide a plethora of additional static information, such as the vehicle’s make, body type, engine specifications, and more.
Permissions and Security
To ensure the security and privacy of vehicle information, the CarInfoManager enforces a robust permission system. Access to static vehicle information is governed by the “PERMISSION_CAR_INFO” permission, granted at the “normal” level. This approach guarantees that only authorized applications can access critical data about the vehicle.
Code and Implementation
The core functionality of the CarInfoManager is encapsulated within the “CarInfoManager.java” file. This file resides in the “packages/services/Car/car-lib/src/android/car/” directory and contains the methods, structures, and logic necessary for retrieving and presenting static vehicle information to applications.
Diving Deeper: Exploring CAR_UX_RESTRICTION_SERVICE Car Manager Interfaces
Let’s know more about CAR_UX_RESTRICTION_SERVICE interface, exploring its role, capabilities, and underlying mechanisms.
Understanding the CAR_UX_RESTRICTION_SERVICE
The CAR_UX_RESTRICTION_SERVICE, represented by the CarUxRestrictionsManager, is an integral part of the Android Automotive ecosystem. Its primary function is to provide a mechanism for assessing and communicating the level of distraction optimization required for the driving experience. Distraction optimization involves tailoring the in-car interactions to minimize distractions and cognitive load on the driver, thus enhancing safety.
Key Features and Functions:
Distraction Optimization Indication: The CarUxRestrictionsManager utilizes information from the CarDrivingStateManager to determine whether the driving conditions necessitate a higher level of distraction optimization. It then communicates this information to relevant components and applications.
Integration with CarDrivingStateManager:The CarDrivingStateManager provides crucial input to the CarUxRestrictionsManager. By analyzing factors such as vehicle speed, driving mode, and other contextual cues, the manager determines the appropriate level of distraction optimization required.
Promoting Safe Driving Practices: The primary aim of the CAR_UX_RESTRICTION_SERVICE is to promote safe driving practices by limiting potentially distracting activities when the driving conditions warrant it. This can include restricting certain in-car interactions or presenting information in a way that minimizes cognitive load.
Enhancing Driver Focus: By dynamically adjusting the user experience based on the current driving context, the CarUxRestrictionsManager ensures that drivers can focus on the road while still accessing essential information and functionalities.
Implementation and Code: CarUxRestrictionsManager.java
The core functionality of the CarUxRestrictionsManager is implemented in the CarUxRestrictionsManager.java file. This file can be found in the following directory: packages/services/Car/car-lib/src/android/car/drivingstate/. Within this file, you\’ll find the logic, methods, and data structures that facilitate the communication between the CarDrivingStateManager and other relevant components.
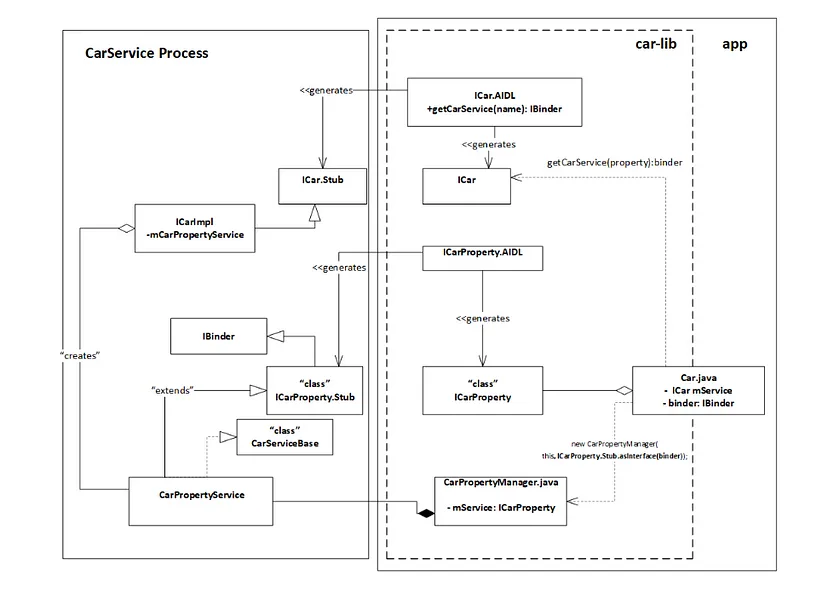
Design Structure of CarService
The CarService plays a crucial role in the Android Car Data Framework, providing a structured and organized approach to accessing a range of car-specific services. Here we aim to dissect the architecture and design of the CarService, focusing on its implementation and the interaction of various components. We’ll use the CarProperty service as an example to illustrate the design pattern, recognizing that a similar approach is adopted for other CarServices within the CarImpl.
The car-lib makes use of the reference to the CarProperty Android service by calling the getCarServices(“property”) AIDL method, as provided by ICar. This very generic and simple method is implemented by the CarService in ICarImpl to return the specific service requested through the getCarService method, specified with the name of the service as its parameter. Thus, ICarImpl follows the Factory pattern implementation, which returns the IBinder object for the requested service. Within the car-lib, Car.Java will obtain the service reference by calling the specific client interface using ICarProperty.Stub.asInterface(binder). With the returned service reference, the CarPropertyManager will access the methods as implemented by the CarPropertyService. As a result, the car service framework-level service access is abstracted following this implementation pattern, and applications will include car-lib and utilize Car.Java to return respective Manager class objects.
Here is a short summary of the flow:
Your application (car-lib) uses the Car service framework to access specific vehicle functionalities.
You request a specific service (e.g., CarProperty) using the getCarService method provided by ICarImpl.
ICarImpl returns a Binder object representing the requested service.
You convert this Binder object into an interface using .asInterface(binder).
This interface allows your application to interact with the service (e.g., CarPropertyService) in a more abstract and user-friendly manner.
Understanding the pattern of classes and their relationships is important when adding new services under CarServices or making modifications to existing service implementations, such as extending CarMediaService to add new capabilities or updating CarNavigationServices to enhance navigation information data.
Car Properties and Permissions
Accessing car properties through the Android Car Data Framework provides developers with a wealth of vehicle-specific data, enhancing the capabilities of automotive applications. However, certain properties are protected by permissions, requiring careful consideration and interaction with user consent. Let’s jump into the concepts of car properties, permissions, and the nuanced landscape of access within the CarService framework.
Understanding Car Properties
Car properties encapsulate various aspects of vehicle data, ranging from basic information like the car’s VIN (Vehicle Identification Number) to more intricate details.
All of the car properties are defined in the VehiclePropertyIds file. They can be read with CarPropertyManager. However, when trying to read the car VIN, a SecurityException is thrown. This means the app needs to request user permission to access this data.
Car Permissions
Just like a bouncer at a club, Android permissions control which apps can access specific services. This ensures that only the right apps get the keys to the digital kingdom. When it comes to the Car Service, permissions play a crucial role in determining which apps can tap into its features.
However, the Car Service is quite selective about who gets what. Here are a few permissions that 3rd party apps can ask for and possibly receive:
CAR_INFO:Think of this as your car’s digital diary. Apps with this permission can access general information about your vehicle, like its make, model, and year.
READ_CAR_DISPLAY_UNITS:This permission lets apps gather data about your car’s display units, such as screen size and resolution. It’s like letting apps know how big the stage is.
CONTROL_CAR_DISPLAY_UNITS: With this permission, apps can actually tweak your car’s display settings. It’s like allowing them to adjust the stage lighting to set the perfect ambiance.
CAR_ENERGY_PORTS: Apps with this permission can monitor the energy ports in your car, like charging points for electric vehicles. It’s like giving them the backstage pass to your car’s energy sources.
CAR_EXTERIOR_ENVIRONMENT:This permission allows apps to access data about the external environment around your car, like temperature and weather conditions. It’s like giving them a sensor to feel the outside world.
CAR_POWERTRAIN, CAR_SPEED, CAR_ENERGY:These permissions grant apps access to your car’s powertrain, speed, and energy consumption data. It’s like letting them peek under the hood and see how your car performs.
Now, here’s the twist: some permissions are VIP exclusive. They’re marked as “signature” or “privileged,” and only apps that are built by the original equipment manufacturer (OEM) and shipped with the platform can get them. These are like the golden tickets reserved for the chosen few — they unlock advanced features and deeper integrations with the Car Service.
Vehicle Property Permissions
In a vehicle system, properties are defined in a way that groups them as either SYSTEM or VENDOR properties. For example, as mentioned initially, consider the property VENDOR_FOO in the code snippet below. This property is assigned to the VENDOR group.
For properties in the VENDOR group, specific permissions are applied using the VENDOR_EXTENSION permissions, which can be of type Signature or System. This allows applications to access a special channel for vendor-specific information exchange.
<!-- Allows an application to access the vehicle vendor channel to exchange vendor-specific information. -->
<!-- <p>Protection level: signature|privileged -->

<permission
    android:name="android.car.permission.CAR_VENDOR_EXTENSION"
    android:protectionLevel="signature|privileged"
    android:label="@string/car_permission_label_vendor_extension"
    android:description="@string/car_permission_desc_vendor_extension" />
For properties not associated with the VENDOR group, permissions are set based on the property’s group. This is managed by adding the property to a permission group, as shown in the code snippet below.
Helper class to define which property IDs are used by PropertyHalService. This class binds the read and write permissions to the property ID. */
mProps.put(VehicleProperty.INFO_VIN, new Pair<>( Car.PERMISSION_IDENTIFICATION, Car.PERMISSION_IDENTIFICATION)); mProps.put(VehicleProperty.INFO_MAKE, new Pair<>( Car.PERMISSION_CAR_INFO, Car.PERMISSION_CAR_INFO));
In simpler terms, permissions control access to different vehicle properties. To access the property INFO_VIN, you need the PERMISSION_IDENTIFICATION permission. Similarly, INFO_MAKE requires PERMISSION_CAR_INFO permission. There’s a clear connection between the application service layer (VehiclePropertyIds.java) and the HAL layer (PropertyHalServiceIds.java) for all properties.
Navigating Permissions
Permissions serve as a gatekeeper, regulating access to sensitive car property data. The association between properties and permissions is defined through multiple layers:
VehiclePropertyIds: This file links properties to specific permissions using comments like:
/**
* Door lock
* Requires permission: {@link Car#PERMISSION_CONTROL_CAR_DOORS}.
*/
public static final int DOOR_LOCK = 371198722;
Car.java: Permissions are defined as strings within Car.java. For example:
/**
* Permission necessary to control the car's door.
* @hide
*/
@SystemApi
public static final String PERMISSION_CONTROL_CAR_DOORS = "android.car.permission.CONTROL_CAR_DOORS";
car.service.AndroidManifest.xml: Permissions are declared in the AndroidManifest.xml file, specifying protection levels and attributes:
Normal:Default permissions granted without user intervention.
Dangerous:Permissions requiring user consent at runtime.
Signature|Privileged: Restricted to system apps only.
Gaining Access to Signature|Privileged Properties
Properties protected by signature|privileged permissions are accessible solely to system apps. To emulate this access for your application, consider these steps:
Build Keys: Sign your application with the same build keysas the system apps. This method effectively disguises your app as a system app, enabling access to signature|privileged properties.
It’s essential to exercise caution when attempting to gain access to restricted properties, as this might lead to security risks and unintended consequences. Ensure that your intentions align with best practices and adhere to privacy and security principles.
ADB Commands for Car-Related Services
The Car System Service is a pivotal component within the Android Car Data Framework, providing a comprehensive platform for managing and interacting with various car-related services. Leveraging the power of Android Debug Bridge (ADB), developers gain the ability to access and manipulate car properties directly through the command line.
Accessing Car System Service via ADB
The Car System Service can be accessed through ADB commands, providing a direct line of communication to car-related services. The command structure follows the pattern:
adb shell dumpsys car_service <command> [options]
Let’s explore how this works in practice by querying a car property, specifically the door lock property:
get-property-value specifies the action to retrieve the value of a car property.
16200B02 is the hex value corresponding to the door lock property (371198722 in decimal).
1 indicates the vehicle area type, which could be VEHICLE_AREA_TYPE_GLOBAL in this case.
For further insights into available commands and options, you can utilize the -h flag:
adb shell dumpsys car_service -h
Car Apps
Here we will look into the diverse world of car apps, taking a closer look at their functionalities and the exciting possibilities they offer. We’ll explore a selection of these apps, each contributing to a seamless and immersive driving journey.
Diverse Range of Car Apps
Car apps form an integral part of the connected car ecosystem, enabling drivers and passengers to access a wide variety of features and services. These apps cater to different aspects of the driving experience, from entertainment and communication to navigation and vehicle control. Let’s explore some noteworthy examples of car apps:
CarLauncher:Serving as the car’s home screen, CarLauncher provides an intuitive interface that allows users to access various apps and features seamlessly. It serves as the digital command center for interacting with different functionalities within the vehicle.
CarHvacApp:This app takes control of the vehicle’s heating, ventilation, and air conditioning systems, ensuring optimal comfort for all occupants. Users can adjust temperature settings and airflow preferences to create a pleasant driving environment.
CarRadioApp: CarRadioApp brings the traditional radio experience to the digital realm, allowing users to tune in to their favorite radio stations and enjoy a wide range of content while on the road.
CarDialerApp:Designed specifically for in-car communication, CarDialerApp offers a safe and convenient way to make and receive calls while driving. Its user-friendly interface ensures that drivers can stay connected without compromising safety.
CarMapsPlaceholder: While not specified in detail, CarMapsPlaceholder hints at the integration of navigation services, providing drivers with real-time directions and ensuring they reach their destinations efficiently.
LocalMediaPlayer: This media player app allows users to enjoy their favorite music, podcasts, and audio content directly from their vehicle’s infotainment system, providing entertainment during their journeys.
CarMessengerApp: Keeping drivers informed and connected, CarMessengerApp handles messages and notifications, ensuring that essential communications are accessible without distractions.
CarSettings:CarSettings brings customization to the forefront, enabling users to tailor their driving experience by configuring various vehicle settings, preferences, and options.
EmbeddedKitchenSinkApp:As its name suggests, EmbeddedKitchenSinkApp is a comprehensive demo app that showcases a wide range of features, serving as a platform for testing and experimentation.
Third-Party Apps
In the dynamic realm of Android Automotive, third-party apps have emerged as a significant avenue for innovation and enhanced driving experiences. However, these apps operate within a carefully orchestrated ecosystem, designed to ensure driver safety and minimize distractions. Here, we delve into the intricate landscape of third-party apps for Android Automotive, exploring their access restrictions, design considerations, and the pivotal role they play in enhancing driver safety.
Access Restrictions and the Play Store for Auto
Unlike traditional Android apps, third-party apps for Android Automotive do not have direct access to the system APIs. This approach is a deliberate design choice aimed at maintaining system stability and safeguarding against potential security vulnerabilities. Apps available on the Play Store for Android Automotive OS and Android Auto undergo thorough scrutiny to ensure compliance with stringent design requirements. This ensures that apps meet specific standards of quality, functionality, and safety before being listed for users.
Minimizing Driver Distraction: A Core Principle
Driver distraction is a paramount concern in the development of third-party apps for Android Automotive. Given the potential risks associated with diverting a driver’s attention from the road, Google places significant emphasis on creating a distraction-free environment. Apps must adhere to strict guidelines to minimize any potential interference with the driver’s focus.
Key principles for minimizing driver distraction include:
Design Consistency:Apps must follow consistent design patterns that prioritize clarity and ease of use. Intuitive navigation and minimalistic interfaces ensure that users can interact with the app without confusion.
Voice Interaction:Voice commands are a pivotal aspect of reducing distraction. Apps should integrate voice-based interactions to allow drivers to perform tasks without taking their hands off the wheel.
Limited Visual Engagement:Apps should limit the frequency and complexity of visual interactions. Displaying large amounts of information or requiring frequent glances can divert the driver’s attention from the road.
Contextual Relevance:App content and notifications should be contextually relevant to the driving experience. This ensures that only essential and non-distracting information is presented.
Appropriate Testing and Evaluation:Developers are encouraged to rigorously test and evaluate their apps in simulated driving scenarios to identify potential distractions and address them before deployment.
Supported App Categories: Revolutionizing the Drive
Third-party apps for Android Automotive have expanded the possibilities of in-car technology, offering users diverse functionalities that seamlessly integrate into the driving experience. The following app categories are supported, each adding a layer of convenience and engagement to the road:
Media (Audio) Apps:These apps turn vehicles into personalized entertainment hubs, allowing users to enjoy their favorite music, podcasts, and audio content while on the go. The integration of media apps ensures a dynamic and enjoyable driving experience.
Messaging Apps: Messaging apps take communication to the next level by using text-to-speech and voice input technologies. Drivers can stay connected and informed through voice-enabled interactions, minimizing distraction and enhancing safety.
Navigation, Parking, and Charging Apps:These apps provide valuable support for drivers. Navigation apps offer real-time directions, while parking apps help locate available parking spaces. Charging apps aid electric vehicle drivers in finding charging stations, adding a layer of convenience to sustainable travel.
Impact on the Driving Experience
Third-party apps wield the power to reshape the driving experience, infusing it with innovation and convenience. Media apps transform mundane journeys into immersive musical experiences, while messaging apps ensure that communication remains seamless and hands-free. Navigation, parking, and charging apps not only guide drivers efficiently but also contribute to a greener and more sustainable travel ecosystem.
Guidelines for Quality and Safety
Google places paramount importance on quality and safety when it comes to third-party apps for Android Automotive. Google has provided a set of references and guidelines for developers:
Developers are encouraged to adhere to the quality guidelines outlined in the Android documentation. These guidelines ensure that apps are user-friendly, visually consistent, and minimize driver distraction.
Developing for Android Automotive
The realm of Android development has extended its reach beyond smartphones and tablets, embracing the automotive landscape with open arms. Developers now have the opportunity to create apps that enhance the driving experience, making vehicles smarter, safer, and more connected. In this context, let’s delve into exploring the tools, requirements, and considerations that drive this exciting endeavor.
Android Studio: The Gateway to Automotive Development
For developers venturing into the world of Android Automotive, Android Studio serves as an indispensable companion. This development environment provides dedicated Software Development Kits (SDKs) for Android versions R/11 and beyond, empowering developers to craft innovative applications tailored to vehicles’ unique needs.
Key highlights of developing for Android Automotive include:
SDK Availability: Android Studio offers automotive SDKs for Android versions R/11, S/12, and T/13. These SDKs extend their capabilities to the automotive domain, providing developers with the tools and resources they need to create engaging and functional automotive apps.
Minimum Android Studio Version: To develop automotive apps, developers need Android Studio version 4.2 or higher. This version includes the necessary tools and resources for automotive development, such as the Automotive Gradle plugin and the Automotive SDK.
Transition to Stability:Android Studio version 4.2 transitioned to a stable release in May 2021. This means that it is the recommended version for automotive development. However, developers can also use the latest preview versions of Android Studio, which include even more features and improvements for automotive development.
Automotive AVD for Android Automotive Car Service Development
The Automotive AVD (Android Virtual Device) provides developers with a platform to emulate Android Automotive systems, facilitating the refinement of apps and services before deployment to physical vehicles. Let’s explore the key components and aspects of the Automotive AVD.
SDK and System Image
The Automotive AVD operates within the Android 10.0 (Q) (latest T/13) software development kit (SDK). This SDK version is specifically tailored to the needs of Android Automotive Car Service. The AVD utilizes the “Automotive with Google Play Intel x86 Atom” system image, replicating the architecture and features of an Android Automotive environment on Intel x86-based hardware.
AVD Configuration
The AVD configuration is structured around the “Automotive (1024p landscape) API 29” and in the latest “Automotive (1024p landscape) API 32” setup. This configuration mimics a landscape-oriented 1024p (pixels) display, which is representative of the infotainment system commonly found in vehicles. This choice of resolution and orientation ensures that developers can accurately assess how their apps will appear and function within the context of an automotive display.
Additional Features
The Automotive AVD also includes a number of additional features that can be helpful for developers, such as:
Support for multiple displays:The Automotive AVD can be configured to support multiple displays, which is useful for developing apps that will be used in vehicles with large infotainment systems.
Support for sensors: The Automotive AVD can be configured to simulate a variety of sensors, such as the accelerometer, gyroscope, and magnetometer. This allows developers to test how their apps will behave in response to changes in the environment.
Support for connectivity:The Automotive AVD can be configured to connect to a variety of networks, such as Wi-Fi, cellular, and Bluetooth. This allows developers to test how their apps will behave when connected to the internet or other devices.
Testing and Experimentation
Developers can utilize the Automotive AVD for a range of purposes:
App Development:The AVD allows developers to test how their apps interact with the Android Automotive Car Service interface, ensuring compatibility and optimal performance.
User Experience:User interface elements, such as touch controls and voice interactions, can be evaluated in a simulated automotive environment.
Feature Integration:Developers can experiment with integrating their apps with Android Automotive Car Service features like navigation, voice commands, and media playback.
Advantages of Automotive AVD
Cost-Efficient:The Automotive AVD eliminates the need for dedicated physical hardware for testing, reducing costs and resource requirements.
Efficiency:Developers can rapidly iterate and debug apps within a controlled virtual environment.
Realistic Testing: The AVD closely emulates the behavior and constraints of an actual Android Automotive system, providing a realistic testing environment.
Customization:AVD configurations can be fine-tuned to match specific hardware and software requirements.
Embracing the Future: Considerations for Automotive Development
Developing for Android Automotive requires a strategic approach that takes into account the unique context of the driving environment. While the tools and SDKs provide a solid foundation, developers must also consider:
Driver Safety: Safety is paramount in the automotive domain. Apps should be designed with minimal driver distraction in mind, favoring voice interactions and intuitive interfaces that prioritize safe driving.
Contextual Relevance:The driving experience is distinct from other contexts. Apps should deliver information and services that are relevant to the road, such as navigation guidance, vehicle status, and communication functionalities.
User-Centric Design:User experience is key. Design apps that align with drivers’ needs, making interactions seamless and intuitive even in a dynamic and ever-changing driving environment.
Conclusion
Android Automotive represents a transformative leap in the automotive industry, seamlessly integrating technology into vehicles. The Car Service and Car Manager components facilitate communication between applications and the vehicle’s hardware, enhancing the user experience. As developers, exploring this ecosystem opens doors to innovative in-car applications while adhering to strict guidelines to ensure driver safety. With Android Automotive’s rapid advancement, the future promises even more exciting opportunities for both developers and car enthusiasts alike.
In the modern world, vehicles are no longer just modes of transportation; they have transformed into mobile entertainment hubs and communication centers. The integration of advanced audio systems in vehicles has revolutionized the driving experience, providing drivers and passengers with a seamless blend of music, navigation guidance, voice commands, and much more. However, what makes the audio in vehicles truly special goes beyond just the melodies and beats. In this blog, we delve into the intricacies of automotive audio systems, exploring the unique features that make them stand out.
What is special about audio in vehicles?
Automotive Audio is a feature of Android Automotive OS (AAOS) that allows vehicles to play infotainment sounds, such as media, navigation, and communications. AAOS is not responsible for chimes and warnings that have strict availability and timing requirements, as these sounds are typically handled by the vehicle’s hardware.
Here are some of the things that are special about audio in vehicles:
Many audio channels with special behaviors
In a vehicle, there can be many different audio channels, each with its own unique purpose. For example, there may be a channel for music, a channel for navigation instructions, a channel for phone calls, and a channel for warning sounds. Each of these channels needs to behave in a specific way in order to be effective. For example, the music channel should not be interrupted by the navigation instructions, and the warning sounds should be audible over all other channels.
Critical chimes and warning sounds
In a vehicle, it is important to be able to hear critical chimes and warning sounds clearly, even over loud music or other noise. This is why these sounds are often played through a separate set of speakers, or through the speakers at a higher volume.
Interactions between audio channels
The audio channels in a vehicle can interact with each other in a variety of ways. For example, the music channel may be muted when the navigation instructions are spoken, or the warning sounds may override all other channels. These interactions need to be carefully designed in order to ensure that the audio system is safe and effective.
Lots of speakers
In order to provide good sound quality in a vehicle, there are often many speakers installed. This is because the sound waves need to be able to reach all parts of the vehicle, even if the driver and passengers are not sitting directly in front of the speakers.
In addition to these special features, audio in vehicles is also subject to a number of challenges, such as:
Noise
There is often a lot of noise in a vehicle, from the engine, the road, and the wind. This noise can make it difficult to hear the audio system, especially the critical chimes and warning sounds.
Vibration
The vehicle can vibrate, which can also make it difficult to hear the audio system.
Temperature
The temperature in a vehicle can vary greatly, from very hot to very cold. This can also affect the performance of the audio system.
Despite these challenges, audio in vehicles is an important safety feature and can also be a great way to enjoy music and entertainment while driving.
Automotive Sounds and Streams
The world of automotive sounds and streams is a testament to the intersection of technology, design, and human experience. The symphony of sounds within a vehicle, coupled with the seamless integration of streaming services, creates a holistic journey that engages our senses and transforms the act of driving into an unforgettable adventure
In car audio systems using Android, different sounds and streams are managed:
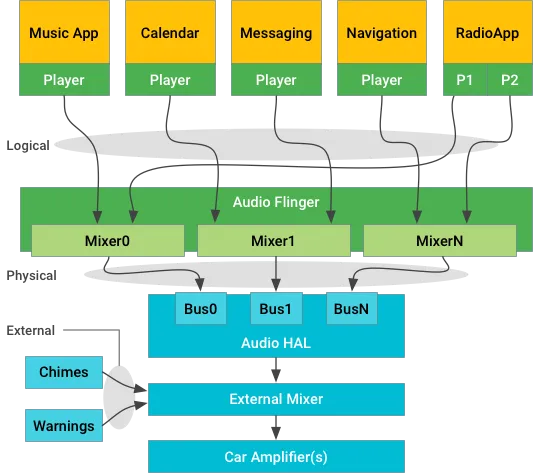
Stream-centric architecture diagram
Logical Streams
Logical streams are the streams of audio data that are generated by Android apps. These streams are tagged with AudioAttributes, which provide details like where they come from, and information about the type of audio, such as its importance, latency requirements, and desired output devices.
Physical Streams
Physical streams are the streams of audio data that are output by the vehicle’s audio hardware. These are the actual sounds that come out of the speakers. These streams are not tagged with AudioAttributes, as they are not controlled by Android. They are made by mixing logical streams together. Some sounds, like important warnings, are managed separately from Android.
The main difference between logical streams and physical streams is that logical streams are controlled by Android, while physical streams are not. This means that Android can control the volume, routing, and focus of logical streams, but it cannot control the volume, routing, or focus of physical streams.
Android App Sounds
Apps make sounds, like music or navigation. These sounds are sent to a mixer and then to the speakers. The mixer combines different sounds and makes them into one.
External Sounds
External sounds are sounds that are generated by sources other than Android apps, such as seatbelt warning chimes. These sounds are managed outside of Android and are not subject to the same audio policies as Android sounds. Some sounds shouldn’t go through Android, so they go directly to the mixer. The mixer can ask Android to pause other sounds when these important sounds play.
External sounds are typically managed outside of Android because they have strict timing requirements or because they are safety-critical. For example, a seatbelt warning chime must be played immediately when the seatbelt is not buckled, and it must be audible over any other sounds that are playing. This is why external sounds are typically handled by the vehicle’s hardware, rather than by Android software.
Contexts
Contexts are used to identify the purpose of the audio data. This information is used by the system to determine how to present the audio, such as the volume level, the priority, and whether or not it should be interrupted by other sounds.
Buses
Buses are logical groups of physical streams that are routed to the same output device. This allows the system to mix multiple audio streams together before sending them to the speakers.
Audio Flinger
AudioFlinger is the system service that manages the audio output. It uses the context to mix logical streams down to physical streams called buses. This allows multiple logical streams to be mixed together, even if they are in different formats or have different priorities.
The IAudioControl::getBusForContextmethod maps from context to bus. This method is used by applications to get the bus that is associated with a particular context. This information can be used to route the audio output to the desired speakers.
For example, the NAVIGATION context could be routed to the driver’s side speakers. This would ensure that the navigation instructions are always audible, even if the music is playing.
The physical streams, contexts, and buses are an important part of the Android audio system. They allow the system to intelligently manage the audio output and ensure that the most important sounds are always audible.
Output Devices
Audio Flinger is like the conductor of an orchestra. It takes the different streams from each context and mixes them together into something called a “bus.” Think of a bus as a big container for mixed sounds.
In the Audio HAL (the part of the system that handles audio), there’s something called “AUDIO_DEVICE_OUT_BUS.”It’s like a general way to send sounds to the speakers in a car. The AUDIO_DEVICE_OUT_BUS device type is the only supported output device type in Android Automotive OS. This is because it allows for the most flexibility in terms of routing and mixing audio streams.
A system implementation can choose to use one bus port for all Android sounds, or it can use one bus port for each CarAudioContext. A CarAudioContext is a set of audio attributes that define the type of audio, such as its importance, latency requirements, and desired output devices.
If a system implementation uses one bus port for all Android sounds, then Android will mix everything together and deliver it as one stream. This is the simplest approach, but it may not be ideal for all use cases. For example, if you want to be able to play different sounds from different apps at the same time, then you will need to use one bus port for each CarAudioContext.
The assignment of audio contexts to output devices is done through the car_audio_configuration.xml file. This file is used to define the audio routing and mixing policies for the vehicle.
Microphone Input
When we want to record audio (like using a microphone), the Audio HAL gets a request called “openInputStream.” This request includes a way to process the microphone sound.
There’s a special type called “VOICE_RECOGNITION.”This is used for things like the Google Assistant. It needs sound from two microphones (stereo) and can cancel echoes. Other processing is done by the Assistant.
If there are more than two microphones, we use a special setting called “channel index mask.” This setting helps handle multiple microphones properly.
Here’s a simple example of how to set this up in code:
Java
// Setting up the microphone formatAudioFormataudioFormat = new AudioFormat.Builder() .setEncoding(AudioFormat.ENCODING_PCM_16BIT) .setSampleRate(44100) .setChannelIndexMask(0xf/* 4 channels, 0..3 */) .build();// Creating an AudioRecord object with the formatAudioRecordaudioRecord = new AudioRecord.Builder() .setAudioFormat(audioFormat) .build();// Choosing a specific microphone device (optional)audioRecord.setPreferredDevice(someAudioDeviceInfo);
If both “setChannelMask” and “setChannelIndexMask” are used, then “setChannelMask” (maximum of two channels) wins.
Starting from Android 10, the Android system can record from different sources at the same time, but there are rules to protect privacy. Some sources, like FM radio, can be recorded along with regular sources like the microphone. Apps using specific devices like bus microphones need to tell the system which one to use explicitly.
Audio Context
Audio contexts are groups of audio usages that are used to simplify the configuration of audio in Android Automotive OS. Let’s first discuss audio usage
Audio Usage
In Android Automotive OS (AAOS), AudioAttributes.AttributeUsages are like labels for sounds.They help control where the sound goes, how loud it is, and who has control over it. Each sound or request for focus needs to have a specific usage defined. If no usage is set, it’s treated as a general media sound.
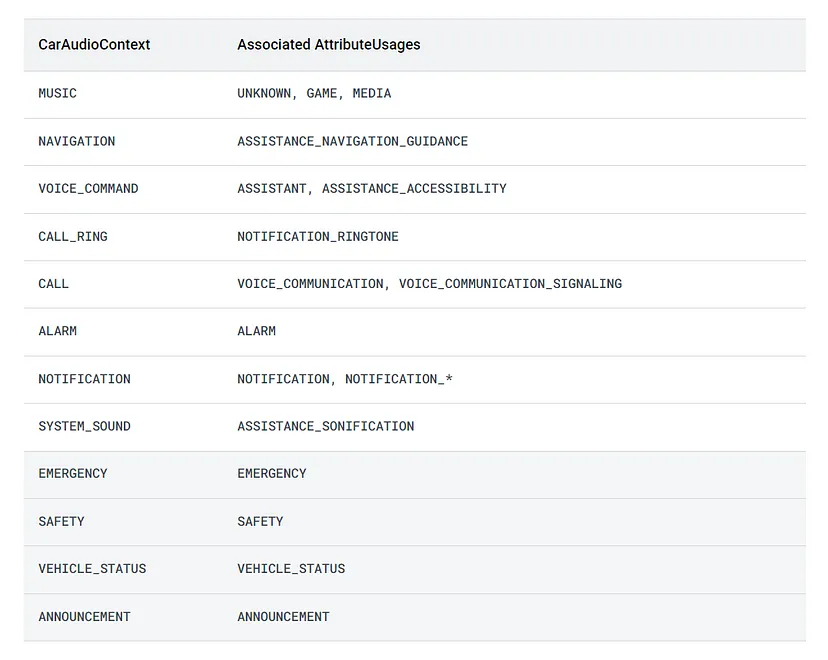
Android 11 introduced system usages, which are special labels that require specific permissions to use. These are:
USAGE_EMERGENCY
USAGE_SAFETY
USAGE_VEHICLE_STATUS
USAGE_ANNOUNCEMENT
To set a system usage, you use AudioAttributes.Builder#setSystemUsage. If you try to mix regular usage with system usage, it won’t work.
Java
package com.softaai.automotive.audioimport android.media.AudioAttributes;/** * Created by amoljp19 on 8/12/2023. * softAai Apps. */publicclassAudioAttributesExample {publicstaticvoidmain(String[] args) {// Constructing AudioAttributes with system usageAudioAttributes.BuilderattributesBuilder = new AudioAttributes.Builder() .setSystemUsage(AudioAttributes.USAGE_ALARM); // Set a system usage (alarm)// You can also set a general usage, but not both a system usage and a general usage// attributesBuilder.setUsage(AudioAttributes.USAGE_MEDIA); // Uncommenting this line would cause an error// Building the AudioAttributes instanceAudioAttributesaudioAttributes = attributesBuilder.build();// Checking the associated system usage or usageintsystemUsage = audioAttributes.getSystemUsage();System.out.println("Associated System Usage: " + systemUsage); }}
In this example:
We use AudioAttributes.Builder to create an instance of audio attributes.
We use setSystemUsage to specify a system context for the audio, in this case, an alarm usage.
Attempting to set both a system usage and a general usage using setUsage would result in an error,so that line is commented out.
We then build the AudioAttributes instance using attributesBuilder.build().
Finally, we use audioAttributes.getSystemUsage() to retrieve the associated system usage and print it.
Audio Context
Audio contexts are used in Android to identify the purpose of a sound. This information is used by the system to determine how to present the sound, such as the volume level, the priority, and whether or not it should be interrupted by other sounds.
The following are the audio contexts that are currently defined in Android:
MUSIC: This is for playing music in the vehicle, like your favorite songs.
NAVIGATION:These are the directions your vehicle’s navigation system gives you to help you find your way.
VOICE_COMMAND:When you talk to the vehicle, like telling it to change settings or do something for you.
CALL_RING:When someone is calling you, this is the ringing sound you hear.
CALL:This is for when you’re having a conversation with someone on the phone while in the vehicle.
ALARM:A loud sound that might go off if something needs your immediate attention.
NOTIFICATION:These are little messages or reminders from the vehicle’s systems.
SYSTEM_SOUND:The sounds you hear when you press buttons or interact with the vehicle’s controls.
The following table summarizes the mapping between audio contexts and usages in Android Automotive OS:
The audio contexts in Android 11
The audio context for a sound can be specified by the application that is playing the sound. This is done by setting the context property of the AudioAttributes object that is used to create the sound.
The system uses the audio context to determine how to present the sound. For example, the volume level of a sound may be higher for the MUSIC context than for the NOTIFICATION context. The system may also choose to interrupt a sound of a lower priority with a sound of a higher priority.
Audio contexts are an important part of the Android audio system. They allow the system to intelligently manage the audio output and ensure that the most important sounds are always audible.
Multi-zone Audio
In cars, multiple people might want to listen to different things at the same time. Multi-zone audio makes this possible. For instance, the driver could be playing music in the front while passengers watch a video in the back.
Starting from Android 10, car makers (OEMs) can set up separate audio zones in the vehicle. Each zone is like a specific area with its own volume control, sound settings, and ways to switch between different things playing.
Imagine the main cabin is one zone, and the screens and headphone jacks in the back are another zone.
This setup is done using a special file called “car_audio_configuration.xml.” A part of the car’s system reads this and decides how sounds should move between zones. When you start a music or video player, the system knows where to send the sound based on the zone and what you’re doing.
Each zone can focus on its own sounds, so even if two people are listening to different things, their sounds won’t interfere with each other. This makes sure everyone gets their own audio experience.
Configure multi-zone audio
Zonesare collections of devices within the vehicle that are grouped together for audio routing and focus management. Each zone has its own volume groups, routing configuration for contexts, and focus management.
The zones are defined in car_audio_configuration.xml. This file is used to define the audio routing and focus policies for the vehicle.
When a player is created, CarAudioService determines for which zone the player is associated with. This is done based on the player’s uid and the audio context of the stream that it is playing.
Focus is also maintained independently for each audio zone. This means that applications in different zones can independently produce audio without interfering with each other.
CarZonesAudioFocus within CarAudioService is responsible for managing focus for each zone. This ensures that only one application can have an audio focus in a given zone at a time.
In a simpler way, multi-zone audio lets different parts of the car play different sounds at the same time, so everyone can enjoy what they want to hear.
Audio HAL
In automotive audio, the Android system uses something called the Audio HAL to manage audio devices. This helps control how sounds are sent to speakers and received from microphones.
Audio HAL Components:
IDevice.hal:Handles creating sound streams, controlling volume, and muting. It uses “createAudioPatch” to connect different devices for sound.
IStream.hal:Manages the actual streaming of audio to and from the hardware, both for input and output.
Automotive Device Types:
Here are some device types that matter for cars:
AUDIO_DEVICE_OUT_BUS:Main output for all Android sounds in the car.
AUDIO_DEVICE_OUT_TELEPHONY_TX: For sending audio to the phone for calls. Here “TX” stands for “transmit”. In general, TX refers to the device that is sending data.
AUDIO_DEVICE_IN_BUS:Used for inputs that don’t fit other categories.
AUDIO_DEVICE_IN_FM_TUNER:Only for radio input.
AUDIO_DEVICE_IN_LINE:For things like AUX input.
AUDIO_DEVICE_IN_BLUETOOTH_A2DP: For music from Bluetooth.
AUDIO_DEVICE_IN_TELEPHONY_RX:For audio from phone calls. Here “RX” stands for “receive.” In general, RX refers to the device that is receiving data.
Configuring Audio Devices:
To make audio devices work with Android, they must be defined in a file called “audio_policy_configuration.xml”.
module name: It specifies the type of device, like “primary” for automotive.
devicePorts:This is where you define different input and output devices with their settings.
mixPorts:It lists the different streams for audio, like what’s coming from apps.
routes:These are connections between devices and streams.
For example, you can define an output device called “bus0_phone_out” that mixes all Android sounds. You can also set the volume levels for it.
In simpler words, the Audio HAL helps manage how sounds come out of speakers and go into microphones in cars. Devices and settings are defined in a special file to make everything work correctly.
Chimes and warnings
Chimes and warnings within vehicles serve as auditory cues that communicate vital information to the driver and occupants. From seatbelt reminders to collision warnings, these sounds are designed to promptly draw attention to situations that require immediate action. These auditory cues enhance situational awareness and contribute to the overall safety of the driving experience.
Android’s Role in Automotive Audio
While Android has become a ubiquitous operating system for various devices, it presents certain considerations when it comes to automotive safety. Android, in its standard form, is not classified as a safety-critical operating system. Unlike dedicated safety-critical systems found in vehicles, Android’s primary focus is on delivering a versatile and user-friendly platform.
The Absence of an Early Audio Path
In the context of chimes and warnings, Android lacks an early audio path that is essential for producing regulatory and safety-related sounds. An early audio path would involve direct access to the audio hardware, ensuring that these crucial sounds are played promptly and without interruption. Android, being a multifunctional operating system, may not possess the mechanisms required for such instantaneous audio playback.
Regulatory Sounds Beyond Android
Given the critical nature of regulatory chimes and warnings, generating and delivering these sounds falls outside the Android operating system. To ensure that these sounds are reliable and timely, they are often generated and mixed independently from Android, later integrating into the vehicle’s overall audio output chain. This approach guarantees that regulatory sounds maintain their integrity, even in scenarios where Android might face limitations due to its primary focus on versatility.
Safety-Critical Considerations
The absence of an early audio path within Android highlights a broader concern related to the safety-critical nature of automotive audio. As vehicles continue to integrate advanced technologies, including infotainment systems and connectivity features, the challenge lies in finding the balance between innovation and safety. Regulatory bodies and automotive manufacturers collaborate to ensure that safety-critical elements, such as chimes and warnings, are given the utmost attention and reliability.
The Road Ahead: Safety and Technology Integration
The integration of technology, including operating systems like Android, into vehicles is a testament to the dynamic evolution of the automotive landscape. As the industry continues to innovate, addressing safety concerns remains paramount. The future promises advancements that bridge the gap between safety-critical needs and technological capabilities. This may involve further synchronization between Android and the vehicle’s safety systems, ensuring that critical alerts and warnings are delivered seamlessly and without compromise.
In short, the realm of chimes and warnings in automotive audio underscores the delicate balance between safety and technology. While Android contributes significantly to the modern driving experience, there are specific safety-critical aspects, such as regulatory sounds, that demand specialized attention. The collaborative efforts of regulatory bodies, automotive manufacturers, and technology providers will continue to shape a safer and more immersive driving journey for all.
Conclusion
The audio systems in modern vehicles have evolved far beyond their humble beginnings as simple radios. They have become intricate orchestras, harmonizing various audio contexts to provide an engaging and safe driving experience. The integration of multiple audio channels, critical warning sounds, seamless context interactions, and an abundance of speakers all contribute to the unique symphony that accompanies us on our journeys. As technology continues to advance, we can only anticipate further innovations that will elevate the in-car audio experience to new heights.
The Polestar 2 is the first car with Android Automotive OS Get ready for an incredible driving experience as I unlock the secrets of Android Automotive! Just like your beloved gadgets and apps, now your car can deliver the same easy and exciting journey you’ve come to love. Picture this: seamless integration with your personal...
In Kotlin, we often come across situations where we need to call functions on objects using dot notation, which can sometimes lead to verbose and cluttered code. To address this issue, Kotlin introduces the concept of infix functions, a powerful feature that allows you to call methods in a more concise and intuitive way. In...
Kotlin is a modern, statically typed programming language that runs on the Java Virtual Machine (JVM). One of the language’s powerful features is reflection, which allows you to examine and manipulate the structure of your code at runtime. Kotlin reflection provides a set of APIs that enable introspection, dynamic loading, and modification of classes, objects, properties, and functions. In this blog post, we will delve into the world of Kotlin reflection, exploring its various aspects and providing examples to help you understand its capabilities.
Basics of Reflection in Kotlin
Reflection in Kotlin allows you to access properties and methods of objects dynamically at runtime, without knowing them in advance. Normally, when you access a method or property, your program’s source code references a specific declaration, and the compiler ensures that the declaration exists. However, there are situations where you need to work with objects of any type or where the names of methods and properties are only known at runtime. This is where reflection comes in handy.
In Kotlin, there are two reflection APIs you can work with. The first one is the standard Java reflection API, which is defined in java.lang.reflect package. Since Kotlin classes are compiled to regular Java bytecode, the Java reflection API works perfectly with Kotlin. This means that Java libraries that use reflection are fully compatible with Kotlin code.
The second reflection API is the Kotlin reflection API, defined in the kotlin.reflect package. This API provides access to concepts that don’t exist in the Java world, such as properties and nullable types. However, it doesn’t fully replace the Java reflection API, and there may be cases where you need to use Java reflection instead. It’s important to note that the Kotlin reflection API is not restricted to Kotlin classes alone; you can use it to access classes written in any JVM language.
Let’s take an example to understand how reflection can be useful. Suppose you have a JSON serialization library that needs to serialize any object to JSON. Since the library can’t reference specific classes and properties, it relies on reflection to dynamically access and serialize the object’s properties at runtime. This allows the library to handle objects of different types without having prior knowledge about their structure.
Here’s a simplified example of using reflection in Kotlin to access the properties of an object dynamically:
Kotlin
dataclassPerson(val name: String, val age: Int)funmain() {val person = Person("Alice", 25)val properties = person.javaClass.declaredFieldsfor (property in properties) { property.isAccessible = truevalvalue = property.get(person)println("${property.name}: $value") }}
In this example, we have a Person class with two properties: name and age. Using reflection, we retrieve the declared fields (name and age) of the person object dynamically. By setting the isAccessible property to true, we ensure that we can access private fields as well. Finally, we get the values of the properties using the get() method and print them.
JVM dependency
To add the Kotlin reflection library as a dependency in your JVM project, you’ll need to include the kotlin-reflect artifact. Here’s how you can do it in Gradle and Maven:
Make sure to replace the version (1.9.0 in this example) with the version you desire to use or the latest updated one.
If you’re not using Gradle or Maven, ensure that the kotlin-reflect.jar is present in the classpath of your project. For IntelliJ IDEA projects that use the command-line compiler or Ant, the reflection library is automatically added by default. However, in the command-line compiler and Ant, you can use the -no-reflect compiler option to exclude kotlin-reflect.jar from the classpath if you don’t need it.
Note that, to reduce the runtime library size on platforms where it matters, such as Android, the Kotlin reflection API is packaged into a separate .jar file, kotlin-reflect.jar, which isn’t added to the dependencies of new projects by default. If you’re using the Kotlin reflection API, you need to make sure the library is added as a dependency. IntelliJ IDEA can detect the missing dependency and assist you with adding it.
Kotlin reflection API
The Kotlin reflection API provides a set of classes and interfaces that allow you to inspect and manipulate the structure and behavior of Kotlin classes at runtime. Here are the main components of the Kotlin reflection API that you mentioned:
KClass
In Kotlin, the main entry point for the reflection API is the KClass interface, which represents a class. It serves as a counterpart to Java’s java.lang.Class and allows you to perform various reflection operations.
To obtain an instance of KClass, you can use the ::class syntax on a class name. For example, if you have a class named MyClass, you can get its KClass instance like this:
Kotlin
val myClassKClass: KClass<MyClass> = MyClass::class
Once you have a KClass instance, you can use it to enumerate and access the declarations contained within the class, its superclasses, interfaces, and so on. The KClass interface provides functions and properties to perform these operations.
To get the KClass of an object at runtime, you can use the javaClass property, which returns the corresponding Java class. Then, you can access the .kotlin extension property on the Java class to obtain the Kotlin reflection counterpart (KClass). Here’s an example:
Kotlin
val obj = MyClass()val objKClass: KClass<outMyClass> = obj.javaClass.kotlin
In the above example, obj.javaClass returns the Java class of the obj instance, and .kotlin is used to obtain the corresponding KClass instance.
Once you have a KClass instance, you can use it to perform reflection operations such as accessing properties, functions, constructors, annotations, and more.
Kotlin
classPerson(val name: String, val age: Int)val person = Person("Alice", 29)val kClass = person.javaClass.kotlinprintln(kClass.simpleName)kClass.memberProperties.forEach { println(it.name) }
Output:
Person
age
name
Explanation:
The Person class is defined with two properties: name of type String and age of type Int.
An instance of Person named person is created with the values “Alice” and 29 for the name and age properties, respectively.
person.javaClass returns the corresponding Java class object for the person instance.
kotlin is used as an extension property on the Java class object to obtain the KClass instance representing the Person class, which is assigned to the kClass variable.
kClass.simpleName prints the simple name of the class, which in this case is “Person”.
kClass.memberProperties returns a collection of KProperty objects representing the non-extension properties of the class, including properties defined in its superclasses.
The forEach function is used to iterate over each KProperty object in the collection and print its name. In this example, it prints “age” and “name”, which are the names of the properties defined in the Person class.
By using kClass.memberProperties, you can retrieve all the non-extension properties defined in a class, including those inherited from its superclasses. This is a useful feature of Kotlin reflection for dynamically inspecting and working with class properties at runtime.
If you browse the declaration of KClass, you’ll see that, KClass interface in Kotlin reflection provides several useful methods and properties for accessing the contents of a class. Here are some additional features of KClass:
simpleName:Returns the simple name of the class as a String. This property is useful for getting the name of the class without any package information.
qualifiedName: Returns the fully qualified name of the class as a String, including the package name. This property is useful when you need the complete name of the class, including the package.
members:Returns a collection of KCallable objects representing all members (properties, functions, etc.) of the class. This includes both declared members and inherited members from superclasses.
constructors:Returns a collection of KFunction objects representing all constructors of the class. This allows you to retrieve information about the constructors and their parameters.
nestedClasses:Returns a collection of KClass objects representing all nested classes declared within the class. This is useful if you want to access and work with nested classes.
These are just a few examples of the additional features provided by the KClass interface. You can find more details and explore other methods and properties available in the Kotlin standard library reference (http://mng.bz/em4i).
KCallable
In Kotlin, when you want to access and call functions or properties dynamically through reflection, you can use the KCallable interface. KCallable is a super interface for functions and properties, and it declares the call method, which allows you to invoke the corresponding function or property getter.
Here’s an example of using the call method to call a function through reflection:
In this example, the ::foo syntax refers to the function foo and returns an instance of the KFunction class from the reflection API. By using the call method on kFunction, you can invoke the referenced function. In this case, we provide a single argument, 42.
If you try to call the function with an incorrect number of arguments, such as function.call(), it will throw a runtime exception with the message “IllegalArgumentException: Callable expects 1 arguments, but 0 were provided.”
To provide better type safety and enforce the correct number of arguments, you can use a more specific method called invoke. The type of the ::foo expression, in this case, is KFunction1<Int, Unit>, which contains information about parameter and return types. The 1 denotes that this function takes one parameter of type Int. You can then use the invoke method to call the function with a fixed number of arguments:
In the above example, kFunction.invoke(1, 2) calls the sum function with arguments 1 and 2, and kFunction(3, 4) is a shorthand notation for invoking the function. Since kFunction is of type KFunction2<Int, Int, Int>, it only accepts two arguments of type Int. If you try to call it with an incorrect number of arguments, the code won’t compile.
So, if you have a KFunction of a specific type with known parameters and return type, it’s recommended to use its invoke method for type safety. The call method is a more generic approach that can work with any type of function but doesn’t provide the same level of type safety.
BTW, How, and where are KFunctionN interfaces defined?
The KFunctionN interfaces, such as KFunction1, KFunction2, and so on, represent functions with different numbers of parameters. Each of these types extends the KFunction interface and adds an invoke member with the corresponding number of parameters.
For example, the KFunction2 interface declares the invoke method as follows:
Kotlin
operatorfuninvoke(p1: P1, p2: P2): R
Here, P1 and P2 represent the parameter types of the function, and R represents the return type.
It’s important to note that these function types, represented by KFunctionN, are synthetic compiler-generated types. You won’t find their explicit declarations in the kotlin.reflect package or any other standard Kotlin library.
The synthetic types approach allows for flexibility in the number of parameters a function type can have. Generating these types dynamically reduces the size of the kotlin-runtime.jar and avoids imposing artificial restrictions on the maximum number of function-type parameters.
So, the KFunctionN interfaces are synthetic types created by the compiler to represent functions with different numbers of parameters. They are not explicitly defined in the kotlin.reflect package, and their generation is based on the function’s parameter and return types.
KProperty
In Kotlin, you can also use reflection to access and retrieve property values dynamically. The KProperty interface provides methods to achieve this, with different interfaces for top-level properties and member properties.
For top-level properties, you can use instances of the KProperty0 interface, which has a no-argument get method. Here’s an example:
Kotlin
var counter = 0val kProperty = ::counterkProperty.setter.call(21)println(kProperty.get()) // Output: 21
In this example, kProperty refers to the top-level property counter. By calling kProperty.get(), you retrieve the current value of the property.
For member properties, you need to use the appropriate interface based on the number of arguments the get method requires. For example, KProperty1 is used for member properties with a single argument. You also need to provide the object instance on which the property is accessed. Here’s an example:
Kotlin
classPerson(val name: String, val age: Int)val person = Person("Alice", 29)val memberProperty = Person::ageprintln(memberProperty.get(person)) // Output: 29
In this case, memberProperty refers to the age property of the Person class. By calling memberProperty.get(person), you retrieve the value of the age property for the specific person instance.
It’s important to note that KProperty1 is a generic class. The type of memberProperty in the above example is KProperty<Person, Int>, where the first type parameter represents the type of the receiver (in this case, Person) and the second type parameter represents the property type (Int). This ensures that you can only call the get method with a receiver of the correct type. Attempting to call memberProperty.get("Alice") would result in a compilation error.
Please keep in mind that reflection can only be used to access properties defined at the top level or within a class, and not local variables within a function. If you try to obtain a reference to a local variable using::x, you will encounter a compilation error stating that “References to variables aren’t supported yet”.
Hierarchy of interfaces in Kotlin Reflection API
In Kotlin, there is a hierarchy of interfaces that allows you to access source code elements at runtime. These interfaces are designed to represent declarations and provide access to various information about them.
Hierarchy of interfaces in the Kotlin reflection API
Here’s a breakdown of the key interfaces mentioned:
KAnnotatedElement: This interface serves as the base for all other interfaces that represent declarations at runtime, such as KClass, KFunction, and KParameter. Since all declarations can be annotated, they inherit this interface to provide access to annotations.
KClass:This interface is used to represent both classes and objects at runtime. It provides access to information about the class or object, such as its name, superclass, interfaces, properties, and functions.
KProperty: This interface represents any property at runtime, regardless of whether it’s mutable (var) or read-only (val). It allows you to access information about the property, such as its name, type, annotations, and the getter function.
KMutableProperty: This is a subclass of KProperty and specifically represents a mutable property, which is declared using var. It provides additional functionality to modify the property’s value, in addition to the information available through KProperty.
Getter and Setter: These are special interfaces defined in Property and KMutableProperty to work with property accessors as functions. They extend the KFunction interface, allowing you to access information about the getter and setter functions associated with the property. For example, you can retrieve annotations applied to the getter or setter.
Note that the figure mentions the omission of specific interfaces like KProperty0 for simplicity. KProperty0 represents a property without any parameters (zero-argument property). Similarly, there are other specific interfaces in the hierarchy that cater to different scenarios and numbers of parameters.
Overall, these interfaces in the hierarchy provide a flexible and comprehensive way to access and manipulate source code elements at runtime, allowing you to retrieve information, modify values, and work with annotations.
Best Practices and Use Cases for Kotlin Reflection:
Serialization and Deserialization
Reflection is commonly used in serialization and deserialization libraries. It allows these libraries to introspect object structures dynamically, enabling automatic conversion between objects and their serialized forms. Reflection facilitates the inspection of object properties and their values, making it easier to transform objects into a serialized format and vice versa.
In this example, reflection is used to serialize a Person object by obtaining its properties using memberProperties and creating a map of property names and values. The same reflection-based approach is used to deserialize the serialized data back into a Person object.
Dependency Injection
Frameworks like Spring heavily rely on reflection for implementing dependency injection. Reflection enables these frameworks to scan classes, examine annotations, and wire dependencies at runtime. By leveraging reflection, frameworks can automatically discover and instantiate the required dependencies, reducing the need for manual configuration. Reflection helps in achieving loose coupling and makes the dependency injection process more flexible and adaptable.
Kotlin
classServiceA {fundoSomething() {println("Service A is doing something.") }}classServiceB {fundoSomethingElse() {println("Service B is doing something else.") }}classClient(privateval serviceA: ServiceA, privateval serviceB: ServiceB) {funperformActions() { serviceA.doSomething() serviceB.doSomethingElse() }}funmain() {val clientClass = Client::classval constructors = clientClass.constructorsif (constructors.isNotEmpty()) {val constructor = constructors.first()val parameters = constructor.parameters// Dependency injection using reflectionval serviceA = ServiceA()val serviceB = ServiceB()val client = constructor.callBy(mapOf(parameters[0] to serviceA, parameters[1] to serviceB)) client.performActions() }}
In this example, reflection is used for dependency injection. The Client class has dependencies on ServiceA and ServiceB. Using reflection, the constructor of Client is obtained, and the dependencies are instantiated (ServiceA and ServiceB). The dependencies are then injected into the Client object using callBy and a map of parameter-to-argument pairs.
Testing and Mocking
Reflection is valuable in testing and mocking scenarios. It allows developers to examine and modify internal state, invoke private methods, and create mock objects dynamically. Reflection provides the ability to access and modify otherwise inaccessible members, which is particularly useful for unit testing private methods or creating mock objects with dynamically generated behavior. It simplifies the process of writing test cases and enables comprehensive testing of code components.
Kotlin
classMathUtils {privatefunmultiply(a: Int, b: Int): Int {return a * b }funsquare(n: Int): Int {returnmultiply(n, n) }}funmain() {val mathUtils = MathUtils()val multiplyMethod = mathUtils::class.declaredFunctions .firstOrNull { it.name == "multiply" } multiplyMethod?.let { it.isAccessible = trueval result = it.call(mathUtils, 4, 5)println(result) // Output: 20 }}
In this example, reflection is used for testing and mocking. The private multiply method of the MathUtils class is accessed using reflection by setting its accessibility to true. The call method is then used to invoke the method with arguments. This allows us to test the private method’s functionality or mock its behavior in a controlled testing environment.
By following these best practices and leveraging Kotlin reflection in appropriate use cases such as serialization, dependency injection, and testing, developers can harness the full potential of reflection to enhance the flexibility, extensibility, and maintainability of their Kotlin applications.
Limitations of Kotlin Reflection
Reflection has some limitations, such as being unable to access private members by default, requiring additional permissions in security-restricted environments, and being less type-safe than static typing.
The limitations of Kotlin reflection include:
Performance Overhead: Reflection operations incur performance overhead compared to statically typed code, as they involve runtime introspection and dynamic dispatch.
Limited Access to Private Members: By default, Kotlin reflection does not provide direct access to private members of classes. Access to private members requires setting accessibility, which may have security implications.
Security and Permissions: In security-restricted environments, using reflection may require additional permissions or explicit configuration to prevent unauthorized access.
Type Safety: Reflection is inherently less type-safe compared to static typing. Type errors that would normally be caught by the compiler can only be detected at runtime when using reflection.
Limited Compile-Time Checks: Reflection bypasses many compile-time checks provided by the Kotlin compiler. Renaming elements accessed via reflection may lead to runtime errors that are not caught during compilation.
Platform Dependencies: Kotlin reflection relies on platform-specific features and APIs, which may introduce variations in behavior and capabilities across different platforms.
Conclusion
Kotlin reflection provides a powerful set of APIs that enable you to examine and manipulate your code dynamically at runtime. From accessing class information to modifying properties and invoking functions dynamically, reflection opens up a whole new range of possibilities in your Kotlin projects. However, it’s essential to use reflection judiciously and be aware of its performance implications. By understanding the concepts and best practices outlined in this blog post, you’ll be well-equipped to leverage the full potential of Kotlin reflection in your applications.
Annotations are a powerful feature in the Kotlin programming language that allows you to add metadata and additional information to your code. They provide a way to decorate classes, functions, properties, and other program elements with custom markers, which can be processed at compile time or runtime. In this blog post, we will dive deep...
Kotlin is a modern programming language that offers powerful features for building robust and type-safe applications. One such feature is generics, which allows developers to write reusable code that can work with different types. In this blog post, we will delve into the concept of Kotlin generics and explore the intricacies of variance, providing clear explanations and practical examples along the way.
In Kotlin, there are some advanced concepts related to generics that we will explore. These concepts include reified type parameters and declaration-site variance. While they may sound unfamiliar, don’t worry! This blog post will cover them in detail.
Generic type parameters
In Kotlin Generics, you can define types that have type parameters, allowing for more flexible and reusable code. When you create an instance of such a type, you substitute the type parameters with specific types, known as type arguments. This allows you to specify the kind of data that will be stored or processed by the type.
For example, let’s consider the List type. In Kotlin, you can declare a variable of type List<String>, which means it holds a list of strings. Similarly, the Map type has type parameters for the key type (K) and the value type (V). You can instantiate a Map with specific arguments, such as Map<String, Person>, which represents a map with string keys and Person values.
In many cases, the Kotlin compiler can infer the type arguments based on the context. For example:
Kotlin
val authors = listOf("Stan Lee", "J.K Rowling")
Here, since both values passed to the listOf function are strings, the compiler infers that you’re creating a List<String>. However, when creating an empty list, there is nothing to infer the type argument from, so you need to specify it explicitly. You have two options for specifying the type argument:
Kotlin
// here created empty list, so nothing to infer, so specified type argument(i.e String) explicitly.val readers: MutableList<String> = mutableListOf()val readers = mutableListOf<String>()
Both of these declarations are equivalent and create an empty mutable list of strings.
It’s important to note that Kotlin always requires type arguments to be either specified explicitly or inferred by the compiler. In contrast, Java allows the use of raw types, where you can declare a variable of a generic type without specifying the type argument. However, Kotlin does not support raw types, and type arguments must always be defined.
So, in Kotlin, you won’t encounter situations where you can use a generic type without providing the type arguments explicitly or inferring them through type inference.
Generic functions and properties
In Kotlin generics, You can write generic functions and properties to work with any type, providing flexibility and reusability. Generic functions have their own type parameters, which are replaced with specific type arguments when invoking the function. Similarly, generic properties allow you to define properties that are parameterized by a type.
Let’s explore examples of generic functions and properties to understand how they work.
Generic Functions
To illustrate, let’s consider the slice function, which returns a list containing elements at specified indices. Its declaration looks like this:
The generic function slice has the type parameter T
Kotlin
fun <T> List<T>.slice(indices: IntRange): List<T> {// Implementation goes here}
In this example, <T> is the type parameter, which represents the unknown type that will be specified when calling the function. The List<T> is the receiver type, indicating that this function is an extension function for lists. The return type List<T> ensures that the resulting list has the same type as the input list.
When invoking the slice function, you can either explicitly specify the type argument or rely on type inference:
Kotlin
val letters = ('a'..'z').toList()println(letters.slice<Char>(0..2)) // Specifies the type argument explicitly, o/p - [a, b, c]println(letters.slice(10..13)) // The compiler infers that T is Char here, o/p - [k, l, m, n]
The compiler can often infer the type argument based on the context, so you don’t need to explicitly provide it. In both cases, the result type will be List<Char>.
Generic type parameter used in parameter Function Type
When a generic type parameter is used in a parameter function type like (T) -> Boolean, it allows the function to accept a lambda or function that operates on elements of the generic type. The compiler infers the type based on the context and ensures type safety throughout the filtering process. Let’s see it in detail.
Consider the filter function, which filters a list based on a provided predicate. Its declaration looks like this:
In this example, <T> is the type parameter, representing the unknown type that will be specified when calling the function. The List<T> is the receiver type, indicating that this function is an extension function for lists. The predicate parameter has the function type (T) -> Boolean, which means it accepts a function that takes a parameter of type T and returns a Boolean value.
When using the filter function, you can provide a lambda expression as the predicate. The compiler infers the type based on the function’s declaration and the type of the list being filtered. Here’s an example:
Kotlin
val authors = listOf("Stan Lee", "J.K.Rowling")val readers = mutableListOf<String>(/* ... */)val filteredReaders = readers.filter { it !in authors }
In this case, the lambda expression { it !in authors } is used as the predicate. The compiler determines that the lambda parameter it has the type T, which is inferred to be String because the filter function is called on List<String> (readers).
By utilizing the generic type parameter T in the function declaration, the filter function can work with any type of list and apply the provided predicate accordingly.
Generic Extension Properties
Similar to generic functions, you can declare generic extension properties using the same syntax. For example, let’s define an extension property penultimate that returns the element before the last one in a list:
Kotlin
val <T> List<T>.penultimate: T// This generic extension property can be called on a list of any kindget() = this[size - 2]
In this case, <T> is the type parameter, and it is part of the receiver type List<T>. The get() function provides the implementation for retrieving the penultimate element.
You can then use the penultimate property on a list:
Kotlin
println(listOf(1, 2, 3, 4).penultimate) //The type parameter T is inferred to be Int in this invocation// Output: 3
Note that generic non-extension properties are not allowed in Kotlin. Regular (non-extension) properties cannot have type parameters because they are associated with a specific class or obect and cannot store multiple values of different types.
If you attempt to declare a generic non-extension property, the compiler will report an error similar to the following:
Kotlin
val <T> x: T = TODO()// ERROR: type parameter of a property must be used in its receiver type
The error message indicates that the type parameter T used in the property declaration should be associated with its receiver type, but since regular properties are specific to a class or object, it doesn’t make sense to have a generic property that can accommodate multiple types.
Declaring generic classes
Just like in Java, in Kotlin also, you can declare generic classes and interfaces by using angle brackets after the class name and specifying the type parameters within the angle brackets. These type parameters can then be used within the body of the class, just like any other types.
For example, let’s consider the declaration of the standard Java interface List in Kotlin:
In this example, List is declared as a generic interface with a type parameter T. You can use this type parameter in the interface’s methods and other declarations.
When a class extends a generic class or implements a generic interface, you need to provide a type argument for the generic parameter of the base type. This type argument can be a specific type or another type parameter.
In the first example, the StringList class extends List<String>, which means it specifically contains String elements. The get function in StringList will have the signature fun get(index: Int): String instead of fun get(index: Int): T.
In the second example, the ArrayList class defines its own type parameter T and specifies it as the type argument for the superclass List<T>.
Note that T in ArrayList is not the same as in List — it’s a new type parameter, and it doesn’t need to have the same name.
Additionally, a class can even refer to itself as a type argument. Classes implementing the Comparable interface are the classical example of this pattern. Any comparable element must define how to compare it with objects of the same type:
In this example, the String class implements the generic Comparable interface by specifying String as the type argument for the type parameter T.
Type parameter constraints
Type parameter constraints in Kotlin allow you to limit the types that can be used as arguments for a class or function. This ensures that only specific types or their subtypes can be used.
When you specify a type as an upper bound constraint for a type parameter of a generic type, the corresponding type arguments in specific instantiations of the generic type must be either the specified type or its subtypes(For now, you can think of subtype as a synonym for subclass).
To specify a constraint, you put a colon after the type parameter name, followed by the type that’s the upper bound for the type parameter. In Java, you use the keyword extends to express the same concept: T sum(List list)
Constraints are defined by specifying an upper bound after a type parameter
Let’s start with an example. Suppose we have a function called sum that calculates the sum of elements in a list. We want this function to work with List<Int> or List<Double>, but not with List<String>. To achieve this, we can define a type parameter constraint that specifies the type parameter of sum must be a number.
Kotlin
fun <T : Number> sum(list: List<T>): T {var result = 0.0for (element in list) { result += element.toDouble() }return result as T}
In this example, we specify <T : Number> as the type parameter constraint, indicating that T must be a subclass of Number. Now, when we invoke the function with a list of integers, it works correctly:
Kotlin
println(sum(listOf(1, 2, 3))) // Output: 6
The type argument Int extends Number, so it satisfies the type parameter constraint.
You can also use methods defined in the class used as the bound for the type parameter constraint. Here’s an example:
In this case, T is constrained to be a subclass of Number, so we can use methods defined in the Number class, such as toDouble().
Now let’s consider another example where we want to find the maximum of two items. Since it’s only possible to compare items that are comparable to each other, we need to specify that requirement in the function signature using the Comparable interface:
Kotlin
fun <T : Comparable<T>> max(first: T, second: T): T {returnif (first > second) first else second}println(max("kotlin", "java")) // Output: kotlin
In this case, we specify <T : Comparable<T>> as the type parameter constraint. It ensures that T can only be a type that implements the Comparable interface. Hence, we can compare first and second using the > operator.
If you try to call max with incomparable items, such as a string and an integer, it won’t compile:
Kotlin
println(max("kotlin", 42)) // ERROR: Type parameter bound for T is not satisfied
The error occurs because the type argument Any inferred for T is not a subtype of Comparable<Any>, which violates the type parameter constraint.
In some cases, you may need to specify multiple constraints on a type parameter. You can use a slightly different syntax for that. Here’s an example where we ensure that the given CharSequence has a period at the end and can be appended:
Kotlin
fun <T> ensureTrailingPeriod(seq: T)where T : CharSequence, T : Appendable {if (!seq.endsWith('.')) { seq.append('.') }}val helloWorld = StringBuilder("Hello World")ensureTrailingPeriod(helloWorld)println(helloWorld) // Output: Hello World.
In this case, we specify the constraints T : CharSequence and T : Appendable using the where clause. This ensures that the type argument must implement both the CharSequence and Appendable interfaces, allowing us to use operations like endsWith and append on values of that type
Type parameter constraints are also commonly used when you want to declare a non-null type parameter. This helps enforce that the type argument cannot be nullable, ensuring that you always have a non-null value. Let’s see it in more detail.
Making type parameters non-null
In Kotlin, when you declare a generic class or function, you can substitute any type argument, including nullable types, for its type parameters. By default, a type parameter without an upper bound specified will have the upper bound of Any? which means it can accept both nullable and non-nullable types.
Let’s take an example to understand this. Consider the Processor class defined as follows:
Kotlin
classProcessor<T> {funprocess(value: T) {value?.hashCode() // value” is nullable, so you have to use a safe call }}
In the process function of this class, the parameter value is nullable, even though T itself is not marked with a question mark. This is because specific instantiations of the Processor class can use nullable types for T. For example, you can create an instance of Processor<String?> which allows nullable strings as its type argument:
Kotlin
val nullableStringProcessor = Processor<String?>() // String?, which is a nullable type, is substituted for TnullableStringProcessor.process(null) // This code compiles fine, having “null” as the “value” argument
If you want to ensure that only non-null types can be substituted for the type parameter, you can specify a constraint or an upper bound. If the only restriction you have is nullability, you can use Any as the upper bound instead of the default Any?. Here’s an example:
Kotlin
classProcessor<T : Any> { // Specifying a non-“null” upper boundfunprocess(value: T) {value.hashCode() // “value” of type T is now non-“null” }}
In this case, the <T : Any> constraint ensures that the type T will always be a non-nullable type. If you try to use a nullable type as the type argument, like Processor<String?>(), the compiler will produce an error. The reason is that String? is not a subtype of Any (it’s a subtype of Any?, which is a less specific type):
Kotlin
val nullableStringProcesor = Processor<String?>()// Error: Type argument is not within its bounds: should be subtype of 'Any'
It’s worth noting that you can make a type parameter non-null by specifying any non-null type as an upper bound, not only Any. This allows you to enforce stricter constraints based on your specific needs.
Underscore operator ( _ ) for type arguments
The underscore operator _ in Kotlin is a type inference placeholder that allows the Kotlin compiler to automatically infer the type of an argument based on the context and other explicitly specified types.
Kotlin
abstractclassSomeClass<T> {abstractfunexecute() : T}classSomeImplementation : SomeClass<String>() {overridefunexecute(): String = "Test"}classOtherImplementation : SomeClass<Int>() {overridefunexecute(): Int = 42}objectRunner {inlinefun <reifiedS: SomeClass<T>, T> run() : T {return S::class.java.getDeclaredConstructor().newInstance().execute() }}funmain() {// T is inferred as String because SomeImplementation derives from SomeClass<String>val s = Runner.run<SomeImplementation, _>()assert(s == "Test")// T is inferred as Int because OtherImplementation derives from SomeClass<Int>val n = Runner.run<OtherImplementation, _>()assert(n == 42)}
Don’t worry! Let’s break down the code step by step:
In this code, we have an abstract class called SomeClass with a generic type T. It declares an abstract function execute() that returns an object of type T.
We have a class called SomeImplementation which extends SomeClass and specifies the generic type as String. It overrides the execute() function and returns the string value "Test".
Similarly, we have another class called OtherImplementation which extends SomeClass and specifies the generic type as Int. It overrides the execute() function and returns the integer value 42.
Below that, we have an object called Runner with a function run(). This function is generic and has two type parameters S and T. It uses the reified keyword to access the type information at runtime. Inside the function, it creates an instance of the specified class S using reflection (getDeclaredConstructor().newInstance()) and calls the execute() function on it, returning the result of type T.
In the above code, the underscore operator is used in the main() function when calling the Runner.run() function. Let’s take a closer look:
Kotlin
val s = Runner.run<SomeImplementation, _>()
In this line, the type parameter T is explicitly specified as _ for the Runner.run() function. Here, _ acts as a placeholder for the type to be inferred by the compiler. Since SomeImplementation derives from SomeClass<String>, the compiler infers T as String for this invocation. Therefore, the variable s is inferred to be of type String, and the Runner.run() function returns the result of executing SomeImplementation, which is the string "Test".
Kotlin
val n = Runner.run<OtherImplementation, _>()
Similarly, in this line, the type parameter T is specified as _ for the Runner.run() function. Since OtherImplementation derives from SomeClass<Int>, the compiler infers T as Int for this invocation. Consequently, the variable n is inferred to be of type Int, and the Runner.run() function returns the result of executing OtherImplementation, which is the integer 42.
By using the underscore operator _ as a type argument, the compiler can automatically infer the appropriate type based on the context and the explicitly specified types.
BTW, how do generics work at runtime?
In Kotlin, generics are a compile-time feature rather than a runtime feature. This means that type information is erased at runtime and not available for inspection or manipulation by the program.
When you use generics in Kotlin, the compiler performs type checking and ensures type safety at compile time. It enforces that the correct types are used in generic functions or classes based on the type parameters specified.
At runtime, Kotlin uses type erasure to remove the generic type information. This is done for compatibility with Java, as both languages share a common runtime environment known as the Java Virtual Machine (JVM). The JVM does not natively support reified generics, which would allow for preserving type information at runtime.
Due to type erasure, you cannot directly access the type parameters of a generic class or function at runtime. For example, if you define a List<String> and a List<Int>, they both become List<Any> at runtime.
However, there are cases where Kotlin provides a workaround for working with generics at runtime using reified types. The reified keyword can be used in inline functions to retain type information within the body of the function. This allows you to perform type checks or access the class instance of the type parameter within the function.
Here’s an example of an inline function that utilizes reified types to perform type checks at runtime:
Kotlin
inlinefun <reifiedT> getType(obj: T) {if (obj is T) {println("Object is of type ${T::class.simpleName}") } else {println("Object is not of type ${T::class.simpleName}") }}
In this example, the reified T declaration allows you to access the class instance of the type parameter T using T::class. This wouldn’t be possible without the reified keyword.
Please note that although reified types enable limited runtime access to type information, they only work within the scope of inline functions. Outside of inline functions, the type information is still erased at runtime.
Variance: generics and subtyping
The concept of variance describes how types with the same base type and different type arguments relate to each other: for example, List<String> and List<Any>. It’s important to understand variance when working with generic classes or functions because it helps ensure the safety and consistency of your code.
Why variance exists: passing an argument to a function
To illustrate why variance is important, let’s consider passing arguments to functions. Suppose we have a function that takes a List<Any> as an argument. Is it safe to pass a variable of type List<String> to this function?
In the case of a function that prints the contents of the list, such as:
You can safely pass a list of strings (List<String>) to this function. Each element in the list is treated as an Any, and since String is a subtype of Any, it is considered safe.
However, let’s consider another function that modifies the list:
If you attempt to pass a list of strings (MutableList<String>) to this function, like so:
Kotlin
val strings = mutableListOf("abc", "bac")addAnswer(strings)println(strings.maxBy { it.length })
You will encounter a ClassCastException at runtime. This occurs because the function addAnswer tries to add an integer (42) to a list of strings. If the compiler allowed this, it would lead to a type inconsistency when accessing the contents of the list as strings. To prevent such issues, the Kotlin compiler correctly forbids passing a MutableList<String> as an argument when a MutableList<Any> is expected.
So, the answer to whether it’s safe to pass a list of strings to a function expecting a list of Any objects depends on whether the function modifies the list. If the function only reads the list, it is safe to pass a List with a more specific element type. However, if the list is mutable and the function adds or replaces elements, it is not safe.
Kotlin provides different interfaces, such as List and MutableList, to control safety based on mutability. If a function accepts a read-only list, you can pass a List with a more specific element type. However, if the list is mutable, you cannot do that.
In the upcoming sections, we’ll explore these concepts in the context of generic classes. We’ll also examine why List and MutableList differ regarding their type arguments. But before that, let’s discuss the concepts of type and subtype.
Difference between Classes, types, and subtypes
In Kotlin, the type of a variable specifies the possible values it can hold. The terms “type” and “class” are sometimes used interchangeably, but they have distinct meanings. In the case of a non-generic class, the class name can be used directly as a type. For example, var x: String declares a variable that can hold instances of the String class. However, the same class name can also be used to declare a nullable type, such as var x: String?which indicates that the variable can hold either a String or null. So each Kotlin class can be used to construct at least two types.
When it comes to generic classes, things get more complex. To form a valid type, you need to substitute a specific type as a type argument for the class’s type parameter. For example, List is a class, not a type itself, but the following substitutions are valid types: List<Int>, List<String?>, List<List<String>>, and so on. Each generic class can generate an infinite number of potential types.
To discuss the relationship between types, it’s important to understand the concept of subtyping. Type B is considered a subtype of type A if you can use a value of type B wherever a value of type A is expected. For example, Int is a subtype of Number, but Int is not a subtype of String. Note that a type is considered a subtype of itself. The term “supertype” is the opposite of subtype: if A is a subtype of B, then B is a supertype of A.
B is a subtype of A if you can use it when A is expected
Understanding subtype relationships is crucial because the compiler performs checks whenever you assign a value to a variable or pass an argument to a function. For example:
Storing a value in a variable is only allowed if the value’s type is a subtype of the variable’s type. In this case, since Int is a subtype of Number, the declaration val n: Number = i is valid. Similarly, passing an expression to a function is only allowed if the expression’s type is a subtype of the function’s parameter type. In the example, the type Int of the argument i is not a subtype of the function parameter type String, so the invocation of the f function does not compile.
In simpler cases, subtype is essentially the same as subclass. For example, Int is a subclass of Number, so the Int type is a subtype of the Number type. If a class implements an interface, its type is a subtype of the interface type. For instance, String is a subtype of CharSequence.
Nullable types introduce a scenario where subtype and subclass differ. A non-null type is a subtype of its corresponding nullable type, but they both correspond to the same class.
A non-null type A is a subtype of nullable A?, but not vice versa
You can store the value of a non-null type in a variable of a nullable type, but not vice versa. For example:
Kotlin
val s: String = "abc"val t: String? = s
In this case, the value of the non-null type String can be stored in a variable of the nullable type String?. However, you cannot assign a nullable type to a non-null type because null is not an acceptable value for a non-null type.
The distinction between subclasses and subtypes becomes particularly important when dealing with generic types. This brings us back to the question from the previous section: is it safe to pass a variable of type List<String> to a function expecting List<Any>? We’ve already seen that treating MutableList<String> as a subtype of MutableList<Any> is not safe. Similarly, MutableList<Any> is not a subtype of MutableList<String> either.
A generic class, such as MutableList, is called invariant on the type parameter if, for any two different types A and B, MutableList<A> is neither a subtype nor a supertype of MutableList<B>. In Java, all classes are invariant, although specific uses of those classes can be marked as non-invariant (as you’ll see soon).
In the previous section, we encountered a class, List, where the subtyping rules are different. The List interface in Kotlin represents a read-only collection. If type A is a subtype of type B, then List<A> is a subtype of List<B>. Such classes or interfaces are called covariant. In the upcoming sections, we’ll explore the concept of covariance in more detail and explain when it’s possible to declare a class or interface as covariant.
Covariance: preserved subtyping relation
Covariance refers to preserving the subtyping relation between generic classes. In Kotlin, you can declare a class to be covariant on a specific type parameter by using the out keyword before the type parameter’s name.
A covariant class is a generic class (we’ll use Producer as an example) for which the following holds: Producer<A> is a subtype of Producer<B> if A is a subtype of B. We say that the subtyping is preserved. For example, Producer<Cat> is a subtype of Producer<Animal> because Cat is a subtype of Animal.
Here’s an example of the Producer interface using the out keyword:
Kotlin
interfaceProducer<outT> {funproduce(): T}
Flexible Function Argument and Return Value Passing
Covariance in Kotlin allows you to pass values of a class as function arguments and return values, even when the type arguments don’t exactly match the function definition. This means that you can use a more specific type as a substitute for a more generic type.
Suppose we have a hierarchy of classes involving Animal, where Cat is a subclass of Animal. We also have a generic interface called Producer, which represents a producer of objects of type T. We’ll make the Producer interface covariant by using the out keyword on the type parameter.
Kotlin
interfaceProducer<outT> {funproduce(): T}
Now, let’s define a class AnimalProducer that implements the Producer interface for the Animal type:
Since Cat is a subtype of Animal, we can also use CatProducer wherever a Producer<Animal> is expected. This is possible because we declared the Producer interface as covariant.
Now, let’s see how covariance allows us to pass these producers as function arguments and return values:
funmain() {val animalProducer = AnimalProducer()val catProducer = CatProducer()feedAnimal(animalProducer) // Passes an AnimalProducer, which is a Producer<Animal>feedAnimal(catProducer) // Passes a CatProducer, which is also a Producer<Animal>}
In the feedAnimal function, we expect a Producer<Animal> as an argument. With covariance, we can pass both AnimalProducer and CatProducer instances because Producer<Cat> is a subtype of Producer<Animal> due to the covariance declaration.
This demonstrates how covariance allows you to treat more specific types (Producer<Cat>) as if they were more generic types (Producer<Animal>) when it comes to function arguments and return values.
BTW, How covariance guarantees type safety?
Suppose we have a class hierarchy involving Animal, where Cat is a subclass of Animal. We also have a Herd class that represents a group of animals.
Kotlin
openclassAnimal {funfeed() { /* feeding logic */ }}classHerd<T : Animal> { // The type parameter isn’t declared as covariantval size: Intget() = /* calculate the size of the herd */operatorfunget(i: Int): T { /* get the animal at index i */ }}funfeedAll(animals: Herd<Animal>) {for (i in0 until animals.size) { animals[i].feed() }}
Now, suppose you have a function called takeCareOfCats, which takes a Herd<Cat> as a parameter and performs some operations specific to cats.
Kotlin
classCat : Animal() {funcleanLitter() { /* clean litter logic */ }}funtakeCareOfCats(cats: Herd<Cat>) {for (i in0 until cats.size) { cats[i].cleanLitter()// feedAll(cats) // This line would cause a type-mismatch error, Error: inferred type is Herd<Cat>, but Herd<Animal> was expected }}
In this case, if you try to pass the cats herd to the feedAll function, you’ll get a type-mismatch error during compilation. This happens because you didn’t use any variance modifier on the type parameter T in the Herd class, making the Herd<Cat> incompatible with Herd<Animal>. Although you could use an explicit cast to overcome this issue, it is not a recommended approach.
To make it work correctly, you can make the Herd class covariant by using the out keyword on the type parameter:
Kotlin
classHerd<outT : Animal> { // The T parameter is now covariant.// ...}funtakeCareOfCats(cats: Herd<Cat>) {for (i in0 until cats.size) { cats[i].cleanLitter() }feedAll(cats) // Now this line works because of covariance, You don’t need a cast.
By marking the type parameter as covariant, you ensure that the subtyping relation is preserved, and T can only be used in \”out\” positions. This guarantees type safety and allows you to pass a Herd<Cat> where a Herd<Animal> is expected.
Usage of covariance
Covariance in Kotlin allows you to make a class covariant on a type parameter, but it also imposes certain constraints to ensure type safety. The type parameter can only be used in “out” positions, which means it can produce values of that type but not consume them.
You can’t make any class covariant: it would be unsafe. Making the class covariant on a certain type parameter constrains the possible uses of this type parameter in the class. To guarantee type safety, it can be used only in so-called out positions, meaning the class can produce values of type T but not consume them. Uses of a type parameter in declarations of class members can be divided into “in” and “out” positions.
Let’s consider a class that declares a type parameter T and contains a function that uses T. We say that if T is used as the return type of a function, it’s in the out position. In this case, the function produces values of type T. If T is used as the type of a function parameter, it’s in the in position. Such a function consumes values of type T.
The function parameter type is called in position, and the function return type is called out position
The out keyword on a type parameter of the class requires that all methods using T have T only in “out” positions and not in “in” positions. This keyword constrains possible use of T, which guarantees safety of the corresponding subtype relation.
Let’s understand this with some examples. Consider the Herd class, which is declared as Herd<out T : Animal>. The type parameter T is used only in the return value of the get method. This is an “out” position, and it is safe to declare the class as covariant. For instance, Herd<Cat> is considered a subtype of Herd<Animal> because Cat is a subtype of Animal.
Kotlin
classHerd<outT : Animal> {val size: Int = ...operatorfunget(i: Int): T { ... } // Uses T as the return type}
Similarly, the List<T> interface in Kotlin is covariant because it only defines a get method that returns an element of type T. Since there are no methods that store values of type T, it is safe to declare the class as covariant.
Kotlin
interfaceList<outT> : Collection<T> {operatorfunget(index: Int): T// Read-only interface that defines only methods that return T (so T is in the “out” position)// ...}
You can also use the type parameter T as a type argument in another type. For example, the subList method in the List interface returns a List<T>, and T is used in the “out” position.
Kotlin
interfaceList<outT> : Collection<T> {funsubList(fromIndex: Int, toIndex: Int): List<T> // Here T is in the “out” position as well.// ...}
However, you cannot declare MutableList<T> as covariant on its type parameter because it contains methods that both consume and produce values of type T. Therefore, T appears in both “in” and “out” positions, and making it covariant would be unsafe.
Kotlin
interfaceMutableList<T> : List<T>, MutableCollection<T> { //MutableList can’t be declared as covariant on T …overridefunadd(element: T): Boolean// … because T is used in the “in” position.}
The compiler enforces this restriction. It would report an error if the class was declared as covariant: Type parameter T is declared as ‘out’ but occurs in ‘in’ position.
Constructor Parameters and Variance
In Kotlin, constructor parameters are not considered to be in the “in” or “out” position when it comes to variance. This means that even if a type parameter is declared as “out,” you can still use it in a constructor parameter declaration without any restrictions.
The type parameter T is declared as “out” but it can still be used in the constructor parameter vararg animals: T without any issues. The variance protection is not applicable to the constructor because it is not a method that can be called later, so there are no potentially dangerous method calls that need to be restricted.
However, if you use the val or var keyword with a constructor parameter, it declares a property with a getter and setter (if the property is mutable). In this case, the type parameter T is used in the “out” position for a read-only property and in both “out” and “in” positions for a mutable property.
Here, the type parameter T cannot be marked as “out” because the class contains a setter for the leadAnimal property, which uses T in the “in” position. The presence of a setter makes it necessary to consider both “out” and “in” positions for the type parameter.
It’s important to note that the position rules for variance in Kotlin only apply to the externally visible API of a class, such as public, protected, and internal members. Parameters of private methods are not subject to the “in” or “out” position rules. The variance rules are in place to protect a class from misuse by external clients and do not affect the implementation of the class itself.
In this case, the Herd class can safely be made covariant on T because the leadAnimal property has been made private. The private visibility means that the property is not accessible from external clients, so the variance rules for the public API do not apply.
Contravariance: reversed subtyping relation
Contravariance is the opposite of covariance and it can be understood as a mirror image of covariance. When a class is contravariant, the subtyping relationship between its type arguments is the reverse of the subtyping relationship between the classes themselves.
To illustrate this concept, let’s consider the example of the Comparator interface. This interface has a single method called compare, which takes two objects and compares them:
Kotlin
interfaceComparator<inT> {funcompare(e1: T, e2: T): Int { ... }}
In this case, you’ll notice that the compare method only consumes values of type T. This means that the type parameter T is used in “in” positions only, indicating that it is a contravariant type. To indicate contravariance, the “in” keyword is placed before the declaration of T.
A comparator defined for values of a certain type can, of course, compare the values of any subtype of that type. For example, if you have a Comparator, you can use it to compare values of any specific type.
Kotlin
val anyComparator = Comparator<Any> { e1, e2 -> e1.hashCode() - e2.hashCode() }val strings: List<String> = listOf("abc","xyz")strings.sortedWith(anyComparator) // You can use the comparator for any objects to compare specific objects, such as strings.
Here, the sortedWith function expects a Comparator (a comparator that can compare strings), and it’s safe to pass one that can compare more general types. If you need to perform comparisons on objects of a certain type, you can use a comparator that handles either that type or any of its supertypes. This means Comparator<Any> is a subtype of Comparator<String>, where Any is a supertype of String. The subtyping relation between comparators for two different types goes in the opposite direction of the subtyping relation between those types.
What is contravariance?
A class that is contravariant on the type parameter is a generic class (let’s consider Consumer<T> as an example) for which the following holds: Consumer<A> is a subtype of Consumer<B> if B is a subtype of A. The type arguments A and B changed places, so we say the subtyping is reversed. For example, Consumer<Animal> is a subtype of Consumer<Cat>.
In simple words, contravariance in Kotlin means that the subtyping relationship between two generic types is reversed compared to the normal inheritance hierarchy. If B is a subtype of A, then a generic class or interface that is contravariant on its type parameter T will have the relationship ClassName<A> is a subtype of ClassName<B>.
For a covariant type Producer, the subtyping is preserved, but for a contravariant type Consumer, the subtyping is reversed
Here, we see the difference between the subtyping relation for classes that are covariant and contravariant on a type parameter. You can see that for the Producer class, the subtyping relation replicates the subtyping relation for its type arguments, whereas for the Consumer class, the relation is reversed.
The “in” keyword means values of the corresponding type are passed in to methods of this class and consumed by those methods. Similar to the covariant case, constraining use of the type parameter leads to the specific subtyping relation. The “in” keyword on the type parameter T means the subtyping is reversed and T can be used only in “in” positions.
Covariance and Contravariance in Kotlin’s Function Types
In Kotlin, a class or interface can be covariant on one type parameter and contravariant on another. One of the classic examples of this is the Function interface. Let’s take a look at the declaration of the Function1 interface, which represents a one-parameter function:
To make the notation more readable, Kotlin provides an alternative syntax (P) -> R to represent Function1<P, R>. In this syntax, you’ll notice that P (the parameter type) is used only in the in position and is marked with the in keyword, while R (the return type) is used only in the out position and is marked with the out keyword.
This means that the subtyping relationship for the function type is reversed for the first type argument (P) and preserved for the second type argument (R).
For example, let’s say you have a higher-order function called enumerateCats that accepts a lambda function taking a Cat parameter and returning a Number:
Kotlin
funenumerateCats(f: (Cat) -> Number) { ... }
Now, suppose you have a function called getIndex defined in the Animal class that returns an Int. You can pass Animal::getIndex as an argument to enumerateCats:
Kotlin
funAnimal.getIndex(): Int = ...enumerateCats(Animal::getIndex) // This code is legal in Kotlin. Animal is a supertype of Cat, and Int is a subtype of Number
In this case, the Animal::getIndex function is accepted because Animal is a supertype of Cat, and Int is a subtype of Number, the function type’s subtyping relationship allows it.
The function (T) -> R is contravariant on its argument and covariant on its return type
This illustration demonstrates how subtyping works for function types. The arrows indicate the subtyping relationship.
Use-site variance: specifying variance for type occurrences
To understand use-site variance better, you first need to understand declaration-site variance. In Kotlin, the ability to specify variance modifiers on class declarations provides convenience and consistency because these modifiers apply to all places where the class is used. This concept is known as a declaration-site variance.
Declaration-site variance in Kotlin is achieved by using variance modifiers on type parameters when defining a class. As you already knows there are two main variance modifiers:
out (covariant): Denoted by the out keyword, it allows the type parameter to be used as a return type or read-only property. It specifies that the type parameter can only occur in the “out” position, meaning it can only be returned from functions or accessed in a read-only manner.
in (contravariant): Denoted by the in keyword, it allows the type parameter to be used as a parameter type. It specifies that the type parameter can only occur in the “in” position, meaning it can only be passed as a parameter to functions.
By specifying these variance modifiers on type parameters, you define the variance behavior of the class, and it remains consistent across all usages of the class.
On the other hand, Java handles variance differently through use-site variance. In Java, each usage of a type with a type parameter can specify whether the type parameter can be replaced with its subtypes or supertypes using wildcard types (? extends and ? super). This means that at each usage point of the type, you can decide the variance behavior.
It’s important to note that while Kotlin supports declaration-site variance with the out and in modifiers, it also provides a certain level of use-site variance through the out and in projection syntax (out T and in T). These projections allow you to control the variance behavior in specific usage points within the code.
Declaration-site variance in Kotlin Vs. Java wildcards
In Kotlin, declaration-site variance allows for more concise code because variance modifiers are specified once on the declaration of a class or interface. This means that clients of the class or interface don’t have to think about the variance modifiers. The convenience of declaration-site variance is that the variance behavior is determined at the point of declaration and remains consistent throughout the codebase.
On the other hand, in Java, wildcards are used to handle variance at the use site. To create APIs that behave according to users’ expectations, the library writer has to use wildcards extensively. For example, in the Java 8 standard library, wildcards are used on every use of the Function interface. This can lead to code like Function<? super T, ? extends R> in method signatures.
To illustrate the declaration of the map method in the Stream interface in Java :
In the Java code, wildcards are used in the declaration of the map method to handle the variance of the function argument. This can make the code less readable and more cumbersome, especially when dealing with complex type hierarchies.
In contrast, the Kotlin code uses declaration-site variance, specifying the variance once on the declaration makes the code much more concise and elegant.
BTW, How does use-site variance work in Kotlin?
Kotlin supports use-site variance, you can specify variance at the use site, which means you can indicate the variance for a specific occurrence of a type parameter, even if it can’t be declared as covariant or contravariant in the class declaration. Let’s break down the concepts and see how use-site works.
In Kotlin, many interfaces, like MutableList, are not covariant or contravariant by default because they can both produce and consume values of the types specified by their type parameters. However, in certain situations, a variable of that type may be used only as a producer or only as a consumer.
Consider the function copyData that copies elements from one collection to another:
Kotlin
fun <T> copyData(source: MutableList<T>, destination: MutableList<T>) {for (item in source) { destination.add(item) }}
In this function, both the source and destination collections have an invariant type. However, the source collection is only used for reading, and the destination collection is only used for writing. In this case, the element types of the collections don’t need to match exactly.
To make this function work with lists of different types, you can introduce a second generic parameter:
Kotlin
fun <T : R, R> copyData(source: MutableList<T>, destination: MutableList<R>) {for (item in source) { destination.add(item) }}
In this modified version, you declare two generic parameters representing the element types in the source and destination lists. The source element type (T) should be a subtype of the elements in the destination list (R).
However, Kotlin provides a more elegant way to express this using use-site variance. If the implementation of a function only calls methods that have the type parameter in the “out” position (as a producer) or only in the “in” position (as a consumer), you can add variance modifiers to the particular usages of the type parameter in the function definition.
For example, you can modify the copyData function as follows:
Kotlin
fun <T> copyData(source: MutableList<outT>, destination: MutableList<T>) {for (item in source) { destination.add(item) }}
In this version, you specify the out modifier for the source parameter, which means it’s a projected (restricted) MutableList. You can only call methods that return the generic type parameter (T) or use it in the “out” position. The compiler prohibits calling methods where the type parameter is used as an argument (“in” position).
When using use-site variance in Kotlin, there are limitations on the methods that can be called on a projected type. If you are using a projected type, you may not be able to call certain methods that require the type parameter to be used as an argument (“in” position) :
Kotlin
val list: MutableList<outNumber> = ..list.add(42) // Error: Out-projected type 'MutableList<out Number>' prohibits the use of 'fun add(element: E): Boolean'
Here, list is declared as a MutableList<out Number>, which is an out-projected type. The out projection restricts the type parameter Number to only be used in the “out” position, meaning it can only be used as a return type or read from. You cannot call the add method because it requires the type parameter to be used as an argument (“in” position).
If you need to call methods that are prohibited by the projection, you should use a regular type instead of a projection. In this case, you can use MutableList<Number> instead of MutableList<out Number>. By using the regular type, you can access all the methods available for that type.
Regarding the concept of using the in modifier, it indicates that in a particular location, the corresponding value acts as a consumer, and the type parameter can be substituted with any of its supertypes. This is similar to the contravariant position in Java’s bounded wildcards.
For example, the copyData function can be rewritten using an in-projection:
Kotlin
fun <T> copyData(source: MutableList<T>, destination: MutableList<inT>) {for (item in source) { destination.add(item) }}
In this version, the destination parameter is projected with the in modifier, indicating that it can consume elements of type T or any of its supertypes. This allows you to copy elements from the source list to a destination list with a broader type.
It’s important to note that use-site variance declarations in Kotlin correspond directly to Java’s bounded wildcards. MutableList<out T> in Kotlin is equivalent to MutableList<? extends T> in Java, while the in-projected MutableList<in T> corresponds to Java’s MutableList<? super T>.
Use-site projections in Kotlin can help widen the range of acceptable types and provide more flexibility when working with generic types, without the need for separate covariant or contravariant interfaces.
Star projection: using * instead of a type argument
In Kotlin, star projection is a syntax that allows you to indicate that you have no information about a generic argument. It is represented by the asterisk (*) symbol. Let’s explore the semantics of star projections in more detail.
When you use star projection, such as List<*>, it means you have a list of elements of an unknown type. It’s important to note that MutableList<*> is not the same as MutableList<Any?>. The former represents a list that contains elements of a specific type, but you don’t know what type it is. You can’t put any values into the list because it may violate the expectations of the calling code. However, you can retrieve elements from the list because you know they will match the type Any?, which is the supertype of all Kotlin types.
Here’s an example to illustrate this:
Kotlin
val list: MutableList<Any?> = mutableListOf('a', 1, "qwe")val chars = mutableListOf('a', 'b', 'c')val unknownElements: MutableList<*> = if (Random().nextBoolean()) list else charsunknownElements.add(42) // Error: Adding elements to a MutableList<*> is not allowedprintln(unknownElements.first()) // You can retrieve elements from unknownElements
In this example, unknownElements can be either list or chars based on a random condition. You can’t add any values to unknownElements because its type is unknown, but you can retrieve elements from it using the first() function.
Kotlin
unknownElements.add(42)// Error: Out-projected type 'MutableList<*>' prohibits//the use of 'fun add(element: E): Boolean'
The term “out-projected type” refers to the fact that MutableList<*> is projected to act as MutableList<out Any?>. It means you can safely get elements of type Any? from the list but cannot put elements into it.
For contravariant type parameters, like Consumer<in T>, a star projection is equivalent to <in Nothing>. In this case, you can’t call any methods that have T in the signature on a star projection because you don’t know exactly what it can consume. This is similar to Java’s wildcards (MyType<?> in Java corresponds to MyType<*> in Kotlin).
You can use star projections when the specific information about type arguments is not important. For example, if you only need to read the data from a list or use methods that produce values without caring about their specific types. Here’s an example of a function that takes List<*> as a parameter:
In this case, the printFirst function only reads the first element of the list and doesn’t care about its specific type. Alternatively, you can introduce a generic type parameter if you need more control over the type:
Kotlin
fun <T> printFirst(list: List<T>) {if (list.isNotEmpty()) {println(list.first()) }}
The syntax with star projection is more concise, but it works only when you don’t need to access the exact value of the generic type parameter.
Now let’s consider an example using a type with a star projection and common traps that you may encounter. Suppose you want to validate user input using an interface called FieldValidator. It has a type parameter declared as contravariant (in T). You also have two validators for String and Int inputs.
If you want to store all validators in the same container and retrieve the right validator based on the input type, you might try using a map. However, using FieldValidator<*> as the value type in the map can lead to difficulties. You won’t be able to validate a string with a validator of type FieldValidator<*> because the compiler doesn’t know the specific type of the validator.
Kotlin
val validators = mutableMapOf<KClass<*>, FieldValidator<*>>()validators[String::class] = DefaultStringValidatorvalidators[Int::class] = DefaultIntValidatorvalidators[String::class]!!.validate("") // Error: Cannot call validate() on FieldValidator<*>
In this case, you will encounter a similar error as before, indicating that it’s unsafe to call a method with the type parameter on a star projection. One way to work around this is by explicitly casting the validator to the desired type, but this is not recommended as it is not type-safe.
Kotlin
val stringValidator = validators[String::class] as FieldValidator<String>println(stringValidator.validate("")) // Output: false
This code compiles, but it’s not safe because the cast is unchecked and may fail at runtime if the generic type information is erased.
A safer approach is to encapsulate the access to the map and provide type-safe methods for registration and retrieval. This ensures that only the correct validators can be registered and retrieved. Here’s an example using an object called Validators:
In this example, the Validators object controls all access to the map, ensuring that only correct validators can be registered and retrieved. The code emits a warning about the unchecked cast, but the guarantees provided by the Validators object make sure that no incorrect use can occur.
This pattern of encapsulating unsafe code in a separate place helps prevent misuse and makes the usage of a container safe. It’s worth noting that this pattern is not specific to Kotlin and can be applied in Java as well.
Conclusion
Kotlin generics and variance are powerful tools that enhance type safety and code reusability. Understanding these concepts enables developers to write generic code that can be adapted to different types and relationships between them. By mastering generics and variance, you can build more flexible and robust applications.
In this blog post, we covered the basics of Kotlin generics, explained variance with examples, explored variance annotations, wildcards, type projections, and discussed additional topics such as reified type parameters and generic constraints. With this knowledge, you are well-equipped to utilize generics effectively in your Kotlin projects.
In object-oriented programming, inheritance is a fundamental concept that allows a class to inherit properties and behaviors from its parent class. However, inheritance has its limitations, and sometimes an alternative approach is needed. Kotlin provides native support for the delegation pattern, which is a powerful alternative to implementation inheritance. In this article, we will explore the delegation pattern in Kotlin and its various aspects.
Overview of the Delegation Pattern
The delegation pattern is a design pattern where an object delegates some or all of its responsibilities to another object. Instead of inheriting behavior, an object maintains a reference to another object and forwards method calls to it. This promotes composition over inheritance and provides greater flexibility in reusing and combining behaviors from different objects.
In Kotlin, the delegation pattern is built into the language, making it easy and convenient to implement. With the by keyword, Kotlin allows a class to implement an interface by delegating all of its public members to a specified object. Let’s dive into the details and see how it works.
Basic Usage of Delegation in Kotlin
To understand the basic usage of delegation in Kotlin, let’s consider a simple example. Assume we have an interface called Base with a single function print():
Kotlin
interfaceBase {funprint()}
Next, we define a class BaseImpl that implements the Base interface. It has a constructor parameter x of type Int and provides an implementation for the print() function:
Kotlin
classBaseImpl(val x: Int) : Base {overridefunprint() {println(x) }}
Now, we want to create a class called Derived that also implements the Base interface. Instead of implementing the print() function directly, we can delegate it to an instance of the Base interface. We achieve this by using the by keyword followed by the object reference in the class declaration:
Kotlin
classDerived(b: Base) : Basebyb
In this example, the by clause in the class declaration indicates that b will be stored internally in objects of Derived, and the compiler will generate all the methods of Base that forward to b. This means that the print() function in Derived will be automatically delegated to the print() function of the b object.
To see the delegation in action, let’s create an instance of BaseImpl with a value of 10 and pass it to the Derived class. Then, we can call the print() function on the Derived object:
When we execute the print() function on the Derived object, it internally delegates the call to the BaseImpl object (b), and thus it prints the value 10.
Overriding Methods in DelegationPattern
In Kotlin, when a class implements an interface by delegation, it can also override methods provided by the delegate object. This allows for customization and adding additional behavior specific to the implementing class.
Let’s extend our previous example to understand method overriding in the delegation. Assume we have an interface Base with two functions: printMessage() and printMessageLine():
In this example, the printMessage() function in the Derived class overrides the implementation provided by the delegate object b. When we call printMessage() on an instance of Derived, it will print “softAai Apps” instead of the original implementation.
To test the overridden behavior, we can modify the main() function as follows:
When we call the printMessage() function on the Derived object, it invokes the overridden implementation in the Derived class, and it prints “softAai Apps” instead of 10. However, the printMessageLine() function is not overridden in the Derived class, so it delegates the call to the BaseImpl object, which prints the original value 10 followed by a new line.
Property Delegationin Delegation Pattern
In addition to method delegation, Kotlin also supports property delegation. This allows a class to delegate the implementation of properties to another object. Let’s understand how it works.
Assume we have an interface Base with a read-only property message:
Kotlin
interfaceBase {val message: String}
We modify the BaseImpl class to implement the Base interface with the message property:
Kotlin
classBaseImpl(val x: Int) : Base {overrideval message: String = "BaseImpl: x = $x"}
Now, let’s update the Derived class to delegate the Base interface and override the message property:
In this example, the Derived class delegates the implementation of the Base interface to the b object. However, it overrides the message property and provides its own implementation.
To see the property delegation in action, we can modify the main() function as follows:
Kotlin
funmain() {val b = BaseImpl(10)val derived = Derived(b)println(derived.message) // Output: Message of Derived}
When we access the message property of the Derived object, it returns the overridden value “Message of Derived” instead of the one in the delegate object b.
Advantages of the Delegation Pattern in Kotlin
Code Reusability: Delegation allows for code reuse by delegating responsibilities to another object. This promotes composition over inheritance and allows for the flexible reuse of behavior.
Separation of Concerns: Delegation helps in separating different concerns by assigning specific responsibilities to different objects. This leads to a more modular and maintainable codebase.
Flexibility: Delegation allows for dynamic behavior modification at runtime. By delegating to different objects, you can easily switch or modify behavior as needed without changing the implementing class.
Easy Composition: Delegation makes it straightforward to combine and compose multiple behaviors. Objects can be combined by delegating to multiple objects, allowing for flexible composition of functionalities.
Code Readability: Delegation improves code readability by clearly specifying which object is responsible for which behavior. It enhances code understanding and reduces complexity.
Disadvantages of the Delegation Pattern in Kotlin
Performance Overhead: Delegation adds a level of indirection, which can introduce a slight performance overhead. Each method call needs to be forwarded to the delegate object, which can impact performance in performance-critical scenarios.
Increased Complexity: Delegation can introduce additional complexity, especially when multiple levels of delegation are involved. Understanding the flow of method calls and responsibilities might require careful analysis.
Potential Code Duplication: If multiple classes implement the same interface using delegation, there is a possibility of code duplication. Each class might need to provide its own implementation, even if the behavior is similar across implementations.
Limited Access to Internal State: When using delegation, accessing the internal state or members of the delegate object might become more complex. If the delegate object exposes limited or no access to its internal state, it can limit the flexibility of the implementing class.
Learning Curve: Understanding and utilizing the delegation pattern might require some learning and understanding of the concept. Developers who are not familiar with delegation might require additional effort to grasp the concept and its best practices.
Conclusion
The delegation pattern in Kotlin is a powerful alternative to implementation inheritance. It allows a class to implement an interface by delegating the responsibilities to another object. Kotlin’s by keyword makes it easy to implement delegation without boilerplate code.
In this article, we covered the basics of delegation pattern, including how to delegate methods and properties, and how to override them in the implementing class. We also discussed the limitation of overridden methods not being called from within the delegate object.
By leveraging the delegation pattern, you can achieve code reuse, composition, and flexibility in your Kotlin applications. Understanding and utilizing this pattern can lead to cleaner and more maintainable code.
Remember to consider the delegation pattern when designing your classes and to evaluate whether it provides a better solution compared to traditional implementation inheritance.
Performance is an important element in constructing solid and proficient software applications. Kotlin, a cutting-edge and multifunctional programming language, offers multiple language structures for developers to take advantage of, each with its own performance-related properties. In this blog post, we will go in-depth into the execution efficiency impact of regular classes, sealed classes, and sealed interfaces in Kotlin.
Regular Classes
Regular classes in Kotlin provide the most basic form of class definition. They are open by default, meaning that they can be inherited and extended by other classes. Regular classes allow for polymorphism, encapsulation, and inheritance. In terms of performance, regular classes generally have a minimal impact on runtime efficiency. When instantiating regular classes, there is a slight overhead associated with memory allocation and object initialization. However, this overhead is typically negligible and doesn’t significantly impact performance unless you are creating an excessive number of instances. The method dispatch mechanism used in regular classes is dynamic, which incurs a small runtime cost when invoking methods. Nevertheless, modern virtual machine optimizations often mitigate this performance impact, making regular classes a reliable choice for most scenarios.
Sealed Classes
Sealed classes in Kotlin are used to represent restricted class hierarchies. They provide a way to define a limited set of subclasses that can inherit from them. Sealed classes are declared with the sealed modifier and are typically used in scenarios where you have a predefined set of possible types.
In terms of performance, sealed classes offer a slight trade-off compared to regular classes. The restricted class hierarchy allows the compiler to perform exhaustive when expression checks, which results in more efficient code generation. The when expression, when used with sealed classes, can ensure that all possible subclasses are handled, eliminating the need for a default case. This static analysis leads to improved performance since the compiler can optimize the code based on the exhaustive knowledge of the subclasses. Consequently, sealed classes can offer better runtime efficiency compared to regular classes when used appropriately.
Sealed Interfaces
Sealed interfaces, introduced in Kotlin 1.5, extend the concept of sealed classes to interfaces. They allow developers to define a sealed set of possible implementations for an interface. Sealed interfaces are declared using the sealed modifier and provide a way to restrict the types that can implement them.
From a performance standpoint, sealed interfaces share similar characteristics with sealed classes. The restricted set of implementations allows for exhaustive checks, enabling the compiler to optimize the code by eliminating unnecessary branching and providing improved runtime efficiency. The usage of sealed interfaces can lead to more predictable performance compared to regular interfaces, especially in scenarios where you need to handle a limited number of implementations.
Conclusion
When constructing applications in Kotlin, regular classes, sealed classes, and sealed interfaces provide varied performance benefits depending on the specific utilization. Regular classes are strong, providing minimal performance effects. Sealed classes and sealed interfaces, conversely, introduce a bound class hierarchy or implementation group, permitting more competent code generation and enhanced runtime productivity.
To determine the best construction for the job, it is critical to take into consideration the design prerequisites and balance between agility and performance. Regular classes are a suitable solution for a wide range of circumstances, whereas sealed classes and sealed interfaces are of greater use when there is a minimal number of known subclasses or executions.
It is imperative to understand that optimizing performance must be carried out with actual profiling and testing to determine issues with accuracy. By understanding the performance properties of regular classes, sealed classes, and sealed interfaces in Kotlin, you can make sound decisions to generate efficient and high-performing applications.