When working with numbers in Kotlin, there may be situations where you need to identify the two smallest numbers from a given list. Whether you are handling data analysis, competitive programming, or simply solving an algorithmic challenge, knowing an efficient way to do this is essential.
The goal is simple: Given a list of integers, find and return the two smallest numbers in that list. If the list has fewer than two elements, the program should handle that scenario gracefully.
The Approach
To solve this problem efficiently, we will use a linear scan method. This ensures that our solution runs in O(n) time complexity, making it optimal for large datasets.
Steps to Find the Two Smallest Numbers
1. Initialize Two Variables: Start by setting two variables, smallest and secondSmallest, to the maximum possible integer value (Int.MAX_VALUE).
2. Iterate Through the List: For each number in the list:
If it is smaller than smallest, update secondSmallest to the current smallest, then update smallest with the new value.
If it is greater than smallest but smaller than secondSmallest, update secondSmallest.
3. Handle Edge Cases: If the list contains fewer than two unique numbers, return an appropriate message.
Let’s implement this in Kotlin!
Kotlin Implementation
Below is the Kotlin program to find the two smallest numbers from a list:
Kotlin
funfindTwoSmallestNumbers(numbers: List<Int>): Pair<Int, Int>? {if (numbers.size < 2) returnnull// Ensure there are at least 2 numbersvar smallest = Int.MAX_VALUEvar secondSmallest = Int.MAX_VALUEfor (num in numbers) {if (num < smallest) { secondSmallest = smallest smallest = num } elseif (num < secondSmallest && num != smallest) { secondSmallest = num } }returnif (secondSmallest == Int.MAX_VALUE) nullelsePair(smallest, secondSmallest)}funmain() {val numbers = listOf(7, 3, 9, 1, 4, 2)val result = findTwoSmallestNumbers(numbers)if (result != null) {println("The two smallest numbers are: ${result.first} and ${result.second}") } else {println("Not enough unique numbers to find two smallest.") }}
Explanation of the Code
Edge Case Handling: The function first checks if the list has fewer than two elements. If so, it returns null.
Initialization:smallest and secondSmallest are initialized to Int.MAX_VALUE to ensure any number in the list will be smaller.
Single Pass Iteration: The list is traversed only once, making this solution efficient.
Conditions to Find the Two Smallest Numbers:
If the current number is smaller than smallest, update both smallest and secondSmallest.
If it is greater than smallest but still smaller than secondSmallest, update secondSmallest.
Final Check: If secondSmallest remains Int.MAX_VALUE, it means the list didn’t have enough unique values, so null is returned.
Dry Run & Output
Input:
Kotlin
List: [7, 3, 9, 1, 4, 2]
Dry Run Processing:
smallest = 7, secondSmallest = Int.MAX_VALUE
3 is smaller than 7 → Update smallest = 3, secondSmallest = 7
9 is greater than both → No update
1 is smaller than 3 → Update smallest = 1, secondSmallest = 3
4 is greater than 3 → No update
2 is greater than 1 but smaller than 3 → Update secondSmallest = 2
Output:
Kotlin
The two smallest numbers are: 1and2
Optimizing the Code
Time Complexity:O(n) (Single pass through the list)
Space Complexity:O(1) (Only a few variables are used, no extra data structures)
Alternative Approach (Using Sorting)
Another way to solve this is by sorting the list and picking the first two elements. However, sorting takes O(n log n) time, which is slower than our approach:
Kotlin
val sortedNumbers = numbers.sorted()val smallestTwo = sortedNumbers.take(2)
While this works, it is less efficient for large lists, making our linear approach the better choice.
Conclusion
Finding the two smallest numbers in a list is a common problem in programming. Using the approach discussed above, we can solve this problem efficiently with just one pass through the list. The key takeaways from this guide are:
Always consider edge cases, such as lists with fewer than two numbers.
Optimize performance by using a single iteration where possible.
Keep code readable and well-structured for easy debugging and maintenance.
This implementation follows best coding practices, making it suitable for real-world applications. Try modifying the code with different test cases to deepen your understanding.
When working with lists in Kotlin, a common task is to find the two smallest numbers. Whether you’re solving coding challenges, optimizing algorithms, or simply manipulating data, knowing how to efficiently extract the smallest elements is useful.
We then filter out the smallest number and find the next smallest using minOrNull() again.
This method is concise but slightly less efficient than the single-pass method.
Time Complexity: O(n) for filtering + O(n) for finding the min → Overall, O(n).
Which Method Should You Use?
Method
Time Complexity
Best Use Case
Sorting (sorted())
O(n log n)
When readability is more important than speed
Single-pass (Efficient)
O(n)
When performance is a priority
Functional (minOrNull())
O(n)
When writing concise and idiomatic Kotlin
Conclusion
In this blog, we explored multiple ways to find the two smallest numbers in a Kotlin list. We covered sorting, a highly efficient single-pass approach, and a functional-style solution. Each method has its trade-offs in terms of readability and performance.
When analyzing algorithms, time complexity plays a crucial role in determining their efficiency. Two common complexities encountered in sorting, searching, and data structure operations areO(n) (linear time) and O(n log n) (linearithmic time). But which one is better? In this blog, we will explore both complexities in detail, understand their significance, and compare them with real-world examples.
Understanding O(n) vs. O(n log n) Complexity
Imagine you’re throwing a party, and you need to greet every single guest. If you shake hands with each person individually, that’s a straightforward, one-to-one interaction. That’s essentially what O(n) is — a linear relationship. The time it takes to greet everyone grows directly with the number of guests.
Now, picture a slightly more complex scenario. You’re not just greeting guests; you’re also organizing them by height, and you’re using a clever method that involves repeatedly dividing the group in half and comparing heights. This is more akin to O(n log n). It’s still efficient, But it involves a bit more ‘thinking’ (checks) for each guest.
What is O(n)?
O(n), or linear time complexity, means that the execution time of an algorithm increases directly in proportion to the size of the input. If we double the input size, the time required also doubles.
A simple example of an O(n) algorithm is traversing an array:
Kotlin
funprintElements(arr: IntArray) {for (element in arr) {println(element) }}
Here, if we have an array of size n, the loop runs n times, making it O(n).
When O(n) is Used?
Searching in an unsorted array
Finding the maximum or minimum element in an arra
Simple computations that process each element once
What is O(n log n)?
O(n log n), or linearithmic time complexity, appears in algorithms where the problem is divided into smaller subproblems (like divide-and-conquer strategies). The additional log(n) factor results from recursive halving or merging operations.
A common example of O(n log n) complexity is Merge Sort:
Kotlin
funmergeSort(arr: IntArray): IntArray {if (arr.size <= 1) return arrval mid = arr.size / 2val left = mergeSort(arr.sliceArray(0 until mid))val right = mergeSort(arr.sliceArray(mid until arr.size))returnmerge(left, right)}funmerge(left: IntArray, right: IntArray): IntArray {var i = 0; var j = 0val mergedList = mutableListOf<Int>()while (i < left.size && j < right.size) {if (left[i] < right[j]) { mergedList.add(left[i++]) } else { mergedList.add(right[j++]) } }while (i < left.size) mergedList.add(left[i++])while (j < right.size) mergedList.add(right[j++])return mergedList.toIntArray()}
In Merge Sort, the array is divided into halves (log(n) times), and each element is processed (n times), resulting in O(n log n) complexity.
When O(n log n) is Used?
Sorting large datasets (Merge Sort, Quick Sort, Heap Sort)
Efficient searching in balanced trees
Solving problems using divide and conquer approach
O(n) vs. O(n log n): Which One is Better?
Complexity
Growth Rate
When to Use
O(n)
Faster for large inputs (linear growth)
When direct iteration is possible
O(n log n)
Slower due to log factor
When sorting or recursion is required
Example: If n = 1,000,000:
O(n) → 1,000,000 operations
O(n log n) → ~20,000,000 operations (log base 2)
Clearly, O(n) is preferable whenever possible, but for sorting and recursion-based problems, O(n log n) is necessary.
Conclusion
Understanding time complexity is essential for writing efficient code. O(n) is ideal for simple iterations, while O(n log n) is crucial for sorting and divide-and-conquer approaches. By recognizing these complexities, developers can optimize their code for better performance.
Reversing words in a sentence is a common programming task often used in coding interviews and algorithm-based challenges. In this blog, we’ll break down a Kotlin function that reverses the order of words in a given string. We’ll analyze each part of the code, identify potential improvements, and present an optimized version.
Reversing Words: Problem Statement
Given an input string containing multiple words separated by spaces, we need to reverse the order of words while maintaining their original form.
Input:
Kotlin
"Hello India Pune World"
Output:
Kotlin
"World Pune India Hello"
Understanding the Kotlin Code
Let’s analyze the following Kotlin function that reverses the order of words in a string:
Understand how lists work — mutable and immutable lists impact how you modify data in Kotlin.
Code readability is important — the optimized version is much easier to understand and maintain.
Conclusion
Reversing words in a string is a simple yet insightful exercise in Kotlin. The initial approach using a loop and swapping elements works but is not the most efficient solution. By leveraging Kotlin’s built-in functions, we can achieve the same result with cleaner and more readable code.
Understanding such basic transformations is crucial for improving problem-solving skills, especially in coding interviews and real-world applications.
If you’re learning Kotlin and want to understand how data structures work, linked lists are a fundamental concept worth mastering. A linked list is a collection of values arranged in a linear, unidirectional sequence. Compared to contiguous storage options like arrays, linked lists offer several theoretical advantages, such as constant-time insertion and removal from the front of the list, along with other reliable performance characteristics.
In this blog, we’ll cover everything you need to know about linked lists in Kotlin — including what they are, how they work, and how to implement them, with clear explanations and code examples.
What is a Linked List?
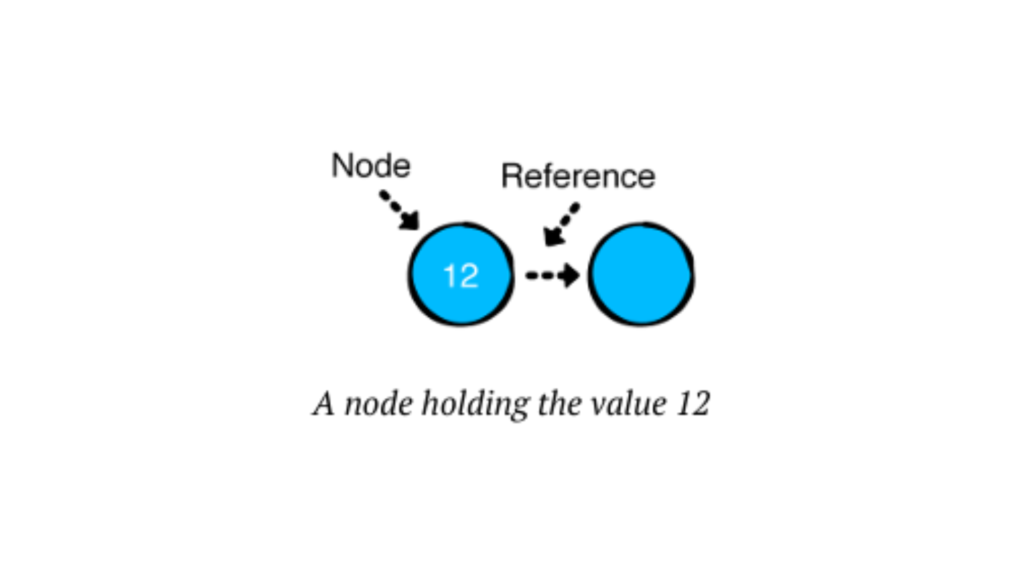
A Linked List is a data structure consisting of a sequence of elements, called nodes.
Each node has two components:
Data: The value we want to store.
Next: A reference to the next node in the sequence.
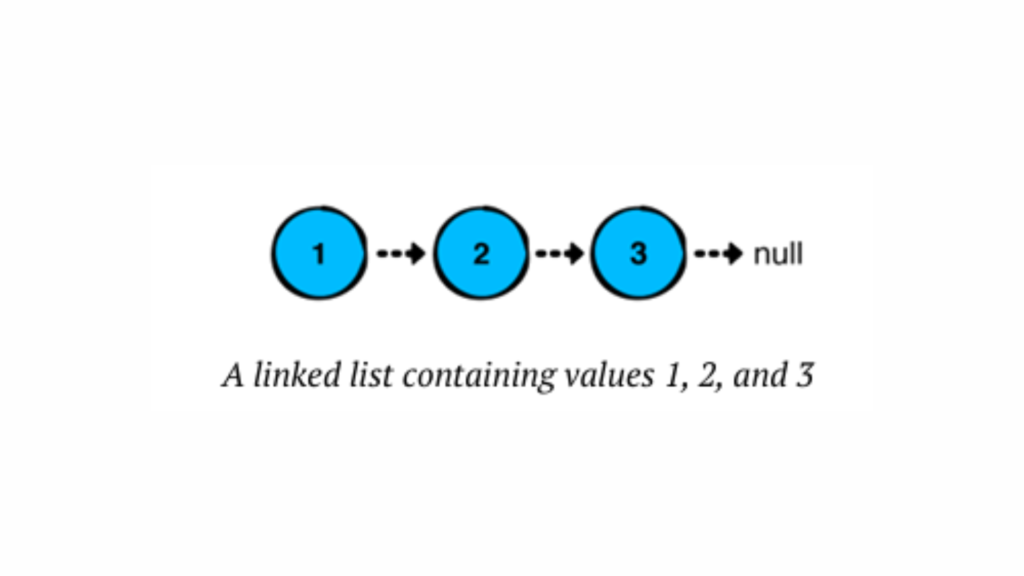
Unlike arrays, Linked Lists are dynamic in size, offering efficient insertions and deletions at any position in the list.
In a linked list, each node stores a value and points to the next node in the chain. The last node in the sequence points to “null,” indicating the end of the list.
Linked lists have several advantages over arrays or ArrayLists in Kotlin:
Quick insertions and removals at the front of the list.
Consistent performance for operations, especially for inserting or removing elements anywhere in the list.
Types of Linked Lists
Singly Linked List – Each node points to the next node in the sequence (we’ll focus on this one & only for insertion operations).
Doubly Linked List – Each node has a reference to both the next and the previous node.
Circular Linked List – The last node points back to the first node, forming a loop.
Why Use Linked Lists?
Before we dive into the code, let’s understand why we might choose Linked Lists over arrays:
Dynamic Size – No need to specify a fixed size upfront.
Efficient Insertions/Deletions – Adding or removing elements doesn’t require shifting other elements.
Memory Efficiency – Uses only as much memory as needed.
However, Linked Lists have their trade-offs. Accessing elements is slower compared to arrays because you can’t directly access an element by an index – you have to traverse the list.
Building a Singly Linked List in Kotlin
Now that we understand what Linked Lists are, let’s build one step-by-step in Kotlin! We’ll create the following:
Node Class – Represents each element in the list.
LinkedList Class – Manages the nodes and provides functionality to add, remove, and display elements.
Defining the Node Class
Each node needs to store data and a reference to the next node. Here’s our Node class:
Kotlin
// We define a node of the linked list as a data class, where it holds a value and a reference to the next node.dataclassNode<T>(varvalue: T, var next: Node<T>? = null) {overridefuntoString(): String {returnif (next != null) {"$value -> ${next.toString()}" } else {"$value" } }}funmain() {val node1 = Node(value = 1)val node2 = Node(value = 2)val node3 = Node(value = 3) node1.next = node2 node2.next = node3 //here node3 points to null at last, as per our code we only print its valueprintln(node1)}//OUTPUT1->2->3
Here, we defined a generic Node class for a linked list in Kotlin. Each Node holds a value of any type (T) and a reference to the next Node, which can be null. The toString() method provides a custom string representation for the node, recursively displaying the value of the node followed by the values of subsequent nodes, separated by ->. If the node is the last in the list, it simply shows its value.
Have you observed how we constructed the list above? We essentially created a chain of nodes by linking their ‘next’ references. However, building lists in this manner becomes impractical as the list grows larger. To address this, we can use a LinkedList, which simplifies managing the nodes and makes the list easier to work with. Let’s explore how we can implement this in Kotlin.
Creating the LinkedList Class
Let’s create our LinkedList class and add core functionalities like adding nodes and displaying the list.
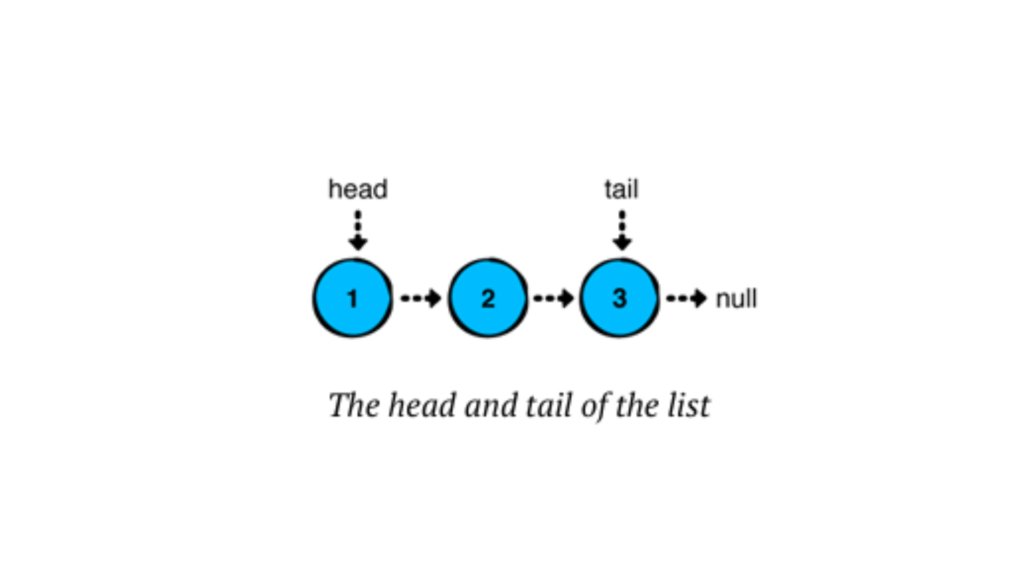
Basically, a linked list has a ‘head’ (the first node) and a ‘tail’ (the last node). In a singly linked list, we usually only deal with the head node, although the tail node can also be relevant, especially when adding elements at the end. The tail node becomes more important in doubly linked lists or circular linked lists, where it supports bidirectional traversal or maintains circular references. However, here, we will use both nodes in a singly linked list.
Here, a linked list has a ‘head’ (the first node) and a ‘tail’ (the last node). We’ll also store the list’s size in a ‘size’ property.
Adding values to the list
Now, let’s develop a way to manage the nodes in our list and focus on adding values. There are three common approaches to inserting values into a linked list, each offering different performance benefits:
Push: Inserts a value at the start of the list.
Append: Adds a value to the end of the list.
Insert: Places a value after a specified node in the list.
We’ll implement these methods step by step and analyze their performance.
Push Operations
Inserting a value at the beginning of the list is called a push operation or head-first insertion. The implementation for this is remarkably straightforward.
To achieve this, add the following method to our LinkedList class:
Kotlin
// This function is used to insert a new element at the first position in the linked list.// This is a head-first insertion.funpushAtHead(value: T) { head = Node(value, next = head) // The previous head value (i.e., null if the list is empty) is assigned to the next node.// If the list is empty (i.e., tail is null), we add the new node and assign it to the tail.// If the tail is not null, we add the new element and assign it to the head (as done above).if (tail == null) { tail = head } size++ // Whenever a new node is added, the size is increased by one.}
What happens here is that when we push into an empty list, the new node becomes both the head and the tail. Since the list now contains one node, we increase the size.
We will run this code, but I have a question for you: Should we always run this code in the main function? I mean, should we always copy and paste it into Android Studio or Kotlin Playground? What if, in the future, we want to revisit or refer to it? The answer is simple—we can use special Kotlin features like infix functions and higher-order functions. By doing this, we can create a Runner class and add different functionalities using infix and higher-order functions. This approach will make the code easier to understand and manage in the future. Without further delay, let’s implement it, and I’ll explain how it works.
First of all, create a new file and name it LinkedListRunner.kt. Then, add the following code:
Kotlin
funmain() {// Push operation at the first position in the linked list."push"example {val list = LinkedList<String>() list.pushAtHead("amol") list.pushAtHead("satara") list.pushAtHead("bajirao") list.pushAtHead("pune")println(list) }}// This infix function is used to print an example description and then execute the provided function.infixfunString.example(function: () -> Unit) {println("----- Example of $this -----")function()println()}
Here,
Infix Function (“push” example{..})
An infix function allows you to call a function in a cleaner and more readable way, without parentheses and dots. In this case, "push" example {...} is an example of an infix function.
How it works:
"push" is a string, and when combined with example, it invokes the example function.
The infix keyword enables the usage of this function in a special syntax: a infixFun b instead of a.infixFun(b).
In this function, this refers to the string "push" and is used to print a custom message (like "----- Example of push -----").
Higher-Order Function (String.example())
The example function is also a higher-order function because it takes another function as a parameter.
How it works:
The example function takes a lambda expression (function: () -> Unit) as a parameter. This is a function that does not take any arguments and returns nothing (Unit is equivalent to void).
Inside example, the function passed (function()) is executed.
In your code, the block of code inside {} (which modifies the linked list) is the function being passed to example as a lambda.
So, finally,
Infix Function: The example function is used with infix notation, making the code more readable. It prints the description "----- Example of push -----" and then runs the provided code block.
Higher-Order Function: The example function is a higher-order function because it accepts a lambda function as a parameter and executes it inside its body.
Execution Flow will be…,
The string "push" calls the infix function example.
The block of code inside {} (which adds items to the linked list) is passed as a lambda to the example function.
example prints the message "----- Example of push -----", runs the lambda function to manipulate the linked list, and prints the result.
Kotlin
----- Example of push -----pune -> bajirao -> satara -> amol
This approach is good, but we can improve it further. By using the fluent interface pattern, you can chain multiple push() calls together. To do this, modify the push() method to return LinkedList<T>. Then, add return this at the end, so it returns the list after adding the new element.
Create a new method in LinkedList.kt. The method should now look like this:
Kotlin
// Push operation using chaining.// Head-first insertion using chaining.funpushingAtHead(value: T): LinkedList<T> { head = Node(value, next = head) // The previous head value is assigned to the next node.// If the list is empty (i.e., tail is null), assign the new node to the tail.if (tail == null) { tail = head } size++ // Increment the size of the list whenever a new node is added.returnthis// Return the updated list to enable chaining.}
In the main() function of the LinkedListRunner.kt file, you can either create a new method or update the existing one to use the return value of pushAtHead().
Kotlin
"fluent interface for chain pushing" example {val list = LinkedList<Int>() list.pushingAtHead(2).pushingAtHead(3).pushingAtHead(7).pushingAtHead(1)println(list) }//Output ----- Example of fluent interfacechain pushing -----1->7->3->2
That’s better..! Now, you can easily add multiple elements to the beginning of the list.
Wait a moment…! What we see here might seem unclear at first, but is it really necessary? Yes, it is! That’s why I’ve covered it here. As we go further, you’ll get used to it, and things will become much clearer.
Append Operations
Next, we’ll focus on the append operation, which adds a value to the end of the list (also known as tail-end insertion).
In LinkedList.kt, we’ll add the following code right below the push() method:
Kotlin
// Append a new node at the last position of the linked list.// Tail-end insertion.funappendAtTail(value: T) {// Example: 1 -> 2 -> 3 -> 4if (isEmpty()) {pushAtHead(value) // If the list is empty, add the new node at the head.return }// If the list is not empty, link the new node to the tail and update the tail. tail?.next = Node(value) tail = tail?.next // Update the tail to the newly added node. size++ // Increment the size of the list when a new node is added.}
This code is quite simple:
As before, if the list is empty, we need to set both the head and the tail to the new node. Since appending to an empty list is the same as pushing, we can use the push method to handle this for us.
For all other cases, we create a new node after the current tail node. The tail won’t be null here because we’ve already handled the empty list case earlier in the code.
Since this is a tail-end insertion, the new node becomes the tail of the list.
Now, go back to LinkedListRunner.kt and add the following code at the bottom of main():
Kotlin
"append"example{val list = LinkedList<Int>() list.appendAtTail(1) list.appendAtTail(2) list.appendAtTail(3) list.appendAtTail(4)println(list) }//Output ----- Example of append -----1->2->3->4
You can apply the technique you used for push() to create a fluent interface for append() as well.
Kotlin
// Append using chaining.// Tail-end insertion using chaining.funappendingAtTail(value: T): LinkedList<T> {if (isEmpty()) {pushAtHead(value) // If the list is empty, add the new node at the head.returnthis }// If the list is not empty, link the new node to the tail and update the tail. tail?.next = Node(value) tail = tail?.next // Update the tail to the newly added node.returnthis// Return the updated list to enable chaining.}
Whether you find it useful or not, just think about the possibilities of chaining both push and append together. Or, feel free to have some fun experimenting with it.
Insert Operations
The third and final operation for adding values is insert(afterNode: Node<T>). This operation allows us to insert a value at a specific position in the list, and it involves two steps:
Locating the node where the value should be inserted.
Inserting the new node right after the located node.
First, we’ll write the code to find the node where we want to insert the value.
In LinkedList.kt, add the following code just below the append() method:
Kotlin
// Get the node at the specified index.funnodeAt(index: Int): Node<T>? {var currentNode = headvar currentIndex = 0// Traverse the list until the node at the specified index is found.while (currentNode != null && currentIndex < index) { currentNode = currentNode.next currentIndex++ }return currentNode // Return the node at the specified index, or null if not found.}
nodeAt() retrieves a node from the list based on the given index. Since we can only start from the head node, we need to traverse the list step by step. Here’s how it works:
We start with a reference to the head node and keep track of the number of steps taken.
Using a while loop, we move through the list until we reach the desired index. If the list is empty or the index is out of range, it will return null.
Next, we will insert the new node. To do this, add the following method below nodeAt().
Kotlin
// Insert a new node with the specified value after the given node.// If the node is the tail, the new node is appended at the tail.funinsertAt(value: T, afterNode: Node<T>): Node<T>? {if (tail == afterNode) {appendAtTail(value) // If afterNode is the tail, append the new node at the tail.return tail!! // Return the updated tail. }// Create a new node and link it to the node after the given node.val newNode = Node(value = value, next = afterNode.next) afterNode.next = newNode // Update the next pointer of the afterNode to the new node. size++ // Increment the size of the list.return newNode // Return the newly inserted node.}
Here’s what we’ve done:
If the method is called with the tail node, we use the append method, which updates the tail.
Otherwise, we create a new node and link it to the next node in the list.
We update the specified node to point to the new node.
To test this, go to LinkedListRunner.kt and add the following code at the bottom of main().
Kotlin
"linked list insert At perticular index "example {val list = LinkedList<Int>() list.pushAtHead(1) list.pushAtHead(2) list.pushAtHead(3)println("list before insert $list")var middleNode = list.nodeAt(1)!!for(i in1..3){ middleNode = list.insertAt(-1 * i, middleNode)!! }println("After inserting $list") }//Output ----- Example of linked list insert At perticular index ----- list before insert 3->2->1 After inserting 3->2-> -1-> -2-> -3->1
Great job! You’ve made excellent progress. To recap, you’ve implemented the three operations for adding values to a linked list, as well as a method to find a node at a specific index.
Conclusion
We’ve explored the key insertion operations in linked lists, along with the foundational concepts and structure that make them an essential part of data management. Understanding these operations provides a solid base for working with linked lists in various scenarios. As you continue to practice, you’ll gain more proficiency in implementing and manipulating linked lists, further enhancing your problem-solving skills in Kotlin.
Kotlin Kadane’s algorithm is a well-known algorithm used for finding the maximum subarray sum in a given array. It is an efficient algorithm that works in O(n) time complexity. In this blog, we will discuss Kadane’s algorithm and how to implement it using the Kotlin programming language.
KotlinKadane’s Algorithm
Kadane’s algorithm is a dynamic programming algorithm that works by iterating over the array and keeping track of the maximum subarray sum seen so far. The algorithm maintains two variables, max_so_far and max_ending_here, where max_so_far is the maximum subarray sum seen so far, and max_ending_here is the maximum subarray sum that ends at the current index.
The algorithm starts by setting both max_so_far and max_ending_here to the first element of the array. It then iterates over the remaining elements of the array, updating max_ending_here by adding the current element to it. If max_ending_here becomes negative, it is reset to zero, as any subarray with a negative sum cannot be the maximum subarray. If max_ending_here is greater than max_so_far, max_so_far is updated with the value of max_ending_here. At the end of the iteration, max_so_far will contain the maximum subarray sum.
Kotlin Implementation
Now let’s see how we can implement Kadane’s algorithm using Kotlin:
In this implementation, we first initialize max_so_far and max_ending_here to the first element of the array. We then loop over the remaining elements of the array and update max_ending_here by adding the current element to it. If max_ending_here becomes negative, it is reset to zero. If max_ending_here is greater than max_so_far, max_so_far is updated with the value of max_ending_here. Finally, the function returns max_so_far.
Let’s test our implementation with an example:
Kotlin
funmain() {val arr = intArrayOf(-2, -3, 4, -1, -2, 1, 5, -3)val maxSum = maxSubArraySum(arr)println(\"Maximum subarray sum is: $maxSum\")}
Output:
Maximum subarray sum is: 7
In this example, we have an array of integers, and we want to find the maximum subarray sum. Our implementation correctly returns 7, which is the maximum subarray sum.
Conclusion
Kadane’s algorithm is a simple yet powerful algorithm for finding the maximum subarray sum in an array. In this blog, we have seen how to implement Kadane’s algorithm using Kotlin. This implementation works in O(n) time complexity, making it an efficient algorithm for solving the maximum subarray problem.
Note → Time and space complexity are high-level measures of scalability. They don’t measure the actual speed of the algorithm itself.
Space Complexity
The time complexity of an algorithm isn’t the only performance metric against which algorithms are ranked. Another important metric is its space complexity, which is a measure of the amount of memory it uses.
So basically, It is made up of Auxiliary space (extra or temporary space) and Input space (all possible inputs).
Since numbers.sorted() produces a new list with the same size of numbers, the space complexity of printSorted is O(n)
While the above function is simple and elegant, there may be some situations in which you want to allocate as little memory as possible. You could rewrite the above function like this:
The above algorithm only allocates memory for a few variables. Since the amount of memory allocated is constant and does not depend on the size of the list, the space complexity is O(1).
Tradeoff → This is in contrast with the previous function, which allocates an entire list to create the sorted representation of the source array. The tradeoff here is that you sacrifice time and code readability to use as little memory as possible. This is common in a problem since a problem cannot have both low computing time and low memory consumption. you either use more memory and solve the problem more quickly or use more time to solve the problem but with limited memory.
Note →The best algorithm/program should have the minimum space complexity. The lesser space used, the faster it executes.
Note → Time and space complexity are high-level measures of scalability. They don’t measure the actual speed of the algorithm itself. Time complexity in Kotlin Time complexity is a measure of the time required to run an algorithm as the input size increases and we use Big O notation to represent it. Let’s go through...