Android

Android SDK Tools vs Android Platform Tools

Android SDK Tools vs Android Platform Tools: What You Really Need Today

The Android SDK (Software Development Kit) is a powerful suite of tools, libraries, and system images used to develop Android apps. Among its components, two commonly mentioned terms — Android SDK Tools and Android Platform Tools — are often confused or misunderstood.

In this post, we’ll break down what each one really is, whether you still need them, and how they fit into a modern Android development workflow.

Android SDK Tools — Deprecated but Historically Important

What It Was:

Android SDK Tools was a legacy package that included core development utilities used for creating, testing, and debugging Android apps. It provided platform-independent tools necessary for managing Android development environments.

As of Android Studio 3.x, the monolithic SDK Tools package has been deprecated. Its functionality is now split into modular SDK packages like emulator, build-tools, and cmdline-tools, and is managed automatically by Android Studio.

Key Tools (Now Modularized, Moved, or Obsolete):

  • AVD Manager: For creating and managing Android Virtual Devices (emulators). Now integrated in Android Studio and backed by the emulator and system-images packages.
  • Emulator: The virtual Android device runner. Now a separate and actively updated component (emulator package).
  • Lint: Static code analysis tool — now part of the Android Gradle Plugin.
  • mksdcard: Used to create SD card images for emulators (rarely needed today).
  • ProGuard: A legacy code shrinking/obfuscation tool — still optionally usable, but replaced by R8 as the default.
  • DDMS (Dalvik Debug Monitor Server): Deprecated — its features now live in Android Studio’s Profiler, Logcat, and Device Explorer.

Important: You no longer need to manually install or manage Android SDK Tools — Android Studio and the command-line SDK Manager handle everything via modular components.

Android Platform Tools — Actively Maintained and Essential

What It Is:

Android Platform Tools is a core SDK component that includes essential command-line tools used to communicate with Android devices and emulators. Unlike the deprecated SDK Tools, Platform Tools are actively maintained and updated frequently to stay in sync with the latest Android versions.

Key Tools (Still Actively Used):

adb (Android Debug Bridge): A versatile tool to:

  • Install/uninstall APKs: adb install yourapp.apk
  • Copy files: adb push, adb pull
  • View logs: adb logcat
  • Open a shell: adb shell
  • Forward ports, record screen, take screenshots, and more

fastboot: Used for flashing firmware or custom recoveries (in bootloader mode)

sqlite3: Query and inspect app databases

dmtracedump, etc1tool, systrace: Diagnostic and visualization tools

Platform Tools are indispensable for real-device debugging, sideloading, recovery operations, and emulator communication.

Common Misunderstandings — Let’s Clarify

Misconception: “Tools like aidl, aapt, dx, dexdump are part of Platform Tools.”
Fact: These are part of the Build Tools package. They help with compiling and packaging apps — not with device interaction.

Misconception: “R8 is part of SDK Tools or Platform Tools.”
Fact: R8 is integrated into the Android Gradle Plugin, not a standalone SDK tool. It handles code shrinking, obfuscation, and resource optimization during builds.

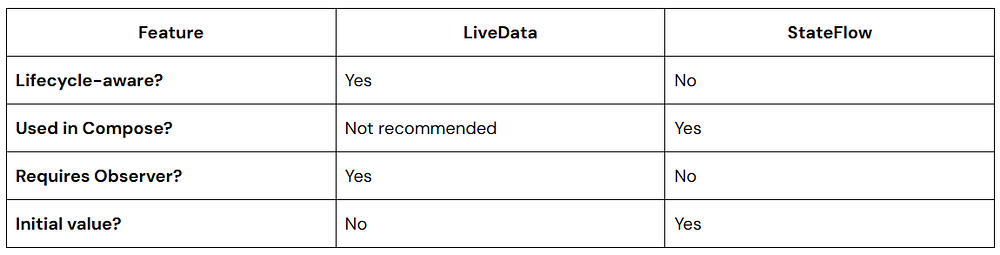
SDK Tools vs Platform Tools

FeatureAndroid SDK Tools (Legacy)Android Platform Tools (Current)
StatusDeprecated since Android Studio 3.xActively maintained
Managed viaOld SDK Manager (now replaced)Android Studio SDK Manager
PurposeDevelopment environment setupDevice/emulator interaction
Key ToolsAVD Manager, Emulator, DDMS (legacy)adb, fastboot, sqlite3, dmtracedump
Update FrequencyNo longer updatedFrequently updated with platform
Needed Today?No — handled by Android StudioYes — essential for development
Android SDK Tools Vs Platform Tools

Conclusion

Modern Android development no longer requires you to manually manage the old Android SDK Tools package. Android Studio — with its modular SDK components like cmdline-tools, emulator, and build-tools — takes care of everything from virtual device creation to project building through Gradle.

However, Android Platform Tools remain essential. Whether you’re installing APKs on a physical device, debugging over USB or Wi-Fi, or flashing recovery images, tools like adb and fastboot are irreplaceable in any developer’s toolbox.

When in Doubt:

  • Use Platform Tools to interact with devices/emulators.
  • Let Android Studio and Gradle manage build, analysis, and emulator creation.
android studio theme

Choosing the Best Android Studio Appearance Theme: Comfort, Clarity, and Code Focus

Whether you’re building your next killer app or debugging a tricky issue late into the night, the look and feel of your development environment matters more than you might think. The appearance theme you choose in Android Studio isn’t just about aesthetics — it directly impacts eye strain, code readability, and even your productivity over time.

So, what’s the best Android Studio theme?

The answer: It depends on you — your working hours, visual preferences, screen setup, and personal taste.

In this post, we’ll walk through the most popular Android Studio appearance themes, explore what makes each one stand out, and help you decide which is right for your workflow.

1. Darcula — The Classic Dark Theme

Darcula is the default dark theme in Android Studio, and for good reason.

Why Developers Love It:

  • Reduced eye strain: The dark background with high-contrast syntax coloring is gentle on the eyes, especially during long coding sessions or at night.
  • Consistency: As a built-in theme maintained by JetBrains, Darcula ensures stability and compatibility with every Android Studio release.
  • Minimal distractions: The muted tones help keep your focus on the code.

Things to Consider:

  • The color palette may feel a bit dull or washed out to some developers who prefer more vibrant UI elements.
  • Limited customization compared to third-party themes.

Best for: Developers who prefer a no-nonsense, stable dark theme that works well in all lighting conditions.

2. IntelliJ Light — For Fans of Brighter UIs

Not everyone loves dark themes, and IntelliJ Light offers a crisp, bright alternative.

Why It Works:

  • Great for daylight use: If you’re working in a well-lit environment or near a window, this theme can feel more natural and easier to read.
  • Professional and clean: Screenshots and presentations with a light theme tend to look better, especially in documents or tutorials.

Downsides:

  • Prolonged use in low-light settings may cause more eye fatigue.
  • Some developers find bright UIs too harsh after extended periods.

Best for: Those who work in bright environments or simply find dark themes hard to read.

3. One Dark / One Dark Pro — A VS Code Favorite, Now in Android Studio

If you’ve ever used Visual Studio Code, you’ve probably encountered the One Dark theme — now ported to Android Studio as well.

Why It’s Popular:

  • Balanced aesthetics: One Dark strikes a great balance between dark backgrounds and colorful, legible syntax highlighting.
  • Modern look: It feels more polished than Darcula, with just enough visual flair to keep things fresh.
  • Plugin availability: You can install this theme via Android Studio’s plugin marketplace.

Potential Drawbacks:

  • May need manual tweaks if you’re looking for colorblind accessibility.
  • Slightly more saturated than Darcula, which could be distracting for some.

Best for: Developers seeking a refined, modern dark theme with better contrast and color separation.

4. Material Theme UI Plugin — Where Beauty Meets Customization

If you want your IDE to be as gorgeous as your code, the Material Theme UI plugin is a must-try. It brings Material Design principles to Android Studio, offering multiple themes under one roof.

Popular Variants Include:

  • Material Oceanic
  • Material Darker
  • Monokai
  • Arc Dark

What Makes It Stand Out:

  • Highly customizable: Beyond themes, you can tweak the look of scrollbars, icons, status bars, and more.
  • Vibrant and stylish: The themes are eye-catching without being overbearing.
  • Regularly updated: Maintained by the open-source community with ongoing improvements.

Things to Watch:

  • Can slow down Android Studio slightly on older machines.
  • Might feel a bit too “busy” if you prefer minimal UIs.

Best for: Developers who want their IDE to look sleek, modern, and highly personalized.

5. Solarized Light & Solarized Dark — A Color Theory Masterpiece

Designed with scientific precision, the Solarized color palette is built to reduce eye fatigue while improving readability.

Why It’s Unique:

  • Color balance: Uses sixteen carefully chosen hues optimized for both dark and light modes.
  • Ideal for long hours: The subtle contrast helps reduce visual fatigue without sacrificing syntax clarity.
  • Cross-platform consistency: Works well across terminals, code editors, and other tools.

Possible Limitations:

  • Some developers find the pastel tones a bit too soft or outdated.
  • Not included by default — must be installed via plugins or imported manually.

Best for: Developers with sensitive eyes or those who appreciate color harmony in their editor.

Bonus Tip: Pair Your Theme with a Great Font

No matter which theme you choose, your experience can be dramatically improved by switching to a better coding font. Here are a few favorites:

  • JetBrains Mono: Clean, readable, and comes with Android Studio.
  • Fira Code: Features ligatures that make reading complex code easier.
  • Cascadia Code: A Microsoft font with friendly curves and good ligature support.

You can update your font by going to:

HTML
Preferences (or Settings) > Editor > Font

So, Which Theme Should You Use?

The best theme is the one that feels comfortable, readable, and makes you want to code more. Here’s a quick summary:

Conclusion

Your Android Studio theme isn’t just decoration — it’s part of your workspace, your mindset, and your daily developer experience. Choosing the right one can make a real difference in how you feel and perform throughout the day.

Experiment with a few of the themes above. Find the one that speaks to you — not just visually, but practically. After all, great code starts with a comfortable environment.

WeChat Mini Programs WXML and WXSS

WXML and WXSS Explained: The Building Blocks of WeChat Mini Programs

In the dynamic world of app development, WeChat Mini Programs have carved a unique space — especially in China, where over a billion users rely on WeChat daily. These “sub-apps” run directly within WeChat, allowing users to access everything from ride-hailing to food delivery to banking without ever installing a separate app. But what powers these Mini Programs behind the scenes?

Two key technologies form the foundation of every WeChat Mini Program: WXML (WeiXin Markup Language) and WXSS (WeiXin Style Sheets). In this blog, we’ll break down what these technologies are, how they work together, and why they matter for developers.

What Is WXML?

WXML, short for WeiXin Markup Language, is the structural layer of a Mini Program. If you’ve worked with HTML before, WXML will feel familiar — it serves the same purpose: defining the layout and UI components of your application.

Key Characteristics of WXML:

  • Declarative Syntax: WXML uses a clean, readable syntax to describe elements and their hierarchy.
  • Component-Based: Instead of generic <div> and <span>, WXML uses specific components like <view>, <text>, <image>, and more.
  • Data Binding: It supports two-way data binding, allowing dynamic updates between the logic and UI.
  • Control Structures: Includes logic like wx:if, wx:for, and wx:else for conditionals and loops.

Sample WXML Code:

XML
<view class="container">
  <text>Hello, WeChat Mini Program..!</text>
  <image src="{{avatarUrl}}" mode="aspectFill"/>
</view>

Here, the avatarUrl is a variable dynamically provided by the Mini Program’s logic, demonstrating WXML’s support for dynamic rendering.

What Is WXSS?

Just like HTML needs CSS for styling, WXML relies on WXSS — short for WeiXin Style Sheets — to handle the visual design of the Mini Program. WXSS is inspired by CSS but includes WeChat-specific enhancements.

Why WXSS Matters:

  • Familiar Yet Enhanced: While it inherits most of CSS syntax, WXSS introduces rpx units for responsive design, making it ideal for varying screen sizes in the WeChat ecosystem.
  • Scoped Styling: Styles are typically scoped to a single page or component, promoting modularity.
  • Lightweight and Fast: WXSS is optimized for fast rendering within the WeChat runtime environment.

Sample WXSS Code:

CSS
.container {
  padding: 20rpx;
  background-color: #f8f8f8;
}

text {
  font-size: 32rpx;
  color: #333;
}

The rpx (responsive pixel) unit is especially handy—it automatically adjusts to the device screen width, ensuring consistent UI across all devices.

How WXML and WXSS Work Together

Think of WXML as the skeleton and WXSS as the clothing. WXML structures the page; WXSS makes it look good. They’re tightly integrated but separated to maintain a clean and maintainable codebase — much like HTML and CSS.

When a Mini Program loads a page:

  1. WXML renders the structure.
  2. WXSS applies styles.
  3. JavaScript handles logic and interactions.

Developer Tip: Understanding rpx vs px

In WXSS, the rpx unit is one of the most powerful features. It adapts automatically based on screen size. For example:

  • On a 750px wide screen: 1rpx = 1px
  • On a 375px wide screen: 1rpx = 0.5px

This removes the need for complicated media queries and ensures your layout scales naturally on all devices using WeChat.

Real-World Example

Let’s say you’re building a profile card:

profile.wxml

XML
<view class="profile-card">
  <image src="{{user.avatar}}" class="avatar"/>
  <text class="username">{{user.name}}</text>
</view>

profile.wxss

CSS
.profile-card {
  display: flex;
  align-items: center;
  padding: 20rpx;
  background-color: #fff;
  border-radius: 16rpx;
  box-shadow: 0 2rpx 10rpx rgba(0, 0, 0, 0.1);
}

.avatar {
  width: 80rpx;
  height: 80rpx;
  border-radius: 50%;
  margin-right: 20rpx;
}
.username {
  font-size: 32rpx;
  color: #222;
}

This simple layout renders a user profile with a responsive image and styled name — all done using WXML and WXSS.

Why WXML and WXSS Matter in 2025

As WeChat Mini Programs continue to grow — powering e-commerce, services, education, and government apps — understanding WXML and WXSS is more relevant than ever. They’re not just front-end tools; they’re core to building scalable, high-performing micro-experiences in one of the world’s most influential platforms.

In a mobile-first and app-fatigued world, Mini Programs offer a lightweight alternative — and WXML and WXSS are your gateway in.

Conclusion

WXML and WXSS aren’t just “HTML and CSS in Chinese clothes” — they’re tailored for a fast, responsive, mobile ecosystem that thrives inside the WeChat super-app. For developers eyeing the Chinese market, or anyone curious about the future of lightweight app ecosystems, learning these tools is a smart investment.

FAQs

Q: Is WXML the same as HTML?
 A: No, WXML is similar in structure but designed specifically for WeChat Mini Programs. It uses custom tags and supports dynamic binding.

Q: What is the difference between WXSS and CSS?
 A: WXSS is based on CSS but includes enhancements like the rpx unit for responsive design, optimized for WeChat’s environment.

Q: Can I use Flexbox or Grid in WXSS?
 A: Yes, WXSS supports Flexbox, which is the recommended layout model for WeChat Mini Programs. CSS Grid is not fully supported.

Q: How do I test WXML and WXSS?
 A: Use the official WeChat Developer Tool to create and preview Mini Programs with real device simulation.

TCMPP

A Deep Dive into Tencent Cloud Mini Program Platform (TCMPP): Use Cases, Tools, and Benefits

In today’s digital landscape, businesses strive for agility, scalability, and seamless user experiences. Tencent Cloud Mini Program Platform (TCMPP) emerges as a powerful solution, enabling developers to create lightweight, cross-platform applications that integrate effortlessly into various ecosystems.

What is Tencent Cloud Mini Program Platform (TCMPP)?

Before we go further, let’s clarify what a mini program is.
 A mini program is a lightweight application that doesn’t require separate download or installation like traditional apps. Instead, it runs within a larger platform — such as WeChat or other super apps — and provides specific, targeted functionalities. This enables users to instantly access services without consuming additional device storage.

Tencent Cloud Mini Program Platform (TCMPP) is a comprehensive development framework that empowers businesses to build and manage these mini programs. Designed for platforms like WeChat or custom enterprise ecosystems, TCMPP enables the creation of app-like experiences that are fast, efficient, and highly accessible — without the friction of traditional app distribution.

Key Features of TCMPP

1. Cross-Platform Compatibility

TCMPP supports the development of mini programs that can run seamlessly across multiple platforms, including WeChat and custom enterprise applications. This “write once, deploy anywhere” approach reduces development time and ensures consistent user experiences.

2. Robust Development Tools

The platform provides a suite of tools to facilitate the development process:

  • Mini Program IDE: An integrated development environment that supports coding, debugging, previewing, and releasing mini programs.
  • Container SDKs: Available for Android and iOS, these SDKs allow integration of mini programs into native applications.
  • Performance Monitoring: Built-in tools to monitor mini program performance, ensuring optimal user experiences.

3. Security and Compliance

TCMPP emphasizes security with features like:

  • Security Scans: Automated scans to detect vulnerabilities.
  • Compliance Checks: Ensuring mini programs adhere to regulatory standards.
  • Data Protection: Measures to safeguard user data and prevent unauthorized access.

Use Cases: Where TCMPP Shines

The versatility of the Tencent Cloud Mini Program Platform (TCMPP) makes it suitable for a wide array of industries and business needs. Here are some compelling use cases:

E-commerce and Retail:

  • In-app shopping: Create seamless shopping experiences directly within super apps, allowing users to browse products, add to cart, and complete purchases without leaving the primary application.
  • Loyalty programs: Develop mini programs for digital loyalty cards, points redemption, and personalized promotions, driving repeat business.
  • Customer service: Implement chatbots and self-service options for quick answers to common queries, order tracking, and support.

Financial Services:

  • Banking services: Offer basic banking functionalities like balance inquiry, transaction history, and fund transfers.
  • Insurance applications: Streamline policy applications, claims submission, and policy management.
  • Payment solutions: Integrate secure and convenient payment gateways for various transactions.

Education and E-learning:

  • Interactive courses: Deliver bite-sized lessons, quizzes, and multimedia content.
  • Event registration: Manage registrations for workshops, seminars, and online events.
  • Student support: Provide quick access to academic resources, schedules, and administrative assistance.

Healthcare and Wellness:

  • Appointment booking: Enable easy scheduling of doctor’s appointments or wellness sessions.
  • Health tracking: Allow users to log fitness data, monitor health metrics, and receive personalized tips.
  • Telemedicine consultations: Facilitate virtual consultations with healthcare professionals.

Gaming and Entertainment:

  • Casual games: Develop lightweight, engaging games that users can play instantly.
  • Content streaming: Offer snippets of videos, music, or news directly within the mini program.
  • Event ticketing: Streamline the process of Browse and purchasing tickets for events.

Public Services and Government:

  • Citizen services: Provide access to various government services, such as applying for permits or checking public records, as seen with initiatives like TAMM in Abu Dhabi utilizing TCMPP to consolidate public services.
  • Information dissemination: Share important announcements, public health updates, and emergency information.

Tools: Empowering Your Development Journey

The Tencent Cloud Mini Program Platform (TCMPP) provides a comprehensive suite of tools to support developers throughout the mini program lifecycle, from initial coding to deployment and management.

Tencent Cloud Mini Program Development Tool (IDE):

This is your primary workspace. It’s a powerful integrated development environment specifically designed for building mini programs. It offers features like:

  • Code Editing: Supports WXML (Weixin Markup Language), WXSS (Weixin Style Sheet), and JavaScript, the core languages for mini program development.
  • Real-time Preview: See your changes instantly as you code, accelerating the development process.
  • Debugging Tools: Identify and resolve issues efficiently with built-in debugging capabilities.
  • Project Management: Organize your mini program projects, manage files, and handle configurations.

Client SDKs:

For integrating mini program capabilities into your own super apps, Tencent Cloud provides client SDKs for various platforms, including Android and iOS. These SDKs allow you to:

  • Embed Mini Program Containers: Host mini programs within your existing mobile application.
  • Manage Mini Program Lifecycle: Control the opening, closing, and updating of mini programs.
  • Customize UI: Tailor the appearance of the mini program within your app.

Management Console:

This web-based console is your command center for managing your mini programs after deployment. Key functionalities include:

  • Mini Program Management: Publish new versions, roll back updates, and manage user access.
  • Data Analytics: Monitor user behavior, track performance metrics, and gain insights into your mini program’s usage.
  • User Management: Oversee user accounts and permissions.
  • Payment Configuration: Set up and manage mini program payment options.

Open APIs:

Tencent Cloud Mini Program Platform (TCMPP) offers a rich set of Open APIs that allow your mini programs to interact with various Tencent Cloud services and other third-party platforms. These APIs enable powerful integrations, such as:

  • Cloud Object Storage (COS): For storing images, videos, and other static assets.
  • Serverless Cloud Function (SCF): To run backend logic without managing servers.
  • AI and Machine Learning Services: Integrate features like image recognition, natural language processing, and face fusion.
  • Real-time Communication: Incorporate chat and real-time interaction capabilities.

Getting Started with TCMPP: A Simple Example

Let’s walk through a basic example of creating a mini program using TCMPP.

Step 1: Set Up the Development Environment

Download and install the Mini Program IDE provided by Tencent Cloud.

Step 2: Create a New Project

In the IDE, create a new project and set up the necessary configuration files.

Step 3: Develop the Mini Program

Here’s a simple example of a mini program that displays a greeting message:

app.json

JSON
{<br>  "pages": [<br>    "pages/index/index"<br>  ],<br>  "window": {<br>    "navigationBarTitleText": "Welcome to TCMPP"<br>  }<br>}

This is the configuration file that defines the structure and window appearance of your mini program.

pages/index/index.json
 Page-level configuration (can be empty for simple apps).

JSON
{}

pages/index/index.wxml
 Defines the UI structure using WXML (WeChat Markup Language).

XML
<view class="container">
  <text class="title">Hello from Tencent Cloud Mini Program Platform!</text>
</view>

pages/index/index.wxss
 Styles the UI with WXSS (WeChat Style Sheets).

CSS
.container {
  padding: 30px;
  display: flex;
  justify-content: center;
  align-items: center;
  height: 100vh;
}

.title {
  font-size: 24px;
  color: #007aff;
}

pages/index/index.js
 Controls logic and behavior for the page.

JavaScript
Page({
  data: {
    message: "Hello from TCMPP..!"
  },
  onLoad() {
    console.log(this.data.message);
  }
});

Here,

  • app.json: Sets up the app structure and UI navigation bar.
  • index.wxml: Displays a simple greeting inside a styled container.
  • index.wxss: Styles the greeting with center alignment and color.
  • index.js: Initializes the page with a message logged on load.

Benefits of Using TCMPP

Fast Development & Deployment

Build, test, and launch mini programs rapidly with Tencent’s streamlined tools and APIs.

Seamless Integration

Mini programs built on TCMPP can be embedded in WeChat, QQ, or enterprise environments, reaching millions instantly.

Enterprise-Grade Security

With end-to-end encryption, permission controls, and real-time monitoring, TCMPP is built to handle sensitive enterprise workflows.

Scalable Analytics

Monitor usage, performance, and user behavior with Tencent Cloud’s integrated analytics dashboards.

Best Practices for TCMPP Development

  1. Modular Code Structure
     Break code into manageable components to maintain clarity and reusability.
  2. Optimize for Speed
     Use lazy loading and CDN-hosted assets to keep the app responsive.
  3. Follow UX Guidelines
     Ensure a consistent experience with WeChat mini program design principles.
  4. Test Across Devices
     Use TCMPP’s simulator and device labs to test for compatibility and responsiveness.

Conclusion

Tencent Cloud Mini Program Platform (TCMPP) empowers developers to create powerful, lightweight applications with ease. Whether you’re building a retail experience, a government service, or an engaging game, TCMPP provides the tools, performance, and flexibility you need.

Its intuitive environment, strong documentation, and ecosystem integration make it a standout choice for developers looking to engage users where they already spend their time — inside platforms like WeChat.

Want to scale your app idea without building from scratch? TCMPP might just be your launchpad.

GAS

Google Automotive Services (GAS) Compliance: A Developer’s Guide to Licensing, Integration, and Certification

If you’re an OEM or Tier 1 developer integrating Google Automotive Services (GAS) into your Android Automotive OS (AAOS) stack, compliance isn’t just a formality — it’s a binding agreement with Google. Their guidelines are intentionally strict to preserve platform security, ensure a consistent user experience, and maintain API reliability across the ecosystem.

This article takes a deep dive into what GAS compliance actually entails — offering actionable insights for engineers, system architects, and product owners navigating the AAOS landscape.

Quick Primer: What Is GAS?

Google Automotive Services (GAS) is a proprietary suite of applications running on Android Automotive OS (AAOS). It includes:

  • com.google.android.apps.maps (Google Maps)
  • com.google.android.googlequicksearchbox (Google Assistant)
  • com.android.vending (Play Store)
  • com.google.android.gms (Play Services)

Unlike Android Auto, which mirrors from a paired phone, GAS apps run natively on the IVI (In-Vehicle Infotainment) hardware. That requires full-stack integration — kernel to UI.

Licensing GAS (OEM Legal Requirement)

Before any technical work begins, your OEM must sign a GAS License Agreement with Google. This is model-specific, meaning:

  • Each vehicle/trim with a different infotainment configuration = separate GAS approval
  • Google reserves the right to audit or revoke if compliance slips

As a developer, you’ll typically get access to the GAS Partner Portal after your OEM is approved — where SDKs, sample projects, and certification tools are hosted.

Hardware & OS Prerequisites

To be GAS-compliant, your hardware must meet strict thresholds.

Minimum Hardware Spec

ComponentRequirement
RAM≥ 2GB (realistically 4GB+ recommended)
Storage≥ 32GB eMMC or UFS
ConnectivityWi-Fi, Bluetooth Classic + LE
GNSS / GPSRequired for Maps integration
MicrophonesHigh SNR, beamforming preferred
Audio DSPFor voice recognition preprocessing

Android Automotive OS

To integrate Google Automotive Services, your IVI system must use a Google-certified build of Android Automotive OS. This typically involves:

  • A certified AOSP base, often from a recent LTS (Long-Term Support) branch
  • HALs and BSPs tailored for IVI use cases, compliant with VHAL (Vehicle HAL) standards
  • A custom UI that respects Google Automotive Services guidelines for system behavior, Assistant integration, and safe navigation

Note: Google prohibits UI customizations that interfere with system-level navigation, Assistant triggers, or driving safety workflows. GAS will not support heavily skinned or fragmented UI shells that break these requirements.

The Test Suites — All Mandatory

Google requires your system to pass a set of test suites to ensure stability and UX consistency.

Compatibility Test Suite (CTS)

Tests Android APIs, permissions, and behavior.

Kotlin
$ run_cts --module CtsAppSecurityHostTestCases
$ run_cts --module CtsMediaTestCases

Failures often involve:

  • Custom permission models
  • Background activity restrictions
  • Missing system apps

Vendor Test Suite (VTS)

Validates hardware interface layers. You’ll need to flash your build and execute these over adb/fastboot.

Kotlin
$ run_vts --plan VtsKernelTest

Typical failures:

  • Bad binder transaction handling
  • Incomplete HIDL implementation

Automotive Test Suite (ATS)

Tests GAS apps in the context of AAOS.

Key checks include:

  • Intent resolution from Assistant (ACTION_NAVIGATE_TO)
  • Overlay permission use
  • Play Store update flow

Drivable Test Suite (DTS)

DTS evaluates runtime behavior during actual vehicle use. Google may perform this directly or via OEM-conducted telemetry logs.

Integration Tips for GAS Developers

1. Use CarApp API for Custom Apps

If you’re building companion apps, use the androidx.car.app APIs (Jetpack):

Kotlin
class MyCarScreen(carContext: CarContext) : Screen(carContext) {
    override fun onGetTemplate(): Template {
        return MessageTemplate.Builder("Welcome to MyCar App")
            .setTitle("MyCar")
            .setHeaderAction(Action.APP_ICON)
            .build()
    }
}

2. Use MediaBrowserServiceCompat for Media Apps

GAS expects media apps to use Android’s MediaBrowserServiceCompat so that Assistant can control them

Kotlin
class MyMediaService : MediaBrowserServiceCompat() {
    override fun onCreate() {
        super.onCreate()
        // Setup your media session and player
    }
    
    override fun onLoadChildren(parentId: String, result: Result<List<MediaItem>>) {
        // Populate UI content
    }
}

3. Assistant Support = Deep Linking Required

Make sure you support Google Assistant voice intents. This requires implementing App Actions schema or handling common Intents.

XML
<intent-filter>
    <action android:name="android.media.action.MEDIA_PLAY_FROM_SEARCH" />
</intent-filter>

Handle queries like “Play Arijit Singh songs on MyCar App”.

Privacy & Data Handling for GAS Compliance

As a developer, your GAS integration must comply with Google and regional privacy rules.

You must:

  • Avoid tracking without user consent
  • Route sensitive data via Android Keystore or SafetyNet
  • Support user-level account deletion (GDPR/CCPA)
  • Never misuse the Location or Microphone data exposed via GAS APIs

Pro Tips for Dev Teams

  • Use Emulator Images from AOSP: GAS builds aren’t public, but you can prototype using AAOS emulator images from Google’s android-automotive GitHub.
  • Leverage VHAL correctly: Don’t shortcut vehicle HAL integrations — Google’s certification expects clean VehicleProp handling.
  • Automate testing with TradeFed: You’ll be running these tests often. Use TradeFederation to orchestrate builds and reports.

Conclusion: Build for Compliance, Not Just Launch

GAS compliance is a high bar. But it’s not just bureaucracy — it’s about delivering a polished, secure, responsive infotainment system users can trust.

As a developer, your role is to make sure the AAOS stack:

  • Runs clean, certified builds
  • Passes all test suites
  • Delivers a user experience aligned with Google’s best practices
  • Handles data securely and transparently

Once certified, your GAS integration unlocks the full power of Google’s ecosystem — and keeps your vehicles competitive in a connected world.

How to Build Cross-Platform iOS and Android Apps Using Kotlin Multiplatform Mobile

How to Build Cross-Platform iOS and Android Apps Using Kotlin Multiplatform Mobile

If you’ve ever built the same app twice — once for Android and once for iOS — you know how painful and repetitive it can be. But what if you could write your core logic once and use it on both platforms?

Welcome to Kotlin Multiplatform Mobile (KMM) — a game-changer for mobile developers who want to work smarter, not harder.

In this guide, I’ll walk you through how to build cross-platform iOS and Android apps using Kotlin Multiplatform Mobile. Whether you’re a solo dev or part of a team, this tool can drastically simplify your workflow without sacrificing native performance.

What is Kotlin Multiplatform Mobile?

Kotlin Multiplatform Mobile, or KMM, is a feature of the Kotlin language that lets you share code across Android and iOS apps. Think of it like this:

  • Your business logic, such as API calls, data handling, and utilities, goes into a shared module.
  • Your UI and platform-specific stuff stays native (Swift for iOS, Kotlin for Android).

So instead of writing everything twice, you write your core logic once and reuse it. The result? Less duplicated code, fewer bugs, and faster development.

What You Need to Get Started

Before jumping into code, make sure you have the right tools installed.

Prerequisites

  • Android Studio (latest version)
  • Kotlin Multiplatform Plugin (Install via Android Studio Plugins)
  • Xcode (for iOS development — macOS only)
  • KDoctor (to verify setup; install using brew install kdoctor)

Run this command to check if everything’s good:

kdoctor

It will let you know if anything is missing.

Setting Up a New KMM Project

Let’s get our hands dirty and create a KMM project from scratch.

1. Open Android Studio

Choose “New Project” → Select “Kotlin Multiplatform App”.

2. Configure Your Project

  • Project Name: MyKMMApp
  • Package: com.softaai.mykmmapp
  • Platforms: Check both Android and iOS
  • UI Sharing: Select “Do not share UI” (We’ll use native UI)

3. Finish

Click Finish. Android Studio will create the project with:

  • shared/ → your shared Kotlin code
  • androidApp/ → Android-specific code
  • iosApp/ → iOS-specific Swift code

Writing Shared Logic with Kotlin

Let’s write a basic example to see how shared code works.

Create a Kotlin Class

// shared/src/commonMain/kotlin/com/softaai/shared/Greeting.kt

package com.softaai.shared

class Greeting {
    fun greet(): String {
        return "Hello from Kotlin Multiplatform!"
    }
}

This simple class is in the commonMain source set, which means it’s shared between iOS and Android.

Using Platform-Specific Code

Sometimes, you need to run different code depending on the platform. That’s where expect and actual come in.

Shared Declaration

// shared/src/commonMain/kotlin/com/softaai/shared/Platform.kt

package com.softaai.shared

expect fun getPlatformName(): String

Android Implementation

// shared/src/androidMain/kotlin/com/softaai/shared/Platform.kt

package com.softaai.shared

actual fun getPlatformName(): String = "Android"

iOS Implementation

// shared/src/iosMain/kotlin/com/softaai/shared/Platform.kt

package com.softaai.shared

actual fun getPlatformName(): String = "iOS"

Now when you call getPlatformName(), it runs the correct version based on the platform.

Using Shared Code in Android

Open MainActivity.kt and call your shared logic.

// androidApp/src/main/java/com/softaai/androidApp/MainActivity.kt

package com.softaai.androidApp
import android.os.Bundle
import androidx.appcompat.app.AppCompatActivity
import com.softaai.shared.Greeting

class MainActivity : AppCompatActivity() {
    override fun onCreate(savedInstanceState: Bundle?) {
        super.onCreate(savedInstanceState)
        val message = Greeting().greet()
        println(message)  // Should print: Hello from Kotlin Multiplatform!
    }
}

Using Shared Code in iOS (Swift)

In your iosApp, open ViewController.swift:

// iosApp/iosApp/ViewController.swift

import UIKit
import shared

class ViewController: UIViewController {
    override func viewDidLoad() {
        super.viewDidLoad()
        let greeting = Greeting().greet()
        print(greeting)  // Prints: Hello from Kotlin Multiplatform!
    }
}

Make sure your iOS app links to the shared Kotlin framework properly.

Running Your App

Android

  • In Android Studio, choose the androidApp module
  • Click Run

iOS

  • Open iosApp in Xcode
  • Choose a simulator
  • Click Run

And just like that, you’ve got both apps pulling logic from the same Kotlin codebase.

Why Kotlin Multiplatform Mobile?

Still wondering if KMM is right for you? Here’s why it’s gaining traction:

  • True Native Performance: Shared code compiles to native binaries.
  • Maximum Code Reuse: Write once, run on both platforms.
  • Freedom of UI: Keep the native look and feel with platform-specific UIs.
  • Tooling Support: First-class support in Android Studio and Xcode.

Bonus Resources

Conclusion

Learning how to build cross-platform iOS and Android apps using Kotlin Multiplatform Mobile might feel like a shift at first — but once you get the hang of it, you’ll wonder how you ever coded without it.

By sharing logic between your apps, you’re saving time, reducing bugs, and simplifying maintenance — all without compromising on native performance.

So fire up Android Studio, spin up Xcode, and start building smarter, cleaner, and faster apps with KMM.

Mastering MVVM Architecture

Mastering MVVM Architecture in Android: A Complete Guide

Modern Android development demands scalable, maintainable, and testable architectures, and MVVM (Model-View-ViewModel) has emerged as the gold standard. It helps in structuring code in a way that ensures a clean separation of concerns, making it easier to manage UI, business logic, and data operations.

In this guide, we’ll take an in-depth look at MVVM, its benefits, how to implement it using Jetpack Compose, and advanced concepts like dependency injection, UI state handling, and testing. Let’s dive in!

What is MVVM?

MVVM (Model-View-ViewModel) is an architectural pattern that separates the presentation layer (UI) from the business logic and data handling. This separation enhances modularity, making the app easier to maintain and test.

MVVM Components

  1. Model: Represents the data layer (API, database, repositories) and business logic.
  2. View: The UI layer (Activity, Fragment, or Composable functions in Jetpack Compose).
  3. ViewModel: Acts as a bridge between View and Model, holding UI-related data and surviving configuration changes.

How MVVM Works

  1. The View observes data from the ViewModel.
  2. The ViewModel fetches data from the Model.
  3. The Model retrieves data from an API, database, or local cache.
  4. The ViewModel exposes the data, and the View updates accordingly.

Why Use MVVM?

  • Separation of Concerns — Keeps UI and business logic separate.
  • Better Testability — ViewModel can be unit tested without UI dependencies.
  • Lifecycle Awareness — ViewModel survives configuration changes.
  • Scalability — Works well with large-scale applications.
  • Compatibility with Jetpack Compose — Supports modern UI development in Android.

Implementing MVVM in Android with Jetpack Compose

Let’s implement a simple MVVM architecture using Jetpack Compose.

Step 1: Model (Repository Layer)

Kotlin
class UserRepository {
    fun getUsers(): List<String> {
        return listOf("Amol", "Akshay", "Swapnil")
    }
}

Step 2: ViewModel

Kotlin
class UserViewModel : ViewModel() {
    private val repository = UserRepository()
    private val _users = MutableStateFlow<List<String>>(emptyList())
    val users: StateFlow<List<String>> = _users

    init {
        fetchUsers()
    }

    private fun fetchUsers() {
        _users.value = repository.getUsers()
    }
}

Step 3: View (Jetpack Compose UI)

Kotlin
@Composable
fun UserScreen(viewModel: UserViewModel = viewModel()) {
    val users by viewModel.users.collectAsState()
    LazyColumn {
        items(users) { user ->
            Text(text = user, fontSize = 20.sp, modifier = Modifier.padding(16.dp))
        }
    }
}

This basic example sets up MVVM with a repository, ViewModel, and a UI that observes data changes.

Dependency Injection in MVVM (Using Hilt)

To make the architecture scalable, we use Hilt for dependency injection.

Step 1: Add Dependencies

Kotlin
dependencies {
    implementation "androidx.hilt:hilt-navigation-compose:1.1.0"
    implementation "com.google.dagger:hilt-android:2.44"
    kapt "com.google.dagger:hilt-compiler:2.44"
}

Step 2: Enable Hilt in the Application Class

Kotlin
@HiltAndroidApp
class MyApp : Application()

Step 3: Inject Repository into ViewModel

Kotlin
@HiltViewModel
class UserViewModel @Inject constructor(private val repository: UserRepository) : ViewModel() {
    private val _users = MutableStateFlow<List<String>>(emptyList())
    val users: StateFlow<List<String>> = _users

    init {
        fetchUsers()
    }

    private fun fetchUsers() {
        _users.value = repository.getUsers()
    }
}

Step 4: Inject ViewModel into Composable

Kotlin
@Composable
fun UserScreen(viewModel: UserViewModel = hiltViewModel()) {
    val users by viewModel.users.collectAsState()
    
    LazyColumn {
        items(users) { user ->
            Text(text = user, fontSize = 20.sp, modifier = Modifier.padding(16.dp))
        }
    }
}

LiveData vs StateFlow: Which One to Use?

Best Practice: Use StateFlow with Jetpack Compose because it integrates better with collectAsState().

Handling UI State in MVVM

To manage loading, success, and error states:

Kotlin
sealed class UIState<out T> {
    object Loading : UIState<Nothing>()
    data class Success<T>(val data: T) : UIState<T>()
    data class Error(val message: String) : UIState<Nothing>()
}

Modify ViewModel:

Kotlin
class UserViewModel : ViewModel() {
    private val _users = MutableStateFlow<UIState<List<String>>>(UIState.Loading)
    val users: StateFlow<UIState<List<String>>> = _users

    fun fetchUsers() {
        viewModelScope.launch {
            try {
                val data = repository.getUsers()
                _users.value = UIState.Success(data)
            } catch (e: Exception) {
                _users.value = UIState.Error("Failed to load users")
            }
        }
    }
}

In UI:

Kotlin
when (state) {
    is UIState.Loading -> CircularProgressIndicator()
    is UIState.Success -> LazyColumn { items(state.data) { user -> Text(user) } }
    is UIState.Error -> Text(state.message, color = Color.Red)
}

Unit Testing MVVM Components

Unit testing is important in MVVM to ensure reliability.

Test ViewModel

Add testing dependencies:

Kotlin
testImplementation "junit:junit:4.13.2"
testImplementation "org.jetbrains.kotlinx:kotlinx-coroutines-test:1.6.4"
testImplementation "io.mockk:mockk:1.13.3"

Create a UserViewModelTest file:

Kotlin
@ExperimentalCoroutinesApi
class UserViewModelTest {

    private lateinit var viewModel: UserViewModel
    private val repository = mockk<UserRepository>()

    @Before
    fun setUp() {
        every { repository.getUsers() } returns listOf("Amol", "Akshay", "Swapnil")

        viewModel = UserViewModel(repository)
    }

    @Test
    fun `fetchUsers updates users state correctly`() {
       // We can also call the body of setUp() here, which is useful for individual test functions that need more customization.
        assert(viewModel.users.value is UIState.Success)
    }
}

This tests that fetchUsers() properly updates the UI state.

Conclusion

MVVM architecture enhances modularity, testability, and scalability in Android development. By using Jetpack Compose, Hilt for DI, StateFlow for state management, and UI state handling, we can build robust and maintainable applications.

The Ultimate Guide to Android Basics

The Ultimate Guide to Android Basics: Architecture, Components, Development, and More

Android is the world’s most popular mobile operating system, powering billions of devices worldwide. Whether you’re an aspiring developer or just curious about how Android works, understanding the fundamentals is crucial. This in-depth guide covers everything from Android’s architecture to app development essentials and best practices. Let’s dive in!

What is Android?

Android is an open-source operating system developed by Google, based on the Linux kernel. It provides a flexible ecosystem for developers to build mobile applications and supports a wide range of devices, including smartphones, tablets, smart TVs, and even wearables.

Android Architecture

Android’s architecture consists of multiple layers, each playing a critical role in its functionality. Here’s a breakdown:

1. Linux Kernel

At the core of Android is the Linux kernel, which manages low-level operations like memory management, process scheduling, security, and hardware communication.

2. Hardware Abstraction Layer (HAL)

HAL provides standard interfaces that allow the Android OS to communicate with different hardware components like cameras, sensors, and Bluetooth.

3. Native Libraries

These libraries include essential components like OpenGL (for graphics rendering), SQLite (database storage), and WebKit (browser engine).

4. Android Runtime (ART)

Android Runtime (ART) is responsible for executing applications. It uses Just-In-Time (JIT) and Ahead-Of-Time (AOT) compilation to optimize app performance.

5. Application Framework

This layer provides APIs and services for developers to build and manage applications, including:

  • Activity Manager: Controls app lifecycle and navigation.
  • Content Providers: Manages shared data between apps.
  • Resource Manager: Handles UI elements like layouts and strings.

6. Applications

At the top of the stack, we have the user-facing applications, including built-in Google apps (Phone, Messages, Maps) and third-party apps from the Play Store.

Core Android Components

Android applications are built using four main components:

1. Activities

An activity represents a single screen in an app. It contains the UI elements that users interact with. Activities follow a lifecycle, managed through methods like onCreate(), onResume(), and onDestroy().

2. Services

Services run in the background without a user interface. They are used for tasks like playing music or fetching data.

3. Broadcast Receivers

These listen for system-wide broadcast messages like battery low alerts or network connectivity changes.

4. Content Providers

Content providers manage shared data and allow different apps to access it securely, such as the Contacts or MediaStore databases.

Getting Started with Android Development

To start building Android applications, you need the right tools and languages.

Programming Languages

  • Kotlin: The preferred language for Android development, offering concise and expressive syntax.
  • Java: The traditional language, still widely used and supported.

Development Tools

  • Android Studio: The official IDE for Android development.
  • Android SDK (Software Development Kit): Provides the tools and libraries needed to build Android apps.
  • Gradle: Manages project dependencies and build automation.

AndroidManifest.xml

This file declares essential app information like activities, permissions, and services.

Building User Interfaces in Android

Android provides various UI components to design engaging applications.

Layouts

  • LinearLayout: Arranges elements in a single row or column.
  • ConstraintLayout: A flexible layout with constraints for responsive design.
  • RelativeLayout: Allows positioning elements relative to each other.

Common UI Elements

  • TextView: Displays text.
  • EditText: Accepts user input.
  • Button: Triggers actions when clicked.
  • RecyclerView: Efficiently displays large lists or grids.

Fragments

Fragments are modular UI components that allow flexible designs, especially for tablets and large-screen devices.

Understanding Android Lifecycle

Activities and fragments follow a structured lifecycle to manage user interactions efficiently. Key methods include:

  • onCreate(): Called when the activity is first created.
  • onStart(): When the activity becomes visible.
  • onResume(): When the user interacts with the activity.
  • onPause(): When the activity goes into the background.
  • onStop(): When the activity is no longer visible.
  • onDestroy(): When the activity is destroyed.

Data Storage in Android

Android provides multiple storage options based on application needs:

1. Shared Preferences

Used to store small key-value pairs, ideal for settings and preferences.

2. SQLite Database

A lightweight, local database for structured data storage.

3. Room Database

An abstraction layer over SQLite, making database management easier with an ORM approach.

4. Cloud & Firebase Storage

For cloud-based data storage and real-time updates.

Networking in Android

Most apps require network communication. Popular libraries include:

  • Retrofit: A type-safe HTTP client for interacting with APIs.
  • Volley: A fast networking library for handling multiple requests.
  • OkHttp: A low-level HTTP client for efficient network calls.

Security and Permissions

Android enforces strict security measures to protect user data.

Runtime Permissions

Apps must request permissions at runtime for sensitive actions like accessing the camera, location, or contacts.

Encryption

Ensures data security during storage and transmission.

ProGuard & R8

Used to minify and obfuscate code, making reverse engineering difficult.

Publishing Your Android App

Once your app is ready, follow these steps to publish it:

1. Google Play Console

Register as a developer and upload your app.

2. App Signing

Securely sign your app to ensure authenticity.

3. App Monetization

Options include ads (Google AdMob), in-app purchases, and subscriptions.

Conclusion

Android development is an exciting and ever-evolving field. By understanding its architecture, components, and best practices, you can create powerful applications that provide excellent user experiences. Whether you’re a beginner or an experienced developer, mastering these fundamentals will set you on the path to success in Android development.

Kotlin Multiplatform Mobile (KMM)

What Is Kotlin Multiplatform Mobile (KMM) and Why Developers Are Switching in 2025

In the rapidly evolving world of mobile app development, one question keeps popping up in 2025:
“Is Kotlin Multiplatform Mobile (KMM) finally ready for prime time?”

The answer is a resounding yes.

Kotlin Multiplatform Mobile (KMM) has matured into a powerful tool that allows developers to share code across Android and iOS while still delivering a native user experience. With growing community support, enhanced tooling, and major production apps going multiplatform, it’s clear why many developers are making the switch.

Let’s break it all down in a simple way.

What Is Kotlin Multiplatform Mobile (KMM)?

Kotlin Multiplatform Mobile (KMM) is a feature of JetBrains’ Kotlin language that enables code sharing between Android and iOS apps. Unlike other cross-platform solutions like Flutter or React Native that render UI across platforms, KMM focuses on sharing business logic, not UI.

This means:

  • You write platform-independent code in Kotlin (like data models, business rules, network calls).
  • You write platform-specific UI with SwiftUI on iOS and Jetpack Compose on Android.

Here’s a visual breakdown:

               ┌──────────────────────────────┐
               │   Shared Kotlin Code (KMM)   │
               │  (Network, DB, Logic, etc.)  │
               └──────────────────────────────┘
                      ▲                 ▲
                      │                 │
        ┌─────────────┘                 └──────────────┐
        │                                              │
┌────────────┐                               ┌────────────┐
│ Android UI │                               │  iOS UI    │
│ Jetpack    │                               │ SwiftUI    │
└────────────┘                               └────────────┘

Why Are Developers Switching to KMM in 2025?

There are several reasons why Kotlin Multiplatform Mobile is trending in 2025. Let’s unpack the big ones:

1. Save Time, Save Money

Instead of writing the same logic twice (once in Kotlin and once in Swift), you write it once and share it. Teams can move faster without compromising on performance or UX.

2. Native Experience, No Compromise

KMM doesn’t touch your UI code. You still get fully native interfaces using the best platform-specific tools (SwiftUI and Jetpack Compose). This means your app feels right at home on both platforms.

3. First-Class Kotlin Support

Kotlin is now officially backed by Google for Android development and tightly integrated into JetBrains’ ecosystem. KMM benefits from constant language updates, better IDE tooling (especially in Android Studio and IntelliJ IDEA), and strong community support.

4. Flexible Adoption

You don’t have to rewrite your entire app. KMM allows gradual adoption. You can start with one shared module and expand as needed. It’s perfect for teams who want to test the waters without a full migration.

How KMM Works — A Simple Code Example

Let’s take a real-world example: fetching user data from an API and displaying it.

Step 1: Define the Shared Code

Inside the shared module:

commonMain/kotlin/UserRepository.kt

expect class HttpClientEngine()

class UserRepository(private val client: HttpClient = HttpClient(HttpClientEngine())) {
    suspend fun fetchUser(): User {
        val response = client.get("https://api.softaai.com/user") // just an example
        return Json.decodeFromString(response.bodyAsText())
    }
}

Here, expect means “I need a platform-specific implementation.” Kotlin will look for it in androidMain and iosMain.

Step 2: Android Implementation

androidMain/kotlin/PlatformHttpClient.kt

actual class HttpClientEngine {
    fun getEngine(): HttpClientEngine = Android.create()
}

Use Android-specific networking, like Ktor’s Android engine.

Step 3: iOS Implementation

iosMain/kotlin/PlatformHttpClient.kt

actual class HttpClientEngine {
    fun getEngine(): HttpClientEngine = Ios.create()
}

Same logic, but for iOS. You keep platform differences isolated and the rest of your business logic remains untouched.

What Makes KMM Developer-Friendly?

  • IDE Support: JetBrains has invested heavily in IntelliJ and Android Studio plugins that make working with shared code intuitive.
  • Official Libraries: Ktor (networking), Kotlinx Serialization, SQLDelight, and Coroutines work seamlessly with KMM.
  • Robust Testing: You can write unit tests for shared logic and run them across platforms.

Is KMM Production-Ready in 2025?

Yes — and it’s not just startups using it anymore.

Companies like VMware, Netflix, and Philips have integrated KMM into their production apps. JetBrains themselves use KMM in their own apps.

With Kotlin 2.0 officially supporting KMM and Kotlin/Native seeing major improvements in performance and stability, developers can now trust it for large-scale, production-grade apps.

When Should You Use Kotlin Multiplatform Mobile?

KMM is a great fit if:

  • You want code sharing between Android and iOS.
  • You want to retain full native UI control.
  • You already have Android developers familiar with Kotlin.
  • You prefer gradual migration over rewriting from scratch.

When NOT to Use KMM?

It might not be ideal if:

  • You want shared UI (in which case Flutter or React Native may suit better).
  • Your team lacks experience with Kotlin.
  • You’re targeting multiple platforms beyond mobile (e.g., Web + Desktop + Mobile).

Conclusion

Kotlin Multiplatform Mobile (KMM) has truly come of age in 2025. It’s no longer a niche experiment — it’s a production-ready, efficient, and modern way to build mobile apps with shared business logic and native performance.

RemoteViews

RemoteViews in Android: What It Is, How It Works, and Why It Matters

RemoteViews might not be something you think about often, but it plays a big role in many Android experiences you use every day. From home screen widgets to media controls in your notifications — and even the UI in Android Automotive dashboards — RemoteViews is quietly working behind the scenes.

But what exactly is RemoteViews? Why does Android need it in the first place?

In this post, we’ll break it all down. We’ll explore what RemoteViews is, how it works under the hood, where it’s commonly used, its limitations, and how it’s changing with modern Android development.

TL;DR: What Is RemoteViews?

RemoteViews is a mechanism in Android that lets you define and update UI components across different processes. It’s primarily used in:

  • Home screen app widgets
  • Custom notifications
  • Android Auto / Automotive OS UI templates
  • Legacy lock screen widgets

Because apps in Android run in isolated sandboxes (i.e., processes), RemoteViews offers a way to package simple view updates and deliver them to another process, like the system UI or launcher.

Why Does Android Need RemoteViews?

Android enforces strict process separation for security and performance. Each app runs in its own process, and the system UI — like the launcher or notification shade — runs in another. This design prevents one app from injecting arbitrary UI or code into another.

But what if your app needs to show a widget on the home screen? Or customize a rich notification with buttons and thumbnails?

That’s where RemoteViews comes in.

It acts like a deferred UI recipe: your app says, “I want to show this layout, with this text and image,” and Android takes care of rendering it safely in another process.

How RemoteViews Works (Under the Hood)

Let’s break down what happens behind the scenes:

1. You define a layout in XML, typically using a subset of supported views (TextView, ImageView, etc.).

2. You create a RemoteViews object in your app: 

val views = RemoteViews(context.packageName, R.layout.my_widget)
views.setTextViewText(R.id.title, "Hello World")
views.setImageViewResource(R.id.icon, R.drawable.my_icon)

3. You send it to the host process, like the AppWidgetManager or NotificationManager, using something like:

appWidgetManager.updateAppWidget(widgetId, views)

4. The system applies the layout and updates the UI in the context of the host process, ensuring it can’t be tampered with or crash the system UI.

Where RemoteViews Is Used

1. App Widgets (Home Screen Widgets)

The most classic use case. These are interactive UI snippets on your launcher that update periodically or in response to events (weather updates, calendars, to-do lists, etc.).

2. Custom Notifications

RemoteViews powers notification templates that include custom layouts — like music player controls, media thumbnails, and action buttons.

3. Android Automotive OS

Automotive dashboards require safe rendering of media apps. RemoteViews is used to define UI layouts that can be shown in car displays without exposing full UI control.

4. Lock Screen Widgets (Pre-Android 5.0)

Before Android Lollipop, apps could show widgets directly on the lock screen using RemoteViews.

Supported Views in RemoteViews

Not all views work with RemoteViews. Since everything must be serialized and sent across processes, only a subset of safe, lightweight views are supported:

Supported ViewsSupported Actions
TextViewsetTextViewText()
ImageViewsetImageViewResource()
ProgressBarsetProgressBar()
LinearLayout(limited, for stacking views)
ViewFlippershowNext() or showPrevious()
Chronometer, AnalogClockPartially supported

You can attach PendingIntents to certain views using setOnClickPendingIntent() for basic interactivity.

Limitations of RemoteViews

While RemoteViews solves a specific problem well, it’s not without trade-offs:

LimitationDescription
No custom viewsYou can’t use your own View subclasses or Compose UI
No animationsNo property animations, transitions, or motion effects
No real-time interactionCan’t handle gestures or live two-way data binding
Limited click supportOnly supports triggering PendingIntents on click
Tedious to update frequentlyYou must manually update RemoteViews and push to the host

Because of this, RemoteViews isn’t a full replacement for an activity or fragment—it’s a lightweight display mechanism.

RemoteViews in the Modern Android World

While RemoteViews is still widely used, especially for backward compatibility and automotive use cases, Google has introduced modern alternatives to make UI composition easier and more declarative:

Jetpack Glance (Recommended for Widgets)

Jetpack Glance is a modern Kotlin-based library for building app widgets using a Compose-like DSL. It abstracts RemoteViews under the hood but gives you a much more developer-friendly experience.

Notification Styles

If you’re building rich notifications, use Android’s built-in notification styles (MediaStyle, MessagingStyle, etc.) before falling back to custom RemoteViews.

When to Use RemoteViews (And When Not To)

Use It When…Avoid It When…
Building widgets or media-style notificationsBuilding full-featured or interactive UIs
Working with Android AutomotiveNeeding real-time feedback from users
You need safe cross-process UI renderingYou want fluid animations or dynamic layouts

Conclusion

Even in 2025, RemoteViews is still a core part of the Android ecosystem. It’s reliable, secure, and ideal for situations where your UI needs to run in a different process — like home screen widgets or notifications — and stay lightweight and sandboxed.

That said, Android’s UI development is evolving quickly. With modern tools like Jetpack Glance and Jetpack Compose, building UIs has become much more flexible and developer-friendly.

So, stick with RemoteViews when you need to — but don’t hesitate to adopt these newer, more powerful APIs when you can

FAQ

Q: Can I use Jetpack Compose with RemoteViews?
A: Not directly. However, Jetpack Glance offers a Compose-like way to build RemoteViews-compatible layouts.

Q: Is RemoteViews deprecated?
A: No, it’s still fully supported and maintained, especially in system-level use cases like Android Automotive and app widgets.

Q: Can RemoteViews support animations or gestures?
A: No. RemoteViews supports only limited click interactions via PendingIntent. Animations and complex gestures aren’t allowed.

error: Content is protected !!