Kotlin Kadane’s algorithm is a well-known algorithm used for finding the maximum subarray sum in a given array. It is an efficient algorithm that works in O(n) time complexity. In this blog, we will discuss Kadane’s algorithm and how to implement it using the Kotlin programming language.
KotlinKadane’s Algorithm
Kadane’s algorithm is a dynamic programming algorithm that works by iterating over the array and keeping track of the maximum subarray sum seen so far. The algorithm maintains two variables, max_so_far and max_ending_here, where max_so_far is the maximum subarray sum seen so far, and max_ending_here is the maximum subarray sum that ends at the current index.
The algorithm starts by setting both max_so_far and max_ending_here to the first element of the array. It then iterates over the remaining elements of the array, updating max_ending_here by adding the current element to it. If max_ending_here becomes negative, it is reset to zero, as any subarray with a negative sum cannot be the maximum subarray. If max_ending_here is greater than max_so_far, max_so_far is updated with the value of max_ending_here. At the end of the iteration, max_so_far will contain the maximum subarray sum.
Kotlin Implementation
Now let’s see how we can implement Kadane’s algorithm using Kotlin:
In this implementation, we first initialize max_so_far and max_ending_here to the first element of the array. We then loop over the remaining elements of the array and update max_ending_here by adding the current element to it. If max_ending_here becomes negative, it is reset to zero. If max_ending_here is greater than max_so_far, max_so_far is updated with the value of max_ending_here. Finally, the function returns max_so_far.
Let’s test our implementation with an example:
Kotlin
funmain() {val arr = intArrayOf(-2, -3, 4, -1, -2, 1, 5, -3)val maxSum = maxSubArraySum(arr)println(\"Maximum subarray sum is: $maxSum\")}
Output:
Maximum subarray sum is: 7
In this example, we have an array of integers, and we want to find the maximum subarray sum. Our implementation correctly returns 7, which is the maximum subarray sum.
Conclusion
Kadane’s algorithm is a simple yet powerful algorithm for finding the maximum subarray sum in an array. In this blog, we have seen how to implement Kadane’s algorithm using Kotlin. This implementation works in O(n) time complexity, making it an efficient algorithm for solving the maximum subarray problem.
Kotlin is a popular programming language that offers a wide range of features for developers to write concise and expressive code. One of the most powerful features of Kotlin is its scope functions, which are a set of functions that allow you to execute a block of code within the context of an object. In this blog post, we’ll explore Kotlins scope functions and how you can use them to write more efficient and readable code.
Overview of Kotlin Scope Functions
Kotlin offers five scope functions: let, run, with, apply, and also. Each of these functions has its unique use cases and can be used to execute a block of code in a specific context. Let’s take a closer look at each of these functions:
1. Let
The let function allows you to execute a block of code on a nullable object. If the object is null, the block of code is not executed. Otherwise, the block of code is executed, and the result of the block is returned. This function is particularly useful when you need to perform some operations on an object that may or may not be null.
2. Run
The run function is similar to the let function, but it is used to execute a block of code on a non-null object. The result of the block is returned, and the object on which the code is executed is referred to as this within the block.
3. With
The with function is used to execute a block of code on an object without the need for an explicit receiver. This function is particularly useful when you need to perform multiple operations on the same object.
4. Apply
The apply function is similar to the with function, but it is used to modify the object on which the code is executed. The object is returned after the block of code is executed, making this function particularly useful for initializing objects.
5. Also
The also function is used to perform some side effects on an object. The object is returned after the block of code is executed, and this function is particularly useful when you need to log or debug some values.
Benefits of Kotlin Scope Functions
Kotlin scope functions offer a number of benefits for developers, including:
Concise and readable code: Kotlin scope functions allow us to write more concise and readable code by reducing the need for intermediate variables.
Reduced boilerplate: Scope functions eliminate the need for redundant code and make it easier to perform operations on objects.
Improved debugging: Kotlin scope functions provide more visibility into the state of objects by allowing you to perform side effects and log values.
Examples
Let’s take a look at some examples of how we can use Kotlin scope functions in our code.
1. Using let to perform operations on a nullable object:
Kotlin
val name: String? = "softAai"name?.let { println(it) }
In this example, we use the let function to print the value of the name variable only if it is not null.
2. Using run to initialize an object:
Kotlin
val person = Person().run { firstName = "amol" lastName = "pawar"this}
In this example, we use the run function to initialize a Person object and set its properties. The object is returned after the block of code is executed.
3. Using apply to modify an object:
Kotlin
val person = Person().apply { firstName = "Amol" lastName = "Pawar"}
In this example, we use the apply function to modify a Person object by setting its properties. The object is returned after the block of code is executed.
4. Using with to perform multiple operations on the same object:
Kotlin
val person = Person()with(person) { firstName = "Amol" lastName = "Pawar" age = 20 occupation = "Software Developer"}
In this example, we use the with function to perform multiple operations on the person object. The with function allows us to omit the explicit receiver when accessing the properties and methods of the person object.
5. Using also to perform side effects on an object:
Kotlin
val person = Person("amol", "pawar", 20)person.also { logger.info("Person created: $it")}
In this example, we use the also function to log the creation of a person object using a logger. The also function allows us to perform a side effect on the person object and return it afterwards.
Disadvantage of Kotlin Scope Functions
While Kotlins scope functions offer a number of benefits, there are also some potential disadvantages to consider:
Overuse: It’s possible to overuse scope functions, which can make code less readable and harder to maintain. It’s important to use these functions judiciously and only where they add value.
Learning curve: While the concept of scope functions is relatively simple, it can take some time to become comfortable using them effectively. New developers may find them confusing at first.
Performance: While the performance impact of Kotlin scope functions is typically minimal, using them extensively can potentially slow down our code. However, this is rarely a concern in practice.
Conclusion
Overall,the benefits of Kotlin scope functions in Kotlin generally outweigh the potential drawbacks. By using these functions judiciously and with care, we can write more efficient and expressive code.
In Java, Strings are widely used for storing and manipulating textual data. However, if the content of the string is not fixed and needs to be changed frequently, using the String class is not recommended as it creates a new object every time a change is made, causing performance issues. In such cases, it is better to use the StringBuffer class.
StringBuffer
StringBuffer is a mutable sequence of characters that provides various methods to modify its content. The main advantage of StringBuffer over String is that all the required changes are performed on the existing object, avoiding the creation of new objects for each change. This improves performance and reduces memory consumption.
There are three constructors available for creating StringBuffer objects. The first constructor creates an empty StringBuffer object with a default capacity of 16. When the StringBuffer reaches its maximum capacity, a new StringBuffer object is created with a new capacity of (currentCapacity + 1) * 2. The second constructor creates an empty StringBuffer object with the specified initial capacity. The third constructor creates a StringBuffer object for a given String with a capacity of string.length() + 16.
StringBuffer provides several methods for manipulating its content. Some of the important methods are:
length(): returns the length of the StringBuffer.
capacity():returns the total number of characters that the StringBuffer can accommodate.
charAt(int index):returns the character at the specified index.
setCharAt(int index, char ch):replaces the character at the specified index with the provided character.
append():appends the specified argument to the end of the StringBuffer. This method is overloaded for different argument types.
insert():inserts the specified argument at the specified index. This method is overloaded for different argument types.
delete(int begin, int end):deletes characters from the begin index to end — 1 index.
deleteCharAt(int index):deletes the character at the specified index.
reverse():reverses the content of the StringBuffer.
setLength(int length):sets the length of the StringBuffer to the specified length.
ensureCapacity(int capacity):increases the capacity of the StringBuffer based on our requirement.
trimToSize():deallocates extra allocated free memory.
StringBuilder
In addition to StringBuffer, there is another class called StringBuilder that provides similar functionality but is not synchronized. Every method present in StringBuffer is synchronized, allowing only one thread to operate on the StringBuffer object at a time, which may cause performance problems. To handle this problem, the StringBuilder concept was introduced in Java 1.5. StringBuilder is non-synchronized and multiple threads can operate on it at a time, making it faster than StringBuffer.
Examples
Example 1: Using StringBuffer to concatenate strings in a loop
In this example, we use a StringBuffer to concatenate the strings in thewords array inside a loop. Since we are performing multiple concatenations, it is more efficient to use a StringBuffer than to create new String objects with each concatenation.
Example 2: Using StringBuilder for single-threaded string operations
Java
StringBuildersb = newStringBuilder();sb.append("The quick brown ");sb.append("fox jumped over ");sb.append("the lazy dog.");Stringresult = sb.toString(); // "The quick brown fox jumped over the lazy dog."
In this example, we use a StringBuilder to concatenate three strings together. Since there is no need for synchronization in this single-threaded example, we can use a StringBuilder instead of a StringBuffer for improved performance.
Example 3: Using StringBuffer for multi-threaded string operations
Java
String[] words = {"The", "quick", "brown", "fox", "jumped", "over", "the", "lazy", "dog."};StringBuffersb = newStringBuffer();Arrays.stream(words) .parallel() .forEach(word ->sb.append(word).append(" "));Stringresult = sb.toString(); // "The quick brown fox jumped over the lazy dog."
In this example, we use a StringBuffer to concatenate the strings in the words array in a multi-threaded environment. Since StringBuffer is synchronized, it can safely be used by multiple threads. Note that if we were to use a StringBuilder instead of a StringBuffer in a multi-threaded environment, we could run into synchronization issues.
String Vs StringBuffer Vs StringBuilder
If the content is fixed and won’t change frequently, we can use the String class.
If the content is not fixed and keeps changing frequently, and we want thread safety, we can use the StringBuffer class.
If the content is not fixed and keeps changing frequently, and we don’t want thread safety, we can use the StringBuilder class.
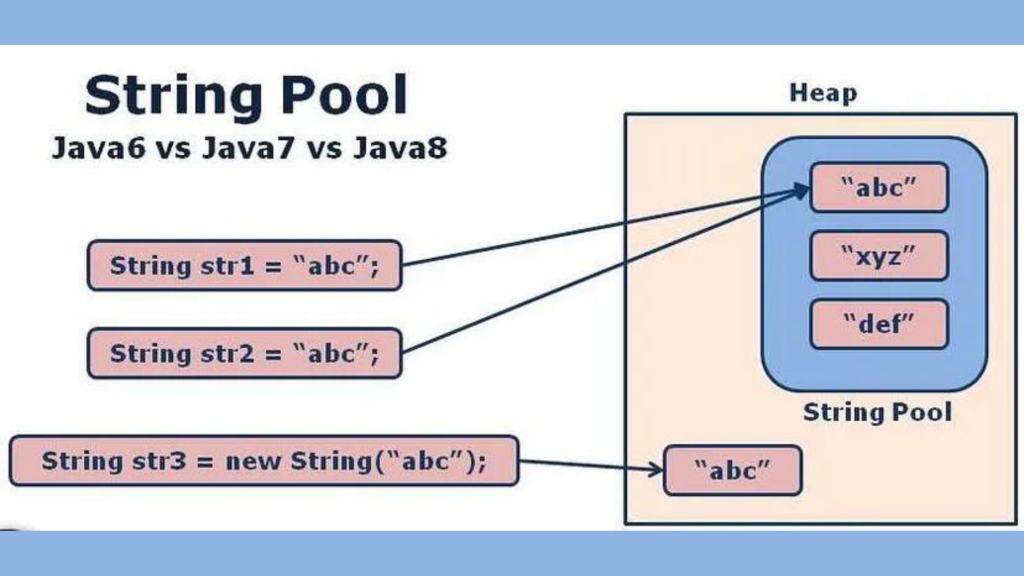
String is a widely used data type in Java, and it has a special place in memory management. In Java, every time a new object is created, it is allocated memory in the heap area. However, Java has a special feature called String Constant Pool (SCP) that allows for efficient memory management of String objects. In this blog post, we will discuss what SCP is, how it works, and how it impacts memory management in Java.
What is Java String Constant Pool (SCP)?
SCP is a special memory area in Java where all String literals are stored. When a String literal is encountered, Java looks for the same String literal in the SCP. If the String literal already exists in SCP, Java uses the existing String literal from SCP. Otherwise, Java creates a new String literal in SCP. This ensures that only one copy of a particular String literal is stored in the memory.
SCP is part of the runtime constant pool, which is a shared pool of constants that are loaded with the class definition. SCP is created when the class is loaded by the JVM and is destroyed when the JVM shuts down. SCP is not accessible by the garbage collector, so even if a String object does not have any references pointing to it, it will not be eligible for garbage collection if it is in SCP.
How SCP works?
SCP works differently for String objects created using the “new” keyword and String literals.
When a String object is created using the “new” keyword, two objects are created: one in the heap area and one in SCP. The reference variable points to the object in the heap area. For example:
Java
Strings = newString(“softAai”);
In this case, the String literal “softAai” is created in SCP, and a new String object is created in the heap area. The reference variable “s” points to the String object in the heap area.
On the other hand, when a String literal is encountered, Java checks if the same String literal exists in SCP. If it does, Java uses the existing String literal from SCP. Otherwise, Java creates a new String literal in SCP. For example:
Java
Strings = “softAai”;
In this case, the String literal “softAai” is created in SCP, and the reference variable “s” points to the String literal in SCP. No new object is created in the heap area.
Note that object creation in SCP is optional. If a String object with the required content is already present in SCP, the existing object will be reused instead of creating a new object.
Impact on Memory Management
SCP has a significant impact on memory management in Java. When a program uses many String literals, SCP ensures that only one copy of each String literal is stored in the memory, which saves a lot of memory space. This also improves the performance of the program because fewer objects need to be created and garbage collected.
However, if a program creates many String objects using the “new” keyword, SCP does not have a significant impact on memory management. In this case, each String object is created in the heap area, and SCP only contains the String literals.
SCP Limitations
The SCP has some limitations, such as the fact that objects in the SCP cannot be garbage collected, even if they are no longer being used by the program. This can lead to memory leaks if too many objects are created in the SCP. Additionally, because objects in the SCP are shared among all threads in the JVM, changes to these objects made by one thread can affect the behavior of other threads in unpredictable ways.
Despite these limitations, the SCP remains an essential part of Java’s memory management system. Storing string literals and constant values in the SCP can help to reduce memory usage and improve performance by minimizing the number of objects that need to be created. Additionally, the SCP can help to improve string comparison performance by allowing the JVM to compare string objects by reference instead of by value
Conclusion
SCP is a powerful feature of Java that allows for efficient memory management of String objects. By storing String literals in a shared memory area, SCP ensures that only one copy of each String literal is stored in memory, which saves a lot of memory space and improves the performance of the program. While SCP has some limitations, still it remains an essential part of Java’s memory management system.
Java, one of the most widely used programming languages, offers a robust and versatile class for handling textual data – the String class. Understanding the intricacies of Java Strings is crucial for any Java developer. In this comprehensive guide, we’ll explore the important concepts related to Java Strings, covering everything from basic operations to advanced topics.
String is one of the most commonly used data types in Java programming. Understanding the concept of Strings is crucial for any Java developer. In this blog post, we will discuss some of the important concepts related to Strings in Java.
Immutable vs Mutable Java Strings
In Java, Strings are immutable objects, which means once we create a string object, we cannot perform any changes in the existing object. If we are trying to perform any change, a new object will be created with those changes. This non-changeable behavior is known as the immutability of Strings.
For example,
Kotlin
String s = new String("softAai");s.concat("Apps");System.out.println(s); //softAai
In the above code, the concat() method is called on the string object s, but the original string remains unchanged. This is because a new string object is created with the concatenated value, but it doesn\’t hold any reference in this case, and hence it is eligible for garbage collection.
On the other hand, if we use StringBuffer instead of String, we can perform any change in the existing object. This changeable behavior is known as the mutability of the StringBuffer object.
For example,
Kotlin
StringBuffer sb = new StringBuffer("softAai");sb.append("Apps");System.out.println(sb); // softAaiApps
In the above code, the append() method is called on the StringBuffer object sb, and the original object is modified with the appended value.
“==” vs .equals()
In Java, the == operator compares the references of two objects, while the .equals() method compares the content of two objects. In the case of Strings, the .equals() method is overridden for content comparison.
For example,
Kotlin
String s1 = new String("softAai");String s2 = new String("softAai");System.out.println(s1 == s2); // falseSystem.out.println(s1.equals(s2)); // true
In the above code, two different string objects are created, but their contents are the same. The == operator compares the references of these objects, which are different, and hence it returns false. But the .equals() method compares the content of these objects, which are the same, and hence it returns true.
On the other hand, the equals() method is not overridden for content comparison in StringBuffer. Hence, the equals() method of the Object class is executed, which compares the references of the objects.
For example,
Kotlin
StringBuffer sb1 = new StringBuffer("softAai");StringBuffer sb2 = new StringBuffer("softAai");System.out.println(sb1 == sb2); // falseSystem.out.println(sb1.equals(sb2)); // false
In the above code, two different StringBuffer objects are created, and their contents are the same. Both the == operator and the .equals() method return false because they compare the references of these objects, which are different.
Conclusion
The concepts of immutability and mutability in strings and the differences between == and .equals() operators are important to understand. By understanding these concepts, you can better optimize memory usage and avoid common pitfalls when working with strings in Java
In the ever-evolving landscape of mobile app development, security remains a top concern for developers. Android, being one of the most popular mobile operating systems, is a prime target for malicious actors seeking to exploit vulnerabilities and reverse engineer applications for unauthorized access to sensitive data. To counter these threats, developers employ various techniques, with ProGuard and R8 playing pivotal roles in enhancing the security of Android applications.
Understanding ProGuard
ProGuard is a tool used in Android development to optimize and obfuscate code. It’s an optimization tool that can remove unused code and shrink the size of the application. It also helps to make the code difficult to understand or reverse-engineer by renaming classes, methods, and fields, which is called obfuscation.
ProGuard comes with a set of default rules that are applied to the code during the build process. However, developers can also define their own rules for specific classes, methods, or fields. The rules are defined in a ProGuard configuration file, usually named proguard-rules.pro, which is located in the app module of the Android project.
Here are some examples of ProGuard rules:
Keep a specific class:
Plaintext
-keep class com.example.MyClass { *; }
This rule ensures that the class com.example.MyClass is not removed during the optimization process.
2. Keep a specific method:
Plaintext
-keepclassmembers class com.example.MyClass { public void myMethod(java.lang.String);}
This rule ensures that the method myMethod in the class com.example.MyClass is not removed during the optimization process.
3. Obfuscate class and method names:
Plaintext
-keepnames class com.example.MyClass { void myMethod(java.lang.String);}
This rule obfuscates the names of the class com.example.MyClass and the method myMethod.
4. Remove unused classes:
Plaintext
-dontwarn com.example.UnusedClass-keep class com.example.** { *; }-dontnote com.example.UnusedClass
This rule removes the unused class com.example.UnusedClass from the application and keeps all classes in the com.example package.
These are just a few examples of ProGuard rules that can be used in Android development. ProGuard is a powerful tool that can help optimize and secure an Android application, but it requires careful configuration to avoid unintended consequences.
Does ProGuard provide 100% protection against reverse engineering?
ProGuard is a useful tool for making reverse engineering of Android applications more difficult, but it does not provide 100% protection against reverse engineering.
While ProGuard can obfuscate the code, it does not encrypt it. This means that a determined attacker could still decompile and reverse engineer the code with enough time and effort. Additionally, ProGuard cannot protect against other methods of reverse engineering, such as debugging or analyzing network traffic.
It’s important to note that while ProGuard can make reverse engineering more difficult, it’s not a substitute for implementing proper security measures in an Android application. Developers should also consider other security techniques, such as encryption and secure coding practices, to help protect against reverse engineering and other types of attacks.
What about R8?
R8 is another code shrinking and obfuscation tool that is used in Android development, similar to ProGuard. R8 is included in the Android Gradle plugin and can be enabled by adding the following line to the app module’s build.gradle file:
When R8 is enabled, it analyzes the code and removes unused code and resources, as well as obfuscates the code to make it more difficult to understand or reverse engineer. R8 can achieve similar results to ProGuard, but with better performance and more reliable mapping files for debugging.
One benefit of using R8 is that it is faster than ProGuard, which can result in faster build times. Additionally, R8 can also remove dead code more aggressively than ProGuard, resulting in smaller APK file sizes.
Like ProGuard, R8 is not a foolproof solution for protecting an Android application from reverse engineering, but it can help make it more difficult for attackers to understand and modify the code
Protecting Android App from Reverse Engineering: Best Practices
It’s important to note that there is no 100% reverse engineering safe solution for any software, including Android applications. However, there are several measures that can be taken to make reverse engineering more difficult and protect sensitive data.
Code Obfuscation: Obfuscation is the process of modifying code to make it difficult to understand or reverse engineer. This can be done using tools like ProGuard, which can rename classes, methods, and fields to make them more difficult to understand.
Encryption: Encrypting sensitive data can make it more difficult for attackers to extract information from the application. This can be done using encryption libraries or by implementing secure communication protocols.
Tamper Detection: Implementing tamper detection mechanisms can help detect if the application has been modified or tampered with. This can be done by implementing checksums or digital signatures that can be checked during runtime.
Anti-Debugging Techniques: Implementing anti-debugging techniques can make it more difficult for attackers to debug the application and extract sensitive data. This can be done by implementing code that detects if the application is running in a debugging environment and terminates if it is.
Secure Coding Practices: Following secure coding practices can help prevent vulnerabilities in the application that can be exploited by attackers. This includes practices like input validation, error handling, and secure data storage.
By implementing a combination of these measures, it is possible to make reverse engineering of an Android application more difficult and protect sensitive data. However, it’s important to note that no solution can provide 100% protection against reverse engineering, and implementing security measures is an ongoing process that requires constant monitoring and updating to stay ahead of attackers.
Conclusion
In the constant cat-and-mouse game between developers and malicious actors, the use of tools like ProGuard and R8 is essential for fortifying Android applications against reverse engineering and unauthorized access. By leveraging code obfuscation, optimization, and additional protective measures, developers can significantly enhance the security posture of their apps. Continuous vigilance, staying informed about emerging threats, and adopting best practices in secure coding remain key components of a robust mobile app security strategy.
When it comes to creating visually appealing and responsive Android applications, developers often grapple with the decision of using image or vector assets. Both play crucial roles in the overall user experience, but understanding the differences between the two and when to use each is essential. In this comprehensive guide, we’ll explore the characteristics, advantages, and use cases of image and vector assets in the context of Android development.
In Android Studio, image assets and vector assets are two types of resources that can be used in an Android application.
Image assets:
Image assets are raster images that are designed using a bitmap format such as JPEG, PNG, and GIF. These are pixel-based graphics that are made up of a grid of pixels. Image assets are great for displaying realistic images or photographs in your app. However, when it comes to resizing, they can lose quality and become pixelated.
In Android Studio, you can create image assets by going to the “res” folder and selecting “New > Image Asset”. You can then select the image you want to use and choose various settings such as the file type, size, and name.
Vector assets:
Vector assets are graphics that are created using mathematical equations to define lines, curves, and shapes. Vector assets are resolution-independent and can be scaled to any size without losing quality. They are great for displaying icons, logos, and other graphics that need to be displayed in multiple sizes and resolutions.
In Android Studio, you can create vector assets by going to the “res” folder and selecting “New > Vector Asset”. You can then select the image you want to use and choose various settings such as the name, color, and size.
Image Asset Vs Vector Asset :
The main difference between image assets and vector assets in Android Studio is that image assets are raster images, while vector assets are made up of mathematical equations.
Here are some of the key differences between image assets and vector assets:
Resolution: Image assets are made up of a fixed number of pixels and have a fixed resolution, while vector assets are resolution-independent and can be scaled up or down without losing quality.
Size: Image assets can be very large in size, especially if they are high-resolution, while vector assets are generally much smaller in size.
Quality: When you resize an image asset, it can become blurry or pixelated, while vector assets maintain their quality at any size.
Compatibility: Image assets may not be compatible with all devices or screen resolutions, while vector assets can be used on any device and screen resolution.
Editing: Image assets can be edited using image editing software like Photoshop, while vector assets can be edited using vector graphics software like Adobe Illustrator.
In general, if you need to display a realistic image or photograph in your app, use image assets. If you need to display an icon or logo that needs to be displayed in multiple sizes and resolutions, use vector assets.
Choosing the Right Asset for the Right Scenario
Performance Considerations:
Image assets may be preferable for static, high-detail visuals.
Vector assets are optimal for scalable elements, icons, and animations.
App Size and Loading Times:
Image assets contribute to larger app sizes.
Vector assets help reduce app size and loading times.
Screen Density:
Image assets require multiple versions for different screen densities.
Vector assets scale seamlessly across various screen densities.
Editing and Customization:
Image assets are often more challenging to edit without losing quality.
Vector assets can be easily customized and modified without compromising quality.
Dynamic UI Elements:
For dynamic and interactive UI elements, vectors are preferred.
Image assets may be suitable for static elements with no need for scalability.
Summary
In the dynamic world of Android development, the choice between image and vector assets is a critical consideration. Both have their strengths and weaknesses, and the decision should be based on the specific requirements of the app. Striking a balance between visual appeal, performance, and scalability is key to creating a successful and engaging Android application. By understanding the characteristics of each asset type, developers can make informed choices that contribute to a seamless and visually pleasing user experience.
In summary, image assets are raster graphics that are great for displaying realistic images, while vector assets are resolution-independent and are great for displaying icons, logos, and other graphics that need to be displayed in multiple sizes and resolutions.
Destructuring in Kotlin is a feature that allows developers to extract values from complex data structures into separate variables. This makes it easier to access individual components of the data, making code more readable and easier to maintain. Destructuring allows developers to efficiently extract values from complex data structures like arrays, lists, maps, and even custom objects. In this blog, we’ll take a closer look at destructuring in Kotlin, exploring its syntax, benefits, and examples of its use.
Syntax of Destructuring in Kotlin
Destructuring in Kotlin is done using a special syntax. To destructure an object, you use the val or var keyword, followed by the names of the variables you want to extract, surrounded by parentheses, and then the object to be destructured. For example:
Kotlin
val (name, age) = User("amol pawar", 22)
In the above example, the User object is destructured and the values of the name and age properties are extracted into separate variables with the same names.
Benefits
There are several benefits to using destructuring in Kotlin:
Code readability: By breaking down complex data structures into separate variables, code becomes easier to read and understand. This can make a big difference when working on large projects with multiple developers.
Simplifies access to data: Destructuring makes it easier to access individual components of complex data structures, as you no longer need to access them through the object. This can result in less repetitive code and fewer bugs.
Makes code more concise: Destructuring can help make your code more concise, as you don’t need to write as many lines of code to access the data you need.
Examples
Here are some examples of using destructuring in Kotlin:
Destructuring data classes
One common use case for destructuring is with data classes. A data class is a class that is designed to hold data, and it’s often used to store information like user data, payment information, and more. Here’s an example of destructuring a data class in Kotlin:
Kotlin
dataclassUser(val name: String, val age: Int)funmain() {val user = User("amol pawar", 22)val (name, age) = userprintln("Name: $name, Age: $age")}
In this example, the User data class has two properties name and age. When the User object is destructured, the values of name and age are extracted into separate variables with the same names. The resulting output is: Name: amol pawar, Age: 22
Destructuring maps
Another common use case for destructuring is with maps. A map is a collection of key-value pairs, and destructuring makes it easier to access individual elements of the map. Here’s an example of destructuring a map in Kotlin:
Kotlin
funmain() {val map = mapOf("Key1" to 1, "Key2" to 2, "Key3" to 3)for ((key, value) in map) {println("Key: $key, Value: $value") }}
In this example, the values from the map are destructured in a loop and the key and value are extracted into separate variables for each iteration. The resulting output is:
Destructuring in Kotlin is a powerful feature that enhances the readability and expressiveness of code. It simplifies the extraction of values from data structures, making code more concise and natural. Whether working with standard collections or custom objects, destructuring declarations provide a clean and efficient way to handle complex data in Kotlin.
By leveraging destructuring, Kotlin developers can write more elegant and maintainable code, ultimately contributing to a more enjoyable and productive development experience. As you continue to explore Kotlin, consider integrating destructuring into your coding arsenal for cleaner and more expressive solutions.
Jetpack Compose, the modern Android UI toolkit, has revolutionized the way developers build user interfaces for Android applications. One of the powerful features that Compose provides is the getApplicationContext function, commonly referred to as “Get Context.” In this blog post, we will delve into the intricacies of Get Context in Jetpack Compose and explore how it can be harnessed to enhance the development experience.
Understanding Get Context
In Android development, the application context serves as a global context for an application. It allows components to access resources, services, and other application-related information. In Jetpack Compose, the getApplicationContext function provides a straightforward way to obtain the application context within the Composable functions.
Usage of Get Context
In Android Jetpack Compose, you can get the context by using LocalContext, but it should be called from the composable function only or within its scope.
In the above code snippet, we are retrieving the context and showing a toast message inside the composable.
But if we use the LocalContext.current directly inside the clickable function results in the compilation error “@composable invocations can only happen from the context of an @composable function”.
Since the LocalContext.current is composable, you can’t invoke it within the non-composable function. i.e. clickable function is not a composable function and so can’t accept other composable functions.
Alternatively, you can get the context outside the clickable function scope and use it, as shown in the above code snippet.
Common Use Cases
Accessing Resources:
Kotlin
val stringResource = stringResource(id = R.string.app_name)
This example demonstrates how to use the context to access string resources defined in the res/values/strings.xml file.
Retrieving System Services:
Kotlin
val connectivityManager = context.getSystemService(Context.CONNECTIVITY_SERVICE) as ConnectivityManager?
Here, we use the context to retrieve the ConnectivityManager system service, enabling us to check the device’s network connectivity.
Get Context allows Compose developers to initiate activities, facilitating navigation within the application.
Using SharedPreferences:
Kotlin
val sharedPreferences = PreferenceManager.getDefaultSharedPreferences(context)val storedValue = sharedPreferences.getString("key", "default")
Accessing shared preferences becomes seamless with Get Context, allowing for the retrieval of user-specific data.
Benefits of Get Context in Jetpack Compose
Simplified Resource Access: Get Context streamlines the process of accessing resources, reducing boilerplate code and making the development workflow more efficient.
Improved Code Organization: By obtaining the application context directly within Composable functions, the code becomes more organized and cohesive. Developers can access necessary resources without passing them through function parameters.
Integration with Android Ecosystem: Leveraging the application context through Get Context ensures seamless integration with the broader Android ecosystem, enabling Compose applications to interact with system services and components.
Conclusion
Get Context in Jetpack Compose plays a pivotal role in enhancing the development experience by providing a simple and effective way to access the application context within Composable functions. Whether you’re retrieving resources, interacting with system services, or launching activities, Get Context simplifies these tasks, making your code more concise and readable. As you continue exploring Jetpack Compose, consider leveraging Get Context to unlock its full potential and streamline your UI development process.
Git, the distributed version control system, is a powerful tool that allows developers to manage and track changes in their projects efficiently. Despite its robustness, developers sometimes find themselves needing to undo a commit, either due to a mistake, a change in requirements, or other reasons. Git provides several ways to revert changes, and one of the common methods is using the git revert command. In this blog post, we will explore how to use git revert to undo the last commit and understand its implications.
Let’s say we are working on your code in Git and something didn’t go as planned. So now we need to revert our last commit. How do we do it? Let’s find out!
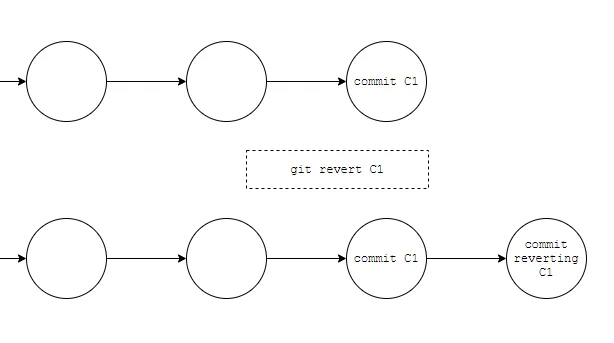
There are two possible ways to undo your Git last commit
revert Command — The revert command will create a commit that reverts the changes of the commit being targeted. means here git will create a new commit that contains reverted changes so that we will maintain commit history in the shared repository.
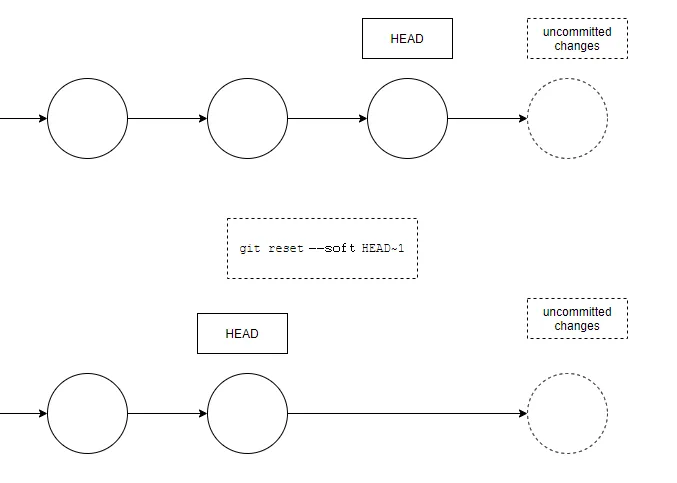
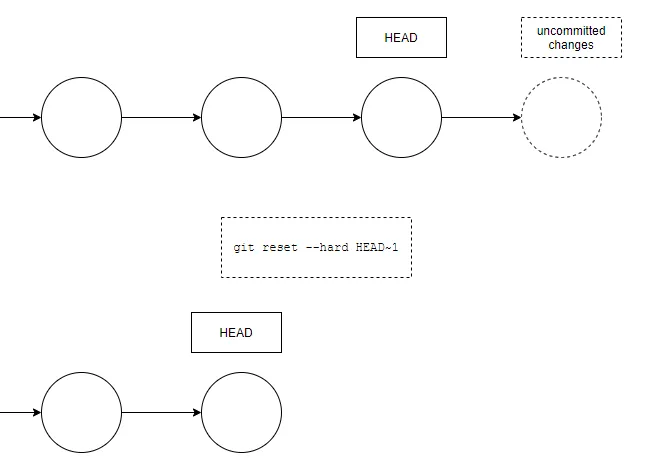
2. reset Command — the reset command to undo your last commit. So be careful. it will change the commit history, it will move the HEAD of the working branch indicating commit and discard anything after.
we use the reset command with two options
a. The --soft option means that you will not lose the uncommitted changes you may have.
git reset --soft HEAD~1
b. If you want to reset to the last commit and also remove all unstaged changes, you can use the --hard option:
git reset --hard HEAD~1
This will undo the latest commit, but also any uncommitted changes.
When should we use resetor revert?
we should really only use reset if the commit being reset only exists locally. This command changes the commit history and it might overwrite the history that remote team members depend on.
revert instead creates a new commit that undoes the changes, so if the commit to revert has already been pushed to a shared repository, it is best to use revert as it doesn’t overwrite commit history.
Conclusion
Undoing the last commit using git revert is a safe and effective way to manage mistakes or changes in your Git project without altering the commit history. It promotes collaboration by preserving the commit history’s integrity and allows for seamless integration with subsequent changes. Understanding the implications of git revert empowers developers to make informed decisions when managing their version-controlled projects.