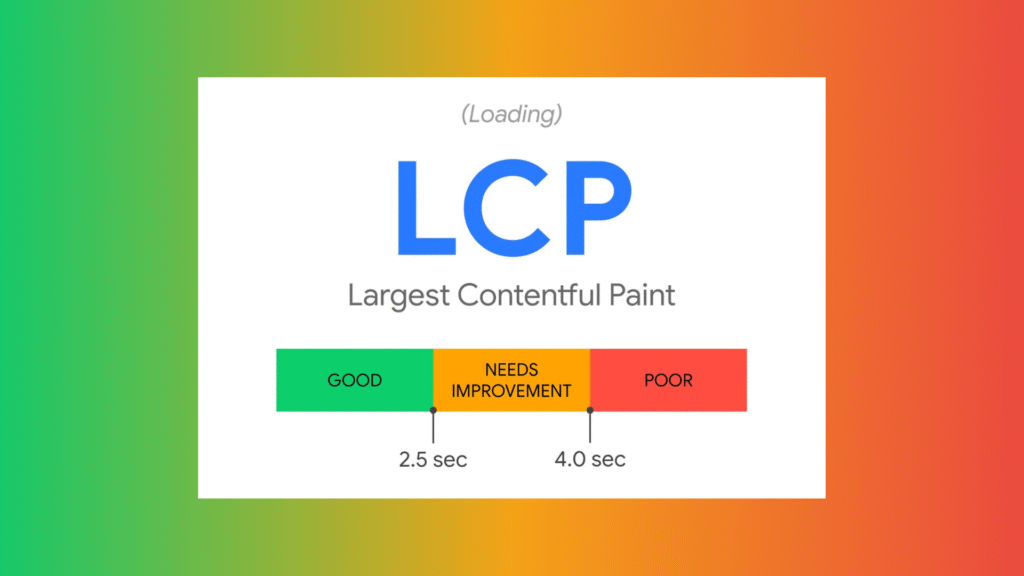
If you’re working to improve your website’s performance, you’ve probably come across the term Largest Contentful Paint (LCP). Maybe you even received a warning like: “Largest Contentful Paint element: 4,200 ms.” But what exactly does that mean? And more importantly, how do you fix it? In this guide, we’ll walk you through everything you need...
In today’s digital age, delivering a seamless user experience across all devices and networks is critical for web developers and businesses alike. However, achieving this goal requires more than just optimizing your website’s code and design. Performance testing is essential, especially when it comes to simulating various internet connection speeds and device capabilities. This is where network throttling in Chrome Developer Tools (DevTools) becomes incredibly useful.
In this blog, we’ll walk you through the powerful features of Chrome DevTools’ throttling options and show you how to create a custom throttle profile. We’ll also delve into why it’s essential for real-world performance testing and how you can utilize it for building faster, more reliable websites.
What is Network Throttling in Chrome DevTools?
Network throttling is a feature in Chrome’s Developer Tools that allows you to simulate slow network conditions, such as 3G, 2G, or even offline scenarios, directly within your browser. By mimicking the behavior of a website or web app on different internet speeds, you can gain valuable insights into performance bottlenecks and user experience issues that may only arise under certain network conditions.
This is particularly valuable in an era where mobile-first design is a top priority and mobile devices often operate under less-than-ideal internet speeds. Testing with network throttling lets you proactively identify areas for improvement before users encounter them.
Why Should You Use Network Throttling?
Simulate Real-World Conditions: While you may have access to a fast, stable internet connection, your users may not be so fortunate. By simulating slower network conditions, you can ensure that your website or app works well on slower connections (e.g., 3G or slower).
Optimize for Mobile Users: With mobile internet connections often varying in speed, throttling helps you understand how your site performs on mobile networks, which tend to be slower than desktop connections.
Debugging Performance Issues: If you notice performance issues like slow loading times or resource delays, throttling allows you to identify problems that only appear under slower network conditions.
Improve User Experience: Ensuring your website or app provides a smooth user experience across a variety of networks and devices is key to user retention and satisfaction.
How to Use Network Throttling in Chrome DevTools
Step 1: Open Chrome DevTools
To begin testing your website under throttled conditions, you first need to open Chrome DevTools:
Right-click anywhere on the webpage, and select Inspect.
Alternatively, press F12 (or Ctrl + Shift + I on Windows/Linux or Cmd + Option + I on macOS).
Step 2: Navigate to the Network Tab
Once DevTools is open, go to the Network tab at the top of the panel. This tab shows all network requests made by your webpage, such as images, scripts, and API calls. This is where you can control the throttling settings.
Step 3: Access the Throttling Dropdown
At the top of the Network tab, you’ll see a dropdown labeled “Online” (this is the default setting). Click the dropdown to reveal various throttling options:
No throttling: This simulates a fast, ideal connection.
Offline: This simulates an offline state, helpful for testing what happens when there’s no internet connection.
Fast 3G, Slow 3G: Simulate slow mobile network connections, with Fast 3G being faster than Slow 3G.
Custom: This allows you to set your own throttling parameters.
Step 4: Set a Custom Throttle Profile
For more granular control, you can create a custom throttle profile. To do this:
Click the Custom… option at the bottom of the throttling dropdown.
Here, you can customize:
Download Speed: Set a specific download speed (e.g., 500 kbps, 1 Mbps).
Upload Speed: Set a specific upload speed (e.g., 250 kbps, 500 kbps).
Latency: This refers to the delay in data transfer, which can be adjusted (e.g., 200 ms for a slight delay, 1000 ms for a noticeable lag).
Once configured, hit Add to save your custom profile.
Benefits of Custom Network Throttling
Custom throttling is particularly useful if you need to simulate more specific real-world scenarios. For example, if you want to mimic an extremely slow 2G connection, you can create a throttle with:
Download Speed: 100 kbps
Upload Speed: 50 kbps
Latency: 2000 ms (2 seconds)
Simulating these conditions can help you uncover performance issues like:
Delayed image loading
Slow-form submission
Timeout errors in API calls
Testing CPU Throttling in DevTools
In addition to network throttling, Chrome DevTools also allows you to throttle the CPU. This is helpful for simulating the performance of web applications on older or lower-end devices, where slower processing speeds can affect overall performance.
To test CPU throttling:
Open the Performance tab in DevTools.
Click the ⚙️(settings) icon and adjust the CPU throttling settings.
Choose the level of CPU throttling (e.g., 2x slowdown or 4x slowdown) to simulate lower processing power.
Best Practices for Network Throttling in Performance Testing
Test on Multiple Speeds: Don’t limit your tests to just 3G or offline. Try simulating various connection speeds like Fast 3G, Slow 3G, or even custom profiles to cover a wide range of scenarios.
Test with and without Throttling: Compare how your site performs with network throttling versus an unthrottled connection. This will help you identify issues that might only appear under slower conditions.
Focus on Critical Resources: Prioritize testing for key resources like images, videos, CSS files, and JavaScript. These are often the first things that cause slow page loads when network conditions are poor.
Ensure Mobile Optimization: With the rise of mobile browsing, it’s essential that your site performs well on mobile networks. Use throttling to test how your site behaves on mobile devices with various network conditions.
Monitor Developer Tools for Errors: While throttling, make sure to keep an eye on the Console and Network tabs for any errors that arise due to slow network conditions. Fixing these issues early on can improve the overall user experience.
Conclusion
Network throttling in Chrome DevTools is a must-have tool for web developers and performance testers looking to optimize their websites for real-world conditions. By simulating slower network speeds, you can identify and address performance issues that may negatively affect users on slower connections, ensuring that your website delivers a fast, smooth experience for all.
By following the steps above, creating custom throttle profiles, and implementing best practices, you’ll be able to test, refine, and optimize your website’s performance across various network scenarios. This will not only improve user satisfaction but also boost your site’s performance, search engine rankings, and overall success.
When it comes to building fast, secure, and scalable websites, one term you’ll hear over and over again is CDN. Short for Content Delivery Network, a CDN is a critical part of modern web infrastructure — and it plays a big role in keeping your site lightning-fast, even for users on the other side of the globe.
But what exactly is a CDN? How does it work? And why should you care as a developer, designer, or site owner?
Let’s break it all down
Understanding the Basics: What Is a CDN?
At its core, a Content Delivery Network (CDN) is a globally distributed network of servers that deliver web content — like images, videos, CSS files, JavaScript, and even entire HTML pages — to users based on their geographical location.
The idea is simple: rather than making every user fetch content from a single central server (which could be thousands of miles away), a Content Delivery Network stores copies of your content on multiple edge servers that are strategically placed around the world.
So when someone in Tokyo loads your website, they’ll receive the content from a server located in or near Tokyo — not from your origin server in, say, New York.
Why Does That Matter?
The internet is fast, but distance still affects performance. If users have to connect to a faraway server, it can lead to:
Slower page loads
Increased latency (the delay before a transfer begins)
Poorer overall user experience
A Content Delivery Network solves this by bringing your content closer to your audience, wherever they are.
Everyday Analogy: Think of It Like a Pizza Chain
Let’s make it even simpler with a relatable analogy.
Imagine you run a famous pizza restaurant in New York, and someone in Mumbai places an order. If you had to cook and ship that pizza from New York, it would take ages to arrive, and it’d be cold and soggy by the time it got there.
Now, imagine you’ve opened branches in Mumbai, London, and Tokyo. When someone in Mumbai places an order, they get their pizza fresh and fast — from the nearest location.
That’s exactly what a Content Delivery Network does for your website’s static assets. It serves them from the closest available “branch,” known as an edge server.
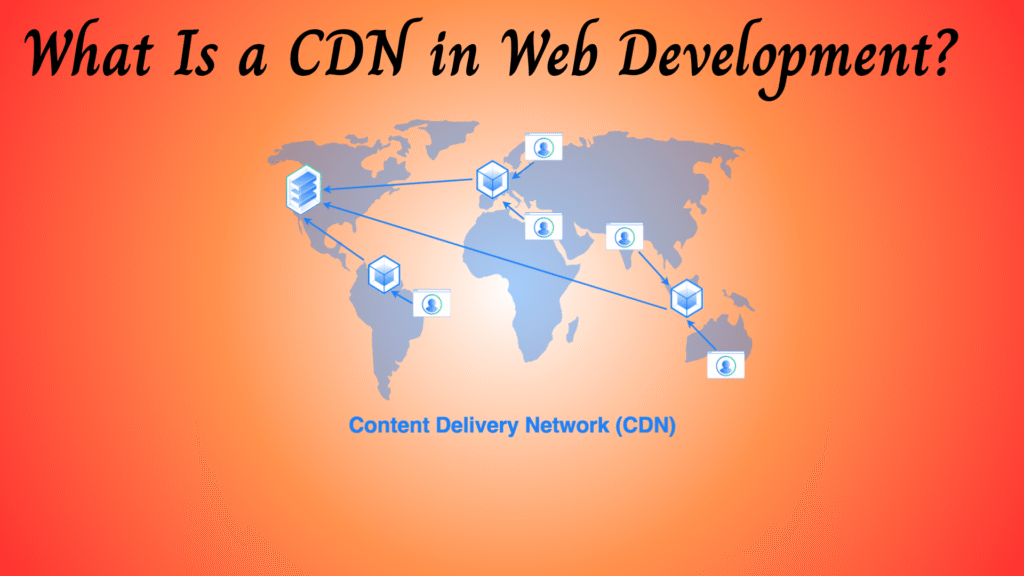
How a CDN Works: A Simple Diagram
Here’s a quick overview of how a CDN fits into the picture:
PHP
                    +---------------------+
                    |   Origin Server     |
                    | (Your Web Hosting)  |
                    +---------------------+
                              |
              -------------------------------------------
              |               |                         |
   +----------------+ +----------------+ +----------------+
   | CDN Edge - USA | | CDN Edge - UK  | | CDN Edge - Asia |
   +----------------+ +----------------+ +----------------+
              |                 |                  |
            Users             Users              Users
          (America)          (Europe)            (Asia)
Whenever a user requests your site:
The request is routed to the nearest CDN edge server.
If the content is cached, it’s delivered instantly.
If not, the edge server fetches it from the origin, caches it, and then serves it.
Key Benefits of Using a Content Delivery Network
Here’s why developers and businesses love CDNs:
1. Faster Load Times
By serving content closer to the user, CDNs drastically reduce latency. Faster sites lead to better engagement and conversions.
2. Global Reach
You can deliver a consistent experience to users across continents without setting up servers everywhere.
3. Enhanced Security
Many Content Delivery Network providers offer built-in DDoS protection, firewalls, and TLS/SSL encryption to safeguard your site.
4. Reduced Server Load
Instead of all users hitting your origin server, the load is distributed across multiple edge servers — saving bandwidth and server resources.
5. Improved Uptime
Even if your origin server goes down temporarily, cached content from edge servers can keep your site online.
Common Use Cases
CDNs are widely used in all sorts of web projects. Here are some popular scenarios:
E-commerce websites: Faster load times improve sales.
Media-heavy blogs or portfolios: Smoothly deliver high-resolution images or video.
Web applications and SPAs: Ensure fast JS and CSS delivery.
Corporate or news sites: Handle traffic spikes without crashing.
Popular Content Delivery Network Providers
There are plenty of Content Delivery Network providers out there. Here are some of the most widely used:
Provider
Highlights
Cloudflare
Free tier, security features, global reach
Akamai
Enterprise-grade, great for large-scale traffic
Amazon CloudFront
Deep AWS integration, flexible pricing
Fastly
Great for dynamic content and real-time control
Google Cloud CDN
Tightly integrated with Google Cloud services
Real-Life Example: Using a CDN for jQuery
You might already be using a Content Delivery Network without even knowing it. Consider this HTML snippet:
This line loads jQuery from Cloudflare’s CDN, not your own server. The browser fetches it from the nearest Cloudflare edge node — fast and efficient!
Do You Need a Content Delivery Network?
Short answer: Probably, yes — especially if you serve users beyond a single region or host rich media.
For small static sites, a Content Delivery Network is still helpful for speed. For dynamic web apps or eCommerce platforms, it’s often essential.
If you’re using WordPress, many caching or optimization plugins offer CDN support (like Jetpack, WP Rocket, or Cloudflare). If you’re building with modern stacks (React, Next.js, etc.), many hosting providers like Vercel and Netlify have CDN baked right in.
Conclusion
A CDN isn’t just a nice-to-have — it’s a performance and reliability multiplier for websites of all sizes. Whether you’re running a simple blog or a full-scale eCommerce platform, a Content Delivery Network ensures your content loads fast, stays secure, and remains available even under heavy traffic.
So the next time someone asks, “What’s a CDN and why do I need one?”, just tell them it’s like getting a pizza from the nearest branch — hot, fresh, and on time.
In the age of lightning-fast websites and ever-growing user expectations, every second counts. If you’re running a WordPress site, especially with dynamic content like eCommerce or membership platforms, you need more than just a basic CDN. You need something smarter, faster, and built for the future. Enter QUIC.cloud.
In this comprehensive guide, we’ll cover everything you need to know about QUIC.cloud — what it is, why it matters, and how to set it up the right way to supercharge your website performance. Whether you’re a beginner or a seasoned developer, this article has something for you.
What is QUIC.cloud?
QUIC.cloud is a cutting-edge content delivery network (CDN) and website optimization service designed to work seamlessly with the LiteSpeed Web Server and LiteSpeed Cache plugin (LSCache). What makes it unique is that it supports dynamic page caching, meaning it can serve even your dynamic WordPress pages from edge servers around the world.
It’s the first and only CDN service that can cache both static and dynamic content generated by WordPress, thanks to its native integration with LiteSpeed technologies.
Why Use QUIC.cloud?
1. Dynamic CDN for WordPress
Most traditional CDNs only cache static assets like images, CSS, and JS files. QUIC.cloud takes it a step further by caching dynamic content, like your homepage, product pages, blog posts, or anything powered by PHP.
2. Global Content Delivery
QUIC uses a network of globally distributed edge servers, meaning your site is delivered to visitors from the nearest server to them. This drastically reduces latency and load time.
3. Image Optimization
With QUIC, you can automatically compress images and convert them to next-gen formats like WebP, reducing load time without sacrificing quality.
4. Critical CSS Generation
It creates critical CSS for each page, ensuring faster paint and layout times, especially on mobile devices.
5. Minification & Combination
You can minify and combine CSS, JavaScript, and HTML directly through the LiteSpeed Cache plugin settings, streamlining page loading.
6. HTTP/3 Support via QUIC Protocol
Built on the QUIC protocol (which is the basis for HTTP/3), QUIC.cloud offers more secure and faster data transmission than older protocols.
7. Security Features
QUIC adds extra layers of protection including:
DDoS Mitigation
Geo IP blocking
reCAPTCHA integration
8. Works Seamlessly with LiteSpeed Hosting
If you’re using a LiteSpeed-powered web host, you get access to more features and increased optimization credits at no additional cost.
Who Should Use It?
WordPress site owners using LiteSpeed Cache
WooCommerce or eCommerce sites
Membership or LMS platforms
Anyone looking for top-tier site speed and global performance
How to Set Up QUIC.cloud for WordPress
Here’s how to get QUIC.cloud up and running on your WordPress site:
Step 1: Install LiteSpeed Cache Plugin
Go to your WordPress admin dashboard:
Navigate to Plugins → Add New
Search for LiteSpeed Cache
Install and activate it
Step 2: Request a Domain Key
This key connects your site to the QUIC.cloud platform.
Go to LiteSpeed Cache → General → General Settings
Click Request Domain Key
Wait a few minutes for the domain key to be generated and verified.
Step 3: Link Your Site to QUIC.cloud
Once the domain key is validated:
Click the Link to QUIC.cloud button
Log in or create a my.quic.cloud account
Your site will now appear in the QUIC.cloud dashboard
Step 4: Enable CDN
From your QUIC.cloud dashboard:
Select your site
Navigate to CDN → Enable CDN
You will be given a CNAME record (e.g., yourdomain.quic.cloud)
Step 5: Update DNS Settings
Log in to your domain registrar or DNS manager (e.g., Cloudflare, GoDaddy):
Replace your current A record with the provided CNAME
Save and apply changes
DNS changes may take a few minutes to a few hours to propagate globally.
Step 6: Verify CDN Status
Once DNS is updated:
Go back to the QUIC.cloud dashboard
Check that your site is now being served via QUIC.cloud CDN
Fine-Tuning for Performance
After setup, you can dig into the LiteSpeed Cache settings to unlock more performance:
Page Optimization: Minify/Combine CSS, JS, and HTML; Load CSS Asynchronously
Media Optimization: Enable image compression and WebP conversion
Critical CSS: Turn on automatic critical CSS generation
Database Cleanup: Remove post revisions, spam comments, and transient options
Crawler: Enable cache warm-up for better first-load experience
Free vs. Paid: What’s the Difference?
Free Plan Includes:
10 GB CDN Bandwidth per month
Basic image optimization and CSS services
Paid Plans Add:
More CDN bandwidth
Higher optimization credits
Prioritized support
Hosting on a LiteSpeed server? You may be eligible for additional free credits. Eligibility may change from time to time, so for the most up-to-date information, please visit the official QUIC.cloud website and documentation.
Conclusion
Absolutely — especially if you’re already using LiteSpeed Cache. It brings together CDN performance, image optimization, HTTP/3 support, and enhanced security, all in one tightly integrated package.
By following the steps above, your WordPress site will load faster, rank better in search engines, and offer a smoother experience for your users.
If you’re serious about site performance and future-proofing your online presence, QUIC.cloud is a no-brainer.
In the world of website optimization and performance tuning, one term you’ll often come across is “cache.” If you’ve ever opened your browser’s developer tools and seen headers like x-litespeed-cache: hit or cf-cache-status: miss, you’re witnessing caching in action. But what do these terms really mean? And how can understanding them help you optimize your website? In this blog, we’ll break it all down in a simple way.
What is Caching, Really?
Caching is like a memory shortcut. Instead of re-generating a web page from scratch every time someone visits, a cached version is saved and served instantly. This dramatically speeds up load times and reduces the workload on the server.
Imagine you’re running a bakery. If a customer orders a chocolate cake every day, you could either bake a new one each time (slow and costly) or just have a fresh one ready to go each morning (fast and efficient). That’s caching in a nutshell.
Common Web Cache Statuses and What They Mean
When you view the response headers of a website in tools like Chrome DevTools, you might see terms like HIT, MISS, or BYPASS. Let’s break down what each of these means:
Status
What It Means
HIT
The content was already cached and served instantly. This is ideal.
MISS
The content wasn’t in the cache, so the server had to regenerate it.
BYPASS
The cache was intentionally skipped—usually due to login sessions or cookies.
EXPIRED
The cached version was out-of-date and had to be refreshed.
REVALIDATED
The server checked if the cached copy was still valid and then used it.
These terms help developers and site owners understand how their caching mechanisms are behaving — and whether things are running optimally.
Where You’ll See These Headers
Depending on what kind of server or CDN (Content Delivery Network) you’re using, these headers may look slightly different. Here are a few examples:
LiteSpeed (often used with WordPress):
x-litespeed-cache: hit
x-lsadc-cache: hit
Cloudflare:
cf-cache-status: HIT
cf-cache-status: MISS
Generic Headers:
x-cache: HIT from server-name
How to View These Headers in Chrome
If you want to check what cache status you’re getting for a website:
Open the site in Chrome.
Right-click and select Inspect, or press Ctrl+Shift+I (Windows/Linux) or Cmd+Option+I (Mac).
Go to the Network tab.
Reload the page.
Click on the first request (usually the document or HTML file).
Look under the Headers tab for lines like server, x-litespeed-cache, or cf-cache-status.
Conclusion
Understanding cache statuses like HIT and MISS isn’t just valuable for developers — it’s essential for anyone invested in delivering a fast, seamless web experience. Every cache hit reduces server load, speeds up content delivery, and enhances user satisfaction. On the other hand, a cache miss can signal an opportunity for optimization or reveal issues that are slowing your site down.
Whether you’re managing a personal blog, an eCommerce platform, or a high-traffic web application, being able to interpret these cache signals helps you make smarter decisions about performance tuning. Tools like LiteSpeed Cache, Cloudflare, and other reverse proxy or CDN systems provide powerful caching mechanisms—but they only deliver their full potential when you understand how they’re behaving.
In today’s fast-paced digital world, the speed and efficiency of your website aren’t just nice to have — they’re essential. Whether you’re aiming to climb higher in Google rankings or deliver a seamless experience to your users, optimizing every part of your site matters. One classic but still highly effective technique to enhance your website’s loading performance is CSS Image Sprites.
In this guide, we’ll walk you through what CSS Sprites are, why they matter in modern web development, and exactly how to use them — with clear examples. Plus, you’ll understand how they fit into today’s best practices for SEO Core Web Vitals, and AI-powered content optimization.
What Are CSS Image Sprites?
In simple terms, a CSS Image Sprite is a single image that contains multiple smaller graphics. Instead of loading dozens of individual images (like icons, buttons, or small decorative visuals) separately, you load just one — and use CSS to show only the part of the image you need at a specific spot.
Think of it like a collage poster: all your images are placed together neatly, and you simply “frame” the part you want to display.
Why Use CSS Image Sprites?
Here’s where it gets interesting. Using CSS Sprites can solve several major performance problems at once:
1. Reduce HTTP Requests
Each image on a webpage normally requires a separate HTTP request. More requests = longer load times. With a sprite, all those images come in one file. Result? Fewer server requests, faster loading.
2. Improve Website Speed
By cutting down on unnecessary requests, your page displays faster — which directly impacts your site’s Core Web Vitals like Largest Contentful Paint (LCP) and First Contentful Paint (FCP). Speed is also a key ranking factor for Google.
3. Better Bandwidth Efficiency
Downloading one slightly larger image is often much lighter than downloading twenty smaller ones individually (due to reduced header and connection overhead).
4. Easier Maintenance
Managing a single sprite is cleaner than juggling dozens of small icons across your server.
5. Contribute to AI-Optimized Delivery
While CSS Sprites are not an AI technology themselves, they indirectly support AI-optimized delivery by improving site speed, Core Web Vitals, and user experience — all of which are factors that AI-driven search algorithms prioritize. They help your content be more efficiently served, discovered, and ranked in AI-powered environments like Google’s Search Generative Experience (SGE).
The .sprite class defines the shared styles: loading the big image, setting size.
Specific classes like .icon-home shift the view window using background-position.
Only the piece you want becomes visible!
Real-World Example: Before vs. After Optimization
Here’s a quick visual breakdown:
Before Optimization
After Optimization
Four separate <img> files
One <span> with background positioning
Four HTTP requests
Only one HTTP request
Slower load time
Much faster page load
Harder to style consistently
Centralized, easy CSS control
In short: Fewer requests + faster load time + easier maintenance = happy users and happier Googlebot.
When Should You Use CSS Sprites?
Great for:
Static websites
Sets of icons, badges, small images
Projects where images don’t change often
Improving Core Web Vitals and SEO
Not ideal for:
Highly dynamic or user-customized image content
Responsive websites needing different icon sets for mobile/desktop
When using modern SVGs (more on that later)
CSS Sprites vs. Modern Alternatives
In 2025, many developers prefer SVG sprites or icon fonts for scalability and sharpness across screen sizes. However, for raster images (like PNG or JPEG icons), CSS Sprites still have a valuable role — especially when dealing with legacy projects, bitmap-heavy sites, or low-bandwidth environments.
Final Thoughts: Should You Still Care About CSS Sprites?
Absolutely — when used smartly, CSS Sprites remain a powerful, SEO-friendly, performance-enhancing technique.
By applying this classic strategy today, you’re not just speeding up your website — you’re aligning with Google’s focus on better user experience (UX), stronger Core Web Vitals, and faster, AI-optimized delivery. Whether you’re aiming for better rankings, happier users, or faster performance scores, mastering CSS Image Sprites is a simple win you shouldn’t overlook.
If you want an even faster workflow, there are free tools like SpritePad or CSS Sprite Generator that help you build sprites and generate the CSS automatically.
In the dynamic world of app development, WeChat Mini Programs have carved a unique space — especially in China, where over a billion users rely on WeChat daily. These “sub-apps” run directly within WeChat, allowing users to access everything from ride-hailing to food delivery to banking without ever installing a separate app. But what powers these Mini Programs behind the scenes?
Two key technologies form the foundation of every WeChat Mini Program: WXML (WeiXin Markup Language) and WXSS (WeiXin Style Sheets). In this blog, we’ll break down what these technologies are, how they work together, and why they matter for developers.
What Is WXML?
WXML, short for WeiXin Markup Language, is the structural layer of a Mini Program. If you’ve worked with HTML before, WXML will feel familiar — it serves the same purpose: defining the layout and UI components of your application.
Key Characteristics of WXML:
Declarative Syntax: WXML uses a clean, readable syntax to describe elements and their hierarchy.
Component-Based: Instead of generic <div> and <span>, WXML uses specific components like <view>, <text>, <image>, and more.
Data Binding: It supports two-way data binding, allowing dynamic updates between the logic and UI.
Control Structures: Includes logic like wx:if, wx:for, and wx:else for conditionals and loops.
Sample WXML Code:
XML
<viewclass="container"><text>Hello, WeChat Mini Program..!</text><imagesrc="{{avatarUrl}}"mode="aspectFill"/></view>
Here, the avatarUrl is a variable dynamically provided by the Mini Program’s logic, demonstrating WXML’s support for dynamic rendering.
What Is WXSS?
Just like HTML needs CSS for styling, WXML relies on WXSS — short for WeiXin Style Sheets — to handle the visual design of the Mini Program. WXSS is inspired by CSS but includes WeChat-specific enhancements.
Why WXSS Matters:
Familiar Yet Enhanced: While it inherits most of CSS syntax, WXSS introduces rpx units for responsive design, making it ideal for varying screen sizes in the WeChat ecosystem.
Scoped Styling: Styles are typically scoped to a single page or component, promoting modularity.
Lightweight and Fast: WXSS is optimized for fast rendering within the WeChat runtime environment.
The rpx (responsive pixel) unit is especially handy—it automatically adjusts to the device screen width, ensuring consistent UI across all devices.
How WXML and WXSS Work Together
Think of WXML as the skeleton and WXSS as the clothing. WXML structures the page; WXSS makes it look good. They’re tightly integrated but separated to maintain a clean and maintainable codebase — much like HTML and CSS.
When a Mini Program loads a page:
WXML renders the structure.
WXSS applies styles.
JavaScript handles logic and interactions.
Developer Tip: Understanding rpx vs px
In WXSS, the rpx unit is one of the most powerful features. It adapts automatically based on screen size. For example:
On a 750px wide screen: 1rpx = 1px
On a 375px wide screen: 1rpx = 0.5px
This removes the need for complicated media queries and ensures your layout scales naturally on all devices using WeChat.
This simple layout renders a user profile with a responsive image and styled name — all done using WXML and WXSS.
Why WXML and WXSS Matter in 2025
As WeChat Mini Programs continue to grow — powering e-commerce, services, education, and government apps — understanding WXML and WXSS is more relevant than ever. They’re not just front-end tools; they’re core to building scalable, high-performing micro-experiences in one of the world’s most influential platforms.
In a mobile-first and app-fatigued world, Mini Programs offer a lightweight alternative — and WXML and WXSS are your gateway in.
Conclusion
WXML and WXSS aren’t just “HTML and CSS in Chinese clothes” — they’re tailored for a fast, responsive, mobile ecosystem that thrives inside the WeChat super-app. For developers eyeing the Chinese market, or anyone curious about the future of lightweight app ecosystems, learning these tools is a smart investment.
FAQs
Q: Is WXML the same as HTML? A: No, WXML is similar in structure but designed specifically for WeChat Mini Programs. It uses custom tags and supports dynamic binding.
Q: What is the difference between WXSS and CSS? A: WXSS is based on CSS but includes enhancements like the rpx unit for responsive design, optimized for WeChat’s environment.
Q: Can I use Flexbox or Grid in WXSS? A: Yes, WXSS supports Flexbox, which is the recommended layout model for WeChat Mini Programs. CSS Grid is not fully supported.
Q: How do I test WXML and WXSS? A: Use the official WeChat Developer Tool to create and preview Mini Programs with real device simulation.
In today’s digital landscape, businesses strive for agility, scalability, and seamless user experiences. Tencent Cloud Mini Program Platform (TCMPP) emerges as a powerful solution, enabling developers to create lightweight, cross-platform applications that integrate effortlessly into various ecosystems.
What is Tencent Cloud Mini Program Platform (TCMPP)?
Before we go further, let’s clarify what a mini program is. A mini program is a lightweight application that doesn’t require separate download or installation like traditional apps. Instead, it runs within a larger platform — such as WeChat or other super apps — and provides specific, targeted functionalities. This enables users to instantly access services without consuming additional device storage.
Tencent Cloud Mini Program Platform (TCMPP) is a comprehensive development framework that empowers businesses to build and manage these mini programs. Designed for platforms like WeChat or custom enterprise ecosystems, TCMPP enables the creation of app-like experiences that are fast, efficient, and highly accessible — without the friction of traditional app distribution.
Key Features of TCMPP
1. Cross-Platform Compatibility
TCMPP supports the development of mini programs that can run seamlessly across multiple platforms, including WeChat and custom enterprise applications. This “write once, deploy anywhere” approach reduces development time and ensures consistent user experiences.
2. Robust Development Tools
The platform provides a suite of tools to facilitate the development process:
Mini Program IDE: An integrated development environment that supports coding, debugging, previewing, and releasing mini programs.
Container SDKs: Available for Android and iOS, these SDKs allow integration of mini programs into native applications.
Performance Monitoring: Built-in tools to monitor mini program performance, ensuring optimal user experiences.
3. Security and Compliance
TCMPP emphasizes security with features like:
Security Scans: Automated scans to detect vulnerabilities.
Compliance Checks: Ensuring mini programs adhere to regulatory standards.
Data Protection: Measures to safeguard user data and prevent unauthorized access.
Use Cases: Where TCMPP Shines
The versatility of the Tencent Cloud Mini Program Platform (TCMPP) makes it suitable for a wide array of industries and business needs. Here are some compelling use cases:
E-commerce and Retail:
In-app shopping: Create seamless shopping experiences directly within super apps, allowing users to browse products, add to cart, and complete purchases without leaving the primary application.
Loyalty programs: Develop mini programs for digital loyalty cards, points redemption, and personalized promotions, driving repeat business.
Customer service: Implement chatbots and self-service options for quick answers to common queries, order tracking, and support.
Financial Services:
Banking services: Offer basic banking functionalities like balance inquiry, transaction history, and fund transfers.
Insurance applications: Streamline policy applications, claims submission, and policy management.
Payment solutions: Integrate secure and convenient payment gateways for various transactions.
Education and E-learning:
Interactive courses: Deliver bite-sized lessons, quizzes, and multimedia content.
Event registration: Manage registrations for workshops, seminars, and online events.
Student support: Provide quick access to academic resources, schedules, and administrative assistance.
Healthcare and Wellness:
Appointment booking: Enable easy scheduling of doctor’s appointments or wellness sessions.
Health tracking: Allow users to log fitness data, monitor health metrics, and receive personalized tips.
Telemedicine consultations: Facilitate virtual consultations with healthcare professionals.
Gaming and Entertainment:
Casual games: Develop lightweight, engaging games that users can play instantly.
Content streaming: Offer snippets of videos, music, or news directly within the mini program.
Event ticketing: Streamline the process of Browse and purchasing tickets for events.
Public Services and Government:
Citizen services: Provide access to various government services, such as applying for permits or checking public records, as seen with initiatives like TAMM in Abu Dhabi utilizing TCMPP to consolidate public services.
Information dissemination: Share important announcements, public health updates, and emergency information.
Tools: Empowering Your Development Journey
The Tencent Cloud Mini Program Platform (TCMPP) provides a comprehensive suite of tools to support developers throughout the mini program lifecycle, from initial coding to deployment and management.
Tencent Cloud Mini Program Development Tool (IDE):
This is your primary workspace. It’s a powerful integrated development environment specifically designed for building mini programs. It offers features like:
Code Editing: Supports WXML (Weixin Markup Language), WXSS (Weixin Style Sheet), and JavaScript, the core languages for mini program development.
Real-time Preview: See your changes instantly as you code, accelerating the development process.
Debugging Tools: Identify and resolve issues efficiently with built-in debugging capabilities.
Project Management: Organize your mini program projects, manage files, and handle configurations.
Client SDKs:
For integrating mini program capabilities into your own super apps, Tencent Cloud provides client SDKs for various platforms, including Android and iOS. These SDKs allow you to:
Embed Mini Program Containers: Host mini programs within your existing mobile application.
Manage Mini Program Lifecycle: Control the opening, closing, and updating of mini programs.
Customize UI: Tailor the appearance of the mini program within your app.
Management Console:
This web-based console is your command center for managing your mini programs after deployment. Key functionalities include:
Mini Program Management: Publish new versions, roll back updates, and manage user access.
Data Analytics: Monitor user behavior, track performance metrics, and gain insights into your mini program’s usage.
User Management: Oversee user accounts and permissions.
Payment Configuration: Set up and manage mini program payment options.
Open APIs:
Tencent Cloud Mini Program Platform (TCMPP) offers a rich set of Open APIs that allow your mini programs to interact with various Tencent Cloud services and other third-party platforms. These APIs enable powerful integrations, such as:
Cloud Object Storage (COS): For storing images, videos, and other static assets.
Serverless Cloud Function (SCF): To run backend logic without managing servers.
AI and Machine Learning Services: Integrate features like image recognition, natural language processing, and face fusion.
Real-time Communication: Incorporate chat and real-time interaction capabilities.
Getting Started with TCMPP: A Simple Example
Let’s walk through a basic example of creating a mini program using TCMPP.
Step 1: Set Up the Development Environment
Download and install the Mini Program IDE provided by Tencent Cloud.
Step 2: Create a New Project
In the IDE, create a new project and set up the necessary configuration files.
Step 3: Develop the Mini Program
Here’s a simple example of a mini program that displays a greeting message:
app.json
JSON
{<br>"pages": [<br>"pages/index/index"<br> ],<br>"window": {<br>"navigationBarTitleText": "Welcome to TCMPP"<br> }<br>}
This is the configuration file that defines the structure and window appearance of your mini program.
pages/index/index.json Page-level configuration (can be empty for simple apps).
JSON
{}
pages/index/index.wxml Defines the UI structure using WXML (WeChat Markup Language).
XML
<viewclass="container"><textclass="title">Hello from Tencent Cloud Mini Program Platform!</text></view>
pages/index/index.wxss Styles the UI with WXSS (WeChat Style Sheets).
pages/index/index.js Controls logic and behavior for the page.
JavaScript
Page({data: {message:"Hello from TCMPP..!" },onLoad() {console.log(this.data.message); }});
Here,
app.json: Sets up the app structure and UI navigation bar.
index.wxml: Displays a simple greeting inside a styled container.
index.wxss: Styles the greeting with center alignment and color.
index.js: Initializes the page with a message logged on load.
Benefits of Using TCMPP
Fast Development & Deployment
Build, test, and launch mini programs rapidly with Tencent’s streamlined tools and APIs.
Seamless Integration
Mini programs built on TCMPP can be embedded in WeChat, QQ, or enterprise environments, reaching millions instantly.
Enterprise-Grade Security
With end-to-end encryption, permission controls, and real-time monitoring, TCMPP is built to handle sensitive enterprise workflows.
Scalable Analytics
Monitor usage, performance, and user behavior with Tencent Cloud’s integrated analytics dashboards.
Best Practices for TCMPP Development
Modular Code Structure Break code into manageable components to maintain clarity and reusability.
Optimize for Speed Use lazy loading and CDN-hosted assets to keep the app responsive.
Follow UX Guidelines Ensure a consistent experience with WeChat mini program design principles.
Test Across Devices Use TCMPP’s simulator and device labs to test for compatibility and responsiveness.
Conclusion
Tencent Cloud Mini Program Platform (TCMPP) empowers developers to create powerful, lightweight applications with ease. Whether you’re building a retail experience, a government service, or an engaging game, TCMPP provides the tools, performance, and flexibility you need.
Its intuitive environment, strong documentation, and ecosystem integration make it a standout choice for developers looking to engage users where they already spend their time — inside platforms like WeChat.
Want to scale your app idea without building from scratch? TCMPP might just be your launchpad.
When working with strings in Kotlin — especially dynamic ones that embed variables — developers have long enjoyed the flexibility of string interpolation. But if you’ve ever had to include literal dollar signs in multiline strings, you’ve likely run into messy workarounds that hurt readability and feel clunky.
With the release of Kotlin 2.2.0-RC, JetBrains has introduced a powerful feature that’s both subtle and impactful: Multi-Dollar String Interpolation. This feature addresses the pain points around dollar sign usage in multiline strings, offering a clean, intuitive way to balance literal characters and string interpolation.
Note: Multi-dollar string interpolation, introduced as an experimental feature in Kotlin 2.1, is becoming stable in version 2.2.
In this post, we’ll explore what multi-dollar string interpolation is, why it matters, and how it simplifies real-world Kotlin code — especially when generating formats like JSON or dealing with currency values.
Quick Refresher: What Is String Interpolation?
String interpolation is the process of embedding variables or expressions directly into a string.
Here’s the basic syntax in Kotlin:
Kotlin
val name = "Amol"println("Hello, $name") // Output: Hello, Amol
You can also interpolate expressions:
Kotlin
println("2 + 2 = ${2 + 2}") // Output: 2 + 2 = 4
This works beautifully in single-line strings. But once you step into multiline strings, things get a little more complicated — especially when your string includes literal dollar signs.
The Problem: Dollar Signs in Multiline Strings
In single-line strings, Kotlin allows escaping special characters like so:
Kotlin
val price = "\$100"
But in multiline strings — which use triple quotes ("""), Kotlin doesn’t support backslash escaping.
Let’s say you want to create a JSON template inside a multiline string that contains dollar signs for things like currency or schema declarations:
Kotlin
val json = """{ "$schema": "https://example.com/schema", "price": "$100"}"""
Oops..! Kotlin will try to interpolate $schema and $100 as variables—likely leading to a compile-time error or unintended behavior.
The Workaround (Before Kotlin 2.2)
Previously, the only way to escape a dollar sign in multiline strings was to use:
Kotlin
"${'$'}"
So your JSON would look like this:
Kotlin
val json = """{ "${'$'}schema": "https://example.com/schema", "price": "${'$'}100"}"""
Technically correct — but let’s be honest, it’s ugly and hard to read, especially when you have multiple dollar signs in a single string.
The Solution: Multi-Dollar String Interpolation (Kotlin 2.2)
Kotlin 2.2 introduces multi-dollar string interpolation, which lets you define how many dollar signs are needed to trigger interpolation. This makes it easier to include literal dollar signs without messy escaping.
How It Works
Instead of starting a multiline string with """, you prefix it with $$""" or $$$"""—depending on how many dollar signs should be treated as interpolation triggers.
$$$""" tells Kotlin: only $$$ triggers interpolation.
So $ and $$ stay literal in the string.
$$$productName gets interpolated to "Amul".
This is incredibly helpful in scenarios like:
Generating JSON or XML.
Embedding currency symbols.
Working with configuration files.
Using template engines or schema definitions.
Why This Matters: Cleaner, Safer Code
Multi-dollar interpolation isn’t just a syntactic sugar. It:
Improves readability in strings with many dollar signs.
Reduces errors caused by mistaken interpolations.
Eliminates the awkward ${'$'} pattern.
Enhances maintainability when dealing with external formats like JSON, HTML, or YAML.
And importantly, it allows developers to express their intent more clearly: whether you’re writing a literal value or embedding a variable.
Conclusion
Multi-dollar string interpolation might seem like a small change, but for Kotlin developers who regularly deal with multiline strings, templates, or embedded formats, it’s a massive win. It cleans up your code, improves safety, and makes your intentions more explicit — all while keeping Kotlin’s expressive syntax intact.
If you’re working on data-heavy applications, web services, or even Android development with Kotlin DSLs or Compose, this is a feature you’ll definitely want to adopt.
Kotlin has always been loved for its expressive syntax and focus on developer productivity. With Kotlin 2.2, JetBrains continues that tradition by introducing several enhancements — and one of the most impactful is support for guard conditions in when expressions with a subject (when guards).
If you’ve ever wished you could use if-style conditions inside a when statement that uses a subject, you’re going to love this update. It’s a small change, but it goes a long way in reducing boilerplate and making your code cleaner and easier to read.
You might’ve noticed I’ve mentioned the term “subject” a few times — but what exactly does that mean in a Kotlin when statement? Let’s clear that up before we dive in further.
What is a “Subject” in Kotlin’s when Expression?
In Kotlin, the “subject” of a when expression is the value or variable you’re evaluating — it’s what the expression is checking to decide which block of code to run.
Think of it like this:
The subject is the value you’re comparing against.
You declare it once at the start of the when.
Each branch then checks something about that subject — almost like asking questions: “Is it red?”, “Is it a cat?”, “Is it greater than 10?”
with a Subject
The subject is explicitly provided in parentheses right after the when keyword.
Kotlin
when (subject) {// branches}
Kotlin
val number = 3when (number) {1->println("One")2->println("Two")3->println("Three")else->println("Unknown number")}
Here,
number is the subject.
Each case like 1, 2, 3 is being compared to the subject.
This is called whenwith a subject, because we are checking different conditions against a single known value.
Without a Subject
You can also write a when expression without a subject, like this:
Kotlin
when { // <-- No subject here condition1 -> { /* code */ } condition2 -> { /* code */ }else-> { /* code */ }}
Kotlin
val number = 3when { number == 1->println("One") number == 2->println("Two") number == 3->println("Three")else->println("Unknown number")}
Here, there’s no subject. Each branch is an independent condition.
This form is useful when:
You want to evaluate different expressions.
You need to compare multiple values, not just one.
Why Use a Subject?
Using a subject makes the code:
Cleaner — no need to repeat the value you’re checking.
More readable — it communicates intent better.
Safer — the compiler checks exhaustiveness for enums and sealed classes when a subject is used.
Understanding the Problem (Before Kotlin 2.2)
In versions prior to Kotlin 2.2, you could use guard conditions (i.e., if statements) only in a when expression without a subject. That looked like this:
This works fine, but you lose the ability to declare the subject once and reuse it cleanly in each branch. You’d often find yourself repeating logic or working around this limitation, especially in complex branching.
On the flip side, if you did use a subject:
Kotlin
when (value) {1->println("One")2->println("Two")//Can't use custom `if` conditions here pre-2.2else->println("Other")}
— you couldn’t use guard clauses like if (value % 2 == 0) in combination with pattern matching.
Kotlin 2.2 Fixes This: Introducing Guard Conditions in when with Subject
Starting in Kotlin 2.2, you can now write when expressions with a subject and use guard conditions (if) directly inside each branch. Here’s how:
Kotlin
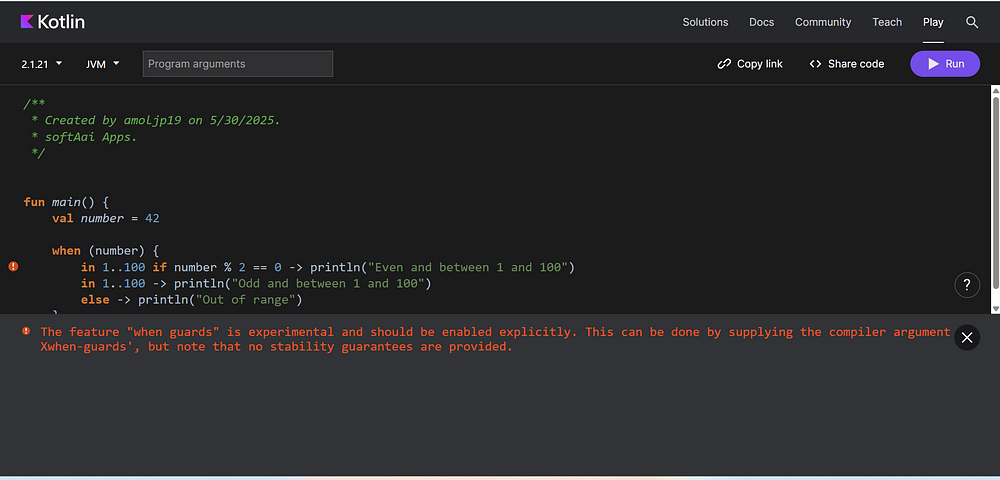
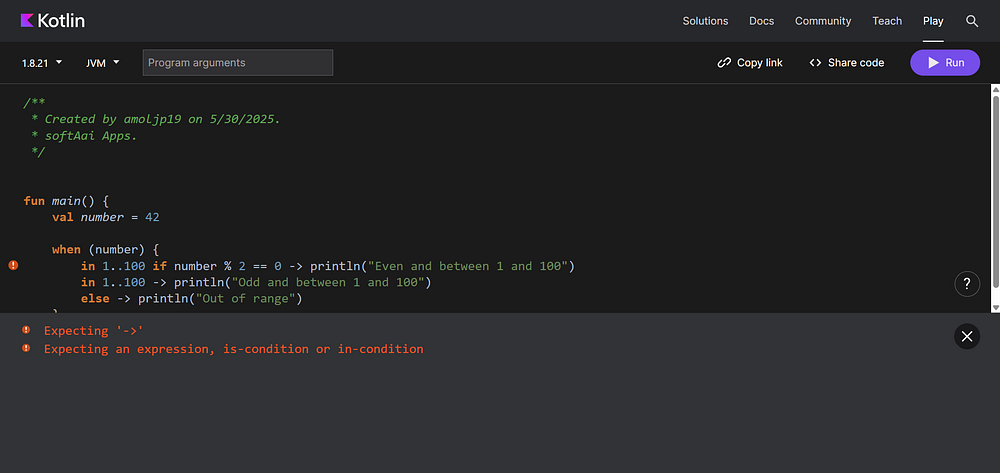
val number = 42when (number) {in1..100if number % 2 == 0->println("Even and between 1 and 100")in1..100->println("Odd and between 1 and 100")else->println("Out of range")}
Now that’s clean, expressive, and Kotlin-esque..!
FYI
If we try the same code in Kotlin versions below 2.2, we’ll get an error like this.
Error: The feature “when guards” is experimental and should be enabled explicitly. This can be done by supplying the compiler argument ‘-Xwhen-guards’, but note that no stability guarantees are provided.
And if we run the same code in Kotlin versions before 2.0, we’ll get an error like this.
Real-World Example: API Response Handling
Imagine you’re building a mobile app with a sealed class representing different API states:
With Kotlin 2.2, your when statement becomes more expressive and readable:
Kotlin
funhandleResponse(response: ApiResponse) {when (response) {is ApiResponse.Success if response.data.contains("welcome", ignoreCase = true) ->println("Greeting received: ${response.data}")is ApiResponse.Success ->println("Success with data: ${response.data}")is ApiResponse.Error if response.code == 401->println("Unauthorized. Please login again.")is ApiResponse.Error ->println("Error with code ${response.code}") ApiResponse.Loading ->println("Loading...") }}// Note - Since Success, Error, and Loading are nested inside the sealed class ApiResponse, you must use ApiResponse. to reference them unless you import or alias them.
This pattern simplifies what would otherwise require deeply nested if checks or multiple when blocks.
Another Practical Use Case: Enum Matching with Context
Here’s how you can add guard logic to when with enums:
This approach provides extremely readable and maintainable access control logic, ideal for mobile apps, backend services, or web platforms.
How to Enable Kotlin 2.2 in Your Project
To use features introduced in Kotlin 2.2, such as “when guards” (officially known as “Guard conditions in when with a subject”), ensure your Kotlin compiler is version 2.2 or later.
As of today (May 30, 2025), Kotlin 2.2.0-RC (Release Candidate) is the latest available version.
What exactly is an RC or Release Candidate version? A Release Candidate is a pre-release version that is feature-complete and nearly final, but not yet officially marked as stable. It’s made available to users for testing, feedback, and final validation before the official stable release.
Because “when guards” is an experimental feature (introduced as a preview in Kotlin 2.1.0), you might encounter a compiler error like:
Kotlin
"The feature "when guards" is experimental and should be enabled explicitly"
To enable it, you need to explicitly opt-in to the experimental feature in your project. This is typically done in your build.gradle.kts (for Kotlin DSL) or build.gradle (for Groovy DSL) file.
Here’s how you can enable it:
For Android or JVM Projects (Kotlin DSL — build.gradle.kts):
Update your plugin version and add the compiler argument:
Kotlin
plugins {kotlin("jvm") version "2.2.0-RC"// or kotlin("android") for Android apps}kotlinOptions { freeCompilerArgs += "-Xexperiment-when-guards"}
For Groovy DSL (build.gradle):
Groovy
plugins { id 'org.jetbrains.kotlin.jvm' version '2.2.0-RC'// or 'org.jetbrains.kotlin.android' for Android apps}kotlinOptions { freeCompilerArgs += ['-Xexperiment-when-guards']}
For Android Studio Users:
If you are using the latest version of Android Studio with Gradle’s version catalog, update your Kotlin plugin version in your libs.versions.toml file:
TOML
[versions]kotlin = "2.2.0-RC"# Update this to the desired Kotlin version[libraries]# Your existing other entries here
Additionally, ensure that the Kotlin plugin in Android Studio itself is updated to version 2.2.0 or higher. This feature may not work correctly if your IDE’s Kotlin plugin is outdated, even if your Gradle configuration is up to date.
Note — The feature will only be fully usable in Kotlin 2.2.0 stable (likely coming very soon).
Why It Matters for Developer Productivity
Guard conditions in when with subject:
Reduce repetitive code
Increase clarity in control flow
Enable more expressive and context-aware logic
Minimize bugs by localizing logic per branch
This feature might seem small on paper, but in practice, it leads to more elegant and bug-resistant code.
FAQ
Q: What is guard condition in Kotlin’s when expression? A guard condition is an additional if clause that allows you to add more complex checks inside each when branch.
Q: Can I use if with when in Kotlin 2.2? Yes. Starting in Kotlin 2.2, you can use if conditions inside a when expression that uses a subject, which was previously not allowed.
Q: How do I enable Kotlin 2.2 features? Update your Kotlin plugin and Gradle configuration to use version 2.2.0 or higher.
Q: Why is this useful in real-world projects? It simplifies conditional logic in APIs, enums, sealed classes, and makes branching more readable and maintainable.
Conclusion
Kotlin continues to evolve with thoughtful enhancements that make a real impact on everyday development. The introduction of guard conditions in when with subject might look like a small change, but it helps you write cleaner, safer, and more expressive logic.
If you’re already using Kotlin in production — especially for mobile or backend development — upgrading to Kotlin 2.2 is a smart move. With each release, Kotlin becomes more intuitive, letting you focus on building great software without fighting the language.
Give it a try, and you’ll notice how natural things start to feel.