Jetpack Compose has completely changed how we build Android UIs. With its declarative approach, you just describe what your UI should look like, and Compose takes care of the rest. But here’s the thing: your app isn’t only about drawing screens.
There are things like showing a toast, requesting a permission, or launching a background task. These aren’t UI elements, but they’re essential for real app behavior. That’s where Side-Effect APIs in Jetpack Compose come into the picture.
If you use them the wrong way, you could run into bugs, sluggish performance, or actions triggering more often than they should. But when used correctly, your app behaves smoothly and predictably.
In this post, we’ll walk through what side-effects are, why they matter, and how to use these APIs the right way — with clear examples and tips that make sense even if you’re new to Compose.
What Is a Side-Effect in Jetpack Compose?
In Compose, a side-effect is any operation that affects or relies on something outside the scope of the composable function itself. These operations should not happen during recomposition. Examples include:
Showing a snackbar
Launching a coroutine
Reading from a database or shared preferences
Navigating to another screen
Since composables can recompose multiple times, these side-effects need to be controlled to avoid repeating them unnecessarily. That’s exactly what the Side-Effect APIs in Jetpack Compose are designed for.
The Core Side-Effect APIs in Jetpack Compose
1. LaunchedEffect
Use this when you want to launch a coroutine tied to a specific key or lifecycle. It cancels and relaunches if the key changes.
Kotlin
@ComposablefunGreetingScreen(userId: String) {LaunchedEffect(userId) {val user = fetchUserFromApi(userId)println("Fetched user: $user") }Text("Welcome!")}
Here, the API call only runs when userId changes. If the composable recomposes but userId stays the same, the effect won’t run again.
2. rememberCoroutineScope
This gives you a stable coroutine scope to launch coroutines in response to user actions.
Use case: Passing latest lambdas to long-lived effects like coroutines without triggering unnecessary re-launches.
Best Practices for Side-Effect APIs in Jetpack Compose
Don’t run side-effects in composables directly. Always use the appropriate API.
Avoid using LaunchedEffect with Unit unless you really need a one-time effect.
Use keys wisely. The key in LaunchedEffect or DisposableEffect controls when the effect restarts.
Use remember for state you don’t want to reset on recomposition.
Common Pitfalls and How to Avoid Them
Mistake: Triggering network requests during every recomposition. Fix: Wrap the request in LaunchedEffect with a proper key.
Mistake: Memory leaks from observers or listeners. Fix: Use DisposableEffect and onDispose to clean up.
Mistake: Stale references inside LaunchedEffect. Fix: Use rememberUpdatedState to always get the latest values.
Conclusion
Side-Effect APIs in Jetpack Compose are critical tools that help you manage real-world app behavior safely and efficiently. They prevent bugs, improve performance, and keep your UI logic clean and reactive.
Learning how and when to use them correctly is one of the key steps to becoming proficient in Jetpack Compose.
Stay declarative, stay clean, and let side-effects do the heavy lifting — the right way.
Jetpack Compose, Android’s modern UI toolkit, introduces a declarative approach to building user interfaces. With this shift comes a new way of thinking about side effects — operations that interact with the outside world or perform actions outside the scope of a composable function. Understanding how to manage these side effects properly is crucial to building reliable, efficient, and reactive Compose applications.
In this article, we’ll dive into three key APIs provided by Compose for handling side effects: SideEffect, LaunchedEffect, and DisposableEffect. Each serves a distinct purpose and understanding their differences can help you write cleaner, more predictable UI code.
What Are Side Effects in Jetpack Compose?
In Jetpack Compose, a side effect is any change that happens outside the scope of a composable function. This might include updating a database, logging analytics, showing a toast, or triggering a network call. Because composable functions can be re-executed (recomposed) frequently and unpredictably — whenever state or parameters change — running side-effect code directly inside them can lead to bugs or performance issues, such as duplicate network requests or inconsistent UI states.
Why Do We Need Side-Effect APIs in Jetpack Compose?
The declarative paradigm means you describe what the UI should look like, and Compose decides how and when to update it. However, this also means you can’t control exactly when your composable functions run. If you place side-effect code (like a network call) directly in a composable, it might run multiple times — once for every recomposition — which is usually not what you want.
Side-Effect APIs in Jetpack Compose are designed to solve this problem. They provide safe, predictable ways to perform actions that reach outside the Compose runtime, such as:
Triggering one-time operations
Cleaning up resources
Synchronizing Compose state with external systems
Key Side-Effect APIs in Jetpack Compose
Let’s explore the most commonly used Side-Effect APIs in Jetpack Compose, when to use each, and see them with simple code examples.
1. SideEffect
What it does:
Runs code after every successful recomposition of the parent composable.
When to use:
For actions that should happen every time the UI updates, like logging or updating analytics.
When you need to synchronize Compose state with an external system, but not for heavy or asynchronous operations.
Here, LaunchedEffect ensures the network call runs only when userId changes—not on every recomposition—preventing duplicate requests and wasted resources.
3. DisposableEffect
What it does:
Performs setup and cleanup logic tied to the lifecycle of the composable. Runs setup when the key(s) change, and cleanup when the composable leaves the composition.
When to use:
For managing resources like listeners, callbacks, or broadcast receivers that need explicit teardown.
When you want to perform cleanup when a composable is removed from the UI tree.
This ensures the observer is added when the composable enters the composition and removed when it leaves, preventing memory leaks.
Common Mistakes and How to Avoid Them
Running Expensive Operations in SideEffect: Avoid using SideEffect for network calls or other heavy operations—it runs on every recomposition, which can lead to performance issues and duplicate work.
Ignoring Cleanup: If you add listeners or callbacks, always use DisposableEffect to remove them when the composable is disposed.
Not Using Keys Properly: For LaunchedEffect and DisposableEffect, always specify appropriate keys to control when effects should re-run.
Choosing the Right Side-Effect API
Conclusion
Side-Effect APIs in Jetpack Compose are essential for bridging the gap between declarative UI and imperative side effects. By understanding and using SideEffect, LaunchedEffect, and DisposableEffect correctly, you can:
Prevent bugs and performance issues caused by unwanted repeated side effects
Build responsive, robust, and maintainable Compose apps
Ensure your app interacts safely with the outside world
Remember:
Use SideEffect for lightweight, repeatable actions after recomposition
Use LaunchedEffect for one-time or asynchronous tasks
Use DisposableEffect for managing resources with setup and teardown
Mastering these tools will help you write cleaner, more reliable Compose code — and take your Android apps to the next level.
Android Automotive OS is Google’s in‑car operating system that runs directly on a vehicle’s hardware. Not to be confused with Android Auto (a phone projection platform), Android Automotive OS Architecture is a complete software stack, ready for infotainment, driver assistance apps, and full vehicle integration.
Let’s dive into its main layers.
Android Automotive Architecture
A high-level architecture diagram of the Android Automotive OS is given below.
It consists of the following four main generic components:
Application Framework
Application Framework layer, also known as the HMI (Human-Machine Interface) is responsible for providing the user interface for the car’s infotainment system. It includes both user applications, such as music players and navigation apps, as well as system applications, such as the car’s settings and the voice assistant.
It is important to design applications in this layer with most core business functions moved to the Services layer. This approach ensures scalability and easy updates for the future.
The Application Framework layer contains further parts, which are as follows:
1. Android Open Source Project (AOSP): The Android Open Source Project (AOSP) is the base software for Android devices. It includes all the necessary components like system apps, application frameworks, system services, and HAL interfaces. These components are organized as “GIT-tree packages.”
In AOSP, you find generic system apps like the default launcher, contacts app, and clock app. The application framework provides tools for app development. System services manage important functions like network connectivity and security. HAL interfaces help interact with device-specific hardware.
When you install Android on a device, all these components are stored in the /system partition, which is like the “core” of the Android system. Custom ROMs replace these files to offer different features and optimizations.
2. OEM and 3rd party applications: The OEM and 3rd party applications are the “face” of the car’s infotainment system. They’re the things that people see and interact with. The HMI is the way that people interact with those applications. And the application background services are the things that keep the whole system running smoothly.
BTW, What is OEM?
OEM stands for Original Equipment Manufacturer. In general, an OEM is a company that manufactures products that are sold under another company’s brand name. For example, Bose is an OEM for sound systems. They make sound systems that are sold under the brand names of other companies, such as Toyota, Ford, and Honda.
In other words, Bose is the company that actually makes the sound system, but Toyota, Ford, and Honda are the companies that sell the sound system to their customers.
In the context of Android Automotive OS architecture, an OEM is a car manufacturer that uses the Android Automotive OS as the operating system for its car’s infotainment system.
OEMs have a lot of flexibility in how they use the Android Automotive OS. They can customize the look and feel of the system, add their own applications, and integrate the system with their car’s other systems.
Here are some examples of OEMs that use the Android Automotive OS:
Volvo: Volvo is a Swedish car manufacturer that uses the Android Automotive OS in its XC40 Recharge electric car.
Renault: Renault is a French car manufacturer that uses the Android Automotive OS in its Megane E-Tech electric car.
Honda: Honda is a Japanese car manufacturer that uses the Android Automotive OS in its e:NS1 electric car.
These components are stored in the /product partition on the car’s hard drive. This is a separate partition from the /system partition, which contains the Android operating system itself. This separation allows OEMs and developers to customize the car’s infotainment system without affecting the underlying Android operating system.
Android Automotive System Services
This layer contains all the important System services that handle various essential functions in the Android Automotive system, like managing network connections, power, and security features.
One interesting aspect of this layer is that it acts like a protective shield of security for the system. Instead of allowing applications to directly communicate with the hardware through the Hardware Abstraction Layer (HAL), they interact with the System services. These services act as an intermediary between the applications and the hardware.
This approach has a significant advantage in terms of security. By using the Services layer as a middleman, OEMs can ensure that the hardware’s sensitive functionalities are accessed and controlled in a secure manner. It prevents direct access to the hardware from regular applications, reducing the risk of potential vulnerabilities or unauthorized access.
The Android Automotive System Services layer contains further parts, which are as follows:
1. Car Services: Car services are an important part of the Android Automotive Architecture Service Layer. They provide a consistent, secure, and efficient way for applications to interact with the car’s hardware and software. Some examples of these services include CarPropertyService, CarAudioService, CarClimateControlService, and CarNavigationService.
2. Car Managers: Car managers are a set of system managers that provide access to the car’s hardware and software. They are implemented as a set of classes, each of which is responsible for a specific area of the car, such as the audio system, the climate control system, or the navigation system.
Overview of the different Car Managers along with their respective descriptions
Hardware Abstraction Layer (HAL)
The Hardware Abstraction Layer (HAL) plays a crucial role. It acts as a bridge between the vehicle’s hardware, specifically the Electronic Control Units (ECUs), and the rest of the system, including the application framework and system services.
The HAL’s main purpose is to expose standardized interfaces that the system services can use to communicate with the different hardware components inside the vehicle. This creates a “vehicle-agnostic” architecture, meaning that the Android Automotive system doesn’t need to know the specific details of each car’s hardware.
By using the HAL, the system services can interact with the vehicle’s hardware in a consistent and standardized way. This enables data exchange and control of various car functionalities, such as handling sensors, managing displays, and controlling audio and climate systems.
Vehicle HAL: Vehicle HAL is a crucial component in Android Automotive architecture. Its main purpose is to provide a standardized and adaptable way for the system services to communicate with car-specific hardware and functionalities.
The Vehicle HAL provides access to a variety of car-specific features, including:
Signals to/from the ECUs in the vehicle: The ECUs (Electronic Control Units) are the electronic brains of the car. They control everything from the engine to the climate control system. The Vehicle HAL provides access to the signals that are sent between the ECUs, which allows the Android Automotive system to monitor and control the car’s systems.
Signals generated from the vehicle microcontroller unit to the IVI OS: The IVI OS (In-Vehicle Infotainment Operating System) is the software that runs on the car’s infotainment system. The Vehicle HAL provides access to the signals that are generated by the car’s microcontroller unit, which allows the IVI OS to interact with the car’s hardware.
Access to service-oriented functions available on the vehicle network (e.g.: SOME-IP):SOME-IP is a standard for service-oriented communication in vehicles. The Vehicle HAL provides access to the SOME-IP services that are available on the car’s network, which allows the Android Automotive system to communicate with other devices in the car.
Board Support Package (BSP)
In the Android Automotive architecture, BSP stands for “Board Support Package.” It is a crucial component that plays a vital role in making the Android Automotive system compatible with specific hardware configurations, especially System on a Chip (SoC) devices.
System on a Chip (SoC) refers to a type of semiconductor integrated circuit(IC) that incorporates multiple essential components of a computer or electronic system onto a single chip. It is a complete computing system on a single chip, including the central processing unit (CPU), memory, graphics processing unit (GPU), input/output interfaces, and various other components.
System on Chip (SoC): Brain of Smartphones, tablets, laptops, TVs, and cars.
The BSP is an important part of the Android Automotive architecture because it allows the operating system to interact with the car’s hardware. This is necessary for the operating system to run and for applications to function properly.
The BSP is also important because it allows OEMs to customize the car’s infotainment system. OEMs can extend the BSP with their own code and applications, which allows them to add features that are specific to their car.
The BSP is typically developed by the SoC vendor or by an OEM. It is then provided to the Android Automotive team, who integrate it into the Android Automotive operating system.
Linux Kernel: The BSP typically contains the Linux kernel image, which is the core of the operating system. The Linux kernel handles hardware interactions and provides a foundation for running Android on the given hardware platform.
AIDL & HIDL
In the Android Automotive architecture, both AIDL (Android Interface Definition Language) and HIDL (HAL Interface Definition Language) play essential roles in enabling communication between different components of the system.
AIDL (Android Interface Definition Language):
AIDL is a communication interface used primarily for inter-process communication (IPC) between applications running on the Android system.
In Android Automotive, AIDL is used for communication between user applications and system services. It enables apps to interact with system services and access certain functionalities provided by the Android framework.
AIDL is commonly used for remote method invocation, where one application can request services from another application running in a different process.
HIDL (HAL Interface Definition Language):
HIDL is a communication interface used for interacting with the Hardware Abstraction Layer (HAL).
In Android Automotive, HIDL allows system services and other components to communicate with the hardware-specific functionalities of the vehicle.
The HAL abstracts the hardware-specific details and exposes standardized interfaces through HIDL, allowing the rest of the system to interact with the vehicle’s hardware in a consistent manner.
So, AIDL is used for communication between user applications and system services, while HIDL facilitates communication between the Android system services and the Hardware Abstraction Layer (HAL).
Conclusion
This high-level walkthrough of the Android Automotive OS architecture explained how each layer — from apps down to car hardware — connects and interacts. You’ve seen how vehicle data is accessed in a clean and structured way. Whether you’re an OEM building new car platforms or a developer creating in-vehicle apps, this architecture provides a powerful, secure, and modern foundation.
If you’ve been working with Android and Fragments, you’ve probably faced this decision: should I use add() or replace() when switching Fragments?
It might sound simple — but the difference between FragmentTransaction.add() and FragmentTransaction.replace() can lead to bugs, memory leaks, or even unexpected UI behavior if misunderstood.
This guide breaks it down clearly and aligns with modern best practices, especially if you’re using Kotlin and Jetpack components.
What Are add() and replace() in Fragment Transactions?
When working with FragmentManager, you use FragmentTransaction to display Fragments in your app. Two core methods you’ll come across:
add(containerViewId, fragment)
replace(containerViewId, fragment)
Both methods attach a Fragment to your UI, but they do so differently under the hood.
Think of swapping one picture frame for another — the old one is removed completely.
Pros:
Keeps the Fragment stack cleaner
Avoids UI overlap
Saves memory in complex flows
Cons:
Destroys previous Fragment’s state (unless manually handled)
Recreates the old Fragment if you navigate back
So When Should You Use add() or replace()?
Use add() when:
You need to preserve the previous Fragment’s state.
You’re building a flow where users can go back to the same exact screen without reloading it.
You have multiple Fragment layers (like dialogs, bottom sheets, or nested flows).
Use replace() when:
You want a clean switch without preserving the old Fragment.
You don’t need to reuse the previous Fragment state.
You’re swapping between main tabs or screens (e.g., Home → Profile → Settings).
A Quick Reference: add() vs replace()
Feature
add()
replace()
Keeps previous Fragment
Yes
No
Overlaps Fragments
Possible
No
Back stack behavior
Preserves all
Can restore, but recreates
Memory usage
Higher
Lower
Ideal for
Wizard flows, multi-layer UI
Tab switching, top-level views
Pro Tips for Using Fragment add() and replace()
1. Always use addToBackStack() if you want to support back navigation. Without it, pressing back will exit the activity.
2. With add(), make sure to hide() or detach() previous Fragments if you don’t want visual overlap.
Kotlin
val transaction = supportFragmentManager.beginTransaction()transaction.hide(currentFragment)transaction.add(R.id.fragment_container, newFragment)transaction.addToBackStack(null)transaction.commit()
3. If you’re using Jetpack Navigation Component, add() and replace() are abstracted — but under the hood, it still uses replace() behavior.
4. Avoid memory leaks: If using add(), remember that Fragments left in memory can still hold references to Views, Context, etc. Clean them up..!
5. Keep fragment tags consistent when using add() so you can retrieve them via findFragmentByTag() later.
Jetpack Compose Developers — Does This Still Matter?
If you’ve switched to Jetpack Compose, and you’re using NavHost with Navigation Compose, you’re no longer directly dealing with add() or replace().
Compose’s navigation system manages screen state using a backstack model, more akin to replace(). But understanding this topic still matters if:
You’re migrating from legacy Views to Compose.
You’re using Fragments to host Compose screens in a hybrid setup.
Final Verdict: Fragment add() vs replace() — Choose Wisely
Choosing between Fragment add() or replace() is more than just a technical decision — it’s about managing user experience, performance, and memory.
If you’re building dynamic UIs with nested Flows — lean on add() with careful state management.
If you’re keeping your app lean and focused — replace() is your friend.
The key is knowing what each does under the hood, so your Fragment transactions are intentional, predictable, and maintainable.
Over to You
Next time you write a FragmentTransaction, ask yourself:
Do I need the old Fragment to stick around, or not?
That one question will guide you every time.
TL;DR
add() → Keeps old Fragment, good for preserving state.
replace() → Destroys old Fragment, cleaner transitions.
Be careful with overlapping Fragments when using add()
Use addToBackStack() if you want back navigation.
Prefer replace() for main screens, add() for layered UIs.
In the world of Android development, configuration changes are one of those things that often trip up even seasoned developers. You rotate your device, and suddenly your Activity is destroyed and recreated — poof! That counter you were tracking? Gone. Thankfully, Android ViewModel has your back. In this article, we’ll dive deep into how Android ViewModel survives...
Ever heard the phrase “don’t fix what isn’t broken”? In coding, a similar mindset applies: don’t load what you don’t need. This is where Lazy Initialization in Kotlin comes in — a slick way to optimize performance, cut unnecessary processing, and keep your codebase clean.
In this post, we’ll break down what lazy initialization is, how it works in Kotlin, and why it can be a game-changer for your Android apps or any Kotlin-based project.
What Is Lazy Initialization?
Lazy initialization is a technique where you delay the creation of an object or the execution of code until it’s actually needed.
Instead of doing this:
Kotlin
val userProfile = loadUserProfile() // called immediately
You can do this:
Kotlin
val userProfile bylazy { loadUserProfile() } // called only when accessed
That one small change tells Kotlin: “Hey..!, don’t run this until someone actually tries to use userProfile.”
Why Use Lazy Initialization in Kotlin?
Kotlin makes lazy initialization incredibly simple and safe. Here are a few reasons to use it:
Improved performance: Avoid heavy operations at startup.
Memory efficiency: Delay creating large objects until necessary.
Cleaner code: Encapsulate logic without creating unnecessary setup.
Now the ViewModel only gets initialized when you first access viewModel, which can save resources if your fragment has optional UI states or features.
How Lazy Works Under the Hood
When you use by lazy { ... }, Kotlin creates a delegate object that handles initialization. The first time the variable is accessed, the lambda runs and the result is stored. Every future access returns that cached value.
SYNCHRONIZED: Safe for multithreaded access. Overhead of synchronization.
PUBLICATION: May run initializer multiple times on concurrent access, but only one result is stored.
NONE: No thread safety. Fastest, but use only in single-threaded contexts.
Custom Lazy Initialization
Want full control? You can create your own lazy-like delegate:
Kotlin
classCustomLazy<T>(val initializer: () -> T) {// 1. Private backing field to hold the actual valueprivatevar _value: T? = null// 2. Public property to access the value, with a custom gettervalvalue: Tget() {// 3. Check if the value has been initialized yetif (_value == null) {// 4. If not, execute the initializer lambda _value = initializer() }// 5. Return the (now initialized) valuereturn _value!! // !! asserts that _value is not null }}val config = CustomLazy { loadConfig() }.value///////////////////////////////////////////////////////////////////////////////////////////////////// Working Code////////////////////////////////////// 1. Define your CustomLazy classclassCustomLazy<T>(val initializer: () -> T) {privatevar _value: T? = nullvalvalue: Tget() {if (_value == null) {println("--- Calling initializer (loadConfig()) for the first time... ---") _value = initializer()println("--- Initializer finished. ---") } else {println("--- Value already initialized, returning cached value. ---") }return _value!! }}// 2. A sample function that simulates loading configuration// (e.g., from a file, network, or complex calculation)funloadConfig(): String {println(">>> Executing actual loadConfig() function... (This is an expensive operation)")// Simulate some delay or heavy computation Thread.sleep(1000) // Sleep for 1 secondreturn"Application Configuration Data Loaded!"}// 3. Main function to demonstrate the usagefunmain() {println("Application starting...")// This line creates the CustomLazy object, but loadConfig() is NOT called yet.// The lambda { loadConfig() } is merely stored.val lazyConfigInstance = CustomLazy { loadConfig() }println("\nCustomLazy instance created, but config is not loaded yet.")println("You can do other things here before accessing config...\n") Thread.sleep(500) // Simulate some workprintln("Now, let's access the config value for the first time.")// This is where .value is accessed, triggering loadConfig()val config1 = lazyConfigInstance.valueprintln("Config (first access): \"$config1\"")println("\n------------------------------------------------------")println("Accessing config value again (should be instant and not re-run loadConfig())...")// This access will use the cached value; loadConfig() will NOT be called again.val config2 = lazyConfigInstance.valueprintln("Config (second access): \"$config2\"")println("------------------------------------------------------\n")// Another example: If you create a new CustomLazy instance,// loadConfig() will run again when its value is first accessed.println("Creating another CustomLazy instance and accessing it immediately...")val configImmediatelyLoaded = CustomLazy { loadConfig() }.valueprintln("Config (immediately loaded): \"$configImmediatelyLoaded\"")println("\nApplication finished.")}
This is just for learning purposes — Kotlin’s built-in lazy does the job better in most cases.
Pitfalls to Watch Out For
Heavy lambdas: If the initializer does too much, you’re just delaying pain.
Non-idempotent initializers: The initializer should always produce the same result or be side-effect free.
Overuse: Don’t lazy-initialize everything. Use it where it adds real benefit.
Conclusion
Lazy Initialization in Kotlin is a powerful yet simple tool. It shines when you want to keep your app responsive and your code clean. Whether you’re building Android apps, desktop tools, or backend services, Kotlin’s by lazy is an elegant way to write smarter code.
Try it out in your project. Start small. Refactor a few variables. You’ll likely see performance gains with very little effort. And that’s the beauty of Kotlin: it lets you do more with less.
The Android SDK (Software Development Kit) is a powerful suite of tools, libraries, and system images used to develop Android apps. Among its components, two commonly mentioned terms — Android SDK Tools and Android Platform Tools — are often confused or misunderstood.
In this post, we’ll break down what each one really is, whether you still need them, and how they fit into a modern Android development workflow.
Android SDK Tools — Deprecated but Historically Important
What It Was:
Android SDK Tools was a legacy package that included core development utilities used for creating, testing, and debugging Android apps. It provided platform-independent tools necessary for managing Android development environments.
As of Android Studio 3.x, the monolithic SDK Tools package has been deprecated. Its functionality is now split into modular SDK packages like emulator, build-tools, and cmdline-tools, and is managed automatically by Android Studio.
Key Tools (Now Modularized, Moved, or Obsolete):
AVD Manager: For creating and managing Android Virtual Devices (emulators). Now integrated in Android Studio and backed by the emulator and system-images packages.
Emulator: The virtual Android device runner. Now a separate and actively updated component (emulator package).
Lint: Static code analysis tool — now part of the Android Gradle Plugin.
mksdcard: Used to create SD card images for emulators (rarely needed today).
ProGuard: A legacy code shrinking/obfuscation tool — still optionally usable, but replaced by R8 as the default.
DDMS (Dalvik Debug Monitor Server): Deprecated — its features now live in Android Studio’s Profiler, Logcat, and Device Explorer.
Important: You no longer need to manually install or manage Android SDK Tools — Android Studio and the command-line SDK Manager handle everything via modular components.
Android Platform Tools — Actively Maintained and Essential
What It Is:
Android Platform Tools is a core SDK component that includes essential command-line tools used to communicate with Android devices and emulators. Unlike the deprecated SDK Tools, Platform Tools are actively maintained and updated frequently to stay in sync with the latest Android versions.
Key Tools (Still Actively Used):
adb (Android Debug Bridge): A versatile tool to:
Install/uninstall APKs: adb install yourapp.apk
Copy files: adb push, adb pull
View logs: adb logcat
Open a shell: adb shell
Forward ports, record screen, take screenshots, and more
fastboot: Used for flashing firmware or custom recoveries (in bootloader mode)
sqlite3: Query and inspect app databases
dmtracedump, etc1tool, systrace: Diagnostic and visualization tools
Platform Tools are indispensable for real-device debugging, sideloading, recovery operations, and emulator communication.
Common Misunderstandings — Let’s Clarify
Misconception:“Tools like aidl, aapt, dx, dexdump are part of Platform Tools.” Fact: These are part of the Build Tools package. They help with compiling and packaging apps — not with device interaction.
Misconception:“R8 is part of SDK Tools or Platform Tools.” Fact:R8 is integrated into the Android Gradle Plugin, not a standalone SDK tool. It handles code shrinking, obfuscation, and resource optimization during builds.
SDK Tools vs Platform Tools
Feature
Android SDK Tools (Legacy)
Android Platform Tools (Current)
Status
Deprecated since Android Studio 3.x
Actively maintained
Managed via
Old SDK Manager (now replaced)
Android Studio SDK Manager
Purpose
Development environment setup
Device/emulator interaction
Key Tools
AVD Manager, Emulator, DDMS (legacy)
adb, fastboot, sqlite3, dmtracedump
Update Frequency
No longer updated
Frequently updated with platform
Needed Today?
No — handled by Android Studio
Yes — essential for development
Android SDK Tools Vs Platform Tools
Conclusion
Modern Android development no longer requires you to manually manage the old Android SDK Tools package. Android Studio — with its modular SDK components like cmdline-tools, emulator, and build-tools — takes care of everything from virtual device creation to project building through Gradle.
However, Android Platform Tools remain essential. Whether you’re installing APKs on a physical device, debugging over USB or Wi-Fi, or flashing recovery images, tools like adb and fastboot are irreplaceable in any developer’s toolbox.
When in Doubt:
Use Platform Tools to interact with devices/emulators.
Let Android Studio and Gradle manage build, analysis, and emulator creation.
Elementor is a powerful page builder, but it’s no secret that it can slow down your website if not optimized properly. The good news? You can reduce Elementor bloat without losing your design features. In this post, we’ll walk you through actionable steps to clean up the unnecessary load and keep your site fast, user-friendly, and visually appealing.
Why Does Elementor Cause Bloat?
Elementor adds a lot of CSS, JavaScript, and DOM elements to help deliver its drag-and-drop magic. The result? Larger page sizes, longer load times, and decreased performance scores. This bloat can hurt your SEO, UX, and even conversion rates.
But don’t worry—you don’t need to ditch your designs or switch to a new builder. You just need a smarter setup.
1. Use Elementor’s Built-In Performance Features
Elementor > Settings > Experiments now includes several performance-focused tools:
Optimized DOM Output: Reduces unnecessary wrapper divs.
Improved Asset Loading: Loads JS/CSS only when needed.
Inline Font Icons: Stops loading external font icon libraries.
Enable these features and test your site to ensure compatibility.
2. Disable Unused Elementor Widgets
Elementor loads scripts for all widgets—even the ones you don’t use.
How to fix it:
Use the “Elementor Custom Code Snippet” or a plugin like Asset CleanUp or [Plugin Organizer] to disable unused scripts.
Note: Always test after changes to make sure no scripts break.
8. Clean Up the Database
Elementor autosaves and revisions can pile up.
Quick win:
Use WP-Optimize or Advanced Database Cleaner to:
Delete old post revisions
Remove transients
Optimize tables
Less junk = faster queries.
9. Consider a CDN
Using a CDN (like Cloudflare or BunnyCDN) speeds up your site by serving assets from locations closer to your users.
Bonus:
Most CDNs also offer automatic minification, image optimization, and even firewall protection.
Conclusion
Elementor offers unmatched flexibility for designing WordPress websites, but its convenience can come at the cost of performance. Fortunately, reducing Elementor bloat doesn’t mean sacrificing design quality.
By leveraging its built-in optimization settings, disabling unused features, streamlining fonts and media, and utilizing caching, lightweight themes, and a CDN, you can dramatically improve your site’s speed and user experience. With a few strategic tweaks, you’ll keep your site visually stunning — without bogging it down.
Remember: a fast website isn’t just better for SEO and conversions — it’s better for your visitors too.
Whether you’re building your next killer app or debugging a tricky issue late into the night, the look and feel of your development environment matters more than you might think. The appearance theme you choose in Android Studio isn’t just about aesthetics — it directly impacts eye strain, code readability, and even your productivity over time.
The answer: It depends on you — your working hours, visual preferences, screen setup, and personal taste.
In this post, we’ll walk through the most popular Android Studio appearance themes, explore what makes each one stand out, and help you decide which is right for your workflow.
1. Darcula — The Classic Dark Theme
Darcula is the default dark theme in Android Studio, and for good reason.
Why Developers Love It:
Reduced eye strain: The dark background with high-contrast syntax coloring is gentle on the eyes, especially during long coding sessions or at night.
Consistency: As a built-in theme maintained by JetBrains, Darcula ensures stability and compatibility with every Android Studio release.
Minimal distractions: The muted tones help keep your focus on the code.
Things to Consider:
The color palette may feel a bit dull or washed out to some developers who prefer more vibrant UI elements.
Limited customization compared to third-party themes.
Best for: Developers who prefer a no-nonsense, stable dark theme that works well in all lighting conditions.
2. IntelliJ Light — For Fans of Brighter UIs
Not everyone loves dark themes, and IntelliJ Light offers a crisp, bright alternative.
Why It Works:
Great for daylight use: If you’re working in a well-lit environment or near a window, this theme can feel more natural and easier to read.
Professional and clean: Screenshots and presentations with a light theme tend to look better, especially in documents or tutorials.
Downsides:
Prolonged use in low-light settings may cause more eye fatigue.
Some developers find bright UIs too harsh after extended periods.
Best for: Those who work in bright environments or simply find dark themes hard to read.
3. One Dark / One Dark Pro — A VS Code Favorite, Now in Android Studio
If you’ve ever used Visual Studio Code, you’ve probably encountered the One Dark theme — now ported to Android Studio as well.
Why It’s Popular:
Balanced aesthetics: One Dark strikes a great balance between dark backgrounds and colorful, legible syntax highlighting.
Modern look: It feels more polished than Darcula, with just enough visual flair to keep things fresh.
Plugin availability: You can install this theme via Android Studio’s plugin marketplace.
Potential Drawbacks:
May need manual tweaks if you’re looking for colorblind accessibility.
Slightly more saturated than Darcula, which could be distracting for some.
Best for: Developers seeking a refined, modern dark theme with better contrast and color separation.
4. Material Theme UI Plugin — Where Beauty Meets Customization
If you want your IDE to be as gorgeous as your code, the Material Theme UI plugin is a must-try. It brings Material Design principles to Android Studio, offering multiple themes under one roof.
Popular Variants Include:
Material Oceanic
Material Darker
Monokai
Arc Dark
What Makes It Stand Out:
Highly customizable: Beyond themes, you can tweak the look of scrollbars, icons, status bars, and more.
Vibrant and stylish: The themes are eye-catching without being overbearing.
Regularly updated: Maintained by the open-source community with ongoing improvements.
Things to Watch:
Can slow down Android Studio slightly on older machines.
Might feel a bit too “busy” if you prefer minimal UIs.
Best for: Developers who want their IDE to look sleek, modern, and highly personalized.
5. Solarized Light & Solarized Dark — A Color Theory Masterpiece
Designed with scientific precision, the Solarized color palette is built to reduce eye fatigue while improving readability.
Why It’s Unique:
Color balance: Uses sixteen carefully chosen hues optimized for both dark and light modes.
Ideal for long hours: The subtle contrast helps reduce visual fatigue without sacrificing syntax clarity.
Cross-platform consistency: Works well across terminals, code editors, and other tools.
Possible Limitations:
Some developers find the pastel tones a bit too soft or outdated.
Not included by default — must be installed via plugins or imported manually.
Best for: Developers with sensitive eyes or those who appreciate color harmony in their editor.
Bonus Tip: Pair Your Theme with a Great Font
No matter which theme you choose, your experience can be dramatically improved by switching to a better coding font. Here are a few favorites:
JetBrains Mono: Clean, readable, and comes with Android Studio.
Fira Code: Features ligatures that make reading complex code easier.
Cascadia Code: A Microsoft font with friendly curves and good ligature support.
You can update your font by going to:
HTML
Preferences (or Settings) > Editor > Font
So, Which Theme Should You Use?
The best theme is the one that feels comfortable, readable, and makes you want to code more. Here’s a quick summary:
Conclusion
Your Android Studio theme isn’t just decoration — it’s part of your workspace, your mindset, and your daily developer experience. Choosing the right one can make a real difference in how you feel and perform throughout the day.
Experiment with a few of the themes above. Find the one that speaks to you — not just visually, but practically. After all, great code starts with a comfortable environment.
In today’s digital landscape, having a fast and user-friendly website isn’t just a nice-to-have — it’s absolutely essential. Google’s Core Web Vitals are at the heart of this shift, measuring critical aspects of user experience that directly impact your site’s visibility in search rankings.
But what exactly are Core Web Vitals? Why do they matter? And how can you measure and improve them?
In this guide, we’ll walk you through everything you need to know, with simple explanations, and actionable tips.
What Are Core Web Vitals?
Core Web Vitals are a set of specific website performance metrics introduced by Google to measure real-world user experience. They focus on how quickly a page loads, how soon it becomes interactive, and how visually stable it is while loading.
In short:
Core Web Vitals = How fast, smooth, and stable your website feels to real users.
These vitals are part of Google’s broader Page Experience ranking signals, meaning they have a direct influence on how your pages perform in organic search results.
Why Are Core Web Vitals Important?
Google’s goal has always been to serve users the best and most useful web pages. A slow, jumpy, or unresponsive page frustrates users — and Google wants to avoid recommending such experiences.
If your website nails the Core Web Vitals, you not only boost user satisfaction but also:
Improve SEO rankings
Increase engagement and conversions
Reduce bounce rates
Build long-term brand trust
In a world increasingly shaped by AI, user-first optimization is no longer optional — it’s a necessity.
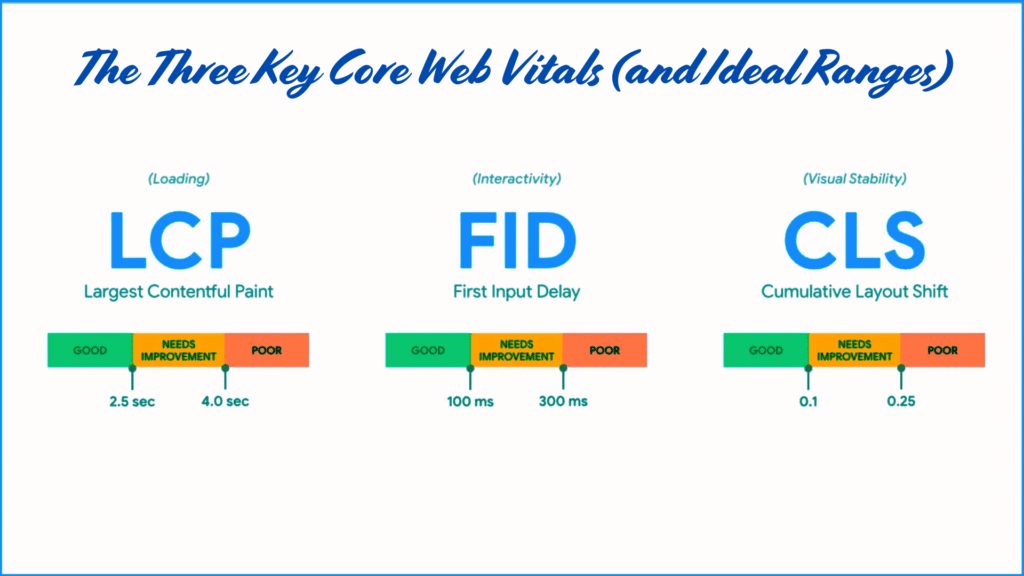
The Three Key Core Web Vitals (and Ideal Ranges)
Let’s break down the three main metrics you need to master:
1. Largest Contentful Paint (LCP)
What it measures:
How long it takes for the largest visible content (like an image, hero banner, or main text block) to fully load in the viewport.
Why it matters:
Users judge a page’s loading speed based on how fast they see important content. If LCP is slow, they may abandon your site.
Ideal LCP score:
≤ 2.5 seconds for a good user experience.
2. First Input Delay (FID)
What it measures:
The time it takes for your site to respond after a user first interacts (like clicking a button, tapping a link, or filling a form).
Why it matters:
Slow interactivity frustrates users, especially on mobile. A fast FID ensures that your site feels responsive and smooth.
Ideal FID score:
≤ 100 milliseconds.
Important: Starting in March 2024, Google is replacing FID with INP (Interaction to Next Paint) for even more accurate interactivity measurement.
Ideal INP score:
≤ 200 milliseconds.
3. Cumulative Layout Shift (CLS)
What it measures:
How much content unexpectedly moves around while the page is loading.
Why it matters:
Layout shifts cause misclicks, bad experiences, and user frustration — especially on mobile devices.
Ideal CLS score:
≤ 0.1.
How to Measure Core Web Vitals: 5 Powerful Tools
Optimizing Core Web Vitals starts with accurate measurement. Here are the best tools to help you diagnose and fix performance issues:
Tracks your entire site’s Core Web Vitals performance.
Groups pages into “Good,” “Needs Improvement,” and “Poor.”
Highlights problematic URLs for prioritization.
Best for: Monitoring performance across all indexed pages.
3. Lighthouse (Built into Chrome DevTools)
How to use:
Right-click on any webpage → Inspect → Go to Lighthouse tab → Generate a report.
Features:
Deep audit covering performance, SEO, accessibility, and best practices.
Provides a clear breakdown of issues affecting Core Web Vitals.
Best for: Detailed technical audits and advanced troubleshooting.
4. Chrome User Experience Report (CrUX)
The Chrome User Experience Report (CrUX) is a public dataset provided by Google that measures how real-world Chrome users experience popular websites on the internet.
Features:
Collects real-world performance data from opted-in Chrome users.
Provides insights into actual user experiences at scale.
Best for: Real-user monitoring and data validation.
5. Web Vitals Chrome Extension
Where to get it: Chrome Web Store.
Features:
Displays live Core Web Vitals data as you browse.
Instantly shows if a page passes Google’s thresholds.
Best for: On-the-fly live testing.
Pro Tips to Boost Core Web Vitals
Optimize images and use modern formats like WebP.
Use lazy loading to defer off-screen images.
Minify CSS, JavaScript, and HTML.
Prioritize critical CSS and defer non-essential JS.
Use server-side rendering or static site generation if possible.
Conclusion
In a world where milliseconds matter, Core Web Vitals are your roadmap to building a faster, more reliable, and more user-friendly website.
By focusing on:
Speed (LCP),
Interactivity (FID/INP),
Stability (CLS),
you’re not just chasing Google’s algorithms — you’re truly creating better experiences for real people.
Remember: Websites that prioritize user experience today will be the brands that thrive tomorrow.
FAQs
Q1: What is the minimum passing score for Core Web Vitals? To pass, a page should meet the ideal range for all three metrics (LCP, FID/INP, CLS).
Q2: How often should I check Core Web Vitals? It’s best to monitor them monthly or after major updates.
Q3: Will Core Web Vitals alone guarantee top Google rankings? No, but they’re a critical ranking factor — combined with high-quality, relevant content, they significantly boost your chances.