
If you’ve ever caught yourself doing the same digital task over and over — copying data from one app to another, sending the same type of email, checking for updates manually — you already understand why automation exists.
n8n is the tool that makes all of that disappear.
Unlike many automation platforms that lock you into their ecosystem, n8n gives you something rare: the power to run it yourself, customize it completely, and connect it to almost anything — including AI models. Whether you’re a solo developer, a growing startup, or a technical team lead, n8n meets you where you are.
This guide is not a surface-level overview. We’re going deep — from installing n8n and building your first workflow to writing custom JavaScript nodes and deploying AI agents that can think, decide, and act on your behalf.
Let’s get into it.
What Is n8n and Why Should You Care?
n8n (pronounced “n-eight-n,” short for “nodemation”) is an open-source workflow automation platform. Think of it as the connector layer between every app, API, database, and service you use.
Here’s what makes n8n different from the crowd:
- It’s open-source. You can self-host it, inspect its code, and modify it freely.
- It supports code. When the visual editor isn’t enough, you can drop in JavaScript or Python directly.
- It has native AI capabilities. n8n has built-in support for LangChain, OpenAI, Anthropic, and other AI tools — making it one of the best platforms for building AI agents.
- It’s node-based. Every action in n8n is a “node,” and you connect nodes visually to create workflows.
If you’ve used Zapier or Make (formerly Integromat), you already have a mental model for what n8n does. But n8n goes further — it’s more flexible, more powerful, and far more customizable.
n8n vs. Other Automation Tools
Before you invest time learning a tool, it’s worth understanding where it stands.
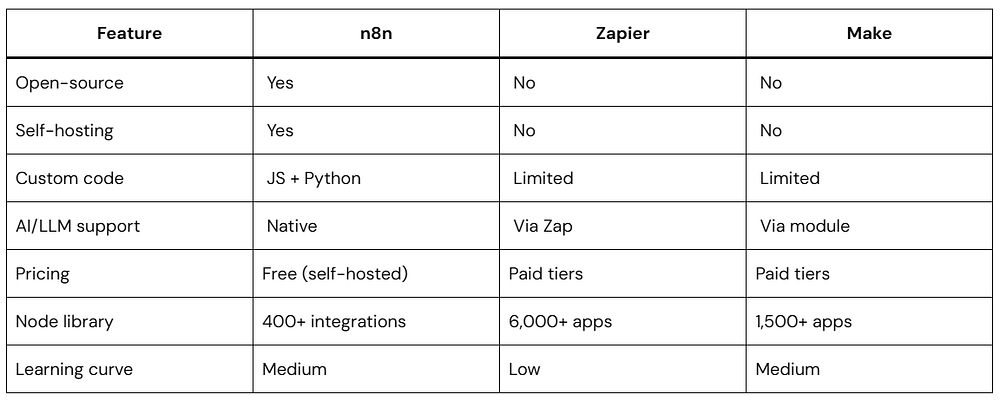
The trade-off is real: n8n requires more setup than Zapier, but you gain control, cost savings (especially at scale), and capabilities that the others simply can’t match — especially when it comes to AI workflows.
Installing n8n: Three Ways to Get Started
Option A: Run It Locally with npx (Fastest)
If you have Node.js installed (version 18 or higher), this is the quickest way to try n8n:
npx n8n
That’s it. n8n will download, start, and open in your browser at http://localhost:5678.
Note: This runs n8n in memory. Data won’t persist between restarts unless you configure a database.
Option B: Install Globally with npm
For a more stable local setup, install n8n globally:
npm install -g n8n
Then start it anytime with:
n8n start
To keep your workflow data between restarts, set an environment variable pointing to a persistent folder:
export N8N_USER_FOLDER=/home/yourname/.n8n
n8n start
Option C: Docker (Recommended for Production)
Docker is the cleanest way to run n8n in production. Create a docker-compose.yml file like this:
version: '3.8'

services:
  n8n:
    image: n8nio/n8n
    restart: always
    ports:
      - "5678:5678"
    environment:
      - N8N_BASIC_AUTH_ACTIVE=true
      - N8N_BASIC_AUTH_USER=admin
      - N8N_BASIC_AUTH_PASSWORD=your_secure_password
      - N8N_HOST=your-domain.com
      - N8N_PORT=5678
      - N8N_PROTOCOL=https
      - WEBHOOK_URL=https://your-domain.com/
      - DB_TYPE=postgresdb
      - DB_POSTGRESDB_HOST=postgres
      - DB_POSTGRESDB_DATABASE=n8n
      - DB_POSTGRESDB_USER=n8n_user
      - DB_POSTGRESDB_PASSWORD=your_db_password
    volumes:
      - n8n_data:/home/node/.n8n
  postgres:
    image: postgres:15
    restart: always
    environment:
      - POSTGRES_DB=n8n
      - POSTGRES_USER=n8n_user
      - POSTGRES_PASSWORD=your_db_password
    volumes:
      - postgres_data:/var/lib/postgresql/data
volumes:
  n8n_data:
postgres_data:N8N_BASIC_AUTH_ACTIVE— Enables a login screen so only you can access the instance.DB_TYPE=postgresdb— Uses PostgreSQL for storing workflow data reliably (better than SQLite for production).WEBHOOK_URL— Tells n8n what public URL to use when generating webhook links for external services.- The
volumessection maps persistent storage so your data survives container restarts.
Start it with:
docker-compose up -d
Understanding the n8n Interface
Once you open n8n, you’ll see a canvas-based editor. Here’s what each part does:
Canvas: The main area where you drag, drop, and connect nodes. Think of it as your visual workflow builder.
Node Panel (left sidebar): A searchable library of all available integrations and utility nodes. Click any node to add it to the canvas.
Node Settings (right panel): When you click a node on the canvas, its configuration appears here — inputs, outputs, credentials, and options.
Executions Tab: A history of every time your workflow ran, with full input/output data for debugging.
Credentials Manager: A secure vault for storing API keys, OAuth tokens, and database passwords. You set these once and reference them across workflows.
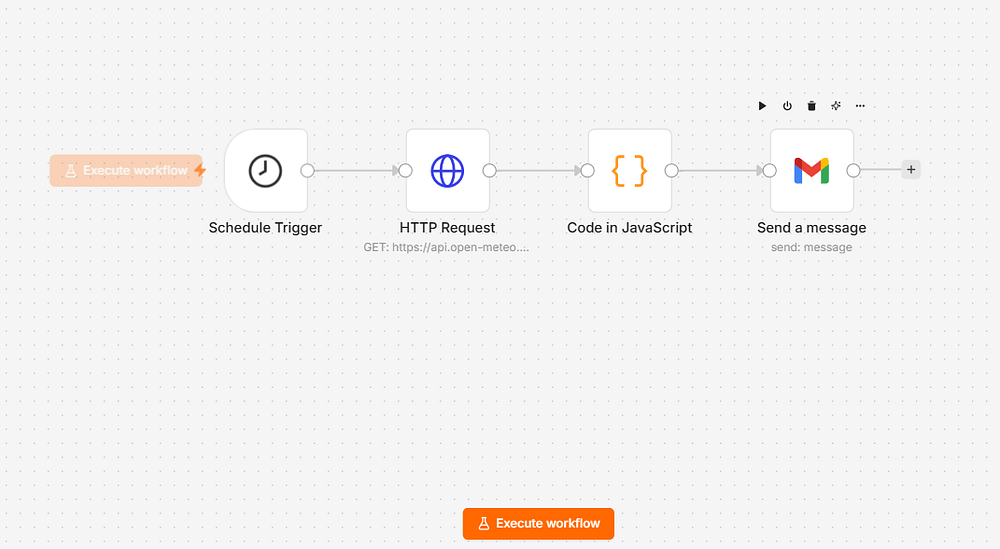
Your First Workflow: A Real-World Example
Let’s build something practical: a workflow that checks a weather API every morning and sends you an email summary.
Step 1: Add a Schedule Trigger
Click the + button or search for “Schedule” in the node panel. Add the Schedule Trigger node.
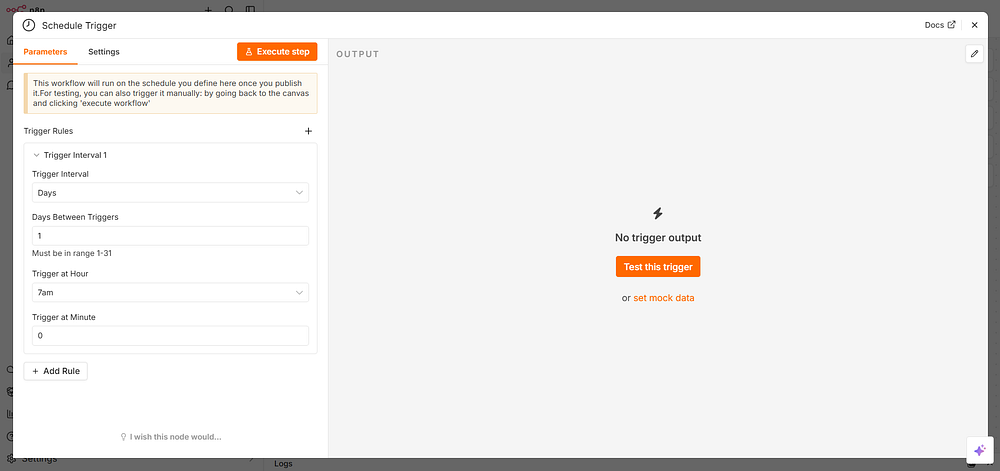
Configure it:
- Rule: Every Day
- Hour: 7 (for 7:00 AM)
- Minute: 0
This node fires automatically at 7 AM every day — no code needed.
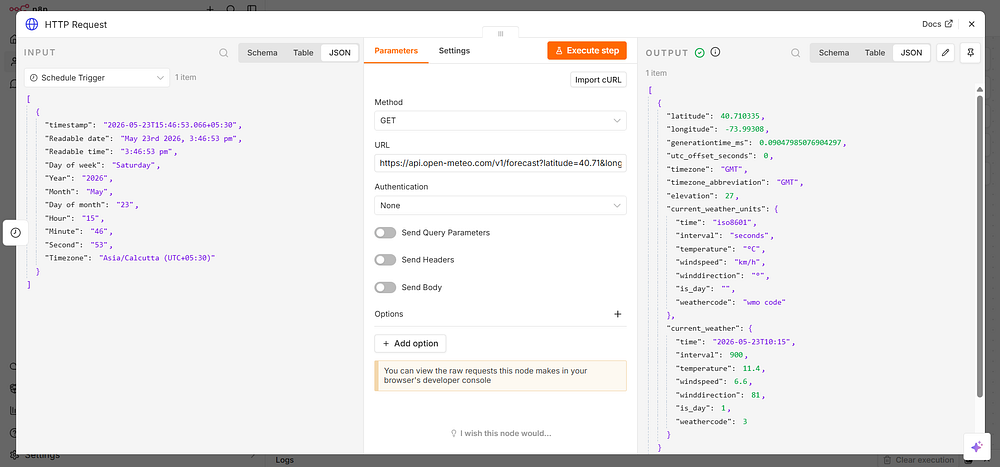
Step 2: Fetch Weather Data
Add an HTTP Request node and connect it to the Schedule Trigger.
Configure it:
- Method: GET
- URL:
https://api.open-meteo.com/v1/forecast?latitude=40.71&longitude=-74.01¤t_weather=true
This hits the free Open-Meteo API to get current weather for New York (no API key needed). You’ll get back JSON data like:
[
  {
    "latitude": 40.710335,
    "longitude": -73.99308,
    "generationtime_ms": 0.09047985076904297,
    "utc_offset_seconds": 0,
    "timezone": "GMT",
    "timezone_abbreviation": "GMT",
    "elevation": 27,
    "current_weather_units": {
      "time": "iso8601",
      "interval": "seconds",
      "temperature": "°C",
      "windspeed": "km/h",
      "winddirection": "°",
      "is_day": "",
      "weathercode": "wmo code"
    },
    "current_weather": {
      "time": "2026-05-23T10:15",
      "interval": 900,
      "temperature": 11.4,
      "windspeed": 6.6,
      "winddirection": 81,
      "is_day": 1,
      "weathercode": 3
    }
  }
]
Step 3: Format the Data
Add a Code node. Connect it to the HTTP Request node. Paste this JavaScript:
// Extract weather data from the previous node's output
const weather = $input.first().json.current_weather;

// Map weather codes to human-readable descriptions
const weatherDescriptions = {
  0: 'Clear sky',
  1: 'Mainly clear',
  2: 'Partly cloudy',
  3: 'Overcast',
  45: 'Foggy',
  51: 'Light drizzle',
  61: 'Slight rain',
  80: 'Rain showers',
  95: 'Thunderstorm'
};
const description = weatherDescriptions[weather.weathercode] || 'Unknown conditions';
// Return a formatted object for the next node
return [{
  json: {
    temperature: `${weather.temperature}°C`,
    windspeed: `${weather.windspeed} km/h`,
    conditions: description,
    summary: `Good morning! Today's weather: ${description}, ${weather.temperature}°C with winds at ${weather.windspeed} km/h.`
  }
}];
Here,
$input.first().json— grabs the output from the previous node (the HTTP response).weatherDescriptions— a simple lookup table that converts API codes (like1,61) into readable words.- The
returnstatement passes formatted data forward to the next node. n8n always expects an array of objects with ajsonkey.
[
  {
    "temperature": "11.4°C",
    "windspeed": "6.6 km/h",
    "conditions": "Overcast",
    "summary": "Good morning! Today's weather: Overcast, 11.4°C with winds at 6.6 km/h."
  }
]
Step 4: Send the Email
Add a Send Email node (or Gmail, if you prefer). Connect it to the Code node.
Configure it:
- To: [email protected]
- Subject:
Daily Weather Update - Message: Click the expression icon
{}next to the field and type:
{{ $json.summary }}This pulls the summary field from the Code node’s output directly into the email body.

Note: Allow all OAuth scopes for it to work properly.

Step 5: Test and Activate
Click Execute Workflow to run it immediately and verify the email arrives. If everything looks good, toggle Active in the top-right corner.
Your first n8n automation is live.
n8n recommends self-hosting for experienced users only. Configuration mistakes can lead to downtime, security risks, or data loss. If you’re just trying out n8n or want to save time on setup and configuration, use n8n Cloud.
Core n8n Concepts You Must Know
Nodes
Every action in n8n is a node. There are several types:
- Trigger nodes — Start a workflow (schedule, webhook, app event)
- Regular nodes — Do something (HTTP request, send email, query database)
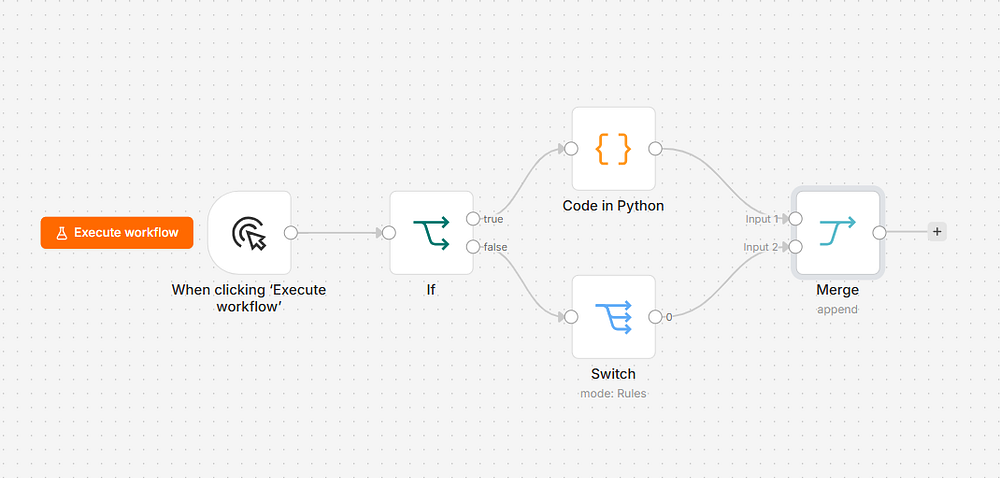
- Core nodes — Transform or control data flow (IF, Switch, Merge, Code, Set)
- AI nodes — Interact with language models and AI tools
Items
n8n processes data as items — each item is a JSON object. A node can output one item or hundreds. Understanding this is key to working with lists, loops, and batch operations.
For example, if you fetch a list of 10 customers from a database, n8n creates 10 items — one per customer. Every downstream node then runs once per item by default.
Expressions
Expressions let you reference data dynamically using the {{ }} syntax.
{{ $json.email }}            → Current item's email field
{{ $node["HTTP Request"].json.id }}  → Specific field from a named node
{{ $now.toISO() }}           → Current timestamp
{{ $workflow.id }}            → Current workflow ID
Connections
You connect nodes by dragging from one node’s output dot to another node’s input dot. Data flows left to right. A node can have multiple outputs (used in IF/Switch nodes for branching).
Working with Data in n8n
The Set Node
Use the Set node to add, rename, or remove fields from your data.
Example use case: You get a response from an API with a field called cust_id, but downstream you need it called customerId. The Set node handles that rename cleanly without writing code.
The Code Node
When the visual nodes aren’t enough, the Code node lets you write raw JavaScript (or Python) to transform data any way you need.
Here’s a practical example — flattening a nested API response:
// Input: items with nested address objects
// Goal: pull city and country up to the top level

return $input.all().map(item => {
  const data = item.json;

  return {
    json: {
      name: data.name,
      email: data.email,
      city: data.address?.city || 'Unknown',
      country: data.address?.country || 'Unknown',
      // Drop the nested address object
    }
  };
});$input.all()— returns every item from the previous node as an array..map()— transforms each item and returns a new version.- Always return
{ json: { ... } }— n8n requires this structure. - Use optional chaining (
?.) to safely handle fields that might be missing.
The Merge Node
When two branches of a workflow need to come back together, the Merge node handles it.

You can merge by:
- Append — combine all items from both branches into one list
- Merge By Key — join two datasets like a SQL JOIN (match records by a shared field like
id) - Multiplex — combine every item from Branch A with every item from Branch B
HTTP Requests and API Integrations
Most real-world n8n workflows involve calling external APIs. Here’s everything you need to know.
Basic GET Request
Method: GET
URL: https://api.softaai.com/users
Headers:
  Authorization: Bearer {{ $credentials.apiToken }}
POST Request with a JSON Body
When sending data to an API:
Method: POST
URL: https://api.softaai.com/orders
Body Content Type: JSON
Body:
{
  "customer_id": "{{ $json.customerId }}",
  "product": "{{ $json.product }}",
  "quantity": {{ $json.quantity }}
}
Handling Pagination
Many APIs return results in pages. Here’s an n8n pattern using a Loop node:
- Start with page 1
- Fetch data
- Check if there’s a
next_pagein the response - If yes, increment the page number and loop back
- If no, exit the loop and merge all collected data

You can implement this with the Loop Over Items node combined with a Code node that tracks state:
// Code node: check if we should continue fetching
const response = $input.first().json;

// If the API returns a next_page_token, keep going
if (response.next_page_token) {
  return [{
    json: {
      ...response,
      shouldContinue: true,
      nextToken: response.next_page_token
    }
  }];
}
// Otherwise, signal we're done
return [{
  json: {
    ...response,
    shouldContinue: false
  }
}];
Writing Custom JavaScript in n8n
The Code node is where n8n becomes genuinely powerful. Here are patterns you’ll use constantly.
Filtering Items
// Only keep customers who signed up in the last 30 days
const thirtyDaysAgo = new Date();
thirtyDaysAgo.setDate(thirtyDaysAgo.getDate() - 30);

return $input.all().filter(item => {
  const signupDate = new Date(item.json.created_at);
  return signupDate >= thirtyDaysAgo;
}).map(item => ({ json: item.json }));
Grouping Items
// Group orders by customer ID
const orders = $input.all();
const grouped = {};

for (const order of orders) {
  const customerId = order.json.customer_id;

  if (!grouped[customerId]) {
    grouped[customerId] = {
      customer_id: customerId,
      orders: [],
      total: 0
    };
  }

  grouped[customerId].orders.push(order.json);
  grouped[customerId].total += order.json.amount;
}

// Return one item per customer
return Object.values(grouped).map(group => ({ json: group }));
Working with Dates
// Format a timestamp for a report
const item = $input.first().json;
const date = new Date(item.timestamp);

return [{
  json: {
    ...item,
    formatted_date: date.toLocaleDateString('en-US', {
      weekday: 'long',
      year: 'numeric',
      month: 'long',
      day: 'numeric'
    }),
    days_since: Math.floor((Date.now() - date) / (1000 * 60 * 60 * 24))
  }
}];
Making HTTP Calls Inside Code Nodes
n8n’s Code node supports $http for making API calls directly from JavaScript:
// Fetch additional data for each item
const results = [];

for (const item of $input.all()) {
  const userId = item.json.id;

  // Make an API call for each user
  const response = await $http.get({
    url: `https://api.softaai.com/users/${userId}/profile`,
    headers: {
      'Authorization': 'Bearer your_token_here'
    }
  });

  results.push({
    json: {
      ...item.json,
      profile: response.data
    }
  });
}

return results;
Important: Use
awaitfor async operations inside Code nodes. n8n handles the async context for you.
Error Handling and Workflow Reliability
Production workflows fail. An API goes down, a webhook sends unexpected data, a rate limit kicks in. n8n gives you tools to handle this gracefully.
Try/Catch in Code Nodes
try {
  const data = $input.first().json;

  // Validate required fields
  if (!data.email) {
    throw new Error('Missing required field: email');
  }

  const processedEmail = data.email.toLowerCase().trim();

  return [{
    json: {
      ...data,
      email: processedEmail,
      processed: true
    }
  }];

} catch (error) {
  // Return error info instead of crashing the workflow
  return [{
    json: {
      error: true,
      errorMessage: error.message,
      originalData: $input.first().json
    }
  }];
}
The Error Trigger Node
n8n has a built-in Error Trigger node. Create a separate “error handling” workflow, start it with an Error Trigger, and configure your main workflows to call it on failure.

Your error workflow can:
- Send you a Slack message with the error details
- Log the error to a Google Sheet
- Retry the failed workflow after a delay
- Create a ticket in your project management tool
Setting Up Retries
For any node that makes an external call, you can enable retries in the node settings:
- Retry On Fail: Enabled
- Max Tries: 3
- Wait Between Tries: 5000ms (5 seconds)
This is especially useful for flaky APIs or rate-limited services.
Building AI-Powered Workflows in n8n
This is where n8n truly pulls ahead of other automation tools. n8n has native LangChain integration, meaning you can build sophisticated AI pipelines visually.
- Add a Chat OpenAI (OpenAI Chat Model) node to your workflow
- Click on Credentials → Create New
- Paste your OpenAI API key
- Configure the model, temperature, and system prompt
A basic AI summarization workflow:
Schedule Trigger → RSS Feed → OpenAI Chat → Send Email

The OpenAI node configuration:
Model: gpt-4o
System Prompt: You are a professional summarizer. Take the article text provided and return a 3-sentence summary that captures the key points. Be concise and factual.
User Message: {{ $json.content }}
Classifying Data with AI
Here’s a workflow that uses n8n + OpenAI to automatically categorize customer support emails:
Gmail Trigger → Code Node (extract body) → OpenAI → IF Node → Route to correct team
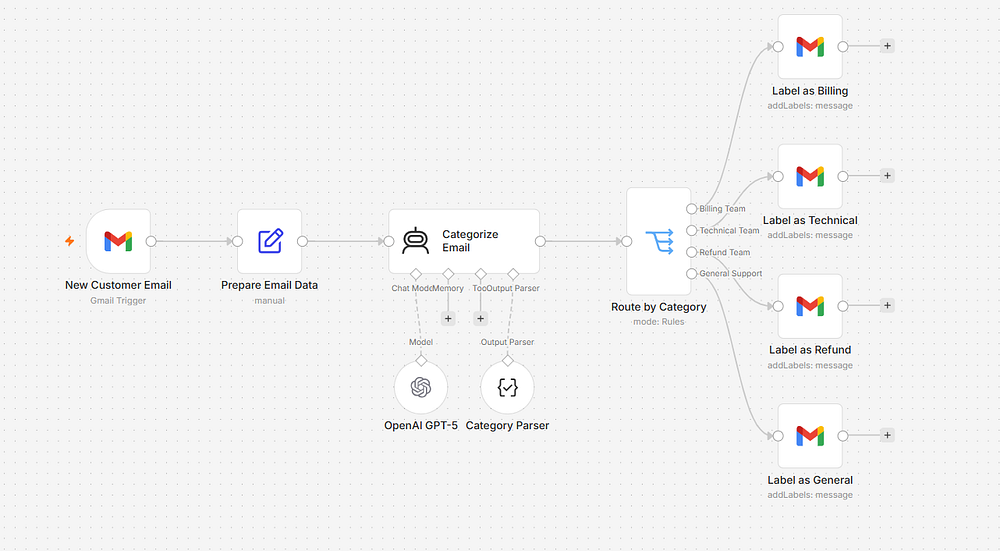
The Code node that prepares the prompt:
const email = $input.first().json;

return [{
  json: {
    emailId: email.id,
    from: email.from,
    subject: email.subject,
    body: email.snippet,
    prompt: `Classify this customer email into exactly one category: BILLING, TECHNICAL, GENERAL, or REFUND.
Email Subject: ${email.subject}
Email Body: ${email.snippet}
Respond with only the category name, nothing else.`
  }
}];
The OpenAI node uses {{ $json.prompt }} as the user message. The output goes into an IF node that checks {{ $json.message.content }} for the category name.
n8n AI Agents: The Next Level
An AI agent in n8n isn’t just a node that calls an LLM — it’s a workflow that can reason, use tools, and take actions based on that reasoning.
n8n’s Agent node supports the ReAct (Reasoning + Acting) pattern. Here’s what that means in practice:
You give the agent:
- A goal (“Research this company and summarize what they do”)
- A set of tools it can use (web search, database lookup, email sending)
- A starting input
The agent then decides which tools to use, in what order, and when it’s done — without you hardcoding that logic.
Building an AI Research Agent
Here’s a full agent setup in n8n:
Trigger → AI Agent Node
Agent Node configuration:
System Message:
You are a business research assistant. When given a company name, you will:
1. Search for their website and core business description
2. Look for recent news about the company
3. Summarize your findings in 3-5 bullet points

Always be factual. If you can't find information, say so clearly.
Tools connected to the agent:
- HTTP Request tool — lets the agent fetch web pages
- SerpAPI tool — lets the agent run Google searches
- Code tool — lets the agent run JavaScript for data processing

The agent decides autonomously which tools to invoke and how many times. You just pass in the company name and get back a structured research report.
Memory in n8n Agents
For agents that need to remember context across multiple runs (like a customer service bot), connect a Memory node:
- Window Buffer Memory — remembers the last N messages in a conversation
- Postgres Chat Memory — stores conversation history in a database for long-term persistence
Example: A support chatbot that remembers what a customer said 3 messages ago:
Chat Trigger → AI Agent (with Window Buffer Memory → OpenAI) → Respond to Chat
The Memory node automatically retrieves and injects previous messages into the agent’s context — no extra code needed.
Scheduling, Triggers, and Real-Time Automation
Types of Triggers in n8n
Schedule Trigger Runs workflows on a fixed schedule. Uses cron syntax for precision:
Every weekday at 9 AM:    0 9 * * 1-5
Every 15 minutes:         */15 * * * *
First day of each month:  0 0 1 * *
Webhook Trigger Creates an HTTP endpoint that external services can call. n8n gives you a unique URL like:
https://your-n8n-instance.com/webhook/your-unique-id
Paste this into any service that supports webhooks (GitHub, Stripe, Typeform, etc.) and the workflow fires automatically when an event happens.
App Event Triggers Many native n8n integrations include event-based triggers. For example:
- Gmail trigger: fires when a new email arrives matching your filter
- Slack trigger: fires when someone posts in a specific channel
- GitHub trigger: fires on pull request, push, or issue creation
Testing Webhooks Locally
When developing locally, external services can’t reach localhost. Use a tunneling tool:
# Using ngrok
ngrok http 5678

# This gives you a public URL like:
# https://abc123.ngrok.io → http://localhost:5678
Set your WEBHOOK_URL environment variable to the ngrok URL, and webhook testing works perfectly from your local machine.
n8n Best Practices for Production Workflows
After building dozens of workflows, these are the habits that separate clean, maintainable automations from ones that break at 3 AM.
Name Everything
Every node in n8n has a name. Use it. Instead of “HTTP Request1” and “HTTP Request2,” name them “Fetch Customer Data” and “Update Order Status.” Future-you will thank current-you.
Use Environment Variables for Secrets
Never hardcode API keys, passwords, or URLs in your workflow. Use n8n’s Credentials system for authentication, and environment variables for configuration:
# In your .env or Docker environment
N8N_API_BASE_URL=https://api.n8n.com
SLACK_WEBHOOK_URL=https://hooks.slack.com/...
Access them in workflows via $env.N8N_API_BASE_URL.
Keep Workflows Focused
One workflow should do one thing well. Instead of a 40-node mega-workflow, break it into:
- Workflow A: Collect and validate data
- Workflow B: Process and enrich data
- Workflow C: Send notifications
Use the Execute Workflow node to chain them together. This makes debugging infinitely easier.
Add Monitoring
For important workflows, add a final node that logs the result:
// Logging node at the end of critical workflows
const result = $input.first().json;
const timestamp = new Date().toISOString();

// Log to your monitoring system
console.log(JSON.stringify({
  workflow: $workflow.name,
  timestamp,
  itemsProcessed: $input.all().length,
  success: true
}));

return $input.all();
Test Edge Cases
Before activating a workflow, manually test it with:
- An empty dataset (what happens with zero items?)
- Missing required fields
- Unexpected data types (string where a number is expected)
- Very large datasets
Common n8n Mistakes and How to Avoid Them
Mistake 1: Forgetting that nodes process items individually
By default, most nodes run once per item. If you have 100 items and add an HTTP Request node, it makes 100 separate API calls. This can blow through rate limits fast.
Fix: Use the Split In Batches node to process items in groups, with delays between batches.
Mistake 2: Not pinning test data
When you run a test, n8n captures the output of each node. You can pin this data so the node always returns it during development, even if the real API is down.
Click the pin icon on any executed node to lock its output. This is huge for building workflows that depend on external services you don’t want to call repeatedly.
Mistake 3: Using the wrong data reference
There’s a common confusion between:
$json— refers to the current item’s data$node["Node Name"].json— refers to a specific node’s output
If your expression returns undefined, double-check which one you need.
Mistake 4: Ignoring the Executions tab
Every workflow run is logged in the Executions tab with full input/output data at every node. This is your best debugging tool. Get in the habit of checking it the moment something behaves unexpectedly.
Mistake 5: Not handling null/undefined values
APIs return inconsistent data. A field might exist in 99 records and be missing from 1. Always use defensive coding:
// Dangerous
const city = item.json.address.city;

// Safe
const city = item.json?.address?.city ?? 'Not specified';
Frequently Asked Questions
Q: Is n8n really free?
n8n’s self-hosted version is free and open-source under the Sustainable Use License. The cloud version (n8n.io) has a free tier and paid plans. For most solo developers and small teams, self-hosting on a $5–10/month VPS is the most cost-effective option.
Q: How many integrations does n8n have?
As of 2026, n8n has over 400 built-in integrations — covering CRMs, email providers, databases, cloud storage, payment processors, communication tools, and AI platforms. Plus, the HTTP Request node lets you connect to any service with an API, even if there’s no native node.
Q: Can n8n replace a backend developer?
For straightforward automation tasks and API orchestration, absolutely yes. For complex business logic, high-traffic applications, or custom user-facing features — n8n handles a lot, but you’ll likely want it as a complement to a codebase rather than a replacement for one.
Q: Is n8n secure for handling sensitive data?
Self-hosted n8n keeps all data within your own infrastructure. Credentials are encrypted at rest. For regulated industries (healthcare, finance), self-hosting with proper access controls, SSL, and audit logging is entirely viable. Review n8n’s security documentation and ensure your server follows standard hardening practices.
Q: How does n8n compare to building automation with code?
n8n is dramatically faster for building automation than writing it from scratch. What might take a developer a full day to build (API integrations, error handling, scheduling, logging) takes minutes in n8n. The Code node ensures you’re never blocked when you hit the limits of the visual editor.
Conclusion
n8n is one of those tools that genuinely changes how you work. Once you start building workflows, you’ll find yourself automating things you never thought to question — and getting hours of your week back.
Start small. Build the weather email workflow from this guide. Then add a second step. Then try connecting it to an AI model. Before long, you’ll have a personal automation layer that runs silently in the background, handling dozens of repetitive tasks while you focus on the work that actually matters.
The best automation is the one you build today — even if it’s imperfect. n8n makes iteration fast, and every workflow you ship teaches you something that makes the next one better.