
In the era of advanced driver assistance systems (ADAS) and autonomous vehicles, the integration of various sensors and cameras is crucial for ensuring safety and enhancing the overall driving experience. One integral component of this integration is the Vehicle Camera Hardware Abstraction Layer (HAL), a vital software framework that bridges the gap between hardware and software, enabling efficient communication and control over vehicle cameras. In this blog post, we will dive deep into the concept of Vehicle Camera HAL, its importance, architecture, and its role in shaping the future of automotive technology.
Vehicle Camera HAL
Android has a special part called the automotive HIDL Hardware Abstraction Layer (HAL), which helps with capturing and showing images right when Android starts up in cars. This part keeps working as long as the car system is on. It has something called the exterior view system (EVS) stack, which is like a set of tools to handle what the car’s cameras see. This is usually used for things like showing the rearview camera or a view of all around the car on the screen in cars with Android-based screens. The EVS system also helps to add fancy features to apps.
Android also has a special way for the EVS part to talk to the camera and screen (you can find it in /hardware/interfaces/automotive/evs/1.0). While you could make a rearview camera app using the normal Android camera and screen stuff, it might start too late when Android starts up. But using this special way (the dedicated HAL) makes it smoother and easier for the car maker to add the EVS system.
Architecture
The Exterior View System’s architecture is designed to maximize efficiency and speed while maintaining a seamless user experience. The following system components are present in the EVS architecture:
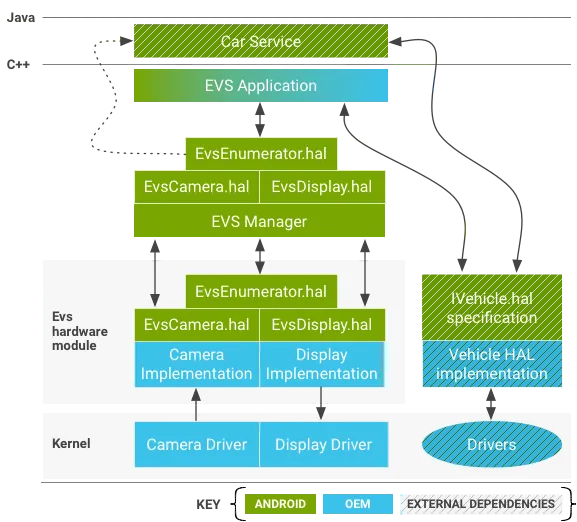
EVS Application
There’s an EVS application example written in C++ that you can find at /packages/services/Car/evs/app. This example shows you how to use EVS. The job of this application is to ask the EVS Manager for video frames and then send these frames to the EVS Manager so they can be shown on the screen. It’s designed to start up as soon as the EVS and Car Service are ready, usually within two seconds after the car turns on. Car makers can change or use a different EVS application if they want to.
EVS Manager
The EVS Manager, located at /packages/services/Car/evs/manager, is like a toolbox for EVS applications. It helps these applications create different things, like showing a basic rearview camera view or even a complex 6DOF(Six degrees of freedom (6DOF) refers to the specific number of axes that a rigid body is able to freely move in three-dimensional space.) multi-camera 3D view. It talks to the applications through HIDL, a special communication way in Android. It can work with many applications at the same time.
Other programs, like the Car Service, can also talk to the EVS Manager. They can ask the EVS Manager if the EVS system is up and running or not. This helps them know when the EVS system is working.
EVS HIDL interface
The EVS HIDL interface is how the EVS system’s camera and display parts talk to each other. You can find this interface in the android.hardware.automotive.evs package. There’s an example version of it in /hardware/interfaces/automotive/evs/1.0/default that you can use to test things out. This example makes fake images and checks if they work properly.
The car maker (OEM) needs to make the actual code for this interface. The code is based on the .hal files in /hardware/interfaces/automotive/evs. This code sets up the real cameras, gets their data, and puts it in special memory areas that Gralloc (Gralloc is a type of shared memory that is also shared with the GPU) understands. The display part of the code has to make a memory area where the app can put its images (usually using something called EGL), and then it shows these images on the car screen. This display part is important because it makes sure the app’s images are shown instead of anything else on the screen. Car makers can put their own version of the EVS code in different places, like /vendor/… /device/… or hardware/… (for example, /hardware/[vendor]/[platform]/evs).
Kernel drivers
For a device to work with the EVS system, it needs special software called kernel drivers. If a device already has drivers for its camera and display, those drivers can often be used for EVS too. This can be helpful, especially for display drivers, because showing images might need to work together with other things happening in the device.
In Android 8.0, there’s an example driver based on something called v4l2 (you can find it in packages/services/Car/evs/sampleDriver). This driver uses the kernel for v4l2 support (a way to handle video) and uses something called SurfaceFlinger to show images.
It’s important to note that the sample driver uses SurfaceFlinger, which isn’t suitable for a real device because EVS needs to start quickly, even before SurfaceFlinger is fully ready. However, the sample driver is designed to work with different hardware and lets developers test and work on EVS applications at the same time as they develop EVS drivers.
EVS hardware interface description
In this section, we explain the Hardware Abstraction Layer (HAL) for the EVS (Exterior View System) in Android. Manufacturers need to create implementations of this HAL to match their hardware.
IEvsEnumerator
This object helps find available EVS hardware (cameras and the display) in the system.
getCameraList(): Gets a list of all available cameras.openCamera(string camera_id): Opens a specific camera for interaction.closeCamera(IEvsCamera camera): Closes a camera.openDisplay(): Opens the EVS display.closeDisplay(IEvsDisplay display): Closes the display.getDisplayState(): Gets the current display state.
IEvsCamera
This object represents a single camera and is the main interface for capturing images.
getCameraInfo(): Gets information about the camera.setMaxFramesInFlight(int32 bufferCount): Sets the maximum number of frames the camera can hold.startVideoStream(IEvsCameraStream receiver): Starts receiving camera frames.doneWithFrame(BufferDesc buffer): Signals that a frame is done being used.stopVideoStream(): Stops receiving camera frames.getExtendedInfo(int32 opaqueIdentifier): Requests driver-specific information.setExtendedInfo(int32 opaqueIdentifier, int32 opaqueValue): Sends driver-specific values.
BufferDesc
Describes an image passed through the API.
width: Width of the image in pixels.height: Height of the image in pixels.stride: Number of pixels per row in memory.pixelSize: Size of a single pixel in bytes.format: Pixel format (compatible with OpenGL).usage: Usage flags for the image.bufferId: A unique identifier for the buffer.memHandle: Handle for the image data.
It’s important to note that these interfaces help EVS applications communicate with the hardware and manage camera and display functionality. Manufacturers can customize these implementations to match their specific hardware features and capabilities.
IEvsCameraStream
The client uses this interface to receive video frames asynchronously.
deliverFrame(BufferDesc buffer): Called by the HAL whenever a video frame is ready. The client must return buffer handles usingIEvsCamera::doneWithFrame(). When the video stream stops, this callback might continue as the pipeline drains. When the last frame is delivered, a NULL bufferHandle is sent, indicating the end of the stream. The NULL bufferHandle doesn\’t need to be sent back usingdoneWithFrame(), but all other handles must be returned.
IEvsDisplay
This object represents the EVS display, controls its state, and handles image presentation.
getDisplayInfo(): Gets basic information about the EVS display.setDisplayState(DisplayState state): Sets the display state.getDisplayState(): Gets the current display state.getTargetBuffer(): Gets a buffer handle associated with the display.returnTargetBufferForDisplay(handle bufferHandle): Informs the display that a buffer is ready for display.
DisplayDesc
Describes the basic properties of an EVS display.
display_id: Unique identifier for the display.vendor_flags: Additional information for a custom EVS Application.
DisplayState
Describes the state of the EVS display.
NOT_OPEN: Display has not been opened.NOT_VISIBLE: Display is inhibited.VISIBLE_ON_NEXT_FRAME: Will become visible with the next frame.VISIBLE: Display is currently active.DEAD: Display is not available, and the interface should be closed.
The IEvsCameraStream interface allows the client to receive video frames from the camera, while the IEvsDisplay interface manages the state and presentation of images on the EVS display. These interfaces help coordinate the communication between the EVS hardware and the application, ensuring smooth and synchronized operation.
EVS Manager
The EVS Manager is a component that acts as an intermediary between applications and the EVS Hardware API, which handles external camera views. The Manager provides shared access to cameras, allowing multiple applications to use camera streams concurrently. A primary EVS application is the main client of the Manager, with exclusive display access. Other clients can have read-only access to camera images.
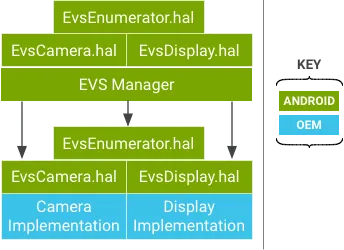
The EVS Manager offers the same API as the EVS Hardware drivers, except that the EVS Manager API allows concurrent camera stream access. The EVS Manager is, itself, the one allowed client of the EVS Hardware HAL layer, and acts as a proxy for the EVS Hardware HAL.
IEvsEnumerator
openCamera(string camera_id): Obtains an interface to interact with a specific camera. Multiple processes can open the same camera for video streaming.
IEvsCamera
startVideoStream(IEvsCameraStream receiver): Starts video streams independently for different clients. The camera starts when the first client begins.doneWithFrame(uint32 frameId, handle bufferHandle): Returns a frame when a client is done with it. Other clients continue to receive all frames.stopVideoStream(): Stops a video stream for a client, without affecting other clients.setExtendedInfo(int32 opaqueIdentifier, int32 opaqueValue): Allows one client to affect another by sending driver-specific values.
IEvsDisplay
- The EVS Manager passes the
IEvsDisplayinterface directly to the underlying HAL implementation.
In essence, the EVS Manager acts as a bridge, enabling multiple clients to utilize the EVS system simultaneously, while maintaining independent access to cameras. It provides flexibility and concurrent access to camera streams, enhancing the overall functionality of the EVS system.
EVS application
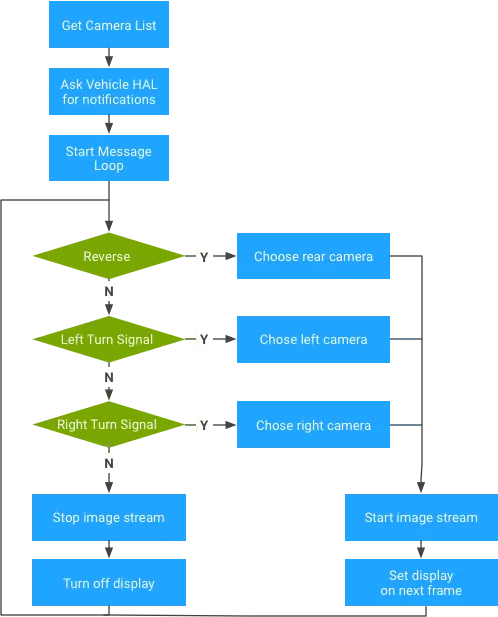
The EVS application in Android is a C++ program that interacts with the EVS Manager and Vehicle HAL to offer basic rearview camera functionality. It’s meant to start early in the system boot process and can show appropriate video based on available cameras and the car’s state (gear, turn signal). Manufacturers can customize or replace this application with their own logic and visuals.
Since image data is provided in a standard graphics buffer, the application needs to move the image from the source buffer to the output buffer. This involves a data copy, but it also gives the app the flexibility to manipulate the image before displaying it.
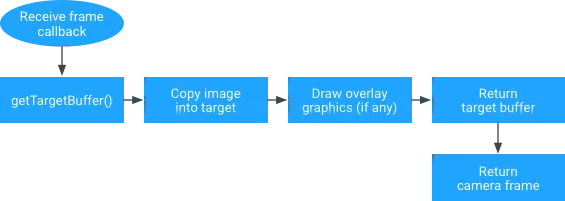
For instance, the app could move pixel data while adding scaling or rotation. Alternatively, it could use the source image as an OpenGL texture and render a complex scene onto the output buffer, including virtual elements like icons, guidelines, and animations. More advanced applications might even combine multiple camera inputs into a single output frame for a top-down view of the vehicle surroundings.
Overall, the EVS application provides the essential connection between hardware and user presentation, allowing manufacturers to create custom and sophisticated visual experiences based on their specific vehicle designs and features.
Boot Sequence Diagram
The boot sequence diagram outlines the steps involved in the initialization and operation of the Exterior View System (EVS) within the context of an Android-based system:
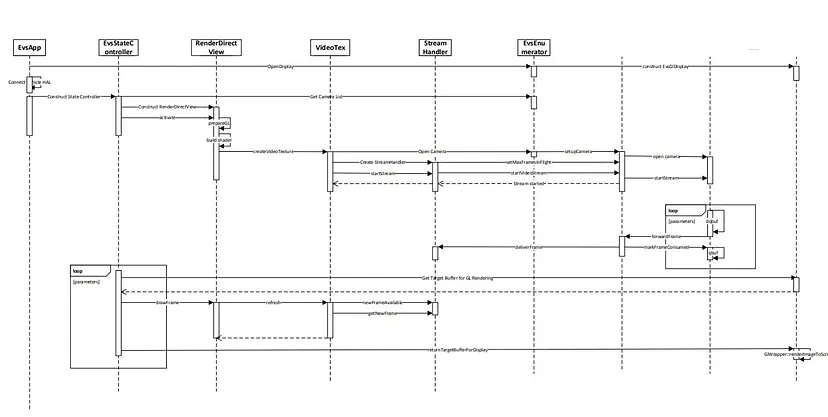
Communication with EVS Manager and Vehicle HAL
The process begins by establishing communication between the EVS Application and both the EVS Manager and the Vehicle HAL (Hardware Abstraction Layer). This communication enables the EVS Application to exchange information and commands with these two key components.
Infinite Loop for Monitoring Camera and Gear/Turn Signal State
Once communication is established, the EVS Application enters an infinite loop. This loop serves as the core operational mechanism of the system. Within this loop, the EVS Application constantly monitors two critical inputs: the camera state and the state of the vehicle’s gear or turn signals. These inputs help determine what needs to be displayed to the user.
Reaction to Camera and Vehicle State
Based on the monitored inputs, the EVS Application reacts accordingly. If the camera state changes (e.g., a new camera feed is available), the EVS Application processes the camera data. Similarly, if there’s a change in the gear or turn signal state, the system responds by updating the displayed content to provide relevant information to the driver.
Use of Source Image as OpenGL Texture and Rendering a Complex Scene
The EVS Application utilizes the source image from the camera feed as an OpenGL texture. OpenGL is a graphics rendering technology that enables the creation of complex visual scenes. The EVS Application takes advantage of this capability to render a sophisticated and informative scene. This scene, which includes data from the camera feed and potentially other elements, is then composed and prepared for display.
Rendering to the Output Buffer
The rendered scene is finally placed into the output buffer, which is essentially a designated area of memory used for displaying content on the screen. This process ensures that the composed scene, which combines the camera feed and other relevant information, is ready for presentation to the user.
In essence, the boot sequence diagram illustrates how the EVS Application interacts with the EVS Manager, the Vehicle HAL, and the hardware to continuously monitor camera and vehicle states, react to changes, create a visually informative scene, and render that scene for display on the screen. This orchestration ensures that the driver receives real-time and relevant exterior view information during the operation of the vehicle.
Use the EGL/SurfaceFlinger in the EVS Display HAL
This section provides instructions on how to use the EGL/SurfaceFlinger in the EVS Display HAL implementation for Android 10. It includes details on building libgui for vendor processes, using binder in an EVS HAL implementation, SELinux policies, and building the EVS HAL reference implementation as a vendor process.
Building libgui for Vendor Processes
The libgui library is required to use EGL/SurfaceFlinger in EVS Display HAL implementations. To build libgui for vendor processes, create a new target in the build script that is identical to libgui but with some modifications by addition of two these fields:
namevendor_available
cc_library_shared {
    name: \"libgui_vendor\",
    vendor_available: true,
    vndk: {
        enabled: false,
    },
    double_loadable: true,
    defaults: [\"libgui_bufferqueue-defaults\"],
    srcs: [
        // ...
    ],
    target: {
        vendor: {
            cflags: [
                \"-DNO_BUFFERHUB\",
                \"-DNO_INPUT\",
            ],
        },
        // ...
    },
}
Using binder in an EVS HAL Implementation
For Android 8 (and higher), /dev/binder became exclusive to framework processes. Vendor processes should use /dev/hwbinder and convert AIDL interfaces to HIDL. You can use /dev/vndbinder to continue using AIDL interfaces between vendor processes.
Update your EVS HAL implementation to use /dev/binder for SurfaceFlinger:
#include <binder/ProcessState.h>

int main() {
    // ...

    // Use /dev/binder for SurfaceFlinger
    ProcessState::initWithDriver(\"/dev/binder\");

    // ...
}
SELinux Policies
Depending on your device’s implementation, SELinux policies may prevent vendor processes from using /dev/binder. You can modify SELinux policies to allow access to /dev/binder for your EVS HAL implementation:
# Allow to use /dev/binder
typeattribute hal_evs_driver binder_in_vendor_violators;

# Allow the driver to use the binder device
allow hal_evs_driver binder_device:chr_file rw_file_perms;
Building EVS HAL Reference Implementation as a Vendor Process
Modify your Android.mk file(packages/services/Car/evs/Android.mk) for the EVS HAL reference implementation to include libgui_vendor and set LOCAL_PROPRIETARY_MODULE to true:
LOCAL_SHARED_LIBRARIES := \\
    [email protected] \\
    libgui \\
    libgui_vendor \\
    libEGL \\
    libGLESv2 \\
    libbase \\
    # ...
LOCAL_PROPRIETARY_MODULE := true
Also, make sure your EVS HAL implementation uses /dev/binder for SurfaceFlinger initialization as mentioned earlier.
diff --git a/evs/sampleDriver/Android.mk b/evs/sampleDriver/Android.mk
index 734feea7d..0d257214d 100644
--- a/evs/sampleDriver/Android.mk
+++ b/evs/sampleDriver/Android.mk
@@ -16,7 +16,7 @@ LOCAL_SRC_FILES := \\
 LOCAL_SHARED_LIBRARIES := \\
     [email protected] \\
     libui \\
-    libgui \\
+    libgui_vendor \\
     libEGL \\
     libGLESv2 \\
     libbase \\
@@ -33,6 +33,7 @@ LOCAL_SHARED_LIBRARIES := \\
 LOCAL_INIT_RC := [email protected]

 LOCAL_MODULE := [email protected]
+LOCAL_PROPRIETARY_MODULE := true

 LOCAL_MODULE_TAGS := optional
 LOCAL_STRIP_MODULE := keep_symbols
@@ -40,6 +41,7 @@ LOCAL_STRIP_MODULE := keep_symbols
 LOCAL_CFLAGS += -DLOG_TAG=\\\"EvsSampleDriver\\\"
 LOCAL_CFLAGS += -DGL_GLEXT_PROTOTYPES -DEGL_EGLEXT_PROTOTYPES
 LOCAL_CFLAGS += -Wall -Werror -Wunused -Wunreachable-code
+LOCAL_CFLAGS += -Iframeworks/native/include

 # NOTE:  It can be helpful, while debugging, to disable optimizations
 #LOCAL_CFLAGS += -O0 -g
diff --git a/evs/sampleDriver/service.cpp b/evs/sampleDriver/service.cpp
index d8fb31669..5fd029358 100644
--- a/evs/sampleDriver/service.cpp
+++ b/evs/sampleDriver/service.cpp
@@ -21,6 +21,7 @@
 #include <utils/Errors.h>
 #include <utils/StrongPointer.h>
 #include <utils/Log.h>
+#include <binder/ProcessState.h>

 #include \"ServiceNames.h\"
 #include \"EvsEnumerator.h\"
@@ -43,6 +44,9 @@ using namespace android;
 int main() {
     ALOGI(\"EVS Hardware Enumerator service is starting\");
+    // Use /dev/binder for SurfaceFlinger
+    ProcessState::initWithDriver(\"/dev/binder\");
+
     // Start a thread to listen video device addition events.
     std::atomic<bool> running { true };
     std::thread ueventHandler(EvsEnumerator::EvsUeventThread, std::ref(running));
diff --git a/evs/sepolicy/evs_driver.te b/evs/sepolicy/evs_driver.te
index f1f31e9fc..632fc7337 100644
--- a/evs/sepolicy/evs_driver.te
+++ b/evs/sepolicy/evs_driver.te
@@ -3,6 +3,9 @@ type hal_evs_driver, domain, coredomain;
 hal_server_domain(hal_evs_driver, hal_evs)
 hal_client_domain(hal_evs_driver, hal_evs)

+# allow to use /dev/binder
+typeattribute hal_evs_driver binder_in_vendor_violators;
+
 # allow init to launch processes in this context
 type hal_evs_driver_exec, exec_type, file_type, system_file_type;
 init_daemon_domain(hal_evs_driver)
@@ -22,3 +25,7 @@ allow hal_evs_driver ion_device:chr_file r_file_perms;

 # Allow the driver to access kobject uevents
 allow hal_evs_driver self:netlink_kobject_uevent_socket create_socket_perms_no_ioctl;
+
+# Allow the driver to use the binder device
+allow hal_evs_driver binder_device:chr_file rw_file_perms;
These instructions provide a step-by-step guide to incorporate EGL/SurfaceFlinger in your EVS Display HAL implementation for Android 10. Keep in mind that these steps might need further adaptation based on your specific device and implementation.
Conclusion
The Vehicle Camera Hardware Abstraction Layer (HAL) serves as a crucial link between the complex hardware of vehicle cameras and the software applications that leverage their capabilities. By abstracting hardware intricacies, standardizing interfaces, and optimizing performance, the HAL empowers automotive developers to focus on creating innovative applications and features that enhance driving safety and convenience. As the automotive industry continues to advance, the Vehicle Camera HAL will remain a cornerstone of the technology driving the vehicles of the future.