
Gradle is the official build system for Android development, offering flexibility and powerful dependency management. Understanding how to declare Gradle dependencies properly is crucial for efficient Android app development. In this guide, we’ll break down Gradle dependencies, their types, and how to use them effectively in Android Projects.
What are Gradle Dependencies?
Gradle dependencies are external libraries or modules that your Android project needs to function. They allow you to include reusable code, such as UI components, networking libraries, or database handlers, without writing everything from scratch.
Dependencies in Gradle are usually defined in the build.gradle.kts (Kotlin DSL) or build.gradle (Groovy) files. Modern Android projects use Kotlin DSL (build.gradle.kts), which is more type-safe and readable.
Producers and Consumers in Dependency Management
In Android development, dependency management is about how libraries and modules interact. Simply put, it’s important to differentiate between producers and consumers in dependency management.
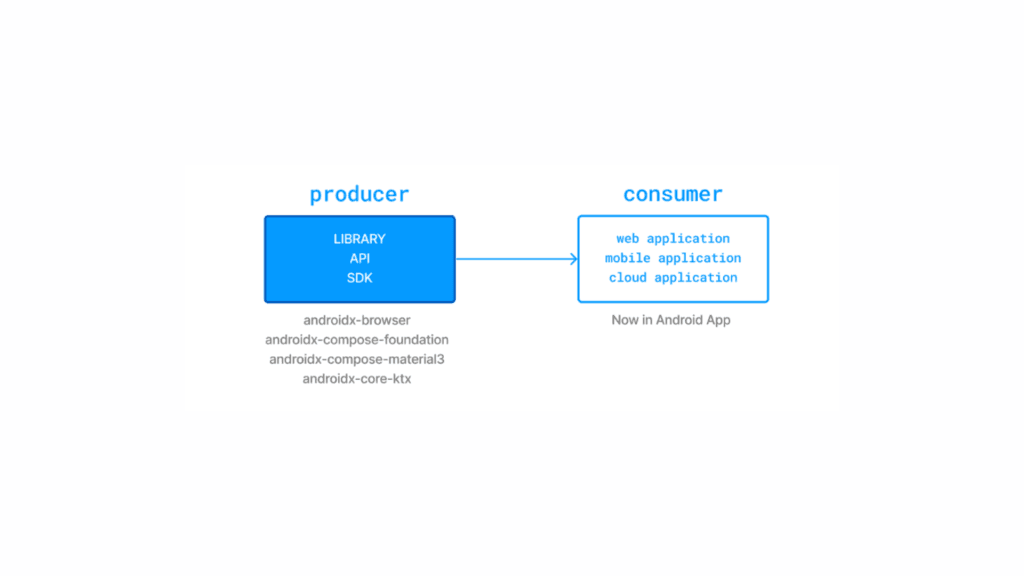
- Producer: When you create an Android library (like a custom UI component or a utility library), you are the producer because you provide this library for others to use.
- Consumer: When you add dependencies in your Android project (e.g., using
implementation 'com.squareup.retrofit2:retrofit:2.9.0'inbuild.gradle), you are the consumer because you are using a library created by someone else.
How to Declare Gradle Dependencies in Android Projects
Declaring dependencies correctly in Gradle is fundamental to building reliable Android applications. Dependencies are specified inside the Gradle build files, most commonly in build.gradle.kts (Kotlin DSL) or build.gradle (Groovy). Since modern Android development encourages using Kotlin DSL for better readability and type safety, this guide focuses on it.
Types of Gradle Dependencies
There are several types of dependencies in an Android project, each serving a different purpose:
- implementation: The most common configuration,
implementationadds the dependency to the project but hides it from consumers, improving build performance and avoiding unnecessary exposure. - api: Exposes the dependency to both the project and any consumers of the project’s library module. Useful when creating Android libraries.
- compileOnly: Adds the dependency at compile time only; it is not packaged in the final APK. Ideal for annotation processors.
- runtimeOnly: The dependency is available only at runtime but not at compile time.
- testImplementation: Dependencies required only for testing purposes.
- androidTestImplementation: Dependencies used only in Android instrumentation tests.
Adding a Dependency Example Using Kotlin DSL
dependencies {
    implementation("com.squareup.retrofit2:retrofit:2.9.0")
    api("androidx.core:core-ktx:1.7.0")
    testImplementation("junit:junit:4.13.2")
}
Using BOM for Version Management
To avoid version conflicts and manage library versions efficiently, Gradle supports the Bill of Materials (BOM). It declares a fixed set of compatible library versions.
dependencies {
    implementation(platform("com.google.firebase:firebase-bom:31.0.2"))
    implementation("com.google.firebase:firebase-analytics-ktx")
    implementation("com.google.firebase:firebase-auth-ktx")
}
Here, the versions for Firebase libraries are controlled centrally by the BOM, ensuring consistency without explicitly specifying versions for each artifact.
Best Practices for Dependency Management
- Use Kotlin DSL: It improves readability, offers type safety, and better IDE support compared to Groovy syntax.
- Keep dependencies updated: Regularly check for updates to benefit from bug fixes and performance improvements, but test carefully to avoid breaking changes.
- Avoid unnecessary dependencies: Minimize the size of your APK and reduce build times by only including libraries essential to your app.
- Utilize Dependency Constraints: To enforce or restrict specific versions across your entire project and avoid unexpected version conflicts.
- Separate test dependencies: Keep your production code clean by isolating libraries used solely for testing.
Managing Transitive Dependencies
Gradle automatically includes transitive dependencies (dependencies of your dependencies). Sometimes, conflicts arise when different versions of the same library appear. Use strategies like excluding particular transitive dependencies or forcing specific versions to resolve conflicts.
dependencies {
    implementation("some.library:dependency:1.0.0") {
        exclude(group = "conflicting.group", module = "conflicting-module")
    }
}
Conclusion
Understanding how to declare and manage Gradle dependencies in Android development is essential for keeping projects well-organized and optimized. By leveraging Kotlin DSL, BOM, and dependency constraints, you can efficiently manage dependencies, prevent version conflicts, and ensure your project remains maintainable.
By following these best practices, you’ll improve your build process, reduce errors, and create a scalable Android application.