Kotlin has gained immense popularity for its modern and expressive syntax, making Android development and general programming more efficient. One of its unique features is the companion object, which allows defining static-like members within a class. If you’re a beginner looking to understand Kotlin companion objects, this guide will take you through every essential detail.
What is a Kotlin Companion Object?
In Kotlin, unlike Java, there are no static methods. Instead, Kotlin provides a way to achieve similar functionality using companion objects. A Kotlin Companion Object is an object associated with a class that allows you to access its properties and methods without creating an instance of the class.
Key Characteristics:
A companion object is defined inside a class using the companion keyword.
It behaves like a singleton, meaning there is only one instance of it per class.
You can access its properties and methods using the class name, just like static members in Java.
How to Declare a Companion Object
Declaring a companion object in Kotlin is simple. Use the companion object keyword inside a class.
Kotlin
classMyClass {companionobject {funsayHello() {println("Hello from Companion Object!") } }}funmain() { MyClass.sayHello() // Calling the function without creating an instance}
Here,
The companion object inside MyClass defines a function sayHello().
MyClass.sayHello() is called directly, without creating an instance.
This behavior is similar to Java’s static methods but follows Kotlin’s object-oriented approach.
Adding Properties in a Companion Object
You can also define properties inside a companion object.
The companion object implements the Logger interface.
Now, Service.log("Service started") logs a message without an instance.
Conclusion
Kotlin companion objects provide a powerful way to create static-like functionality while keeping an object-oriented structure. They enable defining functions, properties, factory methods, and interface implementations within a class, making code more readable and maintainable.
Now that you have a clear understanding, start using companion objects in your Kotlin projects and take advantage of their benefits..!
Generics in Kotlin add flexibility and type safety, but sometimes we don’t need to specify a type. This is where star projection (*) comes in. In this blog, we’ll explore star projection in Kotlin, its use cases, and practical examples to help you understand how and when to use it.
Understanding Star Projection in Kotlin
In Kotlin, star projection is a syntax that allows you to indicate that you have no information about a generic argument. It is represented by the asterisk (*) symbol. Let’s explore the semantics of star projections in more detail.
When you use star projection, such as List<*>, it means you have a list of elements of an unknown type. It’s important to note that MutableList<*> is not the same as MutableList<Any?>. The former represents a list that contains elements of a specific type, but you don’t know what type it is. You can’t put any values into the list because it may violate the expectations of the calling code. However, you can retrieve elements from the list because you know they will match the type Any?, which is the supertype of all Kotlin types.
Here’s an example to illustrate this:
Kotlin
val list: MutableList<Any?> = mutableListOf('a', 1, "qwe")val chars = mutableListOf('a', 'b', 'c')val unknownElements: MutableList<*> = if (Random().nextBoolean()) list else charsunknownElements.add(42) // Error: Adding elements to a MutableList<*> is not allowedprintln(unknownElements.first()) // You can retrieve elements from unknownElements
In this example, unknownElements can be either list or chars based on a random condition. You can’t add any values to unknownElements because its type is unknown, but you can retrieve elements from it using the first() function.
Kotlin
unknownElements.add(42)// Error: Out-projected type 'MutableList<*>' prohibits//the use of 'fun add(element: E): Boolean
The term “out-projected type” refers to the fact that MutableList<*> is projected to act as MutableList<out Any?>. It means you can safely get elements of type Any? from the list but cannot put elements into it.
For contravariant type parameters, like Consumer<in T>, a star projection is equivalent to <in Nothing>. In this case, you can’t call any methods that have T in the signature on a star projection because you don’t know exactly what it can consume. This is similar to Java’s wildcards (MyType<?> in Java corresponds to MyType<*> in Kotlin).
You can use star projections when the specific information about type arguments is not important. For example, if you only need to read the data from a list or use methods that produce values without caring about their specific types. Here’s an example of a function that takes List<*> as a parameter:
In this case, the printFirst function only reads the first element of the list and doesn’t care about its specific type. Alternatively, you can introduce a generic type parameter if you need more control over the type:
Kotlin
fun <T> printFirst(list: List<T>) {if (list.isNotEmpty()) {println(list.first()) }}
The syntax with star projection is more concise, but it works only when you don’t need to access the exact value of the generic type parameter.
Now let’s consider an example using a type with a star projection and common traps that you may encounter. Suppose you want to validate user input using an interface called FieldValidator. It has a type parameter declared as contravariant (in T). You also have two validators for String and Int inputs.
If you want to store all validators in the same container and retrieve the right validator based on the input type, you might try using a map. However, using FieldValidator<*> as the value type in the map can lead to difficulties. You won’t be able to validate a string with a validator of type FieldValidator<*> because the compiler doesn’t know the specific type of the validator.
Kotlin
val validators = mutableMapOf<KClass<*>, FieldValidator<*>>()validators[String::class] = DefaultStringValidatorvalidators[Int::class] = DefaultIntValidatorvalidators[String::class]!!.validate("") // Error: Cannot call validate() on FieldValidator<*>
In this case, you will encounter a similar error as before, indicating that it’s unsafe to call a method with the type parameter on a star projection. One way to work around this is by explicitly casting the validator to the desired type, but this is not recommended as it is not type-safe.
Kotlin
val stringValidator = validators[String::class] as FieldValidator<String><br>println(stringValidator.validate("")) // Output: false
This code compiles, but it’s not safe because the cast is unchecked and may fail at runtime if the generic type information is erased.
A safer approach is to encapsulate the access to the map and provide type-safe methods for registration and retrieval. This ensures that only the correct validators can be registered and retrieved. Here’s an example using an object called Validators:
In this example, the Validators object controls all access to the map, ensuring that only correct validators can be registered and retrieved. The code emits a warning about the unchecked cast, but the guarantees provided by the Validators object make sure that no incorrect use can occur.
This pattern of encapsulating unsafe code in a separate place helps prevent misuse and makes the usage of a container safe. It’s worth noting that this pattern is not specific to Kotlin and can be applied in Java as well.
Star Projection vs Wildcards in Java
If you are familiar with Java, you might recognize ? (wildcard) in generics:
In Kotlin, ? is used for nullability, so * is used instead for wildcard-like behavior.
List<?> in Java ⟶ List<*> in Kotlin
List<? extends T> in Java ⟶ List<out T> in Kotlin
List<? super T> in Java ⟶ List<in T> in Kotlin
Kotlin’s approach is more concise and expressive, improving readability and reducing boilerplate code.
Limitations of Star Projection
While * is useful, it has some limitations:
You cannot add elements to a List<*> because the exact type is unknown.
The compiler restricts unsafe operations to maintain type safety.
Using * excessively can make code less readable.
For example, this won’t work:
Kotlin
funaddElement(list: MutableList<*>) { list.add(42) // Error: Cannot add an element of type Int}
To modify a generic list, you need a known type parameter:
Kotlin
fun <T> addElement(list: MutableList<T>, element: T) { list.add(element)}
When to Use Star Projection in Kotlin
When you need to access elements from a generic class but don’t care about their exact type.
When working with APIs that use generics, and you don’t want to specify a concrete type.
When you want to achieve type safety while maintaining code flexibility.
Conclusion
Star projection in Kotlin simplifies working with generics when the type is unknown or irrelevant. It provides flexibility while ensuring type safety, making it a valuable tool in generic programming.
Next time you’re handling generics, consider whether * might be the right choice to simplify your code.
Kotlin coroutines are a powerful feature that simplify asynchronous programming. They allow developers to write asynchronous code in a sequential manner, making it easier to read and maintain. At the heart of coroutines are coroutine builders, specifically launch and async. These builders define how coroutines are started and managed.
In this blog, we’ll dive deep into the differences between launch and async, when to use them, and best practices for effective coroutine usage.
Understanding Coroutine Builders
A coroutine builder is a function that creates and starts a coroutine. The two primary coroutine builders in Kotlin are:
launch: Used for fire-and-forget operations (does not return a result).
async: Used for parallel computations that return a result.
Let’s explore both in detail.
launch – Fire and Forget
The launch builder is used when you don’t need a result. It starts a coroutine that runs independently, meaning it does not return a value. However, it returns a Job object, which can be used to manage its lifecycle (e.g., cancellation or waiting for completion).
Key Points:
Does not return a result.
Returns a Job that can be used for cancellation or waiting.
Runs in the background without blocking the main thread.
The coroutine is launched using launch(Dispatchers.IO) { ... }.
The fetchData() function runs asynchronously without blocking the main thread.
job.join() ensures the coroutine completes before proceeding.
Output:
Kotlin
Data: FetchedDataCoroutine completed
Note: If job.join() is not called, the program might exit before the coroutine completes, depending on the coroutine scope.
async – Returns a Result
The async builder is used when you need a result. It returns a Deferred<T> object, which represents a future result. To retrieve the result, you must call await().
Key Points:
Returns a Deferred<T> object, which must be awaited.
Used for parallel computations.
Must be called within a coroutine scope.
Kotlin
import kotlinx.coroutines.*funmain() = runBlocking {val result = async(Dispatchers.IO) { fetchData() }println("Data: ${result.await()}") // Await to get the result}suspendfunfetchData(): String {delay(1000) // Simulating network callreturn"Fetched Data"}
async(Dispatchers.IO) { fetchData() } starts an asynchronous task.
It returns a Deferred<String> object.
Calling .await() retrieves the result.
Output:
Kotlin
Data: FetchedData
Important: If you do not call await(), the coroutine will run, but the result won’t be retrieved.
async for Parallel Execution
One of the most powerful use cases for async is running multiple tasks in parallel.
async { fetchData1() } and async { fetchData2() } start in parallel.
Each coroutine takes 1 second.
Since they run concurrently, the total execution time is ~1 second instead of 2 seconds (if they run sequentially then 2 seconds).
Best Practices for launch and async
Use launch when you don’t need a result (e.g., updating UI, logging, background tasks).
Use async when you need a result and always call await().
For multiple async tasks, start them first, then call await() to maximize concurrency.
Avoid using async outside of structured concurrency unless you explicitly manage its lifecycle, as it can lead to untracked execution, potential memory leaks, or uncaught exceptions.
Conclusion
Kotlin’s launch and async coroutine builders serve distinct purposes:
Use launch when you don’t need a result (fire-and-forget).
Use async when you need a result (and always call await()).
By understanding the differences and best practices, you can write efficient, safe, and scalable Kotlin applications using coroutines.
Kotlin is a powerful programming language that simplifies development while maintaining strong type safety. One of the essential concepts in Kotlin is variance, which helps us understand how generics and subtyping work. If you’ve ever been confused by out, in, or *, and how generics behave in Kotlin, this guide is for you.
Variance: generics and subtyping
The concept of variance describes how types with the same base type and different type arguments relate to each other: for example, List<String> and List<Any>. It’s important to understand variance when working with generic classes or functions because it helps ensure the safety and consistency of your code.
Why variance exists: passing an argument to a function
To illustrate why variance is important, let’s consider passing arguments to functions. Suppose we have a function that takes a List<Any> as an argument. Is it safe to pass a variable of type List<String> to this function?
In the case of a function that prints the contents of the list, such as:
You can safely pass a list of strings (List<String>) to this function. Each element in the list is treated as an Any, and since String is a subtype of Any, it is considered safe.
However, let’s consider another function that modifies the list:
If you attempt to pass a list of strings (MutableList<String>) to this function, like so:
Kotlin
val strings = mutableListOf("abc", "bac")addAnswer(strings)println(strings.maxBy { it.length })
You will encounter a ClassCastException at runtime. This occurs because the function addAnswer tries to add an integer (42) to a list of strings. If the compiler allowed this, it would lead to a type inconsistency when accessing the contents of the list as strings. To prevent such issues, the Kotlin compiler correctly forbids passing a MutableList<String> as an argument when a MutableList<Any> is expected.
So, the answer to whether it’s safe to pass a list of strings to a function expecting a list of Any objects depends on whether the function modifies the list. If the function only reads the list, it is safe to pass a List with a more specific element type. However, if the list is mutable and the function adds or replaces elements, it is not safe.
Kotlin provides different interfaces, such as List and MutableList, to control safety based on mutability. If a function accepts a read-only list, you can pass a List with a more specific element type. However, if the list is mutable, you cannot do that.
In the upcoming sections, we’ll explore these concepts in the context of generic classes. We’ll also examine why List and MutableList differ regarding their type arguments. But before that, let’s discuss the concepts of type and subtype.
Difference between Classes, types, and subtypes
In Kotlin, the type of a variable specifies the possible values it can hold. The terms “type” and “class” are sometimes used interchangeably, but they have distinct meanings. In the case of a non-generic class, the class name can be used directly as a type. For example, var x: String declares a variable that can hold instances of the String class. However, the same class name can also be used to declare a nullable type, such as var x: String?which indicates that the variable can hold either a String or null. So each Kotlin class can be used to construct at least two types.
When it comes to generic classes, things get more complex. To form a valid type, you need to substitute a specific type as a type argument for the class’s type parameter. For example, List is a class, not a type itself, but the following substitutions are valid types: List<Int>, List<String?>, List<List<String>>, and so on. Each generic class can generate an infinite number of potential types.
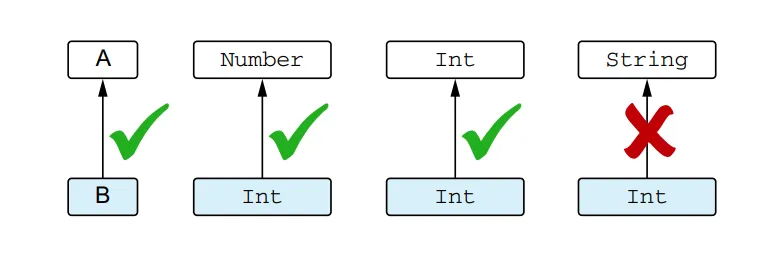
To discuss the relationship between types, it’s important to understand the concept of subtyping. Type B is considered a subtype of type A if you can use a value of type B wherever a value of type A is expected. For example, Int is a subtype of Number, but Int is not a subtype of String. Note that a type is considered a subtype of itself. The term “supertype” is the opposite of subtype: if A is a subtype of B, then B is a supertype of A.
B is a subtype of A if you can use it when A is expected
Understanding subtype relationships is crucial because the compiler performs checks whenever you assign a value to a variable or pass an argument to a function. For example:
Storing a value in a variable is only allowed if the value’s type is a subtype of the variable’s type. In this case, since Int is a subtype of Number, the declaration val n: Number = i is valid. Similarly, passing an expression to a function is only allowed if the expression’s type is a subtype of the function’s parameter type. In the example, the type Int of the argument i is not a subtype of the function parameter type String, so the invocation of the f function does not compile.
In simpler cases, subtype is essentially the same as subclass. For example, Int is a subclass of Number, so the Int type is a subtype of the Number type. If a class implements an interface, its type is a subtype of the interface type. For instance, String is a subtype of CharSequence.
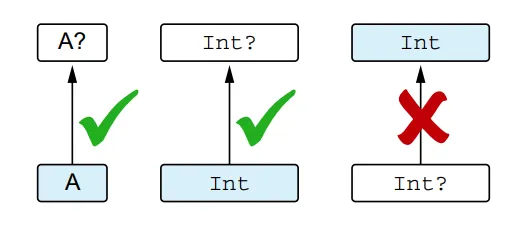
Nullable types introduce a scenario where subtype and subclass differ. A non-null type is a subtype of its corresponding nullable type, but they both correspond to the same class.
A non-null type A is a subtype of nullable A?, but not vice versa
You can store the value of a non-null type in a variable of a nullable type, but not vice versa. For example:
Kotlin
val s: String = "abc"val t: String? = s
In this case, the value of the non-null type String can be stored in a variable of the nullable type String?. However, you cannot assign a nullable type to a non-null type because null is not an acceptable value for a non-null type.
The distinction between subclasses and subtypes becomes particularly important when dealing with generic types. This brings us back to the question from the previous section: is it safe to pass a variable of type List<String> to a function expecting List<Any>? We’ve already seen that treating MutableList<String> as a subtype of MutableList<Any> is not safe. Similarly, MutableList<Any> is not a subtype of MutableList<String> either.
A generic class, such as MutableList, is called invariant on the type parameter if, for any two different types A and B, MutableList<A> is neither a subtype nor a supertype of MutableList<B>. In Java, all classes are invariant, although specific uses of those classes can be marked as non-invariant (as you’ll see soon).
In the previous section, we encountered a class, List, where the subtyping rules are different. The List interface in Kotlin represents a read-only collection. If type A is a subtype of type B, then List<A> is a subtype of List<B>. Such classes or interfaces are called covariant. In the upcoming sections, we’ll explore the concept of covariance in more detail and explain when it’s possible to declare a class or interface as covariant.
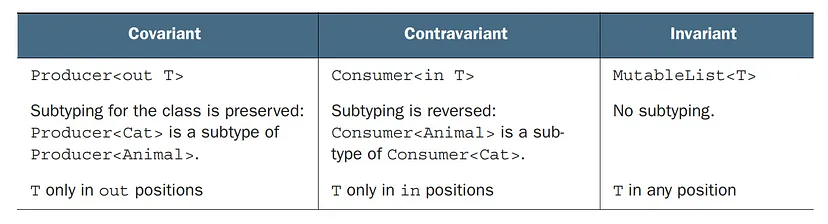
Covariance: preserved subtyping relation
Covariance refers to preserving the subtyping relation between generic classes. In Kotlin, you can declare a class to be covariant on a specific type parameter by using the out keyword before the type parameter’s name.
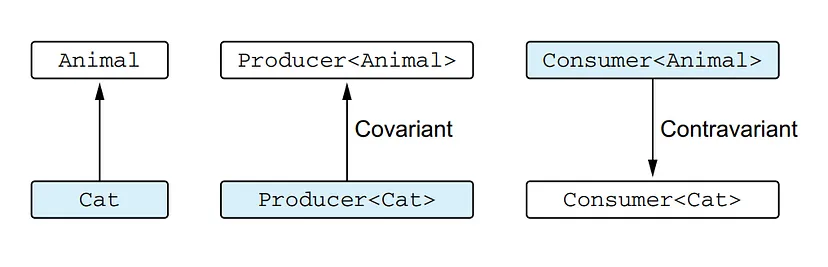
A covariant class is a generic class (we’ll use Producer as an example) for which the following holds: Producer<A> is a subtype of Producer<B> if A is a subtype of B. We say that the subtyping is preserved. For example, Producer<Cat> is a subtype of Producer<Animal> because Cat is a subtype of Animal.
Here’s an example of the Producer interface using the out keyword:
Kotlin
interfaceProducer<outT> {funproduce(): T}
Flexible Function Argument and Return Value Passing
Covariance in Kotlin allows you to pass values of a class as function arguments and return values, even when the type arguments don’t exactly match the function definition. This means that you can use a more specific type as a substitute for a more generic type.
Suppose we have a hierarchy of classes involving Animal, where Cat is a subclass of Animal. We also have a generic interface called Producer, which represents a producer of objects of type T. We’ll make the Producer interface covariant by using the out keyword on the type parameter.
Kotlin
interfaceProducer<outT> {funproduce(): T}
Now, let’s define a class AnimalProducer that implements the Producer interface for the Animal type:
Since Cat is a subtype of Animal, we can also use CatProducer wherever a Producer<Animal> is expected. This is possible because we declared the Producer interface as covariant.
Now, let’s see how covariance allows us to pass these producers as function arguments and return values:
funmain() {val animalProducer = AnimalProducer()val catProducer = CatProducer()feedAnimal(animalProducer) // Passes an AnimalProducer, which is a Producer<Animal>feedAnimal(catProducer) // Passes a CatProducer, which is also a Producer<Animal>}
In the feedAnimal function, we expect a Producer<Animal> as an argument. With covariance, we can pass both AnimalProducer and CatProducer instances because Producer<Cat> is a subtype of Producer<Animal> due to the covariance declaration.
This demonstrates how covariance allows you to treat more specific types (Producer<Cat>) as if they were more generic types (Producer<Animal>) when it comes to function arguments and return values.
BTW, How covariance guarantees type safety?
Suppose we have a class hierarchy involving Animal, where Cat is a subclass of Animal. We also have a Herd class that represents a group of animals.
Kotlin
openclassAnimal {funfeed() { /* feeding logic */ }}classHerd<T : Animal> { // The type parameter isn’t declared as covariantval size: Intget() = /* calculate the size of the herd */operatorfunget(i: Int): T { /* get the animal at index i */ }}funfeedAll(animals: Herd<Animal>) {for (i in0 until animals.size) { animals[i].feed() }}
Now, suppose you have a function called takeCareOfCats, which takes a Herd<Cat> as a parameter and performs some operations specific to cats.
Kotlin
classCat : Animal() {funcleanLitter() { /* clean litter logic */ }}funtakeCareOfCats(cats: Herd<Cat>) {for (i in0 until cats.size) { cats[i].cleanLitter()// feedAll(cats) // This line would cause a type-mismatch error, Error: inferred type is Herd<Cat>, but Herd<Animal> was expected }}
In this case, if you try to pass the cats herd to the feedAll function, you’ll get a type-mismatch error during compilation. This happens because you didn’t use any variance modifier on the type parameter T in the Herd class, making the Herd<Cat> incompatible with Herd<Animal>. Although you could use an explicit cast to overcome this issue, it is not a recommended approach.
To make it work correctly, you can make the Herd class covariant by using the out keyword on the type parameter:
Kotlin
classHerd<outT : Animal> { // The T parameter is now covariant.// ...}funtakeCareOfCats(cats: Herd<Cat>) {for (i in0 until cats.size) { cats[i].cleanLitter() }feedAll(cats) // Now this line works because of covariance, You don’t need a cast.
By marking the type parameter as covariant, you ensure that the subtyping relation is preserved, and T can only be used in \”out\” positions. This guarantees type safety and allows you to pass a Herd<Cat> where a Herd<Animal> is expected.
Usage of covariance
Covariance in Kotlin allows you to make a class covariant on a type parameter, but it also imposes certain constraints to ensure type safety. The type parameter can only be used in “out” positions, which means it can produce values of that type but not consume them.
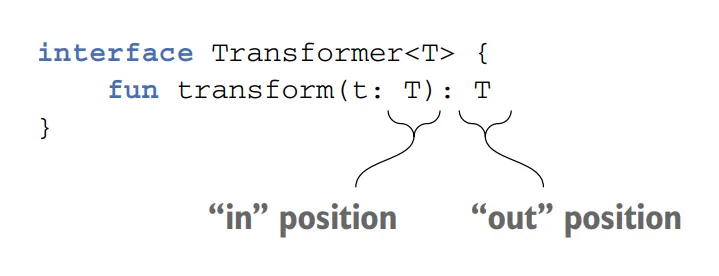
You can’t make any class covariant: it would be unsafe. Making the class covariant on a certain type parameter constrains the possible uses of this type parameter in the class. To guarantee type safety, it can be used only in so-called out positions, meaning the class can produce values of type T but not consume them. Uses of a type parameter in declarations of class members can be divided into “in” and “out” positions.
Let’s consider a class that declares a type parameter T and contains a function that uses T. We say that if T is used as the return type of a function, it’s in the out position. In this case, the function produces values of type T. If T is used as the type of a function parameter, it’s in the in position. Such a function consumes values of type T.
The function parameter type is called in position, and the function return type is called out position
The out keyword on a type parameter of the class requires that all methods using T have T only in “out” positions and not in “in” positions. This keyword constrains possible use of T, which guarantees safety of the corresponding subtype relation.
Let’s understand this with some examples. Consider the Herd class, which is declared as Herd<out T : Animal>. The type parameter T is used only in the return value of the get method. This is an “out” position, and it is safe to declare the class as covariant. For instance, Herd<Cat> is considered a subtype of Herd<Animal> because Cat is a subtype of Animal.
Kotlin
classHerd<outT : Animal> {val size: Int = ...operatorfunget(i: Int): T { ... } // Uses T as the return type}
Similarly, the List<T> interface in Kotlin is covariant because it only defines a get method that returns an element of type T. Since there are no methods that store values of type T, it is safe to declare the class as covariant.
Kotlin
interfaceList<outT> : Collection<T> {operatorfunget(index: Int): T// Read-only interface that defines only methods that return T (so T is in the “out” position)// ...}
You can also use the type parameter T as a type argument in another type. For example, the subList method in the List interface returns a List<T>, and T is used in the “out” position.
Kotlin
interfaceList<outT> : Collection<T> {funsubList(fromIndex: Int, toIndex: Int): List<T> // Here T is in the “out” position as well.// ...}
However, you cannot declare MutableList<T> as covariant on its type parameter because it contains methods that both consume and produce values of type T. Therefore, T appears in both “in” and “out” positions, and making it covariant would be unsafe.
Kotlin
interfaceMutableList<T> : List<T>, MutableCollection<T> { //MutableList can’t be declared as covariant on T …overridefunadd(element: T): Boolean// … because T is used in the “in” position.}
The compiler enforces this restriction. It would report an error if the class was declared as covariant: Type parameter T is declared as ‘out’ but occurs in ‘in’ position.
Constructor Parameters and Variance
In Kotlin, constructor parameters are not considered to be in the “in” or “out” position when it comes to variance. This means that even if a type parameter is declared as “out,” you can still use it in a constructor parameter declaration without any restrictions.
The type parameter T is declared as “out” but it can still be used in the constructor parameter vararg animals: T without any issues. The variance protection is not applicable to the constructor because it is not a method that can be called later, so there are no potentially dangerous method calls that need to be restricted.
However, if you use the val or var keyword with a constructor parameter, it declares a property with a getter and setter (if the property is mutable). In this case, the type parameter T is used in the “out” position for a read-only property and in both “out” and “in” positions for a mutable property.
Here, the type parameter T cannot be marked as “out” because the class contains a setter for the leadAnimal property, which uses T in the “in” position. The presence of a setter makes it necessary to consider both “out” and “in” positions for the type parameter.
It’s important to note that the position rules for variance in Kotlin only apply to the externally visible API of a class, such as public, protected, and internal members. Parameters of private methods are not subject to the “in” or “out” position rules. The variance rules are in place to protect a class from misuse by external clients and do not affect the implementation of the class itself.
In this case, the Herd class can safely be made covariant on T because the leadAnimal property has been made private. The private visibility means that the property is not accessible from external clients, so the variance rules for the public API do not apply.
Contravariance: reversed subtyping relation
Contravariance is the opposite of covariance and it can be understood as a mirror image of covariance. When a class is contravariant, the subtyping relationship between its type arguments is the reverse of the subtyping relationship between the classes themselves.
To illustrate this concept, let’s consider the example of the Comparator interface. This interface has a single method called compare, which takes two objects and compares them:
Kotlin
interfaceComparator<inT> {funcompare(e1: T, e2: T): Int { ... }}
In this case, you’ll notice that the compare method only consumes values of type T. This means that the type parameter T is used in “in” positions only, indicating that it is a contravariant type. To indicate contravariance, the “in” keyword is placed before the declaration of T.
A comparator defined for values of a certain type can, of course, compare the values of any subtype of that type. For example, if you have a Comparator, you can use it to compare values of any specific type.
Kotlin
val anyComparator = Comparator<Any> { e1, e2 -> e1.hashCode() - e2.hashCode() }val strings: List<String> = listOf("abc","xyz")strings.sortedWith(anyComparator) // You can use the comparator for any objects to compare specific objects, such as strings.
Here, the sortedWith function expects a Comparator (a comparator that can compare strings), and it’s safe to pass one that can compare more general types. If you need to perform comparisons on objects of a certain type, you can use a comparator that handles either that type or any of its supertypes. This means Comparator<Any> is a subtype of Comparator<String>, where Any is a supertype of String. The subtyping relation between comparators for two different types goes in the opposite direction of the subtyping relation between those types.
What is contravariance?
A class that is contravariant on the type parameter is a generic class (let’s consider Consumer<T> as an example) for which the following holds: Consumer<A> is a subtype of Consumer<B> if B is a subtype of A. The type arguments A and B changed places, so we say the subtyping is reversed. For example, Consumer<Animal> is a subtype of Consumer<Cat>.
In simple words, contravariance in Kotlin means that the subtyping relationship between two generic types is reversed compared to the normal inheritance hierarchy. If B is a subtype of A, then a generic class or interface that is contravariant on its type parameter T will have the relationship ClassName<A> is a subtype of ClassName<B>.
For a covariant type Producer, the subtyping is preserved, but for a contravariant type Consumer, the subtyping is reversed
Here, we see the difference between the subtyping relation for classes that are covariant and contravariant on a type parameter. You can see that for the Producer class, the subtyping relation replicates the subtyping relation for its type arguments, whereas for the Consumer class, the relation is reversed.
The “in” keyword means values of the corresponding type are passed in to methods of this class and consumed by those methods. Similar to the covariant case, constraining use of the type parameter leads to the specific subtyping relation. The “in” keyword on the type parameter T means the subtyping is reversed and T can be used only in “in” positions.
Covariance and Contravariance in Kotlin’s Function Types
In Kotlin, a class or interface can be covariant on one type parameter and contravariant on another. One of the classic examples of this is the Function interface. Let’s take a look at the declaration of the Function1 interface, which represents a one-parameter function:
To make the notation more readable, Kotlin provides an alternative syntax (P) -> R to represent Function1<P, R>. In this syntax, you’ll notice that P (the parameter type) is used only in the in position and is marked with the in keyword, while R (the return type) is used only in the out position and is marked with the out keyword.
This means that the subtyping relationship for the function type is reversed for the first type argument (P) and preserved for the second type argument (R).
For example, let’s say you have a higher-order function called enumerateCats that accepts a lambda function taking a Cat parameter and returning a Number:
Kotlin
funenumerateCats(f: (Cat) -> Number) { ... }
Now, suppose you have a function called getIndex defined in the Animal class that returns an Int. You can pass Animal::getIndex as an argument to enumerateCats:
Kotlin
funAnimal.getIndex(): Int = ...enumerateCats(Animal::getIndex) // This code is legal in Kotlin. Animal is a supertype of Cat, and Int is a subtype of Number
In this case, the Animal::getIndex function is accepted because Animal is a supertype of Cat, and Int is a subtype of Number, the function type’s subtyping relationship allows it.
The function (T) -> R is contravariant on its argument and covariant on its return type
This illustration demonstrates how subtyping works for function types. The arrows indicate the subtyping relationship.
Use-site variance: specifying variance for type occurrences
To understand use-site variance better, you first need to understand declaration-site variance. In Kotlin, the ability to specify variance modifiers on class declarations provides convenience and consistency because these modifiers apply to all places where the class is used. This concept is known as a declaration-site variance.
Declaration-site variance in Kotlin is achieved by using variance modifiers on type parameters when defining a class. As you already knows there are two main variance modifiers:
out (covariant): Denoted by the out keyword, it allows the type parameter to be used as a return type or read-only property. It specifies that the type parameter can only occur in the “out” position, meaning it can only be returned from functions or accessed in a read-only manner.
in (contravariant): Denoted by the in keyword, it allows the type parameter to be used as a parameter type. It specifies that the type parameter can only occur in the “in” position, meaning it can only be passed as a parameter to functions.
By specifying these variance modifiers on type parameters, you define the variance behavior of the class, and it remains consistent across all usages of the class.
On the other hand, Java handles variance differently through use-site variance. In Java, each usage of a type with a type parameter can specify whether the type parameter can be replaced with its subtypes or supertypes using wildcard types (? extends and ? super). This means that at each usage point of the type, you can decide the variance behavior.
It’s important to note that while Kotlin supports declaration-site variance with the out and in modifiers, it also provides a certain level of use-site variance through the out and in projection syntax (out T and in T). These projections allow you to control the variance behavior in specific usage points within the code.
Declaration-site variance in Kotlin Vs. Java wildcards
In Kotlin, declaration-site variance allows for more concise code because variance modifiers are specified once on the declaration of a class or interface. This means that clients of the class or interface don’t have to think about the variance modifiers. The convenience of declaration-site variance is that the variance behavior is determined at the point of declaration and remains consistent throughout the codebase.
On the other hand, in Java, wildcards are used to handle variance at the use site. To create APIs that behave according to users’ expectations, the library writer has to use wildcards extensively. For example, in the Java 8 standard library, wildcards are used on every use of the Function interface. This can lead to code like Function<? super T, ? extends R> in method signatures.
To illustrate the declaration of the map method in the Stream interface in Java :
In the Java code, wildcards are used in the declaration of the map method to handle the variance of the function argument. This can make the code less readable and more cumbersome, especially when dealing with complex type hierarchies.
In contrast, the Kotlin code uses declaration-site variance, specifying the variance once on the declaration makes the code much more concise and elegant.
BTW, How does use-site variance work in Kotlin?
Kotlin supports use-site variance, you can specify variance at the use site, which means you can indicate the variance for a specific occurrence of a type parameter, even if it can’t be declared as covariant or contravariant in the class declaration. Let’s break down the concepts and see how use-site works.
In Kotlin, many interfaces, like MutableList, are not covariant or contravariant by default because they can both produce and consume values of the types specified by their type parameters. However, in certain situations, a variable of that type may be used only as a producer or only as a consumer.
Consider the function copyData that copies elements from one collection to another:
Kotlin
fun <T> copyData(source: MutableList<T>, destination: MutableList<T>) {for (item in source) { destination.add(item) }}
In this function, both the source and destination collections have an invariant type. However, the source collection is only used for reading, and the destination collection is only used for writing. In this case, the element types of the collections don’t need to match exactly.
To make this function work with lists of different types, you can introduce a second generic parameter:
Kotlin
fun <T : R, R> copyData(source: MutableList<T>, destination: MutableList<R>) {for (item in source) { destination.add(item) }}
In this modified version, you declare two generic parameters representing the element types in the source and destination lists. The source element type (T) should be a subtype of the elements in the destination list (R).
However, Kotlin provides a more elegant way to express this using use-site variance. If the implementation of a function only calls methods that have the type parameter in the “out” position (as a producer) or only in the “in” position (as a consumer), you can add variance modifiers to the particular usages of the type parameter in the function definition.
For example, you can modify the copyData function as follows:
Kotlin
fun <T> copyData(source: MutableList<outT>, destination: MutableList<T>) {for (item in source) { destination.add(item) }}
In this version, you specify the out modifier for the source parameter, which means it’s a projected (restricted) MutableList. You can only call methods that return the generic type parameter (T) or use it in the “out” position. The compiler prohibits calling methods where the type parameter is used as an argument (“in” position).
When using use-site variance in Kotlin, there are limitations on the methods that can be called on a projected type. If you are using a projected type, you may not be able to call certain methods that require the type parameter to be used as an argument (“in” position) :
Kotlin
val list: MutableList<outNumber> = ..list.add(42) // Error: Out-projected type 'MutableList<out Number>' prohibits the use of 'fun add(element: E): Boolean'
Here, list is declared as a MutableList<out Number>, which is an out-projected type. The out projection restricts the type parameter Number to only be used in the “out” position, meaning it can only be used as a return type or read from. You cannot call the add method because it requires the type parameter to be used as an argument (“in” position).
If you need to call methods that are prohibited by the projection, you should use a regular type instead of a projection. In this case, you can use MutableList<Number> instead of MutableList<out Number>. By using the regular type, you can access all the methods available for that type.
Regarding the concept of using the in modifier, it indicates that in a particular location, the corresponding value acts as a consumer, and the type parameter can be substituted with any of its supertypes. This is similar to the contravariant position in Java’s bounded wildcards.
For example, the copyData function can be rewritten using an in-projection:
Kotlin
fun <T> copyData(source: MutableList<T>, destination: MutableList<inT>) {for (item in source) { destination.add(item) }}
In this version, the destination parameter is projected with the in modifier, indicating that it can consume elements of type T or any of its supertypes. This allows you to copy elements from the source list to a destination list with a broader type.
It’s important to note that use-site variance declarations in Kotlin correspond directly to Java’s bounded wildcards. MutableList<out T> in Kotlin is equivalent to MutableList<? extends T> in Java, while the in-projected MutableList<in T> corresponds to Java’s MutableList<? super T>.
Use-site projections in Kotlin can help widen the range of acceptable types and provide more flexibility when working with generic types, without the need for separate covariant or contravariant interfaces.
Star projection: using * instead of a type argument
In Kotlin, star projection is a syntax that allows you to indicate that you have no information about a generic argument. It is represented by the asterisk (*) symbol. Let’s explore the semantics of star projections in more detail.
When you use star projection, such as List<*>, it means you have a list of elements of an unknown type. It’s important to note that MutableList<*> is not the same as MutableList<Any?>. The former represents a list that contains elements of a specific type, but you don’t know what type it is. You can’t put any values into the list because it may violate the expectations of the calling code. However, you can retrieve elements from the list because you know they will match the type Any?, which is the supertype of all Kotlin types.
Here’s an example to illustrate this:
Kotlin
val list: MutableList<Any?> = mutableListOf('a', 1, "qwe")val chars = mutableListOf('a', 'b', 'c')val unknownElements: MutableList<*> = if (Random().nextBoolean()) list else charsunknownElements.add(42) // Error: Adding elements to a MutableList<*> is not allowedprintln(unknownElements.first()) // You can retrieve elements from unknownElements
In this example, unknownElements can be either list or chars based on a random condition. You can’t add any values to unknownElements because its type is unknown, but you can retrieve elements from it using the first() function.
Kotlin
unknownElements.add(42)// Error: Out-projected type 'MutableList<*>' prohibits//the use of 'fun add(element: E): Boolean'
The term “out-projected type” refers to the fact that MutableList<*> is projected to act as MutableList<out Any?>. It means you can safely get elements of type Any? from the list but cannot put elements into it.
For contravariant type parameters, like Consumer<in T>, a star projection is equivalent to <in Nothing>. In this case, you can’t call any methods that have T in the signature on a star projection because you don’t know exactly what it can consume. This is similar to Java’s wildcards (MyType<?> in Java corresponds to MyType<*> in Kotlin).
You can use star projections when the specific information about type arguments is not important. For example, if you only need to read the data from a list or use methods that produce values without caring about their specific types. Here’s an example of a function that takes List<*> as a parameter:
In this case, the printFirst function only reads the first element of the list and doesn’t care about its specific type. Alternatively, you can introduce a generic type parameter if you need more control over the type:
Kotlin
fun <T> printFirst(list: List<T>) {if (list.isNotEmpty()) {println(list.first()) }}
The syntax with star projection is more concise, but it works only when you don’t need to access the exact value of the generic type parameter.
Now let’s consider an example using a type with a star projection and common traps that you may encounter. Suppose you want to validate user input using an interface called FieldValidator. It has a type parameter declared as contravariant (in T). You also have two validators for String and Int inputs.
If you want to store all validators in the same container and retrieve the right validator based on the input type, you might try using a map. However, using FieldValidator<*> as the value type in the map can lead to difficulties. You won’t be able to validate a string with a validator of type FieldValidator<*> because the compiler doesn’t know the specific type of the validator.
Kotlin
val validators = mutableMapOf<KClass<*>, FieldValidator<*>>()validators[String::class] = DefaultStringValidatorvalidators[Int::class] = DefaultIntValidatorvalidators[String::class]!!.validate("") // Error: Cannot call validate() on FieldValidator<*>
In this case, you will encounter a similar error as before, indicating that it’s unsafe to call a method with the type parameter on a star projection. One way to work around this is by explicitly casting the validator to the desired type, but this is not recommended as it is not type-safe.
Kotlin
val stringValidator = validators[String::class] as FieldValidator<String>println(stringValidator.validate("")) // Output: false
This code compiles, but it’s not safe because the cast is unchecked and may fail at runtime if the generic type information is erased.
A safer approach is to encapsulate the access to the map and provide type-safe methods for registration and retrieval. This ensures that only the correct validators can be registered and retrieved. Here’s an example using an object called Validators:
In this example, the Validators object controls all access to the map, ensuring that only correct validators can be registered and retrieved. The code emits a warning about the unchecked cast, but the guarantees provided by the Validators object make sure that no incorrect use can occur.
This pattern of encapsulating unsafe code in a separate place helps prevent misuse and makes the usage of a container safe. It’s worth noting that this pattern is not specific to Kotlin and can be applied in Java as well.
Conclusion
Understanding Kotlin variance helps you write safer, more flexible code. By using out for producers, in for consumers, and keeping generics invariant when necessary, you ensure your programs remain type-safe and efficient.
Next time you see out, in, or *, you’ll know exactly what’s happening and why!
When working with numbers in Kotlin, there may be situations where you need to identify the two smallest numbers from a given list. Whether you are handling data analysis, competitive programming, or simply solving an algorithmic challenge, knowing an efficient way to do this is essential.
The goal is simple: Given a list of integers, find and return the two smallest numbers in that list. If the list has fewer than two elements, the program should handle that scenario gracefully.
The Approach
To solve this problem efficiently, we will use a linear scan method. This ensures that our solution runs in O(n) time complexity, making it optimal for large datasets.
Steps to Find the Two Smallest Numbers
1. Initialize Two Variables: Start by setting two variables, smallest and secondSmallest, to the maximum possible integer value (Int.MAX_VALUE).
2. Iterate Through the List: For each number in the list:
If it is smaller than smallest, update secondSmallest to the current smallest, then update smallest with the new value.
If it is greater than smallest but smaller than secondSmallest, update secondSmallest.
3. Handle Edge Cases: If the list contains fewer than two unique numbers, return an appropriate message.
Let’s implement this in Kotlin!
Kotlin Implementation
Below is the Kotlin program to find the two smallest numbers from a list:
Kotlin
funfindTwoSmallestNumbers(numbers: List<Int>): Pair<Int, Int>? {if (numbers.size < 2) returnnull// Ensure there are at least 2 numbersvar smallest = Int.MAX_VALUEvar secondSmallest = Int.MAX_VALUEfor (num in numbers) {if (num < smallest) { secondSmallest = smallest smallest = num } elseif (num < secondSmallest && num != smallest) { secondSmallest = num } }returnif (secondSmallest == Int.MAX_VALUE) nullelsePair(smallest, secondSmallest)}funmain() {val numbers = listOf(7, 3, 9, 1, 4, 2)val result = findTwoSmallestNumbers(numbers)if (result != null) {println("The two smallest numbers are: ${result.first} and ${result.second}") } else {println("Not enough unique numbers to find two smallest.") }}
Explanation of the Code
Edge Case Handling: The function first checks if the list has fewer than two elements. If so, it returns null.
Initialization:smallest and secondSmallest are initialized to Int.MAX_VALUE to ensure any number in the list will be smaller.
Single Pass Iteration: The list is traversed only once, making this solution efficient.
Conditions to Find the Two Smallest Numbers:
If the current number is smaller than smallest, update both smallest and secondSmallest.
If it is greater than smallest but still smaller than secondSmallest, update secondSmallest.
Final Check: If secondSmallest remains Int.MAX_VALUE, it means the list didn’t have enough unique values, so null is returned.
Dry Run & Output
Input:
Kotlin
List: [7, 3, 9, 1, 4, 2]
Dry Run Processing:
smallest = 7, secondSmallest = Int.MAX_VALUE
3 is smaller than 7 → Update smallest = 3, secondSmallest = 7
9 is greater than both → No update
1 is smaller than 3 → Update smallest = 1, secondSmallest = 3
4 is greater than 3 → No update
2 is greater than 1 but smaller than 3 → Update secondSmallest = 2
Output:
Kotlin
The two smallest numbers are: 1and2
Optimizing the Code
Time Complexity:O(n) (Single pass through the list)
Space Complexity:O(1) (Only a few variables are used, no extra data structures)
Alternative Approach (Using Sorting)
Another way to solve this is by sorting the list and picking the first two elements. However, sorting takes O(n log n) time, which is slower than our approach:
Kotlin
val sortedNumbers = numbers.sorted()val smallestTwo = sortedNumbers.take(2)
While this works, it is less efficient for large lists, making our linear approach the better choice.
Conclusion
Finding the two smallest numbers in a list is a common problem in programming. Using the approach discussed above, we can solve this problem efficiently with just one pass through the list. The key takeaways from this guide are:
Always consider edge cases, such as lists with fewer than two numbers.
Optimize performance by using a single iteration where possible.
Keep code readable and well-structured for easy debugging and maintenance.
This implementation follows best coding practices, making it suitable for real-world applications. Try modifying the code with different test cases to deepen your understanding.
Java provides a robust exception handling mechanism that helps developers write reliable and maintainable code. While Java’s standard exceptions cover many common error scenarios, sometimes you need something more specific to your application’s needs. This is where custom exceptions in Java come into play. But when should you create a custom exception, and when is it unnecessary? Let’s explore this in depth.
What Are Standard Exceptions in Java?
Java has a rich hierarchy of built-in exceptions that developers can use to handle different errors. These standard exceptions fall into two main categories:
1. Checked Exceptions — Must be handled using try-catch or declared using throws.
Example: IOException, SQLException
2. Unchecked Exceptions (Runtime Exceptions) — Do not require explicit handling.
Using standard exceptions is often the best choice because they are well-documented and understood by developers. However, they might not always convey specific application-related issues effectively.
When to Use Custom Exceptions in Java
Custom exceptions are useful when you need to represent domain-specific errors that are not covered by standard exceptions. Here are some scenarios where custom exceptions make sense:
1. When Standard Exceptions Are Too Generic
Standard exceptions may not always provide enough clarity. For instance, if your application processes payments, throwing a generic Exception or IllegalArgumentException isn’t informative. A PaymentProcessingException makes the error clearer.
2. When You Need to Add Extra Information
A custom exception allows you to include additional details about an error, such as error codes, messages, or even metadata.
3. When You Want to Enforce Business Rules
Custom exceptions help enforce specific business logic. For example, if a user tries to withdraw more money than available, you might throw an InsufficientFundsException instead of a generic RuntimeException.
4. When You Need to Handle Exceptions Differently
If your application has a centralized error-handling mechanism, custom exceptions can be helpful in distinguishing different types of errors.
How to Create a Custom Exception in Java
Creating a custom exception in Java is simple. You can extend either Exception (for checked exceptions) or RuntimeException (for unchecked exceptions).
There’s no need for a NegativeAgeException when IllegalArgumentException works perfectly.
2. When They Add Unnecessary Complexity
If an exception doesn’t add meaningful information or handling logic, it might not be worth creating.
3. When Logging and Debugging Are Not Improved
If a custom exception doesn’t make debugging easier or doesn’t offer additional insights, it may not be necessary.
Best Practices for Custom Exceptions
Keep Custom Exceptions Specific — Avoid generic names like MyAppException; use names that reflect the issue, such as UserNotFoundException.
Extend the Right Class — Use Exception for checked exceptions and RuntimeException for unchecked exceptions.
Include Helpful Messages — Provide meaningful messages to help with debugging.
Document Your Exceptions — Ensure other developers understand when and why to use them.
Avoid Creating Too Many Exceptions — Use them only when they add real value.
Conclusion
Custom exceptions in Java are powerful when used appropriately. They provide clarity, enforce business logic, and enhance maintainability. However, standard exceptions should be preferred when they adequately describe an error. The key is to strike the right balance — use custom exceptions only when they genuinely improve code readability, debugging, and error handling.
Kotlin is well known for its concise syntax, expressive features, and seamless support for functional programming. One of its powerful yet often misunderstood features is inline functions. If you’ve ever worked with higher-order functions in Kotlin, you’ve probably encountered situations where performance becomes a concern due to lambda expressions. This is where inline functions in Kotlin come to the rescue!
In this guide, we’ll break down everything you need to know about inline functions, why they exist, how they work and improve performance, and when (or when not) to use them. Whether you’re a beginner or an experienced developer looking for a refresher, this post will help you grasp inline functions in Kotlin with clear explanations and practical examples.
What Are Inline Functions in Kotlin?
Before diving into the details, let’s start with a simple definition.
In Kotlin, an inline function is a function whose body is copied (or “inlined”) at every place it’s called during compilation. This eliminates the overhead of function calls, making the code more efficient, especially when working with lambda functions.
In this case, the function greet() is marked as inline, which means that when greet("amol") is called, the compiler replaces it with:
Kotlin
println("Hello, amol!")
This eliminates the function call and directly places the function body in the main() function, improving efficiency.
Why Were Inline Functions Introduced in Kotlin?
In Kotlin, inline functions can help remove the overhead associated with lambdas and improve performance. When you use a lambda expression, it is typically compiled into an anonymous class. This means that each time you use a lambda, an additional class is created. Moreover, if the lambda captures variables, a new object is created for each invocation. As a result, using Lambdas can introduce runtime overhead and make the implementation less efficient compared to directly executing the code.
To mitigate this performance impact, Kotlin provides the inline modifier for functions. When you mark a function with inline, the compiler replaces every call to that function with the actual code implementation, instead of generating a function call. This way, the overhead of creating additional classes and objects is avoided.
Let’s see a simple example to illustrate this:
Kotlin
inlinefunmultiply(a: Int, b: Int): Int {return a * b}funmain() {val result = multiply(2, 3)println(result)}
In this example, the multiply function is marked as inline. When you call multiply(2, 3), the compiler replaces the function call with the actual code of the multiply function:
Kotlin
funmain() {val result = 2 * 3// only for illustrating purposes, later we will see how it actually works println(result)}
This allows the code to execute the multiplication directly without the overhead of a function call.
Let’s see one more example to illustrate this:
Kotlin
inlinefunperformOperation(a: Int, b: Int, operation: (Int, Int) -> Int): Int {returnoperation(a, b)}funmain() {val result = performOperation(5, 3) { x, y -> x + y }println(result)}
In this example, the performOperation function is marked as inline. It takes two integers, a and b, and a lambda expression representing an operation to be performed on a and b. When performOperation is called, instead of generating a function call, the compiler directly replaces the code inside the function with the code from the lambda expression.
So, in the main function, the call to performOperation(5, 3) will be replaced with the actual code 5 + 3. This eliminates the overhead of creating an anonymous class and improves performance.
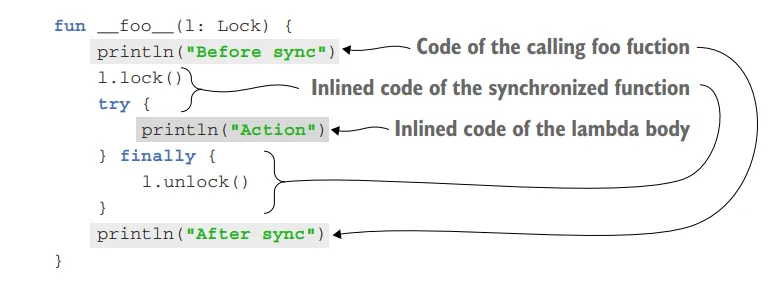
BTW, How inlining works actually?
When you declare a function as inline in Kotlin, its body is substituted directly into the places where the function is called, instead of being invoked as a separate function. This substitution process is known as inlining.
Let’s take a look at an example to understand it more:
In this example, the synchronized function is declared as inline. It takes a Lock object and a lambda action as parameters. The function locks the Lock object, executes the provided action lambda, and then releases the lock.
When you use the synchronized function, the code generated for every call to it is similar to a synchronized statement in Java.
In this case, the lambda expression passed to synchronized is substituted directly into the code of the calling function. The bytecode generated from the lambda becomes part of the definition of the calling function and is not wrapped in an anonymous class implementing a function interface.
Not inlined Case (passing lambda as a parameter)
It’s worth noting that if you call an inline function and pass a parameter of a function type from a variable, rather than a lambda directly, the body of the inline function is not inlined.
Here’s an example:
Kotlin
classLockOwner(val lock: Lock) {funrunUnderLock(body: () -> Unit) {synchronized(lock, body) // A variable of a function type is passed as an argument, not a lambda. }}
In this case, the lambda’s code is not available at the site where the inline function is called, so it cannot be inlined. The body of the runUnderLock function is not inlined because there’s no lambda at the invocation. Only the body of the synchronized function is inlined; the lambda is called as usual. The runUnderLock function will be compiled to bytecode similar to the following function:
Kotlin
classLockOwner(val lock: Lock) {fun__runUnderLock__(body: () -> Unit) { // This function is similar to the bytecode the real runUnderLock is compiled to lock.lock()try {body() // The body isn’t inlined, because there’s no lambda at the invocation. } finally { lock.unlock() } }}
Here, the body of the runUnderLock function cannot be inlined because the lambda is passed as a parameter from a variable (body) rather than directly providing a lambda expression.
Suppose when you pass a lambda as a parameter directly, like this:
Kotlin
lockOwner.runUnderLock {// code block A}
The body of the inline function runUnderLock can be inlined, as the compiler knows the exact code to replace at the call site.
However, when you pass a lambda from a variable, like this:
Kotlin
val myLambda = {// code block A}lockOwner.runUnderLock(myLambda)
The body of the inline function cannot be inlined because the compiler doesn’t have access to the code inside the lambda (myLambda) at the call site. It would require the compiler to know the contents of the lambda in order to inline it.
In such cases, the function call behaves like a regular function call, and the body of the function is not copied to the call site. Instead, the lambda is passed as an argument to the function and executed within the function’s context.
So, suppose even though the runUnderLock function is marked as inline, the body of the function won’t be inlined because the lambda is passed as a parameter from a variable.
What about multiple inlining?
If you have two uses of an inline function in different locations with different lambdas, each call site will be inlined independently. The code of the inline function will be copied to both locations where you use it, with different lambdas substituted into it.
If you have multiple calls to the inline function with different lambdas, like this:
Each call site will be inlined independently. The code of the inline function will be copied to both locations where you use it, with different lambdas substituted into it. This allows the compiler to inline the code at each call site separately.
Restrictions on inline functions
When a function is declared as inline in Kotlin, the body of the lambda expression passed as an argument is substituted directly into the resulting code. However, this substitution imposes certain restrictions on how the corresponding parameter can be used in the function body.
If the parameter is called directly within the function body, the code can be easily inlined. But if the parameter is stored for later use, the code of the lambda expression cannot be inlined because there must be an object that contains this code.
In general, the parameter can be inlined if it’s called directly or passed as an argument to another inline function. If it’s used in a way that prevents inlining, such as storing it for later use, the compiler will prohibit the inlining and show an error message stating “Illegal usage of inline-parameter.”
Let’s consider an example with the Sequence.map function:
Kotlin
fun <T, R> Sequence<T>.map(transform: (T) -> R): Sequence<R> {returnTransformingSequence(this, transform)}
The map function doesn’t call the transform function directly. Instead, it passes the transform function as a constructor parameter to a class (TransformingSequence) that stores it in a property. To support this, the lambda passed as the transform argument needs to be compiled into the standard non-inline representation, which is an anonymous class implementing a function interface.
Why Use Inline Functions in Kotlin?
Inline functions are particularly useful in scenarios where:
Performance Optimization: Reduces function call overhead, making execution faster.
Avoiding Anonymous Object Allocations: Reduces memory allocations by avoiding extra objects for lambdas.
When Not to Use Inline Functions
Although inline functions in Kotlin are beneficial, overusing them can lead to code bloat (increased code size). Here are some situations where you should avoid using inline functions:
Large Function Bodies: If the function body is large, inlining it multiple times will increase the APK size.
Non-Performance Critical Code: For functions that don’t need optimization, inlining may be unnecessary.
Recursion: Recursive inline functions are not allowed in Kotlin since they would cause infinite expansion.
Performance Benefits of Inline Functions
The key benefits of inline functions in Kotlin include:
Reduces function call overhead – No need for extra method calls.
Eliminates unnecessary object creation – No wrapper objects for lambda functions.
Improves performance for high-order functions – Especially beneficial when passing multiple lambdas.
Inline functions in Kotlin are a powerful tool for improving performance, especially when working with higher-order functions and lambda expressions. By eliminating function call overhead and avoiding unnecessary object creation, they help make Kotlin code more efficient.
However, inline functions should be used carefully. Overuse can lead to increased bytecode size, making your application slower rather than faster. The key is to strike a balance—use them where they add value but avoid excessive inlining.
Kotlin Coroutines simplify asynchronous programming, but handling exceptions effectively is crucial to prevent crashes and unexpected behavior. Many developers rely on try-catch, but coroutines offer more powerful ways to manage exceptions. This post explores advanced techniques for Exception Handling in Kotlin Coroutines, ensuring robust and resilient applications.
Understanding Exception Handling in Kotlin Coroutines
Kotlin Coroutines introduce structured concurrency, which changes how exceptions propagate. Unlike traditional threading models, coroutine exceptions bubble up to their parent by default. However, handling them efficiently requires more than a simple try-catch.
Basic Try-Catch in Coroutines
Before diving into advanced techniques, let’s look at the basic approach:
This works but doesn’t leverage coroutine-specific features. Let’s explore better alternatives.
Using CoroutineExceptionHandler
Kotlin provides CoroutineExceptionHandler to catch uncaught exceptions in coroutines. However, it works only for launch, not async.
Kotlin
val exceptionHandler = CoroutineExceptionHandler { _, exception ->println("Caught exception in handler: ${exception.localizedMessage}")}funmain() = runBlocking {val scope = CoroutineScope(Job() + Dispatchers.Default + exceptionHandler) scope.launch {throwRuntimeException("Something went wrong") }delay(100) // Give time for the exception to be handled}
Why Use CoroutineExceptionHandler?
It catches uncaught exceptions from launch coroutines.
It prevents app crashes by handling errors at the scope level.
Works well with structured concurrency if used at the root scope.
It doesn’t work for async, as deferred results require explicit handling.
Handling Exceptions in async
Unlike launch, async returns a Deferred result, meaning exceptions won’t be thrown until await() is called.
To ensure safety, always wrap await() in a try-catch block or use structured exception handling mechanisms.
SupervisorJob for Independent Child Coroutines
By default, when a child coroutine fails, it cancels the entire parent scope. However, a SupervisorJob allows independent coroutine failures without affecting other coroutines in the same scope.
Kotlin
import kotlinx.coroutines.*funmain() = runBlocking {val supervisor = SupervisorJob()val scope = CoroutineScope(supervisor + Dispatchers.Default) // Ensuring a dispatcherval job1 = scope.launch {delay(500)throwIllegalStateException("Job 1 failed") }val job2 = scope.launch {delay(1000)println("Job 2 completed successfully") } job1.join() // Wait for Job 1 (it will fail) job2.join() // Wait for Job 2 (should still succeed)}
How It Works
Without SupervisorJob: If one coroutine fails, the entire scope is canceled, stopping all child coroutines.
With SupervisorJob: A coroutine failure does not affect others, allowing independent execution.
Why Use SupervisorJob?
Prevents cascading failures — a single failure doesn’t cancel the whole scope. Allows independent coroutines — useful when tasks should run separately, even if one fails.
Using supervisorScope for Localized Error Handling
Instead of using SupervisorJob, we can use supervisorScope, which provides similar behavior but at the coroutine scope level rather than the job level:
Kotlin
import kotlinx.coroutines.*funmain() = runBlocking {supervisorScope { // Creates a temporary supervisor scopelaunch {throwException("Failed task") // This coroutine fails }launch {delay(1000)println("Other task completed successfully") // This will still execute } }}
If one child fails, other children keep running (unlike a regular CoroutineScope). Exceptions are still propagated to the parent scope if unhandled.
When to Use Each?
Use SupervisorJob when you need a long-lived CoroutineScope (e.g., ViewModel, Application scope).
Use supervisorScope when you need temporary failure isolation inside an existing coroutine.
Best Practices for Exception Handling in Kotlin Coroutines
Use CoroutineExceptionHandler for launch-based coroutines.
Handle exceptions explicitly when using async.
Leverage SupervisorJob to prevent cascading failures.
Wrap critical code inside supervisorScope when needed.
Log errors properly instead of just printing them.
Always clean up resources (e.g., closing network connections) using finally.
Conclusion
Exception Handling in Kotlin Coroutines is more than just try-catch. With CoroutineExceptionHandler, SupervisorJob, and supervisorScope, you can write robust and resilient coroutine-based applications. Implement these best practices to ensure your coroutines handle failures gracefully, keeping your app stable and efficient.
Kotlin is packed with features that make it both powerful and expressive. One such hidden gem is the underscore (_) operator for type arguments in Kotlin. While it may not be as widely known as other features, it provides a concise and efficient way to work with generics.
In this post, we’ll explore what this operator does, why it’s useful, and how you can leverage it to simplify your Kotlin code.
What is the Underscore (_) Operator for Type Arguments in Kotlin?
In Kotlin, when working with generics, you often have to specify the exact type argument. However, sometimes you just want Kotlin to infer the type for you without explicitly providing it. The underscore (_) operator allows you to do just that—it acts as a placeholder for type arguments.
The syntax looks like this:
Kotlin
val list: List<_> = listOf(1, 2, 3)
Here, instead of specifying List<Int>, we use _, and Kotlin automatically infers that the list contains integers.
Understanding Underscore ( _ ) Operator for type arguments with Example
The underscore operator _ in Kotlin is a type inference placeholder that allows the Kotlin compiler to automatically infer the type of an argument based on the context and other explicitly specified types.
Kotlin
abstractclassSomeClass<T> {abstractfunexecute() : T}classSomeImplementation : SomeClass<String>() {overridefunexecute(): String = "Test"}classOtherImplementation : SomeClass<Int>() {overridefunexecute(): Int = 42}objectRunner {inlinefun <reifiedS: SomeClass<T>, T> run() : T {return S::class.java.getDeclaredConstructor().newInstance().execute() }}funmain() {// T is inferred as String because SomeImplementation derives from SomeClass<String>val s = Runner.run<SomeImplementation, _>()assert(s == "Test")// T is inferred as Int because OtherImplementation derives from SomeClass<Int>val n = Runner.run<OtherImplementation, _>()assert(n == 42)}
Don’t worry! Let’s break down the code step by step:
In this code, we have an abstract class called SomeClass with a generic type T. It declares an abstract function execute() that returns an object of type T.
We have a class called SomeImplementation which extends SomeClass and specifies the generic type as String. It overrides the execute() function and returns the string value "Test".
Similarly, we have another class called OtherImplementation which extends SomeClass and specifies the generic type as Int. It overrides the execute() function and returns the integer value 42.
Below that, we have an object called Runner with a function run(). This function is generic and has two type parameters S and T.It uses the reified keyword to access the type information at runtime. Inside the function, it creates an instance of the specified class S using reflection (getDeclaredConstructor().newInstance()) and calls the execute() function on it, returning the result of type T.
In the above code, the underscore operator is used in the main() function when calling the Runner.run() function. Let’s take a closer look:
Kotlin
val s = Runner.run<SomeImplementation, _>()
In this line, the type parameter T is explicitly specified as _ for the Runner.run() function. Here, _ acts as a placeholder for the type to be inferred by the compiler. Since SomeImplementation derives from SomeClass<String>, the compiler infers T as String for this invocation. Therefore, the variable s is inferred to be of type String, and the Runner.run() function returns the result of executing SomeImplementation, which is the string "Test".
Kotlin
val n = Runner.run<OtherImplementation, _>()
Similarly, in this line, the type parameter T is specified as _ for the Runner.run() function. Since OtherImplementation derives from SomeClass<Int>, the compiler infers T as Int for this invocation. Consequently, the variable n is inferred to be of type Int, and the Runner.run() function returns the result of executing OtherImplementation, which is the integer 42.
By using the underscore operator _ as a type argument, the compiler can automatically infer the appropriate type based on the context and the explicitly specified types.
Why Use the Underscore (_) Operator for Type Arguments in Kotlin?
Using the underscore operator has several benefits:
Simplifies Type Declarations — You don’t have to explicitly specify type arguments when they can be inferred.
Improves Code Readability — It makes code cleaner and easier to read, especially when dealing with complex generics.
Reduces Boilerplate Code — Less repetitive type annotations mean more concise code.
Works with Generic Functions — It allows you to call generic functions without explicitly passing type arguments.
How to Use the Underscore (_) Operator in Kotlin
1. Using _ with Generic Functions
Kotlin lets you use _ when calling generic functions. Suppose you have a function that takes a generic type parameter:
Kotlin
fun <T> printType(value: T) {println("Type: ${value::class.simpleName}")}
You can call this function without explicitly specifying the type argument:
Kotlin
printType<_>(42) // Kotlin infers the type as Int
2. Using _ with Collections
The underscore operator works well with collections, making them more flexible when type inference is possible.
Kotlin infers that getList() returns a List<String> without us specifying it explicitly.
When to Avoid Using the Underscore (_) Operator in Kotlin
While the underscore operator is useful, there are situations where avoiding it can improve code clarity and maintainability:
When Type Inference Fails — If Kotlin cannot determine the type of a variable or lambda parameter, using _ will result in a compilation error.
In Public APIs — Overusing _ in public functions can make the API less clear, potentially confusing users who rely on explicit parameter names for readability.
When Explicit Types Improve Readability — In complex expressions or function signatures, explicitly defining types can enhance code comprehension and maintainability.
Conclusion
The underscore (_) operator for type arguments in Kotlin is a simple yet powerful tool that helps reduce boilerplate code and improve readability. Whether you’re working with collections, or generic functions, it can make your code cleaner and more concise.
Next time you’re dealing with generics, give _ a try and let Kotlin do the heavy lifting for you..!
Kotlin’s coroutines simplify asynchronous programming, but managing them effectively requires a solid understanding of CoroutineScope. Without it, your app may spawn uncontrolled coroutines, leading to memory leaks or unpredictable behavior. In this blog, we’ll take a deep dive into CoroutineScope in Kotlin — exploring its importance, how to use it effectively, and how to avoid common pitfalls.
What is CoroutineScope in Kotlin?
CoroutineScope in Kotlin is an interface that defines a boundary for coroutines. It ensures that all coroutines launched within it follow structured concurrency principles, meaning they get canceled when the scope is canceled.
lifecycleScope.launch {} ensures the coroutine cancels when the activity is destroyed.
Best Practices for Using CoroutineScope in Kotlin
Prefer Built-in Scopes: Use viewModelScope and lifecycleScope for UI-related tasks.
Avoid GlobalScope: Unless absolutely necessary, avoid it to prevent memory leaks.
Always Cancel Coroutines: If using a custom CoroutineScope, ensure you cancel jobs when they’re no longer needed.
Use SupervisorJob for Independent Coroutines: It ensures that if a child coroutine fails, it does not cancel its siblings or the parent scope.
Conclusion
CoroutineScope in Kotlin is crucial for structured concurrency, ensuring that coroutines are properly managed, canceled, and executed within a defined lifecycle. By using viewModelScope, lifecycleScope, and custom scopes wisely, you can build efficient, bug-free Kotlin applications.