The Polestar 2 is the first car with Android Automotive OS Get ready for an incredible driving experience as I unlock the secrets of Android Automotive! Just like your beloved gadgets and apps, now your car can deliver the same easy and exciting journey you’ve come to love. Picture this: seamless integration with your personal...
In the ever-evolving world of Android, each version brings its own set of enhancements and improvements. The past couple of Android versions brought some of the major upgrades Android has gotten since its inception. Android 12 introduced Material You, which brought much-needed UI changes, and Android 13 added quality-of-life improvements over Android 12, making it a more polished experience. Much like Android 13, Android 14 may seem like an incremental upgrade, but you would be surprised by just how many internal changes it brings to improve the overall Android experience.
Throughout this blog post, we will delve into the Android 14 new things you need to know as an Android developer in this fast-paced world. Here, we’ll explore how Android 14 empowers you to create exceptional experiences for your users effortlessly.
So, buckle up and get ready to embark on a thrilling adventure into the future of Android development, as we unravel the wonders of Google I/O 2023 and unveil the exciting world of Android 14!
Android 14 New Features
Android 14 is the latest version of Google’s mobile operating system, and it’s packed with new features for both users and developers. Here’s a look at some of the highlights:
Photo Picker
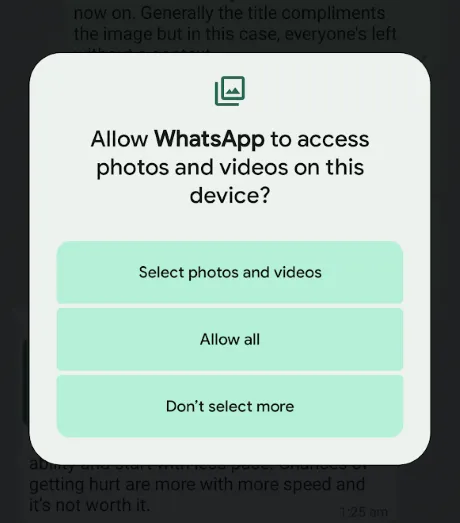
Say goodbye to privacy concerns when it comes to granting access to your photo library! In the past, apps would request access to your entire photo collection even if you just wanted to upload a single picture. This raised legitimate privacy worries since handing over access to all your photos wasn’t the safest option.
Luckily, Android 14 introduces a game-changing solution known as the Photo Picker feature. With this new interface, you have full control over which photos an app can access. Instead of granting unrestricted access, you can now select and share specific photos without compromising your privacy. This means that apps only get access to the photos you choose, ensuring that your entire photo library remains secure.
Thanks to Android 14’s Photo Picker, you can confidently enjoy the convenience of sharing photos while maintaining control over your privacy. It’s a small but significant step towards a safer and more personalized app experience.
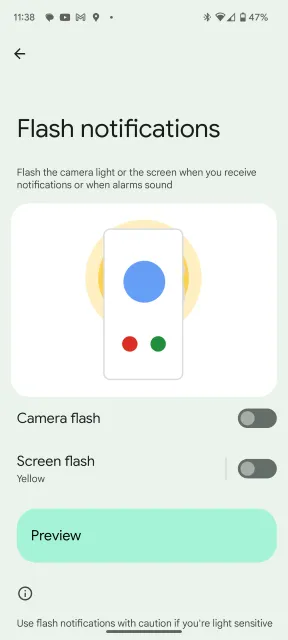
Notification Flashes
Android 14 introduces a handy feature called “Notification Flashes” that proves invaluable in noisy environments or for individuals with hearing difficulties. If you often find yourself in situations where you can’t hear your phone’s notifications, this feature has got you covered.
To enable or disable Notification Flashes, follow these simple steps:
Open your phone’s Settings.
Look for the “Display” option and tap on it.
Scroll down and find “Flash notifications.”
You’ll see two toggle options: “Camera Flash” and “Screen Flash.” Toggle them on or off based on your preference.
If you choose to use Screen Flashes, you can even customize the color of the flash. Here’s how:
Within the “Flash notifications” menu, tap on “Screen Flash.”
You’ll be presented with a selection of colors to choose from.
Tap on a color to preview how it will look.
Once you’re satisfied with your choice, simply close the prompt.
With Notification Flashes, you can stay informed about incoming notifications, even in noisy environments or if you have difficulty hearing. It’s a simple yet powerful feature that enhances accessibility and ensures you never miss an important update.
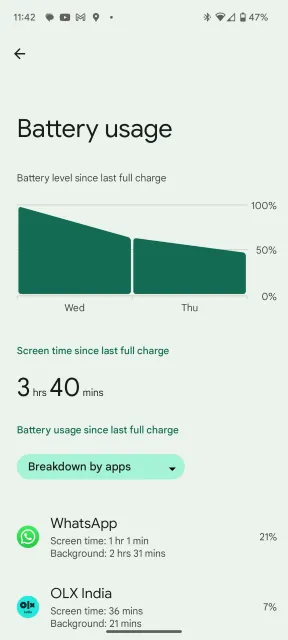
Camera and Battery Life Improvements
Android 14 doesn’t just bring exciting new features but also focuses on enhancing the overall user experience. Google has made significant quality-of-life improvements to ensure a smoother and optimized performance.
One area of improvement is battery consumption. Android 14 is designed to be more efficient, helping to prolong your device’s battery life. This means you can enjoy using your phone for longer periods without worrying about running out of power.
Moreover, both the user interface (UI) and internal workings of Android 14 have been refined to provide a seamless experience. You can expect a smoother and more responsive interface, making navigation and app usage more enjoyable.
In addition to the general improvements, Android 14 introduces new camera extensions. These extensions optimize the post-processing time and enhance the quality of the images captured. If you have a Pixel device powered by the Tensor G2 chip, you’ll notice an even greater improvement in the camera department. The Tensor G2 chip brings significant advancements that further enhance the camera capabilities, resulting in stunning photos with reduced processing time.
With Android 14, you can look forward to a more efficient and polished experience, along with impressive camera enhancements, especially on Pixel devices powered by the Tensor G2 chip. Get ready to enjoy a smoother and more captivating Android journey!
Upcoming Features
As Android 14 is still in the development stage(currently in beta), the upcoming stable version may include or discard these proposed upcoming features.
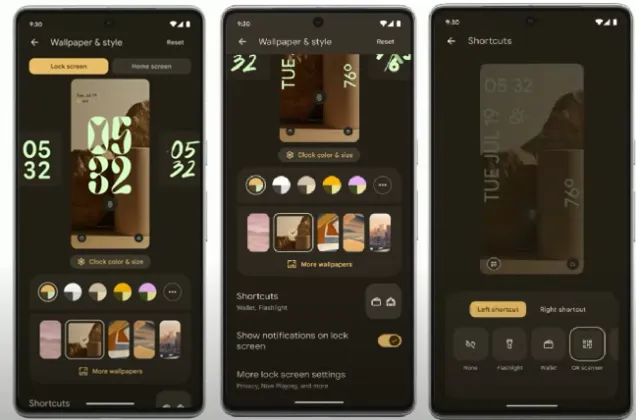
LockScreen Customizations
One of the exciting features coming to Android 14 is the ability to customize your lock screen. This means you can personalize how your lock screen appears, including changing the clock style and customizing the app shortcuts located at the lower corners. This feature draws some inspiration from iOS 16.
These lock screen customizations are expected to be available in the stable Android 14 release, which is scheduled to launch next month if everything goes as planned for Google. However, it’s worth noting that the lock screen clock styles showcased at Google I/O 2023 weren’t particularly appealing, appearing somewhat flat. Hopefully, the final versions will have more vibrant and engaging styles to choose from.
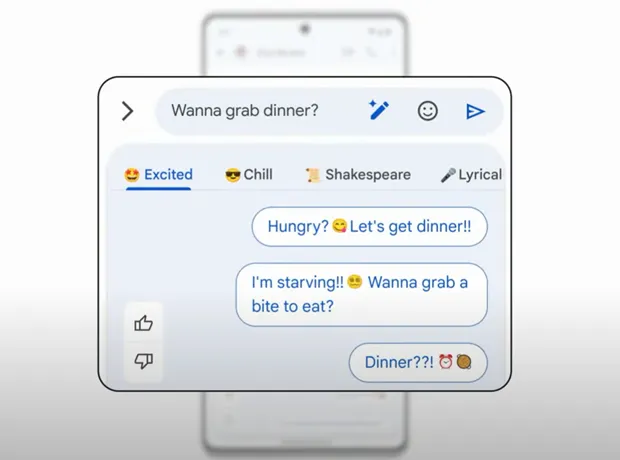
Magic Compose
Google has an exciting feature called “Magic Compose” coming to the Messages app this summer. It works similarly to the AI generative features demonstrated at Google I/O 2023, which will be added to Google’s Workspace apps. Magic Compose helps you write text messages with different moods and styles. From the preview showcased at I/O, it looks really cool.
For example, if you type “Wanna grab dinner,” Magic Compose offers various rewrites that add excitement, lyrical flair, or even Shakespearean language. It’s a clever feature that adds fun and creativity to your messages. We hope it will eventually be available on Gboard as well. It seems like Google’s way of encouraging more people to use RCS and Google Messages in general. However, please note that Magic Compose is currently limited to Pixel devices.
Emoji, Generative AI, and Cinematic Wallpapers
Android has always been known for its customization options, and Android 14 takes it a step further with the addition of Emoji, Generative AI, and Cinematic wallpapers.
The Emoji wallpaper picker lets you create a unique and interactive wallpaper by selecting a few emoji and a dominant color. It combines them to create a fun and personalized wallpaper that reflects your favorite emoji.
The AI Generative Wallpaper feature is particularly exciting. It allows you to input a few words describing the type of wallpaper you want and then generates a selection of unique wallpapers exclusively for your device. These wallpapers are completely one-of-a-kind and tailored to your preferences.
Cinematic wallpapers bring depth and a parallax effect to your photos using AI. You can choose a photo and the feature will add a dynamic effect that responds to your device’s movements. It’s similar to the Cinematic feature in Google Photos, adding a captivating visual element to your device’s wallpaper.
With these customizable features, Android 14 offers even more ways to personalize your device and make it truly your own. Whether it’s through emoji mashups, generative wallpapers, or dynamic effects, Android 14 provides an enhanced level of customization for a unique and enjoyable user experience.
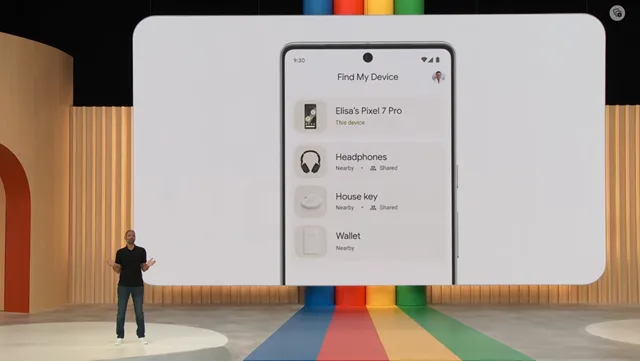
New Find My Device Experience
The Find My Device app on Android has received a fresh new look to match the latest design language. In addition, it will be receiving some exciting new features this fall. One of the notable additions is the expanded device support, allowing you to locate not only your phones but also accessories using other Android devices on the network.
This enhancement is a welcome addition to Android, as Apple has been a leader in the Find My iPhone experience. Furthermore, if you want to track larger objects like bicycles, manufacturers such as Tile and Chipolo will offer tracker tags that can be used with the Find My Device app.
With these updates, Android users can enjoy a more comprehensive and convenient way to locate their devices and belongings. It’s a great step forward in enhancing the Find My Device experience on Android.
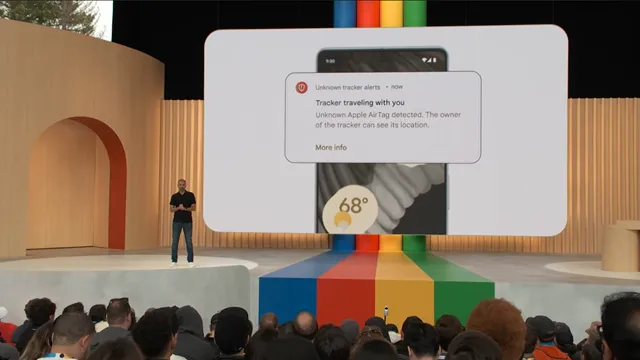
Tracker Prevention and Alerts
Although Google’s efforts to convince Apple to adopt RCS have not been successful, both companies have collaborated on enhancing privacy measures, particularly with Tracker Prevention alerts.
BTW, RCS (Rich Communication Services) is an advanced messaging protocol replacing SMS, offering additional features and capabilities. Some of the features offered by RCS include read receipts, typing indicators, high-quality media sharing, group chats, and the ability to send messages over Wi-Fi or mobile data.
Regardless of the Android device you’re using, if an unidentified tracker is monitoring your activities, your Android device will provide a warning and assist you in locating the source. This collaboration between Google and Apple in the privacy department is a significant achievement, ensuring enhanced privacy and security for Android users.
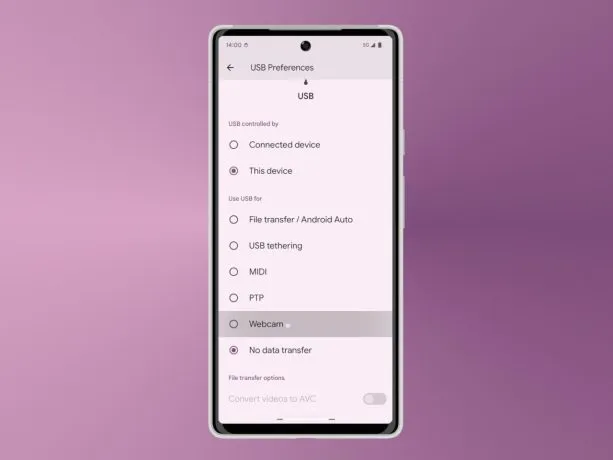
Using your Android device as a Webcam
If you’re disappointed with the low-quality webcam on your laptop, hold off on buying an external webcam just yet. Android 14 might come with a fantastic feature that allows you to use your Android device as an external camera and stream in high-definition at 1080p.
To use this feature, simply connect your Android device to your PC and a menu will pop up. From there, select “webcam” to switch to using your phone’s camera. Currently, this feature is not available in the operating system, even as an experimental option, but it’s expected to be included in Android 14 if Google deems it ready for release.
With Android 14, you could potentially transform your Android device into a high-quality webcam, eliminating the need for an external camera. Keep an eye out for this exciting feature, which aims to provide a better video conferencing and streaming experience for Android users.
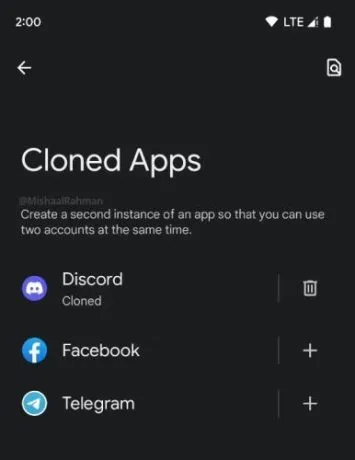
App Cloning
App Cloning is undoubtedly one of the most highly anticipated features in Android. In the past, users had to resort to downloading third-party app cloning utilities that often came bundled with spyware. However, with Android 14, Google plans to address this by introducing a native App Cloning utility.
App Cloning allows you to have two instances of the same app on your device. This feature is particularly useful for users with dual SIM phones who want to use multiple accounts of apps like WhatsApp simultaneously. By cloning the app and logging in with a secondary SIM card, you can have two separate accounts running concurrently.
Google initially hinted at the App Cloning feature during the Android 14 Developer Preview 1. However, there haven’t been any recent updates regarding its development. It is speculated that App Cloning may not be included in the initial stable release of Android 14. However, it is expected to be introduced in future Android 14 feature drop updates, specifically for Pixel users.
The addition of a native App Cloning utility will bring convenience and ease of use to Android users who require multiple instances of certain apps. While its exact timeline for availability remains uncertain, it is an exciting feature to look forward to in future updates of Android 14.
Predictive Back Gestures
Predictive back gestures were introduced in Android 14 Developer Preview 2 but were later removed in the following preview. These gestures allowed users to perform a slow back swipe to reveal the underlying app layer. This was particularly useful when you couldn’t remember the previous page or layer you were on.
By using predictive back gestures, you could check the layer below without losing the contents of the current page. It gave you the flexibility to verify if the previous layer was the one you intended to navigate to.
Initially, this feature was only supported in the Settings app and a few other system apps. However, it remains uncertain whether predictive back gestures will be included in the first stable release of Android 14. If not, there’s a possibility that it will be added in future feature updates.
While the fate of predictive back gestures in Android 14 is unclear, it presented an interesting way to navigate within apps and explore layers. We will have to wait and see if it becomes a part of the official release or is introduced in future updates.
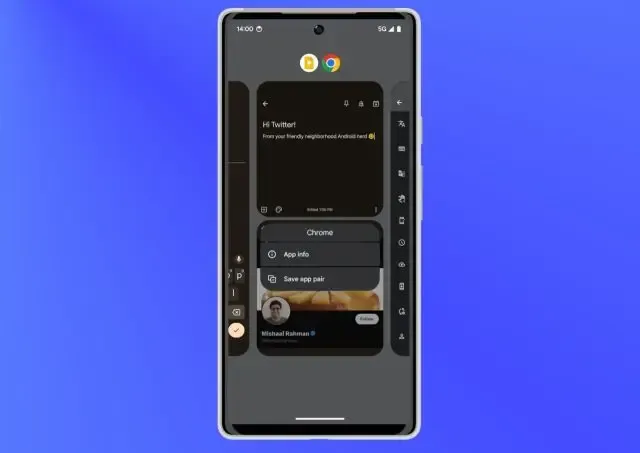
App Pair
During Google I/O 2023, Google unveiled a feature called App Pair, which will be introduced in Android 14 later this year. This feature, showcased during the Pixel Fold announcement, allows users to pair and use apps together in split screens. You can also minimize or maximize them simultaneously.
At first glance, App Pair may not appear particularly useful for smartphones. However, with the increasing popularity of tablets, this feature could be a game-changer. It offers a compelling reason why Android tablets are no longer considered inferior to iPads.
With App Pair, users will have the ability to multitask more effectively on larger screens. By pairing apps in split screens, you can simultaneously use two apps side by side, enhancing productivity and convenience. Whether it’s taking notes while reading, watching a video while browsing the web, or messaging while referencing another app, App Pair makes multitasking on Android tablets a seamless experience.
The inclusion of App Pair in Android 14 demonstrates Google’s commitment to enhancing the tablet experience and bridging the gap between Android tablets and their competitors. It opens up new possibilities for users who rely on tablets for work, entertainment, or any other tasks that require multitasking.
With this upcoming feature, Android tablets are poised to offer a more compelling and competitive alternative to iPads, providing users with a powerful multitasking experience. Look forward to the release of Android 14 to enjoy the benefits of App Pair on compatible devices.
Partial Screen Recorder
In Android 14, a new screen recording feature called “Partial Screen Recording” may be introduced. Despite its name, it doesn’t mean recording only a selected area of the screen. Instead, it allows you to record a specific app without capturing any UI elements or notifications that might appear on the screen.
This feature works similarly to how Discord handles screen sharing. When you switch to view another app or the home screen during the recording, the recorded content will appear black. However, as soon as you switch back to the app you want to record, the content will be visible again. It’s a clever and convenient way to focus solely on recording the app without any distractions.
While the availability of the Partial Screen Recording feature in the official release of Android 14 is not confirmed, it is an exciting addition that can enhance the screen recording experience for users. So, keep an eye out for this neat feature in future Android updates.
Drag and Drop Text and Images to Different Apps
One exciting feature that Android 14 is expected to bring is the ability to drag and drop text and images between apps, similar to what iOS 15 offers. In the Android 14 Beta 3 build, you can already experience this feature with text, and it works seamlessly.
To use the text drag and drop feature, simply select the text you want to move, long press on it, and then drag it to another app where you want to paste the text. With your other hand, switch to the desired app and drop the text into the text area. It’s a convenient way to transfer text quickly and easily between different apps.
While the current beta version only supports text drag and drop, it is anticipated that the final Android 14 release will also include the ability to drag and drop images. This will allow you to effortlessly move images from one app to another, enhancing your productivity and ease of use.
Keep an eye out for the official Android 14 update to enjoy the full drag and drop functionality, making it simpler and more convenient to transfer both text and images between apps on your Android device.
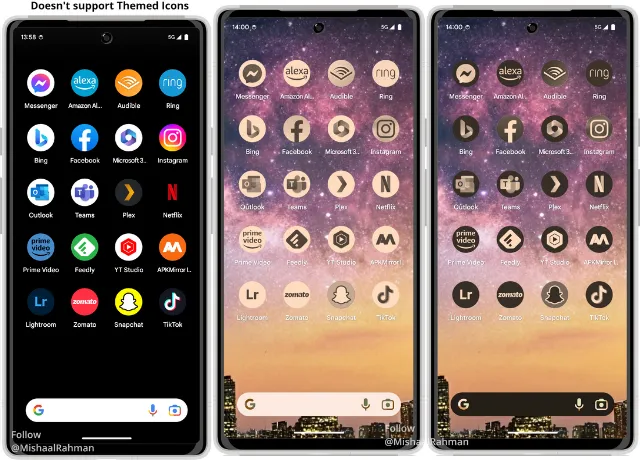
Forced Themed Icons
One of the challenges with adaptive mono icons in Android 12 is that app developers need to add support for them. Without proper support, the overall experience may feel incomplete. However, in Android 13, Google introduced a feature that automatically converts icons to themed icons if they are not supported by developers. This helpful feature may also make its way to Android 14.
Currently, the Pixel launcher has a hidden flag that allows users to force themed icons, which has been present since Android 13 QPR Beta 3. This suggests that Google might enable this feature in the future. If enabled, it will contribute to a seamless and intuitive Android experience, ensuring that the icons match the overall theme of the device.
With automatic icon conversion, users won’t have to worry about inconsistent or mismatched icons on their devices. Android 14 aims to enhance the visual cohesiveness of the user interface, making it more polished and pleasing to the eye.
Keep an eye out for this feature in the upcoming Android 14 release, as it has the potential to improve the overall aesthetic and user experience on your Android device.
Conclusion
Android 14 introduces a range of features and improvements that enhance user experience. It offers customization options like LockScreen customizations and Emoji wallpaper pickers, along with privacy enhancements such as Tracker Prevention alerts. Quality of life improvements includes the Photo Picker feature and Notification Flashes. The update brings camera advancements, App Cloning utility, predictive back gestures, and the ability to use Android devices as external cameras. Android 14 promises a seamless and personalized experience, focusing on user customization and functionality.
Clean Architecture and MVVM Architecture are two popular architectural patterns for building robust, maintainable, and scalable Android applications. In this article, we will discuss how to implement Clean Architecture and MVVM Architecture in an Android application using Kotlin. We will cover all aspects of both architectures in-depth and explain how they work together to create...
I had the opportunity to work with the TCA (The Composable Architecture) in the past and would like to share my knowledge about it with our community. This architecture has gained popularity as a reliable way to create robust and scalable applications. TCA is a composable, unidirectional, and predictable architecture that helps developers to build...
Plugins are modules that provide additional functionality to the build system in Android Studio. They can help you perform tasks such as code analysis, testing, or building and deploying your app.
New Plugin Convention
The new plugin convention for Android Studio was introduced in version 3.0 of the Android Gradle plugin, which was released in 2017. While the new plugin convention was officially introduced in Android Studio 3.0, it is still being used and recommended in recent versions of Android Studio.
To define plugins in the build.gradle file, you can add the plugin’s ID to the plugins block.
Groovy
// Top-level build file where you can add configuration options common to all sub-projects/modules.plugins { id 'com.android.application' version '7.4.2' apply false id 'com.android.library' version '7.4.2' apply false id 'org.jetbrains.kotlin.android' version '1.8.0' apply false}
In this example, the plugins block is used to define three different plugins: ‘com.android.application’, ‘com.android.library’, and ‘org.jetbrains.kotlin.android’. Each plugin is identified by its unique ID, and a specific version is specified as well. The ‘apply false’ statement means that the plugin is not applied to the current module yet — it will only be applied when explicitly called later on in the file.
Once you’ve defined your plugins in the build.gradle file, you can fetch them from the settings file. The settings file is typically located in the root directory of your project, and is named settings.gradle. You can add the following code to the settings.gradle file to fetch your plugins:
This is an example of the new convention for the settings.gradle file in Android Studio, which includes the pluginManagement and dependencyResolutionManagement blocks.
In the pluginManagement block, repositories are defined where Gradle can search for plugin versions. In this example, gradlePluginPortal(), google(), and mavenCentral() are included as repositories. These repositories provide access to a wide range of plugins that can be used in your Android project.
In the dependencyResolutionManagement block, repositories for dependency resolution are defined. The repositoriesMode is set to FAIL_ON_PROJECT_REPOS, which means that if a repository is defined in a module’s build.gradle file that conflicts with one of the repositories defined here, the build will fail. This helps to ensure that dependencies are resolved consistently across all modules in the project.
Finally, the rootProject.name and include statements are used to specify the name of the root project and the modules that are included in the project. In this example, there is only one module, :app, but you can include multiple modules by adding additional include statements.
Advantages Over Traditional Way
The new convention of defining plugins in the build.gradle file and fetching them from the settings file in Android Studio was introduced to improve the modularity and maintainability of the build system.
Traditionally, plugins were defined in a separate file called “buildscript.gradle” and fetched from a separate “build.gradle” file. This approach made it difficult to manage and update plugins, especially in large projects with many dependencies.
By defining plugins in the build.gradle file, the build system becomes more modular and easier to maintain. Each module can specify its own set of plugins, and the build system can handle transitive dependencies automatically.
Fetching plugins from the settings file also provides a central location for managing and updating plugin versions. This approach ensures that all modules use the same version of a plugin, which helps to avoid conflicts and makes it easier to upgrade to newer versions of a plugin.
Disadvantages
Complexity: The new convention adds some complexity to the build system, especially for developers who are not familiar with Gradle or Android Studio. This complexity can make it harder to understand and troubleshoot issues that arise during the build process.
Learning Curve: The new convention requires developers to learn a new way of managing plugins, which can take time and effort. Developers who are used to the traditional approach may find it challenging to adapt to the new convention.
Migration: Migrating an existing project from the traditional approach to the new convention can be time-consuming and error-prone. Developers may need to update multiple files and dependencies, which can introduce new issues and require extensive testing.
In Android development, product flavors allow you to create different versions of your app with different configurations, resources, and code, but with the same base functionality. Product flavors are used when you want to create multiple versions of the same app that differ in some way, such as a free and a paid version, or versions for different countries or languages.
For example, suppose you are creating a language-learning app that supports multiple languages, such as English, Spanish, and French. You could create three different product flavors, one for each language, and configure each flavor to include the appropriate language resources, such as strings, images, and audio files. Each flavor would share the same core codebase but would have different resources and configurations (or consider ABC 123 Learn and Akshar Learn apps, for which I am handling these use cases).
Android Product Flavors
Product flavors are defined in the build.gradle file of your app module. You can define the configuration for each flavor, including things like applicationId, versionName, versionCode, and buildConfigField values. You can also specify which source sets to include for each flavor, which allows you to create different versions of the app with different code, resources, or assets.
Build variants, on the other hand, are different versions of your app that are created by combining one or more product flavors with a build type. Build types are used to specify the build configuration, such as whether to enable debugging or optimize for size, while product flavors are used to specify the app’s functionality and resources.
For example, if you have two product flavors, “free” and “paid”, and two build types, “debug” and “release”, you would have four different build variants: “freeDebug”, “freeRelease”, “paidDebug”, and “paidRelease”. Each build variant would have its own configuration, resources, and code, and could be signed with a different key or configured for different deployment channels.
Resource Merging & Flavor Dimensions
Resource merging is an important part of using product flavors in Android development. When you have multiple product flavors with their own resources, such as layouts, strings, and images, the Android build system needs to merge them together to create the final APK.
Here’s an example of how resource merging works with product flavors:
In this example, we have two flavor dimensions, “language” and “version”. We define four product flavors, “englishFree”, “spanishFree”, “pro”, and “free”, each with their own application ID and app name.
Well, What is Flavor Dimension?
Flavor dimension is a concept in Android Gradle build system that allows the grouping of related product flavors. It is used when an app has multiple sets of product flavors that need to be combined together. For example, if an app is available in multiple countries and each country has multiple build types, then we can use flavor dimensions to group the country-specific flavors together
When we build the app, the Android build system will merge the resources for each product flavor into the final APK. For example, if we have a layout file called “activity_main.xml” in the “res/layout” folder for both “englishFree” and “spanishFree”, the build system will merge them into a single “activity_main.xml” file that includes the appropriate resources for each language.
Now, let’s take a look at how we can use flavor dimensions to create more complex combinations of product flavors:
In this example, we have two flavor dimensions, “language” and “version”, and six product flavors. The “en” and “es” flavors represent the English and Spanish versions of the app, while the “pro” and “free” flavors represent the paid and free versions of the app. We also define two additional product flavors, “enPro” and “esPro”, which combine both language and version dimensions.
When we build the app, the Android build system will merge the resources for each product flavor into the final APK. For example, if we have a layout file called “activity_main.xml” in the “res/layout” folder for both “en” and “es” flavors, the build system will merge them into a single “activity_main.xml” file that includes the appropriate resources for each language. Similarly, if we have a string resource called “app_name” in the “pro” and “en” flavors, the build system will merge them into a single “app_name” resource that includes the appropriate version and language.
We can also use flavor dimensions to create more complex combinations of product flavors. In the example above, we define two additional product flavors, “enPro” and “esPro”, which combine both language and version dimensions. This means that we can create four different versions of the app: “enFree”, “esFree”, “enPro”, and “esPro”, each with their own application ID and app name.
Here’s an example of how we can reference resources for different flavor dimensions in our code:
Kotlin
// Get the app name for the current flavorString appName = getResources().getString(R.string.app_name);// Get the app name for the "enPro" flavorString enProAppName = getResources().getString(R.string.app_name, "en", "pro");// Get the app name for the "esFree" flavorString esFreeAppName = getResources().getString(R.string.app_name, "es", "free");
In this example, we use the getResources() method to get a reference to the app’s resources. We then use the getString() method to get the app name for the current flavor, as well as for the “enPro” and “esFree” flavors, which have different values for the “language” and “version” dimensions.
Pre-Variant Dependencies
When we use product flavors and flavor dimensions to create different variants of our app, we may also need to use different dependencies for each variant. This is where pre-variant dependencies come into play.
Pre-variant dependencies are dependencies that are defined outside of the product flavors and flavor dimensions. These dependencies are applied to all variants of the app, regardless of the product flavor or flavor dimension. We can define pre-variant dependencies in the build.gradle file, outside of the productFlavors and flavorDimensions blocks.
Here’s an example of how we can define pre-variant dependencies:
In this example, we define two pre-variant dependencies: com.google.android.material:material:1.5.0 and androidx.appcompat:appcompat:1.4.1. These dependencies will be applied to all variants of the app, regardless of the product flavor or flavor dimension.
We then define four product flavors, two for the “version” dimension and two for the “language” dimension. We also define flavor-specific dependencies for each flavor dimension. For example, we define enImplementation 'com.squareup.retrofit2:retrofit:2.9.0' for the “en” flavor, which means that this dependency will only be applied to variants that include the “en” flavor.
Finally, we define a pro-variant dependency using the proImplementation keyword. This dependency will be applied only to variants that include the “pro” flavor.
Summary
Overall, product flavors and build variants provide a powerful and flexible way to create different versions of our Android app for different use cases. By combining different flavors and types, we can create highly customizable builds that meet the specific needs of our users.
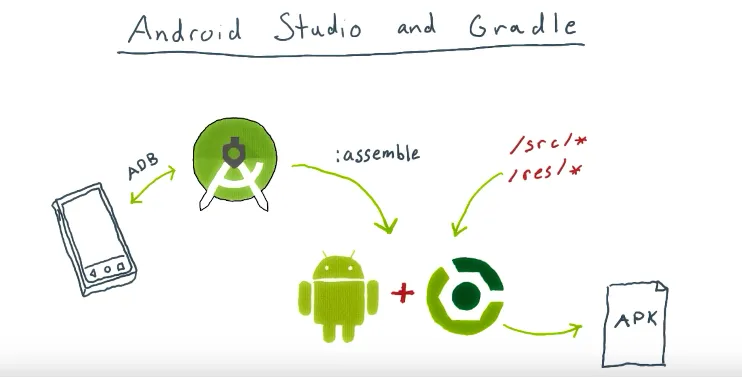
Android Studio and Gradle are two essential tools for developing Android applications. Android Studio is the official integrated development environment (IDE) for Android, while Gradle is the build system used to compile and package your code into an Android application package (APK) file.
Android Studio has an editor with sophisticated code completion and static analysis features. It also has a suite of tools for integrating with Android devices and emulators. The one thing it doesn’t have, however, is an integrated build system. Android Studio delegates the entire build process to Gradle. That’s everything that happens to turn your sources and resources into an APK that you can install on your device.
In this blog post, we’ll explore the features and benefits of Android Studio and Gradle, and how they work together to streamline the Android development process.
Android Studio and Gradle
Android Studio
Android Studio is a powerful and feature-rich IDE that provides developers with a comprehensive set of tools for designing, building, and testing Android applications. Android Studio is built on top of the IntelliJ IDEA platform, which provides a rich and flexible environment for Java and Kotlin development. Some of the key features of Android Studio include:
Layout editor: Android Studio includes a powerful layout editor that allows you to design and preview your app’s user interface (UI) using a drag-and-drop interface. The layout editor also supports a variety of UI components and layouts, making it easy to create a visually appealing and functional UI.
Code editor: Android Studio provides a code editor that supports syntax highlighting, code completion, and code navigation. The code editor also supports a variety of keyboard shortcuts and other productivity features that make coding faster and more efficient.
Debugging tools: Android Studio includes a range of debugging tools that help you identify and fix bugs in your code. The debugger allows you to set breakpoints, inspect variables, and step through your code line by line.
Emulator: Android Studio includes an emulator that allows you to test your app on a variety of virtual devices, including different screen sizes, resolutions, and API levels. The emulator also supports hardware acceleration, making it faster and more responsive than traditional emulators.
Gradle
Gradle is the build system used to compile and package your code into an APK file that can be installed on Android devices. Gradle is built on top of the Groovy programming language and provides a flexible and extensible build system that supports a variety of build configurations and dependencies. Some of the key features of Gradle include:
Build configurations: Gradle allows you to define multiple build configurations for your app, such as “debug” and “release”. Each build configuration can have its own set of build settings and dependencies, making it easy to customize your app for different environments.
Dependency management: Gradle provides a powerful dependency management system that allows you to declare dependencies on other libraries and modules. Gradle automatically downloads and configures the required dependencies, making it easy to include third-party libraries in your app.
Incremental builds:Gradle supports incremental builds, which means that only the parts of your code that have changed since the last build are recompiled. This makes the build process faster and more efficient, especially for large codebases.
Plugins: Gradle supports a variety of plugins that extend its functionality and make it easier to perform common tasks, such as building and testing your app. There are also third-party plugins available for Gradle that provide additional features and integration with other tools.
How Android Studio and Gradle Work Together?
Android Studio and Gradle work together to provide a seamless development experience for Android developers. Android Studio includes built-in support for Gradle, which means that you can easily create and manage Gradle projects within the IDE. When you create a new Android project in Android Studio, the IDE generates a basic Gradle build file that you can customize to suit your project’s needs.
The build file defines the build configurations, dependencies, and other settings for your project. When you build your project, Gradle reads the build file and compiles your code into an APK file. Android Studio provides a graphical interface for managing your Gradle build file, making it easy to configure and customize your build settings.
Android Studio and Gradle also provide a range of plugins and extensions that help you streamline your development workflow. For example, the Android Gradle plugin provides additional functionality for building and testing Android applications, such as support for the Android SDK and integration with the Google Play Store.
Conclusion
Android Studio and Gradle are essential tools for developing high-quality Android applications. Android Studio provides a powerful IDE with a range of features and tools for designing, building, and testing Android apps. Gradle provides a flexible and extensible build system that allows you to customize your app for different environments and include third-party libraries and dependencies. Together, Android Studio and Gradle provide a seamless and efficient development experience for Android developers.
In the ever-evolving landscape of mobile app development, security remains a top concern for developers. Android, being one of the most popular mobile operating systems, is a prime target for malicious actors seeking to exploit vulnerabilities and reverse engineer applications for unauthorized access to sensitive data. To counter these threats, developers employ various techniques, with ProGuard and R8 playing pivotal roles in enhancing the security of Android applications.
Understanding ProGuard
ProGuard is a tool used in Android development to optimize and obfuscate code. It’s an optimization tool that can remove unused code and shrink the size of the application. It also helps to make the code difficult to understand or reverse-engineer by renaming classes, methods, and fields, which is called obfuscation.
ProGuard comes with a set of default rules that are applied to the code during the build process. However, developers can also define their own rules for specific classes, methods, or fields. The rules are defined in a ProGuard configuration file, usually named proguard-rules.pro, which is located in the app module of the Android project.
Here are some examples of ProGuard rules:
Keep a specific class:
Plaintext
-keep class com.example.MyClass { *; }
This rule ensures that the class com.example.MyClass is not removed during the optimization process.
2. Keep a specific method:
Plaintext
-keepclassmembers class com.example.MyClass { public void myMethod(java.lang.String);}
This rule ensures that the method myMethod in the class com.example.MyClass is not removed during the optimization process.
3. Obfuscate class and method names:
Plaintext
-keepnames class com.example.MyClass { void myMethod(java.lang.String);}
This rule obfuscates the names of the class com.example.MyClass and the method myMethod.
4. Remove unused classes:
Plaintext
-dontwarn com.example.UnusedClass-keep class com.example.** { *; }-dontnote com.example.UnusedClass
This rule removes the unused class com.example.UnusedClass from the application and keeps all classes in the com.example package.
These are just a few examples of ProGuard rules that can be used in Android development. ProGuard is a powerful tool that can help optimize and secure an Android application, but it requires careful configuration to avoid unintended consequences.
Does ProGuard provide 100% protection against reverse engineering?
ProGuard is a useful tool for making reverse engineering of Android applications more difficult, but it does not provide 100% protection against reverse engineering.
While ProGuard can obfuscate the code, it does not encrypt it. This means that a determined attacker could still decompile and reverse engineer the code with enough time and effort. Additionally, ProGuard cannot protect against other methods of reverse engineering, such as debugging or analyzing network traffic.
It’s important to note that while ProGuard can make reverse engineering more difficult, it’s not a substitute for implementing proper security measures in an Android application. Developers should also consider other security techniques, such as encryption and secure coding practices, to help protect against reverse engineering and other types of attacks.
What about R8?
R8 is another code shrinking and obfuscation tool that is used in Android development, similar to ProGuard. R8 is included in the Android Gradle plugin and can be enabled by adding the following line to the app module’s build.gradle file:
When R8 is enabled, it analyzes the code and removes unused code and resources, as well as obfuscates the code to make it more difficult to understand or reverse engineer. R8 can achieve similar results to ProGuard, but with better performance and more reliable mapping files for debugging.
One benefit of using R8 is that it is faster than ProGuard, which can result in faster build times. Additionally, R8 can also remove dead code more aggressively than ProGuard, resulting in smaller APK file sizes.
Like ProGuard, R8 is not a foolproof solution for protecting an Android application from reverse engineering, but it can help make it more difficult for attackers to understand and modify the code
Protecting Android App from Reverse Engineering: Best Practices
It’s important to note that there is no 100% reverse engineering safe solution for any software, including Android applications. However, there are several measures that can be taken to make reverse engineering more difficult and protect sensitive data.
Code Obfuscation: Obfuscation is the process of modifying code to make it difficult to understand or reverse engineer. This can be done using tools like ProGuard, which can rename classes, methods, and fields to make them more difficult to understand.
Encryption: Encrypting sensitive data can make it more difficult for attackers to extract information from the application. This can be done using encryption libraries or by implementing secure communication protocols.
Tamper Detection: Implementing tamper detection mechanisms can help detect if the application has been modified or tampered with. This can be done by implementing checksums or digital signatures that can be checked during runtime.
Anti-Debugging Techniques: Implementing anti-debugging techniques can make it more difficult for attackers to debug the application and extract sensitive data. This can be done by implementing code that detects if the application is running in a debugging environment and terminates if it is.
Secure Coding Practices: Following secure coding practices can help prevent vulnerabilities in the application that can be exploited by attackers. This includes practices like input validation, error handling, and secure data storage.
By implementing a combination of these measures, it is possible to make reverse engineering of an Android application more difficult and protect sensitive data. However, it’s important to note that no solution can provide 100% protection against reverse engineering, and implementing security measures is an ongoing process that requires constant monitoring and updating to stay ahead of attackers.
Conclusion
In the constant cat-and-mouse game between developers and malicious actors, the use of tools like ProGuard and R8 is essential for fortifying Android applications against reverse engineering and unauthorized access. By leveraging code obfuscation, optimization, and additional protective measures, developers can significantly enhance the security posture of their apps. Continuous vigilance, staying informed about emerging threats, and adopting best practices in secure coding remain key components of a robust mobile app security strategy.
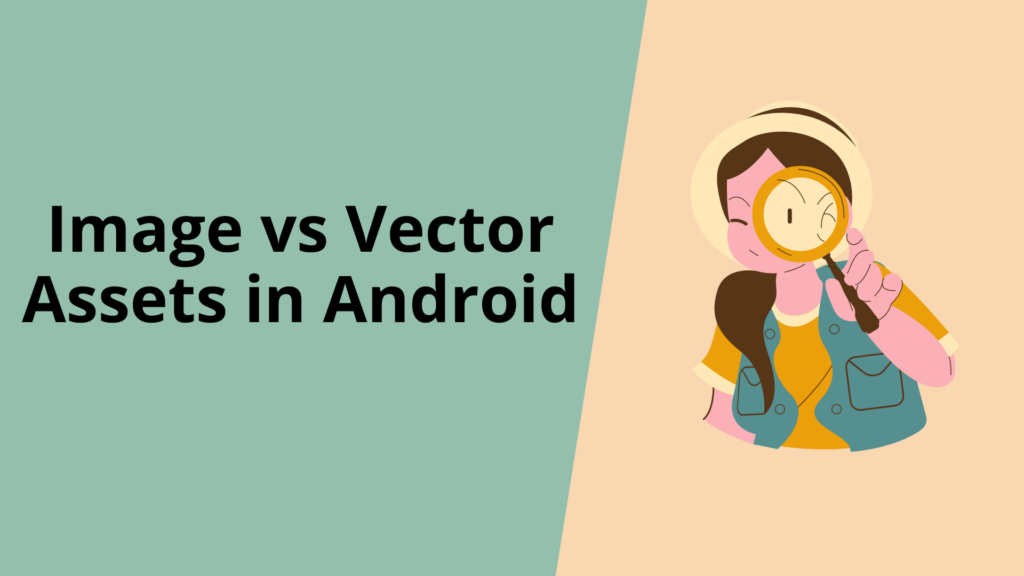
When it comes to creating visually appealing and responsive Android applications, developers often grapple with the decision of using image or vector assets. Both play crucial roles in the overall user experience, but understanding the differences between the two and when to use each is essential. In this comprehensive guide, we’ll explore the characteristics, advantages, and use cases of image and vector assets in the context of Android development.
In Android Studio, image assets and vector assets are two types of resources that can be used in an Android application.
Image assets:
Image assets are raster images that are designed using a bitmap format such as JPEG, PNG, and GIF. These are pixel-based graphics that are made up of a grid of pixels. Image assets are great for displaying realistic images or photographs in your app. However, when it comes to resizing, they can lose quality and become pixelated.
In Android Studio, you can create image assets by going to the “res” folder and selecting “New > Image Asset”. You can then select the image you want to use and choose various settings such as the file type, size, and name.
Vector assets:
Vector assets are graphics that are created using mathematical equations to define lines, curves, and shapes. Vector assets are resolution-independent and can be scaled to any size without losing quality. They are great for displaying icons, logos, and other graphics that need to be displayed in multiple sizes and resolutions.
In Android Studio, you can create vector assets by going to the “res” folder and selecting “New > Vector Asset”. You can then select the image you want to use and choose various settings such as the name, color, and size.
Image Asset Vs Vector Asset :
The main difference between image assets and vector assets in Android Studio is that image assets are raster images, while vector assets are made up of mathematical equations.
Here are some of the key differences between image assets and vector assets:
Resolution: Image assets are made up of a fixed number of pixels and have a fixed resolution, while vector assets are resolution-independent and can be scaled up or down without losing quality.
Size: Image assets can be very large in size, especially if they are high-resolution, while vector assets are generally much smaller in size.
Quality: When you resize an image asset, it can become blurry or pixelated, while vector assets maintain their quality at any size.
Compatibility: Image assets may not be compatible with all devices or screen resolutions, while vector assets can be used on any device and screen resolution.
Editing: Image assets can be edited using image editing software like Photoshop, while vector assets can be edited using vector graphics software like Adobe Illustrator.
In general, if you need to display a realistic image or photograph in your app, use image assets. If you need to display an icon or logo that needs to be displayed in multiple sizes and resolutions, use vector assets.
Choosing the Right Asset for the Right Scenario
Performance Considerations:
Image assets may be preferable for static, high-detail visuals.
Vector assets are optimal for scalable elements, icons, and animations.
App Size and Loading Times:
Image assets contribute to larger app sizes.
Vector assets help reduce app size and loading times.
Screen Density:
Image assets require multiple versions for different screen densities.
Vector assets scale seamlessly across various screen densities.
Editing and Customization:
Image assets are often more challenging to edit without losing quality.
Vector assets can be easily customized and modified without compromising quality.
Dynamic UI Elements:
For dynamic and interactive UI elements, vectors are preferred.
Image assets may be suitable for static elements with no need for scalability.
Summary
In the dynamic world of Android development, the choice between image and vector assets is a critical consideration. Both have their strengths and weaknesses, and the decision should be based on the specific requirements of the app. Striking a balance between visual appeal, performance, and scalability is key to creating a successful and engaging Android application. By understanding the characteristics of each asset type, developers can make informed choices that contribute to a seamless and visually pleasing user experience.
In summary, image assets are raster graphics that are great for displaying realistic images, while vector assets are resolution-independent and are great for displaying icons, logos, and other graphics that need to be displayed in multiple sizes and resolutions.
In the dynamic realm of Android app development, the process of implementing In-App Billing can be both challenging and time-consuming. To ease the burden on budding Android developers, today I am excited to share an easy-to-implement solution: the Google-IAP library, specifically tailored for In-App Billing. This library not only streamlines the implementation process but also minimizes the code required for handling in-app purchases.
Overview of Android In-App Billing / Google-IAP Library
The Google-IAP library is designed to simplify the integration of In-App Billing into Android applications. It stands out for its minimalist approach, offering developers a quick and efficient solution for testing and fast-paced development. With minimal lines of code, the library enables seamless in-app purchase handling, making it an ideal choice for novice Android developers.
Advantages of Google-IAP Library
Minimal Code: One of the standout features of the Google-IAP library is its minimalistic approach to code. Developers can achieve in-app billing functionality with just a few lines of code, reducing the complexity and making the integration process more accessible for beginners.
Fast Development: Time is of the essence in the world of app development, and the Google-IAP library acknowledges this reality. By providing a straightforward and efficient solution, it enables developers to implement in-app purchases rapidly, accelerating the overall development process.
Ease of Testing: The library comes with built-in features that facilitate testing. This is especially beneficial during the development phase, allowing developers to ensure that the in-app billing functionality works as expected without the need for extensive debugging.
The Importance of Understanding Google Play Billing Library
While the Google-IAP library offers a convenient solution for quick implementation, it is crucial to emphasize the significance of understanding and considering the official Google Play Billing Library. Google Play Billing Library is a Google product, ensuring continuous updates and support, and is the recommended tool for handling in-app purchases on the Android platform.
Recommendation for Developers
As a best practice, it is strongly recommended that developers first gain a thorough understanding of the Google Play Billing Library and attempt to use it in their projects. Google’s product comes with the assurance of ongoing updates and support, ensuring compatibility with the latest Android versions and addressing any potential issues.
Caution Regarding Third-Party Libraries: While third-party libraries like Google-IAP can offer quick solutions, there is always a level of uncertainty regarding future updates and support. Relying solely on third-party libraries may lead to complications if they are not actively maintained. To avoid potential consequences in the long run, it is advisable to prioritize the official Google Play Billing Library for in-app billing implementations.
Conclusion
In conclusion, the Google-IAP (Play Billing Library Version 5.0.0) emerges as a handy tool for Android developers, especially those looking for a quick and easy solution for in-app billing. However, it is imperative to balance expediency with long-term stability. Developers are encouraged to first understand and consider the Google Play Billing Library, harnessing the power of an official Google product for robust and future-proof in-app purchase implementations. By doing so, developers can strike a balance between speed and reliability in their Android app development journey.