Dependency Injection (DI) is a crucial concept in modern Android development, enabling better code maintainability, scalability, and testability. Hilt, built on top of Dagger, is the official dependency injection framework recommended by Google for Android. In this blog, we’ll dive deep into the internal workings of Hilt, exploring how it simplifies dependency injection, how it operates behind the scenes, and why it’s essential for building robust Android applications.
What is Dependency Injection?
Dependency Injection is a design pattern where an object’s dependencies are provided externally rather than the object creating them itself. This decouples object creation and object usage, making the code easier to test and manage.
Hilt primarily provides dependencies at runtime, but it also performs compile-time validation and code generation to ensure correctness and optimize dependency injection.
Let’s see each approach in detail.
Compile-Time: Validation and Code Generation
Annotation Processing: Hilt uses annotation processors (kapt or ksp) during compile-time to scan annotations like @Inject, @HiltAndroidApp, @Module, @InstallIn, and others.
Dagger Code Generation: Hilt builds on top of Dagger, which generates code for dependency injection at compile-time. When annotations like @HiltAndroidApp, @Inject, and @Module are used, Hilt generates the required Dagger components and modules at compile-time.
Validation:
Hilt ensures at compile-time that:
Dependencies have a valid scope (SingletonComponent, ActivityComponent, etc.).
Required dependencies are provided in modules.
There are no circular dependencies.
This means many potential runtime issues (like missing dependencies or incorrect scopes) are caught early at compile-time.
Note: At compile-time, Hilt generates the dependency graph and the necessary code for injecting dependencies correctly.
Run-Time: Dependency Provision and Injection
Once the code is compiled and ready to run, Hilt takes over at runtime to provide the actual dependency instances.
It uses the dependency graph generated at compile-time to resolve and instantiate dependencies.
Dependency injection happens dynamically at runtime using the generated Dagger components. For Example, a ViewModel with @Inject constructor gets its dependencies resolved and injected at runtime when the ViewModel is created.
Compile-Time vs Run-Time
So, while Hilt validates and generates code at compile-time, it provides and manages dependency instances at runtime.
If you’re looking for a one-liner:
“Hilt performs dependency graph generation and validation at compile-time, but the actual dependency provisioning happens at runtime.”
This dual-stage approach balances early error detection (compile-time) and flexibility in object creation (runtime).
Best Practices
Use @Singleton for dependencies shared across the entire application.
Avoid injecting too many dependencies into a single class.
Structure modules based on feature scope.
Leverage @Binds instead of @Provides when possible.
Conclusion
Hilt simplifies dependency injection in Android by reducing boilerplate and offering seamless integration with Jetpack libraries. Understanding its internal architecture, component hierarchy, and generated code can significantly improve your development process and app performance.
In modern Android development, managing dependencies efficiently is crucial for maintaining clean, modular, and testable code. Dependency injection (DI) has emerged as a powerful pattern to decouple components and promote reusable and maintainable software. However, the complexity of managing DI can grow rapidly as an app scales. This is where Hilt comes in — a...
Jetpack Compose has revolutionized Android UI development by introducing a declarative UI paradigm. At its core, Compose relies on two fundamental concepts: State and Recomposition. These concepts are crucial for building efficient, responsive, and reactive user interfaces.
What is State in Jetpack Compose?
State is any value that can change over time and affect the UI. In the context of UI development:
State represents any piece of data that can change over time and impacts the UI.
For example: A counter value in a button click scenario, a text field’s current input, or the visibility of a UI component( something like loading spinner).
Example:
Kotlin
var count byremember { mutableStateOf(0) }
I have a question: Is State quite similar to a regular Kotlin variable?
To answer this, we first need to understand what recomposition is and how it works. Once we understand that, we’ll be able to see the difference between state and regular Kotlin variables.
So, What is recomposition?
In Jetpack Compose, we build apps using hierarchies of composable functions. Each composable function takes data as input and uses it to create parts of the user interface, which are then displayed on the screen by the Compose runtime system.
Typically, the data passed between composable functions comes from a state variable declared in a parent function. If the state value changes in the parent, the child composables relying on that state must also reflect the updated value. Compose handles this with a process called recomposition.
Recomposition happens whenever a state value changes. Compose detects this change, identifies the affected composable functions, and calls them again with the updated state value.
Why is recomposition efficient?
Instead of rebuilding the entire UI tree, Compose uses intelligent recomposition. This means only the functions that actually use the changed state value are recomposed. This approach ensures that updates are fast and efficient, avoiding unnecessary processing.
In short, Compose efficiently updates only the parts of the UI affected by state changes, keeping performance smooth and responsive.
Now, back to our question: What’s the difference between a state variable and a regular Kotlin variable?
At first glance, a state variable in Jetpack Compose might seem similar to a regular Kotlin variable, which can also hold changing values during an app’s execution. However, state differs from a regular variable in two important ways:
Remembering the state variable value: When you use a state variable inside a composable function (a UI function in Jetpack Compose), its value should be remembered between function calls. This means that the state doesn’t get reset every time the composable function is called again. If it were a normal variable, it would get reset each time the function is called, but for state variables, Jetpack Compose makes sure they “remember” their previous values so the UI stays consistent.
Implications of changing a state variable: When you change the value of a state variable, it triggers a rebuild of not just the composable function where the state is defined, but also all the composable functions that depend on that state. This means that the entire UI tree (the hierarchy of composables) can be affected, and parts of it may need to be redrawn to reflect the new state. This is different from a regular function where changes in local variables only affect that specific function.
Let’s compare how state behaves differently from a regular Kotlin variable in code.
Kotlin
@ComposablefunCounter() {// State variable that remembers its valuevar count byremember { mutableStateOf(0) }Button(onClick = { count++ }) {Text("Clicked $count times") }}
Here,
count is a state variable. Its value is “remembered” across recompositions.
When count changes (on clicking the button), the UI updates automatically.
On the other hand, with a regular Kotlin variable…
When the button is clicked, count is incremented, but it doesn’t “remember” its previous value.
As a result, the composable doesn’t re-render with the updated value because the value of count is reset every time the composable is called.
In short: State in composables is “sticky” (it remembers its value), and changing the state affects the UI by causing relevant parts to be updated automatically. These two differences make state a powerful tool for managing dynamic and reactive UIs in Compose.
Mutable vs Immutable State
Mutable State: Can change over time (e.g., mutableStateOf)
Immutable State: Cannot change once initialized (e.g., val)
Why is State Important?
State drives how your UI looks and behaves. In Compose:
State updates trigger recompositions (UI updates).
Compose ensures the UI is always consistent with the current state.
Conclusion
State and Recomposition are foundational concepts in Jetpack Compose. Properly managing state and understanding how recomposition works can lead to efficient and scalable Android applications.
Understanding these concepts is not just about syntax but about building a mental model for how Jetpack Compose interacts with state changes. Start experimenting with small examples, and you’ll soon master the art of managing state in Compose effectively.
In modern Android development, user interface (UI) design has evolved to provide more immersive and visually engaging experiences. One of the ways this is achieved is through edge-to-edge UI, where the content extends to the edges of the screen, including areas that are typically reserved for system UI elements such as the status bar and navigation bar.
Jetpack Compose, Android’s modern UI toolkit, allows developers to easily implement edge-to-edge UI with the enableEdgeToEdge() function. In this blog post, we’ll dive deep into what enableEdgeToEdge() is, how to use it effectively, and the implications it has for your app’s design.
What is enableEdgeToEdge()?
The function enableEdgeToEdge() is part of Jetpack Compose’s toolkit, enabling edge-to-edge UI. This concept refers to making your app’s content extend all the way to the edges of the device’s screen, eliminating any unnecessary padding around the system bars.
By default, Android provides some padding around the system bars (like the status bar at the top and the navigation bar at the bottom) to ensure that UI elements are not hidden behind them. However, in some apps (especially media-rich apps, games, or apps with a focus on visual appeal), this padding might be undesirable. That’s where enableEdgeToEdge() comes in.
Key Benefits of enableEdgeToEdge()
Immersive Experience:
This approach is often used in media apps, games, or apps that want to provide a full-screen experience. For example, when watching a movie or playing a game, you want the content to take up every inch of the screen, without being obstructed by the status bar or navigation controls.
Maximizing Screen Real Estate:
With phones becoming more sophisticated and offering more screen space, it’s essential to use every available pixel for displaying content. By removing the default padding around the system bars, you’re ensuring that users are using the maximum screen area possible.
Polished and Modern UI:
Edge-to-edge design feels fresh and modern, particularly in a time when users expect sleek, minimalistic designs. It also allows your app to blend seamlessly with the rest of the system’s visual language.
How to Use enableEdgeToEdge()
In Jetpack Compose, enabling edge-to-edge UI is simple and straightforward. Here’s how to set it up in your app:
1. Basic Usage
You can enable edge-to-edge UI by calling the enableEdgeToEdge() function within your Compose UI hierarchy. This function is often used in the onCreate() method of your activity or in your MainActivity.
The enableEdgeToEdge() function is called inside the onCreate() method, right before setting the content view.
Scaffold is used as a layout container, and the Box is set to fill the maximum available size of the screen.
The Text is then rendered with a background and takes up the full screen.
2. Handling System Bars (Status Bar, Navigation Bar)
Once you enable edge-to-edge, you may need to adjust the layout to ensure that UI components don’t get hidden under the status or navigation bar. Jetpack Compose gives you flexibility to manage this.
For instance, you may want to add padding to ensure your content isn’t obscured by the status bar or navigation bar. You can do this by using WindowInsets to account for the system UI:
We use WindowInsets.systemBars to get the safe area insets for the system bars (status and navigation bars).
Padding is applied to ensure that content doesn’t overlap with the system bars.
Best Practices for Edge-to-Edge UI
While edge-to-edge UI is visually appealing, there are a few things to keep in mind to ensure a smooth user experience:
Safe Area Insets:
Always account for safe areas (areas that are not overlapped by system bars) when positioning UI elements. This prevents important content from being obscured.
Gesture Navigation:
Modern Android devices often use gesture-based navigation instead of traditional navigation buttons. Make sure to account for the bottom edge of the screen where gestures are detected.
Status Bar and Navigation Bar Color:
When enabling edge-to-edge UI, consider customizing the color of your status bar and navigation bar to match your app’s design. Use SystemUiController in Jetpack Compose to change the status bar and navigation bar colors to blend seamlessly with the content.
In some cases, especially on devices with notches, curved edges, or unusual screen shapes, your content might end up being cut off. Always test on different devices to ensure the layout is not disrupted.
Accessibility:
Some users may have accessibility features enabled, such as larger font sizes or screen magnifiers. Be mindful of how your layout behaves with these features.
Device-Specific UI:
Devices like foldables or those with punch-hole cameras require special handling to avoid content being hidden in the camera notch area. Make sure your app handles all edge cases.
Conclusion
enableEdgeToEdge() in Jetpack Compose offers a simple and effective way to create immersive, modern, and visually appealing Android UIs. By removing the default padding around system bars, you can leverage the full screen real estate and create seamless, full-screen experiences in your apps.
However, it’s important to test and adjust your app’s layout for different devices, screen sizes, and system configurations. When used correctly, edge-to-edge UI can elevate the user experience, making your app feel more polished and in line with current design trends.
Android development has experienced tremendous evolution over the years. Among the most significant changes has been the shift in how developers build user interfaces (UIs). Traditionally, Android developers relied on XML-based layouts for UI creation. While this method served its purpose, it came with several limitations and inefficiencies. Enter Jetpack Compose, a revolutionary UI toolkit that eliminates many of the challenges developers faced with traditional Android UI frameworks.
In this blog, we will explore the drawbacks of traditional Android UI toolkits and how Jetpack Compose addresses these issues with its powerful, modern core features. By the end of this post, you’ll understand why Jetpack Compose is a game-changer for Android UI development and how it can streamline your development process.
Traditional Android UI Toolkit: Drawbacks and Limitations
Before we dive into the core features of Jetpack Compose, let’s first take a look at the challenges that Android developers have faced with traditional UI toolkits.
1. Complex XML Layouts
In traditional Android development, UI elements are defined in XML files, which are then “inflated” into the activity or fragment. This approach introduces several complexities:
Verbose Code: XML layouts tend to be verbose, requiring extensive boilerplate code to define simple UI elements.
Separation of UI and Logic: With XML layouts, UI components are separated from the logic that controls them. This makes it harder to manage and maintain the app’s UI, especially as the app grows.
Difficulty in Dynamic Changes: Updating UI components dynamically (e.g., changing a button’s text or visibility) requires cumbersome logic and manual updates to the views, leading to more maintenance overhead.
2. View Binding and FindViewById
Before the introduction of View Binding and Kotlin Extensions, Android developers used the findViewById() method to reference views from XML layouts in their activities. This approach has several drawbacks:
Null Safety: Using findViewById() can result in null pointer exceptions if a view doesn’t exist in the layout, leading to potential crashes.
Repetitive Code: Developers have to call findViewById() for each UI element they want to reference, resulting in repetitive and error-prone code.
Complexity in Managing State: Managing UI state and dynamically updating views based on that state required a lot of boilerplate code and manual intervention.
3. Hard to Maintain Complex UIs
As apps grow in complexity, managing and maintaining the UI becomes more difficult. Developers often need to manage multiple layout files and ensure that changes to one layout do not break others. This becomes especially challenging when dealing with screen sizes, orientations, and platform variations.
4. Limited Flexibility in Layouts
XML layouts are not particularly flexible when it comes to defining complex layouts with intricate customizations. This often requires developers to write custom views or use third-party libraries, adding extra complexity to the project.
The Rise of Jetpack Compose: Modern UI Toolkit
Jetpack Compose is a declarative UI toolkit that allows Android developers to create UIs using Kotlin programming language. Unlike traditional XML-based layouts, Jetpack Compose defines the UI within Kotlin code, making it easier to work with and more dynamic. By leveraging Kotlin’s power, Jetpack Compose provides a more modern, flexible, and efficient way to develop Android UIs.
Now, let’s take a deep dive into how Jetpack Compose overcomes the drawbacks of traditional Android UI toolkits and why it’s quickly becoming the go-to choice for Android development.
1. Declarative UI: Simplicity and Flexibility
One of the key principles behind Jetpack Compose is the declarative approach to UI development. In traditional Android development, you would have to describe the layout of UI elements and the logic separately (in XML and Java/Kotlin code). In Jetpack Compose, everything is done inside the Kotlin code, making it much simpler and more cohesive.
With Jetpack Compose, you describe the UI’s appearance by defining composable functions, which are functions that define how UI elements should look based on the app’s current state. Here’s a simple example of a button in Jetpack Compose:
The declarative nature allows for UI elements to be modified easily by changing the state, reducing the complexity of managing UI components manually.
2. No More findViewById or View Binding
One of the pain points of traditional Android UI development was the need to reference views using findViewById() or even use View Binding. These approaches added complexity and could result in null pointer exceptions or repetitive code.
With Jetpack Compose, there is no need for findViewById() because all UI elements are created directly in Kotlin code. Instead of manually referencing views, you define UI components using composables. Additionally, since Jetpack Compose uses state management, the UI automatically updates when the state changes, so there’s no need for manual intervention.
3. Less Boilerplate Code
Jetpack Compose significantly reduces the need for boilerplate code. In traditional XML-based development, a UI element like a button might require multiple lines of code across different files. In contrast, Jetpack Compose reduces it to just a few lines of Kotlin code, which leads to cleaner and more maintainable code.
For instance, creating a TextField in Jetpack Compose is extremely simple:
Kotlin
@ComposablefunSimpleTextField() {var text byremember { mutableStateOf("") }TextField(value = text, onValueChange = { text = it })}
As you can see, there’s no need for complex listeners or setters—everything is managed directly within the composable function.
4. Powerful State Management
State management is an essential aspect of building dynamic UIs. In traditional Android UI toolkits, managing state across different views could be cumbersome. Developers had to rely on LiveData, ViewModels, or other complex state management tools to handle UI updates.
Jetpack Compose, however, handles state seamlessly. It allows developers to use state in a much more intuitive way, with mutableStateOf and remember helping to store and manage state directly within composables. When the state changes, the UI automatically recomposes to reflect the new state, saving developers from having to manually refresh views.
This simple, dynamic approach to state management is one of the core reasons why Jetpack Compose is considered a powerful modern toolkit.
5. Customizable and Reusable Components
Jetpack Compose encourages the creation of reusable UI components. Composables can be easily customized and combined to create complex UIs without sacrificing maintainability. In traditional Android development, developers often need to write custom views or use third-party libraries to achieve flexibility in their layouts.
In Jetpack Compose, developers can create custom UI components effortlessly by combining smaller composables and applying modifiers to adjust their behavior and appearance. For example:
This flexibility allows for more scalable and maintainable UI code, which is particularly beneficial as the app grows.
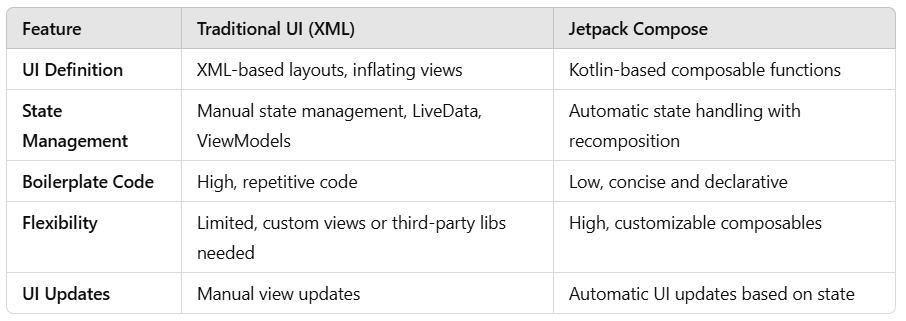
Jetpack Compose vs. Traditional UI: The Key Differences
Core Features of Jetpack Compose
Declarative UI: Build UIs by defining composables, leading to a cleaner and more intuitive way of designing apps.
State Management: Automatic UI recomposition based on state changes, reducing manual updates.
Reusable Components: Easy to create modular, reusable, and customizable UI elements.
Kotlin Integration: Leverages Kotlin’s features for more concise, readable, and maintainable code.
No XML: Eliminates the need for XML layouts, improving development speed and reducing errors.
Conclusion
Jetpack Compose is not just another Android UI toolkit; it is a game-changing approach to UI development. It addresses the drawbacks of traditional Android UI toolkits by providing a declarative, flexible, and efficient way to build user interfaces. By eliminating the need for XML layouts, simplifying state management, and promoting reusability, Jetpack Compose empowers developers to create modern Android UIs faster and with less complexity.
As Android development continues to evolve, Jetpack Compose is poised to be the future of UI design, and adopting it now can help streamline your development process and lead to better, more maintainable apps.
If you’ve dived into Jetpack Compose for Android development, you’ve probably noticed something curious: composable functions are marked with @Composable, but Compose doesn’t seem to use traditional annotation processing like some other libraries. So, what’s going on under the hood?
In “classic” Android development, many libraries rely on annotation processing (APT) to generate code at compile time. Think of libraries like Dagger, Room, or ButterKnife. These libraries scan your code for annotations (e.g., @Inject, @Database, or @BindView) and generate the necessary boilerplate code to make everything work.
How Annotation Processing Works
You add annotations to your code (e.g., @Inject).
During compilation, annotation processors scan your code.
The processor generates new source files (like Dagger components).
The compiler processes these new files to produce the final APK.
This approach has worked well for years, but it has some downsides:
Slow Build Times: Annotation processing can significantly increase compile times.
Complex Boilerplate: You often end up with lots of generated code.
Limited Capabilities: Annotation processing can’t deeply modify or transform existing code—it can only generate new code.
Jetpack Compose: A New Paradigm
Jetpack Compose introduces a declarative UI paradigm where the UI is described as a function of state. Instead of imperative code (“do this, then that”), you write composable functions that declare what the UI should look like based on the current state.
Notice the @Composable annotation? This tells the Compose system that Greeting is a composable function. But here’s the twist: this annotation isn’t processed by traditional annotation processing tools like KAPT.
Why Jetpack Compose Avoids Annotation Processing
Performance
Annotation processing can slow down your build because it requires scanning the code and generating additional files. In large projects, this can become a bottleneck.
Jetpack Compose uses a Kotlin (compose) compiler plugin that hooks directly into the compilation process. This approach is:
Faster: Reduces the need for extra steps in the build process.
Incremental: Supports incremental compilation, speeding up development.
Powerful Transformations
Compose needs to do some heavy lifting behind the scenes:
Track state changes for recomposition.
Optimize UI updates to avoid unnecessary redraws.
Inline functions and manage lambda expressions efficiently.
Traditional annotation processors can only generate new code; they can’t deeply transform or optimize existing code. The Compose compiler plugin can!
Simplified Developer Experience
With annotation processing, you often need to:
Manage generated code.
Understand how annotations work internally.
Handle build errors caused by annotation processing.
Compose’s compiler plugin takes care of the magic behind the scenes. You just write @Composable functions, and the compiler handles the rest. No boilerplate, no fuss.
How the Compose Compiler Plugin Works
Instead of generating new files like annotation processors, the Compose compiler plugin works directly with the Kotlin compiler to:
Analyze composable functions marked with @Composable.
Transform the code to enable state tracking and recomposition.
Optimize performance by skipping UI updates when the underlying state hasn’t changed.
The compiler plugin processes this code and adds logic to efficiently handle changes to name. If name doesn’t change, Compose skips recomposing the Text element. The system ensures that only the necessary UI components are updated, making the UI more responsive.
You get all these optimizations without managing any generated code yourself!
Benefits of This Approach
Faster Builds: No extra annotation processing steps are required.
Less Boilerplate: You don’t need to manage or worry about generated code.
Cleaner Code: Focus on your UI, not on complex annotations.
Powerful Optimizations: The compiler plugin does much more than traditional annotation processing—optimizing performance, tracking state changes, and managing recomposition.
Conclusion
Jetpack Compose’s use of a compiler plugin instead of traditional annotation processing is a key reason it’s so powerful. It embraces modern development practices, focusing on performance, simplicity, and developer experience.
So, the next time you write a @Composable function, remember: there’s no annotation processing magic happening. Instead, a smart compiler plugin is making our life easier, transforming your UI into an efficient, declarative representation of state.
Jetpack Compose has transformed Android UI development with its declarative approach, making UI code more intuitive, easier to maintain, and highly customizable. However, developers occasionally encounter limitations that may seem puzzling, especially when working with composable functions and generics. One such limitation is the inability to use @Composable as a constraint on a generic type...
When I first started exploring Jetpack Compose, I found it both fascinating and challenging. It was a whole new way of building UI, replacing XML layouts with a declarative approach. Today, I’m going to share my journey of understanding Composable Functions, the building blocks of Jetpack Compose. Together, we’ll demystify them, explore how they work, and write some Kotlin code to see them in action.
Let’s start by dissecting the anatomy of a composable function.
Anatomy of a Composable Function
Basically, in Jetpack Compose, the fundamental building block for creating a UI is called a composable function. Which is annoted with @Composable annotation, Let’s break down what it is and how it works.
First, if you see or find any @Composable annotation, right-click on it and select ‘Go To’ -> ‘Declarations & Usage,’ which will redirect you to the Composable.kt file.
There, you will find some commented documentation and code. We will focus on the code, but first, let’s analyze what the documentation says.
Kotlin
/** * [Composable] functions are the fundamental building blocks of an application built with Compose. * * [Composable] can be applied to a function or lambda to indicate that the function/lambda can be * used as part of a composition to describe a transformation from application data into a * tree or hierarchy. * * Annotating a function or expression with [Composable] changes the type of that function or * expression. For example, [Composable] functions can only ever be called from within another * [Composable] function. A useful mental model for [Composable] functions is that an implicit * "composable context" is passed into a [Composable] function, and is done so implicitly when it * is called from within another [Composable] function. This "context" can be used to store * information from previous executions of the function that happened at the same logical point of * the tree. */
It says the following about Composable Functions:
Composable Functions: Functions marked with @Composable are the core components of a Compose UI.
Transform Data to UI: These functions describe how data should be displayed in a UI hierarchy (tree of UI elements).
Implicit Context: When you call a composable function, it gets an implicit “composable context.” This context helps Compose keep track of previous function calls and updates efficiently during recompositions.
Restriction: @Composable functions can only be called from other @Composable functions. You can’t call them directly from non-composable functions.
Have you noticed that the @Composable annotation itself is defined by three other annotations? Let’s break this down further, and see them one by one.
@MustBeDocumented: This annotation indicates that the annotated element should be included in the generated documentation (e.g., when using KDoc to generate documentation).
@Retention(AnnotationRetention.BINARY): Specifies that the annotation is retained in the compiled bytecode (e.g., .class files) but is not available at runtime (not accessible via reflection).
@Target: It defines the types of elements to which the annotation can be applied. For example, the @Composable annotation can be applied to functions and properties, indicating that these are composable functions in Jetpack Compose. In short, it specifies where the @Composable annotation can be applied.
fun <T : @Composable () -> Unit> someFunction() { /*...*/ }// Example // A composable function that takes no parameters and returns Unit@ComposablefunGreeting(name: String) {// This is a composable that displays a greetingText(text = "Hello, $name!")}// A generic function that takes a composable function as a parameterfun <T : @Composable () -> Unit> someFunction(composable: T) {// Here you can invoke the composable functioncomposable()}@Preview@ComposablefunPreviewSomeFunction() {// Passing the Greeting composable function as a parameter to someFunctionsomeFunction { Greeting("Compose") }}
val isEnabled: Boolean@Composableget() { returntrue }//Another Example val greetingText: String@Composableget() = "Hello from a composable property!"
One remains. Why did I leave it for last? Because, theoretically, it exists, but practically, it hasn’t been implemented by the Compose team yet. Let’s see what it is in more detail.
Type Parameters (AnnotationTarget.TYPE_PARAMETER):
Kotlin
fun <T : @Composable () -> Unit> someFunction() { /*...*/ }// Example // A composable function that takes no parameters and returns Unit@ComposablefunGreeting(name: String) {// This is a composable that displays a greetingText(text = "Hello, $name!")}// A generic function that takes a composable function as a parameterfun <T : @Composable () -> Unit> someFunction(composable: T) {// Here you can invoke the composable functioncomposable()}@Preview@ComposablefunPreviewSomeFunction() {// Passing the Greeting composable function as a parameter to someFunctionsomeFunction { Greeting("Compose") }}
While the annotation declares AnnotationTarget.TYPE_PARAMETER as a valid target, the Compose compiler does not actually support constraining type parameters with @Composable functions. This can lead to issues such as a ClassCastException.
Kotlin
fun <T : @Composable () -> Unit> someFunction(composable: T) {composable()}
What’s wrong? Why does this fail?
fun <T : @Composable () -> Unit> someFunction() is not supported by the Compose compiler. The @Composable annotation cannot be applied as a constraint to a type parameter in practice, even though AnnotationTarget.TYPE_PARAMETER exists in the annotation’s definition.
Practical Workaround: Instead of using generics, define function parameters directly with @Composable () -> Unit.
Kotlin
// Instead of constraining a type parameter with @Composable, use a regular function parameter@ComposablefunsomeFunction(content: @Composable () -> Unit) {content()}
The theoretical declaration of AnnotationTarget.TYPE_PARAMETER for @Composable might indicate future or planned support, but as of now, it’s not usable due to the unique nature of composable functions and how the Compose compiler handles them.
Composable Function Restrictions and Rules
Can Only Call From Other @Composable Functions
A @Composable function can only be called from within another @Composable function or a composable context. This is necessary because @Composable functions require the Compose runtime to manage their lifecycle, track state, and handle recompositions properly.
Kotlin
@ComposablefunGreeting(name: String) {Text("Hello, $name!")}funregularFunction() {// This will cause an error!Greeting("Jetpack Compose")}
It will suggest adding @Composable to the regular function, with the message: ‘@Composable invocations can only happen from the context of a @Composable function.’
Implicit Context
When a @Composable function is called, it operates within a composable context. This context allows the Compose runtime to:
Track changes to state.
Recompose parts of the UI efficiently when the state changes.
Manage the lifecycle of composable functions.
This context is automatically provided when you’re within a composable function, making it possible for the Compose framework to determine how and when to re-render parts of the UI.
After diving deep into the world of Composable functions and understanding how they build dynamic and flexible UI components in Jetpack Compose, you might be wondering—How do these Composables actually show up on our screen? 🤔 That’s where setContent() steps in. It’s like the front door to your Composable world, the place where everything begins. In the next part, let’s take a closer look at setContent() and see how it brings your UI to life.
What is setContent?
In traditional Android UI development (using XML layouts), you would typically call setContentView() inside your Activity to set the screen’s layout. With Jetpack Compose, things have changed!
setContent replaces setContentView when you want to define your UI using Compose.
From now on, if you use Jetpack Compose, use this:
Kotlin
// This is defined for illustration purposes. You can use any composition or composable functions inside setContent{...}.setContent {MyComposableContent()}
Instead of using the older setContentView method with XML layouts.
Extension Function: setContent() is an extension function for ComponentActivity, which means you can call it on any ComponentActivity or its subclasses like AppCompatActivity.
parent: CompositionContext? = null:
This optional parameter represents the parent composition context. In Jetpack Compose, a CompositionContext coordinates updates and re-compositions of composable functions.
Passing a parent helps coordinate the lifecycle of this composition with another, which is useful for nested composable hierarchies.
content: @Composable () -> Unit:
This parameter is a composable lambda function that defines the UI contents.
For Example,
Kotlin
setContent {Text("Hello Compose!")}
Preview
I am going a little out of context, but it’s okay. I feel it’s important for our next discussion. Let’s think: what do you think might be inside the setContent() function body ({..})?
Kotlin
funComponentActivity.setContent(){...}
Does Android still use the old View system at its core, or has it introduced something new? If Android has introduced a new system, how can we still support our old or legacy code written in XML?
The answer is simple: ComposeView. It acts as a bridge between Jetpack Compose and the traditional View system. This allows us to integrate Jetpack Compose with existing XML-based layouts and continue using our legacy code when needed.
Although Jetpack Compose offers a completely new way to build UIs, it does not use the old View system internally for rendering. Instead, Compose has its own rendering mechanism. However, thanks to ComposeView and interoperability APIs like AndroidView, Compose and the View system can seamlessly work together. This is why setContent() can host composables within an activity or fragment, enabling us to mix both approaches in a single app.
It’s just an additional insight. Now, let’s get back on track: inside setContent(), we’ll find a ComposeView. Let’s explore what’s inside it to better understand how it works.
Kotlin
publicfunComponentActivity.setContent( parent: CompositionContext? = null, content: @Composable () -> Unit) {val existingComposeView = window.decorView .findViewById<ViewGroup>(android.R.id.content) .getChildAt(0) as? ComposeViewif (existingComposeView != null) with(existingComposeView) {setParentCompositionContext(parent)setContent(content) } elseComposeView(this).apply {// Set content and parent **before** setContentView// to have ComposeView create the composition on attachsetParentCompositionContext(parent)setContent(content)// Set the view tree owners before setting the content view so that the inflation process// and attach listeners will see them already presentsetOwners()setContentView(this, DefaultActivityContentLayoutParams) }}
Let’s break down the body of the function:
Kotlin
val existingComposeView = window.decorView .findViewById<ViewGroup>(android.R.id.content) .getChildAt(0) as? ComposeView
Here,
window.decorView:
The root view of the window where your activity’s content resides.
.findViewById<ViewGroup>(android.R.id.content):
android.R.id.content is the standard ID for the content view of an activity.
This line finds the view group that holds the content of the activity.
.getChildAt(0) as? ComposeView:
This retrieves the first child of the content view (assuming it’s a ComposeView).
The as? ComposeView safely casts the child to a ComposeView if it’s already present.
Next, there’s a check for whether the ComposeView already exists:
Kotlin
if (existingComposeView != null) with(existingComposeView) {setParentCompositionContext(parent)setContent(content)}
if (existingComposeView != null):
Checks if a ComposeView is already present as the first child of the content view.
with(existingComposeView):
If the ComposeView exists, this block configures it:
setParentCompositionContext(parent): Sets the parent composition context for coordinating composition updates.
setContent(content): Sets the new composable content to be displayed in the ComposeView.
This approach reuses the existing ComposeView if available, avoiding the need to create a new one.
If no existing ComposeView is found, a new one is created:
Kotlin
elseComposeView(this).apply {// Set content and parent **before** setContentView// to have ComposeView create the composition on attachsetParentCompositionContext(parent)setContent(content)// Set the view tree owners before setting the content view so that the inflation process// and attach listeners will see them already presentsetOwners()setContentView(this, DefaultActivityContentLayoutParams) // Note : here this is composeview as it is inside apply }
ComposeView(this):
Creates a new ComposeView, passing the current ComponentActivity as the context.
setParentCompositionContext(parent):
Sets the parent composition context for coordinating updates.
setContent(content):
Sets the composable lambda as the content of the ComposeView.
setOwners():
Ensures the ViewTreeLifecycleOwner and ViewTreeViewModelStoreOwner are set. These owners are necessary for handling the lifecycle and ViewModel integration properly.
Sets the newly created ComposeView as the root view of the activity, using default layout parameters.
In short,
Reusing Existing ComposeView:
If there’s already a ComposeView, the function updates its content directly, improving efficiency by avoiding creating a new view.
Creating New ComposeView:
If no ComposeView exists, a new one is created and set as the activity’s content view.
Composition Context:
The parent parameter helps maintain the composable hierarchy and ensures updates are properly synchronized.
Lifecycle Awareness:
setOwners() ensures that the ComposeView has the necessary lifecycle owners before it gets attached to the activity.
By the way, what exactly is ComposeView?
I already gave a little hint, but there’s still more to explore. So, let’s dive into the details.
ComposeView is a special View provided by Jetpack Compose that serves as a bridge between the traditional Android View system and the Compose framework. Essentially, it allows you to embed composable UI within a standard Android View hierarchy.
Best Practices for Using setContent
Keep setContent Clean and Simple:
The lambda inside setContent should primarily call composable functions. Avoid complex logic inside the lambda to keep your code clean and readable.
Use Themes and Styling:
Wrap your content in a theme (e.g., MaterialTheme) to ensure consistent styling across your app.
Separate Concerns:
Structure your composables into separate functions and files based on their functionality. This improves readability and maintainability.
State Management:
Use remember and mutableStateOf for local state management within composables. For shared state, consider using ViewModel and LiveData or StateFlow.
Common Pitfalls to Avoid
Blocking the UI Thread:
Avoid long-running tasks or complex calculations inside setContent. Perform such tasks in a background thread using CoroutineScope.
Deeply Nested Composables:
Keep composable functions small and focused to avoid deeply nested structures, which can affect performance and readability.
Ignoring State Changes:
Ensure state changes trigger recomposition by using mutableStateOf or other state management solutions.
Conclusion
As we wrap up, I hope you’ve gained a solid understanding of Composable Functions and how they simplify UI development. Jetpack Compose is a paradigm shift, but once you get the hang of it, you’ll realize its immense potential for creating beautiful, dynamic, and performant UIs.
Look, if you’re new to Jetpack Compose, start with simple composables and gradually explore more advanced concepts like state management, theming, and animations.
Jetpack Compose has revolutionized Android UI development with its declarative approach. However, many existing projects still rely heavily on XML layouts and the traditional View system. This is where ComposeView comes into play, acting as a bridge between the classic View system and modern Jetpack Compose UI elements.
Let’s break down what ComposeView is, how it works, and where it’s useful.
What is ComposeView (CV)?
ComposeView is a special view provided by Jetpack Compose that allows you to embed Composable functions directly into your traditional XML-based layouts or existing ViewGroups. It essentially acts as a container for hosting Compose UI components within a legacy View system.
This is particularly useful when you are gradually migrating your legacy project to Jetpack Compose or when you want to introduce Compose into an existing application incrementally.
You can create a CV programmatically and add it to a traditional Android layout:
Kotlin
val composeView = ComposeView(context).apply {setContent {Text("Hello from Compose!") }}// Adding to a parent ViewGroupmyLinearLayout.addView(composeView)
Here,
ComposeView(context) creates a new ComposeView.
setContent { ... } sets the composable lambda that defines the UI.
The ComposeView is added to a traditional LinearLayout.
Overview of ComposeView
The ComposeView class extends AbstractComposeView, making it a View that can host Jetpack Compose UI components.
Purpose: Allows seamless integration of Jetpack Compose content into existing Android View-based UI. It acts as a container for composable content in environments that primarily use Views (e.g., activities or fragments that aren’t fully migrated to Compose).
Key Functionality: Provides a method setContent to define the Compose UI content.
Type
ComposeViewdoes not directly extend android.view.View. Instead:
ComposeViewextends androidx.compose.ui.platform.AbstractComposeView, which in turn extends android.view.ViewGroup, and ultimately, ViewGroup extends android.view.View.
Here’s an actual code snippet:
Kotlin
classComposeView@JvmOverloadsconstructor( context: Context, attrs: AttributeSet? = null, defStyleAttr: Int = 0) : AbstractComposeView(context, attrs, defStyleAttr) {privateval content = mutableStateOf<(@Composable () -> Unit)?>(null)@Suppress("RedundantVisibilityModifier")protectedoverridevar shouldCreateCompositionOnAttachedToWindow: Boolean = falseprivateset@ComposableoverridefunContent() { content.value?.invoke() }overridefungetAccessibilityClassName(): CharSequence {return javaClass.name }/** * Set the Jetpack Compose UI content for this view. * Initial composition will occur when the view becomes attached to a window or when * [createComposition] is called, whichever comes first. */funsetContent(content: @Composable () -> Unit) { shouldCreateCompositionOnAttachedToWindow = truethis.content.value = contentif (isAttachedToWindow) {createComposition() } }}
Set the shouldCreateCompositionOnAttachedToWindow flag to true:
Signals that the composition should be created when the view is attached.
Update content with the new composable function:
Stores the provided Jetpack Compose content in the mutableStateOf property.
Check if the view is already attached to the window:
If yes, immediately create the composition using createComposition().
If no, the composition will be created automatically when the view gets attached to the window.
Lifecycle Management
Composition Disposal
The composition is disposed of based on the ViewCompositionStrategy.Default strategy.
Developers can explicitly dispose of the composition using disposeComposition() when needed.
Important Note
If the view is never reattached to the window, developers must manually call disposeComposition() to ensure proper resource cleanup and prevent potential memory leaks.
val composeView: ComposeView = findViewById(R.id.composeView)composeView.setContent {Text(text = "Hello from ComposeView!")}
What Happens Internally?
setContent sets the content composable.
If the view is attached, createComposition() is called.
The content renders dynamically.
Managing Lifecycle and Composition
ComposeView disposes of its composition according to ViewCompositionStrategy.Default.
Use disposeComposition() explicitly if:
The view won’t attach to a window.
You want to clean up resources early.
Kotlin
composeView.disposeComposition()
Best Practices
Use CV for incremental adoption of Jetpack Compose.
Prefer setContent for dynamic UI updates.
Dispose of compositions explicitly when necessary.
Keep Compose logic lightweight inside CV for better performance.
Conclusion
ComposeView is an essential tool for Android developers navigating the transition from XML-based layouts to Jetpack Compose. It provides a smooth path for gradual migration, ensuring that you can leverage Compose’s modern UI paradigms without overhauling your existing codebase.
By understanding its lifecycle, properties, and proper usage, you can unlock the full potential of ComposeView in your projects.
Jetpack Compose has taken the Android UI development world by storm. It simplifies UI development by making it declarative and functional. But one of the first things you’ll encounter when using Jetpack Compose is the setContent function. In this blog, we’ll break down what setContent function is, how it works, and why it matters.
What is setContent Function?
In traditional Android UI development (using XML layouts), you would typically call setContentView() inside your Activity to set the screen’s layout. With Jetpack Compose, things have changed!
setContent replaces setContentView when you want to define your UI using Compose.
From now on, if you use Jetpack Compose, use this:
Kotlin
// This is defined for illustration purposes. You can use any composition or composable functions inside setContent{...}.setContent {MyComposableContent()}
Instead of using the older setContentView method with XML layouts.
Extension Function: setContent() is an extension function for ComponentActivity, which means you can call it on any ComponentActivity or its subclasses like AppCompatActivity.
parent: CompositionContext? = null:
This optional parameter represents the parent composition context. In Jetpack Compose, a CompositionContext coordinates updates and re-compositions of composable functions.
Passing a parent helps coordinate the lifecycle of this composition with another, which is useful for nested composable hierarchies.
content: @Composable () -> Unit:
This parameter is a composable lambda function that defines the UI contents.
For Example,
Kotlin
setContent {Text("Hello Compose!")}
Preview
I am going a little out of context, but it’s okay. I feel it’s important for our next discussion. Let’s think: what do you think might be inside the setContent() function body ({..})?
Kotlin
funComponentActivity.setContent(){...}
Does Android still use the old View system at its core, or has it introduced something new? If Android has introduced a new system, how can we still support our old or legacy code written in XML?
The answer is simple: ComposeView. It acts as a bridge between Jetpack Compose and the traditional View system. This allows us to integrate Jetpack Compose with existing XML-based layouts and continue using our legacy code when needed.
Although Jetpack Compose offers a completely new way to build UIs, it does not use the old View system internally for rendering. Instead, Compose has its own rendering mechanism. However, thanks to ComposeView and interoperability APIs like AndroidView, Compose and the View system can seamlessly work together. This is why setContent() can host composables within an activity or fragment, enabling us to mix both approaches in a single app.
It’s just an additional insight. Now, let’s get back on track: inside setContent(), we’ll find a ComposeView. Let’s explore what’s inside it to better understand how it works.
Kotlin
publicfunComponentActivity.setContent( parent: CompositionContext? = null, content: @Composable () -> Unit) {val existingComposeView = window.decorView .findViewById<ViewGroup>(android.R.id.content) .getChildAt(0) as? ComposeViewif (existingComposeView != null) with(existingComposeView) {setParentCompositionContext(parent)setContent(content) } elseComposeView(this).apply {// Set content and parent **before** setContentView// to have ComposeView create the composition on attachsetParentCompositionContext(parent)setContent(content)// Set the view tree owners before setting the content view so that the inflation process// and attach listeners will see them already presentsetOwners()setContentView(this, DefaultActivityContentLayoutParams) }}
Let’s break down the body of the function:
Kotlin
val existingComposeView = window.decorView .findViewById<ViewGroup>(android.R.id.content) .getChildAt(0) as? ComposeView
Here,
window.decorView:
The root view of the window where your activity’s content resides.
.findViewById<ViewGroup>(android.R.id.content):
android.R.id.content is the standard ID for the content view of an activity.
This line finds the view group that holds the content of the activity.
.getChildAt(0) as? ComposeView:
This retrieves the first child of the content view (assuming it’s a ComposeView).
The as? ComposeView safely casts the child to a ComposeView if it’s already present.
Next, there’s a check for whether the ComposeView already exists:
Kotlin
if (existingComposeView != null) with(existingComposeView) {setParentCompositionContext(parent)setContent(content)}
if (existingComposeView != null):
Checks if a ComposeView is already present as the first child of the content view.
with(existingComposeView):
If the ComposeView exists, this block configures it:
setParentCompositionContext(parent): Sets the parent composition context for coordinating composition updates.
setContent(content): Sets the new composable content to be displayed in the ComposeView.
This approach reuses the existing ComposeView if available, avoiding the need to create a new one.
If no existing ComposeView is found, a new one is created:
Kotlin
elseComposeView(this).apply {// Set content and parent **before** setContentView// to have ComposeView create the composition on attachsetParentCompositionContext(parent)setContent(content)// Set the view tree owners before setting the content view so that the inflation process// and attach listeners will see them already presentsetOwners()setContentView(this, DefaultActivityContentLayoutParams) // Note : here this is composeview as it is inside apply }
ComposeView(this):
Creates a new ComposeView, passing the current ComponentActivity as the context.
setParentCompositionContext(parent):
Sets the parent composition context for coordinating updates.
setContent(content):
Sets the composable lambda as the content of the ComposeView.
setOwners():
Ensures the ViewTreeLifecycleOwner and ViewTreeViewModelStoreOwner are set. These owners are necessary for handling the lifecycle and ViewModel integration properly.
Sets the newly created ComposeView as the root view of the activity, using default layout parameters.
In short,
Reusing Existing ComposeView:
If there’s already a ComposeView, the function updates its content directly, improving efficiency by avoiding creating a new view.
Creating New ComposeView:
If no ComposeView exists, a new one is created and set as the activity’s content view.
Composition Context:
The parent parameter helps maintain the composable hierarchy and ensures updates are properly synchronized.
Lifecycle Awareness:
setOwners() ensures that the ComposeView has the necessary lifecycle owners before it gets attached to the activity.
By the way, what exactly is ComposeView?
I already gave a little hint, but there’s still more to explore. So, let’s dive into the details.
ComposeView is a special View provided by Jetpack Compose that serves as a bridge between the traditional Android View system and the Compose framework. Essentially, it allows you to embed composable UI within a standard Android View hierarchy.
Let’s break down what ComposeView is, how it works, and where it’s useful.
Overview of ComposeView
The ComposeView class extends AbstractComposeView, making it a View that can host Jetpack Compose UI components.
Purpose: Allows seamless integration of Jetpack Compose content into existing Android View-based UI. It acts as a container for composable content in environments that primarily use Views (e.g., activities or fragments that aren’t fully migrated to Compose).
Key Functionality: Provides a method setContent to define the Compose UI content.
Type
ComposeViewdoes not directly extend android.view.View. Instead:
ComposeViewextends androidx.compose.ui.platform.AbstractComposeView, which in turn extends android.view.ViewGroup, and ultimately, ViewGroup extends android.view.View.
Here’s an actual code snippet:
Kotlin
classComposeView@JvmOverloadsconstructor( context: Context, attrs: AttributeSet? = null, defStyleAttr: Int = 0) : AbstractComposeView(context, attrs, defStyleAttr) {privateval content = mutableStateOf<(@Composable () -> Unit)?>(null)@Suppress("RedundantVisibilityModifier")protectedoverridevar shouldCreateCompositionOnAttachedToWindow: Boolean = falseprivateset@ComposableoverridefunContent() { content.value?.invoke() }overridefungetAccessibilityClassName(): CharSequence {return javaClass.name }/** * Set the Jetpack Compose UI content for this view. * Initial composition will occur when the view becomes attached to a window or when * [createComposition] is called, whichever comes first. */funsetContent(content: @Composable () -> Unit) { shouldCreateCompositionOnAttachedToWindow = truethis.content.value = contentif (isAttachedToWindow) {createComposition() } }}
Here,
Constructor:
Uses @JvmOverloads to allow flexibility in calling the constructor with fewer parameters.
Inherits from AbstractComposeView, which handles Jetpack Compose rendering in a View-based system.
State to Hold Content:
content is a mutableStateOf variable that holds a nullable Composable lambda (@Composable () -> Unit).
Flag for Composition on Attachment:
shouldCreateCompositionOnAttachedToWindow ensures that the composition is created when the view is attached to the window.
By default, it’s false. It becomes true when setContent is called.
Composable Content Rendering:
The Content() function is overridden from AbstractComposeView.
If content is not null, it invokes the stored Composable lambda.
Accessibility:
getAccessibilityClassName() returns the class name for accessibility purposes.
setContent Function:
Accepts a Composable function and sets it to the content property.
Sets shouldCreateCompositionOnAttachedToWindow to true.
If the view is already attached to the window (isAttachedToWindow), it immediately calls createComposition() to render the content.
Adding ComposeView in XML
To add ComposeView in an XML layout, follow these steps:
Add Compose dependencies in your build.gradle:
Kotlin
// use latest versionsimplementation "androidx.activity:activity-compose:1.7.2"implementation "androidx.compose.ui:ui:1.6.0"implementation "androidx.compose.material:material:1.6.0"
Incremental Migration: Migrate your app gradually without rewriting everything.
Reuse Composables: Use powerful Composable functions in legacy projects.
Flexibility: Combine both systems seamlessly.
Modern UI Components: Bring Compose’s declarative UI and reactive state management to older architectures.
Key Differences: setContent vs setContentView
Best Practices for Using setContent
Keep setContent Clean and Simple:
The lambda inside setContent should primarily call composable functions. Avoid complex logic inside the lambda to keep your code clean and readable.
Use Themes and Styling:
Wrap your content in a theme (e.g., MaterialTheme) to ensure consistent styling across your app.
Separate Concerns:
Structure your composables into separate functions and files based on their functionality. This improves readability and maintainability.
State Management:
Use remember and mutableStateOf for local state management within composables. For shared state, consider using ViewModel and LiveData or StateFlow.
Common Pitfalls to Avoid
Blocking the UI Thread:
Avoid long-running tasks or complex calculations inside setContent. Perform such tasks in a background thread using CoroutineScope.
Deeply Nested Composables:
Keep composable functions small and focused to avoid deeply nested structures, which can affect performance and readability.
Ignoring State Changes:
Ensure state changes trigger recomposition by using mutableStateOf or other state management solutions.
Conclusion
The setContent function is your entry point to building UI with Jetpack Compose. It replaces setContentView and opens the door to declarative, composable-based UI development. By understanding how setContent works and following best practices, you can create clean, maintainable, and dynamic user interfaces in your Android applications.
Jetpack Compose simplifies UI development, making it a pleasure to design responsive and interactive apps. Embrace setContent and the power of composables to elevate your Android development experience!