If you’ve ever entered a password, paid online, or chatted on WhatsApp, you’ve already used cryptography — whether you knew it or not. It’s the invisible lock protecting your private information from hackers and eavesdroppers.
In this beginner-friendly guide, you’ll learn what cryptography is, how it works, and see a Kotlin example in action. No complex math — just a clear explanation you can actually understand.
What Is Cryptography?
Cryptography is the science of securing information so only the intended people can read it. Think of it as putting your message in a sealed envelope, but one that only the right person has the key to open.
The term comes from the Greek words:
kryptos — hidden
graphein — writing
Put together: hidden writing.
Why Is Cryptography Important?
Without cryptography, sending data online would be like shouting your secrets in a crowded room. Here’s where it plays a role every day:
Online banking: Keeps credit card and transaction data safe.
Messaging apps: WhatsApp, Signal, and Telegram use strong end-to-end encryption.
Passwords: Stored securely so hackers can’t read them.
Data privacy: Protects personal files, medical records, and government documents.
The Core Principles of Cryptography
Confidentiality — Only the intended person can read the message.
Integrity — Ensures the message isn’t altered along the way.
Authentication — Confirms the identity of sender and receiver.
Non-repudiation — Prevents someone from denying they sent a message.
How Does Cryptography Work?
At a basic level, cryptography takes:
Plaintext — normal readable data
Key — a secret or public piece of information
Encryption algorithm — a method to scramble the plaintext
It turns plaintext into ciphertext (scrambled text). Only someone with the correct key can reverse the process through decryption.
Two Main Types of Cryptography
1. Symmetric Key Cryptography
Same key for encryption and decryption.
Faster but needs secure key sharing.
Example: AES (Advanced Encryption Standard).
2. Asymmetric Key Cryptography
Two keys: public (to encrypt) and private (to decrypt).
You can share the public key openly.
Example: RSA encryption.
Kotlin Example: Caesar Cipher
Let’s write a simple Caesar Cipher in Kotlin — one of the earliest encryption methods. It shifts letters in the alphabet by a fixed number.
Secure websites: HTTPS uses cryptography to protect data.
Digital signatures: Prove a file or message is genuine.
Blockchain: Relies on cryptographic hashing for security.
Conclusion
Cryptography is the backbone of digital security. It’s what keeps your passwords, bank details, and personal messages safe in a world where cyber threats are everywhere. While the math behind it can get deep, the basic idea is simple: scramble information so only the right person can read it.
In our digital world, mobile app security is a big deal. With countless apps available, each storing sensitive personal data, it’s essential to address security at every stage—from the initial coding to the app hitting the app store. This guide breaks down four key areas of mobile security that every developer should know about: Application Security, Platform Security, Data Security, and Communication Security.
We’ll walk through practical strategies, real-world examples, and share some Kotlin code to show you exactly how to build more secure apps. Let’s dive in and make sure your mobile applications are as safe as they can be!
Mobile Application Security
To ensure the safety of sensitive data — whether stored on the device or transmitted to and from the server — strong security measures and development practices are a must. This is especially crucial for financial apps, social media platforms, or large enterprise eCommerce apps.
Mobile security presents unique challenges, from vulnerabilities in application, platform, and enterprise communications, to safeguarding sensitive data across distributed environments. To tackle these, we implement advanced mobile security techniques, ensuring users can connect securely from anywhere without compromising the safety of their valuable data. It’s all about creating a seamless, secure experience in a world that’s constantly on the move.
Application Security
Application security is the backbone of protecting user data, ensuring app integrity, and building lasting trust with your audience. With threats like app tampering, unauthorized installs, and reverse engineering on the rise, developers must step up and implement the best security practices from the ground up.
By adopting these cutting-edge security techniques, we can significantly reduce vulnerabilities, prevent unauthorized access, and keep user data safe and sound. It’s not just about protecting your app—it’s about creating a seamless, secure experience that users can trust in a world full of ever-evolving threats.
Let’s look at each technique in detail.
App Signing: Your App’s First Line of Defense
Both Android and iOS require app signing with a valid certificate before they can be uploaded to app stores or installed on devices. App signing is more than a compliance requirement; it’s a critical security measure ensuring that the app hasn’t been tampered with since it was last signed. If an app undergoes modification, it must be signed again to maintain its authenticity.
Understanding App Signing
App signing involves associating your app with a cryptographic key, which verifies its authenticity and integrity. When an app is signed, it is linked to a unique certificate fingerprint that identifies counterfeit or tampered versions of the app. This step is mandatory for both Android and iOS:
iOS apps are signed with a certificate issued by Apple.
Android apps are typically signed with custom CA certificates. Additionally, Google offers the Play App Signing service, which allows developers to securely manage and store their app signing key using Google’s infrastructure. This service is now mandatory for new apps and updates on the Google Play Store.
The Role of App Signing in Security
Imagine sending a sealed package. Your personal signature on the seal verifies that the package is from you and hasn’t been tampered with. Similarly, in the digital world, signing an app with a private key is like sealing it with your unique developer signature. Once an app is signed, it receives a certificate, allowing app stores and devices to confirm two key aspects:
Integrity: Ensures the app hasn’t been altered since it was signed. If malicious code were inserted, the certificate would no longer match, indicating tampering.
Authenticity: Confirms the app genuinely comes from the original developer. Since the private key is unique to the developer, the certificate prevents others from publishing unofficial updates that could compromise user security.
For example, a banking app signed by the bank’s private key reassures users that it’s genuine. If a fake version appeared, it wouldn’t carry the signature, protecting users from counterfeit downloads.
Steps for App Signing in Android Studio
To sign an app in Android Studio, follow these steps:
1. Generate a Signing Key:
In Android Studio, go to Build > Generate Signed Bundle / APK…
Create a new keystore by choosing a password and providing necessary details.
2. Sign Your App:
After creating the keystore, Android Studio will prompt you to select it for signing the app.
Select your key alias and password, then proceed with the build.
3. Configure Signing in build.gradle: In the app/build.gradle file, add the signing configuration:
4. Build and Sign: Once configured, build a signed APK or App Bundle for distribution.
Important Note
The same certificate must be used throughout the app’s lifecycle. This continuity is crucial for smooth updates, version control, and ensuring the app’s integrity and authenticity over time.
With app signing, you’re not only fulfilling store requirements; you’re enhancing the security and trustworthiness of your app, providing users with the confidence that they’re receiving the genuine, untampered version directly from the developer.
App Certificate Checksum Verification
To add an extra layer of security, we can verify the app’s certificate checksum. This ensures the app hasn’t been tampered with since it was signed. Think of the checksum as a digital fingerprint — it confirms the app’s integrity and ensures it’s the original, untampered version.
By using the app signing certificate’s checksum, we can detect any tampering with the app’s code. If an attacker tries to alter the application, the original checksum will no longer match, serving as a red flag that something has been compromised. This verification helps us catch tampering early and prevent malicious code from executing, keeping both the app and its users secure.
To check your app’s signature in Android, you can retrieve and verify the certificate checksum using the following method.
Kotlin
import android.content.pm.PackageManagerimport android.util.Base64import java.security.MessageDigestfungetCertificateChecksum(): String? {try {val packageInfo = context.packageManager.getPackageInfo( context.packageName, PackageManager.GET_SIGNING_CERTIFICATES )val signatures = packageInfo.signingInfo.apkContentsSignersval cert = signatures[0].toByteArray() // Getting the certificate's byte arrayval md = MessageDigest.getInstance("SHA-256") // Using SHA-256 for the checksumval checksum = md.digest(cert) // Generating the checksumreturn Base64.encodeToString(checksum, Base64.NO_WRAP) // Encoding the checksum in Base64 } catch (e: Exception) { e.printStackTrace()returnnull }}
To verify the certificate, simply compare the checksum with the expected value. This helps protect against tampering, as any change in the code will result in a different checksum.
Authorized Install Verification
To ensure your app is installed from a trusted source, like the Google Play Store, Android allows developers to verify the app’s integrity and security. You can use Google’s Play Integrity API (which we will cover in more detail in another blog; here we focus on the basics) to check if the app is running in a legitimate environment and hasn’t been tampered with, helping to prevent unauthorized installs.
Kotlin
import android.content.pm.PackageManagerfunisInstalledFromPlayStore(): Boolean {val installer = context.packageManager.getInstallerPackageName(context.packageName)return installer == "com.android.vending"// Checks if installed from Google Play Store}
This method checks whether the app was installed from the Google Play Store. If isInstalledFromPlayStore() returns false, it could mean the app was installed from an unofficial or unauthorized source.
Wait a minute… What would a simple client-server design look like for verifying authorized installations?
As our app is distributed exclusively through the App Store and Play Store, we verify the installation source on each app launch to detect counterfeit or sideloaded versions. If an unauthorized installation source is detected, a predetermined information packet is sent to the server instead of just a flag. This allows the server to assess the authenticity of the installation source and take preventive actions, if necessary (such as terminating the app instance).
The following algorithm is used to derive strategic information (i.e., whether the installation is authorized or not) at both the client and server ends:
If the app is installed from an unauthorized source, we send the server a SHA-256 hash generated from a unique device identifier, securely shared between the client and server. (Note: the unique identifier may depend on the platform and device permissions.)
If the app is installed from an authorized source, we send a 32-byte random number generated using Java’s SecureRandom, ensuring high security.
This approach enables the server to accurately distinguish between authorized and unauthorized installation sources, helping to prevent unauthorized app usage. However, the success of this method depends on robust key management, secure communication between the client and server, and appropriate handling of device identifiers.
Code Obfuscation
Code Obfuscation is the practice of making source code difficult for humans (and automated tools) to understand by transforming it into a non-syntactical and non-natural language format. It is deliberately done to protect intellectual property and to prevent attackers or malicious entities from reverse-engineering proprietary software logic.
Increasing internal complexity through obfuscation makes it harder for attackers to understand how the app operates, thus reducing potential attack vectors.
Obfuscation is generally achieved by applying some of the following techniques:
Renaming classes, methods, and variables to meaningless or random labels to hide the original intent of the code.
Encrypting sensitive pieces of the code, such as strings or critical functions, to prevent them from being easily understood.
Removing revealing metadata such as debug information and stack traces that could help reverse engineers understand the code’s structure.
Advantages:
Code Bloat: Adding unused or meaningless code to the application increases complexity and can confuse reverse engineers.
Prevents Reverse Engineering: Obfuscation makes it more difficult to reverse-engineer the source code, providing an added layer of protection.
Protects Sensitive Information: By obscuring payment algorithms and other sensitive logic, obfuscation helps prevent fraud.
IP Protection: Obfuscation safeguards proprietary code from theft, reducing the risk of cloning and unauthorized use.
Secure Communication: It helps protect critical communication credentials (e.g., API keys, server communication details) by making them harder to extract.
How does it work?
Advanced code obfuscation in modern software development is typically achieved using automated tools called obfuscators. These tools apply various obfuscation techniques to the code, making it more difficult to analyze or reverse-engineer. When it comes to optimizing and securing Android apps, three primary tools stand out: R8, ProGuard, and DexGuard.
R8: A code shrinker and obfuscator that comes bundled with Android Studio. It replaces ProGuard in Android projects starting from Android Gradle Plugin version 3.4 and beyond. R8 performs code shrinking, optimization, and obfuscation, making it more efficient than ProGuard in many cases.
ProGuard: Originally designed as an optimization tool, ProGuard also provides obfuscation features. While it remains widely used, it’s primarily known for reducing the size of the app and optimizing bytecode, with obfuscation being an optional feature.
DexGuard: A more advanced, proprietary obfuscator specifically designed for Android applications. DexGuard offers stronger obfuscation techniques and more comprehensive protection than ProGuard or R8, making it suitable for apps that require higher levels of security.
Setting Up ProGuard/R8
To enable code obfuscation in your Android app, you’ll need to configure ProGuard/R8 in your build.gradle file.
1.Enable Minification and Obfuscation: In your android block, ensure that the minification and obfuscation are enabled for the release build type:
2.Add Custom Rules (Optional): You can customize the behavior of ProGuard/R8 by adding rules to the proguard-rules.pro file. For example:
Kotlin
// It's in the ProGuard file, not in the Kotlin file. Due to the limitation of selecting a ProGuard file, I added it here.# Keep specific classes-keep classcom.yourpackage.** { *; }# Remove logging statements-assumenosideeffects classandroid.util.Log {public static *** v(...);public static *** d(...);public static *** i(...);public static *** w(...);public static *** e(...);}
3. Obfuscate and Test: After configuring the build.gradle and rules file, build the release version of your app. This will obfuscate the code, making it more difficult for attackers to reverse engineer. Make sure to test the release version to ensure the obfuscation works correctly and that your app functions as expected.
Obfuscation protects sensitive parts of your code and can significantly reduce the likelihood of reverse engineering, adding an important layer of security for proprietary software.
iOS Obfuscation Tools
For iOS applications, there are several obfuscation tools available, with some of the most popular being:
Obfuscator-LLVM: An open-source tool that integrates with the LLVM compiler infrastructure, providing a robust solution for obfuscating iOS applications.
XGuard: A proprietary obfuscation tool that offers advanced protection, although it is less commonly used than others.
These tools help secure the code and prevent reverse engineering, similar to their Android counterparts.
Secure App Distribution
Our app should only be downloaded from official marketplaces—the Play Store for Android and the App Store for iOS. For security reasons, we don’t offer it through other channels like private marketplaces, direct links, emails, or corporate portals. Using a trusted distribution channel helps protect your app from being tampered with or repackaged. Google Play, for example, offers features like Play Protect, automatic updates, and full control over distribution, making it one of the most secure options.
Tips for Secure Distribution
Use the Google Play Console: It offers extra security with app signing and Play Protect.
Enable Play App Signing: When you upload your app, go to App Integrity and select Manage your app signing key. Google will manage your app’s signing key, making it more secure and reducing the risk of key compromise.
Use App Bundles: App Bundles not only help reduce APK size but also provide extra protection through Google’s secure servers.
Avoid Third-Party App Stores: Stick to trusted platforms to keep your app safe.
Other Secure Distribution Options
In-House Distribution: For private app distribution, use secure enterprise app stores.
Encrypted File Transfer: If you’re sharing the APK manually, consider encrypting it before sending.
By distributing your app through Google Play, you’re making sure users get a secure, legitimate version of your app.
Platform Security
Platform security means making sure your app interacts with the device and any external services in a safe, trusted way. Android gives developers a toolkit of APIs and strategies to spot tampered devices, confirm device identity, and securely authenticate users. By combining these security practices, you can block unauthorized access, detect risky devices, and strengthen your app’s overall security.
Rooted Device Detection
Rooted devices come with elevated privileges, giving deeper access to the operating system. While that sounds powerful, it opens up security risks—malicious actors could access sensitive data, bypass restrictions, and compromise your app’s integrity. That’s why detecting rooted devices is a crucial first step in securing your platform.
Root Apps: Common packages associated with rooting are checked.
Root Directories: Checks if common files associated with rooting exist on the device.
When you call RootDetectionUtils.isDeviceRooted(), it returns true if the device is likely rooted.
Device Blacklist Verification
Some devices are known to have vulnerabilities or unsafe configurations, which can make them risky for secure apps. This is where device blacklisting comes in. By comparing a device’s unique identifiers against a list stored on a secure server, you can block those devices from accessing sensitive parts of your app.
Obviously, to create a device blacklist, you first need to gather device IDs when the app is launched. If a user misuses the platform in the future, you can blacklist their device. From then on, whenever the app is used, the system will check the device ID against the blacklist and prevent access if it matches.
Blacklisting has become a common practice in many popular apps—social media platforms like Facebook and Instagram use it, as well as many dating apps like Tinder, Bumble, and others. If a device is blacklisted, users are blocked from accessing key features, helping protect the platform and prevent misuse.
Kotlin
import android.content.Contextimport android.provider.Settingsimport kotlinx.coroutines.Dispatchersimport kotlinx.coroutines.withContextimport okhttp3.OkHttpClientimport okhttp3.Requestimport org.json.JSONArrayobjectDeviceBlacklistVerifier {privateconstval BLACKLIST_URL = "https://secureserver.com/device_blacklist"// Replace with your actual URLprivateval client = OkHttpClient()suspendfunisDeviceBlacklisted(context: Context): Boolean {val deviceId = Settings.Secure.getString(context.contentResolver, Settings.Secure.ANDROID_ID)val blacklistedDevices = fetchBlacklist()return blacklistedDevices.contains(deviceId) }privatesuspendfunfetchBlacklist(): List<String> {returnwithContext(Dispatchers.IO) {try {// Create a request to fetch the blacklist from your serverval request = Request.Builder().url(BLACKLIST_URL).build()val response = client.newCall(request).execute()if (response.isSuccessful) {val json = response.body?.string() ?: "[]"val jsonArray = JSONArray(json)val blacklist = mutableListOf<String>()for (i in0 until jsonArray.length()) { blacklist.add(jsonArray.getString(i)) } blacklist } else {emptyList() // Return an empty list if fetching fails } } catch (e: Exception) { e.printStackTrace()emptyList() // Return an empty list if there's an error } } }}
The isDeviceBlacklisted function fetches the device ID and compares it against the list of blacklisted device IDs fetched from a remote server.
The blacklist is fetched asynchronously using OkHttpClient to make an HTTP request to your server (you can replace BLACKLIST_URL with your actual URL).
The server is expected to return a JSON array of blacklisted device IDs.
Device Fingerprinting / Hardware Detection
Device fingerprinting is a method used to uniquely identify a device based on its hardware features, making it easier to spot cloned or unauthorized devices trying to fake their identity. The main goal is to ensure that only trusted devices can access services, helping to prevent fraud. This fingerprint can also be used to track devices or authenticate users.
Unique Properties: Collects device-specific information to create a unique fingerprint.
Serial Check: Uses Build.getSerial() if API level permits, adding a layer of uniqueness.
SafetyNet Attestation (Android Only)
Google’s SafetyNet Attestation API assesses the security integrity of an Android device, verifying that it’s not rooted or compromised. To use SafetyNet, you need to integrate Google Play Services. This API requires network access, so ensure your application has the necessary permissions.
In your build.gradle file, add the SafetyNet dependency
Kotlin
implementation 'com.google.android.gms:play-services-safetynet:18.0.1'// use latest version
Implement SafetyNet Attestation
Kotlin
funverifySafetyNet() { SafetyNet.getClient(this).attest(nonce, API_KEY) .addOnSuccessListener { response ->val jwsResult = response.jwsResultif (jwsResult != null) {// Verify JWS with server for authenticity and integrity.handleAttestationResult(jwsResult) } } .addOnFailureListener { exception ->// Handle error }}
As we can see,
SafetyNet Client: SafetyNet.getClient(context) initiates the SafetyNet client, enabling attestation requests.
Attestation: The attest function generates an attestation result that can be verified on your server.
Nonce: A random value used to ensure the attestation response is unique to this request.
Verify on Server: To prevent tampering, verify the jwsResult on a secure server by validating its JSON Web Signature (JWS).
JWS Result: The JSON Web Signature (JWS) is a token containing attestation results, which should be sent to the server to verify authenticity and device integrity.
TEE-Backed Fingerprint Authentication
TEE-Backed Fingerprint Authentication refers to fingerprint authentication that leverages the Trusted Execution Environment (TEE) of a device to securely store and process sensitive biometric data, such as fingerprints. The TEE is a secure area of the main processor that is isolated from the regular operating system (OS). It provides a higher level of security for operations involving sensitive data, like biometric information.
In Android, TEE-backed authentication typically involves the Secure Hardware or Trusted Execution Environment in combination with biometric authentication methods (like fingerprint, face, or iris recognition) to ensure that biometric data is processed in a secure and isolated environment. This means the sensitive data never leaves the secure part of the device and is not exposed to the operating system, apps, or any potential attackers.
For TEE-backed fingerprint authentication, you should use the BiometricPrompt approach, as it’s more secure, future-proof, and supports a broader range of biometrics (not just fingerprint) while ensuring compatibility with the latest Android versions.
Kotlin
funauthenticateWithFingerprint(activity: FragmentActivity) {// Create the BiometricPrompt instanceval biometricPrompt = BiometricPrompt(activity, Executors.newSingleThreadExecutor(), object : BiometricPrompt.AuthenticationCallback() {overridefunonAuthenticationSucceeded(result: BiometricPrompt.AuthenticationResult) {// Authentication successful// Proceed with the app flow }overridefunonAuthenticationFailed() {// Authentication failed// Inform the user } })// Create the prompt infoval promptInfo = BiometricPrompt.PromptInfo.Builder() .setTitle("Authenticate") .setSubtitle("Please authenticate to proceed") .setNegativeButtonText("Cancel") .build()// Start the authentication process biometricPrompt.authenticate(promptInfo)}
BiometricPrompt: Provides a unified authentication dialog for fingerprint, face, or iris, backed by secure hardware (TEE) where available.
PromptInfo: Configures the authentication dialog, including title, subtitle, and cancellation options.
This approach will automatically use the TEE or secure hardware for fingerprint authentication on supported devices, offering the highest security and compatibility.
Data Security
Data security is a key focus in Android app development, especially when handling sensitive information. It’s crucial to implement robust security measures that protect user data from unauthorized access and misuse. In today’s digital age, ensuring strong data protection is essential for mobile apps to prevent theft and maintain user trust.
Local Session Timeout
A local session timeout is a security feature that helps keep user data safe by tracking inactivity. If a user hasn’t interacted with the app for a set amount of time, the app will automatically log them out. This feature is especially important in financial apps, where protecting sensitive information is a top priority.
Kotlin
constval TIMEOUT_DURATION = 5 * 60 * 1000L// 5 minutes in millisecondsclassSessionManager(privateval context: Context) {privatevar timer: CountDownTimer? = null// Start or restart the inactivity timerfunstartSessionTimeout() { timer?.cancel() // cancel any existing timer timer = object : CountDownTimer(TIMEOUT_DURATION, 1000L) {overridefunonTick(millisUntilFinished: Long) {// Optionally, add logging or other feedback here }overridefunonFinish() {onSessionTimeout() } }.start() }// Reset the timer on user interactionfunresetSessionTimeout() {startSessionTimeout() }// Handle session timeout (e.g., log the user out)privatefunonSessionTimeout() {// Example action: Redirect to login screen context.startActivity(Intent(context, LoginActivity::class.java).apply { flags = Intent.FLAG_ACTIVITY_NEW_TASK or Intent.FLAG_ACTIVITY_CLEAR_TASK }) }// Cancel the timer when the session endsfunendSession() { timer?.cancel() }}classMainActivity : AppCompatActivity() {privatelateinitvar sessionManager: SessionManageroverridefunonCreate(savedInstanceState: Bundle?) {super.onCreate(savedInstanceState)setContentView(R.layout.activity_main) sessionManager = SessionManager(this)// Start the session timer when the activity is created sessionManager.startSessionTimeout() }overridefunonUserInteraction() {super.onUserInteraction()// Reset the session timeout on any user interaction sessionManager.resetSessionTimeout() }overridefunonDestroy() {super.onDestroy()// End the session when the activity is destroyed sessionManager.endSession() }}
startSessionTimeout(): Starts a countdown timer that will log the user out after the set duration.
onUserInteraction(): Resets the timer whenever the user interacts with the app to prevent unintended logouts.
App Data Backup Disabling
By default, Android automatically backs up an app’s data to Google Drive, including SharedPreferences, files, and other persistent data. This process is controlled by the android:allowBackup attribute in the app’s AndroidManifest.xml. By setting this attribute to false, the app ensures its data is not backed up, which is essential for securing financial apps and other apps that handle sensitive information.
XML
<applicationandroid:name=".FinancialApp"android:allowBackup="false"android:fullBackupContent="false" ... ><!-- other configurations --></application>
android:allowBackup=”false”: Prevents Android from backing up any data from this app.
android:fullBackupContent=”false”: Ensures that no full data backup occurs, even if the device supports full data backups.
Configuration Data Protection
Sensitive configuration data, like API keys or access tokens, shouldn’t be hardcoded directly into the app. Instead, it’s safer to encrypt them or store them securely in the Android Keystore, which serves as a secure container for cryptographic keys. Hardcoding sensitive information exposes it to potential attackers, who can easily extract it from the app’s binary. In contrast, the Android Keystore provides tamper-resistant storage, ensuring that your sensitive data remains protected.
Encrypted SharedPreferences
SharedPreferences is commonly used to store small data values in Android, but the issue with standard SharedPreferences is that it saves data in plain text, which is vulnerable if the device is compromised. For sensitive data like API keys or user credentials, it’s best to use EncryptedSharedPreferences, which ensures your data is encrypted and stored securely. Let’s take a look at how to implement this.
Kotlin
import androidx.security.crypto.EncryptedSharedPreferencesimport androidx.security.crypto.MasterKeysfungetSecureSharedPreferences(context: Context): SharedPreferences {val masterKeyAlias = MasterKeys.getOrCreate(MasterKeys.AES256_GCM_SPEC)return EncryptedSharedPreferences.create("secure_preferences", // Name of the preferences file masterKeyAlias, // The master key for encryption context, EncryptedSharedPreferences.PrefKeyEncryptionScheme.AES256_SIV, EncryptedSharedPreferences.PrefValueEncryptionScheme.AES256_GCM )}funsaveConfigData(context: Context, apiKey: String) {val sharedPreferences = getSecureSharedPreferences(context)with(sharedPreferences.edit()) {putString("api_key", apiKey)apply() // Save the data securely }}fungetConfigData(context: Context): String? {val sharedPreferences = getSecureSharedPreferences(context)return sharedPreferences.getString("api_key", null) // Retrieve the secure data}
Here,
MasterKeys.getOrCreate() creates a master key using AES-256 encryption. This key is used to encrypt the data.
EncryptedSharedPreferences.create() initializes the EncryptedSharedPreferences instance with the specified encryption schemes for both the keys and values.
putString() securely saves sensitive data like API keys, while getString() retrieves the encrypted value.
Encrypting API Keys and Tokens
Hardcoding API keys and tokens directly into your app’s code can create serious security vulnerabilities. If someone decompiles your app or gains unauthorized access, these sensitive credentials could be exposed. Instead, it’s safer to store them in an encrypted format and decrypt them only when needed during runtime.
Here’s how you can use AES encryption in Kotlin to securely handle your API keys and tokens.
Kotlin
import javax.crypto.Cipherimport javax.crypto.KeyGeneratorimport javax.crypto.SecretKeyimport javax.crypto.spec.GCMParameterSpecimport android.util.Base64// Encrypting a string with AESfunencryptData(plainText: String, secretKey: SecretKey): String {val cipher = Cipher.getInstance("AES/GCM/NoPadding") cipher.init(Cipher.ENCRYPT_MODE, secretKey)val iv = cipher.ivval encryptedData = cipher.doFinal(plainText.toByteArray())val ivAndEncryptedData = iv + encryptedDatareturn Base64.encodeToString(ivAndEncryptedData, Base64.DEFAULT)}// Decrypting the encrypted stringfundecryptData(encryptedText: String, secretKey: SecretKey): String {val ivAndEncryptedData = Base64.decode(encryptedText, Base64.DEFAULT)val iv = ivAndEncryptedData.sliceArray(0 until 12) // Extract the 12-byte IVval encryptedData = ivAndEncryptedData.sliceArray(12 until ivAndEncryptedData.size)val cipher = Cipher.getInstance("AES/GCM/NoPadding")val gcmParameterSpec = GCMParameterSpec(128, iv) // 128-bit authentication tag length cipher.init(Cipher.DECRYPT_MODE, secretKey, gcmParameterSpec)val decryptedData = cipher.doFinal(encryptedData)returnString(decryptedData)}// Generate Secret Key for AESfungenerateSecretKey(): SecretKey {val keyGenerator = KeyGenerator.getInstance("AES") keyGenerator.init(256) // AES 256-bit encryptionreturn keyGenerator.generateKey()}
AES/GCM/NoPadding: This mode provides strong encryption and also ensures no unnecessary padding is added, keeping the data size as small as possible.
Initialization Vector (IV): The IV is crucial for ensuring that even if the same data is encrypted multiple times, the output will differ. It’s stored alongside the encrypted data and is required for decryption.
generateSecretKey(): This method creates a 256-bit AES key, which can be used for both encryption and decryption. To further enhance security, you can store this key in the Android Keystore.
Android Keystore for Secure Key Management
Storing encryption keys directly in the app can leave them vulnerable to attacks. To avoid this, we can use the Android Keystore system, which securely stores keys either in hardware or a secure enclave, ensuring that only the app has access to them. This adds a significant layer of protection, especially for sensitive data.
Here’s how you can generate and securely manage keys using the Keystore:
Kotlin
import android.security.keystore.KeyGenParameterSpecimport android.security.keystore.KeyPropertiesimport java.security.KeyStoreimport javax.crypto.KeyGeneratorimport javax.crypto.SecretKey// Generate and store a key in Android KeystorefuncreateKey() {val keyGenerator = KeyGenerator.getInstance(KeyProperties.KEY_ALGORITHM_AES, "AndroidKeyStore")val keyGenParameterSpec = KeyGenParameterSpec.Builder("SecureKeyAlias", KeyProperties.PURPOSE_ENCRYPT or KeyProperties.PURPOSE_DECRYPT ).setBlockModes(KeyProperties.BLOCK_MODE_GCM) .setEncryptionPaddings(KeyProperties.ENCRYPTION_PADDING_NONE) .build() keyGenerator.init(keyGenParameterSpec) keyGenerator.generateKey()}// Retrieve the secret key from KeystorefungetSecretKey(): SecretKey? {val keyStore = KeyStore.getInstance("AndroidKeyStore") keyStore.load(null)return keyStore.getKey("SecureKeyAlias", null) as SecretKey?}
KeyGenParameterSpec.Builder: This part sets the encryption requirements, such as the encryption block mode and padding. In this case, we’re using AES with GCM mode, which is both secure and efficient.
createKey(): This function creates a new AES encryption key and securely stores it in the Keystore with the alias SecureKeyAlias. The key is only accessible to the app, making it safe from potential leaks.
getSecretKey(): This function retrieves the stored key from the Keystore when needed for encryption or decryption. The key is never exposed in the code, adding an extra layer of security.
Secure In-Memory Sensitive Data Holding
When your app processes sensitive information like user session tokens, PINs, or account numbers, this data is temporarily stored in memory. If this information is kept in memory for too long, it becomes vulnerable to unauthorized access—especially in rooted or debug-enabled environments where attackers could potentially retrieve it from other applications. Financial apps are particularly at risk because they handle highly sensitive data, so securing session tokens, PINs, and account numbers in memory is essential for protecting user privacy and minimizing exposure to attacks.
Best Practices for Securing In-Memory Data in Android
To keep session tokens, PINs, account numbers, and other sensitive data safe in memory, consider these three core principles:
Minimal Data Exposure: Only keep sensitive data in memory for as long as absolutely necessary, and clear it promptly once it’s no longer needed.
Kotlin
funperformSensitiveOperation() {val sensitiveData = fetchSensitiveData() // Example: fetching from secure storagetry {// Use the sensitive data within a limited scopeprocessSensitiveData(sensitiveData) } finally {// Clear sensitive data once it's no longer needed sensitiveData.clear() }}
Data Clearing: Ensure that sensitive data is swiftly and thoroughly cleared from memory when it’s no longer required. We can use ByteArray and clear the data immediately after use.
Kotlin
classSensitiveDataHandler {funprocessSensitiveData(data: ByteArray) {try {// Process the sensitive data securely } finally {data.fill(0) // Clear data from memory immediately } }}
Obfuscation: Make it difficult for attackers to make sense of session tokens, PINs, or account numbers if they gain access to memory.
Secure Input for PIN Entry
Imagine a user is logging into their banking app while grabbing coffee in a crowded cafe. They quickly type in their PIN, maybe not noticing someone glancing over their shoulder — or that a vulnerability in the app could put their data at risk. That’s exactly why secure PIN entry is so important, especially in financial apps where a PIN is more than just a few numbers; it’s a gateway to sensitive information.
To securely capture PINs, use Android’s secure input types, and avoid storing PINs in plain text. Always hash sensitive data and use Base64 encoding before encrypting and storing it.
Kotlin
import android.content.Contextimport android.text.InputTypeimport android.widget.EditTextimport androidx.security.crypto.EncryptedSharedPreferencesimport androidx.security.crypto.MasterKeysimport java.security.MessageDigestimport java.util.*classSecurePinManager(context: Context) {privateval masterKeyAlias = MasterKeys.getOrCreate(MasterKeys.AES256_GCM_SPEC)privateval encryptedPrefs = EncryptedSharedPreferences.create("secure_prefs", masterKeyAlias, context, EncryptedSharedPreferences.PrefKeyEncryptionScheme.AES256_SIV, EncryptedSharedPreferences.PrefValueEncryptionScheme.AES256_GCM )funsetupPinInputField(editText: EditText) { editText.inputType = InputType.TYPE_CLASS_NUMBER or InputType.TYPE_NUMBER_VARIATION_PASSWORD }funsavePin(pin: String) {val hashedPin = hashPin(pin) // Hash the PIN before saving encryptedPrefs.edit().putString("user_pin", hashedPin).apply() }funverifyPin(inputPin: String): Boolean {val storedHashedPin = encryptedPrefs.getString("user_pin", null)val inputHashedPin = hashPin(inputPin) // Hash the input before comparisonreturn storedHashedPin == inputHashedPin }// Hashes the PIN using SHA-256privatefunhashPin(pin: String): String {val digest = MessageDigest.getInstance("SHA-256")val hashedBytes = digest.digest(pin.toByteArray())return Base64.getEncoder().encodeToString(hashedBytes) // Encode the hashed bytes in Base64 }}
Here,
PIN Hashing: The PIN is now hashed using SHA-256 before saving and comparing. This adds a layer of security by ensuring the raw PIN is never stored.
Base64 Encoding: The hashed PIN is encoded using Base64 to store it as a string in EncryptedSharedPreferences.
Communication Security
In Android development, building a secure communication environment is crucial, especially when handling sensitive data across networks. Here, we’ll walk through the key security components for secure communication in Android apps, with a focus on practical techniques like certificate pinning, message replay protection, JOSE encryption, and HTTPS with TLS 1.3. We’ll also look at enforcing HTTPS and ensuring strong TLS validation.
Certificate Pinning
In today’s connected world, securing app communication is a top priority for Android developers. Whenever your app exchanges data with a server, there’s a risk that attackers could intercept and alter this information. A reliable way to guard against this is by using certificate pinning.
What is Certificate Pinning?
Certificate pinning is a security measure that ensures our app only trusts specific SSL/TLS certificates for a given domain, instead of relying solely on certificates issued by Certificate Authorities (CAs). This guarantees that our app communicates securely with the intended server and not with a fake or malicious one.
Why is Certificate Pinning Important?
Certificate Pinning is a security technique that binds or “pins” your app to a specific server certificate. Instead of trusting any certificate signed by a recognized Certificate Authority (CA), the app is set up to accept only a specific certificate or public key. This means that if a CA is compromised or a fraudulent certificate is used, your app will detect the mismatch and reject the connection.
By default, Android apps trust a broad set of CAs, which means that if any of these is compromised, a malicious actor could intercept the app-server communication. By using Certificate Pinning, your app trusts only specific certificates, reducing the risk of Man-in-the-Middle (MITM) attacks and keeping your data exchanges more secure.
Implementing Certificate Pinning in Android
Let’s look at how to implement Certificate Pinning.
Kotlin
import okhttp3.CertificatePinnerimport okhttp3.OkHttpClientimport okhttp3.RequestfunpinCertificate() {// SHA256 hash of the server's public keyval certificatePinner = CertificatePinner.Builder() .add("your-website.com", "sha256/your_certificate_hash_here") .build()val client = OkHttpClient.Builder() .certificatePinner(certificatePinner) // Attach the pin to the OkHttp client .build()val request = Request.Builder() .url("https://your-website.com/api/endpoint") .build() client.newCall(request).execute().use { response ->if (!response.isSuccessful) throwIOException("Unexpected code $response")println(response.body!!.string()) }}
Here,
CertificatePinner.Builder(): This is where you define which certificates are trusted. You can pin certificates by their domain and their corresponding SHA256 hash.
sha256/your_certificate_hash_here: This is the hash of the public key of the server certificate. Replace it with your server’s actual hash.
OkHttpClient.Builder(): Here, we attach the certificate pinning to the OkHttp client, ensuring that only certificates matching the pinned hash are trusted.
In this code, if the server’s certificate doesn’t match the pinned certificate, the connection will fail, preventing any communication with unauthorized servers.
Handling Multiple Pinning with Backup Certificates
What happens if your server’s certificate is updated or rotated? This is where backup pinning comes into play. By pinning multiple certificates or public keys, you allow your app to connect even if one certificate changes.
This ensures that if your certificate rotates, the app will still trust the new certificate as long as its public key hash is pinned.
Dynamically Pinning Certificates
In some scenarios, it might be necessary to pin certificates dynamically, particularly when working with multiple environments or during development. You can achieve this by fetching the certificate hash at runtime.
Here, the correct pin is selected based on the environment, giving you flexibility across various stages of development and deployment.
Message Replay Protection
Message replay protection is a critical security feature, especially for mobile apps handling sensitive operations like financial transactions. It ensures that each message exchanged between the client (your app) and the server is unique and valid, preventing attackers from reusing intercepted messages to perform malicious actions.
What Is Message Replay Protection?
Message replay protection prevents attackers from reusing old or intercepted messages to perform unauthorized actions. It works by using things like timestamps, random numbers (nonces), or sequence numbers to make each message unique. With replay protection in place, the server can spot the repeated message and reject it, keeping the communication secure.
Why Is It Important?
In the world of Android apps — particularly finance, e-commerce, or any domain dealing with sensitive data — security breaches can result in financial loss, legal troubles, and damaged user trust. Implementing message replay protection:
Safeguards transactions and sensitive operations.
Ensures compliance with industry standards like PCI DSS (Payment Card Industry Data Security Standard).
Bolsters your app’s reputation for security and reliability.
How Message Replay Protection Works
Message replay protection ensures that every message sent during communication is unique and cannot be reused by an attacker. Here’s how it typically works:
Nonces (Numbers Used Once): Unique identifiers, such as timestamps or random numbers, are attached to messages.
Server Validation: The server checks whether the nonce has been used before.
Rejection of Duplicates: If the same nonce is detected, the server rejects the message, thwarting the replay attempt.
Implementing Message Replay Protection in Android
Now, here’s how you can bring this concept to life in an Android app.
Client-Side Implementation
Kotlin
import java.security.MessageDigest import java.util.Base64 import java.util.UUID funcreateRequestPayload(data: String, secretKey: String): Map<String, String> { val nonce = UUID.randomUUID().toString() // Generate a unique nonce val timestamp = System.currentTimeMillis() // Current timestamp val payload = "$data|$nonce|$timestamp"// Create a cryptographic hash of the payload val signature = hashWithHmacSHA256(payload, secretKey) returnmapOf( "data" to data, "nonce" to nonce, "timestamp" to timestamp.toString(), "signature" to signature ) } funhashWithHmacSHA256(data: String, secretKey: String): String { val hmacSHA256 = MessageDigest.getInstance("HmacSHA256") val keyBytes = secretKey.toByteArray(Charsets.UTF_8) val dataBytes = data.toByteArray(Charsets.UTF_8) val hmacBytes = hmacSHA256.digest(keyBytes + dataBytes) return Base64.getEncoder().encodeToString(hmacBytes) }
Server-Side Validation
On the server, you would:
Check that the nonce is unused. Store and track used nonces.
Verify the timestamp is within an acceptable window (e.g., 5 minutes).
Recompute the signature using the shared secret key and compare it with the one provided.
JOSE provides a standardized approach for securely signing, encrypting, and verifying JSON data, making it a valuable tool for securing APIs and data transmissions. By using JOSE, developers can ensure the authenticity, integrity, and confidentiality of the data being exchanged.
What is JOSE?
JOSE is a suite of standards defined by the IETF that provides a structured approach to securing JSON data. It is ideal for modern applications that rely heavily on APIs for communication and is commonly used in APIs, mobile/web applications, and microservices. It includes:
JWS (JSON Web Signature): Ensures data integrity and authenticity by signing JSON objects.
JWE (JSON Web Encryption): Secures the data by encrypting it.
JWK (JSON Web Key): A format for representing cryptographic keys.
JWA (JSON Web Algorithms): Defines algorithms used for signing and encryption.
JWT (JSON Web Token): A compact representation often used for claims (data) and identity.
JOSE is particularly useful in mobile applications for,
Secure API communications
Token-based authentication
Payment processing
How JOSE Works: A Simplified Flow
Signing Data with JWS:
The app generates a digital signature for the JSON data using a private key.
The recipient verifies the signature using the corresponding public key.
Encrypting Data with JWE:
JSON data is encrypted using a symmetric or asymmetric encryption algorithm.
Only the intended recipient can decrypt the data using their private key.
Sending the Encrypted and Signed Data:
The app sends the JWE or JWS to the server over a secure channel (e.g., HTTPS).
JOSE Structure
The JOSE framework operates through a JSON-based object divided into three major parts:
Header: Metadata specifying encryption/signing algorithms and key information.
Payload: The actual data to be signed/encrypted.
Signature/Encryption: The cryptographic output, which is either a signature or encrypted content.
For encrypted data, a typical JWE looks like this:
First, we’ll generate an RSA key pair for signing and verification. This key pair consists of a private key (used for signing) and a public key (used for verification). For data encryption, we’ll also generate a separate symmetric AES key, which will be used to encrypt the sensitive data itself.
import com.nimbusds.jose.*import com.nimbusds.jose.crypto.RSASSASignerimport com.nimbusds.jwt.SignedJWTimport java.security.interfaces.RSAPrivateKeyimport java.util.Date// Dummy financial data exampledataclassFinancialData(val accountNumber: String,val amount: Double,val transactionId: String)funsignData(financialData: FinancialData, privateKey: RSAPrivateKey): String {// Convert the financial data object to a JSON stringvaldata = """ { "accountNumber": "${financialData.accountNumber}", "amount": ${financialData.amount}, "transactionId": "${financialData.transactionId}" } """// Create a payload with the financial dataval payload = Payload(data)// Create a JWS header with RS256 algorithmval header = JWSHeader.Builder(JWSAlgorithm.RS256).build()// Create a JWS objectval jwsObject = JWSObject(header, payload)// Sign the JWS object using the RSASSASignerval signer = RSASSASigner(privateKey) jwsObject.sign(signer)// Return the serialized JWS (compact format)return jwsObject.serialize()}funmain() {// Just example - RSAPrivateKey (for demonstration purposes, this key would normally be loaded from a secure store)val privateKey: RSAPrivateKey = TODO("Load the private key here")// Create some dummy financial dataval financialData = FinancialData( accountNumber = "1234567890", amount = 2500.75, transactionId = "TXN987654321" )// Sign the financial dataval signedData = signData(financialData, privateKey)// Output the signed dataprintln("Signed JWT: $signedData")}
Encrypting Data with JWE
Let’s move on and encrypt the data.
Kotlin
import com.nimbusds.jose.crypto.RSAEncrypterimport com.nimbusds.jose.EncryptionMethodimport com.nimbusds.jose.JWEHeaderimport com.nimbusds.jose.JWEObjectimport com.nimbusds.jose.Payloadimport java.security.interfaces.RSAPublicKeyfunencryptData(data: String, publicKey: RSAPublicKey): String {// Create the payload from the input dataval payload = Payload(data)// Build the JWE header with RSA-OAEP-256 for key encryption // and AES-GCM 256 for data encryptionval header = JWEHeader.Builder(JWEAlgorithm.RSA_OAEP_256, EncryptionMethod.A256GCM).build()// Initialize the JWE object with the header and payloadval jweObject = JWEObject(header, payload)// Encrypt the JWE object using the RSA public keyval encrypter = RSAEncrypter(publicKey) jweObject.encrypt(encrypter)// Return the serialized JWE (in compact format) for transmissionreturn jweObject.serialize()}
Verifying and Decrypting
On the recipient’s end, verify the signature and decrypt the data.
Kotlin
import com.nimbusds.jose.JWSObjectimport com.nimbusds.jose.crypto.RSASSAVerifierimport java.security.interfaces.RSAPublicKeyfunverifySignature(jws: String, publicKey: RSAPublicKey): Boolean {returntry {// Parse the JWS string into a JWSObjectval jwsObject = JWSObject.parse(jws)// Create a verifier using the public RSA keyval verifier = RSASSAVerifier(publicKey)// Verify the signature of the JWS object and return the result jwsObject.verify(verifier) } catch (e: Exception) {// Optionally log the exception for debuggingprintln("Error verifying signature: ${e.message}")false }}
Decrypting Data
Kotlin
import com.nimbusds.jose.JWEObjectimport com.nimbusds.jose.crypto.RSADecrypterimport java.security.interfaces.RSAPrivateKeyfundecryptData(jwe: String, privateKey: RSAPrivateKey): String {returntry {// Parse the JWE string into a JWEObjectval jweObject = JWEObject.parse(jwe)// Create a decrypter using the RSA private keyval decrypter = RSADecrypter(privateKey)// Decrypt the JWE object jweObject.decrypt(decrypter)// Return the decrypted payload as a UTF-8 string jweObject.payload.toStringUTF8() } catch (exception: Exception) {// Handle any errors (e.g., invalid JWE format, decryption issues)println("Error during decryption: ${exception.message}")"" }}
HTTPS (TLS 1.3) Communication
Secure communication is the backbone of modern financial app development. HTTPS, powered by TLS (Transport Layer Security), ensures that the data exchanged between your app and its server stays protected from unauthorized access.
What is HTTPS and TLS?
HTTPS HTTPS (Hypertext Transfer Protocol Secure) is an upgrade to HTTP, designed to secure the communication between web clients and servers. It uses TLS (Transport Layer Security) to encrypt the data, protecting it from interception during transmission. This is especially important for safeguarding sensitive details like passwords, payment information, or personal data.
TLS TLS is a cryptographic protocol that offers three core protections:
Encryption: Ensures that data remains confidential and cannot be accessed by unauthorized parties.
Authentication: Confirms that the server is legitimate and, optionally, verifies the client’s identity.
Integrity: Guarantees that the data hasn’t been modified during transmission.
TLS 1.3 TLS 1.3, the latest version of the protocol, brings several key enhancements:
Improved Handshake Performance: Reduces the time needed to establish a secure connection.
Stronger Encryption: Implements more robust encryption methods for better security.
HTTPS As the secure version of HTTP, HTTPS uses TLS to encrypt the data exchanged between the app and the server. In the context of financial applications, HTTPS offers:
Confidentiality: Safeguards sensitive information like user credentials and transaction data from being intercepted.
Data Integrity: Ensures the information sent and received is unchanged during transit.
Server Authentication: Verifies the authenticity of the server, helping protect against fraud and man-in-the-middle attacks.
TLS 1.3 TLS 1.3, released in 2018, brings numerous advantages over previous versions:
Stronger Security: Phases out older, vulnerable protocols such as RSA key exchange, making the connection more secure.
Faster Handshakes: Simplifies the connection process, improving speed and reducing delay.
Forward Secrecy: Even if an attacker gains access to a server’s private key, past communication remains secure.
Setting Up HTTPS in Android Apps
Android natively supports HTTPS, but to make sure your app works with TLS 1.3, you’ll need to configure a few settings and understand the requirements.
Prerequisites
Make sure your app is targeting Android 10 (API level 29) or higher, as this version comes with native support for TLS 1.3.
Install a valid SSL certificate on the server hosting your APIs to establish secure communication.
Step-by-Step Implementation
Kotlin
// Use the latest version in the future.implementation("com.squareup.okhttp3:okhttp:4.12.0") implementation("com.google.code.gson:gson:2.12.0")
We’ll utilize OkHttp for handling HTTPS requests, as it offers a lightweight and efficient solution.
Creating a Secure HTTP Client
To enable HTTPS with TLS 1.3, configure OkHttp’s OkHttpClient. This client will handle secure communication with your backend.
connectTimeout: The maximum duration allowed for establishing a connection.
readTimeout: The maximum time allowed to wait for data after the connection is established.
writeTimeout: The maximum time allowed to wait while sending data to the server.
With Android 10 and higher versions supporting TLS 1.3 natively, no extra configuration is needed for the protocol. The OkHttp client automatically negotiates the highest version it supports.
For older Android versions, ensure that the device is using the latest system libraries, or incorporate third-party TLS solutions such as Conscrypt to enable support for newer TLS protocols like TLS 1.2 or TLS 1.3.
Making Secure HTTPS Requests
Once the client is ready, use it to make API requests.
Request Building: Defines the target URL and HTTP method (GET in this case).
Response Handling: Reads and parses the server’s response. Always handle errors to ensure reliability.
Enforced HTTPS Networking
Securing your app’s network communication is vital. Android offers tools and best practices to help enforce HTTPS and ensure all data transmissions are secure.
Network Security Config
During development, Android applications allow developers to set security policies using the network_security_config.xml file. This configuration file helps enforce HTTPS and manage trusted certificates.
If your app interacts with custom servers using self-signed certificates, configure an SSLSocketFactory to ensure secure communication.
Kotlin
import okhttp3.OkHttpClientimport java.security.KeyStoreimport javax.net.ssl.SSLContextimport javax.net.ssl.TrustManagerFactoryimport javax.net.ssl.X509TrustManagerfuncreateSecureOkHttpClient(): OkHttpClient {try {// Initialize TrustManagerFactory with the default algorithmval trustManagerFactory = TrustManagerFactory.getInstance(TrustManagerFactory.getDefaultAlgorithm()) trustManagerFactory.init(nullas KeyStore?)// Get the array of TrustManagersval trustManagers = trustManagerFactory.trustManagersif (trustManagers.isEmpty()) {throwIllegalStateException("No TrustManagers found.") }// Initialize the SSLContext with the TrustManagerval sslContext = SSLContext.getInstance("TLS") sslContext.init(null, trustManagers, null)// Cast the first TrustManager to X509TrustManagerval x509TrustManager = trustManagers[0] as X509TrustManager// Return an OkHttpClient with the custom SSL contextreturn OkHttpClient.Builder() .sslSocketFactory(sslContext.socketFactory, x509TrustManager) .build() } catch (e: Exception) {throwRuntimeException("Error creating secure OkHttpClient", e) }}
Strong TLS Validation
When developing Android apps for sensitive industries like finance, security is paramount. One of the most critical aspects of securing communication between the app and the server is ensuring that TLS (Transport Layer Security) is implemented correctly. TLS encrypts data transferred over the internet, protecting users from attackers trying to intercept or tamper with sensitive information.
The Basics of TLS
TLS (formerly SSL) is a protocol used to secure data transmission over the internet. It ensures three key principles:
Confidentiality: Data is encrypted, making it unreadable if intercepted.
Integrity: Ensures data hasn’t been altered during transmission.
Authentication: Verifies the server’s identity to confirm communication with the intended server.
When connecting to a server over HTTPS (which uses TLS), the server sends its TLS certificate to prove its identity. The client (your Android app) validates this certificate, ensuring the server is trusted. But how do we ensure the certificate is legitimate? This is where Strong TLS Validation comes in.
What is Strong TLS Validation?
Strong TLS validation involves thorough checks to verify the authenticity and security of the server’s TLS certificate. Key checks include:
Certificate Authenticity: Is the certificate issued by a trusted Certificate Authority (CA)?
Certificate Expiry: Has the certificate expired?
Certificate Revocation: Has the CA revoked the certificate due to compromise or misuse?
Domain Validation: Does the certificate’s domain match the server being accessed?
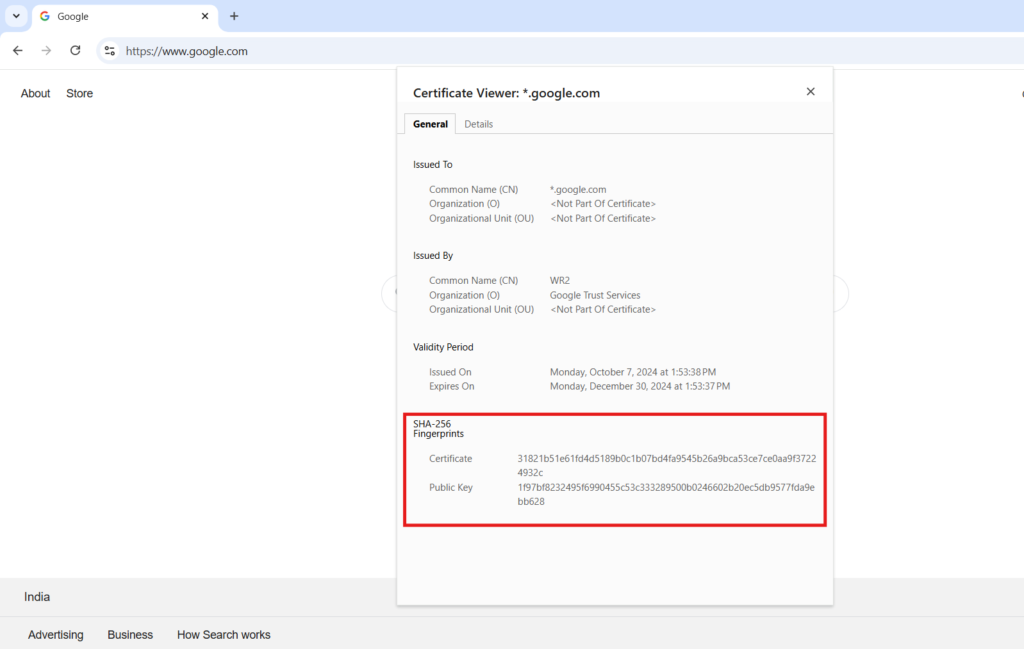
Public Key Pinning: Does the server’s public key match the one the app expects?
Performing these checks ensures secure communication with the legitimate server, protecting users from impersonation and MITM attacks.
Implementing Strong TLS Validation in Android
Here’s how to implement strong TLS validation in your Android app:
Enforcing HTTPS in Android
The first step is to ensure all app communications occur over HTTPS. HTTP is insecure and should never be used for transmitting sensitive data.
You can enforce HTTPS by using Android’s Network Security Configuration. This blocks all cleartext (non-HTTPS) traffic.
This ensures your app only communicates securely with the specified domain.
Validating Server Certificates with a Custom TrustManager
To validate certificates, you can implement a Custom TrustManager. This is the core of TLS validation, where you verify the server’s certificate chain.
Kotlin
classCustomTrustManager : X509TrustManager {overridefuncheckClientTrusted(chain: Array<outX509Certificate>?, authType: String?) {// Optional: Add client-side certificate validation if needed }overridefuncheckServerTrusted(chain: Array<outX509Certificate>?, authType: String?) {try {// Validate the server certificate chainval cert = chain?.firstOrNull()val issuer = cert?.issuerDN?.nameif (issuer != "CN=Your Trusted CA") {throwException("Untrusted certificate issuer: $issuer") } } catch (e: Exception) {throwSSLHandshakeException("Certificate validation failed: ${e.message}") } }overridefungetAcceptedIssuers(): Array<X509Certificate>? {returnnull// Use the system default }}
This validates the certificate issuer. Extend it to check for expiration, revocation, or other criteria.
Configuring SSLContext
To enforce custom certificate validation, configure an SSLContext that uses your Custom TrustManager.
This ensures users understand the issue without exposing sensitive details.
Conclusion
Securing mobile applications requires a proactive, multi-layered approach to protect against various vulnerabilities. By following best practices for application, platform, data, and communication security, developers can significantly reduce risks and protect user information.
This guide only scratches the surface, but it sets a solid foundation for developing secure mobile applications. Remember, continuous security audits and timely updates are crucial for staying protected in an ever-evolving digital landscape.
In Android development, building a secure communication environment is crucial, especially when handling sensitive data across networks. In this post, we’ll walk through the key security components for secure communication in Android apps, with a focus on practical techniques like certificate pinning, message replay protection, JOSE encryption, and HTTPS with TLS 1.2. We’ll also look at enforcing HTTPS and ensuring strong TLS validation. Each of these concepts will be broken down with clear Kotlin examples, making it easier to understand and apply to your own apps.
Let’s dive in and explore how each of these techniques works, step-by-step, to strengthen the security of Android app communications. Whether you’re just getting started or looking to deepen your understanding, you’ll find a straightforward approach to implementing these tools.
Communication Security
In Android development, establishing communication security is vital, particularly when dealing with sensitive data across networks. Here, we’ll explore the key components of communication security in Android apps, focusing on practical techniques such as certificate pinning, message replay protection, JOSE encryption, and HTTPS with TLS 1.3. We’ll also cover how to enforce HTTPS and ensure robust TLS validation for secure communication.
Certificate Pinning
In today’s connected world, securing app communication is a top priority for Android developers. Whenever your app exchanges data with a server, there’s a risk that attackers could intercept and alter this information. A reliable way to guard against this is by using certificate pinning.
What is Certificate Pinning?
Certificate pinning is a security measure that ensures our app only trusts specific SSL/TLS certificates for a given domain, instead of relying solely on certificates issued by Certificate Authorities (CAs). This guarantees that our app communicates securely with the intended server and not with a fake or malicious one.
Why is Certificate Pinning Important?
Certificate Pinning is a security technique that binds or “pins” your app to a specific server certificate. Instead of trusting any certificate signed by a recognized Certificate Authority (CA), the app is set up to accept only a specific certificate or public key. This means that if a CA is compromised or a fraudulent certificate is used, your app will detect the mismatch and reject the connection.
By default, Android apps trust a broad set of CAs, which means that if any of these is compromised, a malicious actor could intercept the app-server communication. By using Certificate Pinning, your app trusts only specific certificates, reducing the risk of Man-in-the-Middle (MITM) attacks and keeping your data exchanges more secure.
Implementing Certificate Pinning in Android
Let’s dive into how to implement certificate pinning in an Android app using OkHttp library.
Kotlin
import okhttp3.CertificatePinnerimport okhttp3.OkHttpClientimport okhttp3.RequestfunpinCertificate() {// SHA256 hash of the server's public keyval certificatePinner = CertificatePinner.Builder() .add("your-website.com", "sha256/your_certificate_hash_here") .build()val client = OkHttpClient.Builder() .certificatePinner(certificatePinner) // Attach the pin to the OkHttp client .build()val request = Request.Builder() .url("https://your-website.com/api/endpoint") .build() client.newCall(request).execute().use { response ->if (!response.isSuccessful) throwIOException("Unexpected code $response")println(response.body!!.string()) }}
Here,
CertificatePinner.Builder(): This is where you define which certificates are trusted. You can pin certificates by their domain and their corresponding SHA256 hash.
sha256/your_certificate_hash_here: This is the hash of the public key of the server certificate. Replace it with your server’s actual hash.
OkHttpClient.Builder(): Here, we attach the certificate pinning to the OkHttp client, ensuring that only certificates matching the pinned hash are trusted.
In this code, if the server’s certificate doesn’t match the pinned certificate, the connection will fail, preventing any communication with unauthorized servers.
Handling Multiple Pinning with Backup Certificates
What happens if your server’s certificate is updated or rotated? This is where backup pinning comes into play. By pinning multiple certificates or public keys, you allow your app to connect even if one certificate changes.
This ensures that if your certificate rotates, the app will still trust the new certificate as long as its public key hash is pinned.
Dynamically Pinning Certificates
In some scenarios, it might be necessary to pin certificates dynamically, particularly when working with multiple environments or during development. You can achieve this by fetching the certificate hash at runtime.
Here, the correct pin is selected based on the environment, giving you flexibility across various stages of development and deployment.
Message Replay Protection
Message replay protection is a critical security feature, especially for mobile apps handling sensitive operations like financial transactions. It ensures that each message exchanged between the client (your app) and the server is unique and valid, preventing attackers from reusing intercepted messages to perform malicious actions.
What Is Message Replay Protection?
Message replay protection prevents attackers from reusing old or intercepted messages to perform unauthorized actions. It works by using things like timestamps, random numbers (nonces), or sequence numbers to make each message unique. With replay protection in place, the server can spot the repeated message and reject it, keeping the communication secure.
Why Is It Important?
In the world of Android apps — particularly finance, e-commerce, or any domain dealing with sensitive data — security breaches can result in financial loss, legal troubles, and damaged user trust. Implementing message replay protection:
Safeguards transactions and sensitive operations.
Ensures compliance with industry standards like PCI DSS (Payment Card Industry Data Security Standard).
Bolsters your app’s reputation for security and reliability.
How Message Replay Protection Works
Message replay protection ensures that every message sent during communication is unique and cannot be reused by an attacker. Here’s how it typically works:
Nonces (Numbers Used Once): Unique identifiers, such as timestamps or random numbers, are attached to messages.
Server Validation: The server checks whether the nonce has been used before.
Rejection of Duplicates: If the same nonce is detected, the server rejects the message, thwarting the replay attempt.
Implementing Message Replay Protection in Android
Now, here’s how you can bring this concept to life in an Android app.
Client-Side Implementation
Kotlin
import java.security.MessageDigest import java.util.Base64 import java.util.UUID funcreateRequestPayload(data: String, secretKey: String): Map<String, String> { val nonce = UUID.randomUUID().toString() // Generate a unique nonce val timestamp = System.currentTimeMillis() // Current timestamp val payload = "$data|$nonce|$timestamp"// Create a cryptographic hash of the payload val signature = hashWithHmacSHA256(payload, secretKey) returnmapOf( "data" to data, "nonce" to nonce, "timestamp" to timestamp.toString(), "signature" to signature ) } funhashWithHmacSHA256(data: String, secretKey: String): String { val hmacSHA256 = MessageDigest.getInstance("HmacSHA256") val keyBytes = secretKey.toByteArray(Charsets.UTF_8) val dataBytes = data.toByteArray(Charsets.UTF_8) val hmacBytes = hmacSHA256.digest(keyBytes + dataBytes) return Base64.getEncoder().encodeToString(hmacBytes) }
Server-Side Validation
On the server, you would:
Check that the nonce is unused. Store and track used nonces.
Verify the timestamp is within an acceptable window (e.g., 5 minutes).
Recompute the signature using the shared secret key and compare it with the one provided.
In today’s digital age, ensuring secure communication and data integrity is essential, especially when handling sensitive information in financial Android applications. User data like credit card numbers, bank account details, and personal identifiers must be safeguarded to prevent unauthorized access. One effective technology for achieving this level of security is JOSE (JSON Object Signing and Encryption).
JOSE provides a standardized approach for securely signing, encrypting, and verifying JSON data, making it a valuable tool for securing APIs and data transmissions. By using JOSE, developers can ensure the authenticity, integrity, and confidentiality of the data being exchanged.
What is JOSE?
JOSE is a suite of standards defined by the IETF that provides a structured approach to securing JSON data. It is ideal for modern applications that rely heavily on APIs for communication and is commonly used in APIs, mobile/web applications, and microservices. It includes:
JWS (JSON Web Signature): Ensures data integrity and authenticity by signing JSON objects.
JWE (JSON Web Encryption): Secures the data by encrypting it.
JWK (JSON Web Key): A format for representing cryptographic keys.
JWA (JSON Web Algorithms): Defines algorithms used for signing and encryption.
JWT (JSON Web Token): A compact representation often used for claims (data) and identity.
In Android, JOSE is commonly used for secure API communication, especially when dealing with sensitive user data.
How JOSE Works: A Simplified Flow
Signing Data with JWS:
The app generates a digital signature for the JSON data using a private key.
The recipient verifies the signature using the corresponding public key.
Encrypting Data with JWE:
JSON data is encrypted using a symmetric or asymmetric encryption algorithm.
Only the intended recipient can decrypt the data using their private key.
Sending the Encrypted and Signed Data:
The app sends the JWE or JWS to the server over a secure channel (e.g., HTTPS).
JOSE Structure
The JOSE framework operates through a JSON-based object divided into three major parts:
Header: Metadata specifying encryption/signing algorithms and key information.
Payload: The actual data to be signed/encrypted.
Signature/Encryption: The cryptographic output, which is either a signature or encrypted content.
For encrypted data, a typical JWE looks like this:
First, we’ll generate an RSA key pair for signing and verification. This key pair consists of a private key (used for signing) and a public key (used for verification). For data encryption, we’ll also generate a separate symmetric AES key, which will be used to encrypt the sensitive data itself.
import com.nimbusds.jose.*import com.nimbusds.jose.crypto.RSASSASignerimport com.nimbusds.jwt.SignedJWTimport java.security.interfaces.RSAPrivateKeyimport java.util.Date// Dummy financial data exampledataclassFinancialData(val accountNumber: String,val amount: Double,val transactionId: String)funsignData(financialData: FinancialData, privateKey: RSAPrivateKey): String {// Convert the financial data object to a JSON stringvaldata = """ { "accountNumber": "${financialData.accountNumber}", "amount": ${financialData.amount}, "transactionId": "${financialData.transactionId}" } """// Create a payload with the financial dataval payload = Payload(data)// Create a JWS header with RS256 algorithmval header = JWSHeader.Builder(JWSAlgorithm.RS256).build()// Create a JWS objectval jwsObject = JWSObject(header, payload)// Sign the JWS object using the RSASSASignerval signer = RSASSASigner(privateKey) jwsObject.sign(signer)// Return the serialized JWS (compact format)return jwsObject.serialize()}funmain() {// Just example - RSAPrivateKey (for demonstration purposes, this key would normally be loaded from a secure store)val privateKey: RSAPrivateKey = TODO("Load the private key here")// Create some dummy financial dataval financialData = FinancialData( accountNumber = "1234567890", amount = 2500.75, transactionId = "TXN987654321" )// Sign the financial dataval signedData = signData(financialData, privateKey)// Output the signed dataprintln("Signed JWT: $signedData")}
Encrypting Data with JWE
Let’s move on and encrypt the data.
Kotlin
import com.nimbusds.jose.crypto.RSAEncrypterimport com.nimbusds.jose.EncryptionMethodimport com.nimbusds.jose.JWEHeaderimport com.nimbusds.jose.JWEObjectimport com.nimbusds.jose.Payloadimport java.security.interfaces.RSAPublicKeyfunencryptData(data: String, publicKey: RSAPublicKey): String {// Create the payload from the input dataval payload = Payload(data)// Build the JWE header with RSA-OAEP-256 for key encryption // and AES-GCM 256 for data encryptionval header = JWEHeader.Builder(JWEAlgorithm.RSA_OAEP_256, EncryptionMethod.A256GCM).build()// Initialize the JWE object with the header and payloadval jweObject = JWEObject(header, payload)// Encrypt the JWE object using the RSA public keyval encrypter = RSAEncrypter(publicKey) jweObject.encrypt(encrypter)// Return the serialized JWE (in compact format) for transmissionreturn jweObject.serialize()}
Verifying and Decrypting
On the recipient’s end, verify the signature and decrypt the data.
Kotlin
import com.nimbusds.jose.JWSObjectimport com.nimbusds.jose.crypto.RSASSAVerifierimport java.security.interfaces.RSAPublicKeyfunverifySignature(jws: String, publicKey: RSAPublicKey): Boolean {returntry {// Parse the JWS string into a JWSObjectval jwsObject = JWSObject.parse(jws)// Create a verifier using the public RSA keyval verifier = RSASSAVerifier(publicKey)// Verify the signature of the JWS object and return the result jwsObject.verify(verifier) } catch (e: Exception) {// Optionally log the exception for debuggingprintln("Error verifying signature: ${e.message}")false }}
Decrypting Data
Kotlin
import com.nimbusds.jose.JWEObjectimport com.nimbusds.jose.crypto.RSADecrypterimport java.security.interfaces.RSAPrivateKeyfundecryptData(jwe: String, privateKey: RSAPrivateKey): String {returntry {// Parse the JWE string into a JWEObjectval jweObject = JWEObject.parse(jwe)// Create a decrypter using the RSA private keyval decrypter = RSADecrypter(privateKey)// Decrypt the JWE object jweObject.decrypt(decrypter)// Return the decrypted payload as a UTF-8 string jweObject.payload.toStringUTF8() } catch (exception: Exception) {// Handle any errors (e.g., invalid JWE format, decryption issues)println("Error during decryption: ${exception.message}")"" }}
HTTPS (TLS 1.3) Communication
Secure communication is the backbone of modern financial app development. HTTPS, powered by TLS (Transport Layer Security), ensures that the data exchanged between your app and its server stays protected from unauthorized access.
What is HTTPS and TLS?
HTTPS HTTPS (Hypertext Transfer Protocol Secure) is an upgrade to HTTP, designed to secure the communication between web clients and servers. It uses TLS (Transport Layer Security) to encrypt the data, protecting it from interception during transmission. This is especially important for safeguarding sensitive details like passwords, payment information, or personal data.
TLS TLS is a cryptographic protocol that offers three core protections:
Encryption: Ensures that data remains confidential and cannot be accessed by unauthorized parties.
Authentication: Confirms that the server is legitimate and, optionally, verifies the client’s identity.
Integrity: Guarantees that the data hasn’t been modified during transmission.
TLS 1.3 TLS 1.3, the latest version of the protocol, brings several key enhancements:
Improved Handshake Performance: Reduces the time needed to establish a secure connection.
Stronger Encryption: Implements more robust encryption methods for better security.
HTTPS As the secure version of HTTP, HTTPS uses TLS to encrypt the data exchanged between the app and the server. In the context of financial applications, HTTPS offers:
Confidentiality: Safeguards sensitive information like user credentials and transaction data from being intercepted.
Data Integrity: Ensures the information sent and received is unchanged during transit.
Server Authentication: Verifies the authenticity of the server, helping protect against fraud and man-in-the-middle attacks.
TLS 1.3 TLS 1.3, released in 2018, brings numerous advantages over previous versions:
Stronger Security: Phases out older, vulnerable protocols such as RSA key exchange, making the connection more secure.
Faster Handshakes: Simplifies the connection process, improving speed and reducing delay.
Forward Secrecy: Even if an attacker gains access to a server’s private key, past communication remains secure.
Setting Up HTTPS in Android Apps
Android natively supports HTTPS, but to make sure your app works with TLS 1.3, you’ll need to configure a few settings and understand the requirements.
Prerequisites
Make sure your app is targeting Android 10 (API level 29) or higher, as this version comes with native support for TLS 1.3.
Install a valid SSL certificate on the server hosting your APIs to establish secure communication.
Step-by-Step Implementation
Kotlin
// Use the latest version in the future.implementation("com.squareup.okhttp3:okhttp:4.12.0") implementation("com.google.code.gson:gson:2.12.0")
We’ll utilize OkHttp for handling HTTPS requests, as it offers a lightweight and efficient solution.
Creating a Secure HTTP Client
To enable HTTPS with TLS 1.3, configure OkHttp’s OkHttpClient. This client will handle secure communication with your backend.
connectTimeout: The maximum duration allowed for establishing a connection.
readTimeout: The maximum time allowed to wait for data after the connection is established.
writeTimeout: The maximum time allowed to wait while sending data to the server.
With Android 10 and higher versions supporting TLS 1.3 natively, no extra configuration is needed for the protocol. The OkHttp client automatically negotiates the highest version it supports.
For older Android versions, ensure that the device is using the latest system libraries, or incorporate third-party TLS solutions such as Conscrypt to enable support for newer TLS protocols like TLS 1.2 or TLS 1.3.
Making Secure HTTPS Requests
Once the client is ready, use it to make API requests.
Request Building: Defines the target URL and HTTP method (GET in this case).
Response Handling: Reads and parses the server’s response. Always handle errors to ensure reliability.
Enforced HTTPS Networking
Securing your app’s network communication is vital. Android offers tools and best practices to help enforce HTTPS and ensure all data transmissions are secure.
Network Security Config
During development, Android applications allow developers to set security policies using the network_security_config.xml file. This configuration file helps enforce HTTPS and manage trusted certificates.
If your app interacts with custom servers using self-signed certificates, configure an SSLSocketFactory to ensure secure communication.
Kotlin
import okhttp3.OkHttpClientimport java.security.KeyStoreimport javax.net.ssl.SSLContextimport javax.net.ssl.TrustManagerFactoryimport javax.net.ssl.X509TrustManagerfuncreateSecureOkHttpClient(): OkHttpClient {try {// Initialize TrustManagerFactory with the default algorithmval trustManagerFactory = TrustManagerFactory.getInstance(TrustManagerFactory.getDefaultAlgorithm()) trustManagerFactory.init(nullas KeyStore?)// Get the array of TrustManagersval trustManagers = trustManagerFactory.trustManagersif (trustManagers.isEmpty()) {throwIllegalStateException("No TrustManagers found.") }// Initialize the SSLContext with the TrustManagerval sslContext = SSLContext.getInstance("TLS") sslContext.init(null, trustManagers, null)// Cast the first TrustManager to X509TrustManagerval x509TrustManager = trustManagers[0] as X509TrustManager// Return an OkHttpClient with the custom SSL contextreturn OkHttpClient.Builder() .sslSocketFactory(sslContext.socketFactory, x509TrustManager) .build() } catch (e: Exception) {throwRuntimeException("Error creating secure OkHttpClient", e) }}
Strong TLS Validation
When developing Android apps for sensitive industries like finance, security is paramount. One of the most critical aspects of securing communication between the app and the server is ensuring that TLS (Transport Layer Security) is implemented correctly. TLS encrypts data transferred over the internet, protecting users from attackers trying to intercept or tamper with sensitive information.
When developing Android apps for sensitive industries like finance, security is paramount. One of the most critical aspects of securing communication between the app and the server is ensuring that TLS (Transport Layer Security) is implemented correctly. TLS encrypts data transferred over the internet, protecting users from attackers trying to intercept or tamper with sensitive information.
The Basics of TLS
TLS (formerly SSL) is a protocol used to secure data transmission over the internet. It ensures three key principles:
Confidentiality: Data is encrypted, making it unreadable if intercepted.
Integrity: Ensures data hasn’t been altered during transmission.
Authentication: Verifies the server’s identity to confirm communication with the intended server.
When connecting to a server over HTTPS (which uses TLS), the server sends its TLS certificate to prove its identity. The client (your Android app) validates this certificate, ensuring the server is trusted. But how do we ensure the certificate is legitimate? This is where Strong TLS Validation comes in.
What is Strong TLS Validation?
Strong TLS validation involves thorough checks to verify the authenticity and security of the server’s TLS certificate. Key checks include:
Certificate Authenticity: Is the certificate issued by a trusted Certificate Authority (CA)?
Certificate Expiry: Has the certificate expired?
Certificate Revocation: Has the CA revoked the certificate due to compromise or misuse?
Domain Validation: Does the certificate’s domain match the server being accessed?
Public Key Pinning: Does the server’s public key match the one the app expects?
Performing these checks ensures secure communication with the legitimate server, protecting users from impersonation and MITM attacks.
Implementing Strong TLS Validation in Android
Here’s how to implement strong TLS validation in your Android app:
Enforcing HTTPS in Android
The first step is to ensure all app communications occur over HTTPS. HTTP is insecure and should never be used for transmitting sensitive data.
You can enforce HTTPS by using Android’s Network Security Configuration. This blocks all cleartext (non-HTTPS) traffic.
This ensures your app only communicates securely with the specified domain.
Validating Server Certificates with a Custom TrustManager
To validate certificates, you can implement a Custom TrustManager. This is the core of TLS validation, where you verify the server’s certificate chain.
Kotlin
classCustomTrustManager : X509TrustManager {overridefuncheckClientTrusted(chain: Array<outX509Certificate>?, authType: String?) {// Optional: Add client-side certificate validation if needed }overridefuncheckServerTrusted(chain: Array<outX509Certificate>?, authType: String?) {try {// Validate the server certificate chainval cert = chain?.firstOrNull()val issuer = cert?.issuerDN?.nameif (issuer != "CN=Your Trusted CA") {throwException("Untrusted certificate issuer: $issuer") } } catch (e: Exception) {throwSSLHandshakeException("Certificate validation failed: ${e.message}") } }overridefungetAcceptedIssuers(): Array<X509Certificate>? {returnnull// Use the system default }}
This validates the certificate issuer. Extend it to check for expiration, revocation, or other criteria.
Configuring SSLContext
To enforce custom certificate validation, configure an SSLContext that uses your Custom TrustManager.
This ensures users understand the issue without exposing sensitive details.
Conclusion
In this article, we explored essential techniques for securing communication in Android applications. From certificate pinning and replay attack prevention to implementing JOSE encryption, enforced HTTPS, and TLS validation, each strategy strengthens the security and trustworthiness of your app’s interactions with servers.
These practical examples demonstrate how to safeguard your Android app from various threats while ensuring data privacy and integrity. By adopting these measures, you contribute to protecting user information and maintaining your app’s resilience against potential attacks.
Happy coding, and may your communication remain secure..!
When developing Android apps for sensitive industries like finance, security is paramount. One of the most critical aspects of securing communication between the app and the server is ensuring that TLS (Transport Layer Security) is implemented correctly. TLS is what keeps our data encrypted while being transferred over the internet, protecting users from attackers trying to intercept or tamper with the information.
In this blog, we’ll dive deep into Strong TLS Validation and how we can implement it in financial Android apps. This includes ensuring that the server we’re communicating with is legitimate and that the communication is safe and encrypted. I’ll walk you through the concept, why it’s so important, and how to integrate strong TLS validation into your Android financial app.
Let’s get started!
Why TLS Validation Matters in Financial Apps
When developing financial applications, we’re dealing with sensitive information like user credentials, financial transactions, and personal data. If an attacker can intercept or manipulate the communication between the app and the server, they could potentially steal money, data, or perform unauthorized actions. This makes it absolutely crucial to implement strong TLS validation to ensure that the communication is both confidential and authentic.
TLS ensures that the data sent from the client (our Android app) to the server is encrypted and cannot be read or altered by anyone in between. However, just encrypting the data isn’t enough. We also need to ensure that the app communicates with the right server (and not a malicious one) by verifying the server’s identity.
The Basics of TLS
Before we go into the code, let’s quickly recap what TLS does. TLS (formerly SSL) is a protocol used to secure data transmission over the internet. It ensures three key things:
Confidentiality – Encrypts data so that even if it’s intercepted, it’s unreadable.
Integrity – Ensures the data hasn’t been altered during transmission.
Authentication – Verifies the identity of the server (so we know we’re talking to the right server).
When we connect to a server over HTTPS (which uses TLS), the server sends its TLS certificate to prove its identity. The client (our Android app) then checks the validity of the certificate. If the certificate is valid, the communication is established securely.
But how do we ensure that the certificate is trusted and legitimate in our Android app? That’s where Strong TLS Validation comes in.
Strong TLS Validation Explaination
Strong TLS validation involves verifying the following:
Certificate Authenticity — Is the certificate issued by a trusted Certificate Authority (CA)?
Certificate Expiry — Is the certificate expired?
Certificate Revocation — Has the certificate been revoked by the CA?
Domain Validation — Does the domain match the one specified in the certificate?
Public Key Pinning — Is the public key of the server the same as the one expected by the app?
By performing these checks, we can ensure that the server we’re communicating with is authentic and that the connection is secure.
Implementing Strong TLS Validation in Android
Now that we understand the importance of strong TLS validation, let’s see how we can implement it in our Android financial app using Kotlin.
The first step in implementing TLS validation is ensuring that our app communicates over HTTPS rather than HTTP. HTTP is not encrypted, so it should never be used for sensitive communication.
In Android, we can enforce HTTPS by ensuring that all our URLs are prefixed with https://. We can also configure the app’s network security configuration to block insecure connections.
This configuration blocks all cleartext (non-HTTPS) traffic while allowing traffic to the specified domain.
Validating Server Certificates with Custom Trust Manager
The next step is to implement certificate validation using a custom TrustManager. This is the core of our TLS validation, where we ensure that the server’s certificate is valid and trustworthy.
Kotlin
import android.util.Logimport java.security.cert.X509Certificateimport javax.net.ssl.X509TrustManagerimport javax.net.ssl.SSLContextimport javax.net.ssl.TrustManagerFactoryclassCustomTrustManager : X509TrustManager {overridefuncheckClientTrusted(chain: Array<outX509Certificate>?, authType: String?) {// Here, you can add additional client-side certificate validation if needed. }overridefuncheckServerTrusted(chain: Array<outX509Certificate>?, authType: String?) {// Validate the server certificate chaintry {// Perform strong certificate validation here (e.g., certificate pinning, issuer validation)val cert = chain?.firstOrNull()val issuer = cert?.issuerDN?.nameif (issuer != "CN=Your Trusted CA") {throwException("Untrusted certificate issuer: $issuer") } Log.d("TLS", "Server certificate is trusted.") } catch (e: Exception) { Log.e("TLS", "Certificate validation failed: ${e.message}")throw e } }overridefungetAcceptedIssuers(): Array<X509Certificate>? {returnnull// Use default trust management for accepted issuers }}
Here, we are checking the issuer of the server’s certificate. You can extend this to validate other aspects, like expiration, revocation, and more.
Configuring SSLContext
Next, we need to create an SSLContext that uses our custom TrustManager to enforce strong validation.
Kotlin
import javax.net.ssl.SSLContextimport javax.net.ssl.HttpsURLConnectionimport java.security.NoSuchAlgorithmExceptionimport java.security.KeyManagementExceptionfunsetupSSLContext() {try {// Create an SSL context with our custom TrustManagerval sslContext = SSLContext.getInstance("TLS") sslContext.init(null, arrayOf(CustomTrustManager()), null)// Set the default SSLSocketFactory to use our custom validation HttpsURLConnection.setDefaultSSLSocketFactory(sslContext.socketFactory) } catch (e: NoSuchAlgorithmException) { Log.e("TLS", "Error initializing SSLContext: ${e.message}") } catch (e: KeyManagementException) { Log.e("TLS", "Error initializing SSLContext: ${e.message}") }}
This setupSSLContext function initializes an SSLContext with our custom TrustManager. It ensures that any HTTPS connection made by the app will undergo strong validation based on our rules.
Using Custom SSL Pinning in Android
One of the strongest techniques for ensuring the integrity of the server’s identity is SSL pinning. SSL pinning involves hardcoding the server’s certificate or public key in the app, ensuring that the app only trusts the specified server.
Kotlin
import okhttp3.*import java.security.cert.CertificateFactoryimport java.io.InputStreamclassCustomSSLPinningInterceptor(privateval certificateInputStream: InputStream) : Interceptor {overridefunintercept(chain: Interceptor.Chain): Response {// Create an SSLContext using the custom certificateval cf = CertificateFactory.getInstance("X.509")val ca = cf.generateCertificate(certificateInputStream)// Creating a KeyStore that contains our certificateval keyStore = java.security.KeyStore.getInstance("PKCS12") keyStore.load(null, null) keyStore.setCertificateEntry("ca", ca)// Set up the TrustManager with our certificateval trustManagerFactory = javax.net.ssl.TrustManagerFactory.getInstance(javax.net.ssl.TrustManagerFactory.getDefaultAlgorithm()) trustManagerFactory.init(keyStore)// Create an SSLContextval sslContext = javax.net.ssl.SSLContext.getInstance("TLS") sslContext.init(null, trustManagerFactory.trustManagers, java.security.SecureRandom())// Create a custom OkHttpClient with our SSLContextval sslSocketFactory = sslContext.socketFactoryval client = OkHttpClient.Builder() .sslSocketFactory(sslSocketFactory, trustManagerFactory.trustManagers[0] as javax.net.ssl.X509TrustManager) .hostnameVerifier { _, _ ->true } // Disable hostname verification for custom pinning .build()return client.newCall(chain.request()).execute() }}
In this code,
We first load the certificate that we want to pin (usually obtained from the server) into a KeyStore.
We then create a TrustManagerFactory and set it up to use our custom certificate.
The SSLContext is configured to only trust our specified certificate for secure communication.
The OkHttpClient is then configured to use this custom SSL context, enforcing SSL pinning.
Using the Custom SSL Pinning Interceptor
Once we’ve created the custom SSL pinning interceptor, we need to attach it to our OkHttp client.
Kotlin
val certificateInputStream = assets.open("my_server_certificate.crt") // Load certificate from assetsval interceptor = CustomSSLPinningInterceptor(certificateInputStream)val okHttpClient = OkHttpClient.Builder() .addInterceptor(interceptor) .build()// Now, use this client for your network requestsval retrofit = Retrofit.Builder() .baseUrl("https://your-financial-app.com") .client(okHttpClient) .addConverterFactory(GsonConverterFactory.create()) .build()
Host Name Verification
In addition to certificate pinning, it’s also important to perform proper hostname verification to ensure the server’s identity. Android’s default SSL handling does this for you, but when implementing custom SSL pinning, you should still verify the hostname manually.
Kotlin
val client = OkHttpClient.Builder() .hostnameVerifier { hostname, session ->// Manually verify the server's hostname hostname == "your-financial-app.com"// Replace with your expected server hostname } .build()
Handling Expired or Invalid Certificates
Another crucial part of TLS validation is handling expired or invalid certificates. In production apps, certificates may expire, so it’s important to have a strategy in place for handling these cases. One approach is to implement fallback mechanisms, like showing a user-friendly error message or redirecting to a page explaining the issue.
For even more security, we can use Public Key Pinning to ensure that we’re always communicating with the expected server. This involves storing the server’s public key hash in the app and verifying that it matches the one in the server’s certificate.
This ensures that the app only connects to the server with the specified public key. If the key doesn’t match, the connection will be blocked, preventing man-in-the-middle attacks.
So, by pinning the certificate, we are making sure that our app only trusts the exact server we’ve configured. Even if a malicious attacker tries to intercept the communication by presenting a forged certificate, the app will reject the connection since the server certificate doesn’t match the one it expects.
Best Practices and Testing
Testing: Use tools like SSL Labs to test your server’s TLS configuration.
Stay Updated: Regularly review TLS best practices and update your implementation to address emerging threats.
Avoid Shortcuts: Never disable TLS checks in production, even during debugging.
Conclusion
Implementing strong TLS validation in financial Android apps is crucial to ensure the security and privacy of sensitive user data. By enforcing HTTPS, using custom TrustManagers, and even implementing certificate pinning, we can significantly reduce the risk of man-in-the-middle attacks and ensure that our app communicates only with trusted servers.
Remember, security is an ongoing process, and it’s essential to stay updated with the latest security best practices. With the steps I’ve outlined here, you’ll be on your way to making your financial Android app secure and trustworthy for your users.
With the rise of digital finance, ensuring security has become more crucial than ever. Financial apps handle sensitive user data—such as personal information, payment details, and transaction histories—which makes them vulnerable to cyberattacks. To protect this data, secure communication is essential. One of the most effective ways to achieve this is by implementing HTTPS networking....
As developers, one of our top priorities is ensuring that our Android apps are as secure as possible, especially when they communicate with backend servers over the internet. With cyber threats constantly evolving, it’s essential to take proactive steps in protecting our data and users’ information. One effective technique that I’ve found invaluable is Certificate Pinning.
In this post, I want to walk you through what certificate pinning is, how it works, and why it’s such an important security measure for Android apps. I’ll share my insights and experiences on the topic, and together, we’ll understand why implementing this in our apps can significantly reduce security risks.
What is Certificate Pinning?
Let’s start with the basics: certificate pinning is a security technique where we bind or “pin” the certificate of a trusted server to the app, ensuring that our app communicates only with that server. By doing this, we effectively prevent attackers from using fraudulent or compromised certificates to intercept or tamper with data during the transmission.
To make it clearer, imagine you’re communicating with a server over HTTPS. Typically, your app will trust any certificate that matches the server’s hostname, relying on a trusted Certificate Authority (CA). However, this method leaves an opening for man-in-the-middle (MITM) attacks, where an attacker could insert themselves into the communication by using a forged certificate. Certificate pinning closes this gap by allowing your app to trust only a specific certificate (or public key) for the server’s domain.
Why is Certificate Pinning So Important?
As Android developers, we are constantly dealing with user data, whether it’s login credentials, payment information, or personal preferences. Without proper security measures in place, attackers can exploit vulnerabilities to intercept this data, potentially causing serious harm to our users and our reputation.
By implementing certificate pinning, we are drastically reducing the risk of MITM attacks. These types of attacks are particularly common when users are connected to unsecured or public networks, like public Wi-Fi. Even with encryption in place, attackers could still pose a significant threat by impersonating the server. Pinning ensures that even if an attacker manages to obtain a valid certificate from a compromised CA, it won’t work for our app.
How Does Certificate Pinning Work in Android?
In Android, certificate pinning is implemented by storing a hash of the server’s certificate (or public key) in the app. Whenever the app establishes a connection to the server, it checks whether the certificate presented by the server matches the pinned certificate. If it doesn’t, the connection is immediately terminated.
Here’s a simple breakdown of the process:
Obtain the server certificate: First, we need to retrieve the server’s public key or certificate, usually in the form of a SHA-256 hash or the certificate itself.
Pin it in the app: We add this certificate hash or public key pin directly into our app’s code. This ensures that the app only accepts certificates that match.
Verify during connection: When the app tries to connect to the server, it checks the server’s certificate against the pinned certificate. If there’s a mismatch, the connection is rejected, and the app is prevented from communicating with the server.
The beauty of certificate pinning is its simplicity and the level of security it offers, especially for protecting sensitive user data.
How to Implement Certificate Pinning in Android
Implementing certificate pinning in Android is relatively straightforward. You can use libraries like OkHttp or Retrofit for HTTP requests, which support certificate pinning out of the box. Let’s dive into the implementation part. We’ll break this down into digestible steps, starting with setting up the basic SSL connection and then adding certificate pinning.
Basic SSL/TLS Implementation in Android
First, let’s understand how a regular HTTPS connection is made in Android. Typically, Android uses OkHttp or HttpURLConnection to make network requests.
Basic example using OkHttp to make an HTTPS request
This is a simple HTTPS request using OkHttp, which by default trusts the entire chain of trusted CAs. However, we need more control if we are to ensure that the app only communicates with our server.
This is a simple HTTPS request using OkHttp, which by default trusts the entire chain of trusted CAs. However, we need more control if we are to ensure that the app only communicates with our server.
Implementing Certificate Pinning with OkHttp
To implement certificate pinning, we need to modify the OkHttpClient to trust only a specific certificate (or public key).
First, download the certificate of your server. This can be done through various tools like browsers or OpenSSL.
google.com certificate
For this example, we will pin the certificate in the form of a SHA256 hash of the public key.
Let’s look at how to implement this.
Kotlin
import okhttp3.CertificatePinnerimport okhttp3.OkHttpClientimport okhttp3.RequestfunpinCertificate() {// SHA256 hash of the server's public keyval certificatePinner = CertificatePinner.Builder() .add("your-website.com", "sha256/your_certificate_hash_here") .build()val client = OkHttpClient.Builder() .certificatePinner(certificatePinner) // Attach the pin to the OkHttp client .build()val request = Request.Builder() .url("https://your-website.com/api/endpoint") .build() client.newCall(request).execute().use { response ->if (!response.isSuccessful) throwIOException("Unexpected code $response")println(response.body!!.string()) }}
Here,
CertificatePinner.Builder(): This is where you define which certificates are trusted. You can pin certificates by their domain and their corresponding SHA256 hash.
sha256/your_certificate_hash_here: This is the hash of the public key of the server certificate. Replace it with your server’s actual hash.
OkHttpClient.Builder(): Here, we attach the certificate pinning to the OkHttp client, ensuring that only certificates matching the pinned hash are trusted.
In this code, if the server’s certificate doesn’t match the pinned certificate, the connection will fail, preventing any communication with unauthorized servers.
Handling Multiple Pinning with Backup Certificates
What happens if your server’s certificate is updated or rotated? This is where backup pinning comes into play. By pinning multiple certificates or public keys, you allow your app to connect even if one certificate changes.
This ensures that if your certificate rotates, the app will still trust the new certificate as long as its public key hash is pinned.
Dynamically Pinning Certificates
In some scenarios, it might be necessary to pin certificates dynamically, particularly when working with multiple environments or during development. You can achieve this by fetching the certificate hash at runtime.
Here, the correct pin is selected based on the environment, giving you flexibility across various stages of development and deployment.
Using HttpsURLConnection for Certificate Pinning(Old Approach)
If you aren’t using OkHttp, you can also pin certificates with HttpsURLConnection. This approach involves implementing a custom TrustManager that validates certificates against pinned ones. Old is gold, but it’s not recommended for new development; however, if you’re working with legacy code, it’s worth considering 🙂
Kotlin
import javax.net.ssl.*import java.security.cert.Certificateimport java.security.cert.X509CertificatefunpinCertificate(certificates: Array<Certificate>) {val x509Certificate = certificates[0] as X509Certificateval pinnedPublicKey = "YOUR_PINNED_PUBLIC_KEY"// Replace with your public keyval certificatePublicKey = x509Certificate.publicKey.encoded.toString(Charsets.UTF_8)if (pinnedPublicKey != certificatePublicKey) {throwSSLException("Certificate pinning failure!") }}
Here,
X509Certificate represents the server certificate.
pinnedPublicKey should be replaced with the actual public key you want to pin.
Testing Certificate Pinning
To test your certificate pinning:
Use Debug Builds: Implement certificate pinning in a debug build to ensure it’s configured correctly.
Test with Interceptors: Use a network interceptor (such as Charles Proxy) to simulate MITM attacks. If pinning works, the app should reject the connection.
Challenges and Considerations
While certificate pinning is a powerful tool for securing your app, there are a few challenges and considerations to keep in mind:
Updating pins: If the server’s certificate needs to be changed (for example, when the certificate expires), we’ll need to update the pinned certificate in the app and release a new version. This means we must ensure the certificate is updated regularly and we have a good process in place for deploying new app versions.
Risk of breakage: If the pinning is too strict, we might face situations where legitimate changes to the server’s certificate (e.g., switching to a different CA) could break the connection. This is why it’s important to monitor certificate changes and have an update strategy.
Backup mechanism: We can implement a backup mechanism to allow updates to the certificate pin during runtime, giving us flexibility without forcing users to update the app every time a pin change occurs.
Best Practices
Here are a few best practices to ensure we’re using certificate pinning effectively:
1. Pin multiple certificates: It’s a good idea to pin more than one certificate or public key. This gives us flexibility in case of certificate rotation or renewal without breaking the app’s functionality.
2. Handle certificate expiry gracefully: Plan for certificate expiration by regularly rotating certificates and testing your app with updated pins before they expire.
3. Hardcoding Pins: Avoid hardcoding pins in your app for security reasons. If the app is decompiled, attackers can retrieve the pinned certificate hash. Consider dynamically fetching pins or using obfuscation techniques to secure your app.
4. Managing Multiple Environments: As demonstrated earlier, dynamically switching pins based on environments (development, staging, production) is crucial. Be careful not to expose development pins in production environments.
5. Monitor and audit pins: Regularly audit your pinned certificates to ensure they’re up-to-date and match the server’s current certificates. You can also use logging to track failed pin validation attempts.
6. Fallback to normal SSL checks: In cases where pinning fails, allow the app to fall back to the standard SSL/TLS verification to avoid completely blocking the user.
Conclusion
Certificate pinning is a powerful security measure that I highly recommend implementing in our Android apps. It adds an extra layer of protection against MITM attacks and ensures that sensitive data is securely transmitted between the app and the server. While it comes with its challenges, like the need for certificate updates, the security benefits far outweigh the trade-offs. By incorporating pinning into our security strategy, we can give users the peace of mind that their data is safe, even in potentially risky environments.
So, next time you’re working on an Android app, take a few moments to consider certificate pinning. It’s one of those simple yet impactful measures that can make a world of difference in securing our applications.
Secure communication is the backbone of modern financial app development. HTTPS, powered by TLS (Transport Layer Security), ensures that the data exchanged between your app and its server stays protected from unauthorized access. In this blog, we’ll explore HTTPS communication on Android, focusing on TLS 1.3—the latest and most secure version of the protocol. We’ll guide you through the process of implementing secure communication in Kotlin, simplifying each step with clear, jargon-free explanations.
What is HTTPS and TLS?
HTTPS HTTPS (Hypertext Transfer Protocol Secure) is an upgrade to HTTP, designed to secure the communication between web clients and servers. It uses TLS (Transport Layer Security) to encrypt the data, protecting it from interception during transmission. This is especially important for safeguarding sensitive details like passwords, payment information, or personal data.
TLS TLS is a cryptographic protocol that offers three core protections:
Encryption: Ensures that data remains confidential and cannot be accessed by unauthorized parties.
Authentication: Confirms that the server is legitimate and, optionally, verifies the client’s identity.
Integrity: Guarantees that the data hasn’t been modified during transmission.
TLS 1.3 TLS 1.3, the latest version of the protocol, brings several key enhancements:
Improved Handshake Performance: Reduces the time needed to establish a secure connection.
Stronger Encryption: Implements more robust encryption methods for better security.
HTTPS As the secure version of HTTP, HTTPS uses TLS to encrypt the data exchanged between the app and the server. In the context of financial applications, HTTPS offers:
Confidentiality: Safeguards sensitive information like user credentials and transaction data from being intercepted.
Data Integrity: Ensures the information sent and received is unchanged during transit.
Server Authentication: Verifies the authenticity of the server, helping protect against fraud and man-in-the-middle attacks.
TLS 1.3 TLS 1.3, released in 2018, brings numerous advantages over previous versions:
Stronger Security: Phases out older, vulnerable protocols such as RSA key exchange, making the connection more secure.
Faster Handshakes: Simplifies the connection process, improving speed and reducing delay.
Forward Secrecy: Even if an attacker gains access to a server’s private key, past communication remains secure.
For financial apps, using TLS 1.3 is essential to ensure both robust security and a smooth, responsive user experience.
Setting Up HTTPS in Android Apps
Android natively supports HTTPS, but to make sure your app works with TLS 1.3, you’ll need to configure a few settings and understand the requirements.
Prerequisites
Make sure your app is targeting Android 10 (API level 29) or higher, as this version comes with native support for TLS 1.3.
Install a valid SSL certificate on the server hosting your APIs to establish secure communication.
Step-by-Step Implementation
Kotlin
// Use the latest version in the future.implementation("com.squareup.okhttp3:okhttp:4.12.0") implementation("com.google.code.gson:gson:2.12.0")
We’ll utilize OkHttp for handling HTTPS requests, as it offers a lightweight and efficient solution.
Creating a Secure HTTP Client
To enable HTTPS with TLS 1.3, configure OkHttp’s OkHttpClient. This client will handle secure communication with your backend.
connectTimeout: The maximum duration allowed for establishing a connection.
readTimeout: The maximum time allowed to wait for data after the connection is established.
writeTimeout: The maximum time allowed to wait while sending data to the server.
With Android 10 and higher versions supporting TLS 1.3 natively, no extra configuration is needed for the protocol. The OkHttp client automatically negotiates the highest version it supports.
For older Android versions, ensure that the device is using the latest system libraries, or incorporate third-party TLS solutions such as Conscrypt to enable support for newer TLS protocols like TLS 1.2 or TLS 1.3.
Making Secure HTTPS Requests
Once the client is ready, use it to make API requests.
Request Building: Defines the target URL and HTTP method (GET in this case).
Response Handling: Reads and parses the server’s response. Always handle errors to ensure reliability.
Key Points About TLS 1.3
Backward Compatibility: TLS 1.3 supports backward compatibility with older versions (like TLS 1.2) by negotiating the highest mutually supported version.
Performance: TLS 1.3 reduces round-trip times (RTTs) during handshakes, resulting in faster connection establishment, making it ideal for mobile apps.
Security: TLS 1.3 deprecates weak cryptographic algorithms and only supports modern, secure encryption methods, ensuring enhanced security.
Testing HTTPS Communication
Use Postman: Test your API endpoints, ensuring valid certificates are used and checking SSL/TLS connection aspects like certificate trust and hostname verification.
Validate Pinning: Validate certificate pinning by changing the server’s certificate and ensuring that the client rejects untrusted connections. Ensure both server and client-side pinning implementations are correctly configured.
Check TLS Version: Check the TLS version using tools like Wireshark, which can capture network traffic and verify if TLS 1.3 is being used, or use OpenSSL for command-line verification.
Best Practices for Secure HTTPS Communication
Use Strong Encryption: Always enable the latest TLS protocols (preferably TLS 1.2 or 1.3) and ensure strong cipher suites are used for secure communication.
Avoid Hardcoding Keys: Avoid hardcoding keys and sensitive data in your source code; use secure storage mechanisms like Android Keystore, EncryptedSharedPreferences, or secure servers to store such information.
Monitor Dependencies: Monitor and regularly update libraries (e.g., OkHttp, Retrofit) to patch vulnerabilities. Use tools like Dependabot to stay up to date with security updates.
Implement Error Handling: Implement robust error handling to manage network issues gracefully without exposing sensitive information. Provide meaningful feedback to users without revealing implementation details or errors.
Conclusion
Secure HTTPS (TLS 1.3) communication isn’t just a best practice — it’s a must for financial Android apps. With Kotlin and powerful tools like OkHttp, you can easily implement top-tier security without the hassle. By following these steps, you’ll not only protect sensitive data but also earn your users’ trust every step of the way.
Let’s secure the financial world, one app at a time..!
In today’s digital age, ensuring secure communication and data integrity is essential, especially when handling sensitive information in financial Android applications. User data like credit card numbers, bank account details, and personal identifiers must be safeguarded to prevent unauthorized access. One effective technology for achieving this level of security is JOSE (JSON Object Signing and Encryption).
JOSE provides a standardized approach for securely signing, encrypting, and verifying JSON data, making it a valuable tool for securing APIs and data transmissions. By using JOSE, developers can ensure the authenticity, integrity, and confidentiality of the data being exchanged.
In this article, we will introduce you to the core concepts behind JOSE, demonstrate its significance in securing financial Android applications, and walk you through the implementation process using Kotlin, complete with practical code examples. By the end of this guide, you’ll understand how JOSE encryption plays a crucial role in protecting sensitive data.
What is JOSE?
JOSE is a suite of standards defined by the IETF that provides a structured approach to securing JSON data. It is ideal for modern applications that rely heavily on APIs for communication and is commonly used in APIs, mobile/web applications, and microservices. It includes:
JWS (JSON Web Signature): Ensures data integrity and authenticity by signing JSON objects.
JWE (JSON Web Encryption): Secures the data by encrypting it.
JWK (JSON Web Key): A format for representing cryptographic keys.
JWA (JSON Web Algorithms): Defines algorithms used for signing and encryption.
JWT (JSON Web Token): A compact representation often used for claims (data) and identity.
In financial applications, JOSE is crucial for:
Data Confidentiality: Encrypt sensitive data like transactions or user credentials.
Data Integrity: Ensure the data has not been tampered with.
Authentication: Verify the identity of users or systems through signatures.
Why Use JOSE in Financial Android Apps?
Regulatory Compliance: Many financial standards like PCI-DSS demand secure data transmission and storage.
End-to-End Encryption: JOSE ensures secure communication between the client (Android app) and the server.
Enhanced User Trust: Users trust apps that prioritize their security and privacy.
How JOSE Works: A Simplified Flow
Signing Data with JWS:
The app generates a digital signature for the JSON data using a private key.
The recipient verifies the signature using the corresponding public key.
Encrypting Data with JWE:
JSON data is encrypted using a symmetric or asymmetric encryption algorithm.
Only the intended recipient can decrypt the data using their private key.
Sending the Encrypted and Signed Data:
The app sends the JWE or JWS to the server over a secure channel (e.g., HTTPS).
JOSE Structure
The JOSE framework operates through a JSON-based object divided into three major parts:
Header: Metadata specifying encryption/signing algorithms and key information.
Payload: The actual data to be signed/encrypted.
Signature/Encryption: The cryptographic output, which is either a signature or encrypted content.
For encrypted data, a typical JWE looks like this:
First, we’ll generate an RSA key pair for signing and verification. This key pair consists of a private key (used for signing) and a public key (used for verification). For data encryption, we’ll also generate a separate symmetric AES key, which will be used to encrypt the sensitive data itself.
RSA Algorithm: RSA is an asymmetric encryption technique that uses two distinct keys: a private key and a public key. The private key is employed for signing data and decrypting messages, while the public key is used for verifying signatures and encrypting messages.
KeyPair: A KeyPair consists of the private and public keys. The KeyPairGenerator is responsible for generating this pair. In the implementation:
Private Key: The RSAPrivateKey is used for decryption and signing data.
Public Key: The RSAPublicKey is used for encryption and verifying signatures.
Key Size: A 2048-bit key size is widely used, offering a good balance between security and performance. For higher security, you can opt for larger key sizes, such as 3072 or 4096 bits, based on your specific needs.
Signing JSON Data with JWS
Here, we’ll sign some financial data.
Kotlin
import com.nimbusds.jose.*import com.nimbusds.jose.crypto.RSASSASignerimport com.nimbusds.jwt.SignedJWTimport java.security.interfaces.RSAPrivateKeyimport java.util.Date// Dummy financial data exampledataclassFinancialData(val accountNumber: String,val amount: Double,val transactionId: String)funsignData(financialData: FinancialData, privateKey: RSAPrivateKey): String {// Convert the financial data object to a JSON stringvaldata = """ { "accountNumber": "${financialData.accountNumber}", "amount": ${financialData.amount}, "transactionId": "${financialData.transactionId}" } """// Create a payload with the financial dataval payload = Payload(data)// Create a JWS header with RS256 algorithmval header = JWSHeader.Builder(JWSAlgorithm.RS256).build()// Create a JWS objectval jwsObject = JWSObject(header, payload)// Sign the JWS object using the RSASSASignerval signer = RSASSASigner(privateKey) jwsObject.sign(signer)// Return the serialized JWS (compact format)return jwsObject.serialize()}funmain() {// Just example - RSAPrivateKey (for demonstration purposes, this key would normally be loaded from a secure store)val privateKey: RSAPrivateKey = TODO("Load the private key here")// Create some dummy financial dataval financialData = FinancialData( accountNumber = "1234567890", amount = 2500.75, transactionId = "TXN987654321" )// Sign the financial dataval signedData = signData(financialData, privateKey)// Output the signed dataprintln("Signed JWT: $signedData")}
Here,
Dummy Financial Data
We created a simple FinancialData data class with fields like accountNumber, amount, and transactionId to represent a financial transaction.
This FinancialData object is then converted into a JSON string that will be the payload of the JWT.
Payload Creation
The data string is a JSON representation of the FinancialData. This string is passed to the Payload constructor to create the JWT payload.
Signing
The RSASSASigner uses the provided private key to sign the JWT, ensuring the integrity and authenticity of the financial data.
RSASSASigner is used to generate digital signatures using the RSA Signature Scheme with Appendix (SSA), where the signature contains a hash of the message but not the message itself. It separates the signature from the original message, ensuring the signature proves authenticity without altering the message.
Serialization
The final signed JWT is serialized into a compact format (a URL-safe string) using the serialize() method.
Note :- In real-world scenarios, the RSAPrivateKey would typically be securely loaded from a file, key store, or environment variable. Also, you can customize the fields or structure of the FinancialData class to suit your specific use case.
Encrypting Data with JWE
Let’s move on and encrypt the data.
Kotlin
import com.nimbusds.jose.crypto.RSAEncrypterimport com.nimbusds.jose.EncryptionMethodimport com.nimbusds.jose.JWEHeaderimport com.nimbusds.jose.JWEObjectimport com.nimbusds.jose.Payloadimport java.security.interfaces.RSAPublicKeyfunencryptData(data: String, publicKey: RSAPublicKey): String {// Create the payload from the input dataval payload = Payload(data)// Build the JWE header with RSA-OAEP-256 for key encryption // and AES-GCM 256 for data encryptionval header = JWEHeader.Builder(JWEAlgorithm.RSA_OAEP_256, EncryptionMethod.A256GCM).build()// Initialize the JWE object with the header and payloadval jweObject = JWEObject(header, payload)// Encrypt the JWE object using the RSA public keyval encrypter = RSAEncrypter(publicKey) jweObject.encrypt(encrypter)// Return the serialized JWE (in compact format) for transmissionreturn jweObject.serialize()}
In this process,
Payload: The Payload is created from the provided data (a string), which will be encrypted.
JWE Header: The JWEHeader specifies the encryption algorithms:
RSA_OAEP_256 is used for securely encrypting the symmetric key. This algorithm encrypts the symmetric key used for payload encryption. The RSA public key is employed in this step, ensuring that only the recipient with the private key can decrypt the symmetric key.
A256GCM (AES GCM with a 256-bit key) is used for encrypting the payload. The data is encrypted using AES with a 256-bit key in Galois/Counter Mode (GCM), ensuring both confidentiality and integrity.
JWE Object: This is the combination of the encrypted symmetric key and the encrypted payload, and is represented as a JWE token that can be securely transmitted.
RSAEncrypter: The RSAEncrypter is responsible for encrypting the symmetric key using the RSA public key.
Serialization: After encryption, the JWE object is serialized into a compact string format, making it ready for secure transmission.
Important Point to Note About JWT,
JWT: A JWT is a compact, URL-safe token format that can represent either a JWS (JSON Web Signature) or JWE (JSON Web Encryption).
When JWT is used as a JWS, it means the payload is signed (i.e., the data is authenticated, but not encrypted).
When JWT is used as a JWE, it means the payload is encrypted.
Verifying and Decrypting
On the recipient’s end, verify the signature and decrypt the data.
Kotlin
import com.nimbusds.jose.JWSObjectimport com.nimbusds.jose.crypto.RSASSAVerifierimport java.security.interfaces.RSAPublicKeyfunverifySignature(jws: String, publicKey: RSAPublicKey): Boolean {returntry {// Parse the JWS string into a JWSObjectval jwsObject = JWSObject.parse(jws)// Create a verifier using the public RSA keyval verifier = RSASSAVerifier(publicKey)// Verify the signature of the JWS object and return the result jwsObject.verify(verifier) } catch (e: Exception) {// Optionally log the exception for debuggingprintln("Error verifying signature: ${e.message}")false }}
Error Handling: The try-catch block ensures that any exception (e.g., parsing error, invalid JWS format, verification failure) is caught.
JWSObject.parse(jws): This parses the provided JWS string into a JWSObject. If the string is malformed or invalid, it will throw an exception, which is handled in the catch block.
RSASSAVerifier(publicKey): This creates a verifier using the provided RSAPublicKey, and the verify method is used to validate the signature. It returns true if the signature is valid, otherwise false.
Decrypting Data
Kotlin
import com.nimbusds.jose.JWEObjectimport com.nimbusds.jose.crypto.RSADecrypterimport java.security.interfaces.RSAPrivateKeyfundecryptData(jwe: String, privateKey: RSAPrivateKey): String {returntry {// Parse the JWE string into a JWEObjectval jweObject = JWEObject.parse(jwe)// Create a decrypter using the RSA private keyval decrypter = RSADecrypter(privateKey)// Decrypt the JWE object jweObject.decrypt(decrypter)// Return the decrypted payload as a UTF-8 string jweObject.payload.toStringUTF8() } catch (exception: Exception) {// Handle any errors (e.g., invalid JWE format, decryption issues)println("Error during decryption: ${exception.message}")"" }}
Here, when returning the decrypted payload, instead of calling toString(), you should use .toStringUTF8() if the payload is encoded in UTF-8. This ensures proper handling of the byte content. Additionally, if an exception occurs during the decryption process, the function currently returns an empty string. Depending on your needs, you might consider returning null, rethrowing the exception, or handling the error in another way that suits your application.
Best Practices
Use Strong Keys: Ensure RSA keys are at least 2048 bits, with 3072 or 4096 bits recommended for long-term security.
Secure Key Storage: Store private keys securely using Android’s Keystore system to prevent unauthorized access.
Regular Key Rotation: Periodically update keys to reduce the risk of long-term exposure, ensuring old keys are securely discarded.
Combine with HTTPS: Use HTTPS to encrypt data in transit and ensure secure communication, and apply encryption at the application layer for sensitive data at rest.
Implementing JOSE for Security in Financial APIs and Beyond
When integrating with financial APIs, secure data transmission is essential. Using JOSE (JSON Object Signing and Encryption) helps you meet security standards. By leveraging JOSE for signing and encrypting data, you can align with widely adopted industry protocols, such as:
OAuth 2.0 Tokens: Commonly use JWTs, which may be signed or unsigned, to facilitate secure authentication and communication.
Banking APIs: For example, Open Banking and PSD2 (Payment Services Directive 2) APIs, which often rely on OAuth 2.0 for secure access and data exchange, with JWTs providing a secure mechanism for identity verification.
In addition to financial applications, JOSE can be applied to various industries where security is paramount. Here are some real-world use cases:
Secure API Tokens: Sign JWT tokens for integrity and encrypt them to ensure confidentiality during transmission.
Payment Gateways: Encrypt sensitive payment information, such as credit card details, to protect against data breaches.
Healthcare Apps: Encrypt and securely transfer patient data between devices and servers, ensuring compliance with regulations such as HIPAA.
Conclusion
JOSE encryption is a powerful tool for securing financial data in Android apps. By using standards like JWS for signing and JWE for encryption, you can ensure the confidentiality, integrity, and authenticity of your data. The Kotlin code examples provided here offer a practical starting point for implementing JOSE in your applications.
With the increasing prevalence of online transactions, adopting JOSE is no longer just a best practice—it’s a necessity. Implement it today to strengthen your app’s defenses against cyber threats. Remember, security isn’t just a feature; it’s a responsibility. By embracing these standards, you’ll build trust and ensure compliance in your financial Android apps.
Message replay protection is a critical security feature, especially for mobile apps handling sensitive operations like financial transactions. It ensures that each message exchanged between the client (your app) and the server is unique and valid, preventing attackers from reusing intercepted messages to perform malicious actions.
If you’re building or maintaining an Android app, this is one security measure you don’t want to overlook. Let’s dive into what message replay protection is, why it’s essential, and how you can implement it effectively in your Android application using Kotlin.
What Is Message Replay Protection?
These days, most of us rely on wallet apps or banking apps for payments. In fact, many people in india— including me — barely carry any cash anymore! 😊 But here’s the thing: as we use these financial apps for transactions, we often overlook a potential risk. Imagine this: a malicious actor (like a hacker) intercepts a network request from your app that authorizes a fund transfer. If your app doesn’t have replay protection, the hacker could simply resend that same intercepted request and execute the transfer again — without you even knowing. You wouldn’t realize it until you notice how much money is gone. Scary, right?
Message replay protection prevents attackers from reusing old or intercepted messages to perform unauthorized actions. It works by using things like timestamps, random numbers (nonces), or sequence numbers to make each message unique. With replay protection in place, the server can spot the repeated message and reject it, keeping the communication secure.
Why Is It Important?
In the world of Android apps—particularly finance, e-commerce, or any domain dealing with sensitive data—security breaches can result in financial loss, legal troubles, and damaged user trust. Implementing message replay protection:
Safeguards transactions and sensitive operations.
Ensures compliance with industry standards like PCI DSS (Payment Card Industry Data Security Standard).
Bolsters your app’s reputation for security and reliability.
How Message Replay Protection Works
Message replay protection ensures that every message sent during communication is unique and cannot be reused by an attacker. Here’s how it typically works:
Nonces (Numbers Used Once): Unique identifiers, such as timestamps or random numbers, are attached to messages.
Server Validation: The server checks whether the nonce has been used before.
Rejection of Duplicates: If the same nonce is detected, the server rejects the message, thwarting the replay attempt.
Message Replay Protection Implementation
The core idea behind replay protection is to use unique identifiers and timestamps for every request. Here’s the typical flow:
Generate a unique nonce (number used once) for each message.
Include the nonce and a timestamp in the request payload.
Use a cryptographic hash to sign the request, ensuring the data isn’t tampered with.
On the server side:
Validate the nonce to ensure it hasn’t been used before.
Check the timestamp to confirm the message isn’t too old.
Verify the cryptographic signature.
If any of these validations fail, the server rejects the request.
Without further delay, let’s implement message replay protection, step by step.
Using a Unique Request Identifier (Nonce)
A nonce (number used once) ensures every request is unique. The server validates this identifier to prevent duplicate processing.
On the server, we validate the nonce and timestamp.
Server-side Validation Steps
Nonce Validation
Maintain a record of used nonces.
Reject requests with duplicate nonces.
Timestamp Validation
Calculate the time difference between the server time and the request timestamp.
Reject requests older than a predefined threshold (e.g., 5 or 10 minutes).
Kotlin
funisRequestValid(request: SecureRequest, usedNonces: MutableSet<String>, timeThreshold: Long = 5 * 60 * 1000): Boolean {// Check if nonce is already usedif (usedNonces.contains(request.nonce)) {returnfalse }// Check if timestamp is within the allowed rangeval currentTime = System.currentTimeMillis()if ((currentTime - request.timestamp) > timeThreshold) {returnfalse }// Add nonce to used list after successful validation usedNonces.add(request.nonce)returntrue}
Here,
usedNonces: A set that keeps track of nonces already used.
timeThreshold: Maximum allowed time difference (e.g., 5 minutes).
If the nonce is already used or the timestamp is invalid, the request is rejected.
Secure Communication with HMAC
To further enhance security, sign the request using HMAC (Hash-based Message Authentication Code). This ensures that the request data cannot be tampered with.
Replay the same request multiple times and ensure the server rejects duplicates.
Use Secure Channels
Always use HTTPS to prevent eavesdropping.
Keep Secrets Safe
Store API keys and secret keys securely (e.g., Android’s Keystore).
Log Suspicious Activity
Maintain logs for failed attempts to analyze potential attack patterns.
Conclusion
Securing your app isn’t just about writing good code—it’s about understanding and anticipating threats. Message replay attacks are a real danger, but with strategies like unique nonces, timestamps, and cryptographic validation, you can stay one step ahead.
By following the steps above, you’re not just protecting your users—you’re building trust and setting a standard for security in your apps.
Stay vigilant, keep learning, and code securely..!
In today’s connected world, securing app communication is a top priority for Android developers. Whenever your app exchanges data with a server, there’s a risk that attackers could intercept and alter this information. A reliable way to guard against this is by using certificate pinning. This security measure helps protect your app from Man-in-the-Middle (MITM)...