

Good UI motion doesn’t call attention to itself. It just feels right.
If your animations feel stiff or robotic, chances are you’re using fixed-duration transitions. Real-world motion doesn’t work like that. Things accelerate, slow down, and sometimes bounce a little. That’s where Jetpack Animation Spring comes in.
Let’s walk through what it is, why it matters, and how to use it in compose projects without overcomplicating things.
Why UI Motion Matters More Than You Think
There’s a specific feeling you get from a well-made app — a card that snaps into place just right, or a button that bounces back a little when you tap it. It’s hard to pin down, but you know it when you feel it. That feeling almost always comes from physics-based animation.
Most of us start with tween animations: move from point A to point B in 300 milliseconds. Simple, predictable, and completely fine. But tweens move in straight lines. Nothing in the physical world actually does that.
That’s the gap Jetpack Animation Spring fills. It gives your UI a sense of mass and momentum — things overshoot slightly, then settle. It’s a small change that makes a noticeable difference.
Tween Animation
Moves from A to B in a fixed time. Feels robotic. Can’t react to mid-gesture interruptions naturally. Ignores real-world physics entirely.
Spring Animation
Moves based on force and resistance. Overshoots slightly, then settles. Can be interrupted mid-flight and still feels smooth. Mimics how real objects move.
Google’s Material Design guidelines call for spring-based animations on interactive elements because they respond more naturally to user input. It’s worth understanding how they work.
What Exactly Is Jetpack Animation Spring?
Jetpack Animation Spring is part of the Jetpack Compose animation APIs. It lets you drive animations with physics instead of timers — no manual easing curves, no hardcoded durations.
A spring animation behaves like a real spring. Pull one end and let go — it doesn’t stop dead at the resting point. It overshoots, oscillates back, and gradually settles. The exact behavior is controlled by two values:
- How stiff the spring is (does it snap back quickly or slowly?)
- How much damping there is (does it bounce a lot or settle immediately?)
In Compose, all of this is exposed through the spring() function. You pass a spring config to any animation call and Compose takes care of the rest.
Key insight: Unlike tween animations, spring animations are duration-independent. They don’t have a fixed end time — they run until the value reaches its target and the velocity drops to near zero. This makes them perfect for interruption-friendly interactions.
The Physics Behind Spring Animation
Under the hood, every spring in Compose is a damped harmonic oscillator. Which sounds more intimidating than it is. The model has two moving parts:
A spring pulls the object toward the target. A damper slows the object down. The interplay between these two forces creates the characteristic spring motion.
Damping Ratio — How Bouncy Is It?
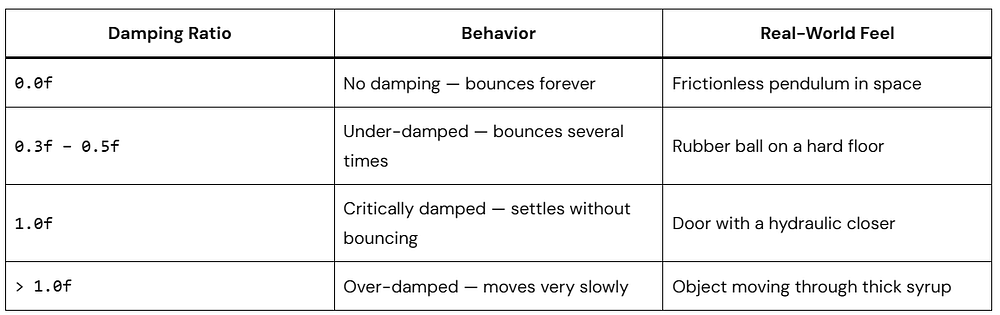
The damping ratio controls how fast the oscillation dies out — think of it as friction:
Stiffness — How Fast Does It Get There?
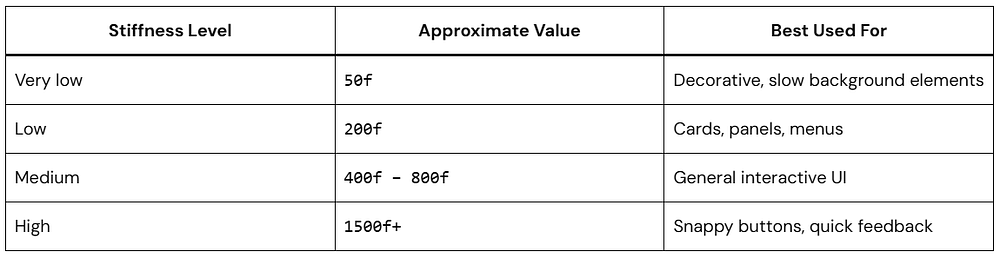
Stiffness controls how aggressively the spring pulls the value toward the target. A high stiffness means fast, snappy motion. A low stiffness means a slow, gentle glide.
Setting Up Spring Animation in Jetpack Compose
Make sure you have the Compose animation dependency in your build.gradle.kts. If you’re using the Compose BOM you probably already have it, but here it is explicitly:
// In your app-level build.gradle.kts
dependencies {
    // Core Compose Animation
    implementation("androidx.compose.animation:animation:1.6.0")

    // Compose UI (already included with most BOM setups)
    implementation("androidx.compose.ui:ui:1.6.0")
}
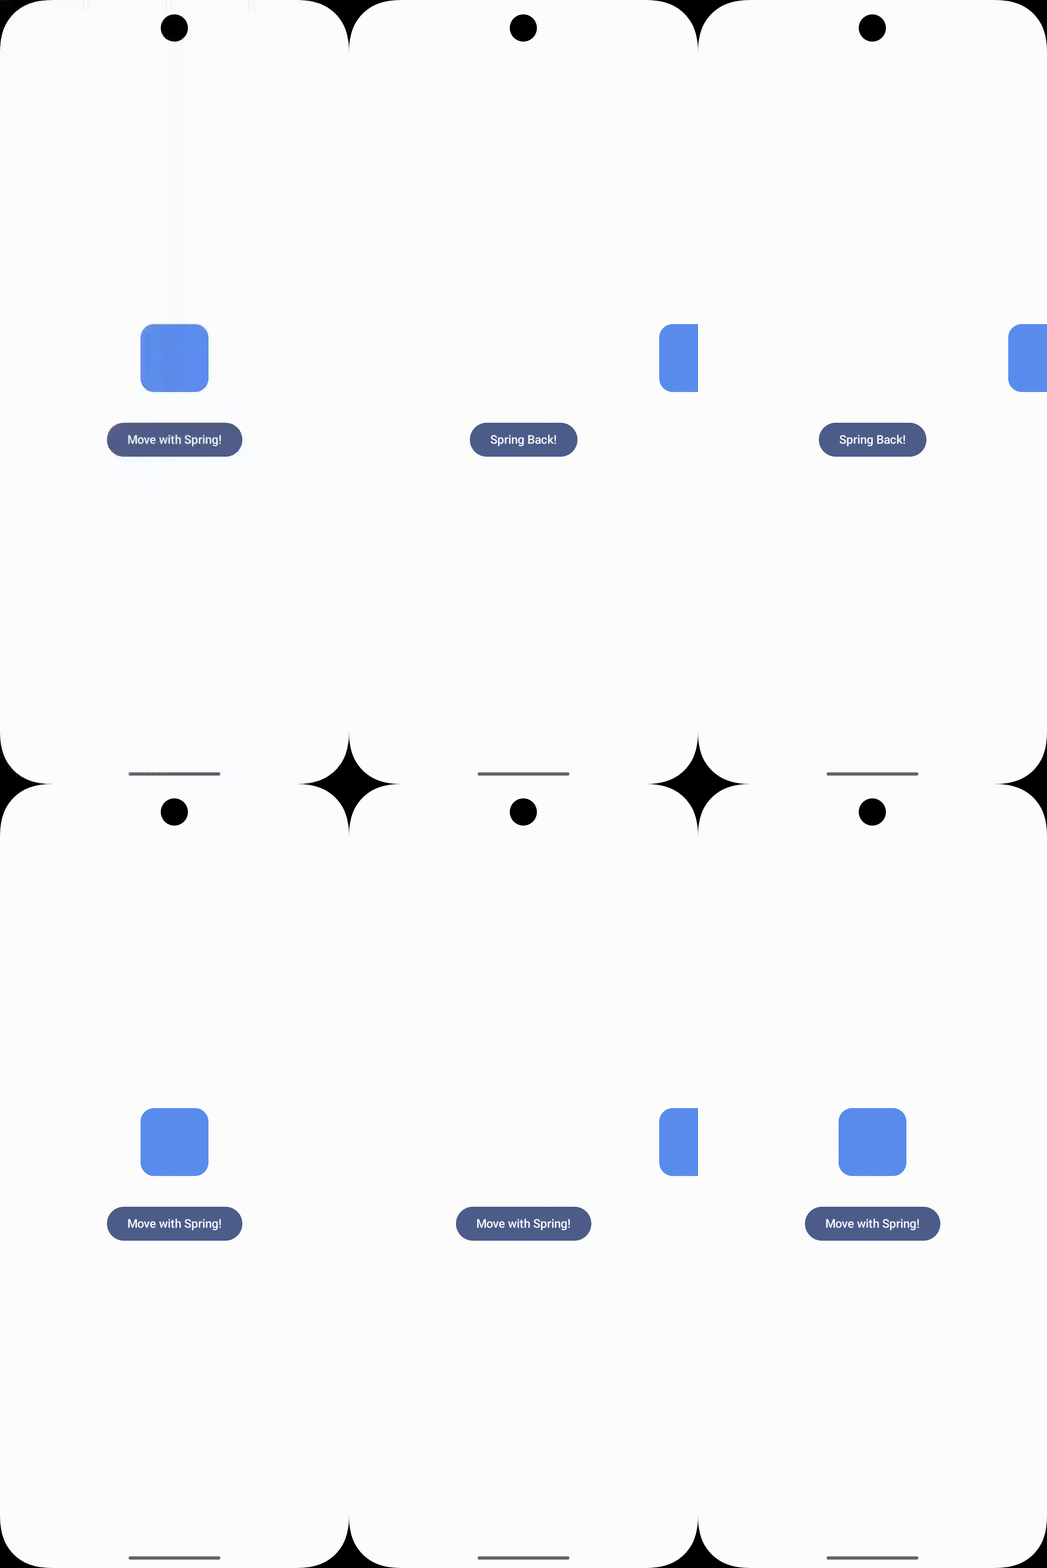
Here’s a simple example — a box that slides horizontally when a button is clicked:
@Composable
fun SimpleSpringExample() {

    // Step 1: Track whether the box is in its "moved" state
    var moved by remember { mutableStateOf(false) }

    // Step 2: Create an animated float value
    val offsetX by animateFloatAsState(
        targetValue = if (moved) 200f else 0f,
        animationSpec = spring(
            dampingRatio = Spring.DampingRatioMediumBouncy,
            stiffness    = Spring.StiffnessLow
        ),
        label = "boxOffset"
    )

    Column(
        modifier = Modifier.fillMaxSize(),
        horizontalAlignment = Alignment.CenterHorizontally,
        verticalArrangement = Arrangement.Center
    ) {

        // Step 3: Apply the offset to the Box
        Box(
            modifier = Modifier
                .size(80.dp)
                .offset(x = offsetX.dp)
                .background(
                    color = Color(0xFF5B8DEE),
                    shape = RoundedCornerShape(16.dp)
                )
        )

        Spacer(modifier = Modifier.height(32.dp))

        Button(onClick = { moved = !moved }) {
            Text(if (moved) "Spring Back!" else "Move with Spring!")
        }
    }
}
1. mutableStateOf(false) — This is a simple boolean that tells Compose whether the box should be at position 0 or position 200. When it changes, Compose re-composes and the animation kicks off automatically.
2. animateFloatAsState() — This is the magic function. It watches the targetValue and whenever it changes, it smoothly animates the float from its current value to the new target using the provided animationSpec.
3. spring(dampingRatio, stiffness) — This is the Jetpack Animation Spring config. Medium bouncy damping with low stiffness means the box moves slowly but overshoots its target before settling back.
4. offset(x = offsetX.dp) — We apply the animated value as the X offset of the Box. Every frame, Compose recalculates this value based on the spring physics and redraws the UI. No manual frame handling needed!
Understanding SpringSpec Parameters in Depth
The spring() function takes three parameters. Most people only use the first two, but the third one is worth knowing:
fun <T> spring(
    dampingRatio: Float = Spring.DampingRatioNoBouncy,
    stiffness:    Float = Spring.StiffnessMedium,
    visibilityThreshold: T? = null
): SpringSpec<T>
The visibilityThreshold Parameter
This one often gets overlooked! The visibilityThreshold tells Compose: “Stop animating when the value is this close to the target.”
Means, it defines “when the animation is close enough to stop”
Because spring animations mathematically never fully stop (they asymptotically approach the target), Compose needs a cutoff.
// For a Dp value — stop when within 0.5dp of target
spring(
    dampingRatio = Spring.DampingRatioLowBouncy,
    stiffness    = Spring.StiffnessMedium,
    visibilityThreshold = 0.5.dp
)

// For a Float - stop when within 0.01f of target
spring<Float>(
    dampingRatio = Spring.DampingRatioNoBouncy,
    stiffness    = Spring.StiffnessMediumLow,
    visibilityThreshold = 0.01f
)

// For an Offset - stop when within 1px in both X and Y
spring(
    dampingRatio = Spring.DampingRatioMediumBouncy,
    stiffness    = Spring.StiffnessHigh,
    visibilityThreshold = Offset(1f, 1f)
)
Meaning per type:
- Dp →
0.5.dp
→ Stop when difference < 0.5dp (visually indistinguishable) - Float →
0.01f
→ Stop when difference < 0.01 - Offset →
Offset(1f, 1f)
→ Stop when X and Y are within 1 pixel
It’s a performance optimization that prevents the animation from running indefinitely due to tiny floating-point movements.
Tip: For pixel-level animations, always set a sensible
visibilityThreshold. Without it, your spring might technically run for dozens of extra frames on tiny sub-pixel oscillations — wasting battery for no visible benefit.
Built-in Spring Presets You Should Know
Compose ships a set of named constants in the Spring object. These are good defaults — you can always tweak from there, but they cover most use cases out of the box.
Damping Ratio Constants
1. NoBouncy
1.0f — Critically damped. Reaches target smoothly without overshooting. Great for practical, functional UI.
2. LowBouncy
0.75f — Slight overshoot. Very subtle and tasteful. Works for most interactive elements.
3. MediumBouncy
0.5f — Noticeable overshoot. Feels playful and lively. Perfect for FABs, pop-ups, and cards.
4. HighBouncy
0.2f — Very bouncy! Eye-catching but use sparingly. Great for celebrations or onboarding animations.
Stiffness Constants
// Compose's named stiffness constants:

Spring.StiffnessVeryLow    // ≈  50f  — very slow, dreamy
Spring.StiffnessLow        // ≈ 200f  — slow and smooth
Spring.StiffnessMediumLow  // ≈ 400f  — default-ish, general use
Spring.StiffnessMedium     // ≈ 500f  — standard interactive
Spring.StiffnessHigh       // ≈1500f  — snappy and sharp
Watch out: Combining a very high stiffness with a high bouncy damping ratio can make your UI feel chaotic. A high-stiffness spring that also bounces a lot will snap back and forth very quickly — which is rarely the intended effect. Aim for balance.
Real-World Use Cases with Code
Here are the three patterns I reach for most often in real projects.
Use Case 1: Bouncy FAB Appearance
A FAB that just fades in feels flat. Scale it in with a bouncy spring and it feels like it’s jumping out at you. Two lines to change:
@Composable
fun BouncyFAB() {

    var isVisible by remember { mutableStateOf(true) }

    // Animate scale from 0 to 1 with a high-bouncy spring
    val scale by animateFloatAsState(
        targetValue = if (isVisible) 1f else 0f,
        animationSpec = spring(
            dampingRatio = Spring.DampingRatioHighBouncy,
            stiffness = Spring.StiffnessMedium
        ),
        label = "fabScale"
    )

    FloatingActionButton(
        onClick = { isVisible = !isVisible },
        modifier = Modifier.scale(scale)
    ) {
        Icon(
            imageVector = Icons.Default.Add,
            contentDescription = "Add"
        )
    }
}

@Preview(showBackground = true)
@Composable
fun BouncyFABPreview() {
    CenteredPreview {
        BouncyFAB()
    }
}
When isVisible flips to true, the scale springs from 0f to 1f. With HighBouncy damping, the FAB overshoots past 1.0 before bouncing back to its final size. Modifier.scale() applies the current value every frame — no extra work needed.
Use Case 2: Drag-and-Release with Spring Snap
Drag something sideways, release it, and it springs back to center. This is one of those interactions that feels obvious once you’ve seen it — and it’s straightforward to build:
@Composable
fun SpringSnapCard() {

    // Animatable gives us full control - we can "snap" or animate to values
    val offsetX = remember { Animatable(0f) }
    val scope = rememberCoroutineScope()

    Box(
        modifier = Modifier
            .fillMaxSize()
            .padding(24.dp),
        contentAlignment = Alignment.Center
    ) {
        Card(
            modifier = Modifier
                .size(width = 300.dp, height = 180.dp)
                .offset(x = offsetX.value.dp)
                .pointerInput(Unit) {
                    detectHorizontalDragGestures(

                        // While dragging: follow the finger directly
                        onHorizontalDrag = { _, dragAmount ->
                            scope.launch {
                                offsetX.snapTo(offsetX.value + dragAmount)
                            }
                        },

                        // On release: spring back to center!
                        onDragEnd = {
                            scope.launch {
                                offsetX.animateTo(
                                    targetValue = 0f,
                                    animationSpec = spring(
                                        dampingRatio = Spring.DampingRatioMediumBouncy,
                                        stiffness    = Spring.StiffnessMedium
                                    )
                                )
                            }
                        }
                    )
                }
        ) {
            Box(
                modifier = Modifier.fillMaxSize(),
                contentAlignment = Alignment.Center
            ) {
                Text(
                    text  = "Drag me sideways! <---->",
                    style = MaterialTheme.typography.bodyLarge
                )
            }
        }
    }
}

@Preview(showBackground = true)
@Composable
fun SpringSnapCardPreview() {
    CenteredPreview {
        SpringSnapCard()
    }
}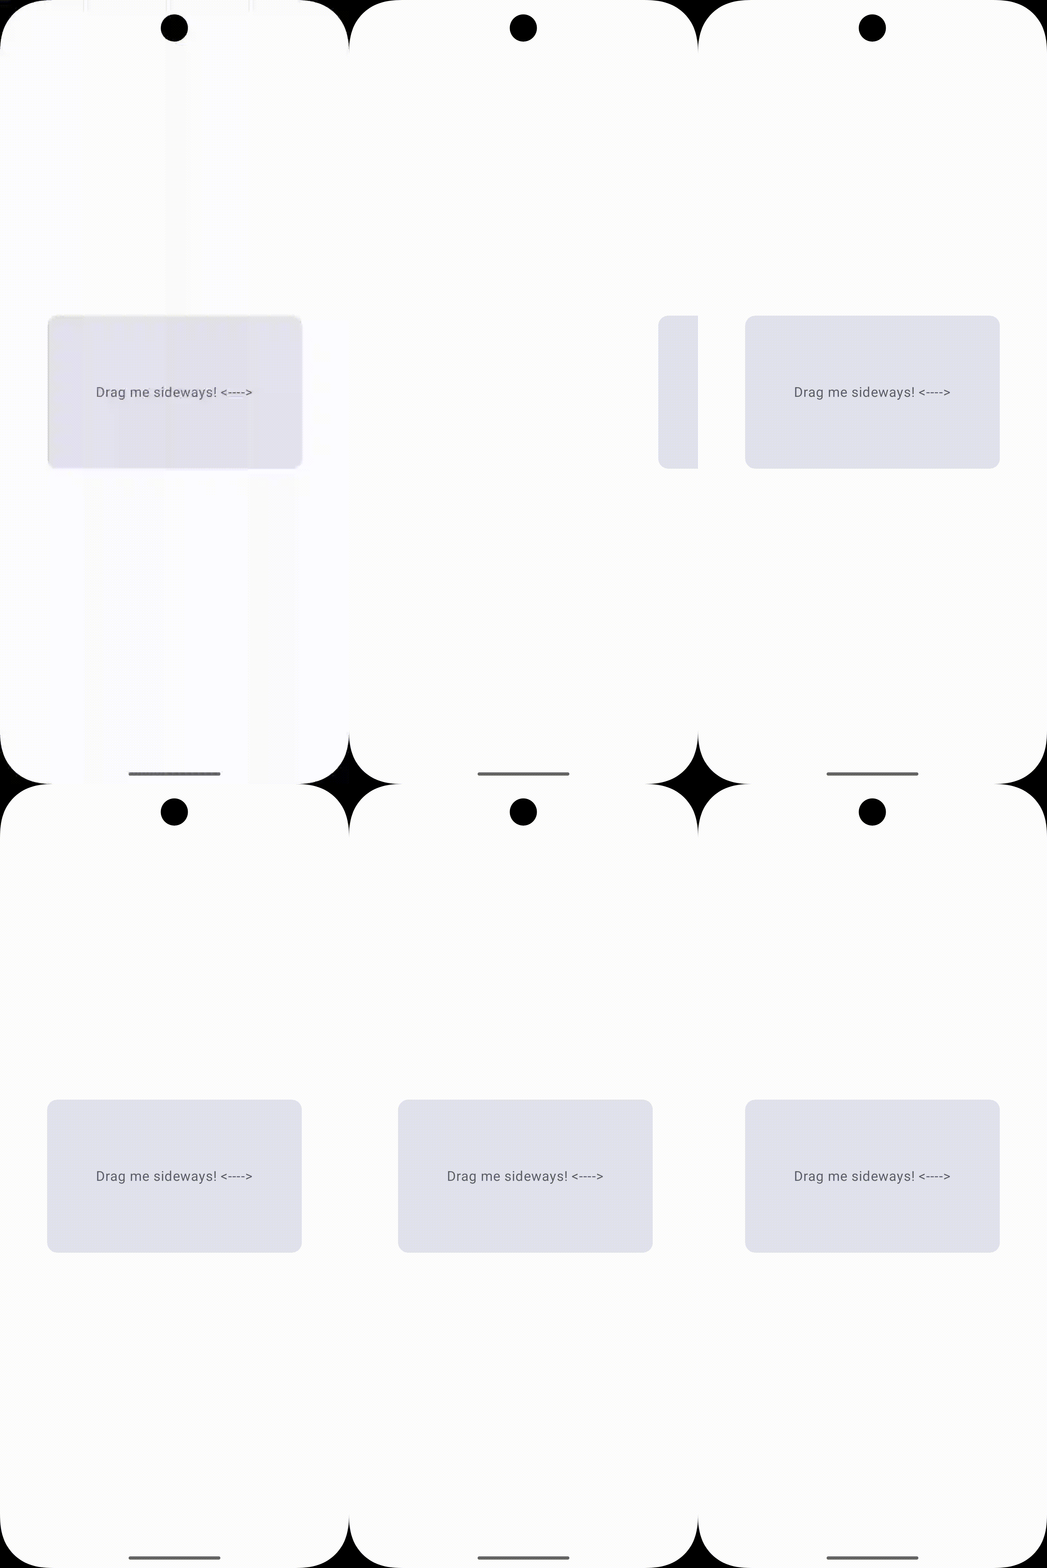
The key pattern: snapTo() during the drag (no animation, just follow the finger), then animateTo() with a spring on release. The spring picks up from whatever velocity the drag left behind, so fast flicks feel different from slow drags.
Use Case 3: Animated Color with Spring
Spring works on colors too. Here’s a button that animates both color and scale on press — layering two springs gives it a more tactile feel:
@Composable
fun SpringColorButton() {

    var isPressed by remember { mutableStateOf(false) }

    // Animate between two colors using spring
    val bgColor by animateColorAsState(
        targetValue = if (isPressed)
            Color(0xFF34D399)   // green when pressed
        else
            Color(0xFF5B8DEE),  // blue when idle
        animationSpec = spring(
            dampingRatio = Spring.DampingRatioLowBouncy,
            stiffness    = Spring.StiffnessMedium
        ),
        label = "buttonColor"
    )

    val scale by animateFloatAsState(
        targetValue = if (isPressed) 0.94f else 1f,
        animationSpec = spring(
            dampingRatio = Spring.DampingRatioMediumBouncy,
            stiffness    = Spring.StiffnessHigh
        ),
        label = "buttonScale"
    )

    Box(
        modifier = Modifier
            .scale(scale)
            .clip(RoundedCornerShape(14.dp))
            .background(bgColor)
            .pointerInput(Unit) {
                detectTapGestures(
                    onPress = {
                        isPressed = true
                        tryAwaitRelease()
                        isPressed = false
                    }
                )
            }
            .padding(horizontal = 32.dp, vertical = 16.dp),
        contentAlignment = Alignment.Center
    ) {
        Text(
            text  = "Press & Hold Me",
            color = Color.White,
            fontWeight = FontWeight.SemiBold
        )
    }
}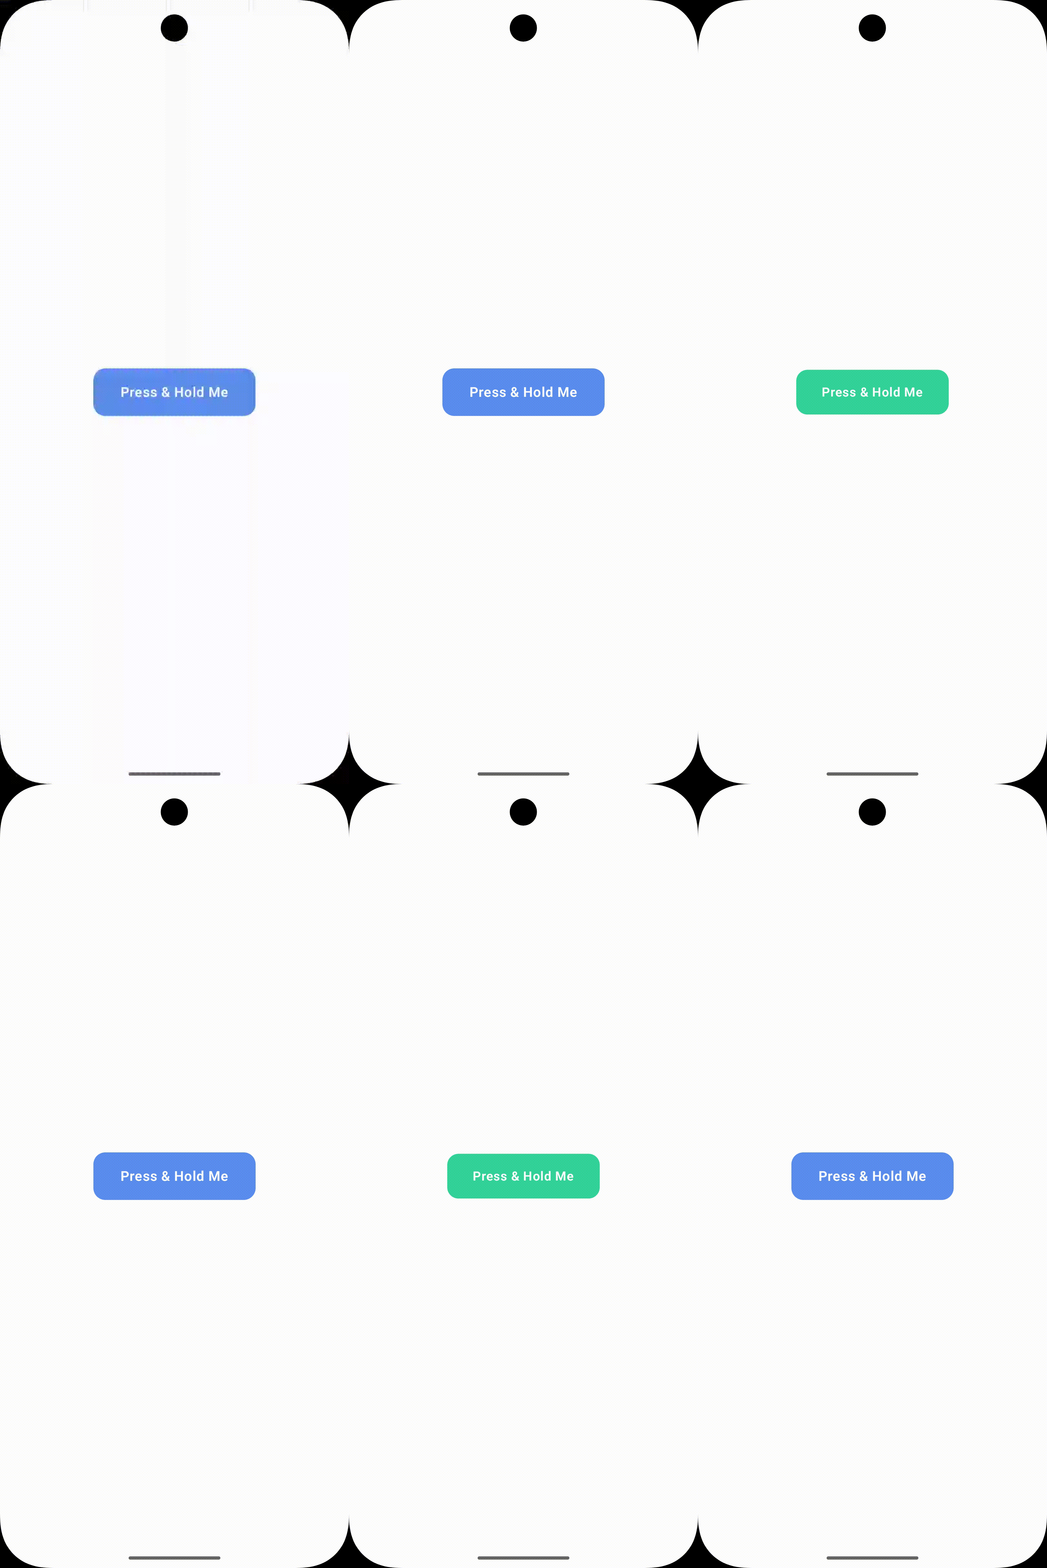
The scale spring uses high stiffness so it reacts instantly. The color spring uses medium stiffness so it transitions a little more slowly. That difference in timing is subtle, but it’s what stops the button from feeling like one flat animation.
Using Animatable with Spring for Full Control
For most UI state changes, animateFloatAsState() is all you need. But sometimes you want to trigger an animation imperatively — not in response to a state flip, but from a coroutine, a gesture callback, or a side effect. That’s what Animatable is for.
You hold a reference to it, then call animateTo(), snapTo(), or updateBounds() directly. Spring specs work the same way:
@Composable
fun AnimatableSpringExample() {

    // Create an Animatable — this is our "controllable" value
    val rotation = remember { Animatable(0f) }
    val scope = rememberCoroutineScope()

    Column(
        modifier = Modifier.fillMaxSize(),
        horizontalAlignment = Alignment.CenterHorizontally,
        verticalArrangement = Arrangement.Center
    ) {
        Icon(
            imageVector = Icons.Default.Favorite,
            contentDescription = null,
            tint = Color.Red,
            modifier = Modifier
                .size(72.dp)
                .graphicsLayer {
                    rotationZ = rotation.value
                }
        )

        Spacer(Modifier.height(24.dp))

        Button(
            onClick = {
                scope.launch {
                    // Snap to 20° instantly (no animation) — simulate a "flick"
                    rotation.snapTo(20f)

                    // Then spring back to 0° with a bouncy spring
                    rotation.animateTo(
                        targetValue = 0f,
                        animationSpec = spring(
                            dampingRatio = Spring.DampingRatioHighBouncy,
                            stiffness    = Spring.StiffnessMediumLow
                        )
                    )
                }
            }
        ) {
            Text("Wobble the Heart! ❤️")
        }
    }
}
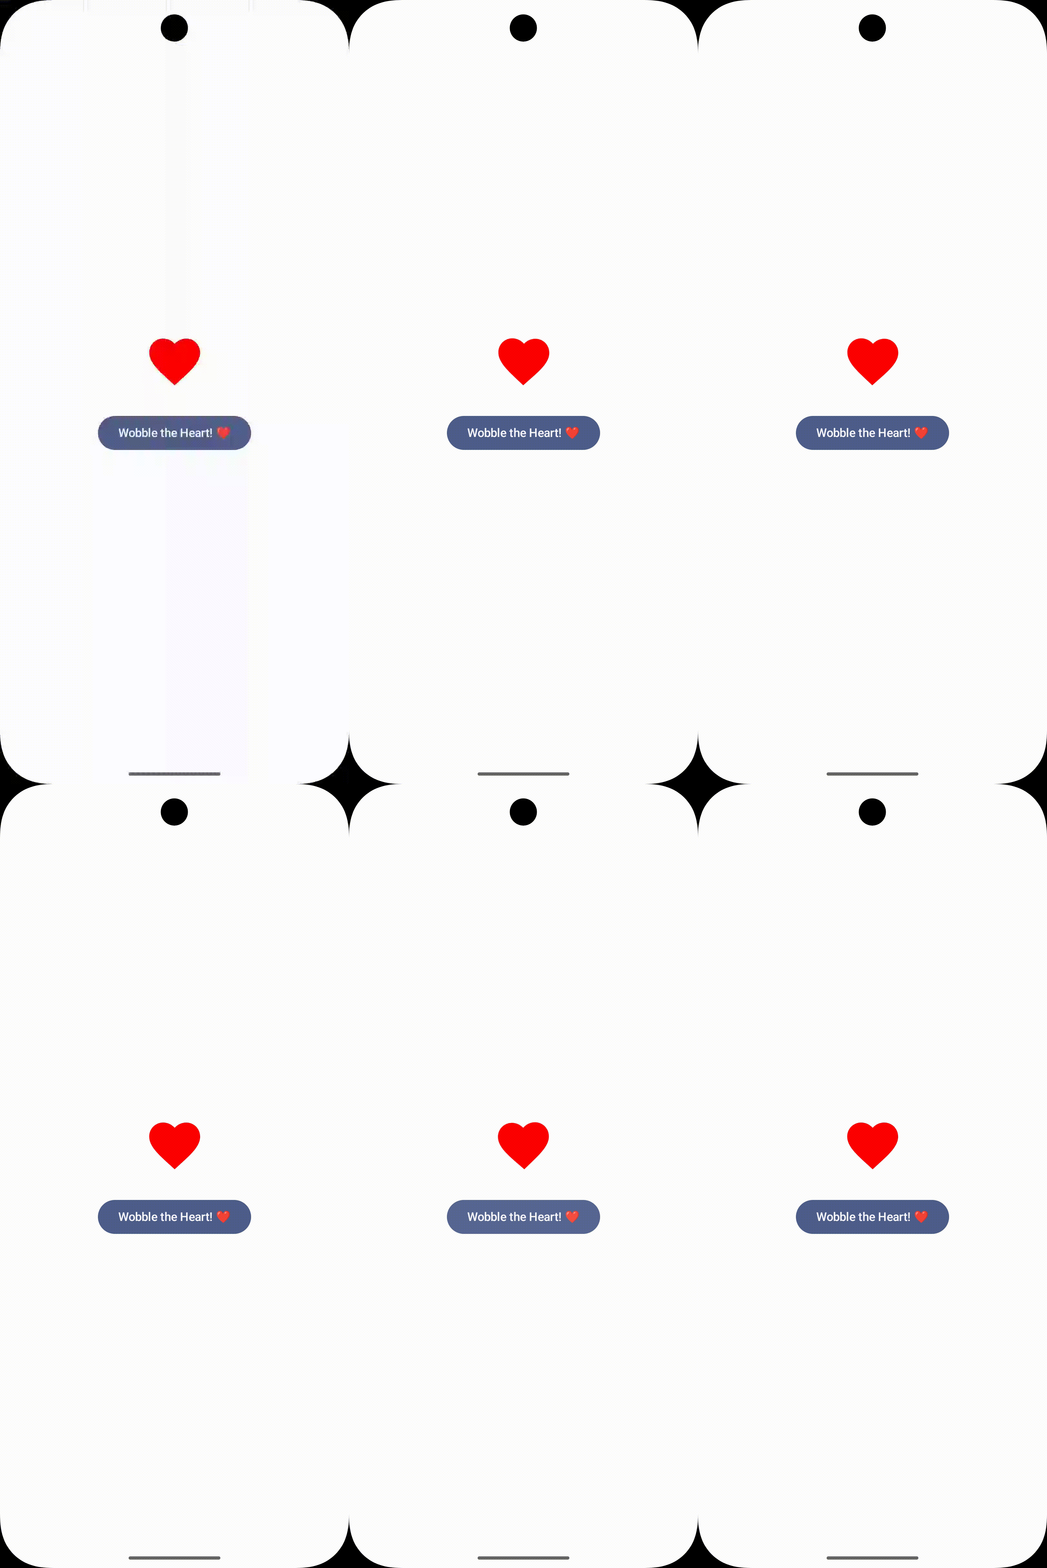
The snapTo() → animateTo() pattern is useful any time you want a “jolt” effect. Instantly displace the value, then spring it back. The icon appears to recoil from the tap rather than just changing state.
animateXAsState vs Animatable: If the animation is tied to a state variable, use
animateXAsState(). If you need to fire it manually from a coroutine, gesture handler, or event callback, useAnimatable.
Pro Tips & Common Mistakes
Do: Always Provide a Label
Since Compose 1.4, animated state APIs have a label parameter. Always fill it in. Android Studio’s Animation Inspector (also known as Animation Preview) uses these labels to identify animations during debugging — it makes your life significantly easier when inspecting overlapping animations.
// Good — label helps the Animation Inspector identify this
val scale by animateFloatAsState(
    targetValue = targetScale,
    animationSpec = spring(...),
    label = "cardScale"   // ← always add this!
)

// Bad — anonymous, hard to debug
val scale by animateFloatAsState(targetValue = targetScale)
Do: Use Spring for Gestures and Interruptions
If the user can reverse or redirect a motion mid-way — swipe back, lift a finger early, change direction — spring is the right tool. It reads the current velocity at the moment of interruption and continues from there. A tween would just reset and start over, which looks broken.
Don’t: Use Spring Where Duration Matters
Springs have no fixed end time. That’s a feature when you’re animating interactions, but a problem for things like progress bars or choreographed transitions where you need precise timing. Use tween() there.
// Use tween for progress bars (duration matters)
val progress by animateFloatAsState(
    targetValue    = loadingProgress,
    animationSpec  = tween(durationMillis = 2000, easing = LinearEasing),
    label = "loadingProgress"
)

// Use spring for interactive gestures (feel matters)
val cardOffset by animateFloatAsState(
    targetValue    = dragOffset,
    animationSpec  = spring(Spring.DampingRatioMediumBouncy),
    label = "cardDrag"
)
Don’t: Assume a Spring Will Finish in N Milliseconds
This one bites people. A developer adds a 300ms delay() after kicking off a spring animation, expecting it to be done. It’s not — a slow spring can run for 800ms or more. Use finishedListener to know when it actually settles.
// React to animation end correctly using finishedListener
val offsetX by animateFloatAsState(
    targetValue    = if (moved) 200f else 0f,
    animationSpec  = spring(Spring.DampingRatioLowBouncy),
    label          = "cardOffset",
    finishedListener = { finalValue ->
        // This fires when the spring fully settles
        Log.d("Spring", "Settled at: $finalValue")
        // Trigger your next action here, not after a hardcoded delay
    }
)

// Wrong — delay doesn't know when spring settles
scope.launch {
    moved = true
    delay(300)         // spring might still be running!
    doNextThing()
}
Frequently Asked Questions
Q. Can I use Jetpack Animation Spring with the old View-based Android system?
Yes. The SpringAnimation class in androidx.dynamicanimation brings the same physics model to View-based UIs. The API looks different from Compose’s spring(), but the underlying math is identical. For new projects, stick with the Compose API — it’s cleaner and integrates with state automatically.
Q. Is Jetpack Animation Spring bad for performance?
Not in practice. Compose batches and optimizes recompositions, so the overhead is minimal for typical UI. If you’re animating something heavy — large composables, complex layouts — wrap it in graphicsLayer. Transformations inside graphicsLayer (scale, rotation, translation, alpha) run on the RenderThread and skip recomposition entirely.
Q. Can I animate multiple properties with spring at the same time?
Yes — each animateXAsState() call is independent, so you can stack as many as you need in one composable. If multiple properties need to stay in sync (start at the same time, driven by the same state change), use updateTransition() instead. It groups them under a single transition so they move together.
Q. What is the difference between spring() and tween() in Compose?
Physics vs time. tween() moves from A to B over a fixed duration. spring() is duration-free — it runs until the value settles, driven by stiffness and damping. Use springs for anything the user can touch or interrupt. Use tweens where timing needs to be exact.
Conclusion
Jetpack Animation Spring is one of those tools that quietly improves your app. It doesn’t add features, but it makes everything feel better.
You don’t need complex setups. Just adjust damping and stiffness until it feels right.
Once you start using it in the right places, it’s hard to go back.