
Have you ever felt overwhelmed by complex systems in your software projects? You’re not alone! The Composite Design Pattern is here to help simplify those tangled webs, but surprisingly, it often gets overlooked. Many of us miss out on its benefits simply because we aren’t familiar with its basics or how to apply it in real-life scenarios.
But don’t worry—I’ve got your back! In this blog, I’ll walk you through the essentials of the Composite Design Pattern, breaking down its structure and showing you practical, real-world examples. By the end, you’ll see just how powerful this pattern can be for streamlining your code. So let’s jump right in and start making your design process easier and more efficient!
Composite Design Pattern
The Composite Design Pattern is a structural pattern that allows you to treat individual objects and compositions of objects uniformly. The pattern is particularly useful when you have a tree structure of objects, where individual objects and groups of objects need to be treated in the same way.
In short, it lets you work with both single objects and groups of objects in a similar manner, making your code more flexible and easier to maintain.
When to Use the Composite Design Pattern
The Composite pattern is super handy when you’re working with a bunch of objects that fit into a part-whole hierarchy.
Wait, what’s a part-whole hierarchy?
A part-whole hierarchy is basically a structure where smaller parts come together to form a larger system. It’s a way of organizing things so that each part can function on its own, but also as part of something bigger. Think of it like a tree or a set of nested boxes — each piece can be treated individually, but they all fit into a larger whole.
In software design, this idea is key to the Composite Design Pattern. It lets you treat both individual objects and collections of objects in the same way. Here’s how it works:
- Leaf objects: These are the basic, standalone parts that don’t contain anything else.
- Composite objects: These are more complex and can hold other parts, both leaf and composite, forming a tree-like structure.
You’ll find this in many places, like:
- UI Components: A window might have buttons, text fields, and panels. A panel can have more buttons or even nested panels inside.
- File Systems: Files and directories share similar operations — open, close, getSize, etc. Directories can hold files or other directories.
- Drawing Applications: A simple shape, like a circle or rectangle, can stand alone or be part of a bigger graphic made up of multiple shapes.
Now, let’s look at a simple example.
Imagine we’re building a graphic editor that works with different shapes — simple ones like circles, rectangles, and lines. But we also want to create more complex drawings by grouping these shapes together. The tricky part is that we want to treat both individual shapes and groups of shapes the same way. That’s where the Composite Pattern comes in handy.
Structure of the Composite Pattern
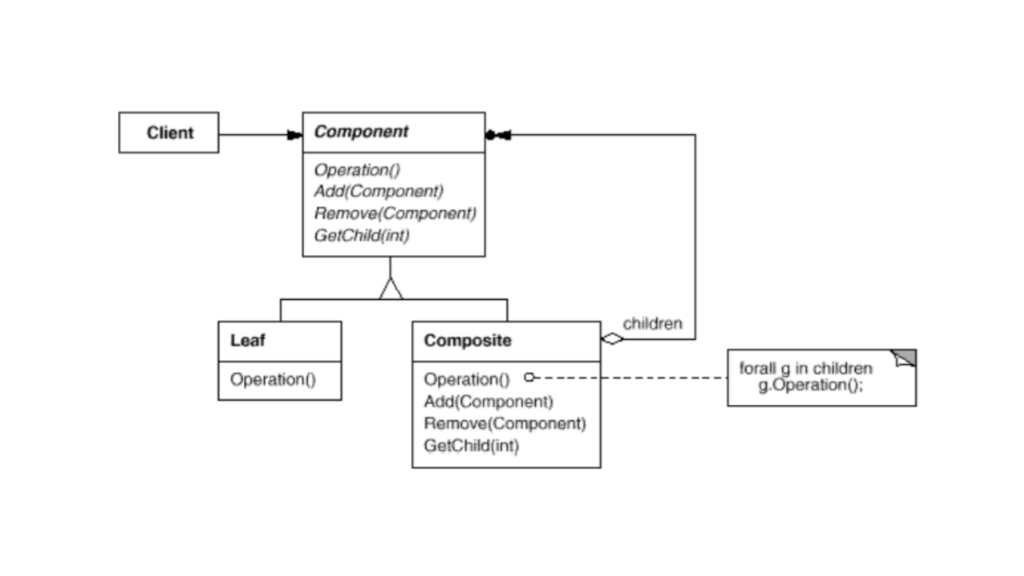
In the Composite Pattern, there are usually three key pieces:
- Component: This is an interface or abstract class that lays out the common operations that both simple objects and composite objects can perform.
- Leaf: This represents an individual object in the structure. It’s a basic part of the system and doesn’t have any children.
- Composite: This is a group of objects, which can include both leaves and other composites. It handles operations by passing them down to its children.
Composite Design Pattern in Kotlin
Now, let’s dive into how to implement the Composite Pattern in Kotlin.
We’ll model a graphics system where shapes like circles and rectangles are treated as Leaf components, and a group of shapes (like a drawing) is treated as a Composite.
Step 1: Defining the Component Interface
The first step is to define a Shape interface that all shapes (both individual and composite) will implement.
interface Shape {
    fun draw()
}
Step 2: Creating the Leaf Components
Now, let’s implement two basic shape classes: Circle and Rectangle. These classes will be the Leaf nodes in our Composite structure, meaning they do not contain any other shapes.
class Circle(private val name: String) : Shape {
    override fun draw() {
        println("Drawing a Circle: $name")
    }
}

class Rectangle(private val name: String) : Shape {
    override fun draw() {
        println("Drawing a Rectangle: $name")
    }
}
Here, both Circle and Rectangle implement the Shape interface. They only define the draw() method because these are basic shapes.
Step 3: Creating the Composite Component
Next, we will create a Composite class called Drawing, which can hold a collection of shapes (both Circle and Rectangle, or even other Drawing objects).
class Drawing : Shape {
    private val shapes = mutableListOf<Shape>()

    // Add a shape to the drawing
    fun addShape(shape: Shape) {
        shapes.add(shape)
    }

    // Remove a shape from the drawing
    fun removeShape(shape: Shape) {
        shapes.remove(shape)
    }

    // Drawing the entire group of shapes
    override fun draw() {
        println("Drawing a group of shapes:")
        for (shape in shapes) {
            shape.draw()  // Delegating the draw call to child components
        }
    }
}
Here’s what’s happening:
Drawingclass implementsShapeand contains a list ofShapeobjects.- It allows adding and removing shapes.
- When
draw()is called on theDrawing, it delegates the drawing task to all the shapes in its list.
Step 4: Bringing It All Together
Now, let’s look at an example that demonstrates how the Composite pattern works in action.
fun main() {
    // Create individual shapes
    val circle1 = Circle("Circle 1")
    val circle2 = Circle("Circle 2")
    val rectangle1 = Rectangle("Rectangle 1")

    // Create a composite drawing of shapes
    val drawing1 = Drawing()
    drawing1.addShape(circle1)
    drawing1.addShape(rectangle1)

    // Create another drawing with its own shapes
    val drawing2 = Drawing()
    drawing2.addShape(circle2)
    drawing2.addShape(drawing1)  // Adding a drawing within a drawing

    // Draw the second drawing, which contains a nested structure
    drawing2.draw()
}
Output
Drawing a group of shapes:
Drawing a Circle: Circle 2
Drawing a group of shapes:
Drawing a Circle: Circle 1
Drawing a Rectangle: Rectangle 1
We first create individual Circle and Rectangle shapes.We then create a Drawing (composite) that contains circle1 and rectangle1.Finally, we create another composite Drawing that includes circle2 and even the previous Drawing. This shows how complex structures can be built from simpler components.
Real-World Examples
Now, let’s go further and explore a few more real-world examples.
Composite Pattern in Shopping Cart System
We’ll create a system to represent a product catalog, where a product can be either a single item (leaf) or a bundle of items (composite).
Step 1: Define the Component Interface
The Component defines the common operations. Here, the Product interface will have a method showDetails to display the details of each product.
// Component
interface Product {
    fun showDetails()
}
Step 2: Implement the Leaf Class
The Leaf class represents individual products, like a single item in our catalog.
// Leaf
class SingleProduct(private val name: String, private val price: Double) : Product {
    override fun showDetails() {
        println("$name: $price")
    }
}
In this class:
name: Represents the product name.price: Represents the price of the product.
The showDetails method simply prints the product’s name and price.
Step 3: Implement the Composite Class
Now, let’s implement the Composite class, which can hold a collection of products (either single or composite).
// Composite
class ProductBundle(private val bundleName: String) : Product {
    private val products = mutableListOf<Product>()

    fun addProduct(product: Product) {
        products.add(product)
    }

    fun removeProduct(product: Product) {
        products.remove(product)
    }

    override fun showDetails() {
        println("$bundleName contains the following products:")
        for (product in products) {
            product.showDetails()
        }
    }
}
Here:
- The
ProductBundleclass maintains a list ofProductobjects. - The
addProductmethod lets us add new products to the bundle. - The
removeProductmethod lets us remove products from the bundle. - The
showDetailsmethod iterates through each product and calls itsshowDetailsmethod.
Step 4: Putting It All Together
Now that we have both single and composite products, we can build a catalog of individual items and bundles.
fun main() {
    // Individual products
    val laptop = SingleProduct("Laptop", 1000.0)
    val mouse = SingleProduct("Mouse", 25.0)
    val keyboard = SingleProduct("Keyboard", 75.0)

    // A bundle of products
    val computerSet = ProductBundle("Computer Set")
    computerSet.addProduct(laptop)
    computerSet.addProduct(mouse)
    computerSet.addProduct(keyboard)

    // Another bundle
    val officeSupplies = ProductBundle("Office Supplies")
    officeSupplies.addProduct(SingleProduct("Notebook", 10.0))
    officeSupplies.addProduct(SingleProduct("Pen", 2.0))

    // Master bundle
    val shoppingCart = ProductBundle("Shopping Cart")
    shoppingCart.addProduct(computerSet)
    shoppingCart.addProduct(officeSupplies)

    // Display details of all products
    shoppingCart.showDetails()
}
Here,
- We first create individual products (
laptop,mouse,keyboard). - Then, we group them into a bundle (
computerSet). - We create another bundle (
officeSupplies). - Finally, we add both bundles to a master bundle (
shoppingCart). - When calling
shoppingCart.showDetails(), the Composite Pattern allows us to display all the products, both single and grouped, using the sameshowDetails()method.
Output
Shopping Cart contains the following products:
Computer Set contains the following products:
Laptop: 1000.0
Mouse: 25.0
Keyboard: 75.0
Office Supplies contains the following products:
Notebook: 10.0
Pen: 2.0
Composite Pattern in File System
Let’s implement the Composite Design Pattern in a file system where files and directories share common operations like opening, deleting, and renaming. In this scenario:
- Files are treated as individual objects (leaf nodes).
- Directories can contain both files and other directories (composite nodes).
Step 1: Define the FileSystemComponent Interface
The Component will be an interface that defines the common operations for both files and directories. We’ll include methods like open, delete, rename, and showDetails.
// Component
interface FileSystemComponent {
    fun open()
    fun delete()
    fun rename(newName: String)
    fun showDetails()
}
Step 2: Implement the File Class (Leaf)
The File class is a leaf node in the composite pattern. It represents individual files that implement the common operations defined in the FileSystemComponent interface.
// Leaf
class File(private var name: String) : FileSystemComponent {
    override fun open() {
        println("Opening file: $name")
    }

    override fun delete() {
        println("Deleting file: $name")
    }

    override fun rename(newName: String) {
        println("Renaming file from $name to $newName")
        name = newName
    }

    override fun showDetails() {
        println("File: $name")
    }
}
Step 3: Implement the Directory Class (Composite)
The Directory class is the composite node in the pattern. It can hold a collection of files and other directories. The directory class implements the same operations as files but delegates actions to its child components (files or directories).
// Composite
class Directory(private var name: String) : FileSystemComponent {
    private val contents = mutableListOf<FileSystemComponent>()

    fun add(component: FileSystemComponent) {
        contents.add(component)
    }

    fun remove(component: FileSystemComponent) {
        contents.remove(component)
    }

    override fun open() {
        println("Opening directory: $name")
        for (component in contents) {
            component.open()
        }
    }

    override fun delete() {
        println("Deleting directory: $name and its contents:")
        for (component in contents) {
            component.delete()
        }
        contents.clear()  // Remove all contents after deletion
    }

    override fun rename(newName: String) {
        println("Renaming directory from $name to $newName")
        name = newName
    }

    override fun showDetails() {
        println("Directory: $name contains:")
        for (component in contents) {
            component.showDetails()
        }
    }
}
Step 4: Putting It All Together
Now, let’s use the File and Directory classes to simulate a file system where directories contain files and possibly other directories.
fun main() {
    // Create individual files
    val file1 = File("file1.txt")
    val file2 = File("file2.txt")
    val file3 = File("file3.txt")

    // Create a directory and add files to it
    val dir1 = Directory("Documents")
    dir1.add(file1)
    dir1.add(file2)

    // Create another directory and add files and a subdirectory to it
    val dir2 = Directory("Projects")
    dir2.add(file3)
    dir2.add(dir1)  // Adding the Documents directory to the Projects directory

    // Display the structure of the file system
    dir2.showDetails()

    // Perform operations on the file system
    println("\n-- Opening the directory --")
    dir2.open()

    println("\n-- Renaming file and directory --")
    file1.rename("new_file1.txt")
    dir1.rename("New_Documents")

    // Show updated structure
    dir2.showDetails()

    println("\n-- Deleting directory --")
    dir2.delete()

    // Try to show the structure after deletion
    println("\n-- Trying to show details after deletion --")
    dir2.showDetails()
}
Here,
- We create individual files (
file1.txt,file2.txt, andfile3.txt). - We create a directory
Documentsand addfile1andfile2to it. - We create another directory
Projects, addfile3and also add theDocumentsdirectory to it, demonstrating that directories can contain both files and other directories. - We display the contents of the
Projectsdirectory, which includes theDocumentsdirectory and its files. - We perform operations like
open,rename, anddeleteon the files and directories. - After deletion, we attempt to show the details again to verify that the contents are removed.
Output
Directory: Projects contains:
File: file3.txt
Directory: Documents contains:
File: file1.txt
File: file2.txt

-- Opening the directory --
Opening directory: Projects
Opening file: file3.txt
Opening directory: Documents
Opening file: file1.txt
Opening file: file2.txt

-- Renaming file and directory --
Renaming file from file1.txt to new_file1.txt
Renaming directory from Documents to New_Documents
Directory: Projects contains:
File: file3.txt
Directory: New_Documents contains:
File: new_file1.txt
File: file2.txt

-- Deleting directory --
Deleting directory: Projects and its contents:
Deleting file: file3.txt
Deleting directory: New_Documents and its contents:
Deleting file: new_file1.txt
Deleting file: file2.txt

-- Trying to show details after deletion --
Directory: Projects contains:
The Composite Pattern allows us to treat directories (composite objects) just like files (leaf objects). This means that operations such as opening, renaming, deleting, and showing details can be handled uniformly for both files and directories. The hierarchy can grow naturally, supporting nested structures where directories can contain files or even other directories. Overall, this implementation showcases how the Composite Design Pattern effectively models a real-world file system in Kotlin, allowing files and directories to share common behavior while maintaining flexibility and scalability.
Benefits of the Composite Pattern
- Simplicity: You can treat individual objects and composites in the same way.
- Flexibility: Adding or removing components is easy since they follow a consistent interface.
- Transparency: Clients don’t need to worry about whether they’re working with a single item or a composite.
Drawbacks
- Complexity: The pattern can introduce complexity, especially if it’s used in scenarios that don’t involve a natural hierarchy.
- Overhead: If not carefully implemented, it may lead to unnecessary overhead when dealing with very simple structures.
When to Use the Composite Pattern?
- When you want to represent part-whole hierarchies of objects.
- When you want clients to be able to treat individual objects and composite objects uniformly.
- When you need to build complex structures out of simpler objects but still want to treat the whole structure as a single entity.
Conclusion
And there you have it! We’ve unraveled the Composite Design Pattern together, and I hope you’re feeling inspired to give it a try in your own projects. It’s all about simplifying those complex systems and making your life a little easier as a developer.
As you move forward, keep an eye out for situations where this pattern can come in handy. The beauty of it is that once you start using it, you’ll wonder how you ever managed without it!
Thanks for hanging out with me today. I’d love to hear about your experiences with the Composite Design Pattern or any cool projects you’re working on. Happy coding, and let’s make our software as clean and efficient as possible!