
The Decorator Design Pattern is a powerful structural design pattern that lets you enhance the behavior of an object on the fly, without touching the code of other objects from the same class. It’s like giving your object a superpower without changing its DNA! This approach offers a smarter alternative to subclassing, allowing you to extend functionality in a flexible and dynamic way.
In this blog, we’ll take a deep dive into the Decorator Design Pattern in Kotlin, uncovering its use cases and walking through practical examples. We’ll start with the basic concept and then dive into code examples to make everything crystal clear. Let’s get started!
What is the Decorator Design Pattern?
The Decorator Pattern allows you to dynamically add behavior to an object without modifying its original structure. It works by wrapping an object with another object that provides additional functionality. This pattern is highly effective when extending the behavior of classes, avoiding the complexity of subclassing.
Think of this pattern as an alternative to subclassing. Instead of creating a large hierarchy of subclasses to add functionality, we create decorator classes that add functionality by wrapping the base object.

Imagine you have a simple object, like a plain cake. If you want to add chocolate or sprinkles to the cake, you don’t have to create new cakes like ChocolateCake or SprinkleCake. Instead, you wrap the plain cake with decorators like ChocolateDecorator or SprinkleDecorator, adding the extra features.
Before diving into the code, let’s first look at the basic structure of the Decorator design pattern. This will give us better clarity as we move forward and tackle more problems with the code.
Basic Components of the Decorator Design Pattern
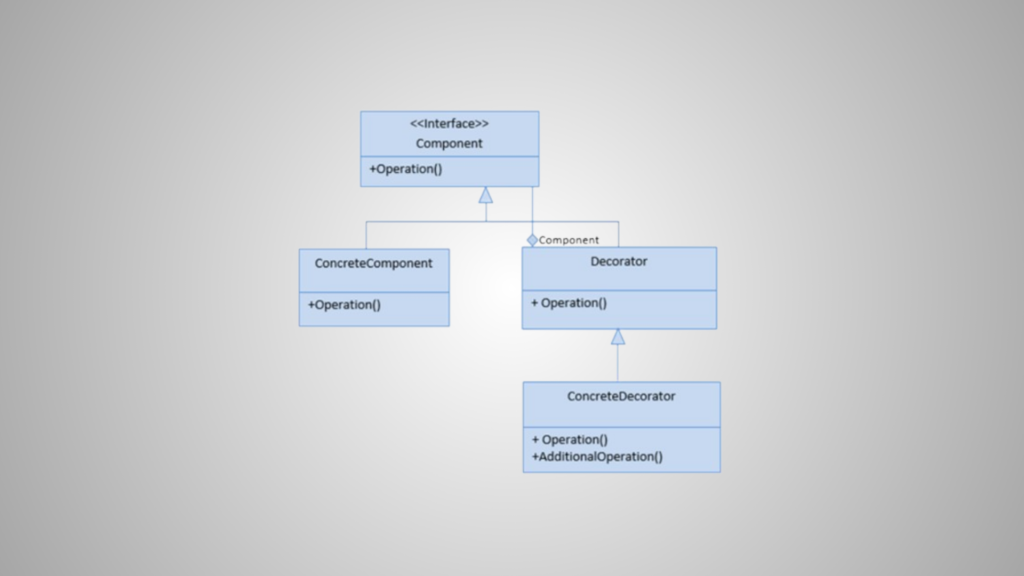
- Component: The interface or abstract class defining the structure for objects that can have responsibilities added to them dynamically.
- Concrete Component: The class that is being decorated.
- Decorator: Abstract class or interface that wraps the component and provides additional functionality.
- Concrete Decorator: The specific implementation of the decorator class that adds new behaviors.
I know many of us might not see the connection, so let’s explore how this works together.
Let’s use our cake example,
- Component (Base Interface or Abstract Class): This is the original object you want to add features to. In our case, it’s a “Cake.”
- ConcreteComponent: This is the base class that implements the component. This is the plain cake.
- Decorator (Abstract Class or Interface): This class is the wrapper that contains a reference to the component and can add new behavior.
- ConcreteDecorator: This is a specific decorator that adds new behavior, like adding chocolate or sprinkles to the cake.
Now, let’s demonstrate this in Kotlin using a simple code snippet.
Step 1: Define the Component Interface
The component defines the base functionality. In our case, we will call it Cake.
// Component
interface Cake {
    fun bake(): String
}
Step 2: Create a Concrete Component (The Plain Cake)
This is the “base” version of the object, which we can decorate later. It has the basic functionality.
// Concrete Component
class PlainCake : Cake {
    override fun bake(): String {
        return "Plain Cake"
    }
}
Step 3: Create the Decorator Class
The decorator class implements the Cake interface and holds a reference to a Cake object (the one being decorated).
// Decorator
abstract class CakeDecorator(private val cake: Cake) : Cake {
    override fun bake(): String {
        return cake.bake() // Delegating the call to the wrapped object
    }
}
Step 4: Create Concrete Decorators (Add Chocolate and Sprinkles)
These are specific decorators that add new behavior. For example, adding chocolate or sprinkles to the cake.
// Concrete Decorator 1: Adding Chocolate
class ChocolateDecorator(cake: Cake) : CakeDecorator(cake) {
    override fun bake(): String {
        return super.bake() + " with Chocolate"
    }
}

// Concrete Decorator 2: Adding Sprinkles
class SprinkleDecorator(cake: Cake) : CakeDecorator(cake) {
    override fun bake(): String {
        return super.bake() + " with Sprinkles"
    }
}
Step 5: Use the Decorators
Now you can take a plain cake and add different decorators (chocolate and sprinkles) to it dynamically.
fun main() {
    // Create a plain cake
    val plainCake = PlainCake()

    // Decorate the plain cake with chocolate
    val chocolateCake = ChocolateDecorator(plainCake)
    println(chocolateCake.bake()) // Output: Plain Cake with Chocolate

    // Further decorate the cake with sprinkles
    val sprinkleChocolateCake = SprinkleDecorator(chocolateCake)
    println(sprinkleChocolateCake.bake()) // Output: Plain Cake with Chocolate with Sprinkles
}
Here, PlainCake is our base object, while ChocolateDecorator and SprinkleDecorator are the wrappers that add delightful flavors without altering the original PlainCake class. You can mix and match these decorators any way you like, dynamically enhancing the cake without changing its original essence.
But wait, here’s a thought!
You might wonder: since we’re using both inheritance and composition here, why not rely solely on inheritance? Why do we need the help of composition?
And here’s another interesting point: have you noticed how we can avoid the hassle of creating countless subclasses for every combination of behaviors, like ChocolateCake, SprinkleCake, and ChocolateSprinkleCake? Instead, we can simply ‘decorate’ an object with as many behaviors as we want, dynamically, at runtime!
Alright, let’s play a little guessing game… 🤔 Ah, yes! No — wait 😕, it’s actually a no! Now that we’ve had our fun, let’s dive deeper into the problem the Decorator Pattern solves: how it helps us avoid subclass explosion while still offering dynamic behavior at runtime.
I’ll walk you through a real-life scenario to illustrate this before we jump into the code. Let’s break it down into two key points:
- Inheritance vs. Composition in the Decorator Pattern
- How this combination avoids subclass explosion while enabling dynamic behavior.
Inheritance vs. Composition in the Decorator Pattern
In the Decorator Pattern, we indeed use both inheritance and composition together. Here’s how:
- Inheritance: Decorators and the base class share a common interface. This is the type system‘s way to ensure that both the decorated object and the original object can be used in the same way (i.e., they both implement the same methods). This is why we inherit from a common interface or abstract class.
- Composition: Instead of adding behavior via inheritance (which creates subclass explosion), we use composition to wrap objects. Each decorator contains an instance of the object it’s decorating. This wrapping allows us to combine behaviors in different ways at runtime.
By using composition (wrapping objects) instead of inheritance (creating subclasses for every combination), the Decorator Pattern allows us to avoid the explosion of subclasses.
Let’s compare this with inheritance-only and then with the Decorator Pattern.
How the Decorator Pattern Avoids Subclass Explosion
Subclass Explosion Problem (Inheritance-Only Approach)
Imagine we have a simple notification system where we want to add sound, vibration, and banner features to notifications. Using inheritance alone, we might end up with:
// Base notification
open class Notification {
    open fun send() = "Sending Notification"
}

// Subclass 1: Add Sound
class SoundNotification : Notification() {
    override fun send() = super.send() + " with Sound"
}

// Subclass 2: Add Vibration
class VibrationNotification : Notification() {
    override fun send() = super.send() + " with Vibration"
}

// Subclass 3: Add Banner
class BannerNotification : Notification() {
    override fun send() = super.send() + " with Banner"
}

// Now we need to combine all features
class SoundVibrationNotification : Notification() {
    override fun send() = super.send() + " with Sound and Vibration"
}

class SoundBannerNotification : Notification() {
    override fun send() = super.send() + " with Sound and Banner"
}

class VibrationBannerNotification : Notification() {
    override fun send() = super.send() + " with Vibration and Banner"
}

// And so on...
Here, we need to create a new subclass for every combination:
- SoundNotification
- VibrationNotification
- BannerNotification
- SoundVibrationNotification
- SoundBannerNotification
- VibrationBannerNotification
- …and so on!
For three features, you end up with a lot of classes. This doesn’t scale well because for n features, you might need 2^n subclasses (combinations of features). This is called subclass explosion.
How Decorator Pattern Solves This (Using Inheritance + Composition)
With the Decorator Pattern, we use composition to dynamically wrap objects instead of relying on subclassing to mix behaviors.
Here’s the key difference:
- Inheritance is used only to ensure that both the base class (
Notification) and the decorators (SoundNotificationDecorator,VibrationNotificationDecorator, etc.) implement the same interface. - Composition is used to “wrap” objects with additional behavior dynamically, at runtime.
Let’s see how this works.
Decorator Pattern Rocks
First, we define the common interface (Notification) and the decorators:
// Step 1: Define the common interface (or abstract class)
interface Notification {
    fun send(): String
}

// Step 2: Implement the base notification class
class BasicNotification : Notification {
    override fun send() = "Sending Basic Notification"
}

// Step 3: Create the abstract decorator class, inheriting from Notification
abstract class NotificationDecorator(private val decoratedNotification: Notification) : Notification {
    override fun send(): String {
        return decoratedNotification.send() // Delegate to the wrapped object
    }
}

// Step 4: Implement concrete decorators
class SoundNotificationDecorator(notification: Notification) : NotificationDecorator(notification) {
    override fun send(): String {
        return super.send() + " with Sound"
    }
}

class VibrationNotificationDecorator(notification: Notification) : NotificationDecorator(notification) {
    override fun send(): String {
        return super.send() + " with Vibration"
    }
}

class BannerNotificationDecorator(notification: Notification) : NotificationDecorator(notification) {
    override fun send(): String {
        return super.send() + " with Banner"
    }
}
Here,
- Common Interface (Notification): Both the base class (
BasicNotification) and the decorators (SoundNotificationDecorator,VibrationNotificationDecorator, etc.) implement theNotificationinterface. This is where we use inheritance. - Composition: Instead of subclassing, each decorator contains another
Notificationobject (which could be the base or another decorator) and wraps it with additional functionality.
Dynamic Behavior at Runtime (No Subclass Explosion)
Now, we can apply these decorators dynamically, without creating new subclasses for each combination:
fun main() {
    // Create a basic notification
    var notification: Notification = BasicNotification()

    // Dynamically add features at runtime using decorators
    notification = SoundNotificationDecorator(notification)
    notification = VibrationNotificationDecorator(notification)
    notification = BannerNotificationDecorator(notification)

    // Final notification with all features
    println(notification.send()) // Output: Sending Basic Notification with Sound with Vibration with Banner
}
Avoiding Subclass Explosion:
- Instead of creating a class for each combination (like
SoundVibrationBannerNotification), we combine behaviors dynamically by wrapping objects. - Using composition, we can mix and match behaviors as needed, avoiding the explosion of subclasses.
Dynamic Behavior:
- You can dynamically add or remove features at runtime by wrapping objects with decorators. For example, you can add sound, vibration, or banner as needed.
- This gives you flexibility because you don’t have to predefine all possible combinations in the class hierarchy.
Why Use Composition and Inheritance Together?
- Inheritance ensures that the decorators and the original object can be used interchangeably since they all implement the same interface (
Notification). - Composition lets us dynamically combine behaviors by wrapping objects instead of creating a new subclass for every possible feature combination.
In short, the Decorator Pattern uses inheritance to define a common interface and composition to avoid subclass explosion by dynamically adding behaviors. This combination provides the flexibility to enhance object behavior at runtime without the need for a rigid subclass hierarchy.
Real-Life Example — Enhancing a Banking Payment System with the Decorator Pattern
Imagine you’re developing a banking payment system that starts off simple — just basic payment processing for transactions. But as the bank expands its services, you need to introduce extra features, like transaction fees or fraud detection, while keeping the core payment logic intact. How do you manage this without creating a tangled mess? That’s where the Decorator Pattern comes in. Let’s break it down step by step, adding these new banking features while maintaining a clean and flexible architecture.
Note: This is just a simple example, but have you noticed similar trends with apps like GPay? When you recharge your mobile, you might encounter an extra platform fee. The same is true for apps like PhonePe, Flipkart, Swiggy, and more recently, Zomato, which raised platform fees during festive seasons like Diwali, where these fees have become increasingly common. Initially, these services offered simple, fee-free features. However, as the platforms evolved and expanded their offerings, additional layers — such as service fees and other enhancements — were introduced to support new functionalities. We don’t know exactly which approach they followed, but the Decorator Pattern would be a great fit for such use cases, as it allows for these additions without disrupting the core functionality.
Let’s design this system step by step using the Decorator Pattern.
Step 1: Defining the Component Interface
We will start by defining a simple PaymentProcessor interface. This interface will have a method processPayment() that handles the basic payment process.
interface PaymentProcessor {
    fun processPayment(amount: Double)
}
Step 2: Implementing the Concrete Component
The BasicPaymentProcessor class will be the concrete implementation of the PaymentProcessor interface. This class will simply process the payment without any additional behavior like fees or fraud checks.
class BasicPaymentProcessor : PaymentProcessor {
    override fun processPayment(amount: Double) {
        println("Processing payment of ₹$amount")
    }
}
This class represents the core logic for processing payments.
Step 3: Creating the Decorator Class
Now, we need to create an abstract class PaymentProcessorDecorator that will implement the PaymentProcessor interface and forward requests to the decorated object. This will allow us to add new behavior in subclasses.
abstract class PaymentProcessorDecorator(private val processor: PaymentProcessor) : PaymentProcessor {
    override fun processPayment(amount: Double) {
        processor.processPayment(amount)  // Forwarding the call to the wrapped component
    }
}
The PaymentProcessorDecorator acts as a wrapper for the original PaymentProcessor and can add extra functionality in the subclasses.
Step 4: Implementing the Concrete Decorators
Let’s now add two decorators:
- TransactionFeeDecorator: This adds a fee to the payment.
- FraudDetectionDecorator: This performs a fraud check before processing the payment.
Transaction Fee Decorator
This decorator adds a transaction fee on top of the payment amount.
class TransactionFeeDecorator(processor: PaymentProcessor) : PaymentProcessorDecorator(processor) {
    private val feePercentage = 2.5  // Let's assume a 2.5% fee on every transaction

    override fun processPayment(amount: Double) {
        val fee = amount * feePercentage / 100
        println("Applying transaction fee of ₹$fee")
        super.processPayment(amount + fee)  // Passing modified amount to the wrapped processor
    }
}
Fraud Detection Decorator
This decorator performs a simple fraud check before processing the payment.
class FraudDetectionDecorator(processor: PaymentProcessor) : PaymentProcessorDecorator(processor) {
    override fun processPayment(amount: Double) {
        if (isFraudulentTransaction(amount)) {
            println("Payment flagged as fraudulent! Transaction declined.")
        } else {
            println("Fraud check passed.")
            super.processPayment(amount)  // Proceed if fraud check passes
        }
    }

    private fun isFraudulentTransaction(amount: Double): Boolean {
        // Simple fraud detection logic: consider transactions above ₹10,000 as fraudulent for this example
        return amount > 10000
    }
}
Step 5: Using the Decorators
Now that we have both decorators ready, let’s use them. We’ll create a BasicPaymentProcessor and then decorate it with both TransactionFeeDecorator and FraudDetectionDecorator to show how these can be combined.
fun main() {
    val basicProcessor = BasicPaymentProcessor()

    // Decorate the processor with transaction fees and fraud detection
    val processorWithFees = TransactionFeeDecorator(basicProcessor)
    val processorWithFraudCheckAndFees = FraudDetectionDecorator(processorWithFees)

    // Test with a small payment
    println("Payment 1:")
    processorWithFraudCheckAndFees.processPayment(5000.0)

    // Test with a large (fraudulent) payment
    println("\nPayment 2:")
    processorWithFraudCheckAndFees.processPayment(20000.0)
}
Output
Payment 1:
Fraud check passed.
Applying transaction fee of ₹125.0
Processing payment of ₹5125.0

Payment 2:
Payment flagged as fraudulent! Transaction declined.
In this case,
- Basic Payment Processing: We start with the
BasicPaymentProcessor, which simply processes the payment. - Adding Transaction Fees: The
TransactionFeeDecoratoradds a fee on top of the amount and forwards the modified amount to theBasicPaymentProcessor. - Fraud Detection: The
FraudDetectionDecoratorchecks if the transaction is fraudulent before forwarding the payment to the next decorator (or processor). If the transaction is fraudulent, it stops the process.
By using the Decorator Pattern, we can flexibly add more behaviors like logging, authentication, or currency conversion without modifying the original PaymentProcessor class. This avoids violating the Open-Closed Principle (OCP), where classes should be open for extension but closed for modification.
Why Use the Decorator Pattern?
- Flexibility: The Decorator Pattern provides more flexibility than inheritance. Instead of creating many subclasses for every combination of features, we use a combination of decorators.
- Open/Closed Principle: The core component class (like Cake, Notification and PaymentProcessor) remains unchanged. We can add new features (decorators) without altering existing code, making the system open for extension but closed for modification.
- Single Responsibility: Each decorator has a single responsibility: to add specific behavior to the object it wraps.
When to Use the Decorator Pattern?
- When you want to add behavior to objects dynamically.
- When subclassing leads to too many classes and complicated hierarchies.
- When you want to follow the Open/Closed principle and extend an object’s functionality without modifying its original class.
Limitations of the Decorator Pattern
While the Decorator Pattern is quite powerful, it has its limitations:
- Increased Complexity: As the number of decorators increases, the system can become more complex to manage and understand, especially with multiple layers of decorators wrapping each other.
- Debugging Difficulty: With multiple decorators, it can be harder to trace the flow of execution during debugging.
Conclusion
The Decorator Design Pattern offers a versatile and dynamic approach to enhancing object behavior without the need for extensive subclassing. By allowing you to “wrap” objects with additional functionality, it promotes cleaner, more maintainable code and encourages reusability. Throughout this exploration in Kotlin, we’ve seen how this pattern can be applied to real-world scenarios, making it easier to adapt and extend our applications as requirements evolve. Whether you’re adding features to a simple object or constructing complex systems, the Decorator Pattern provides a powerful tool in your design toolkit. Embrace the flexibility it offers, and you’ll find that your code can be both elegant and robust!