Dev

Mermaid

What Is Mermaid? A Complete Guide to the Text-Based Diagramming Language Developers Love

Diagrams are essential in software development. They help explain system architecture, workflows, data flow, and logic in ways plain text cannot. But traditional diagram tools can be slow, visual-only, and hard to maintain.

That’s where Mermaid plays an important role.

Mermaid is a text-based diagramming language that lets developers create diagrams using simple, readable syntax. Instead of dragging boxes and arrows, you write text. Mermaid turns that text into clean, professional diagrams automatically.

In this guide, you’ll learn what Mermaid is, how it works, why developers love it, and how to start using it with real examples.

What Is Mermaid?

Mermaid is an open-source JavaScript-based diagramming and charting tool that allows you to generate diagrams from plain text.

You describe a diagram using Mermaid syntax, and Mermaid renders it as a visual diagram.

In simple terms:

Text in → Diagram out

Mermaid is widely used by developers, technical writers, DevOps engineers, and product teams because it fits naturally into code-driven workflows.

Why Developers Prefer Mermaid

Mermaid solves many problems that traditional diagram tools create.

1. Diagrams as Code

With Mermaid, diagrams live next to your code. That means:

  • You can store diagrams in Git
  • Track changes with version control
  • Review diagrams in pull requests
  • Update diagrams as easily as text

No more outdated architecture diagrams.

2. Simple and Readable Syntax

Mermaid syntax is designed to be easy to read, even if you’ve never used it before.

Here’s a basic example:

Mermaid
graph TD
    A[User] --> B[Web App]
    B --> C[Database]

Even without knowing Mermaid, you can understand what this diagram does.

3. Works Everywhere Developers Work

Mermaid integrates with many popular tools, including:

  • Markdown files
  • GitHub
  • GitLab
  • Notion
  • Obsidian
  • VS Code
  • Documentation platforms

If you already write Markdown, you’re halfway there.

How Mermaid Works

Mermaid follows a simple process:

  1. You write Mermaid syntax
  2. The Mermaid engine parses the text
  3. The diagram is rendered visually

The source remains readable text, which makes Mermaid ideal for long-term documentation.

Common Diagram Types Supported by Mermaid

Mermaid supports a wide range of diagram types used in real-world development.

Let’s go through the most popular ones.

Flowcharts in Mermaid

Flowcharts are one of the most common uses of Mermaid.

Basic Flowchart

Mermaid
flowchart TD
    Start --> Check{Is user logged in?}
    Check -->|Yes| Dashboard
    Check -->|No| Login
  • flowchart TD means top-to-bottom layout
  • Curly braces {} define a decision
  • |Yes| and |No| label arrows

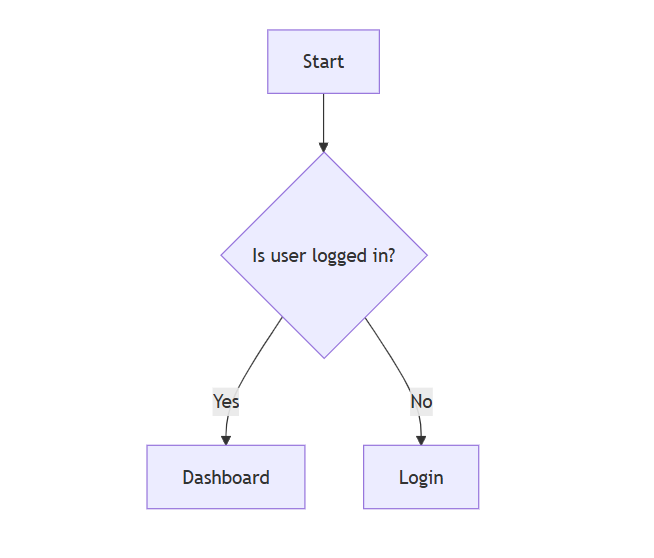
This makes Mermaid perfect for explaining logic and user flows.

Sequence Diagrams in Mermaid

Sequence diagrams show how different systems interact over time.

API Request Flow

Mermaid
sequenceDiagram
    User ->> Frontend: Clicks "Submit"
    Frontend ->> Backend: Send API request
    Backend ->> Database: Query data
    Database -->> Backend: Return result
    Backend -->> Frontend: Response
  • Arrows show communication
  • ->> is a request
  • -->> is a response

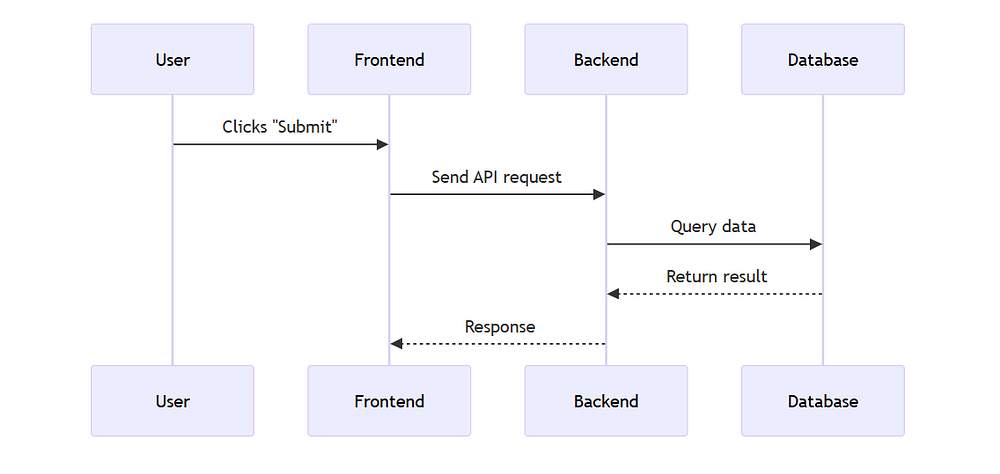
Mermaid sequence diagrams are excellent for backend and API documentation.

Class Diagrams in Mermaid

Class diagrams are useful in object-oriented design.

Simple Class Diagram

Mermaid
classDiagram
    class User {
        +String name
        +String email
        +login()
    }

    class Order {
        +int orderId
        +float total
    }

    User "1" --> "many" Order
  • Classes are defined with attributes and methods
  • Relationships are easy to read
  • Works well for system design docs

State Diagrams in Mermaid

State diagrams show how something changes over time.

Order Status

Mermaid
stateDiagram-v2
    [*] --> Pending
    Pending --> Paid
    Paid --> Shipped
    Shipped --> Delivered

This is commonly used in workflow and business logic documentation.

Gantt Charts in Mermaid

Mermaid can also create project timelines.

Gantt Chart

Mermaid
gantt
    title Project Timeline
    dateFormat YYYY-MM-DD
    section Development
    Planning :done, 2026-03-01, 5d
    Coding :active, 2026-03-06, 10d
    Testing : 2026-03-16, 5d

This is useful for lightweight planning directly inside documentation.

Where You Can Use Mermaid

Mermaid works in many real-world environments.

Popular Platforms That Support Mermaid

  • GitHub Markdown
  • GitLab README files
  • Notion
  • Obsidian
  • VS Code (with extensions)
  • Static site generators
  • Internal documentation tools

This makes Mermaid ideal for teams that value documentation quality.

Mermaid vs Traditional Diagram Tools

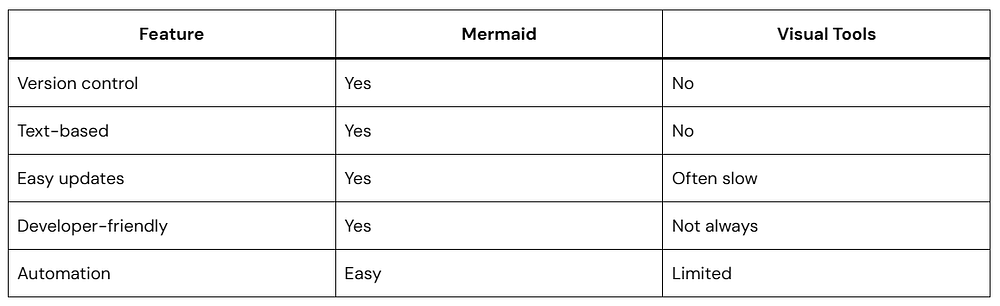
Mermaid wins when documentation needs to stay accurate and maintainable.

Best Practices for Using Mermaid

To get the most out of Mermaid, follow these tips:

  • Keep diagrams simple and focused
  • Use clear labels
  • Avoid overloading one diagram
  • Store Mermaid diagrams close to related code
  • Treat diagrams as part of the development process

Is Mermaid Hard to Learn?

Not at all.

Most developers learn Mermaid basics in under an hour. Since the syntax is readable, you can often understand diagrams without knowing Mermaid at all.

That’s one reason Mermaid adoption keeps growing.

Why Mermaid Aligns with Modern Documentation Standards

Mermaid fits naturally into modern documentation practices, including:

  • Docs-as-code workflows
  • Developer experience (DX)
  • Agile and DevOps practices
  • AI-assisted documentation
  • Search-friendly, structured content

Because Mermaid diagrams are text-based, they integrate seamlessly with version-controlled documentation and are more accessible to AI tools than image-based diagrams. This makes them better suited for indexing, analysis, and automated summarization within modern documentation workflows.

Conclusion

Mermaid changes how developers think about diagrams.

Instead of treating diagrams as static images, Mermaid makes them living documentation. They evolve with your code, stay accurate, and remain easy to maintain.

If you care about clean documentation, team collaboration, and long-term clarity, Mermaid is worth learning.

Once you start using Mermaid, it’s hard to go back.

How to Fix Wrong Git Commits in Android Studio and Safely Remove Unwanted Remote Commits

How to Fix Wrong Git Commits in Android Studio and Safely Remove Unwanted Remote Commits

If you’ve ever opened GitHub and noticed the wrong name on your commits — or spotted a commit on your main branch that never should’ve been there. These are some of the most common (and stressful) Git problems developers run into, especially when working in teams or switching between multiple accounts.

The good news is this: Git gives you the tools to fix both issues cleanly. The bad news? Using the wrong command can make things worse if you don’t understand what’s really going on.

This guide walks you through:

  • Why Android Studio shows the wrong Git user
  • How to correctly change the Git author (without breaking anything)
  • How to fix commits that are already pushed
  • When to remove commits entirely vs safely reverting them
  • Best practices to avoid these problems in the future

Everything here is based on how Git actually works under the hood — not IDE myths.

Why Android Studio Shows the Wrong Git User

Let’s clear up the most common misunderstanding first:

Android Studio does not control your Git commit author. Git does.

Android Studio is just a client. When you click “Commit,” it asks Git two questions:

  • What is the author name?
  • What is the author email?

Git answers based on its configuration files. That’s it.

So changing your GitHub account inside Android Studio affects authentication (push and pull permissions), but it does not change the commit author. That’s why this issue keeps coming back.

How Git Decides Who You Are

Git identifies authors using two values:

  • user.name
  • user.email

These can exist at two levels:

  1. Global — applies to all repositories on your machine
  2. Local (project-specific) — applies only to the current repository

Git always prefers local settings over global ones.

The Correct Way to Change Git User in Android Studio (Recommended)

If you work on multiple projects or use more than one GitHub account, this is the safest approach.

Step 1: Open the Terminal in Android Studio

Open your project, then click Terminal at the bottom.

Step 2: Set the Git user for this project only

Bash
git config user.name "Your Correct Name"<br>git config user.email "[email protected]"

Step 3: Verify

Bash
git config user.name<br>git config user.email

From this point forward, all new commits in this project will use the correct author.

Changing Git User Globally (Use With Caution)

If every repository on your machine is using the wrong user, update the global config:

Bash
git config --global user.name "Your Name"<br>git config --global user.email "[email protected]"

Verify with:

Bash
git config --global --lista

This affects all Git repositories on your system.

Why Switching GitHub Accounts Doesn’t Fix Commit Names

Android Studio’s GitHub settings only control:

  • Authentication
  • Push and pull permissions

They do not control commit authorship. That’s why you can push to one account while commits show another name entirely.

SSH Keys: Why Pushes Go to the Wrong Account

If you’re using SSH, GitHub identifies you by your SSH key, not your username.

Check which account your machine is using:

If GitHub responds with the wrong username, your SSH key is attached to the wrong account.

The Correct Fix

  • Generate a new SSH key
  • Add it to the correct GitHub account
  • Configure ~/.ssh/config to explicitly use that key

This ensures commits and permissions align correctly.

Why Existing Commits Don’t Update Automatically

Changing Git config only affects future commits.

Once a commit exists:

  • Its author is permanent
  • It cannot be changed unless history is rewritten

That’s intentional. Git values integrity over convenience.

How to Fix the Author of the Last Commit

If the most recent commit has the wrong author:

Bash
git commit --amend --author="Your Name <[email protected]>"<br>git push --force-with-lease

Only do this if rewriting history is acceptable.

Fixing Multiple Commits With the Wrong Author

Use interactive rebase:

Bash
git rebase -i HEAD~N

Change pick to edit for the commits you want to fix, then run:

Bash
git commit --amend --author="Your Name <[email protected]>"<br>git rebase --continue

Finish with:

Bash
git push --force-with-lease

Removing an Unwanted Commit From a Remote Repository

This is where many developers panic. The right solution depends on who else is affected.

Option 1: Hard Reset (Deletes History)

Use this only if:

  • It’s your personal branch, or
  • The commit contains sensitive data

Steps

Bash
git log --oneline<br>git reset --hard <last-good-commit><br>git push origin <branch> --force-with-lease

Everyone else must reset their local branch afterward.

Option 2: Revert (Safest for Teams)

If the branch is shared or protected, always revert.

Bash
git revert <bad-commit-hash><br>git push origin <branch>

This creates a new commit that undoes the change without rewriting history.

When to Use Reset vs Revert

SituationRecommended
Secrets pushedReset + force push
Mistake on mainRevert
Cleaning your feature branchReset
Team already pulledRevert

Removing Multiple Commits Cleanly (Interactive Rebase)

For mixed good and bad commits:

Bash
git rebase -i HEAD~5

Change pick to drop for unwanted commits, then:

Bash
git push --force-with-lease

Always create a backup branch first:

git branch backup-before-cleanup

Common Mistakes to Avoid

  • Force-pushing without warning your team
  • Using --force instead of --force-with-lease
  • Rewriting history on protected branches
  • Forgetting to back up before rebasing

If something goes wrong, git reflog can usually save you.

Best Practices to Prevent These Issues

  • Always verify Git user before starting a project
  • Prefer project-level Git config
  • Use separate SSH keys for different accounts
  • Protect main branches with PR rules
  • Never force-push without coordination
  • Keep commit emails matching your GitHub account

Conclusion

Android Studio often gets blamed for Git problems it doesn’t actually control. Once you understand that Git owns identity and history, everything becomes easier to reason about — and fix.

By setting the correct Git user, managing SSH keys properly, and choosing the right strategy for removing commits, you can keep your repositories clean without disrupting your team.

If you treat Git history with intention instead of panic, it becomes a powerful tool instead of a constant source of stress.

Adding Images to GitHub Gists

Adding Images to GitHub Gists: What Works, What Doesn’t, and Why

GitHub Gists are great for sharing small pieces of code, configuration files, or quick notes. They’re fast, lightweight, and easy to link.

But many developers hit the same question sooner or later:

How do we add images to GitHub Gists?

If you’ve tried uploading an image directly or embedding one like you would on GitHub README files, you’ve probably noticed it’s not straightforward.

In this guide, we’ll walk through adding Images to GitHub Gists in detail. You’ll learn what works, what doesn’t, and why GitHub behaves the way it does. We’ll also cover reliable methods with clear examples you can use right away.

Why Adding Images to GitHub Gists Is Confusing

GitHub Gists look similar to repositories, but they’re not the same thing.

A few key differences matter here:

  • Gists are designed for small, single-purpose snippets
  • They don’t have a full file browser like repos
  • They don’t support direct image uploads through the UI

Because of this, adding Images to GitHub Gists require a different approach.

Can We Upload Images Directly to a GitHub Gist?

Short answer: No.

GitHub Gists do not support direct image uploads the way repositories do.

You can:

  • Paste text files
  • Add Markdown
  • Add code files

But you cannot:

  • Upload PNG, JPG, or GIF files directly
  • Drag and drop images into a Gist

That’s not a bug. It’s a design choice.

The Correct Way to Add Images to GitHub Gists

Even though you can’t upload images directly, you can display images in a Gist using external image hosting.

The idea is simple:

  1. Host the image somewhere else
  2. Embed it using Markdown

Let’s go through the working methods.

Method 1: Using GitHub Repository Images (Most Reliable)

This is the best and most stable way to add Images to GitHub Gists.

Step 1: Upload the Image to a GitHub Repository

Create a repository or use an existing one, then upload your image:

Markdown
my-repo/
└── images/
    └── img1.png

Once uploaded, click the image and copy the raw URL.

It will look like this:

Markdown
https://raw.githubusercontent.com/username/repo/main/images/img1.png
Step 2: Embed the Image in Your Gist

Use standard Markdown syntax inside your Gist:

Markdown
![Example Image1](https://raw.githubusercontent.com/username/repo/main/images/img1.png)
  • ! tells Markdown this is an image
  • Example Image1 is the alt text (important for accessibility and SEO)
  • The URL points to the raw image file

This method works consistently and is trusted by GitHub.

Method 2: Using GitHub Issues or Comments as Image Hosts

This method is popular but less controlled.

How It Works
  1. Open any GitHub issue or discussion
  2. Drag and drop your image into the comment box
  3. GitHub uploads the image and generates a CDN URL

The URL will look like this:

Markdown
https://user-images.githubusercontent.com/12345678/img2.png
Embed It in Your Gist
Markdown
![Screenshot](https://user-images.githubusercontent.com/12345678/img2.png)
Pros and Cons

Pros

  • Quick and easy
  • No extra repo needed

Cons

  • Image ownership is unclear
  • Harder to manage long-term
  • Not ideal for documentation that must last

For short-lived examples, this approach works. For professional use, prefer repositories.

Method 3: Using External Image Hosting Services

You can also use services like:

  • Imgur
  • Cloudinary
  • Your own server
Markdown
![Flow Diagram](https://example-cdn.com/images/flow.png)

Important Notes

  • Make sure the image URL is public
  • Avoid services that block hotlinking
  • Prefer HTTPS for security

This method works, but reliability depends on the host.

What Does NOT Work (Common Mistakes)

Understanding what doesn’t work is just as important.

1. Relative Paths

This will not work in Gists:

Markdown
![Image](./image.png)

Why?
Because Gists don’t have a file system like repositories.

2. HTML <img> Tags with Local Files

This also fails:

Markdown
<img src="image.png" />

The browser has no idea where image.png lives.

3. Dragging Images into Gists

You can drag images into GitHub issues, but not into Gists.

If you try, nothing happens.

Why GitHub Designed Gists This Way

GitHub Gists are meant to be:

  • Lightweight
  • Fast
  • Focused on code

Allowing image uploads would:

  • Increase storage costs
  • Complicate versioning
  • Move Gists away from their core purpose

That’s why adding Images to GitHub Gists rely on external hosting.

Best Practices for Adding Images to GitHub Gists

To keep your Gists clean and professional, follow these tips:

Use Descriptive Alt Text

Instead of:

Markdown
![img](url)

Use:

Markdown
![API response structure diagram](url)

This improves:

  • Accessibility
  • Search visibility
  • AI answer extraction

Keep Images Small and Relevant

Large images slow down loading and distract from the code.

Ask yourself:

  • Does this image explain something better than text?
  • Is it necessary?

If yes, include it. If not, skip it.

Version Your Images

If your image changes over time:

  • Store it in a repo
  • Update filenames or folders

This avoids broken references in old Gists.

Conclusion

Adding Images to GitHub Gists isn’t hard once you understand the rules.

You can’t upload images directly, but you can embed them reliably using external URLs. GitHub repositories are the safest option, while issue uploads and external hosts work in specific cases.

Use images sparingly, explain them clearly, and your Gists will be far more useful than plain code alone.

git bisect

How Git Bisect Pinpoints the Problem: Debugging Like a Pro

Debugging can be frustrating, especially when a bug appears in a large codebase and you have no idea when it was introduced. Instead of manually sifting through commits, Git Bisect can help you track down the exact commit that introduced the bug efficiently. In this blog, we’ll explore how Git Bisect works, walk through a practical example, and provide useful tips to make debugging smoother.

What is Git Bisect?

It is a built-in Git tool that helps you perform a binary search through your commit history to find the exact commit that introduced a bug. Instead of checking each commit one by one, it narrows down the search range quickly by repeatedly dividing the history in half.

This makes Git Bisect extremely powerful, especially in large repositories where manually checking each commit would be time-consuming.

How Does It Work?

The process is simple:

  1. You start a bisect session.
  2. Mark a known good commit where the bug is absent.
  3. Mark a bad commit where the bug is present.
  4. Git automatically checks out a commit between those two.
  5. You test the code at that commit and mark it as either “good” or “bad.”
  6. Git continues this process, narrowing the search until it finds the exact problematic commit.

This approach significantly reduces the number of commits you need to check manually.

Step-by-Step Guide to Using It

Imagine you’re working on a project and notice a feature is broken, but you’re not sure when the bug was introduced.

1. Start the Git Bisect Session

Bash
$ git bisect start

This command initiates a Git Bisect session, putting Git in bisect mode.

2. Mark a “Good” and “Bad” Commit

You need to tell Git where the bug exists and where it doesn’t.

  • Identify a commit where the bug exists and mark it as bad:
Bash
$ git bisect bad
  • Find a commit where the bug didn’t exist and mark it as good:
Bash
$ git bisect good <commit-hash>

Git will now start checking commits between these two points.

3. Git Picks a Commit for You to Test

Git automatically checks out a commit in the middle of the range. Now, test your code to see if the bug is present.

  • If the bug is present, mark it as bad:
Bash
$ git bisect bad
  • If the bug is not present, mark it as good:
Bash
$ git bisect good

Each time you mark a commit as good or bad, Git Bisect picks another commit in between to test.

4. Repeat Until the Problematic Commit is Found

Git will continue selecting commits until it pinpoints the exact commit that introduced the bug. Once identified, Git will display the commit hash and message of the problematic commit.

Bash
// something like this

<commit-hash> is the first bad commit  

5. End the Bisect Session

Once you’ve found the bad commit, exit bisect mode:

Bash
$ git bisect reset

This restores your repository to its original state before the bisect process.

Automating with a Script

If testing the bug manually is tedious, you can automate the process using a script. Here’s how:

$ git bisect start
$ git bisect bad
$ git bisect good <commit-hash>
$ git bisect run ./test-script.sh

Replace ./test-script.sh with your actual test script that returns 0 for good commits and 1 for bad commits. Git Bisect will run the script automatically and stop when the bad commit is found.

Best Practices

  • Choose accurate good/bad commits: Ensure your “good” commit is actually bug-free to avoid misleading results.
  • Use automation when possible: Automating the testing process speeds up bisecting significantly.
  • Document findings: Keep notes on what you find to avoid redoing the process later.
  • Reset after bisecting: Always run git bisect reset to return to the original branch.

Why Use Git Bisect?

  • Saves time: Finds the problematic commit quickly using a binary search.
  • Works with any Git project: No additional tools or setup required.
  • Automatable: Can integrate with test scripts to remove manual testing effort.
  • Accurate: Pinpoints the exact commit that introduced a bug, reducing debugging guesswork.

Conclusion

Git Bisect is an essential tool for any developer who wants to debug efficiently. By leveraging binary search, it drastically cuts down the time spent hunting for a bug in large codebases. Whether you’re using it manually or automating the process, it’s a powerful addition to your Git workflow.

Next time you’re stuck debugging a mysterious issue, give Git Bisect a try — it’ll make you look like a pro..!

Git Interview Questions and Answers

Mastering Git: The Most Common Git Interview Questions and Answers

Git is one of the most widely used version control systems, and knowing how to use it efficiently is essential for developers. If you’re preparing for a job interview, expect Git-related questions to come up, whether you’re a beginner or an experienced professional. In this detailed guide, we’ll explore the most commonly asked Git interview questions along with in-depth explanations and accurate answers.

Introduction to Git

What is Git?

Git is a distributed version control system (DVCS) that allows multiple developers to collaborate on a project by tracking changes in files. Unlike traditional version control systems, Git enables decentralized development, making it possible to work offline and merge changes seamlessly.

What is the Difference Between Git and GitHub?

Many beginners confuse Git with GitHub, but they serve different purposes:

  • Git: A version control system that runs locally on a developer’s computer.
  • GitHub: A cloud-based hosting platform that allows developers to store, share, and collaborate on Git repositories.

Git Basics

How to Check the Status of a Git Repository?

To check the status of files in your repository, use:

Bash
git status


// Note - Selected File format is Bash, not ideal but it's ok 

This command provides information on modified, staged, and untracked files.

How to Initialize a New Git Repository?

To create a new Git repository in a project directory, use:

Bash
git init

This creates a .git directory where Git stores version control information.

How to Clone a Remote Repository?

To copy a remote repository to your local machine, use:

Bash
git clone <repository-url>

This command downloads the entire repository and history.

Branching and Merging

How to Create and Switch to a New Branch?

To create a new branch and switch to it, use:

Bash
git checkout -b <branch-name>

Alternatively, you can create and switch separately:

Bash
git branch <branch-name>
 git checkout <branch-name>

How to Merge Branches?

Switch to the branch you want to merge changes into, then run:

Bash
git commit -m "Descriptive commit message"

If there are conflicts, Git will prompt you to resolve them before completing the merge.

What is a Merge Conflict and How to Resolve It?

A merge conflict occurs when two branches modify the same part of a file differently. To resolve:

  1. Open the conflicted file.
  2. Manually edit the conflicting sections.
  3. Run:
Bash
git add <file> git commit -m "Resolved merge conflict"

Committing Changes

How to Add Files to the Staging Area?

To stage specific files:

Bash
git add <file-name>

To stage all changes:

Bash
git add .

How to Commit Changes?

To save staged changes:

Bash
git commit -m "Descriptive commit message"

How to Undo the Last Commit?

  • Keep changes but remove commit:
Bash
git reset --soft HEAD~1
  • Remove commit and changes:
Bash
git reset --hard HEAD~1

Remote Collaboration

How to Push Changes to a Remote Repository?

Bash
git push origin <branch-name>

How to Pull the Latest Changes from a Remote Repository?

Bash
git pull origin <branch-name>

How to Create a Pull Request?

  1. Push changes to GitHub:
Bash
git push origin <branch-name>
  1. Go to GitHub, open the repository, and click “New Pull Request.”
  2. Select branches and submit the PR.

How to Delete a Branch?

  • Delete a local branch:
Bash
git branch -d <branch-name>
  • Delete a remote branch:
Bash
git push origin --delete <branch-name>

Advanced Git

Difference Between git merge and git rebase

  • git merge: Combines two branches and keeps the commit history.
  • git rebase: Moves commits from one branch on top of another, creating a linear history.

How to Stash Changes in Git?

To temporarily save changes without committing:

Bash
git stash

To reapply stashed changes:

Bash
git stash apply

To remove a stash:

Bash
git stash drop

How to Revert a Commit Without Deleting History?

Bash
git revert <commit-hash>

This creates a new commit that undoes the previous changes.

How to View Commit History?

Bash
git log

Bonus

What is .gitignore?

.gitignore file specifies files and directories that should be ignored by Git. 

Bash
node_modules/
*.log
.env

What is git cherry-pick?

This command applies a specific commit from one branch to another:

Bash
git cherry-pick <commit-hash>

What is git bisect?

A tool to find a commit that introduced a bug:

Bash
git bisect start
 git bisect bad
 git bisect good <commit-hash>

How to Change the Last Commit Message?

Bash
git commit --amend -m "New commit message"

What is git reflog Used For?

Tracks all changes in HEAD, even undone ones:

Bash
git reflog

Conclusion

Mastering Git is essential for every developer. Whether you’re preparing for an interview or improving your workflow, understanding Git commands and best practices will make you a more efficient and reliable team member. The best way to solidify your Git knowledge is through hands-on practice, so try these commands in a real repository to gain confidence..!

By following this guide, you’ll be well-prepared to answer Git interview questions and showcase your version control expertise.

After Reinstalling Git

Troubleshooting Git Issues After Reinstalling Git on Windows: Ultimate Guide Step-by-Step

If you’ve been working on a project and decided to uninstall and later reinstall Git on your Windows machine(There are many reasons; mostly, we do it due to corrupted installations, upgrade issues, configuration errors, switching installation methods, or problems with path/environment variables), you might encounter some unexpected issues when trying to push or pull from your repository. These problems can include Git detecting many modified or new files, or even Git configurations being reset. Here, I will walk you through the steps to troubleshoot and resolve these problems, ensuring that your Git setup works smoothly again.

Why Problems Arise After Reinstalling Git

Uninstalling Git does not affect your existing project repositories since Git stores repository information inside each project’s .git folder. However, after reinstalling, certain configurations and settings might be different from what you had before. Here are some common reasons for issues:

  1. Line Ending Differences: Git’s line-ending conversion settings may have changed, causing Git to detect file modifications.
  2. Missing or Reset Configuration: Global Git configurations, such as username, email, or credential helper settings, might be missing or reset.
  3. Ignored Files: Files that were previously ignored may now appear as untracked if .gitignore was altered or its behavior changed.
  4. Stale Credentials: Git might require you to re-enter your authentication details if you are using HTTPS or SSH credentials.

Let’s dive into how to resolve each of these.

Step 1: Verify Git Installation

After reinstalling Git, you should first verify whether it is installed correctly.

Run the following command in your terminal:

Bash
git --version

This should display the current version of Git. If it returns a version number, then Git is properly installed.

Step 2: Check Your Global Git Configurations

You may need to reconfigure Git’s global settings, like your username and email. These are required when you commit to any Git repository. Check your current global Git configurations:

Bash
git config --global --list

If you don’t see your user.name or user.email, you can set them like this:

Bash
git config --global user.name "Your userName"
git config --global user.email "[email protected]"

These settings are essential for Git to know who is making the commits.

Step 3: Line Ending Issues (CRLF vs. LF)

One of the most common issues after reinstalling Git is a change in how line endings are handled. Windows uses CRLF (Carriage Return and Line Feed) for new lines, while Linux and macOS use LF (Line Feed). If your project collaborates across different operating systems, Git’s line-ending conversion setting (core.autocrlf) may cause many files to appear modified after reinstalling Git.

Check Your Line Ending Settings:

To check your current line-ending conversion setting, run:

Bash
git config --global core.autocrlf

This will return one of the following values:

  • true: Git converts LF to CRLF when checking out code on Windows.
  • false: Git does not change line endings.
  • input: Git converts CRLF to LF when committing.

Set the Appropriate Line Ending Setting:

If you’re working on Windows and want to ensure consistency, it’s usually best to set core.autocrlf to true:

Bash
git config --global core.autocrlf true

Or, if you’re working on a cross-platform project, you can set it to input to avoid modifying line endings on commits:

Bash
git config --global core.autocrlf input

Once you’ve set this, reset the changes detected in your working directory:

Bash
git reset --hard

This will reset any uncommitted changes, reverting your files to the state of the last commit.

Step 4: Handling Modified and New Files

After reinstalling Git, you might see many modified or new files when you run git status, even if you didn’t actually change these files. This often happens due to changes in .gitignore or configurations.

Check .gitignore:

Ensure your .gitignore file is correctly configured. Git might now be tracking files that should be ignored. Open the .gitignore file in the root of your project directory and check whether all unwanted files or directories (e.g., logs, build files) are listed.

Run Git Check-Ignore:

To see which files should be ignored, you can use:

Bash
git check-ignore *

This command will output the files that Git is ignoring. If something is missing from .gitignore, add it and then run:

Bash
git add .gitignore
git commit -m "Updated .gitignore"

Step 5: Recommit or Discard Local Changes

If the changes detected by Git are legitimate, you can either commit them or discard them if they aren’t necessary.

If You Want to Keep the Changes:

If you believe the changes are valid and need to be saved, you can stage and commit them:

Bash
git add .
git commit -m "Commit changes after reinstalling Git"
git push origin master (or any current feature branch)

This will save the changes and push them to the remote repository.

If You Want to Discard the Changes:

If the changes are unwanted or were caused by line-ending issues, you can discard them using:

Bash
git reset --hard

This will reset your local files to the last committed state, removing any uncommitted modifications.

Note – Even after resetting, Git is showing “untracked files” because git reset --hard only affects tracked files, not untracked files. Untracked files are new files that haven’t been staged or committed to the repository yet. These files remain even after a hard reset.

Why git reset --hard Leaves Untracked Files

The git reset --hard command only resets tracked files (files that are already part of the repository and have been committed). It doesn’t touch untracked files, which are new files Git hasn’t started tracking yet. If you want to make your repository completely clean (removing all untracked files as well), you’ll need to take an additional step.

Removing Untracked Files to Clean the Repository

To make the repository completely clean, you need to remove all untracked files. Here’s how you can do that:

Option 1: Use git clean

git clean is used to remove untracked files. Be very cautious when using this command, as it will delete files that are not part of the repository.

First, check what will be removed (dry run):

Bash
git clean -n

If you’re sure you want to remove those files, run:

Bash
git clean -f

This removes all untracked files. If you also want to remove untracked directories, run:

Bash
git clean -fd
Option 2: Discard Only Specific Untracked Files

If there are specific untracked files you want to remove, you can manually delete them, or you can use:

Bash
git rm --cached <file>

This will remove only the selected untracked file from the staging area.

Full Command to Clean the Repository

To fully clean your repository, including resetting all changes and removing untracked files, follow these commands:

Reset tracked files to the last commit:
Bash
git reset --hard
Clean untracked files:
Bash
git clean -fd

Now, when you run git status, it should say that there’s nothing to commit, and no untracked files should be listed. Your repository will be in a clean state, just like when you cloned it or after a fresh commit.

Step 6: Reconfigure Credentials (If Necessary)

If you used HTTPS or SSH for Git authentication, you might need to re-enter your credentials after reinstalling Git. To avoid entering your username and password every time you push or pull, you can configure Git’s credential helper.

For HTTPS Authentication:

Bash
git config --global credential.helper wincred

This stores your credentials securely using the Windows Credential Manager.

For SSH Authentication:

Make sure your SSH key is correctly added. Run:

Bash
ssh-add -l

If no SSH keys are listed, you’ll need to re-add them using:

Bash
ssh-add ~/.ssh/id_rsa

The command ssh-add ~/.ssh/id_rsa is used to add a private SSH key to the SSH authentication agent (ssh-agent). Here’s a breakdown:

  • ssh-add: A command that adds private SSH keys to ssh-agent, which manages your private keys and stores them securely in memory.
  • ~/.ssh/id_rsa: This is the path to your private SSH key (in this case, the default file id_rsa stored in the ~/.ssh directory). The ~ represents the home directory of the current user.

By running this command, you’re telling ssh-agent to hold the private key in memory, allowing you to authenticate with SSH servers without needing to enter your passphrase for each connection.

Note – If your SSH key was reset, you may need to regenerate it and add it to your Git hosting service (GitHub, Bitbucket, etc.).

Conclusion

Reinstalling Git on your Windows machine can sometimes lead to unexpected behavior in your repositories, such as detecting modified files, resetting configurations, or needing to reconfigure credentials. By following the steps outlined above, you can troubleshoot and resolve these issues to get Git working smoothly again.

Remember to verify your Git installation, check your global configuration, review line-ending settings, and ensure that ignored files are still ignored. In most cases, resetting line-ending settings and recommitting or discarding changes will solve the issue.

By taking these steps, you can confidently continue working with Git after reinstalling it on your machine, without losing any data or productivity.

Happy committing..!

CASA & ADA

Cloud Application Security Assessment (CASA) and App Defense Alliance (ADA): A Comprehensive Overview

As the adoption of cloud technologies continues to rise, organizations are increasingly reliant on cloud-based applications to drive business operations and deliver services. However, with this reliance comes the imperative need to secure these applications against a myriad of cyber threats. Two critical initiatives have emerged to address these challenges: Cloud Application Security Assessment (CASA) and the App Defense Alliance (ADA). In this article, we will delve into the objectives, methodologies, and impacts of CASA and ADA on the cloud security landscape.

Before understanding CASA, let’s first understand what ADA?

What is ADA(App Defence Alliance)

Launched by Google in 2019, the App Defense Alliance was established to ensure the safety of the Google Play Store and the Android app ecosystem by focusing on malware detection and prevention. With a growing emphasis on app security standards, the Alliance expanded its scope in 2022 and is now the home for several industry-led collaborations including Malware Mitigation, and App Security Assessments for both mobile and cloud applications.

How ADA Works

The ADA operates through a combination of automated and manual processes:

  • Automated Scanning: Partner companies use advanced machine learning models and behavioral analysis to scan apps for malicious behaviors, vulnerabilities, and compliance issues.
  • Human Expertise: Security researchers and analysts review flagged apps, conduct deeper inspections, and provide insights into emerging threats.
  • Developer Collaboration: ADA partners work closely with app developers to remediate issues, providing guidance on secure coding practices and threat mitigation.
  • Google Play Protect Integration: ADA findings are integrated into Google Play Protect, Google’s built-in malware protection for Android devices, further enhancing app security for users.

Now, let’s understand CASA and its benefits

What is CASA

Cloud Application Security Assessment (CASA) is a process or set of procedures designed to evaluate the security posture of cloud-based applications. With the increasing adoption of cloud computing, many organizations are migrating their applications to cloud platforms. However, this migration brings forth security challenges as well. CASA helps in identifying vulnerabilities, misconfigurations, and potential threats within cloud-based applications.

The assessment typically involves examining various aspects of cloud applications, such as:

  1. Authentication and Authorization: Reviewing how user identities are managed and how access to resources within the application is controlled.
  2. Data Encryption: Evaluating how data is encrypted both in transit and at rest within the cloud environment.
  3. Network Security: Assessing the network architecture and configurations to ensure secure communication between components of the application.
  4. Compliance: Ensuring that the cloud application adheres to relevant regulatory requirements and industry standards.
  5. Data Protection: Assessing mechanisms in place to protect sensitive data from unauthorized access or leakage.
  6. Logging and Monitoring: Reviewing logging and monitoring practices to detect and respond to security incidents effectively.
  7. Third-Party Dependencies: Assessing the security of third-party services or libraries used within the cloud application.

CASA is crucial for organizations to identify and remediate security vulnerabilities before they can be exploited by attackers. It helps in ensuring the confidentiality, integrity, and availability of data and resources within cloud-based applications. Additionally, CASA can be part of a broader cloud security strategy aimed at mitigating risks associated with cloud adoption.

Benefits of CASA

  • Risk Mitigation: By identifying and addressing vulnerabilities, CASA helps organizations mitigate the risk of security breaches, data loss, and unauthorized access.
  • Enhanced Compliance: CASA ensures that cloud applications adhere to industry regulations and standards, reducing the likelihood of legal penalties and enhancing trust with customers.
  • Improved Incident Response: Through continuous monitoring and logging, CASA enhances an organization’s ability to detect and respond to security incidents swiftly, minimizing the impact of potential breaches.
  • Increased Resilience: CASA contributes to the overall resilience of cloud applications, ensuring they can withstand attacks and continue to operate securely even in the face of evolving threats.

Security Assessment

To maintain the security of Google user’s data, apps that request access to restricted scopes need to undergo an annual security assessment. This assessment verifies that the app can securely handle data and delete user data upon request. Upon successfully passing the security assessment, the app will be awarded a “Letter of validation” (LOV) from the security assessor, indicating its ability to handle data securely.

To improve and standardize our security assessment process, we implemented the App Defense Alliance and the Cloud App Security Assessment framework (CASA).

Key features of the security assessment framework:

  • Standardized requirements based on the OWASP’s app Security Verification Standard (ASVS) allowing more automated testing and faster remediation.
  • Tiering: CASA adapted a risk-based, multi-tier assessment approach to evaluate app risk based on users count, scopes accessed, and other app specific items. Each project will fall under a specific tier.
  • Accelerator: The CASA accelerator is a tool that minimizes the checks you have to complete based on the certifications you have already passed.
  • Annual Recertification: All apps must be revalidated every year. The app tier can increase to a higher tier for the following year than what it was the previous year. Once an app has been validated at tier 3 it will continue to be validated at tier 3 level at each following year. 

When should I do a security assessment?

Security assessment of an app is the final step of the restricted scopes review process. Before initiating a security assessment of your app, it is important to complete all other verification requirements. If your app is requesting access to restricted scopes, the Google Trust and Safety team will reach out to you when it’s time to start the security assessment process.

What is OWASP

OWASP stands for the Open Web Application Security Project. It is a nonprofit organization dedicated to improving the security of software. OWASP achieves its mission through community-led initiatives that include open-source projects, documentation, tools, and educational resources. The primary focus of OWASP is on web application security, although its principles and guidelines are often applicable to other types of software as well.

Some key aspects of OWASP include:

  1. Top Ten: OWASP publishes the OWASP Top Ten, a list of the most critical web application security risks. This list is updated regularly to reflect emerging threats and trends in the cybersecurity landscape.
  2. Guidelines and Best Practices: OWASP provides comprehensive guides, cheat sheets, and best practices for developers, security professionals, and organizations to build and maintain secure software.
  3. Tools and Projects: OWASP sponsors and supports numerous open-source projects and tools aimed at improving security practices, testing for vulnerabilities, and educating developers and security practitioners.
  4. Community Engagement: OWASP fosters a vibrant community of cybersecurity professionals, developers, researchers, and enthusiasts who collaborate on various initiatives, share knowledge, and contribute to the advancement of web application security.
  5. Conferences and Events: OWASP organizes conferences, seminars, and workshops around the world to promote awareness of web application security issues and facilitate networking and learning opportunities for its members.

Overall, OWASP plays a crucial role in raising awareness about web application security and equipping organizations and individuals with the knowledge and resources needed to build more secure software.

What is ASVS

ASVS stands for the Application Security Verification Standard. It is a set of guidelines and requirements developed by the Open Web Application Security Project (OWASP) to establish a baseline of security requirements for web applications. The ASVS provides a framework for testing the security controls and defenses implemented in web applications, helping organizations ensure that their applications are adequately protected against common security threats and vulnerabilities.

The ASVS is structured into three levels of verification:

  1. Level 1: This level consists of a set of core security requirements that all web applications should meet to provide a basic level of security. These requirements address fundamental security principles such as authentication, session management, access control, and data validation.
  2. Level 2: Level 2 includes additional security requirements that are relevant for most web applications but may not be essential for all applications. These requirements cover areas such as cryptography, error handling, logging, and security configuration.
  3. Level 3: This level contains advanced security requirements that are applicable to web applications with higher security needs or those handling sensitive data. These requirements address topics such as business logic flaws, secure communication, secure coding practices, and secure deployment.

The ASVS is used by organizations, security professionals, and developers to assess the security posture of web applications, identify potential vulnerabilities, and establish security requirements for development and testing. It provides a standardized approach to web application security verification, enabling consistency and comparability across different applications and environments. Additionally, the ASVS is regularly updated to reflect emerging threats, changes in technology, and best practices in web application security.

What is CWEs

CWE stands for Common Weakness Enumeration. It is a community-developed list of software and hardware weakness types that can serve as a common language for describing software security weaknesses in a structured manner. CWE is maintained by the MITRE Corporation with the support of the US Department of Homeland Security’s National Cyber Security Division.

CWE provides a standardized way to identify, describe, and categorize common vulnerabilities and weaknesses in software and hardware systems. Each weakness type in CWE is assigned a unique identifier and is described in terms of its characteristics, potential consequences, and mitigations.

Some examples of weaknesses covered by CWE include:

  1. Buffer Overflow
  2. SQL Injection
  3. Cross-Site Scripting (XSS)
  4. Insecure Direct Object References
  5. Insufficient Authentication
  6. Use of Hard-Coded Credentials
  7. Improper Input Validation
  8. Insecure Cryptographic Storage

By using CWE, security professionals, developers, and organizations can better understand the nature of vulnerabilities and weaknesses in software systems, prioritize security efforts, and develop more secure software. Additionally, CWE provides a foundation for various security-related activities such as vulnerability assessment, penetration testing, secure coding practices, and security training.

The Intersection of CASA and ADA

Both CASA and ADA play pivotal roles in securing applications, albeit in different contexts. CASA is more focused on comprehensive assessments of cloud applications, while ADA targets the mobile app ecosystem. However, there is an intersection where both initiatives complement each other:

  • Shared Objectives: Both CASA and ADA aim to identify and mitigate vulnerabilities before they can be exploited by attackers.
  • Collaborative Approach: CASA and ADA emphasize collaboration—CASA between security teams and cloud service providers, and ADA between Google and cybersecurity firms.
  • Holistic Security: Organizations can leverage CASA to secure their cloud applications while ensuring their mobile counterparts are safeguarded by ADA’s protections.

Conclusion

As cloud and mobile technologies continue to evolve, the need for robust security frameworks like CASA and initiatives like ADA becomes ever more critical. CASA provides a comprehensive approach to securing cloud-based applications, addressing a wide range of security concerns from architecture to compliance. On the other hand, ADA focuses on protecting the mobile app ecosystem, particularly within the Google Play Store, by detecting and mitigating malicious apps before they reach users.

Together, these initiatives form a crucial part of the broader cybersecurity landscape, ensuring that both cloud-based and mobile applications remain secure in an increasingly interconnected digital world. As threats continue to evolve, ongoing innovation and collaboration in initiatives like CASA and ADA will be essential in maintaining the security and integrity of applications that billions of people rely on every day.

Identity Providers

Understanding Identity Providers (IDPs): The Backbone of Secure Digital Authentication

In today’s digital age, ensuring secure and seamless access to online services is more critical than ever. Identity Providers (IDPs) play a pivotal role in this process by managing user identities and facilitating authentication across multiple platforms. This blog delves into the intricacies of IDPs, exploring their functionalities, benefits, and importance in the modern digital ecosystem.

What is an Identity Provider (IDP)?

An Identity Provider (IDP) is a system or service that creates, manages, and verifies user identities for authentication and authorization purposes. IDPs are integral to Single Sign-On (SSO) systems, enabling users to log in once and gain access to multiple services without needing to re-enter credentials.

Key Functions of an IDP

Authentication: IDPs validate that users are who they claim to be, typically through username and password verification, multi-factor authentication (MFA), biometrics, or other authentication methods.

Authorization: Once authenticated, IDPs determine what resources and services the user is permitted to access based on predefined roles and permissions.

User Management: IDPs handle the creation, updating, and deletion of user accounts, ensuring that user information is accurate and up-to-date.

Federation: IDPs enable identity federation, allowing users to use a single identity across multiple domains and services, often through protocols like SAML (Security Assertion Markup Language) or OAuth.

How IDPs Work

The operation of an IDP can be broken down into several key steps:

  1. User Request: A user attempts to access a service or application.
  2. Redirection: The application redirects the user to the IDP for authentication.
  3. Authentication: The IDP prompts the user for credentials or another form of authentication.
  4. Validation: The IDP validates the credentials and, if successful, generates an authentication token.
  5. Token Exchange: The IDP sends the authentication token back to the application.
  6. Access Granted: The application verifies the token and grants the user access.

Benefits of Using an IDP

Improved Security: By centralizing authentication, IDPs reduce the risk of password-related breaches and support advanced security measures like MFA.

User Convenience: Users benefit from SSO, which minimizes the need to remember multiple passwords and simplifies the login process.

Cost Efficiency: Organizations can reduce costs associated with managing multiple authentication systems and streamline IT support.

Scalability: IDPs can easily scale to accommodate growing user bases and integrate with new services.

Regulatory Compliance: IDPs help organizations comply with data protection regulations by ensuring secure and consistent user authentication practices.

Popular Identity Providers

Several well-known IDPs dominate the market, each offering unique features and capabilities:

  1. Auth0: Known for its developer-friendly platform and extensive customization options.
  2. Okta: Popular for its robust SSO capabilities and comprehensive identity management solutions.
  3. Microsoft Azure AD: Widely used in enterprise environments, offering seamless integration with Microsoft services.
  4. Google Identity: Integrates well with Google Workspace and other Google services, providing a straightforward user experience.
  5. Ping Identity: Focuses on enterprise-level identity management and security.

IDP Protocols and Standards

IDPs rely on established protocols and standards to ensure secure and interoperable authentication:

  1. SAML (Security Assertion Markup Language): An XML-based standard for exchanging authentication and authorization data between parties.
  2. OAuth: An open standard for access delegation, commonly used for token-based authentication.
  3. OpenID Connect: An identity layer on top of OAuth 2.0, used for verifying user identities and obtaining basic user profile information.
  4. LDAP (Lightweight Directory Access Protocol): A protocol for accessing and maintaining distributed directory information services.

Challenges and Considerations

While IDPs offer numerous benefits, they also present certain challenges:

  1. Complexity: Implementing and managing an IDP can be complex, especially for organizations with diverse IT environments.
  2. Cost: Depending on the provider and the level of service required, costs can vary significantly.
  3. Privacy Concerns: Centralizing user identities can raise privacy concerns if not managed properly, particularly regarding data storage and access.

Future Trends in Identity Management

As digital transformation accelerates, several trends are shaping the future of identity management:

  1. Decentralized Identity: Leveraging blockchain technology to create self-sovereign identities that users control independently of any central authority.
  2. AI and Machine Learning: Enhancing security by detecting anomalous behavior and improving fraud detection.
  3. Passwordless Authentication: Moving towards more secure and user-friendly authentication methods that eliminate the need for passwords, such as biometrics and hardware tokens.
  4. Adaptive Authentication: Implementing dynamic authentication processes that adjust based on the user’s context and risk level.

Conclusion

Identity Providers are the linchpin of secure and efficient digital authentication. They offer robust solutions for managing user identities, enhancing security, and simplifying access to online services. As the digital landscape continues to evolve, IDPs will play an increasingly critical role in ensuring seamless and secure user experiences. Organizations must carefully evaluate their identity management needs and choose the right IDP to stay ahead in the ever-changing digital world.

Agile

Navigating Agile as a Developer: Enhancing Your Skills for Effective Collaboration

In a world where adaptability is the key to survival, embracing the Agile methodology has become more than just a buzzword — it’s a game-changer. Whether you’re an entrepreneur, a project manager, or a team member seeking to optimize productivity, Agile has gained significant popularity due to its iterative and flexible approach in today’s fast-paced software development landscape. Agile enables teams to respond to changing requirements, deliver high-quality software, and foster collaboration. As a developer, having a solid understanding of Agile principles and practices can greatly enhance your effectiveness in a project. In this blog post, we will explore why Agile is crucial for developers and provide insights into how you can develop the necessary skills to thrive in an Agile environment.

What is Agile?

Agile is a project management and software development approach that emphasizes flexibility, collaboration, and iterative progress. It is a response to the traditional waterfall model, which follows a linear and sequential process. The Agile methodology aims to address the challenges of rapidly changing requirements, uncertain market conditions, and the need for frequent customer feedback.

In an Agile project, the development process is divided into short iterations called sprints. Each sprint typically lasts two to four weeks and results in a potentially shippable product increment. The key principles of Agile, as outlined in the Agile Manifesto, include:

  1. Individuals and interactions over processes and tools: Agile values the importance of effective collaboration, communication, and teamwork. It prioritizes the people involved in the project over the specific tools or processes they use.
  2. Working software over comprehensive documentation: While documentation is essential, the primary focus in Agile is on delivering functioning software that adds value to the customer. Agile encourages lightweight and just-in-time documentation.
  3. Customer collaboration over contract negotiation: Agile promotes active involvement and collaboration with customers throughout the development process. This ensures that the delivered software meets their needs and expectations.
  4. Responding to change over following a plan: Agile recognizes that requirements can evolve and change over time. It encourages teams to be adaptable and responsive to change, allowing for adjustments and refinements during development.

Key Agile Concepts for Developers

To excel in an Agile environment, developers should be familiar with the following concepts:

1. User Stories: User stories capture end-user requirements and serve as the building blocks for development tasks. Understanding how to write and refine user stories will enable developers to align their work with the desired outcomes.

2. Sprint Planning: Developers participate in sprint planning sessions where they estimate the effort required for each user story. This involvement ensures accurate planning and sets realistic goals for the sprint.

3. Daily Stand-ups: Daily stand-up meetings provide an opportunity for developers to share progress, discuss challenges, and collaborate with other team members. Active participation in these meetings helps identify and address any roadblocks promptly.

4. Test-Driven Development (TDD): TDD is an Agile practice that involves writing tests before writing the corresponding code. Familiarity with TDD enables developers to create clean and maintainable code, leading to improved software quality.

Common methodologies

Agile methodologies refer to a set of iterative and collaborative approaches to project management and software development. The Agile methodology focuses on delivering high-quality products in a flexible and adaptive manner, accommodating changes, and responding to customer needs effectively. Here are some key Agile methodologies:

  1. Scrum: Scrum is one of the most widely used Agile methodologies. It involves organizing work into short iterations called “sprints” and using cross-functional teams to deliver increments of the product at the end of each sprint. Scrum emphasizes regular feedback, transparency, and adaptability.
  2. Kanban: Kanban is a visual methodology that uses a Kanban board to manage and track work. Work items are represented as cards that move across different stages of the board, indicating their progress. Kanban focuses on limiting work in progress, optimizing flow, and continuously improving the process.
  3. Lean: Lean methodology aims to maximize customer value while minimizing waste. It emphasizes the elimination of non-value-added activities, continuous improvement, and a focus on delivering value quickly. Lean principles can be applied in conjunction with other Agile methodologies.
  4. Extreme Programming (XP): Extreme Programming is software development methodology that emphasizes collaboration, customer involvement, and continuous feedback. It promotes practices such as test-driven development, continuous integration, pair programming, and frequent releases to ensure high-quality and adaptable software.
  5. Feature-Driven Development (FDD): Feature-Driven Development is methodology that focuses on delivering features incrementally. It involves breaking down the development process into five basic activities: developing an overall model, building a feature list, planning by feature, designing by feature, and building by feature. FDD places emphasis on domain modeling, iterative development, and feature-centric delivery.

These methodologies share common principles such as customer collaboration, iterative development, continuous feedback, and adaptability. They aim to improve productivity, increase customer satisfaction, and enable teams to respond effectively to changing requirements throughout the development process. The choice of the methodology depends on the specific project, team dynamics, and organizational preferences.

Ceremonies

Ceremonies refer to specific meetings or events that are held at regular intervals to facilitate effective collaboration, communication, and progress tracking within the project team. These ceremonies provide structured opportunities for the team to plan, review, and adapt their work. The most common ceremonies in methodologies like Scrum include:

  1. Sprint Planning: This ceremony marks the beginning of a sprint. The team collaboratively plans the work to be accomplished during the upcoming sprint. They review the product backlog, select user stories, estimate effort, and determine the sprint goal.
  2. Daily Stand-up (Daily Scrum): The Daily Stand-up is a short and focused meeting that occurs every day during the sprint. Team members gather to provide brief updates on their progress, discuss any obstacles or challenges they are facing, and coordinate their work for the day.
  3. Sprint Review: At the end of each sprint, the team conducts a sprint review or demo to showcase the completed work to stakeholders, such as product owners, customers, or end-users. The purpose is to gather feedback, validate the work done, and ensure it aligns with the project’s objectives.
  4. Sprint Retrospective: The Sprint Retrospective is held after the sprint review. The team reflects on the just-concluded sprint and discusses what went well, what could be improved, and any action items to enhance their process. It promotes continuous improvement and learning within the team.

In addition to these core ceremonies, there might be other Agile ceremonies or events based on specific needs or the chosen Agile framework. For example:

  1. Backlog Refinement (Grooming): This ceremony involves refining the product backlog by breaking down user stories, adding details, estimating effort, and prioritizing the work for future sprints.
  2. Release Planning: In larger-scale projects, a release planning ceremony helps teams plan and coordinate the release of a product or a significant feature. It involves setting release goals, identifying dependencies, and creating a high-level plan.
  3. Scrum of Scrums: In projects with multiple Scrum teams, the Scrum of Scrums ceremony is held to ensure coordination and alignment between teams. Representatives from each team share updates, discuss interdependencies, and address cross-team challenges.
  4. Product Roadmap Review: This ceremony involves reviewing and refining the product roadmap, which outlines the long-term vision, goals, and major milestones of the product. It helps ensure that the work aligns with the overall product strategy.

These ceremonies provide structure and opportunities for collaboration, feedback, and continuous improvement. They foster transparency, accountability, and effective communication within the team and with stakeholders, ultimately contributing to the successful delivery of valuable software.

Typical Two-Week Sprint Cycle

Here are the details of the Agile ceremonies for a typical two-week sprint cycle in the Scrum framework:

Sprint Kick-off (Time: 1–2 hours):

  • Purpose: To align the team and set the tone for the upcoming sprint.
  • Day: At the beginning of the sprint.
  • Activities: Scrum Master or Product Owner provides an overview of the sprint goals, highlights important information, clarifies any questions or concerns from the team, and discusses the sprint timeline.

Sprint Planning (Time: 2–4 hours):

  • Purpose: To define what will be worked on during the upcoming sprint.
  • Day: After the sprint kick-off.
  • Activities: Product Owner reviews and prioritizes the product backlog. Scrum team discusses and selects user stories for the sprint backlog, estimates effort, sets sprint goals, and breaks down user stories into smaller tasks (task breakdown).

Daily Stand-up (Time: 15 minutes):

  • Purpose: To synchronize and plan work for the day, identify any obstacles, and foster team collaboration.
  • Frequency: Daily (at the same time each day).
  • Activities: Each team member answers three questions — What they did yesterday, what they plan to do today, and any obstacles they’re facing. The focus is on coordination and identifying potential issues.

Backlog Refinement (Time: 1–2 hours):

  • Purpose: To review, prioritize, and refine the product backlog items for future sprints.
  • Frequency: Once or twice during the sprint.
  • Activities: Product Owner and Scrum team analyze and clarify user stories, estimate effort, break down larger stories into smaller tasks (task breakdown), and ensure the backlog is well-prepared for future sprints.

Spike (Time: As needed):

  • Purpose: To investigate and gather information about a particular technical or design challenge.
  • Timing: As needed during the sprint.
  • Activities: The Development Team conducts focused research or experimentation to gain insights or proof of concepts related to a specific problem or requirement. This helps in making informed decisions before implementation.

Sprint Review (Time: 1–2 hours):

  • Purpose: To showcase the completed work from the sprint to stakeholders and gather feedback.
  • Day: Last day of the sprint.
  • Activities: Scrum team demonstrates the increment of work completed during the sprint. Stakeholders provide feedback, discuss potential changes or adjustments, and collectively review the sprint’s achievements.

Sprint Retrospective (Time: 1–2 hours):

  • Purpose: To reflect on the previous sprint and identify opportunities for improvement in processes, teamwork, and collaboration.
  • Day: After the sprint review, before the next sprint planning.
  • Activities: Scrum team reviews what went well, what didn’t go well, and identifies action items for improvement. It encourages open discussions and fosters a culture of continuous learning.

The optional practices, such as task breakdown, spike, and product backlog refinement review, provide additional flexibility and adaptation within the two-week sprint cycle. As always, it’s essential to tailor these ceremonies and practices to the team’s specific needs and context to ensure effective collaboration and continuous improvement.

Importance of Agile for Developers:

Agile methodology offers numerous benefits for developers, including:

1. Collaboration and Communication: It emphasizes regular collaboration and communication among team members, fostering a more transparent and efficient work environment. This helps developers understand requirements more effectively and provides opportunities for timely feedback and problem-solving.

2. Adaptability and Flexibility: With this methodology, developers can easily adapt to changing requirements and market conditions. The iterative nature of Agile allows for incremental development, reducing the risk of building software that does not meet the stakeholders’ needs.

3. Quality and Continuous Improvement: Best Practices, such as continuous integration and continuous delivery, promote frequent testing and feedback loops. Developers can address issues early on, resulting in higher-quality software and improved customer satisfaction.

Strategies for Enhancing Agile Skills as a Developer:

To strengthen your Agile skills and contribute effectively to projects, consider the following strategies:

1. Seek Agile Training: Attend training programs or workshops to gain a comprehensive understanding of Agile principles and methodologies. Learning from experienced practitioners will equip you with practical knowledge and techniques.

2. Embrace Collaboration: Actively participate in team activities, such as sprint planning, retrospectives, and daily stand-ups. Engage in cross-functional discussions, share knowledge, and collaborate with team members to foster a cohesive and productive work environment.

3. Continuously Improve: Adopt a growth mindset and continually seek ways to improve your development practices. Explore Agile frameworks beyond the basic Scrum methodology, such as Kanban or Lean, to expand your knowledge and toolkit.

4. Emphasize Communication: Effective communication is vital in projects. Improve your communication skills by actively listening, asking questions, and providing concise and clear updates during meetings. Strong communication promotes shared understanding and prevents misunderstandings.

5. Embrace Feedback: Feedback is a crucial element. Embrace feedback from your peers, product owners, and end-users to refine your work continuously. Act on the feedback received and use it as an opportunity to grow and enhance your skills.

Conclusion

As a developer, understanding Agile principles and practices can greatly benefit your professional growth and contribution to software development projects. By embracing Agile methodologies, you can collaborate more effectively, adapt to changing requirements, and deliver high-quality software. By investing in your Agile knowledge and continuously improving your practices, you will thrive in the dynamic and fast-paced world of Agile development. So, take the initiative to enhance your Agile skills and contribute to the success of your projects and teams.

git

Git Revert Commit — Undo Last Commit

Git, the distributed version control system, is a powerful tool that allows developers to manage and track changes in their projects efficiently. Despite its robustness, developers sometimes find themselves needing to undo a commit, either due to a mistake, a change in requirements, or other reasons. Git provides several ways to revert changes, and one of the common methods is using the git revert command. In this blog post, we will explore how to use git revert to undo the last commit and understand its implications.

Let’s say we are working on your code in Git and something didn’t go as planned. So now we need to revert our last commit. How do we do it? Let’s find out!

There are two possible ways to undo your Git last commit

  1. revert Command — The revert command will create a commit that reverts the changes of the commit being targeted. means here git will create a new commit that contains reverted changes so that we will maintain commit history in the shared repository.
git revert <commit name to revert>

Example :

— -> commit 1 — → commit2 — → commit c1

git revert c1

— -> commit 1 — → commit2 — → commit3 — → commit reverting c1

2. reset Command — the reset command to undo your last commit. So be careful. it will change the commit history, it will move the HEAD of the working branch indicating commit and discard anything after.

we use the reset command with two options

a. The --soft option means that you will not lose the uncommitted changes you may have.

git reset --soft HEAD~1

b. If you want to reset to the last commit and also remove all unstaged changes, you can use the --hard option:

git reset --hard HEAD~1

This will undo the latest commit, but also any uncommitted changes.

When should we use reset or revert?

we should really only use reset if the commit being reset only exists locally. This command changes the commit history and it might overwrite the history that remote team members depend on.

revert instead creates a new commit that undoes the changes, so if the commit to revert has already been pushed to a shared repository, it is best to use revert as it doesn’t overwrite commit history.

Conclusion

Undoing the last commit using git revert is a safe and effective way to manage mistakes or changes in your Git project without altering the commit history. It promotes collaboration by preserving the commit history’s integrity and allows for seamless integration with subsequent changes. Understanding the implications of git revert empowers developers to make informed decisions when managing their version-controlled projects.

error: Content is protected !!