Amol Pawar

Repository Pattern

How the Repository Pattern Makes Code Easier to Test, Maintain, and Scale

Software projects rarely stay small. Features grow, requirements change, and teams expand. When data access logic is tightly coupled with business logic, even a simple update can break multiple parts of the system.

This is where the Repository Pattern becomes extremely valuable.

In this blog, we’ll explain the Repository Pattern in a clear and beginner-friendly way using Kotlin examples. You’ll learn what it is, why it matters, and how it makes your code easier to test, maintain, and scale over time.

What Is the Repository Pattern?

The Repository Pattern is a design pattern that separates data access logic from business logic.

Instead of letting your services or view models talk directly to a database, API, or data source, all data operations are handled by a repository. Your business logic interacts only with the repository interface.

You can think of the repository as a middle layer that hides all the details of how data is stored or retrieved.

This separation leads to cleaner, safer, and more flexible code.

Why the Repository Pattern Is Important

Without the Repository Pattern, applications often suffer from:

  • Database queries scattered across the codebase
  • Business logic tightly tied to a specific database or framework
  • Difficult and slow unit testing
  • High risk when changing data sources

The Repository Pattern solves these problems by creating a single, consistent place for data access.

Core Structure of the Repository Pattern

A typical Repository Pattern implementation includes:

  1. A repository interface that defines allowed operations
  2. A repository implementation that handles actual data access
  3. Business logic that depends only on the interface

Let’s walk through a simple Kotlin example.

Repository Pattern in Kotlin

Step 1: Define a Data Model

Kotlin
data class User(
    val id: Int,
    val name: String
)

This is a simple data class that represents a user in the system.

Step 2: Create the Repository Interface

Kotlin
interface UserRepository {
    fun getById(id: Int): User?
    fun getAll(): List<User>
    fun add(user: User)
}

This interface defines what the application can do with user data. It does not care how or where the data is stored.

Step 3: Implement the Repository

Kotlin
class UserRepositoryImpl(private val database: UserDatabase) : UserRepository {

    override fun getById(id: Int): User? {
        return database.users.find { it.id == id }
    }

    override fun getAll(): List<User> {
        return database.users
    }

    override fun add(user: User) {
        database.users.add(user)
    }
}

This class contains all the data access logic. Whether the data comes from Room, SQL, an API, or another source, the rest of the app does not need to know.

Step 4: Use the Repository in Business Logic

Kotlin
class UserService(
    private val userRepository: UserRepository
) {
    fun registerUser(user: User) {
        userRepository.add(user)
    }
}

The service depends on the repository interface, not the implementation. This design choice is key to flexibility and testability.

How the Repository Pattern Improves Testability

Testing becomes much easier with the Repository Pattern because dependencies can be replaced with fake or mock implementations.

Fake Repository for Testing

Kotlin
class FakeUserRepository : UserRepository {
    private val users = mutableListOf<User>()

    override fun getById(id: Int): User? {
        return users.find { it.id == id }
    }

    override fun getAll(): List<User> {
        return users
    }

    override fun add(user: User) {
        users.add(user)
    }
}

You can now test your service without a real database:

Kotlin
val repository = FakeUserRepository()
val service = UserService(repository)

service.registerUser(User(1, "Amol"))

This approach results in faster, more reliable tests and supports accurate, verifiable behavior.

How the Repository Pattern Improves Maintainability

As applications grow, maintainability becomes more important than short-term speed.

The Repository Pattern helps by:

  • Keeping data logic in one place
  • Reducing duplicated queries
  • Making code easier to read and reason about
  • Allowing safe refactoring

If you need to update how users are stored or retrieved, you only change the repository implementation.

How the Repository Pattern Helps with Scalability

Scalability is about more than performance. It’s also about adapting to future changes.

With the Repository Pattern, you can:

  • Add caching inside the repository
  • Switch databases or APIs
  • Introduce pagination or background syncing

For example, you might later enhance this:

Kotlin
override fun getAll(): List<User> {
    return database.users
}

Without changing any business logic that depends on it.

Common Mistakes to Avoid

When using the Repository Pattern, avoid these pitfalls:

  • Putting business logic inside repositories
  • Exposing database-specific models directly
  • Adding unnecessary abstraction to very small projects

The Repository Pattern should simplify your code, not complicate it.

When Should You Use the Repository Pattern?

The Repository Pattern is a great choice when:

  • Your app has complex business rules
  • You expect data sources to evolve
  • You want clean unit tests
  • Your project is designed for long-term growth

For quick prototypes, it may be unnecessary. For production systems, it’s often worth the investment.

Conclusion

The Repository Pattern helps you write code that is easier to test, easier to maintain, and easier to scale.

By separating data access from business logic, you create a cleaner architecture that supports growth and change.

When implemented correctly in Kotlin, the Repository Pattern leads to reliable, readable, and future-proof applications that developers can trust.

@ApplicationContext

How @ApplicationContext Works in Jetpack Compose with Hilt : A Practical, Clean-Architecture Guide (With Runtime Explanation)

If you’ve ever used Hilt in a Jetpack Compose app, you’ve probably written code like this:

Kotlin
class MyRepository @Inject constructor(
    @ApplicationContext private val context: Context
)

And then paused for a second and thought:

“Okay… but where is this @ApplicationContext coming from?”
 
“Who creates it?”
 
“And how does Hilt magically inject it at runtime?”

This article answers those questions deeply and practically — without buzzwords, without hand-waving, and without unsafe patterns.

We’ll cover:

  • Why ViewModels should not receive Context
  • How Hilt resolves @ApplicationContext at runtime
  • The exact dependency flow from Compose → ViewModel → Repository
  • Why this approach is clean, safe, and testable
  • What code Hilt generates behind the scenes (conceptually)
  • Common mistakes and how to avoid them

Why Passing Context to ViewModel Is a Bad Idea

Let’s start with the mistake most Android developers make at least once:

Kotlin
class MyViewModel(private val context: Context) : ViewModel()

This looks harmless — until it isn’t.

Jetpack ViewModels are designed to outlive UI components like Activities and Fragments. An Activity context, however, is tied to the Activity lifecycle.

If a ViewModel holds an Activity context:

  • The Activity cannot be garbage collected
  • Memory leaks occur
  • Configuration changes become dangerous
  • Testing becomes harder

This is why Android’s architecture guidelines are very clear:

ViewModels should not hold a Context.

But what if you need access to:

  • SharedPreferences
  • DataStore
  • ConnectivityManager
  • Location services
  • File system APIs

You do need a Context — just not in the ViewModel. This is where repositories and Application context come in.

The Clean Architecture Rule

Here’s the mental model that solves this cleanly:

LayerResponsibilityContext Allowed
UI (Compose)Rendering, user inputYes (UI-only)
ViewModelState & business logicNo
RepositoryData & system accessYes
ApplicationApp lifecycleYes

So the rule is simple:
 If something needs a Context, it belongs below the ViewModel layer.

The Correct Dependency Flow

In a modern Compose app using Hilt, the flow looks like this:

Kotlin
Compose Screen

ViewModel (no Context)

Repository (Application Context)

Android System Services

The ViewModel never touches Context.
 The Repository owns it.
 The Application provides it.

So… Where Does @ApplicationContext Come From?

This is the part that feels like magic — but isn’t.

@HiltAndroidApp Creates the Root Component

Kotlin
@HiltAndroidApp
class MyApp : Application()

When you add this annotation, Hilt:

  • Generates a base class for your Application
  • Creates a singleton Application-level component
  • Stores the Application instance inside it

At runtime, Android creates your Application before anything else.

That Application instance is a Context.

Hilt Has a Built-In Context Provider

Inside Hilt’s internal codebase (not yours), there is a binding equivalent to:

Kotlin
@Provides
@Singleton
@ApplicationContext
fun provideApplicationContext(app: Application): Context = app

You never write this.
 You never import it.
 But it exists and is always available once @HiltAndroidApp is present.

So when Hilt sees:

Kotlin
@ApplicationContext Context

It knows exactly what to inject:
 ➡ the Application instance

Repository Requests the Context

Kotlin
class UserRepository @Inject constructor(
    @ApplicationContext private val context: Context
)

At compile time:

  • Hilt validates that a binding exists
  • It generates a factory class for MyRepository

Conceptually, the generated code looks like:

Kotlin
class MyRepository_Factory(
    private val contextProvider: Provider<Context>
) {
    fun get(): MyRepository {
        return MyRepository(contextProvider.get())
    }
}

At runtime:

  • contextProvider.get() returns the Application
  • The repository receives a safe, long-lived context

ViewModel Receives the Repository

Kotlin
@HiltViewModel
class UserViewModel @Inject constructor(
    private val repository: UserRepository
) : ViewModel()

The ViewModel:

  • Has no idea where the context comes from
  • Has no Android dependency
  • Is fully testable with fake repositories

Compose retrieves it like this:

Kotlin
val viewModel = hiltViewModel<UserViewModel>()

Hilt handles everything else.

A Real Example: SharedPreferences

Repository:

Kotlin
class UserPreferencesRepository @Inject constructor(
    @ApplicationContext context: Context
) {
    private val prefs =
        context.getSharedPreferences("user_prefs", Context.MODE_PRIVATE)

    fun saveUsername(name: String) {
        prefs.edit().putString("username", name).apply()
    }

    fun loadUsername(): String =
        prefs.getString("username", "Guest") ?: "Guest"
}

The ViewModel remains clean:

Kotlin
@HiltViewModel
class UserViewModel @Inject constructor(
    private val repository: UserPreferencesRepository
) : ViewModel() {

    val username = MutableStateFlow("")

    fun load() {
        username.value = repository.loadUsername()
    }
}

Notice what’s missing?

No Context in the ViewModel.
 That’s the whole point.

Why This Is Safe (And Recommended)

Let’s address the usual concerns.

Will this leak memory?
 No. Application context lives as long as the app process.

Will this break on rotation?
 No. ViewModels are lifecycle-aware; repositories aren’t tied to UI.

Is this officially recommended?
 Yes. This matches Google’s own Compose + Hilt samples.

Is this future-proof?
 Yes. This is the architecture Android is moving toward, not away from.

What If You Forget @HiltAndroidApp?

Your app will crash early with a clear error:

Kotlin
Hilt Activity must be attached to an @HiltAndroidApp Application

This happens because:

  • No ApplicationComponent is created
  • No Context binding exists
  • Dependency graph cannot be resolved

This is Hilt protecting you — not failing silently.

The One Rule to Remember

Context belongs to the data layer, not the state layer.

If you follow this rule:

  • Your architecture scales
  • Your code stays testable
  • Your app avoids subtle lifecycle bugs

Conclusion

@ApplicationContext isn’t magic.
 It’s a well-defined dependency provided by Hilt at the Application level, injected safely into the data layer, and kept far away from your UI state.

Once you understand this flow, Compose + Hilt stops feeling mysterious — and starts feeling predictable.

If this helped you, consider sharing it with the next developer who asks:
 “But where does the Context come from?”

back and forward navigation

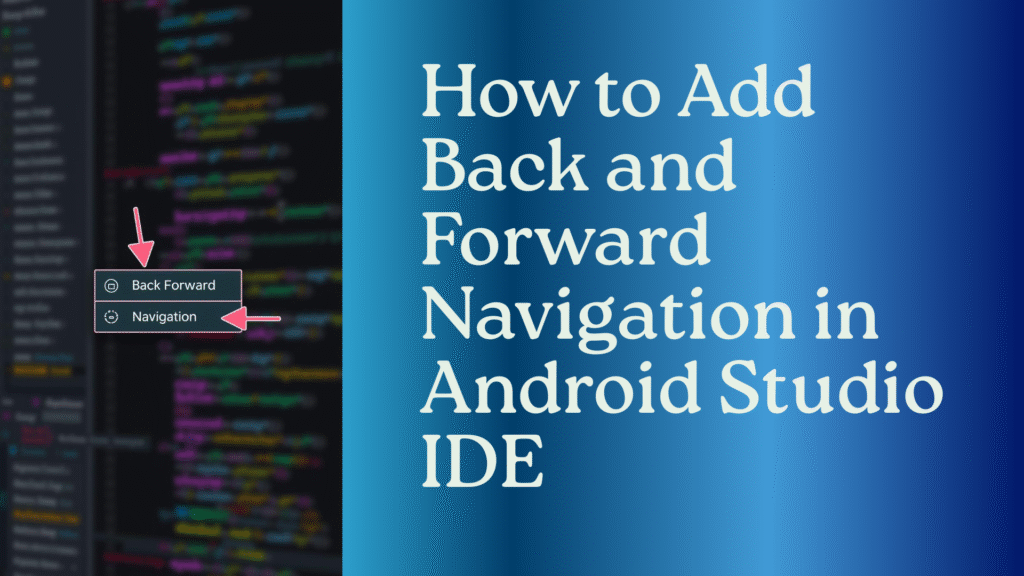
How to Add Back and Forward Navigation in Android Studio IDE

Navigating through code efficiently is crucial for productive Android development. Android Studio provides powerful back and forward navigation features that help you jump between different code locations, making it easier to trace code flow, review changes, and return to previous working contexts. In this comprehensive guide, we’ll explore everything you need to know about implementing and using back and forward navigation in Android Studio.

Understanding Navigation in Android Studio

Before diving into the implementation, it’s important to understand what back and forward navigation means in the context of an IDE. Unlike web browsers where you navigate between pages, in Android Studio, navigation refers to moving between different cursor positions in your code files. Every time you jump to a method definition, search for a usage, or click on a reference, Android Studio records that location in your navigation history.

Default Navigation Shortcuts

Android Studio comes with built-in keyboard shortcuts for back and forward navigation that work out of the box. These shortcuts vary depending on your operating system.

For Windows and Linux:

  • Navigate Back: Ctrl + Alt + Left Arrow
  • Navigate Forward: Ctrl + Alt + Right Arrow

For macOS:

  • Navigate Back: Cmd + [ or Cmd + Alt + Left Arrow
  • Navigate Forward: Cmd + ] or Cmd + Alt + Right Arrow

These shortcuts allow you to quickly move through your navigation history without taking your hands off the keyboard, significantly improving your coding workflow.

Using the Navigation Toolbar

If you prefer using the mouse or want visual confirmation of navigation actions, Android Studio provides toolbar buttons for back and forward navigation.

The navigation buttons are located in the main toolbar, typically near the top-left of the IDE window. They appear as left and right arrows, similar to browser navigation buttons. When you hover over these buttons, tooltips appear showing the keyboard shortcuts and the destination file or location.

To enable or customize the toolbar, go to View > Appearance > Toolbar to ensure the main toolbar is visible. 

If you don’t see the navigation arrows, you may need to customize your toolbar layout.

How Navigation History Works

Understanding how Android Studio tracks your navigation history helps you use these features more effectively. The IDE maintains a stack of cursor positions that gets updated when you perform certain actions.

Actions that add to navigation history include:

  • Jumping to a method or class definition using Ctrl + Click or Cmd + Click
  • Using “Go to Declaration” with Ctrl + B or Cmd + B
  • Finding usages with Alt + F7 or Cmd + F7
  • Navigating to a line number with Ctrl + G or Cmd + L
  • Using “Go to Class,” “Go to File,” or “Go to Symbol” navigation
  • Clicking on items in search results, find usages panels, or the structure view
  • Navigating through bookmarks

Actions that typically don’t add to navigation history:

  • Simple cursor movements with arrow keys
  • Scrolling through a file
  • Typing or editing code
  • Moving within the same visible screen area

This intelligent tracking ensures your navigation history remains useful and doesn’t get cluttered with every minor cursor movement.

Customizing Navigation Shortcuts

If the default shortcuts don’t suit your workflow or conflict with other tools, you can customize them to your preference.

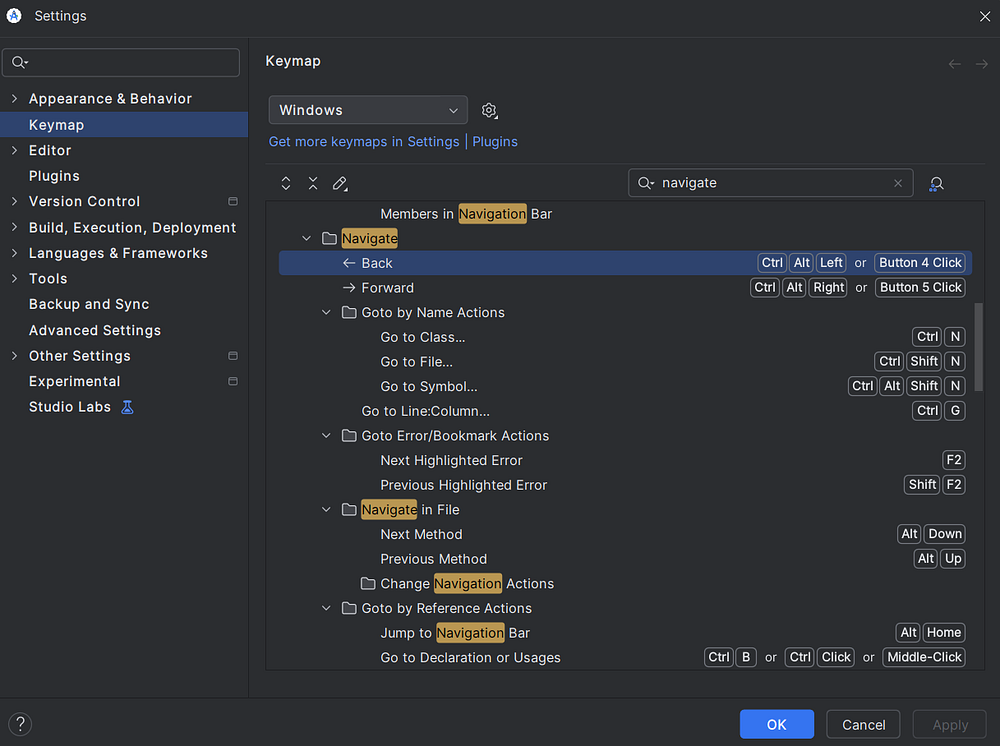
To customize navigation shortcuts, navigate to File > Settings on Windows/Linux or Android Studio > Preferences on macOS. Then follow these steps:

First, expand the Keymap section in the left sidebar. You’ll see a search box at the top of the keymap panel. Type “navigate / navigate back” to find the back navigation action, and “navigate / navigate forward” for the forward navigation action.

Right-click on “Back” under the Navigation category and you’ll see options to add keyboard shortcuts, mouse shortcuts, or abbreviations. Select “Add Keyboard Shortcut” and press your desired key combination. 

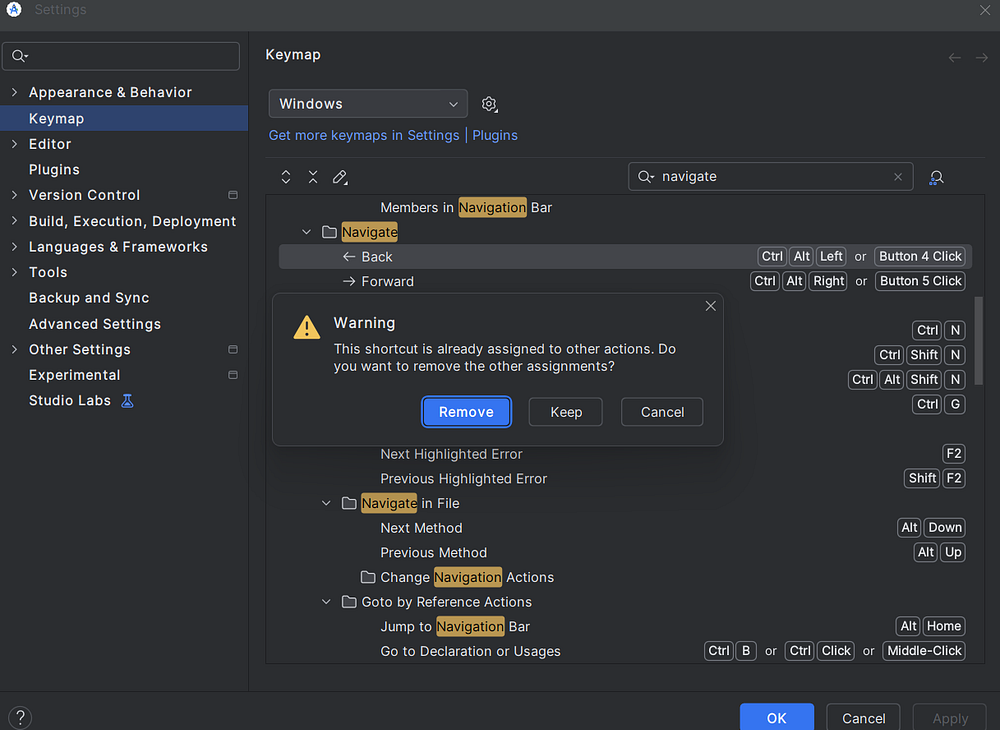
Android Studio will warn you if the shortcut is already assigned to another action, allowing you to resolve conflicts.

Repeat the same process for “Forward” navigation. Once you’ve set your preferred shortcuts, click “Apply” and “OK” to save your changes.

Advanced Navigation Techniques

Beyond basic back and forward navigation, Android Studio offers several advanced navigation features that complement these basic functions.

Recent Files Navigation: Press Ctrl + E on Windows/Linux or Cmd + E on macOS to open a popup showing recently opened files. This provides a quick way to jump to files you’ve worked on recently without going through the full navigation history.

Recent Locations: Press Ctrl + Shift + E on Windows/Linux or Cmd + Shift + E on macOS to see recent cursor locations with code context. This shows you snippets of code from locations you’ve recently visited, making it easier to find the exact spot you’re looking for.

Bookmarks: Set bookmarks at important locations in your code with F11 to create an anonymous bookmark or Ctrl + F11 or Cmd + F11 to create a numbered bookmark. 

Navigate between bookmarks using Shift + F11 to see all bookmarks, providing persistent navigation points beyond your session history.

Navigate to Last Edit Location: Press Ctrl + Shift + Backspace on Windows/Linux or Cmd + Shift + Backspace on macOS to jump directly to the last place you made an edit. This is particularly useful when you’ve navigated away to check something and want to return to where you were actively coding.

Navigation in Split Editor Mode

When working with multiple editor windows in split mode, navigation becomes even more powerful. Android Studio maintains separate navigation histories for each editor pane, allowing you to navigate independently in different views.

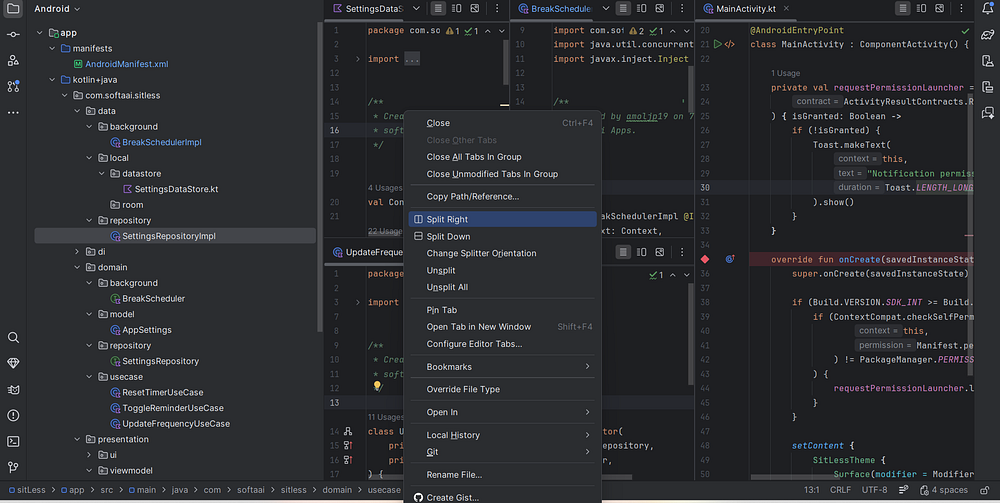
To split your editor, right-click on a file tab and select “Split Right” or “Split Down.” You can then navigate through different parts of your codebase simultaneously. The back and forward navigation shortcuts will apply to whichever editor pane currently has focus.

This is particularly useful when you’re comparing implementations, refactoring code across multiple files, or working on related components simultaneously.

Best Practices for Efficient Navigation

To make the most of Android Studio’s navigation features, consider adopting these best practices in your daily workflow.

1. Learn and use keyboard shortcuts consistently rather than relying on mouse clicks. Muscle memory for navigation shortcuts can dramatically speed up your coding process. The time invested in learning these shortcuts pays dividends in increased productivity.

2. Combine navigation with other IDE features like code search, find usages, and structure view to create efficient navigation patterns. For example, use “Find Usages” to see all references to a method, click on one to examine it, then use back navigation to return to your starting point.

3. Use bookmarks strategically for code locations you return to frequently within a project. This creates persistent reference points that survive beyond your current session.

4. Take advantage of the “Recent Locations” feature when you need to review multiple code sections you’ve recently visited. This provides more context than simple back navigation by showing code snippets.

5. When refactoring or reviewing code, use forward navigation to retrace your steps after going back. This helps you verify that you’ve addressed all necessary changes in a logical sequence.

Troubleshooting Navigation Issues

Sometimes navigation features may not work as expected. Here are common issues and their solutions.

Navigation shortcuts not working: First, check if the shortcuts are being intercepted by your operating system or other applications. On Windows, some keyboard manager utilities might capture these key combinations. On macOS, check System Preferences for conflicting shortcuts. Verify your keymap settings in Android Studio to ensure the shortcuts are properly configured.

Navigation history seems incomplete: Navigation history has limits to prevent memory issues. If you’ve navigated through many locations, older entries may be dropped. Additionally, closing and reopening files or projects may reset certain navigation states. Consider using bookmarks for locations you need to preserve across sessions.

Navigation buttons missing from toolbar: Go to View > Appearance > Toolbar to ensure the toolbar is visible. If the toolbar is visible but navigation buttons are missing, try customizing or resetting your toolbar layout or updating Android Studio to the latest version.

Navigation jumps to unexpected locations: This can happen if files have been modified externally or if you’re working with generated code that gets refreshed. Ensure your project is properly synchronized with File > Sync Project with Gradle Files and that you’re not editing generated files that get overwritten.

Navigation in Large Projects

In large Android projects with hundreds or thousands of files, efficient navigation becomes even more critical. The combination of back/forward navigation with Android Studio’s other navigation tools creates a powerful workflow.

Use the project structure view in conjunction with navigation history. When you need to explore a new area of the codebase, use “Go to Class” or “Go to File” to jump to relevant files, examine them, and then use back navigation to return to your working context.

Leverage the “Call Hierarchy” feature with Ctrl + Alt + H or Cmd + Alt + H to understand method call chains. Navigate through the hierarchy, then use back navigation to return to your starting point. This combination helps you trace execution flow in complex applications.

The “Type Hierarchy” feature, accessed with Ctrl + H or Cmd + H, works similarly for understanding class inheritance and implementations. Navigate through the hierarchy tree, and use navigation history to backtrack when needed.

Conclusion

Mastering back and forward navigation in Android Studio is essential for efficient Android development. These features, combined with the IDE’s other navigation capabilities, create a powerful toolkit for exploring codebases, understanding code flow, and maintaining productivity.

Start by memorizing the basic keyboard shortcuts for your operating system, then gradually incorporate advanced navigation techniques into your workflow. As these patterns become second nature, you’ll find yourself navigating code with confidence and speed, spending less time searching for code and more time writing it.

Remember that effective navigation is about developing habits and patterns that work for your specific coding style. Experiment with different combinations of navigation features, customize shortcuts to match your preferences, and build a navigation workflow that maximizes your productivity in Android Studio.

AlarmManager

Understanding AlarmManager, PendingIntent, BroadcastReceiver, and BootReceiver in Android

Android background execution is one of the most misunderstood parts of the platform, especially when alarms, notifications, and device reboot come into play.

Most tutorials show what code to write. Very few explain why that code works, what Android is doing internally, or why certain architectural rules are non-negotiable.

This article fills that gap.

We’ll walk through AlarmManager, PendingIntent, BroadcastReceiver, and BootReceiver using real, production-style code, explaining not just the syntax but the system behavior behind it.

This is not a copy of documentation.
 It’s an experience-driven explanation based on how Android actually behaves in real apps.

The Core Problem Android Is Solving

Android applications do not run continuously.

The OS is designed to:

  • Preserve battery
  • Free memory aggressively
  • Kill background processes at any time

Yet apps still need to:

  • Show notifications at specific times
  • Perform actions when the app is closed
  • Restore scheduled tasks after a device reboot

Android solves this using system-controlled execution, not app-controlled execution.

That single idea explains everything else in this article.

AlarmManager: Scheduling Time, Not Code

The Most Common Misconception

“AlarmManager runs my code at a specific time.”

It doesn’t.

AlarmManager has one job only:

At a specific time, notify the Android system that something needs to happen.

AlarmManager:

  • Does not execute methods
  • Does not keep your app alive
  • Does not know what your app does

It simply stores:

  • A trigger time
  • A PendingIntent (what the system should do later)

Scheduling an Alarm (MainActivity)

Let’s look at real code and follow the execution flow.

Java
public class MainActivity extends AppCompatActivity {

    private AlarmManager alarmManager;
    private PendingIntent pendingIntent;
    @Override
    protected void onCreate(Bundle savedInstanceState) {
        super.onCreate(savedInstanceState);
        setContentView(R.layout.activity_main);
        alarmManager = (AlarmManager) getSystemService(Context.ALARM_SERVICE);
        findViewById(R.id.btnSetAlarm).setOnClickListener(v -> scheduleAlarm());
        findViewById(R.id.btnCancelAlarm).setOnClickListener(v -> cancelAlarm());
    }

Creating the Intent

This Intent does not execute anything.
 It simply describes what component should be triggered later.

Java
private void scheduleAlarm() {
    Intent intent = new Intent(this, AlarmReceiver.class);
    intent.setAction("com.softaai.alarmdemo.ALARM_ACTION");
    intent.putExtra("message", "Your scheduled reminder!");

PendingIntent: The Permission Slip for the System

Now comes the most important part.

Java
pendingIntent = PendingIntent.getBroadcast(
        this,
        0,
        intent,
        PendingIntent.FLAG_UPDATE_CURRENT | PendingIntent.FLAG_IMMUTABLE
    );

A PendingIntent tells Android:

“You are allowed to perform this action on my app’s behalf later, even if my app process no longer exists.”

Why this matters:

  • Your app may be killed
  • Your activity may never run again
  • Your app may not be in memory

Without PendingIntent, alarms would be impossible in a battery-safe OS.

Scheduling with AlarmManager

Now we calculate when the alarm should fire.

Java
Calendar calendar = Calendar.getInstance();
calendar.add(Calendar.SECOND, 30);

long triggerTime = calendar.getTimeInMillis();

And hand everything to the system:

Java
if (Build.VERSION.SDK_INT >= Build.VERSION_CODES.M) {
        alarmManager.setExactAndAllowWhileIdle(
            AlarmManager.RTC_WAKEUP,
            triggerTime,
            pendingIntent
        );
    } else {
        alarmManager.setExact(
            AlarmManager.RTC_WAKEUP,
            triggerTime,
            pendingIntent
        );
    }
}

Important:
 At this point, your app is no longer involved.
 AlarmManager stores the data and the system takes over.

What Actually Happens Internally

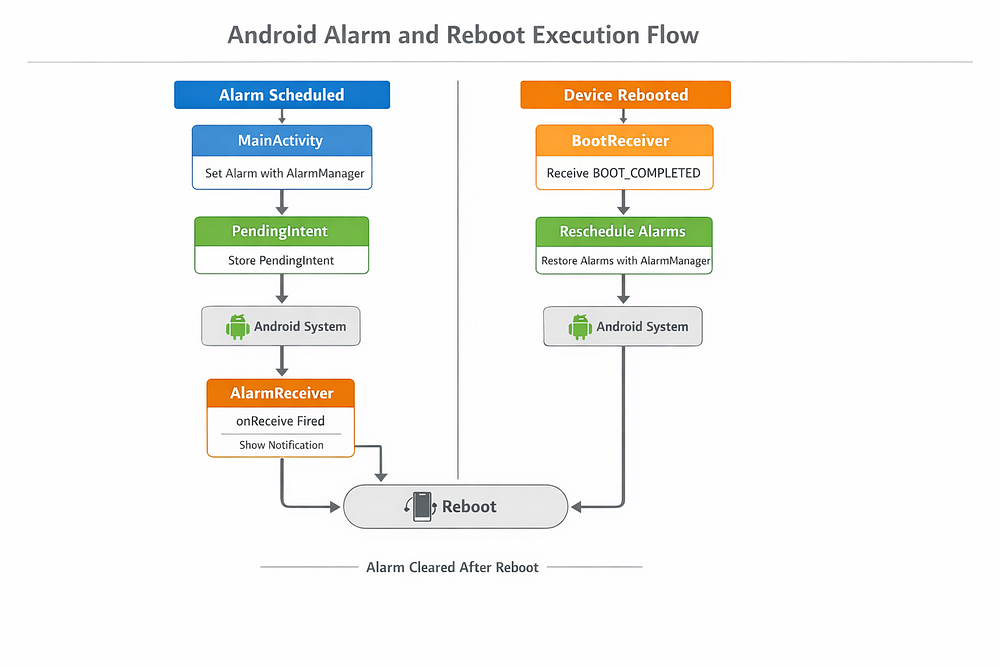
  1. AlarmManager stores the trigger time + PendingIntent
  2. Your app process can be killed at any moment
  3. When time arrives:
  • Android wakes up
  • Android fires the PendingIntent
  • Android decides how to re-enter your app

AlarmManager never runs your code.
 The system does.

BroadcastReceiver: The Entry Point Back Into Your App

When the alarm fires, Android needs a way to re-enter your app safely.

That entry point is a BroadcastReceiver.

Java
public class AlarmReceiver extends BroadcastReceiver {

    @Override
    public void onReceive(Context context, Intent intent) {
        String message = intent.getStringExtra("message");
        if (message == null) message = "Time's up!";
        NotificationHelper.showNotification(
            context,
            "Alarm",
            message
        );
    }
}

What Android Does Here

  • Creates your app process if needed
  • Instantiates the receiver
  • Calls onReceive()
  • Expects it to finish quickly

Important constraints:

  • Runs on the main thread
  • Must finish in ~10 seconds
  • Not meant for long work

If you need long processing, hand off to WorkManager or a service.

Why Alarms Disappear After Reboot

This is intentional behavior.

When a device reboots:

  • RAM is wiped
  • System services restart
  • All alarms are cleared

Android does this to avoid restoring stale or invalid schedules.

So if your app uses alarms, you must restore them manually.

BootReceiver: Restoring Alarms After Reboot

This is where BootReceiver comes in.

Java
public class BootReceiver extends BroadcastReceiver {

    @Override
    public void onReceive(Context context, Intent intent) {
        if (Intent.ACTION_BOOT_COMPLETED.equals(intent.getAction())) {
            rescheduleAlarms(context);
        }
    }

Rescheduling the Alarm

Java
private void rescheduleAlarms(Context context) {
    AlarmManager alarmManager =
        (AlarmManager) context.getSystemService(Context.ALARM_SERVICE);

    Intent alarmIntent = new Intent(context, AlarmReceiver.class);
    alarmIntent.setAction("com.softaai.alarmdemo.ALARM_ACTION");
    alarmIntent.putExtra("message", "Alarm restored after reboot");
    
    PendingIntent pendingIntent = PendingIntent.getBroadcast(
        context,
        0,
        alarmIntent,
        PendingIntent.FLAG_UPDATE_CURRENT | PendingIntent.FLAG_IMMUTABLE
    );
    
    Calendar calendar = Calendar.getInstance();
    calendar.add(Calendar.MINUTE, 1);
    alarmManager.setExactAndAllowWhileIdle(
        AlarmManager.RTC_WAKEUP,
        calendar.getTimeInMillis(),
        pendingIntent
    );
}

A BootReceiver exists for one reason only:

Re-create state lost due to reboot.

Nothing more.

Why AlarmReceiver and BootReceiver Should Be Separate

1. Different Responsibilities

  • AlarmReceiver → time-based events
  • BootReceiver → system lifecycle events

Mixing them creates confusing and fragile code.

2. Different Security Requirements

<uses-permission android:name="android.permission.RECEIVE_BOOT_COMPLETED" />
XML
<receiver
    android:name=".BootReceiver"
    android:exported="true">
    <intent-filter>
        <action android:name="android.intent.action.BOOT_COMPLETED" />
    </intent-filter>
</receiver>

<receiver
    android:name=".AlarmReceiver"
    android:exported="false" />

Boot receivers must be exported.
 Alarm receivers should not be.

Combining them exposes alarm logic to other apps. That’s a security bug.

3. Boot Is a Fragile System State

During boot:

  • Network may be unavailable
  • Storage may not be ready
  • UI work is unsafe

Separating receivers prevents accidental crashes and ANRs.

Industry-Standard Architecture

Well-designed Android apps follow this pattern:

  • AlarmReceiver → reacts to alarms
  • BootReceiver → restores alarms
  • Shared logic → scheduler/helper classes

Receivers stay thin.
 Business logic stays reusable.

This is how production Android apps are built.

Key Takeaways

  • AlarmManager schedules time, not code
  • PendingIntent is a system-approved execution token
  • BroadcastReceiver is a system entry point, not a worker
  • Alarms are wiped on reboot by design
  • BootReceiver restores lost state
  • Combining receivers is unsafe and unmaintainable

FAQ 

Does AlarmManager run my code?

No. It only notifies the system, which decides when and how to re-enter your app.

Why is PendingIntent required?

It allows Android to safely execute actions even if your app process is dead.

Why do alarms disappear after reboot?

Android clears all alarms intentionally to avoid restoring invalid schedules.

Is BootReceiver mandatory for alarm apps?

Yes. Without it, alarms will silently stop after reboot.

Conclusion

Android background execution is not about forcing your app to stay alive.

It’s about cooperating with the system so your app runs only when it is allowed, necessary, and safe.

Once you understand that mindset, AlarmManager, PendingIntent, and BroadcastReceivers stop feeling magical — and start feeling predictable.

How to Fix Wrong Git Commits in Android Studio and Safely Remove Unwanted Remote Commits

How to Fix Wrong Git Commits in Android Studio and Safely Remove Unwanted Remote Commits

If you’ve ever opened GitHub and noticed the wrong name on your commits — or spotted a commit on your main branch that never should’ve been there. These are some of the most common (and stressful) Git problems developers run into, especially when working in teams or switching between multiple accounts.

The good news is this: Git gives you the tools to fix both issues cleanly. The bad news? Using the wrong command can make things worse if you don’t understand what’s really going on.

This guide walks you through:

  • Why Android Studio shows the wrong Git user
  • How to correctly change the Git author (without breaking anything)
  • How to fix commits that are already pushed
  • When to remove commits entirely vs safely reverting them
  • Best practices to avoid these problems in the future

Everything here is based on how Git actually works under the hood — not IDE myths.

Why Android Studio Shows the Wrong Git User

Let’s clear up the most common misunderstanding first:

Android Studio does not control your Git commit author. Git does.

Android Studio is just a client. When you click “Commit,” it asks Git two questions:

  • What is the author name?
  • What is the author email?

Git answers based on its configuration files. That’s it.

So changing your GitHub account inside Android Studio affects authentication (push and pull permissions), but it does not change the commit author. That’s why this issue keeps coming back.

How Git Decides Who You Are

Git identifies authors using two values:

  • user.name
  • user.email

These can exist at two levels:

  1. Global — applies to all repositories on your machine
  2. Local (project-specific) — applies only to the current repository

Git always prefers local settings over global ones.

The Correct Way to Change Git User in Android Studio (Recommended)

If you work on multiple projects or use more than one GitHub account, this is the safest approach.

Step 1: Open the Terminal in Android Studio

Open your project, then click Terminal at the bottom.

Step 2: Set the Git user for this project only

Bash
git config user.name "Your Correct Name"<br>git config user.email "[email protected]"

Step 3: Verify

Bash
git config user.name<br>git config user.email

From this point forward, all new commits in this project will use the correct author.

Changing Git User Globally (Use With Caution)

If every repository on your machine is using the wrong user, update the global config:

Bash
git config --global user.name "Your Name"<br>git config --global user.email "[email protected]"

Verify with:

Bash
git config --global --lista

This affects all Git repositories on your system.

Why Switching GitHub Accounts Doesn’t Fix Commit Names

Android Studio’s GitHub settings only control:

  • Authentication
  • Push and pull permissions

They do not control commit authorship. That’s why you can push to one account while commits show another name entirely.

SSH Keys: Why Pushes Go to the Wrong Account

If you’re using SSH, GitHub identifies you by your SSH key, not your username.

Check which account your machine is using:

If GitHub responds with the wrong username, your SSH key is attached to the wrong account.

The Correct Fix

  • Generate a new SSH key
  • Add it to the correct GitHub account
  • Configure ~/.ssh/config to explicitly use that key

This ensures commits and permissions align correctly.

Why Existing Commits Don’t Update Automatically

Changing Git config only affects future commits.

Once a commit exists:

  • Its author is permanent
  • It cannot be changed unless history is rewritten

That’s intentional. Git values integrity over convenience.

How to Fix the Author of the Last Commit

If the most recent commit has the wrong author:

Bash
git commit --amend --author="Your Name <[email protected]>"<br>git push --force-with-lease

Only do this if rewriting history is acceptable.

Fixing Multiple Commits With the Wrong Author

Use interactive rebase:

Bash
git rebase -i HEAD~N

Change pick to edit for the commits you want to fix, then run:

Bash
git commit --amend --author="Your Name <[email protected]>"<br>git rebase --continue

Finish with:

Bash
git push --force-with-lease

Removing an Unwanted Commit From a Remote Repository

This is where many developers panic. The right solution depends on who else is affected.

Option 1: Hard Reset (Deletes History)

Use this only if:

  • It’s your personal branch, or
  • The commit contains sensitive data

Steps

Bash
git log --oneline<br>git reset --hard <last-good-commit><br>git push origin <branch> --force-with-lease

Everyone else must reset their local branch afterward.

Option 2: Revert (Safest for Teams)

If the branch is shared or protected, always revert.

Bash
git revert <bad-commit-hash><br>git push origin <branch>

This creates a new commit that undoes the change without rewriting history.

When to Use Reset vs Revert

SituationRecommended
Secrets pushedReset + force push
Mistake on mainRevert
Cleaning your feature branchReset
Team already pulledRevert

Removing Multiple Commits Cleanly (Interactive Rebase)

For mixed good and bad commits:

Bash
git rebase -i HEAD~5

Change pick to drop for unwanted commits, then:

Bash
git push --force-with-lease

Always create a backup branch first:

git branch backup-before-cleanup

Common Mistakes to Avoid

  • Force-pushing without warning your team
  • Using --force instead of --force-with-lease
  • Rewriting history on protected branches
  • Forgetting to back up before rebasing

If something goes wrong, git reflog can usually save you.

Best Practices to Prevent These Issues

  • Always verify Git user before starting a project
  • Prefer project-level Git config
  • Use separate SSH keys for different accounts
  • Protect main branches with PR rules
  • Never force-push without coordination
  • Keep commit emails matching your GitHub account

Conclusion

Android Studio often gets blamed for Git problems it doesn’t actually control. Once you understand that Git owns identity and history, everything becomes easier to reason about — and fix.

By setting the correct Git user, managing SSH keys properly, and choosing the right strategy for removing commits, you can keep your repositories clean without disrupting your team.

If you treat Git history with intention instead of panic, it becomes a powerful tool instead of a constant source of stress.

DirectoryLock Process Still Running

Fixing the “DirectoryLock / Process Still Running” Error in Android Studio Across Windows, macOS, and Linux

If Android Studio refuses to start and throws an error like:

Bash
Internal error<br>com.intellij.platform.ide.bootstrap.DirectoryLock$CannotActivateException: Process "studio64.exe" is still running and does not respond.

…you’re dealing with one of the most common (and confusing) Android Studio startup issues.

It usually appears after a crash, a forced shutdown, or reopening the IDE too quickly. The good news is that this error does not mean your installation is broken. It’s a safety mechanism that fails to recover properly in real-world conditions.

This guide explains what’s actually happening under the hood, why it shows up more often on Windows, how it behaves on macOS and Linux, and how to fix — and prevent — it permanently.

What This Error Really Means

Android Studio is built on the JetBrains IntelliJ Platform, which enforces a single-instance lock.

When Android Studio starts, it does three important things:

  1. Creates a lock file in its system directory
  2. Binds to a local socket (internal communication port)
  3. Registers itself as the active IDE instance

When you close Android Studio normally, all of that is cleaned up.

But if the IDE:

  • crashes,
  • is force-killed,
  • is interrupted by sleep or shutdown,
  • or hangs during indexing or Gradle sync,

those locks don’t always get released.

When you try to reopen Android Studio, it checks for those locks, assumes another instance is still running, and blocks startup to protect your data.

That’s when you see errors like:

  • DirectoryLock$CannotActivateException
  • Process is still running and does not respond
  • Address already in use
  • Connection refused

This behavior is intentional — but the recovery is imperfect.

Is this a particular OS problem?

No.
 This error is cross-platform and occurs on Windows, macOS, and Linux.

That said, Windows developers see it far more often, and there are clear technical reasons for that.

Why Windows Is Affected the Most

1. Fast Startup (Hybrid Shutdown) — Windows Fast Startup doesn’t fully terminate background processes. If Android Studio was open during shutdown, its locks may survive the reboot.

2. Aggressive File Locking — Windows uses mandatory file locks. If the IDE freezes or crashes, those locks are more likely to be left behind.

3. Antivirus & Defender Interference — Real-time scanners can delay or block the IDE’s socket binding, triggering false “already running” states.

4. Zombie Java Processes — If studio64.exe or its Java runtime crashes, Windows may leave it running invisibly in the background.

Result:
 Windows users encounter this error far more frequently than macOS or Linux users.

macOS: Less Common, Still Possible

macOS handles process cleanup more gracefully, which reduces the frequency — but doesn’t eliminate it.

Common macOS triggers include:

  • Force-quitting Android Studio
  • System sleep or sudden power loss
  • Corrupted IDE cache after a crash
  • Multiple user sessions sharing the same home directory

Because macOS is Unix-based, socket cleanup is usually reliable, but stale lock files can still remain after abnormal exits.

Linux: Rare, But Not Impossible

Linux is the least affected platform.

When the error appears, it’s usually caused by:

  • Killing the IDE with kill -9
  • Running Android Studio under different users
  • Permission issues in .config or .cache
  • Snap or Flatpak sandbox limitations

Linux aggressively cleans up sockets and file locks, which is why this issue is relatively rare there.

Real-World OS Comparison

Operating SystemLikelihoodOverall Stability
WindowsHighMost problematic
macOSMediumMostly stable
LinuxLowMost reliable

Step-by-Step Fix (Works on Any OS)

1. Kill the Stuck Process (Most Common Fix)

Windows

  • Open Task Manager → Details
  • End studio64.exe or java.exe

macOS

  • Open Activity Monitor
  • Force quit Android Studio or Java

Linux

Bash
pkill -f android-studio

If the error shows a PID, target that process directly.

2. Delete Leftover Lock Files

Sometimes the process is gone, but the lock file remains.

Windows

Bash
C:\Users\<User>\AppData\Local\Google\AndroidStudio<version>/

macOS

Bash
~/Library/Caches/Google/AndroidStudio<version>/

Linux

Bash
~/.cache/Google/AndroidStudio<version>/

Delete files such as:

  • port.lock
  • .lock
  • any *.lock files

Then restart Android Studio.

3. “Address Already in Use” Errors

If you see BindException or Address already in use, the fastest fix is a full system reboot.
 This clears all sockets and zombie processes instantly.

Why Android Studio Is Designed This Way

This behavior isn’t unique to Android Studio.

All JetBrains IDEs (IntelliJ IDEA, PyCharm, WebStorm) use the same architecture. The IDE prioritizes data safety over convenience:

  • It blocks startup if another instance is detected
  • It prevents concurrent access to system directories
  • It assumes clean shutdowns

The problem isn’t the design — it’s that real machines crash, sleep, and lose power.

How to Prevent This Issue Long-Term

Best Practices (All OS)

  • Always close Android Studio normally
  • Avoid force-killing unless absolutely necessary
  • Wait a few seconds before reopening after closing
  • Keep only one instance per project
  • Stay on the latest stable Android Studio release

Windows-Specific Tips

  • Disable Fast Startup
  • Add Android Studio folders to antivirus exclusions
  • Clean IDE cache directories occasionally

macOS & Linux Tips

  • Avoid force-quit
  • Check directory permissions
  • Don’t mix system installs with Snap/Flatpak
  • Kill leftover processes before relaunching

Conclusion

This error is not your fault, and it’s not a sign of a broken setup.

It happens because of:

  • How Android Studio manages single-instance locks
  • How operating systems handle crashes and shutdowns
  • Edge cases the IDE still doesn’t recover from perfectly

Once you understand what’s going on, fixing it takes minutes — and preventing it becomes easy.

If you work with Android Studio long enough, you’ll see this error at least once. Now you know exactly what to do when it happens.

Adding Images to GitHub Gists

Adding Images to GitHub Gists: What Works, What Doesn’t, and Why

GitHub Gists are great for sharing small pieces of code, configuration files, or quick notes. They’re fast, lightweight, and easy to link.

But many developers hit the same question sooner or later:

How do we add images to GitHub Gists?

If you’ve tried uploading an image directly or embedding one like you would on GitHub README files, you’ve probably noticed it’s not straightforward.

In this guide, we’ll walk through adding Images to GitHub Gists in detail. You’ll learn what works, what doesn’t, and why GitHub behaves the way it does. We’ll also cover reliable methods with clear examples you can use right away.

Why Adding Images to GitHub Gists Is Confusing

GitHub Gists look similar to repositories, but they’re not the same thing.

A few key differences matter here:

  • Gists are designed for small, single-purpose snippets
  • They don’t have a full file browser like repos
  • They don’t support direct image uploads through the UI

Because of this, adding Images to GitHub Gists require a different approach.

Can We Upload Images Directly to a GitHub Gist?

Short answer: No.

GitHub Gists do not support direct image uploads the way repositories do.

You can:

  • Paste text files
  • Add Markdown
  • Add code files

But you cannot:

  • Upload PNG, JPG, or GIF files directly
  • Drag and drop images into a Gist

That’s not a bug. It’s a design choice.

The Correct Way to Add Images to GitHub Gists

Even though you can’t upload images directly, you can display images in a Gist using external image hosting.

The idea is simple:

  1. Host the image somewhere else
  2. Embed it using Markdown

Let’s go through the working methods.

Method 1: Using GitHub Repository Images (Most Reliable)

This is the best and most stable way to add Images to GitHub Gists.

Step 1: Upload the Image to a GitHub Repository

Create a repository or use an existing one, then upload your image:

Markdown
my-repo/
└── images/
    └── img1.png

Once uploaded, click the image and copy the raw URL.

It will look like this:

Markdown
https://raw.githubusercontent.com/username/repo/main/images/img1.png
Step 2: Embed the Image in Your Gist

Use standard Markdown syntax inside your Gist:

Markdown
![Example Image1](https://raw.githubusercontent.com/username/repo/main/images/img1.png)
  • ! tells Markdown this is an image
  • Example Image1 is the alt text (important for accessibility and SEO)
  • The URL points to the raw image file

This method works consistently and is trusted by GitHub.

Method 2: Using GitHub Issues or Comments as Image Hosts

This method is popular but less controlled.

How It Works
  1. Open any GitHub issue or discussion
  2. Drag and drop your image into the comment box
  3. GitHub uploads the image and generates a CDN URL

The URL will look like this:

Markdown
https://user-images.githubusercontent.com/12345678/img2.png
Embed It in Your Gist
Markdown
![Screenshot](https://user-images.githubusercontent.com/12345678/img2.png)
Pros and Cons

Pros

  • Quick and easy
  • No extra repo needed

Cons

  • Image ownership is unclear
  • Harder to manage long-term
  • Not ideal for documentation that must last

For short-lived examples, this approach works. For professional use, prefer repositories.

Method 3: Using External Image Hosting Services

You can also use services like:

  • Imgur
  • Cloudinary
  • Your own server
Markdown
![Flow Diagram](https://example-cdn.com/images/flow.png)

Important Notes

  • Make sure the image URL is public
  • Avoid services that block hotlinking
  • Prefer HTTPS for security

This method works, but reliability depends on the host.

What Does NOT Work (Common Mistakes)

Understanding what doesn’t work is just as important.

1. Relative Paths

This will not work in Gists:

Markdown
![Image](./image.png)

Why?
Because Gists don’t have a file system like repositories.

2. HTML <img> Tags with Local Files

This also fails:

Markdown
<img src="image.png" />

The browser has no idea where image.png lives.

3. Dragging Images into Gists

You can drag images into GitHub issues, but not into Gists.

If you try, nothing happens.

Why GitHub Designed Gists This Way

GitHub Gists are meant to be:

  • Lightweight
  • Fast
  • Focused on code

Allowing image uploads would:

  • Increase storage costs
  • Complicate versioning
  • Move Gists away from their core purpose

That’s why adding Images to GitHub Gists rely on external hosting.

Best Practices for Adding Images to GitHub Gists

To keep your Gists clean and professional, follow these tips:

Use Descriptive Alt Text

Instead of:

Markdown
![img](url)

Use:

Markdown
![API response structure diagram](url)

This improves:

  • Accessibility
  • Search visibility
  • AI answer extraction

Keep Images Small and Relevant

Large images slow down loading and distract from the code.

Ask yourself:

  • Does this image explain something better than text?
  • Is it necessary?

If yes, include it. If not, skip it.

Version Your Images

If your image changes over time:

  • Store it in a repo
  • Update filenames or folders

This avoids broken references in old Gists.

Conclusion

Adding Images to GitHub Gists isn’t hard once you understand the rules.

You can’t upload images directly, but you can embed them reliably using external URLs. GitHub repositories are the safest option, while issue uploads and external hosts work in specific cases.

Use images sparingly, explain them clearly, and your Gists will be far more useful than plain code alone.

ViewModel and rememberSaveable

The Truth About ViewModel and rememberSavable: Configuration Changes vs Process Death

If you’ve built Android apps with Jetpack Compose, you’ve probably run into the question: Should I use ViewModel or rememberSaveable? Both help you keep state alive, but they work very differently depending on what’s happening to your app — like when the screen rotates or when the system kills your process.

This post will break down ViewModel and rememberSaveable, explain when to use each, and show real code examples so it finally clicks.

The Basics: Why State Preservation Matters

On Android, your app doesn’t always stay alive. Two big events affect your app’s state:

  1. Configuration changes — like screen rotations, language changes, or switching dark mode. The activity is destroyed and recreated, but the process usually stays alive.
  2. Process death — when Android kills your app’s process (e.g., to reclaim memory) and later restores it when the user comes back.

If you don’t handle these correctly, your users lose whatever they were doing. That’s where ViewModel and rememberSaveable come in.

remember: The Starting Point in Compose

At the simplest level, you use remember in Jetpack Compose to keep state alive across recompositions.

Kotlin
@Composable
fun CounterScreen() {
    var count by remember { mutableStateOf(0) }

    Button(onClick = { count++ }) {
        Text("Count: $count")
    }
}
  • Here, count won’t reset when Compose redraws the UI.
  • But if the device rotates (configuration change), the state is lost because remember only survives recompositions, not activity recreation.

That’s why we need more powerful tools.

rememberSaveable: Survives Configuration Changes and Process Death

rememberSaveable goes one step further. It automatically saves your state into a Bundle using Android’s saved instance state mechanism.

Kotlin
@Composable
fun CounterScreen() {
    var count by rememberSaveable { mutableStateOf(0) }

    Button(onClick = { count++ }) {
        Text("Count: $count")
    }
}

What happens here:

  • Rotate the screen? count survives.
  • App is killed and restored (process death)? count also survives, because it was written to the saved instance state.

Limitations:

  • Only works with data types that can be written to a Bundle (primitives, Strings, parcelables, etc.).
  • Not ideal for large objects or data fetched from a repository.

ViewModel: Survives Configuration Changes, Not Process Death

A ViewModel is a lifecycle-aware container designed to hold UI data. It’s tied to a LifecycleOwner like an activity or a navigation back stack entry.

Kotlin
class CounterViewModel : ViewModel() {
    var count by mutableStateOf(0)
}

@Composable
fun CounterScreen(viewModel: CounterViewModel = viewModel()) {
    Button(onClick = { viewModel.count++ }) {
        Text("Count: ${viewModel.count}")
    }
}

What happens here:

  • Rotate the screen? count survives. The same ViewModel instance is reused.
  • App is killed (process death)? count is lost. The ViewModel does not persist beyond process death.

Configuration Changes vs Process Death: Who Wins?

Here’s the clear breakdown:

When to Use rememberSaveable

Use rememberSaveable for small, lightweight UI state that:

  • Must survive both rotation and process death.
  • Can easily be serialized into a Bundle.

Examples:

  • Current tab index.
  • Form text fields.
  • Simple filter/sort options.

When to Use ViewModel

Use ViewModel for more complex or long-lived state that:

  • Doesn’t need to survive process death.
  • Might involve business logic, repositories, or data streams.
  • Should be scoped to the screen or navigation graph.

Examples:

  • Data loaded from a database or network.
  • Complex business logic.
  • State shared across multiple composables in the same screen.

Can You Combine Them? Yes.

Often, the best solution is to use ViewModel and rememberSaveable together.
 For example, a ViewModel manages your main UI state, but a few critical fields use rememberSaveable so they’re restored even after process death.

Kotlin
@Composable
fun FormScreen(viewModel: FormViewModel = viewModel()) {
    var userInput by rememberSaveable { mutableStateOf("") }

    Column {
        TextField(
            value = userInput,
            onValueChange = { userInput = it }
        )

        Button(onClick = { viewModel.submit(userInput) }) {
            Text("Submit")
        }
    }
}

Here:

  • userInput is lightweight and saved with rememberSaveable.
  • The ViewModel takes care of processing and persisting the submitted data.

Conclusion

The truth about ViewModel and rememberSaveable is simple once you think in terms of configuration changes vs process death:

  • remember → Only survives recomposition.
  • rememberSaveable → Survives both rotation and process death (small, serializable state).
  • ViewModel → Survives rotation, great for business logic, but not process death.

Use them in combination, not competition. Each tool has its place, and knowing when to reach for which makes your Compose apps more resilient, smoother, and user-friendly.

Kotlin Sequences

Kotlin Sequences or Java Streams? A Complete Guide for Modern Developers

If you’ve ever worked with collections in Kotlin or Java, you’ve probably heard about Kotlin Sequences and Java Streams. Both are powerful tools for handling large amounts of data in a clean, functional style. But when should you use one over the other? And what’s the real difference between them?

This guide breaks it all down in simple way — no jargon overload. By the end, you’ll know exactly when to reach for Kotlin Sequences or Java Streams in your projects.

Why Do We Even Need Sequences or Streams?

Collections like List and Set are everywhere. But looping through them with for or while can quickly become messy, especially when you want to:

  • Filter elements
  • Map values
  • Reduce results into a single outcome

This is where lazy evaluation comes in. Instead of processing all elements up front, sequences and streams let you chain operations in a pipeline. The work only happens when you actually need the result. That means cleaner code and often better performance.

Kotlin Sequences: Lazy by Design

Kotlin’s Sequence is basically a wrapper around collections that delays execution until the final result is requested.

Filtering and Mapping with Sequences

Kotlin
fun main() {
    val numbers = listOf(1, 2, 3, 4, 5)

    val result = numbers.asSequence()
        .filter { it % 2 == 1 }   // Keep odd numbers
        .map { it * it }          // Square them
        .toList()                 // Trigger evaluation

    println(result) // [1, 9, 25]
}

Here,

  • .asSequence() converts the list into a sequence.
  • filter and map are chained, but nothing actually runs yet.
  • .toList() triggers evaluation, so all steps run in a pipeline.

Key takeaway: Sequences process elements one by one, not stage by stage. That makes them memory-efficient for large datasets.

Java Streams: Functional Power in Java

Java introduced Stream in Java 8, giving developers a way to work with collections functionally.

Filtering and Mapping with Streams

Java
import java.util.*;
import java.util.stream.*;

public class StreamExample {
    public static void main(String[] args) {

        List<Integer> numbers = Arrays.asList(1, 2, 3, 4, 5);

        List<Integer> result = numbers.stream()
            .filter(n -> n % 2 == 1)  // Keep odd numbers
            .map(n -> n * n)          // Square them
            .toList();                // Collect into a list

        System.out.println(result);   // [1, 9, 25]

    }
}

How It Works

  • .stream() converts the collection into a stream.
  • Operations like filter and map are chained.
  • .toList() (or .collect(Collectors.toList()) in older Java versions) triggers evaluation.

Streams are also lazy, just like Kotlin Sequences. But they come with a big advantage: parallel processing.

Kotlin Sequences vs Java Streams: Key Differences

Here’s a side-by-side comparison of Kotlin Sequences or Java Streams:

When to Use Kotlin Sequences

  • You’re writing Kotlin-first code.
  • You want simple lazy evaluation.
  • You’re processing large collections where memory efficiency matters.
  • You don’t need parallel execution.

Example: processing thousands of lines from a text file efficiently.

When to Use Java Streams

  • You’re in a Java-based project (or interoperating with Java).
  • You want parallel execution to speed up heavy operations.
  • You’re working with Java libraries that already return streams.

Example: data crunching across millions of records using parallelStream().

Which Should You Choose?

If you’re in Kotlin, stick with Kotlin Sequences. They integrate beautifully with the language and make your code feel natural.

If you’re in Java or need parallel execution, Java Streams are the way to go.

And remember: it’s not about one being “better” than the other — it’s about choosing the right tool for your context.

Conclusion

When it comes to Kotlin Sequences or Java Streams, the choice boils down to your project’s ecosystem and performance needs. Both give you lazy, functional pipelines that make code cleaner and more maintainable.

  • Kotlin developers → Sequences
  • Java developers or parallel workloads → Streams

Now you know when to use each one, and you’ve seen them in action with real examples. So the next time you need to process collections, you won’t just write a loop — you’ll reach for the right tool and make your code shine.

Artificial Neural Networks

Artificial Neural Networks Explained: How ANNs Mimic the Human Brain

Artificial Neural Networks (ANNs) are one of the driving forces behind today’s AI revolution. From recognizing faces in photos to powering voice assistants, they’re everywhere. But what exactly are they? And how do they mimic the human brain? Let’s break it down step by step.

What Are Artificial Neural Networks?

Artificial Neural Networks are computational models inspired by how the human brain processes information. Just like our brains use billions of interconnected neurons to learn and make decisions, ANNs use layers of artificial “neurons” to detect patterns, classify data, and make predictions.

At their core, ANNs are about finding relationships in data. Whether it’s images, text, or numbers, they can spot patterns we might miss.

How the Human Brain Inspires ANNs

The inspiration for ANNs comes directly from biology:

  • Neurons in the brain receive signals, process them, and pass them along if the signal is strong enough.
  • Artificial neurons work in a similar way: they take input, apply weights (importance), add them up, and pass the result through an activation function.

Think of it like this:

  • Neurons = nodes in a network.
  • Synapses = weights between nodes.
  • Brain learning = adjusting synapse strengths.
  • ANN learning = adjusting weights during training.

Anatomy of an Artificial Neural Network

Every ANN is built from layers:

  1. Input Layer — Where data enters the network.
     Example: pixels of an image.
  2. Hidden Layers — Where the “thinking” happens.
     These layers detect patterns, like edges, shapes, or textures.
  3. Output Layer — Where results are produced.
     Example: labeling an image as a “cat” or “dog.”

Each connection between neurons has a weight, and learning means updating those weights to improve accuracy.

How ANNs Learn: The Training Process

Training an ANN is like teaching a child. You show it examples, it makes guesses, and you correct it until it improves. Here’s the typical process:

  1. Forward Propagation — Data flows through the network, producing an output.
  2. Loss Calculation — The network checks how far its prediction is from the correct answer.
  3. Backward Propagation (Backprop) — The error flows backward through the network, adjusting weights to reduce mistakes.
  4. Repeat — This cycle happens thousands or even millions of times until the network becomes accurate.

A Simple Neural Network in Python

Let’s build a tiny ANN to classify numbers using TensorFlow and Keras. Don’t worry — it’s simpler than it looks.

Python
import tensorflow as tf
from tensorflow.keras.models import Sequential
from tensorflow.keras.layers import Dense

# Step 1: Build the model
model = Sequential([
    Dense(16, input_shape=(10,), activation='relu'),  # hidden layer with 16 neurons
    Dense(8, activation='relu'),                      # another hidden layer
    Dense(1, activation='sigmoid')                    # output layer (binary classification)
])

# Step 2: Compile the model
model.compile(optimizer='adam',
              loss='binary_crossentropy',
              metrics=['accuracy'])

# Step 3: Train the model with dummy data
import numpy as np
X = np.random.rand(100, 10)  # 100 samples, 10 features each
y = np.random.randint(2, size=100)  # 100 labels (0 or 1)
model.fit(X, y, epochs=10, batch_size=8)
  • Dense layers: These are fully connected layers where every neuron talks to every neuron in the next layer.
  • Activation functions: relu helps capture complex patterns; sigmoid squashes outputs between 0 and 1, making it great for yes/no predictions.
  • Optimizer (adam): Decides how the network updates its weights.
  • Loss function (binary_crossentropy): Measures how far off predictions are from actual results.
  • Training (fit): This is where learning happens—weights get adjusted to reduce errors.

Why Artificial Neural Networks Matter

Artificial Neural Networks power much of modern AI, including:

  • Image recognition (Google Photos, self-driving cars)
  • Natural language processing (chatbots, translation apps)
  • Healthcare (disease prediction, drug discovery)
  • Finance (fraud detection, stock predictions)

Their strength lies in adaptability: once trained, they can generalize knowledge and apply it to new, unseen data.

Challenges of ANNs

While powerful, ANNs have challenges:

  • Data hungry: They need lots of examples to learn.
  • Black box problem: It’s often hard to understand why a network makes certain decisions.
  • Computational cost: Training large ANNs requires heavy computing power.

Researchers are working on making them more efficient and interpretable.

Conclusion

Artificial Neural Networks are one of the best examples of how humans have borrowed ideas from nature — specifically the brain — to solve complex problems. They’re not truly “intelligent” in the human sense, but their ability to learn from data is transforming industries.

As we move forward, ANNs will continue to evolve, becoming more powerful and more transparent. Understanding the basics today means you’ll be ready for the AI-powered world of tomorrow.

error: Content is protected !!