
The Adapter Design Pattern is a developer’s secret weapon when it comes to making incompatible systems work together smoothly without altering their original code. Acting as a bridge, it allows different components to communicate effortlessly. If you’ve ever hit a roadblock where two pieces of code just wouldn’t “talk” to each other, then you’ve faced the exact challenge that the Adapter Pattern is designed to solve!
In this blog, we’re diving deep into everything about the Adapter Design Pattern—its structure, types (like Class and Object adapters), examples, real-world use cases, and how it’s applied in Android development. Whether you’re working with legacy systems or building new features, this pattern is key to simplifying integration and boosting code flexibility.
Grab a coffee mug—this blog’s going to be a big one! Get ready for a complete guide that will take your understanding of design patterns to the next level. Let’s get started!
What is the Adapter Design Pattern?
The Adapter Design Pattern helps connect two things that wouldn’t normally work together because they don’t “fit” or communicate the same way. It acts as a bridge that makes an existing class compatible with another class you need, without changing either one.
Think of it like using an adapter to plug something into an outlet that has a different shape—it allows them to work together without altering either the plug or the outlet.

Imagine you’re traveling in Europe with your US laptop. The European wall outlet provides 220 volts, while your laptop’s power adapter is designed for a standard AC plug and expects 110 volts. They’re incompatible, right? That’s where a power adapter steps in, converting the European outlet’s power to match what your laptop needs.
In software, the Adapter Pattern works in the same way. It allows two incompatible interfaces to work together without changing their core functionality. Just like the power adapter converts the outlet’s power, a software adapter “translates” between systems to make them compatible.
Instead of rewriting code, you create an adapter class that bridges the gap—keeping everything working smoothly.
In short, the Adapter Pattern is your go-to solution for making incompatible systems work together, just like your handy travel adapter!
Defination of Adapter Design Pattern
The Adapter design pattern (one of the structural design patterns) acts as a bridge between two incompatible interfaces. It allows an existing class (which has a specific interface) to be used with another class (which expects a different interface), without changing their existing code. It does this by creating an intermediary adapter class that translates the method calls from one interface to the other.
Why is the Adapter called ‘glue’ or ‘wrapper’?
Sometimes, a class has the features a client needs, but its way of interacting (interface) doesn’t match what the client expects. In these cases, we need to transform the existing interface into a new one that the client can work with, while still utilizing the original class.
Suppose you have an existing software system that requires integrating a new vendor library, but the new vendor has designed their interfaces differently from the previous vendor. What should you do? Write a class that adapts the new vendor’s interface to the one you’re expecting.
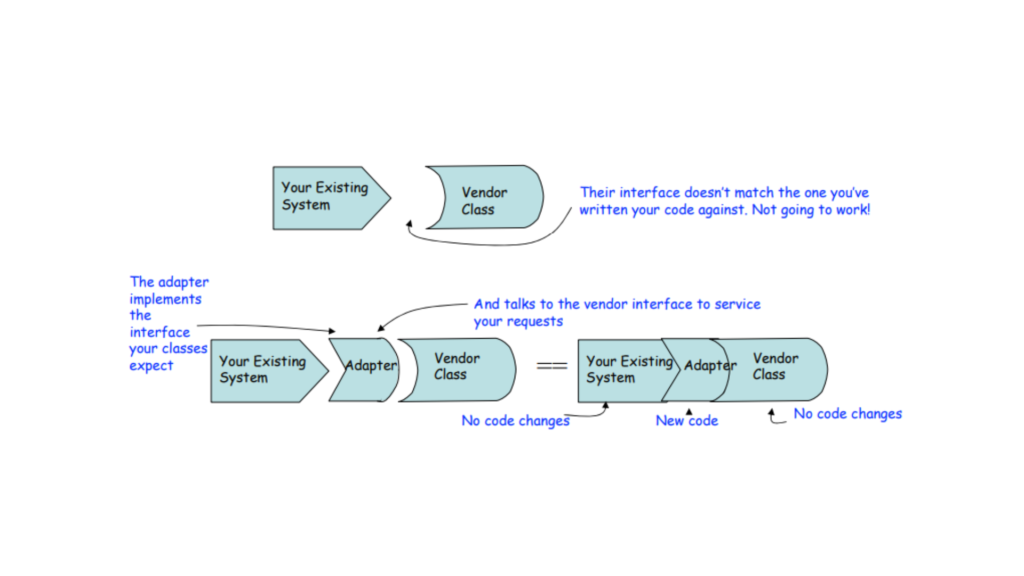
The Adapter Pattern helps us achieve this by creating a wrapper class around the original object. This wrapper is called an adapter, and the original object is known as the adaptee. The adapter acts as a bridge, allowing the client to use the adaptee’s functionality in a way that meets their needs.
To expand on this, the adapter is often referred to as “glue” because it metaphorically binds together two different interfaces, making them work smoothly as one. Similarly, it is called a “wrapper” because it encloses the original object (the adaptee) and presents a modified interface that the client can use without needing to change the original object.

The Structure of Adapter Pattern
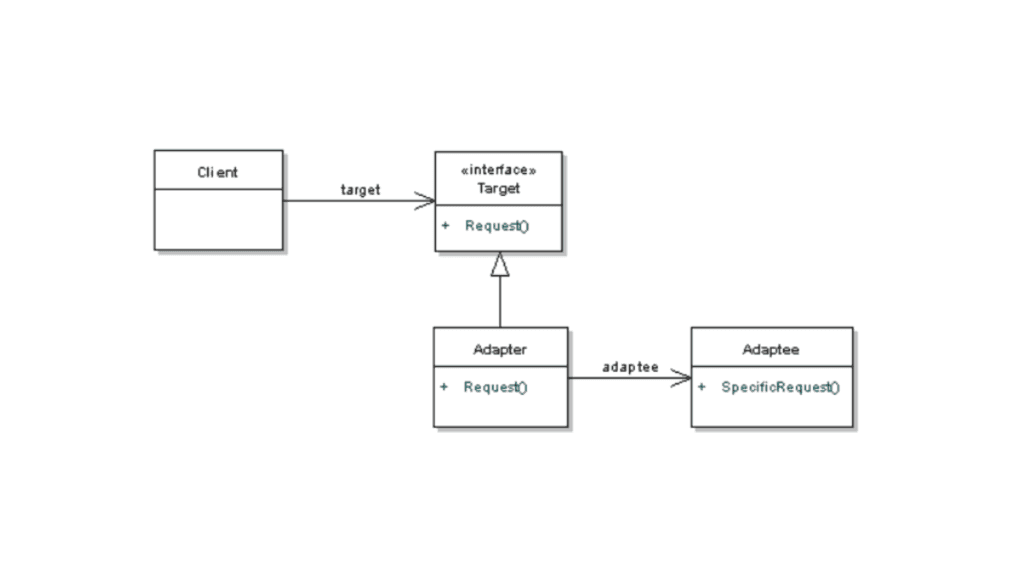
The Adapter Design Pattern involves four components:
- Target (Interface): The desired interface that the client expects.
- Adaptee: The existing class that has the behavior we want to use but with an incompatible interface.
- Adapter: A wrapper class that implements the
Targetinterface and translates the requests from the client to theAdaptee. - Client: The entity that interacts with the
Targetinterface.
Let’s revisit our example of a European wall socket and a US laptop’s AC plug for better understanding.
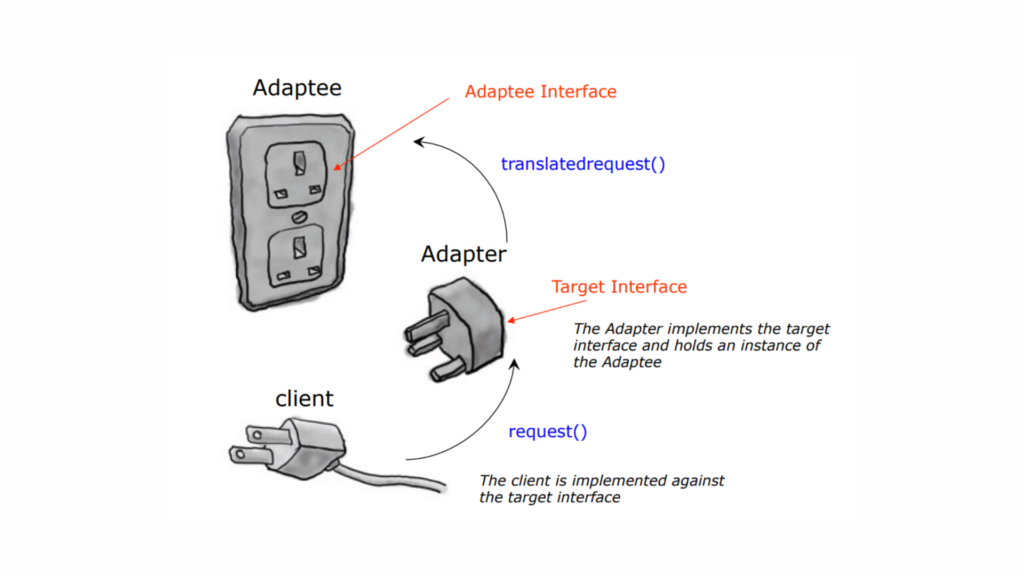
- Adaptee Interface: This is the existing interface or system that needs to be adapted. It has its own methods that may not be compatible with what the client expects.
- Target Interface: This is the interface that the client is designed to work with. The client will call methods from this interface.
- Request Method: This is the method defined in the target interface that the client will use.
- Adapter:
The adapter acts as a bridge between the target interface and the adaptee interface. It implements the target interface and holds a reference to an instance of the adaptee. The adapter translates calls from the target interface into calls to the adaptee interface. - Translated Request Method: This method in the adapter takes the request from the client and converts it into a format that the adaptee can understand.
Now, we have a EuropeanWallSocket that provides electricity in a format incompatible with a US laptop. We will create an adapter to make them compatible.
Step 1: Define the Adaptee Interface
This is the existing interface that represents the European wall socket.
// Adaptee interface
interface EuropeanWallSocket {
    fun provideElectricity(): String // Provides electricity in European format
}

// Implementation of the adaptee
class EuropeanWallSocketImpl : EuropeanWallSocket {
    override fun provideElectricity(): String {
        return "220V AC from European wall socket"
    }
}
Step 2: Define the Target Interface
This is the interface that our US laptop expects.
// Target interface
interface USLaptop {
    fun plugIn(): String // Expects a method to plug in
}
Step 3: Create the Adapter
The adapter will implement the target interface and use an instance of the adaptee.
// Adapter class
class SocketAdapter(private val europeanWallSocket: EuropeanWallSocket) : USLaptop {
    override fun plugIn(): String {
        // Adapt the European socket output for the US laptop
        val electricity = europeanWallSocket.provideElectricity()
        return "Adapting: $electricity to 110V AC for US laptop"
    }
}
Step 4: Client Code
Now, the client can use the USLaptop interface without worrying about the underlying EuropeanWallSocket.
fun main() {
    // Create an instance of the adaptee (European socket)
    val europeanSocket = EuropeanWallSocketImpl()

    // Use the adapter to connect the US laptop
    val socketAdapter = SocketAdapter(europeanSocket)

    // Plug in the US laptop using the adapter
    println(socketAdapter.plugIn())
}
Here,
- Adaptee: The
EuropeanWallSocketinterface and its implementation,EuropeanWallSocketImpl, represent a wall socket that provides electricity in the European format (220V AC). - Target: The
USLaptopinterface defines the method the laptop uses to connect to a power source. - Adapter: The
SocketAdapterclass implements theUSLaptopinterface and contains an instance ofEuropeanWallSocket. It adapts the output from the European wall socket to a format that the US laptop can understand (converting it to 110V AC). - Client: In the
mainfunction, we create an instance of theEuropeanWallSocketImpl, wrap it in theSocketAdapter, and call theplugInmethod to simulate plugging in the US laptop.
Output
When you run this code, it will output:
Adapting: 220V AC from European wall socket to 110V AC for US laptopThis example is only for demonstration purposes, illustrating how the Adapter Pattern allows a US laptop to work with a European wall socket by adapting the interface, making the systems compatible without altering their original functionality.
Bridging the Gap: How the Adapter Pattern Facilitates Communication
Have you ever wondered how the Adapter Pattern bridges the gap? The answer lies in the use of object composition and the principle that the pattern binds the client to an interface rather than an implementation.
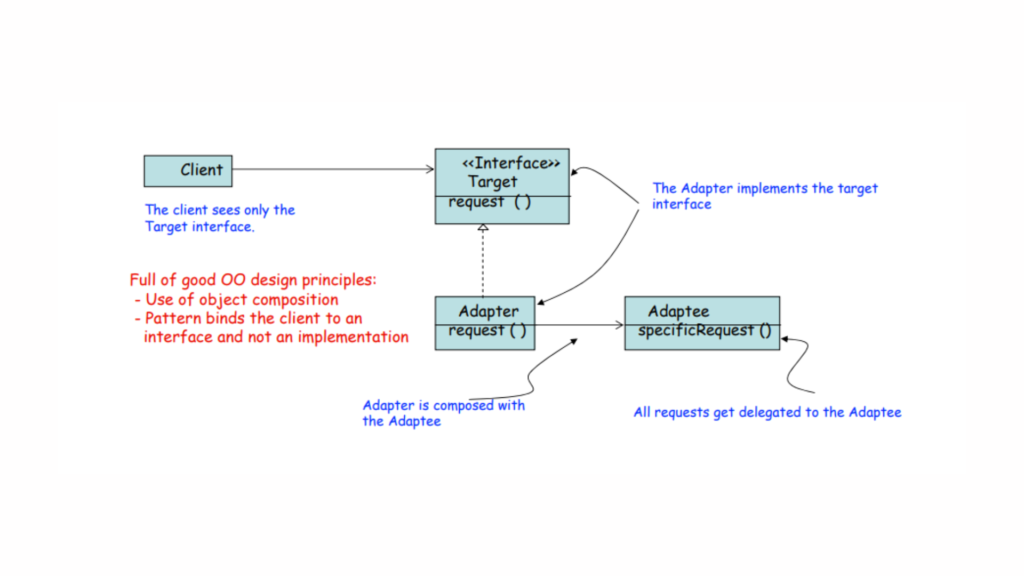
Delegation serves as the vital link that connects an Adapter to its Adaptee, facilitating seamless communication between the two. Meanwhile, interface inheritance defines the contract that the Adapter class must follow, ensuring clarity and consistency in its interactions.
Look at the previous example above: the client code binds to the USLaptop interface, not to the specific implementation of the adapter or the Adaptee. This design allows for flexibility; if you need to adapt to a different type of socket in the future, you can create a new adapter that implements the same USLaptop interface without changing the client code.
The Target and the Adaptee—often an older, legacy system—are established before the Adapter is introduced. The Adapter acts as a bridge, allowing the Target to utilize the Adaptee’s functionality without modifying its original structure. This approach not only enhances flexibility, but also elegantly encapsulates complexity, enabling developers to create more adaptable systems.
Adapter Pattern Variants
There are two common variants of the Adapter pattern:
- Object Adapter: The adapter holds an instance of the adaptee and delegates requests to it.
- Class Adapter: The adapter inherits from both the target and adaptee classes. However, Kotlin (like Java) does not support multiple inheritance, so this variant is less commonly used in Kotlin.
Object Adapters and Class Adapters use two different methods to adapt the Adaptee: composition and inheritance.
Let’s look at each one individually and discuss their differences.
Object Adapter Pattern
In the Object Adapter Pattern, the adapter contains an instance of the adaptee and implements the interface expected by the client. It “adapts” the methods of the adaptee to fit the expected interface.
Structure of Object Adapter Pattern
- Client: The class that interacts with the target interface.
- Target Interface: The interface that the client expects.
- Adaptee: The class with an incompatible interface that needs to be adapted.
- Adapter: The class that implements the target interface and holds a reference to the adaptee, enabling the two incompatible interfaces to work together.

In this UML diagram of the Object Adapter Pattern,
- Client → Depends on → Target Interface
- Adapter → Implements → Target Interface
- Adapter → Has a reference to → Adaptee
- Adaptee → Has methods incompatible with the Target Interface
Key Points:
- Object Adapter uses composition (by containing the adaptee) instead of inheritance, which makes it more flexible and reusable.
- The adapter doesn’t alter the existing
Adapteeclass but makes it compatible with theTarget Interface.
Simple Example of Object Adapter Pattern
Let’s consider a simple scenario where we want to charge different types of phones, but their charging ports are incompatible.
- The Client is a phone charger that expects to use a USB type-C charging port.
- The Adaptee is an old phone that uses a micro-USB charging port.
- The Adapter bridges the difference by converting the micro-USB interface to a USB type-C interface.
Step 1: Define the Target Interface
The charger (client) expects all phones to implement this interface (USB Type-C).
// Target interface that the client expects
interface UsbTypeCCharger {
    fun chargeWithUsbTypeC()
}
Step 2: Define the Adaptee
This is the old phone, which only has a Micro-USB port. The charger can’t directly use this interface.
// Adaptee class that uses Micro-USB for charging
class MicroUsbPhone {
    fun rechargeWithMicroUsb() {
        println("Micro-USB phone: Charging using Micro-USB port")
    }
}
Step 3: Create the Adapter
The adapter will “adapt” the Micro-USB phone to make it compatible with the USB Type-C charger. It wraps the MicroUsbPhone and translates the charging request.
// Adapter that makes Micro-USB phone compatible with USB Type-C charger
class MicroUsbToUsbTypeCAdapter(private val microUsbPhone: MicroUsbPhone) : UsbTypeCCharger {
    override fun chargeWithUsbTypeC() {
        println("Adapter: Converting USB Type-C to Micro-USB")
        microUsbPhone.rechargeWithMicroUsb() // Delegating the charging to the Micro-USB phone
    }
}
Step 4: Implement the Client
The client (charger) works with the target interface (UsbTypeCCharger). It can now charge a phone with a Micro-USB port by using the adapter.
fun main() {
    // Old phone with a Micro-USB port (Adaptee)
    val microUsbPhone = MicroUsbPhone()

    // Adapter that makes the Micro-USB phone compatible with USB Type-C charger
    val usbTypeCAdapter = MicroUsbToUsbTypeCAdapter(microUsbPhone)

    // Client (USB Type-C Charger) charges the phone using the adapter
    println("Client: Charging phone using USB Type-C charger")
    usbTypeCAdapter.chargeWithUsbTypeC()
}
Output:
Client: Charging phone using USB Type-C charger
Adapter: Converting USB Type-C to Micro-USB
Micro-USB phone: Charging using Micro-USB port
Here,
- Client: The charger expects all phones to be charged using a USB Type-C port, so it calls
chargeWithUsbTypeC(). - Adapter: The adapter receives the request from the client to charge using USB Type-C. It converts this request and adapts it to the
MicroUsbPhoneby callingrechargeWithMicroUsb()internally. - Adaptee (MicroUsbPhone): The phone knows how to charge itself using Micro-USB. The adapter simply makes it compatible with the client’s expectation.
Now, let’s look at another type, the Class Adapter Pattern.
Class Adapter Pattern
The Class Adapter Pattern is another type of adapter design pattern where an adapter class inherits from both the target interface and the Adaptee class. Unlike the Object Adapter Pattern, which uses composition (holding an instance of the Adaptee), the Class Adapter Pattern employs multiple inheritance to directly connect the client and the Adaptee.
In languages like Kotlin, which do not support true multiple inheritance, we simulate this behavior by using interfaces. The adapter implements the target interface and extends the Adaptee class to bridge the gap between incompatible interfaces.
Before going into much detail, let’s first understand the structure of the Class Adapter Pattern.
Structure of Class Adapter Pattern
- Client: The class that interacts with the target interface.
- Target Interface: The interface that the client expects to interact with.
- Adaptee: The class with an incompatible interface that needs to be adapted.
- Adapter: A class that inherits from both the target interface and the adaptee, adapting the adaptee to be compatible with the client.

In this UML diagram of the Class Adapter Pattern,
- Client → Depends on → Target Interface
- Adapter → Inherits from → Adaptee
- Adapter → Implements → Target Interface
- Adaptee → Has methods incompatible with the target interface
Key Points:
- The Class Adapter pattern relies on inheritance to connect the
Adapteeand theTarget Interface. - The adapter inherits from the adaptee and implements the target interface, thus combining both functionalities.
Simple Example of Class Adapter Pattern
Now, let’s look at an example of the Class Adapter Pattern. We’ll use the same scenario: a charger that expects a USB Type-C interface but has an old phone that only supports Micro-USB.
Step 1: Define the Target Interface
This is the interface that the client (charger) expects.
// Target interface that the client expects
interface UsbTypeCCharger {
    fun chargeWithUsbTypeC()
}
Step 2: Define the Adaptee
This is the class that needs to be adapted. It’s the old phone with a Micro-USB charging port.
// Adaptee class that uses Micro-USB for charging
class MicroUsbPhone {
    fun rechargeWithMicroUsb() {
        println("Micro-USB phone: Charging using Micro-USB port")
    }
}
Step 3: Define the Adapter (Class Adapter)
The Adapter inherits from the MicroUsbPhone (adaptee) and implements the UsbTypeCCharger (target interface). It adapts the MicroUsbPhone to be compatible with the UsbTypeCCharger interface.
// Adapter that inherits from MicroUsbPhone and implements UsbTypeCCharger
class MicroUsbToUsbTypeCAdapter : MicroUsbPhone(), UsbTypeCCharger {
    // Implement the method from UsbTypeCCharger
    override fun chargeWithUsbTypeC() {
        println("Adapter: Converting USB Type-C to Micro-USB")
        // Call the inherited method from MicroUsbPhone
        rechargeWithMicroUsb() // Uses the Micro-USB method to charge
    }
}
Step 4: Client Usage
The Client only interacts with the UsbTypeCCharger interface and charges the phone through the adapter.
fun main() {
    // Adapter that allows charging a Micro-USB phone with a USB Type-C charger
    val usbTypeCAdapter = MicroUsbToUsbTypeCAdapter()

    // Client (USB Type-C Charger) charges the phone through the adapter
    println("Client: Charging phone using USB Type-C charger")
    usbTypeCAdapter.chargeWithUsbTypeC()
}
Output:
Client: Charging phone using USB Type-C charger
Adapter: Converting USB Type-C to Micro-USB
Micro-USB phone: Charging using Micro-USB port
Here,
- Client: The client expects all phones to be charged using the
UsbTypeCChargerinterface. - Adapter: The adapter class inherits the behavior of the
MicroUsbPhone(adaptee) and implements theUsbTypeCChargerinterface. It converts the USB Type-C charging request and delegates it to the inheritedrechargeWithMicroUsb()method. - Adaptee (Micro-USB phone): The
MicroUsbPhoneclass has a method to recharge using Micro-USB, which is directly called by the adapter.
Class Adapter Vs. Object Adapter
The main difference between the Class Adapter and the Object Adapter lies in how they achieve compatibility between the Target and the Adaptee. In the Class Adapter pattern, we use inheritance by subclassing both the Target interface and the Adaptee class, which allows the adapter to directly access the Adaptee’s behavior. This means the adapter is tightly coupled to both the Target and the Adaptee at compile-time.
On the other hand, the Object Adapter pattern relies on composition, meaning the adapter holds a reference to an instance of the Adaptee rather than inheriting from it. This approach allows the adapter to forward requests to the Adaptee, making it more flexible because the Adaptee instance can be changed or swapped without modifying the adapter. The Object Adapter pattern is generally preferred when more flexibility is needed, as it loosely couples the adapter and Adaptee.
In short, the key difference is that the Class Adapter subclasses both the Target and the Adaptee, while the Object Adapter uses composition to forward requests to the Adaptee.
Real-World Examples
We’ll look at more real-world examples soon, but before that, let’s first explore a structural example of the Adapter Pattern to ensure a smooth understanding.
Adapter Pattern: Structural Example
Since we’ve already seen many code examples, there’s no rocket science here. Let’s jump straight into the code and then go over its explanation.
// Target interface that the client expects
interface Target {
    fun request()
}

// Adaptee class that has an incompatible method
class Adaptee {
    fun delegatedRequest() {
        println("This is the delegated method.")
    }
}

// Adapter class that implements Target and adapts Adaptee
class Adapter : Target {
    private val delegate = Adaptee() // Composition: holding an instance of Adaptee

    // Adapting the request method to call Adaptee's delegatedRequest
    override fun request() {
        delegate.delegatedRequest()
    }
}

// Test class to demonstrate the Adapter Pattern
fun main() {
    val client: Target = Adapter() // Client interacts with the Adapter through the Target interface
    client.request() // Calls the adapted method
}

////////////////////////////////////////////////////////////

// OUTPUT

// This is the delegated method.
In the code above,
- Target interface: The interface that the client expects to interact with.
- Adaptee class: Contains the method
delegatedRequest(), which needs to be adapted to the Target interface. - Adapter class: Implements the
Targetinterface and uses composition to hold an instance ofAdaptee. It adapts therequest()method to calldelegatedRequest(). - Client: Uses the adapter by interacting through the
Targetinterface.
Here, the Adapter adapts the incompatible interface (Adaptee) to the interface the client expects (Target), allowing the client to use the Adaptee without modification.
Adapting an Enumeration to an Iterator
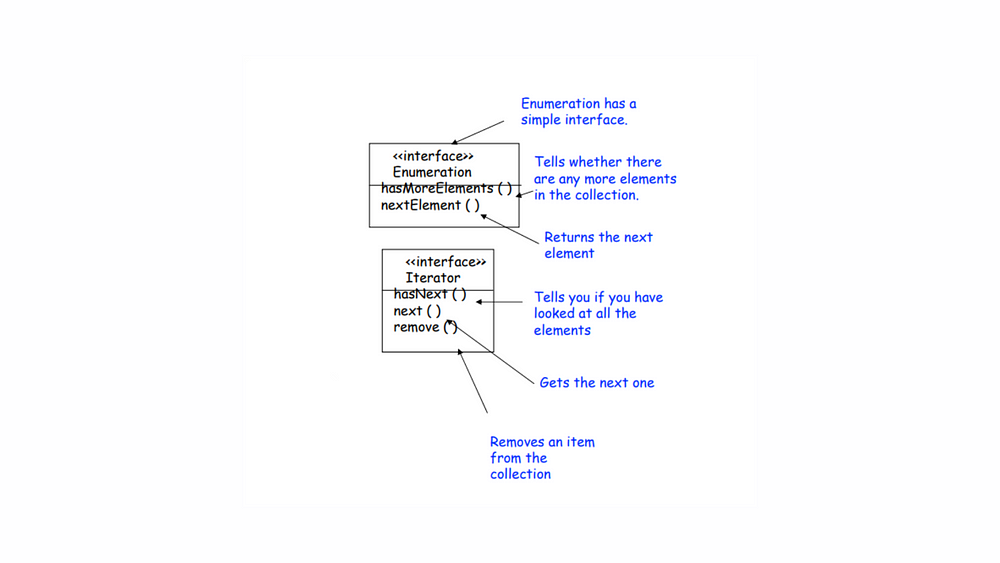
In the landscape of programming, particularly when dealing with collections in Kotlin and Java, we often navigate between legacy enumerators and modern iterators. In Java, the legacy Enumeration interface features straightforward methods like hasMoreElements() to check for remaining elements and nextElement() to retrieve the next item, representing a simpler time. In contrast, the modern Iterator interface—found in both Java and Kotlin—introduces a more robust approach, featuring hasNext(), next(), and even remove() (In Kotlin, the remove() method is part of the MutableIterator<out T> interface) for effective collection management.
Despite these advancements, many applications still rely on legacy code that exposes the Enumeration interface. This presents developers with a dilemma: how to seamlessly integrate this outdated system with newer code that prefers iterators. This is where the need for an adapter emerges, bridging the gap and allowing us to leverage the strengths of both worlds. By creating an adapter that implements the Iterator interface while wrapping an Enumeration instance, we can provide a smooth transition to modern coding practices without discarding the functionality of legacy systems.
Let’s examine the two interfaces
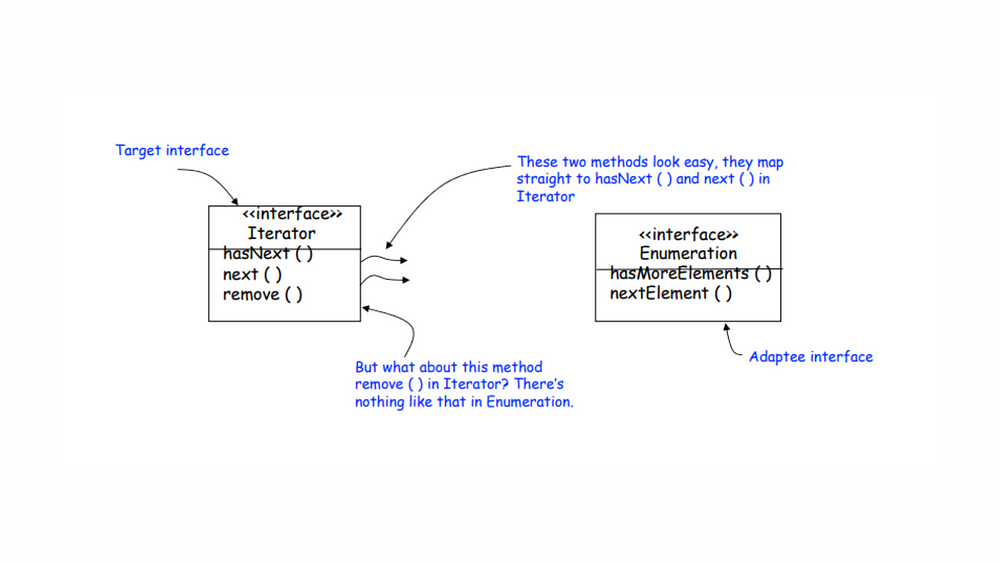
Adapting an Enumeration to an Iterator begins with examining the two interfaces. The Iterator interface includes three essential methods: hasNext(), next(), and remove(), while the older Enumeration interface features hasMoreElements() and nextElement(). The first two methods from Enumeration map easily to Iterator‘s counterparts, making the initial adaptation straightforward. However, the real challenge arises with the remove() method in Iterator, which has no equivalent in Enumeration. This disparity highlights the complexities involved in bridging legacy code with modern practices, emphasizing the need for an effective adaptation strategy to ensure seamless integration of the two interfaces.
Designing the Adapter

To effectively bridge the gap between the old-world Enumeration and the new-world Iterator, we will utilize methods from both interfaces. The Iterator interface includes hasNext(), next(), and remove(), while the Enumeration interface offers hasMoreElements() and nextElement(). Our goal is to create an adapter class, EnumerationIterator, which implements the Iterator interface while internally working with an existing Enumeration. This design allows our new code to leverage Iterators, even though an Enumeration operates beneath the surface. In essence, EnumerationIterator serves as the adapter, transforming the legacy Enumeration into a modern Iterator for your codebase, ensuring seamless integration and enhancing compatibility.
Dealing with the remove() Method
The Enumeration interface is a “read-only” interface that does not support the remove() method. This limitation implies that there is no straightforward way to implement a fully functional remove() method in the adapter. The best approach is to throw a runtime exception, as the Iterator designers anticipated this need and implemented an UnsupportedOperationException for such cases.
EnumerationIterator Adapter Code
Now, let’s look at how we can convert all of this into code.
import java.util.Enumeration
import java.util.Iterator

// EnumerationIterator class implementing Iterator
// Since we are adapting Enumeration to Iterator,
// the EnumerationIterator must implement the Iterator interface
// -- it has to look like the Iterator.
class EnumerationIterator<T>(private val enumeration: Enumeration<T>) : Iterator<T> {

    // We are adapting the Enumeration, using composition to store it in an instance variable.

    // hasNext() and next() are implemented by delegating to the corresponding methods in the Enumeration.

    // Checks if there are more elements in the enumeration
    override fun hasNext(): Boolean {
        return enumeration.hasMoreElements()
    }

    // Retrieves the next element from the enumeration
    override fun next(): T {
        return enumeration.nextElement()
    }

    // For remove(), we simply throw an exception.
    override fun remove() {
        throw UnsupportedOperationException("Remove operation is not supported.")
    }
}
Here,
- Generic Type: The
EnumerationIteratorclass is made generic with<T>to handle different types of enumerations. - Constructor: The constructor takes an
Enumeration<T>object as a parameter. - hasNext() Method: This method checks if there are more elements in the enumeration.
- next() Method: This method retrieves the next element from the enumeration.
- remove() Method: This method throws an
UnsupportedOperationException, indicating that the remove operation is not supported.
Here’s how we can use it,
fun main() {
    val list = listOf("Apple", "Banana", "Cherry")
    val enumeration: Enumeration<String> = list.elements()

    val iterator = EnumerationIterator(enumeration)

    while (iterator.hasNext()) {
        println(iterator.next())
    }
}
Here, you can see how the EnumerationIterator can be utilized to iterate over the elements of an Enumeration. Please note that the elements() method is specific to classes like Vector or Stack, so ensure you have a valid Enumeration instance to test this example.
While the adapter may not be perfect, it provides a reasonable solution as long as the client is careful and the adapter is well-documented. This clarity ensures that developers understand the limitations and can work with the adapter effectively.
Adapting an Integer Set to an Integer Priority Queue
Transforming an Integer Set into a Priority Queue might sound tricky since a Set inherently doesn’t maintain order, while a Priority Queue relies on element priority. However, by using the Adapter pattern, we can bridge this gap. The Adapter serves as an intermediary, allowing the Set to be used as if it were a Priority Queue. It adds the necessary functionality by reordering elements based on their priority when accessed. This way, you maintain the uniqueness of elements from the Set, while enabling the prioritized behavior of a Priority Queue, all without modifying the original structures. This approach enhances code flexibility and usability.
I know some of you might still be a little confused. Before we dive into the adapter code, let’s quickly revisit the basics of priority queues and integer sets. After that, we’ll walk through how we design the adapter, followed by the code and explanations.
What is a Priority Queue?
A Priority Queue is a type of queue in which elements are dequeued based on their priority, rather than their insertion order. In a typical queue (like a regular line), the first element added is the first one removed, which is known as FIFO (First In, First Out). However, in a priority queue, elements are removed based on their priority—typically the smallest (or sometimes largest) value is removed first.
- Example of Priority Queue Behavior: Imagine a hospital emergency room. Patients aren’t necessarily treated in the order they arrive; instead, the most critical cases (highest priority) are treated first. Similarly, in a priority queue, elements with the highest (or lowest) priority are processed first.In a min-priority queue, the smallest element is dequeued first. In a max-priority queue, the largest element is dequeued first.
What is an Integer Set?
A Set is a collection of unique elements. In programming, an Integer Set is simply a set of integers. The key characteristic of a set is that it does not allow duplicate elements and typically has no specific order.
- Example of Integer Set Behavior: If you add the integers
3, 7, 5, 3to a set, the set will only contain3, 7, 5, as the duplicate3will not be added again.
How Does the Integer Set Adapt to Priority Queue Behavior?
A Set by itself does not have any priority-based behavior. However, with the help of the Adapter pattern, we can make the set behave like a priority queue. The Adapter pattern is useful when you have two incompatible interfaces and want to use one in place of the other.
Here, the Set itself doesn’t manage priorities, but we build an adapter around the set that makes it behave like a Priority Queue. Specifically, we implement methods that will:
- Add elements to the set (
add()method). - Remove the smallest element (which gives it the behavior of a min-priority queue).
- Check the size of the set, mimicking the
size()behavior of a queue.
PriorityQueueAdapter : Code
Now, let’s see the code and its explanations
// Define a PriorityQueue interface
interface PriorityQueue {
    fun add(element: Any)
    fun size(): Int
    fun removeSmallest(): Any?
}

// Implement the PriorityQueueAdapter that adapts a Set to work like a PriorityQueue
class PriorityQueueAdapter(private val set: MutableSet<Int>) : PriorityQueue {

    // Add an element to the Set
    override fun add(element: Any) {
        if (element is Int) {
            set.add(element)
        }
    }

    // Get the size of the Set
    override fun size(): Int {
        return set.size
    }

    // Find and remove the smallest element from the Set
    override fun removeSmallest(): Int? {
        // If the set is empty, return null
        if (set.isEmpty()) return null

        // Find the smallest element using Kotlin's built-in functions
        val smallest = set.minOrNull()

        // Remove the smallest element from the set
        if (smallest != null) {
            set.remove(smallest)
        }

        // Return the smallest element
        return smallest
    }
}
PriorityQueue Interface:
- We define an interface
PriorityQueuewith three methods: add(element: Any): Adds an element to the queue.size(): Returns the number of elements in the queue.removeSmallest(): Removes and returns the smallest element from the queue.
PriorityQueueAdapter Class:
- This is the adapter that makes a
MutableSet<Int>work as aPriorityQueue. It adapts theSetbehavior to match thePriorityQueueinterface. - It holds a reference to a
MutableSetof integers, which will store the elements.
add() method:
- Adds an integer to the
Set. SinceSetensures that all elements are unique, duplicate values will not be added.
size() method:
- Returns the current size of the
Set, which is the number of elements stored.
removeSmallest() method:
- This method first checks if the set is empty; if so, it returns
null. - If not, it uses the built-in Kotlin method
minOrNull()to find the smallest element in the set. - Once the smallest element is found, it is removed from the set using
remove(), and the smallest element is returned.
PriorityQueueAdapter: How It Works
Let’s walk through how the PriorityQueueAdapter works by using a simple example, followed by detailed explanations.
fun main() {
    // Create a mutable set of integers
    val integerSet = mutableSetOf(15, 3, 7, 20)

    // Create an instance of PriorityQueueAdapter using the set
    val priorityQueue: PriorityQueue = PriorityQueueAdapter(integerSet)

    // Add elements to the PriorityQueue
    priorityQueue.add(10)
    priorityQueue.add(5)

    // Print the size of the PriorityQueue
    println("Size of the PriorityQueue: ${priorityQueue.size()}") // Expected: 6 (15, 3, 7, 20, 10, 5)

    // Remove the smallest element
    val smallest = priorityQueue.removeSmallest()
    println("Smallest element removed: $smallest") // Expected: 3 (which is the smallest in the set)

    // Check the size of the PriorityQueue after removing the smallest element
    println("Size after removing smallest: ${priorityQueue.size()}") // Expected: 5 (remaining: 15, 7, 20, 10, 5)

    // Remove the next smallest element
    val nextSmallest = priorityQueue.removeSmallest()
    println("Next smallest element removed: $nextSmallest") // Expected: 5

    // Final state of the PriorityQueue
    println("Remaining elements in the PriorityQueue: $integerSet") // Expected: [15, 7, 20, 10]
}
Initialization:
- We create a
MutableSetof integers with values:15,3,7, and20.ThePriorityQueueAdapteris initialized with this set.
Adding Elements:
- We add two new integers,
10and5, using theadd()method of thePriorityQueueAdapter.After adding these, the set contains the following elements:[15, 3, 7, 20, 10, 5].
Size of the PriorityQueue:
- We check the size of the queue using the
size()method. Since we have six unique elements in the set, the size returned is6.
Removing the Smallest Element:
- The
removeSmallest()method is called.The method scans the set and finds3to be the smallest element.It removes3from the set and returns it.After removal, the set becomes:[15, 7, 20, 10, 5].
Size After Removal:
- The size is checked again, and it returns
5, since one element (3) was removed.
Removing the Next Smallest Element:
- The
removeSmallest()method is called again.This time, it finds5as the smallest element in the set.It removes5and returns it.After removal, the set is now:[15, 7, 20, 10].
Final State of the Queue:
- The final remaining elements in the set are printed, showing the updated state of the set:
[15, 7, 20, 10].
The PriorityQueueAdapter demonstrates how we can transform a Set (which does not naturally support priority-based operations) into something that behaves like a PriorityQueue, using the Adapter design pattern. By implementing additional functionality (finding and removing the smallest element), this adapter provides a simple and effective solution to integrate a set into contexts that require a priority queue behavior.
Adapter Design Pattern in Android
The primary goal of the Adapter pattern is to enable communication between two incompatible interfaces. This becomes particularly valuable in Android development, where you frequently need to bridge data sources — such as arrays, lists, or databases — with UI components like RecyclerView, ListView, or Spinner.
So, the Adapter pattern is widely utilized in Android development. Let’s explore its applications one by one.
RecyclerView Adapter
The RecyclerView is a flexible view for providing a limited window into a large data set. The RecyclerView.Adapter serves as the bridge that connects the data to the RecyclerView, allowing for efficient view recycling and performance optimization.
class MyAdapter(private val itemList: List<String>) : RecyclerView.Adapter<MyAdapter.ViewHolder>() {

    class ViewHolder(view: View) : RecyclerView.ViewHolder(view) {
        val textView: TextView = view.findViewById(R.id.text_view)
    }

    override fun onCreateViewHolder(parent: ViewGroup, viewType: Int): ViewHolder {
        val view = LayoutInflater.from(parent.context).inflate(R.layout.item_layout, parent, false)
        return ViewHolder(view)
    }

    override fun onBindViewHolder(holder: ViewHolder, position: Int) {
        holder.textView.text = itemList[position]
    }

    override fun getItemCount(): Int = itemList.size
}
ListView Adapter
Before RecyclerView, ListView was the primary component for displaying lists of data. The ArrayAdapter and SimpleAdapter are classic examples of adapters used with ListView. They help convert data into views.
class MyActivity : AppCompatActivity() {
    private lateinit var listView: ListView

    override fun onCreate(savedInstanceState: Bundle?) {
        super.onCreate(savedInstanceState)
        setContentView(R.layout.activity_main)

        listView = findViewById(R.id.list_view)
        val items = listOf("Item 1", "Item 2", "Item 3")
        val adapter = ArrayAdapter(this, android.R.layout.simple_list_item_1, items)
        listView.adapter = adapter
    }
}
Spinner Adapter
A Spinner is a dropdown list that allows the user to select an item from a list. The Adapter pattern is also applied here, typically through ArrayAdapter or a custom adapter to provide data to the Spinner.
class MySpinnerAdapter(private val context: Context, private val items: List<String>) : BaseAdapter() {

    override fun getCount(): Int = items.size

    override fun getItem(position: Int): String = items[position]

    override fun getItemId(position: Int): Long = position.toLong()

    override fun getView(position: Int, convertView: View?, parent: ViewGroup?): View {
        val textView = TextView(context)
        textView.text = getItem(position)
        return textView
    }
}

// In your activity
val spinner: Spinner = findViewById(R.id.spinner)
val items = listOf("Option 1", "Option 2", "Option 3")
val adapter = MySpinnerAdapter(this, items)
spinner.adapter = adapter
ViewPager Adapter
In ViewPager, the adapter is used to manage the pages of content. The PagerAdapter (or its subclass FragmentPagerAdapter) allows developers to create and manage the fragments that are displayed in the ViewPager.
class MyPagerAdapter(fm: FragmentManager) : FragmentPagerAdapter(fm) {
    private val fragments = listOf(Fragment1(), Fragment2(), Fragment3())

    override fun getItem(position: Int): Fragment = fragments[position]

    override fun getCount(): Int = fragments.size
}

// In your activity
val viewPager: ViewPager = findViewById(R.id.view_pager)
val adapter = MyPagerAdapter(supportFragmentManager)
viewPager.adapter = adapter
Custom Adapter for Data Binding
As developers, we often create custom adapters to directly bind data to views. This approach is especially beneficial when working with frameworks like Android Data Binding or when connecting complex data models to UI components.
// Custom Binding Adapter
@BindingAdapter("app:loadImage")
fun loadImage(view: ImageView, url: String?) {
    // Load image using a library like Glide or Picasso
    Glide.with(view.context).load(url).into(view)
}
The Adapter pattern is prevalent in various components of Android development, from UI elements like ListView, Spinner, and ViewPager to more complex data binding scenarios. It is essential for facilitating seamless communication between data sources and UI components. By implementing various adapters, we enhance code organization, reusability, and flexibility, allowing developers to create responsive and dynamic applications more efficiently.
Conclusion
The Adapter Design Pattern is a powerful tool that every developer should have in their toolkit. By bridging the gap between incompatible systems, it allows for smoother integration and greater code flexibility. Whether you’re using the Class Adapter or Object Adapter, understanding these types can significantly enhance the adaptability of your projects.
From real-world examples to its use in Android development, the Adapter Design Pattern shows its versatility in solving common coding challenges. As we’ve explored, it’s not just about making systems work together—it’s about doing so in a way that’s clean, maintainable, and future-proof.
So next time you face a compatibility issue, remember that the Adapter Pattern is here to save the day. Keep this pattern in mind, and you’ll find yourself writing more robust, adaptable, and efficient code. Now that you’ve finished your coffee, it’s time to apply what you’ve learned—happy coding!