
As a Kotlin developer, you’re no stranger to the numerous architectural patterns in Android app development. From the well-established MVP (Model-View-Presenter) to the widely-used MVVM (Model-View-ViewModel), and now, the emerging MVI (Model-View-Intent), it’s easy to feel lost in the sea of choices. But here’s the thing: MVI is rapidly becoming the go-to architecture for many, and it might just be the game changer you need in your next project.
If you’re feeling overwhelmed by all the buzzwords — MVP, MVVM, and now MVI — you’re not alone. Understanding which architecture fits best often feels like decoding an exclusive developer language. But when it comes to MVI, things are simpler than they seem.
In this blog, we’ll break down MVI architecture in Kotlin step-by-step, showing why it’s gaining popularity and how it simplifies Android app development. By the end, you’ll not only have a solid grasp of MVI, but you’ll also know how to integrate it into your Kotlin projects seamlessly — without the complexity.
What is MVI, and Why Should You Care?
You’re probably thinking, “Oh no, not another architecture pattern!” I get it. With all these patterns out there, navigating Android development can feel like a never-ending quest for the perfect way to manage UI, data, and state. But trust me, MVI is different.
MVI stands for Model-View-Intent. It’s an architecture designed to make your app’s state management more predictable, easier to test, and scalable. MVI addresses several common issues found in architectures like MVP and MVVM, such as:
- State Management: What’s the current state of the UI?
- Complex UI Flows: You press a button, but why does the app behave unexpectedly?
- Testing: How do you test all these interactions without conjuring a wizard?
Challenges in Modern Android App Development
Before we dive into the core concepts of MVI, let’s first examine some challenges faced in contemporary Android app development:
- Heavy Asynchronicity: Managing various asynchronous sources like REST APIs, WebSockets, and push notifications can complicate state management.
- State Updates from Multiple Sources: State changes can originate from different components, leading to confusion and potential inconsistencies.
- Large App Sizes: Modern applications can become cumbersome in size, impacting performance and user experience.
- Asynchronicity and Size: Combining asynchronous operations with large applications can lead to unexpected issues when changes occur in one part of the app.
- Debugging Difficulties: Tracing back to identify the root cause of errors or unexpected behavior can be incredibly challenging, often leaving developers frustrated.
The Core Idea Behind MVI
MVI architecture has its roots in functional and reactive programming. Inspired by patterns like Redux, Flux, and Cycle.js, it focuses on state management and unidirectional data flow, where all changes in the system flow in one direction, creating a predictable cycle of state updates.
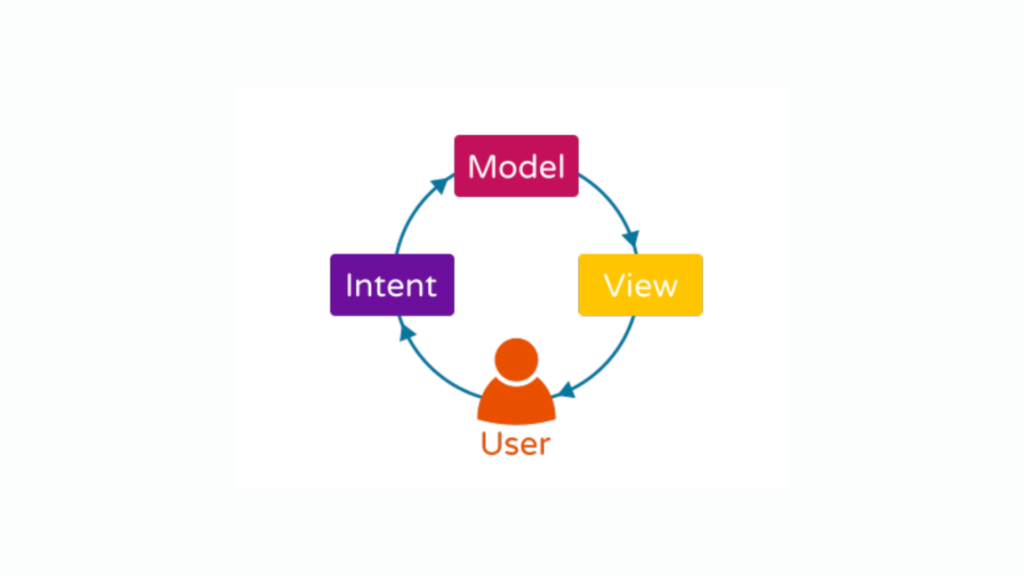
In MVI, the UI is driven by a single source of truth: the Model, which holds the application’s state. Each user interaction triggers an Intent, which updates the Model, and the Model, in turn, updates the View. This clear cycle makes it easier to reason about how the UI evolves over time and simplifies debugging.
Think of your app as a state machine: the UI exists in a specific state, and user actions (or intents) cause the state to change. By having a single source of truth, tracking and debugging UI behavior becomes more predictable and manageable.
Here’s a simple breakdown of the key components:
- Model: Stores the application’s state.
- View: Displays the current state and renders the UI accordingly.
- Intent: Represents user-triggered actions or events, such as button presses or swipes.
Key Principles of MVI:
- Unidirectional Data Flow: Data flows in a single direction—from Intent → Model → View, ensuring a clear and predictable cycle.
- Immutable State: The state of the UI is immutable, meaning that a new instance of the state is created with every change.
- Cyclic Process: The interaction forms a loop, as each new Intent restarts the process, making the UI highly reactive to user inputs.
MVI vs MVVM: Why Choose MVI?
You might be thinking, “Hey, I’ve been using MVVM for years and it works fine. Why should I switch to MVI?” Good question! Let’s break it down.
Bidirectional Binding (MVVM): While MVVM is widely popular, it has one potential pitfall—bidirectional data binding. The ViewModel updates the View, and the View can update the ViewModel. While this flexibility is powerful, it can lead to unpredictable behaviors if not managed carefully, with data flying everywhere like confetti at a party. You think you’re just updating the username, but suddenly the whole form resets. Debugging that can be a real headache!
Unidirectional Flow (MVI): On the other hand, MVI simplifies things with a strict, unidirectional data flow. Data only goes one way—no confusion, no loops. It’s like having a traffic cop ensuring no one drives the wrong way down a one-way street.
State Management: In MVVM, LiveData is often used to manage state, but if not handled carefully, it can lead to inconsistencies. MVI, however, uses a single source of truth (the State), which ensures consistency across your app. If something breaks, you know exactly where to look.
In the end, MVI encourages writing cleaner, more maintainable code. It might require a bit more structure upfront, but once you embrace it, you’ll realize it saves you from a nightmare of state-related bugs and debugging sessions.
Now that you understand the basics of MVI, let’s dive deeper into how each of these components works in practice.
The Model (Where the Magic Happens)
In most architectures like MVP and MVVM, the Model traditionally handles only the data of your application. However, in more modern approaches like MVI (and even in MVVM, where we’re starting to adapt this concept), the Model also manages the app’s state. But what exactly is state?
In reactive programming paradigms, state refers to how your app responds to changes. Essentially, the app transitions between different states based on user interactions or other triggers. For example, when a button is clicked, the app moves from one state (e.g., waiting for input) to another (e.g., processing input).
State represents the current condition of the UI, such as whether it’s loading, showing data, or displaying an error message. In MVI, managing state explicitly and immutably is key. This means that once a state is defined, it cannot be modified directly — a new state is created if changes occur. This ensures the UI remains predictable, easier to understand, and simpler to debug.
So, unlike older architectures where the Model focuses primarily on data handling, MVI treats the Model as the central point for both data and state management. Every change in the app’s flow — whether it’s loading, successful, or in error — is encapsulated as a distinct, immutable state.
Here’s how we define a simple model in Kotlin:
sealed class ViewState {
    object Loading : ViewState()
    data class Success(val data: List<String>) : ViewState()
    data class Error(val errorMessage: String) : ViewState()
}
- Loading: This represents the state when the app is in the process of fetching data (e.g., waiting for a response from an API).
- Success: This state occurs when the data has been successfully fetched and is ready to be displayed to the user.
- Error: This represents a state where something went wrong during data fetching or processing (e.g., a network failure or unexpected error).
The View (The thing people see)
The View is, well, your UI. It’s responsible for displaying the current state of the application. In MVI, the View does not hold any logic. It just renders whatever state it’s given. The idea here is to decouple the logic from the UI.
Imagine you’re watching TV. The TV itself doesn’t decide what show to put on. It simply displays the signal it’s given. It doesn’t throw a tantrum if you change the channel either.
In Kotlin, you could write a function like this in your fragment or activity:
fun render(state: ViewState) {
    when (state) {
        is ViewState.Loading -> showLoadingSpinner()
        is ViewState.Success -> showData(state.data)
        is ViewState.Error -> showError(state.errorMessage)
    }
}
Simple, right? The view just listens for a state and reacts accordingly.
The Intent (Let’s do this!)
The Intent represents the user’s actions. It’s how the user interacts with the app. Clicking a button, pulling to refresh, typing in a search bar — these are all intents.
The role of the Intent in MVI is to communicate what the user wants to do. Intents are then translated into state changes.
Let’s define a couple of intents in Kotlin:
sealed class UserIntent {
    object LoadData : UserIntent()
    data class SubmitQuery(val query: String) : UserIntent()
}
Notice that these intents describe what the user is trying to do. They don’t define how to do it — that’s left to the business logic. It’s like placing an order at a restaurant. You don’t care how they cook your meal; you just want the meal!

Components of MVI Architecture
Model: Managing UI State
In MVI, the Model is responsible for representing the entire state of the UI. Unlike in other patterns, where the model might focus on data management, here it focuses on the UI state. This state is immutable, meaning that whenever there is a change, a new state object is created rather than modifying the existing one.
The model can represent various states, such as:
- Loading: When the app is fetching data.
- Loaded: When the data is successfully retrieved and ready to display.
- Error: When an error occurs (e.g., network failure).
- UI interactions: Reflecting user actions like clicks or navigations.
Each state is treated as an individual entity, allowing the architecture to manage complex state transitions more clearly.
Example of possible states:
sealed class UIState {
    object Loading : UIState()
    data class DataLoaded(val data: List<String>) : UIState()
    object Error : UIState()
}
View: Rendering the UI Based on State
The View in MVI acts as the visual representation layer that users interact with. It observes the current state from the model and updates the UI accordingly. Whether implemented in an Activity, Fragment, or custom view, the view is a passive component that merely reflects the current state—it doesn’t handle logic.
In other words, the view doesn’t make decisions about what to show. Instead, it receives updated states from the model and renders the UI based on these changes. This ensures that the view remains as a stateless component, only concerned with rendering.
Example of a View rendering different states:
fun render(state: UIState) {
    when (state) {
        is UIState.Loading -> showLoadingIndicator()
        is UIState.DataLoaded -> displayData(state.data)
        is UIState.Error -> showErrorMessage()
    }
}
Intent: Capturing User Actions
The Intent in MVI represents user actions or events that trigger changes in the application. This might include events like button clicks, swipes, or data inputs. Unlike traditional Android intents, which are used for launching components like activities, MVI’s intent concept is broader—it refers to the intentions of the user, such as trying to load data or submitting a form.
When a user action occurs, it generates an Intent that is sent to the model. The model processes the intent and produces the appropriate state change, which the view observes and renders.
Example of user intents:
sealed class UserIntent {
    object LoadData : UserIntent()
    data class ItemClicked(val itemId: String) : UserIntent()
}
How Does MVI Work?
The strength of MVI lies in its clear, predictable flow of data.
Here’s a step-by-step look at how the architecture operates:
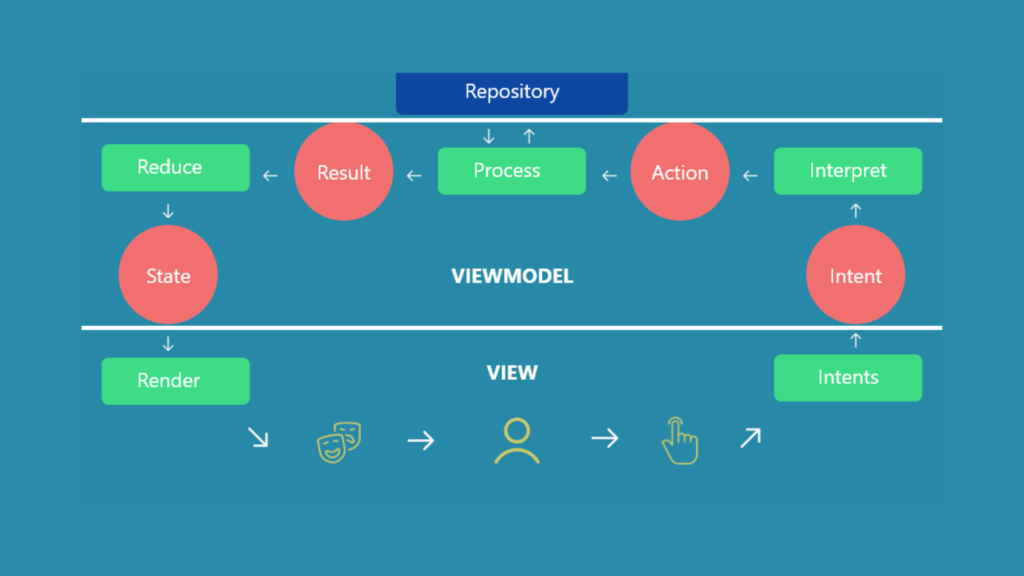
- User Interaction (Intent Generation): The cycle begins when the user interacts with the UI. For instance, the user clicks a button to load data, which generates an Intent (e.g.,
LoadData). - Intent Triggers Model Update: The Intent is then passed to the Model, which processes it. Based on the action, the Model might load data, update the UI state, or handle errors.
- Model Updates State: After processing the Intent, the Model creates a new UI state (e.g.,
Loading,DataLoaded, orError). The state is immutable, meaning the Model doesn’t change but generates a new state that the system can use. - View Renders State: The View observes the state changes in the Model and updates the UI accordingly. For example, if the state is
DataLoaded, the View will render the list of data on the screen. If it’sError, it will display an error message. - Cycle Repeats: The cycle continues as long as the user interacts with the app, creating new intents and triggering new state changes in the Model.
This flow ensures that data moves in one direction, from Intent → Model → View, without circular dependencies or ambiguity. If the user performs another action, the cycle starts again.
Let’s walk through a simple example of how MVI would be implemented in an Android app to load data:
- User Intent: The user opens the app and requests to load a list of items.
- Model Processing: The Model receives the
LoadDataintent, fetches data from the repository, and updates the state toDataLoadedwith the retrieved data. - View Rendering: The View observes the new state and displays the list of items to the user. If the data fetch fails, the state would instead be set to
Error, and the View would display an error message.
This cycle keeps the UI responsive and ensures that the user always sees the correct, up-to-date information.

Let’s Build an Example: A Simple MVI App
Alright, enough theory. Let’s roll up our sleeves and build a simple MVI-based Kotlin app that fetches and displays a list of pasta recipes (because who doesn’t love pasta?).
Step 1: Define Our ViewState
We’ll start by defining our ViewState. This will represent the possible states of the app.
sealed class RecipeViewState {
    object Loading : RecipeViewState()
    data class Success(val recipes: List<String>) : RecipeViewState()
    data class Error(val message: String) : RecipeViewState()
}
- Loading: Shown when we’re fetching the data.
- Success: Shown when we have successfully fetched the list of pasta recipes.
- Error: Shown when there’s an error, like burning the pasta (I mean, network error).
Step 2: Define the User Intents
Next, we define the UserIntent. This will capture the actions the user can take.
sealed class RecipeIntent {
    object LoadRecipes : RecipeIntent()
}
For now, we just have one intent: the user wants to load recipes.
Step 3: Create the Reducer (Logic for Mapping Intents to State)
Now comes the fun part — the reducer! This is where the magic happens. The reducer takes the user’s intent and processes it into a new state.
Think of it as the person in the kitchen cooking the pasta. You give them the recipe (intent), and they deliver you a nice plate of pasta (state). Hopefully, it’s not overcooked.
Here’s a simple reducer implementation:
fun reducer(intent: RecipeIntent): RecipeViewState {
    return when (intent) {
        is RecipeIntent.LoadRecipes -> {
            // Simulating a loading state
            RecipeViewState.Loading
        }
    }
}
Right now, it just shows the loading state, but don’t worry. We’ll add more to this later.
Step 4: Set Up the View
The View in MVI is pretty straightforward. It listens for state changes and updates the UI accordingly.
fun render(viewState: RecipeViewState) {
    when (viewState) {
        is RecipeViewState.Loading -> {
            // Show a loading spinner
            println("Loading recipes... 🍝")
        }
        is RecipeViewState.Success -> {
            // Display the list of recipes
            println("Here are all your pasta recipes: ${viewState.recipes}")
        }
        is RecipeViewState.Error -> {
            // Show an error message
            println("Oops! Something went wrong: ${viewState.message}")
        }
    }
}
The ViewModel
In an MVI architecture, the ViewModel plays a crucial role in coordinating everything. It handles intents, processes them, and emits the corresponding state to the view.
Here’s an example ViewModel:
class RecipeViewModel {

    private val state: MutableLiveData<RecipeViewState> = MutableLiveData()

    fun processIntent(intent: RecipeIntent) {
        state.value = reducer(intent)

        // Simulate a network call to fetch recipes
        GlobalScope.launch(Dispatchers.IO) {
            delay(2000) // Simulating delay for network call

            val recipes = listOf("Spaghetti Carbonara", "Penne Arrabbiata", "Fettuccine Alfredo")
            state.postValue(RecipeViewState.Success(recipes))
        }
    }

    fun getState(): LiveData<RecipeViewState> = state
}
- The
processIntentfunction handles the user’s intent and updates the state. - We simulate a network call using a coroutine, which fetches a list of pasta recipes (again, we love pasta).
- Finally, we update the view state to Success and send the list of recipes back to the view.
Bringing It All Together
Here’s how we put everything together:
fun main() {
    val viewModel = RecipeViewModel()

    // Simulate the user intent to load recipes
    viewModel.processIntent(RecipeIntent.LoadRecipes)

    // Observe state changes
    viewModel.getState().observeForever { viewState ->
        render(viewState)
    }

    // Let's give the network call some time to simulate fetching
    Thread.sleep(3000)
}
This will:
- Trigger the LoadRecipes intent.
- Show a loading spinner (or in our case, print “Loading recipes… 🍝”).
- After two seconds (to simulate a network call), it will print a list of pasta recipes.
And there you have it! A simple MVI-based app that fetches and displays recipes, built with Kotlin.
Let’s Build One More App: A Simple To-Do List App
To get more clarity and grasp the concept, I’ll walk through a simple example of a To-Do List App using MVI in Kotlin.
Step 1: Define the State
First, let’s define the state of our to-do list:
sealed class ToDoState {
    object Loading : ToDoState()
    data class Data(val todos: List<String>) : ToDoState()
    data class Error(val message: String) : ToDoState()
}
Here, Loading represents the loading state, Data holds our list of todos, and Error represents any error states.
Step 2: Define Intents
Next, define the various user intents:
sealed class ToDoIntent {
    object LoadTodos : ToDoIntent()
    data class AddTodo(val task: String) : ToDoIntent()
    data class DeleteTodo(val task: String) : ToDoIntent()
}
These are actions the user can trigger, such as loading todos, adding a task, or deleting one.
Step 3: Create a Reducer
The reducer is the glue that connects the intent to the state. It transforms the current state based on the intent. Think of it as the brain of your MVI architecture.
fun reducer(currentState: ToDoState, intent: ToDoIntent): ToDoState {
    return when (intent) {
        is ToDoIntent.LoadTodos -> ToDoState.Loading
        is ToDoIntent.AddTodo -> {
            if (currentState is ToDoState.Data) {
                val updatedTodos = currentState.todos + intent.task
                ToDoState.Data(updatedTodos)
            } else {
                currentState
            }
        }
        is ToDoIntent.DeleteTodo -> {
            if (currentState is ToDoState.Data) {
                val updatedTodos = currentState.todos - intent.task
                ToDoState.Data(updatedTodos)
            } else {
                currentState
            }
        }
    }
}
The reducer function takes in the current state and an intent, and spits out a new state. Notice how it doesn’t modify the old state but instead returns a fresh one, keeping things immutable.
Step 4: View Implementation
Now, let’s create our View, which will render the state:
class ToDoView {
    fun render(state: ToDoState) {
        when (state) {
            is ToDoState.Loading -> println("Loading todos...")
            is ToDoState.Data -> println("Here are all your todos: ${state.todos}")
            is ToDoState.Error -> println("Oops! Error: ${state.message}")
        }
    }
}
The view listens to state changes and updates the UI accordingly.
Step 5: ViewModel (Managing Intents)
Finally, we need a ViewModel to handle incoming intents and manage state transitions.
class ToDoViewModel {
    private var currentState: ToDoState = ToDoState.Loading
    private val view = ToDoView()

    fun processIntent(intent: ToDoIntent) {
        currentState = reducer(currentState, intent)
        view.render(currentState)
    }
}
The ToDoViewModel takes the intent, runs it through the reducer to update the state, and then calls render() on the view to display the result.
Common Pitfalls And How to Avoid Them
MVI is awesome, but like any architectural pattern, it has its challenges. Here are a few common pitfalls and how to avoid them:
1. Overengineering the State
The whole idea of MVI is to simplify state management, but it’s easy to go overboard and make your states overly complex. Keep it simple! You don’t need a million different states—just enough to represent the core states of your app.
2. Complex Reducers
Reducers are great, but they can get messy if you try to handle too many edge cases inside them. Split reducers into smaller functions if they start becoming unmanageable.
3. Ignoring Performance
Immutable states are wonderful, but constantly recreating new states can be expensive if your app has complex data. Try using Kotlin’s data class copy() method to create efficient, shallow copies.
4. Not Testing Your Reducers
Reducers are pure functions—they take an input and always produce the same output. This makes them perfect candidates for unit testing. Don’t skimp on this; test your reducers to ensure they behave predictably!
Benefits of Using MVI Architecture
The MVI pattern offers several key advantages in modern Android development, especially for managing complex UI states:
- Unidirectional Data Flow: By maintaining a clear, single direction for data to flow, MVI eliminates potential confusion about how and when the UI is updated. This makes the architecture easier to understand and debug.
- Predictable UI State: With MVI, every possible state is predefined in the Model, and the state is immutable. This predictability means that the developer can always anticipate how the UI will react to different states, reducing the likelihood of UI inconsistencies.
- Better Testability: Because each component in MVI (Model, View, and Intent) has clearly defined roles, it becomes much easier to test each in isolation. Unit tests can easily cover different user intents and state changes, making sure the application behaves as expected.
- Scalability: As applications grow in complexity, maintaining a clean and organized codebase becomes essential. MVI’s clear separation of concerns (Intent, Model, View) ensures that the code remains maintainable and can be extended without introducing unintended side effects.
- State Management: Managing UI state is notoriously challenging in Android apps, especially when dealing with screen rotations, background tasks, and asynchronous events. MVI’s approach to handling state ensures that the app’s state is always consistent and correct.
Conclusion
MVI is a robust architecture that offers clear benefits when it comes to managing state, handling user interactions, and decoupling UI logic. The whole idea is to make your app’s state predictable, manageable, and testable — so no surprises when your app is running in production!
We built a simple apps today with MVI using Kotlin, and hopefully, you saw just how powerful and intuitive it can be. While MVI might take a bit more setup than other architectures, it provides a solid foundation for apps that need to scale and handle complex interactions.
MVI might not be the best choice for every app (especially simple ones), but for apps where state management and user interactions are complex, it’s a lifesaver.