
In software design, managing the creation of objects that require multiple parameters can often become complicated, particularly when certain parameters are optional or when validation checks are necessary before the object is constructed. The Builder Design Pattern addresses this challenge by providing a structured and flexible approach to constructing complex objects.
In this blog, we’ll take an in-depth look at the Builder Design Pattern in Kotlin. We’ll walk through it step by step, explaining how it functions, why it’s beneficial, and how to apply it efficiently. By the conclusion, you’ll be well-equipped to use the Builder pattern in your Kotlin development projects.
What is the Builder Design Pattern?
Some objects are complex and need to be built step-by-step (think of objects with multiple fields or components). Instead of having a single constructor that takes in many arguments (which can get confusing), the Builder pattern provides a way to build an object step-by-step. By using this approach, we can have multiple different ways to build (or “represent”) the object, but still follow the same process of construction
In simple terms, the Builder Design Pattern is like ordering a burger at a fancy burger joint. You don’t just ask for “a burger” (unless you enjoy living dangerously); instead, you customize it step by step. First, you pick your bun, then your patty, cheese, sauces, toppings—you get the idea. By the time you’re done, you’ve built your perfect burger 🍔.
Similarly, in software development, when you want to create an object, instead of passing every possible parameter into a constructor (which can be messy and error-prone), you build the object step by step in a clean and readable manner. The Builder Design Pattern helps you construct complex objects without losing your sanity.
Let’s take one more real-world example with a Car class. First, we’ll see the scenario without the Builder Pattern (also known as the Constructor Overload Nightmare).
class Car(val make: String, val model: String, val color: String, val transmission: String, val hasSunroof: Boolean, val hasBluetooth: Boolean, val hasHeatedSeats: Boolean)
Ugh, look at that. My eyes hurt just reading it. 🥲 Now, let’s fix this using the Builder Pattern (Don’t worry about the structure; we’ll look at it soon):
class Car private constructor(
    val make: String?,
    val model: String?,
    val color: String?,
    val transmission: String?,
    val hasSunroof: Boolean,
    val hasBluetooth: Boolean,
    val hasHeatedSeats: Boolean
) {
    // Builder Class Nested Inside Car Class
    class Builder {
        private var make: String? = null
        private var model: String? = null
        private var color: String? = null
        private var transmission: String? = null
        private var hasSunroof: Boolean = false
        private var hasBluetooth: Boolean = false
        private var hasHeatedSeats: Boolean = false

        fun make(make: String) = apply { this.make = make }
        fun model(model: String) = apply { this.model = model }
        fun color(color: String) = apply { this.color = color }
        fun transmission(transmission: String) = apply { this.transmission = transmission }
        fun hasSunroof(hasSunroof: Boolean) = apply { this.hasSunroof = hasSunroof }
        fun hasBluetooth(hasBluetooth: Boolean) = apply { this.hasBluetooth = hasBluetooth }
        fun hasHeatedSeats(hasHeatedSeats: Boolean) = apply { this.hasHeatedSeats = hasHeatedSeats }

        fun build(): Car {
            return Car(make, model, color, transmission, hasSunroof, hasBluetooth, hasHeatedSeats)
        }
    }
}
Usage:
val myCar = Car.Builder()
    .make("Tesla")
    .model("Model S")
    .color("Midnight Silver")
    .hasBluetooth(true)
    .hasSunroof(true)
    .build()

println("I just built a car: ${myCar.make} ${myCar.model}, in ${myCar.color}, with Bluetooth: ${myCar.hasBluetooth}")
Boom! 💥 You’ve just built a car step by step, specifying only the parameters you need without cramming everything into one big constructor. Isn’t that a lot cleaner?
Technical Definition:
The Builder Pattern separates the construction of a complex object from its representation, allowing the same construction process to create different representations.
The Builder Design Pattern allows you to construct objects step by step, without needing to pass a hundred parameters into the constructor. It also lets you create different versions of the same object, using the same construction process. In simple terms, it separates object construction from its representation, making it more flexible and manageable.
For example, think of building a house. You have several steps: laying the foundation, building the walls, adding the roof, etc. If you change how each of these steps is done (e.g., using wood or brick for the walls), you end up with different kinds of houses. Similarly, in programming, different implementations of each step can lead to different final objects, even if the overall process is the same.
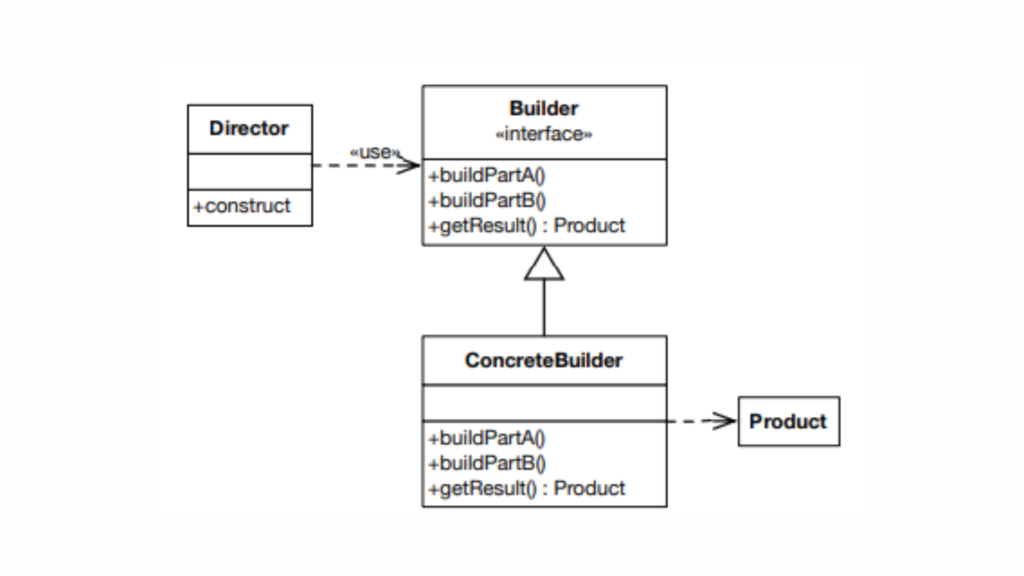
Structure of Builder Design Pattern
Here’s a breakdown of the structure of the Builder Design pattern:
- Product: This is the complex object that is being built. It might have several parts or features that need to be assembled. The
Productclass defines these features and provides methods to access or manipulate them. - Builder: This is an abstract interface or class that declares the construction steps necessary to create the
Product. It often includes methods to set various parts of theProduct. - ConcreteBuilder: This class implements the
Builderinterface and provides specific implementations of the construction steps. It keeps track of the current state of the product being built and assembles it step by step. Once the construction is complete, it returns the finalProduct. - Director: The
Directorclass is responsible for managing the construction process. It uses aBuilderinstance to construct the product. It controls the order of the construction steps, ensuring that the product is built in a consistent and valid way. - Client: The
Clientis responsible for initiating the construction process. It creates aDirectorand aConcreteBuilder, and then uses theDirectorto construct theProductthrough theConcreteBuilder.
Let’s break down each component:
Builder (Interface)
The Builder interface (or abstract class) defines the methods for creating different parts of the Product. It typically includes methods like buildPartA(), buildPartB(), etc., and a method to get the final Product. Here’s a brief overview:
- Methods:
buildPartA(): Defines how to build part A of theProduct.buildPartB(): Defines how to build part B of theProduct.getResult(): Returns the finalProductafter construction.
ConcreteBuilder
The ConcreteBuilder class implements the Builder interface. It provides specific implementations for the construction steps and keeps track of the current state of the Product. Once the construction is complete, it can return the constructed Product.
- Methods:
buildPartA(): Implements the logic to build part A of theProduct.buildPartB(): Implements the logic to build part B of theProduct.getResult(): Returns the constructedProduct.
Director
The Director class orchestrates the construction process. It uses a Builder instance to construct the Product step by step, controlling the order of the construction steps.
- Methods:
construct(): Manages the sequence of construction steps using theBuilder.- It might also call methods like
buildPartA()andbuildPartB()in a specific order.
Product
The Product represents the complex object being built. It is assembled from various parts defined by the Builder. It usually includes features or properties that were set during the building process.
Real-World Examples
Let’s say we want to build a House object. A house can be simple, luxury, or modern, with different features (like number of windows, rooms, etc.). Each of these houses requires similar steps during construction, but the outcome is different.
Key Components:
- Product: The object that is being built (House in this case).
- Builder Interface: Declares the steps to build different parts of the product.
- Concrete Builders: Implement the steps to build different versions of the product.
- Director: Controls the building process and calls the necessary steps in a sequence.
Kotlin Example: House Construction
// Product: The object that is being built
data class House(
    var foundation: String = "",
    var structure: String = "",
    var roof: String = "",
    var interior: String = ""
)

// Builder Interface: Declares the building steps
interface HouseBuilder {
    fun buildFoundation()
    fun buildStructure()
    fun buildRoof()
    fun buildInterior()
    fun getHouse(): House
}

// Concrete Builder 1: Builds a luxury house
class LuxuryHouseBuilder : HouseBuilder {
    private val house = House()

    override fun buildFoundation() {
        house.foundation = "Luxury Foundation with basement"
    }

    override fun buildStructure() {
        house.structure = "Luxury Structure with high-quality materials"
    }

    override fun buildRoof() {
        house.roof = "Luxury Roof with tiles"
    }

    override fun buildInterior() {
        house.interior = "Luxury Interior with modern design"
    }

    override fun getHouse(): House {
        return house
    }
}

// Concrete Builder 2: Builds a simple house
class SimpleHouseBuilder : HouseBuilder {
    private val house = House()

    override fun buildFoundation() {
        house.foundation = "Simple Foundation"
    }

    override fun buildStructure() {
        house.structure = "Simple Structure with basic materials"
    }

    override fun buildRoof() {
        house.roof = "Simple Roof with asphalt shingles"
    }

    override fun buildInterior() {
        house.interior = "Simple Interior with basic design"
    }

    override fun getHouse(): House {
        return house
    }
}

// Director: Controls the building process
class Director(private val houseBuilder: HouseBuilder) {
    fun constructHouse() {
        houseBuilder.buildFoundation()
        houseBuilder.buildStructure()
        houseBuilder.buildRoof()
        houseBuilder.buildInterior()
    }
}

// Client: Using the builder pattern
fun main() {
    // Construct a luxury house
    val luxuryBuilder = LuxuryHouseBuilder()
    val director = Director(luxuryBuilder)
    director.constructHouse()
    val luxuryHouse = luxuryBuilder.getHouse()
    println("Luxury House: $luxuryHouse")

    // Construct a simple house
    val simpleBuilder = SimpleHouseBuilder()
    val director2 = Director(simpleBuilder)
    director2.constructHouse()
    val simpleHouse = simpleBuilder.getHouse()
    println("Simple House: $simpleHouse")
}
Here,
- House (Product): Represents the object being built, with attributes like foundation, structure, roof, and interior.
- HouseBuilder (Interface): Declares the steps required to build a house.
- LuxuryHouseBuilder and SimpleHouseBuilder (Concrete Builders): Provide different implementations of how to construct a luxury or simple house by following the same steps.
- Director: Orchestrates the process of building a house. It doesn’t know the details of construction but knows the sequence of steps.
- Client: Chooses which builder to use and then delegates the construction to the director.
Let’s revisit our initial real-world example of a Car class. Let’s try to build it by following the proper structure of the Builder Design Pattern.
// Product
class Car(
    val engine: String,
    val wheels: Int,
    val color: String
) {
    override fun toString(): String {
        return "Car(engine='$engine', wheels=$wheels, color='$color')"
    }
}

// Builder Interface
interface CarBuilder {
    fun buildEngine(engine: String): CarBuilder
    fun buildWheels(wheels: Int): CarBuilder
    fun buildColor(color: String): CarBuilder
    fun getResult(): Car
}

// ConcreteBuilder
class ConcreteCarBuilder : CarBuilder {
    private var engine: String = ""
    private var wheels: Int = 0
    private var color: String = ""

    override fun buildEngine(engine: String): CarBuilder {
        this.engine = engine
        return this
    }

    override fun buildWheels(wheels: Int): CarBuilder {
        this.wheels = wheels
        return this
    }

    override fun buildColor(color: String): CarBuilder {
        this.color = color
        return this
    }

    override fun getResult(): Car {
        return Car(engine, wheels, color)
    }
}

// Director
class CarDirector(private val builder: CarBuilder) {
    fun constructSportsCar() {
        builder.buildEngine("V8")
               .buildWheels(4)
               .buildColor("Red")
    }

    fun constructFamilyCar() {
        builder.buildEngine("V6")
               .buildWheels(4)
               .buildColor("Blue")
    }
}

// Client
fun main() {
    val builder = ConcreteCarBuilder()
    val director = CarDirector(builder)

    director.constructSportsCar()
    val sportsCar = builder.getResult()
    println(sportsCar)

    director.constructFamilyCar()
    val familyCar = builder.getResult()
    println(familyCar)
}


// Output

//Car(engine='V8', wheels=4, color='Red')
//Car(engine='V6', wheels=4, color='Blue')
Here,
- Product:
Carclass represents the complex object with various parts. - Builder:
CarBuilderinterface defines methods to set different parts of theCar. - ConcreteBuilder:
ConcreteCarBuilderprovides implementations for theCarBuildermethods and assembles theCar. - Director:
CarDirectormanages the construction process and defines specific configurations. - Client: The
mainfunction initiates the building process by creating aConcreteCarBuilderand aCarDirector, then constructs different types of cars.
Builder Design Pattern – Collaboration
In the Builder design pattern, the Director and Builder work together to create complex objects step by step. Here’s how their collaboration functions:
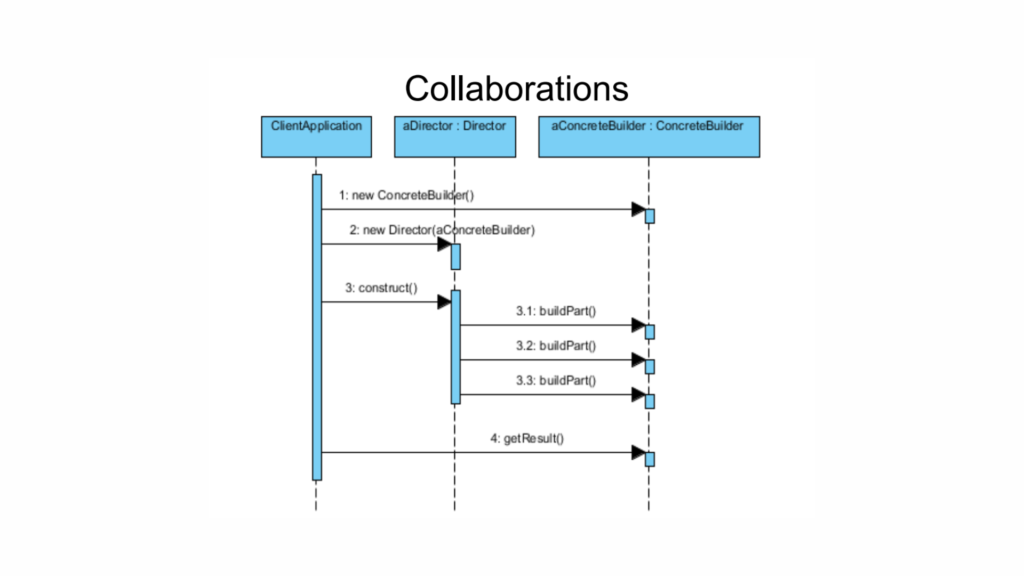
- Client Sets Up the Director and Builder:
- The client (main program) creates a Director and selects a specific Builder to do the construction work.
- Director Gives Instructions:
- The Director tells the Builder what part of the product to build, step by step.
- Builder Constructs the Product:
- The Builder follows the instructions from the Director and adds each part to the product as it’s told to.
- Client Gets the Finished Product:
- Once everything is built, the client gets the final product from the Builder.
Roles
- Director’s Role: Manages the process, knows the order in which the parts need to be created, but not the specifics of how the parts are built.
- Builder’s Role: Handles the construction details, assembling the product part by part as instructed by the Director.
- Client’s Role: Initiates the process, sets up the Director with the appropriate Builder, and retrieves the completed product.
Real-World Examples in Android
In Android, the Builder Design pattern is commonly used to construct objects that require multiple parameters or a specific setup order. A classic real-world example of this is building dialogs, such as AlertDialog, or creating notifications using NotificationCompat.Builder.
AlertDialog Builder
An AlertDialog in Android is a great example of the Builder pattern. It’s used to build a dialog step by step, providing a fluent API to add buttons, set the title, message, and other properties.
val alertDialog = AlertDialog.Builder(this)
    .setTitle("Delete Confirmation")
    .setMessage("Are you sure you want to delete this item?")
    .setPositiveButton("Yes") { dialog, which ->
        // Handle positive button click
    }
    .setNegativeButton("No") { dialog, which ->
        dialog.dismiss()
    }
    .create()

alertDialog.show()
Here, the AlertDialog.Builder is used to construct a complex dialog. Each method (setTitle, setMessage, setPositiveButton) is called in a chained manner, and finally, create() is called to generate the final AlertDialog object.
Notification Builder Using NotificationCompat.Builder
Another common use of the Builder pattern in Android is when constructing notifications.
val notificationManager = getSystemService(Context.NOTIFICATION_SERVICE) as NotificationManager

// Create a notification channel for Android O and above
if (Build.VERSION.SDK_INT >= Build.VERSION_CODES.O) {
    val channel = NotificationChannel("channel_id", "Channel Name", NotificationManager.IMPORTANCE_DEFAULT)
    notificationManager.createNotificationChannel(channel)
}

val notification = NotificationCompat.Builder(this, "channel_id")
    .setSmallIcon(R.drawable.ic_notification)
    .setContentTitle("New Message")
    .setContentText("You have a new message!")
    .setPriority(NotificationCompat.PRIORITY_DEFAULT)
    .build()

notificationManager.notify(1, notification)
Here, the NotificationCompat.Builder allows you to create a notification step by step. You can set various attributes like the icon, title, text, and priority, and finally, call build() to create the notification object.
Builder Design Pattern vs. Abstract Factory Pattern
Abstract Factory Pattern
- Purpose: It focuses on creating multiple related or dependent objects (often of a common family or theme) without specifying their exact classes.
- Object Creation Knowledge: The Abstract Factory knows ahead of time what objects it will create, and the configuration is usually predefined.
- Fixed Configuration: Once deployed, the configuration of the objects produced by the factory tends to remain fixed. The factory doesn’t change its set of products during runtime.
Builder Design Pattern
- Purpose: It focuses on constructing complex objects step by step, allowing more flexibility in the object creation process.
- Object Construction Knowledge: The Director (which orchestrates the Builder) knows how to construct the object but does so by using various Builders to manage different configurations.
- Dynamic Configuration: The Builder allows the configuration of the object to be modified during runtime, offering more flexibility. The specific configuration is chosen dynamically based on the concrete builder used during construction.
Key Differences
- Scope: Abstract Factory deals with families of related objects, while Builder constructs a single, complex object.
- Flexibility: Abstract Factory has a fixed set of products, while Builder allows step-by-step customization during runtime.
- Role of Director: In the Builder pattern, the Director oversees object construction, while the Abstract Factory does not rely on a director to manage creation steps.
In short, use Abstract Factory when you need to create families of objects, and use Builder when constructing a complex object in steps is more important.
Advantages of Builder Design Pattern
- Encapsulates Complex Construction:
The Builder pattern encapsulates the process of constructing complex objects, keeping the construction logic separate from the actual object logic. - Supports Multi-step Object Construction:
It allows objects to be built step-by-step, enabling greater flexibility in how an object is constructed, as opposed to a one-step factory approach. - Abstracts Internal Representation:
The internal details of the product being built are hidden from the client. The client interacts only with the builder, without worrying about the product’s internal structure. - Flexible Product Implementation:
The product implementations can be swapped without impacting the client code as long as they conform to the same abstract interface. This promotes maintainability and scalability.
Disadvantages of Builder Design Pattern
- Increased Code Complexity:
Implementing the Builder pattern can lead to more classes and additional boilerplate code, which may be overkill for simpler objects that don’t require complex construction. - Not Ideal for Simple Objects:
For objects that can be constructed in a straightforward manner, using a Builder pattern might be unnecessarily complex and less efficient compared to simple constructors or factory methods. - Can Lead to Large Number of Builder Methods:
As the complexity of the object grows, the number of builder methods can increase, which might make the Builder class harder to maintain or extend. - Potential for Code Duplication:
If the construction steps are similar across various products, there could be some code duplication, especially when multiple builders are required for related products.
Conclusion
The Builder Design Pattern in Kotlin offers a refined solution for constructing objects, particularly when working with complex structures or optional parameters. It enhances code readability and maintainability by separating the construction logic from the final object representation.
Whether you’re building cars, crafting sandwiches, or assembling pizzas (🍕), the Builder Pattern helps keep your code organized, adaptable, and less prone to mistakes.
So, the next time you face the challenges of overloaded constructors, just remember: Builders are here to help! They’ll bring sanity to your code, protect your project, and possibly even ensure you get the perfect pizza order.
Happy coding, Kotlinites! 🎉