Debugging can be frustrating, especially when a bug appears in a large codebase and you have no idea when it was introduced. Instead of manually sifting through commits, Git Bisect can help you track down the exact commit that introduced the bug efficiently. In this blog, we’ll explore how Git Bisect works, walk through a practical example, and provide useful tips to make debugging smoother.
What is Git Bisect?
It is a built-in Git tool that helps you perform a binary search through your commit history to find the exact commit that introduced a bug. Instead of checking each commit one by one, it narrows down the search range quickly by repeatedly dividing the history in half.
This makes Git Bisect extremely powerful, especially in large repositories where manually checking each commit would be time-consuming.
How Does It Work?
The process is simple:
You start a bisect session.
Mark a known good commit where the bug is absent.
Mark a bad commit where the bug is present.
Git automatically checks out a commit between those two.
You test the code at that commit and mark it as either “good” or “bad.”
Git continues this process, narrowing the search until it finds the exact problematic commit.
This approach significantly reduces the number of commits you need to check manually.
Step-by-Step Guide to Using It
Imagine you’re working on a project and notice a feature is broken, but you’re not sure when the bug was introduced.
1. Start the Git Bisect Session
Bash
$gitbisectstart
This command initiates a Git Bisect session, putting Git in bisect mode.
2. Mark a “Good” and “Bad” Commit
You need to tell Git where the bug exists and where it doesn’t.
Identify a commit where the bug exists and mark it as bad:
Bash
$gitbisectbad
Find a commit where the bug didn’t exist and mark it as good:
Bash
$gitbisectgood <commit-hash>
Git will now start checking commits between these two points.
3. Git Picks a Commit for You to Test
Git automatically checks out a commit in the middle of the range. Now, test your code to see if the bug is present.
If the bug is present, mark it as bad:
Bash
$gitbisectbad
If the bug is not present, mark it as good:
Bash
$gitbisectgood
Each time you mark a commit as good or bad, Git Bisect picks another commit in between to test.
4. Repeat Until the Problematic Commit is Found
Git will continue selecting commits until it pinpoints the exact commit that introduced the bug. Once identified, Git will display the commit hash and message of the problematic commit.
Bash
//somethinglikethis<commit-hash> is the first bad commit
5. End the Bisect Session
Once you’ve found the bad commit, exit bisect mode:
Bash
$gitbisectreset
This restores your repository to its original state before the bisect process.
Automating with a Script
If testing the bug manually is tedious, you can automate the process using a script. Here’s how:
$ git bisect start $ git bisect bad $ git bisect good <commit-hash> $ git bisect run ./test-script.sh
Replace ./test-script.sh with your actual test script that returns 0 for good commits and 1 for bad commits. Git Bisect will run the script automatically and stop when the bad commit is found.
Best Practices
Choose accurate good/bad commits: Ensure your “good” commit is actually bug-free to avoid misleading results.
Use automation when possible: Automating the testing process speeds up bisecting significantly.
Document findings: Keep notes on what you find to avoid redoing the process later.
Reset after bisecting: Always run git bisect reset to return to the original branch.
Why Use Git Bisect?
Saves time: Finds the problematic commit quickly using a binary search.
Works with any Git project: No additional tools or setup required.
Automatable: Can integrate with test scripts to remove manual testing effort.
Accurate: Pinpoints the exact commit that introduced a bug, reducing debugging guesswork.
Conclusion
Git Bisect is an essential tool for any developer who wants to debug efficiently. By leveraging binary search, it drastically cuts down the time spent hunting for a bug in large codebases. Whether you’re using it manually or automating the process, it’s a powerful addition to your Git workflow.
Next time you’re stuck debugging a mysterious issue, give Git Bisect a try — it’ll make you look like a pro..!
Git is one of the most widely used version control systems, and knowing how to use it efficiently is essential for developers. If you’re preparing for a job interview, expect Git-related questions to come up, whether you’re a beginner or an experienced professional. In this detailed guide, we’ll explore the most commonly asked Git interview...
If you’ve been working on a project and decided to uninstall and later reinstall Git on your Windows machine(There are many reasons; mostly, we do it due to corrupted installations, upgrade issues, configuration errors, switching installation methods, or problems with path/environment variables), you might encounter some unexpected issues when trying to push or pull from your repository. These problems can include Git detecting many modified or new files, or even Git configurations being reset. Here, I will walk you through the steps to troubleshoot and resolve these problems, ensuring that your Git setup works smoothly again.
Why Problems Arise After Reinstalling Git
Uninstalling Git does not affect your existing project repositories since Git stores repository information inside each project’s .git folder. However, after reinstalling, certain configurations and settings might be different from what you had before. Here are some common reasons for issues:
Line Ending Differences: Git’s line-ending conversion settings may have changed, causing Git to detect file modifications.
Missing or Reset Configuration: Global Git configurations, such as username, email, or credential helper settings, might be missing or reset.
Ignored Files: Files that were previously ignored may now appear as untracked if .gitignore was altered or its behavior changed.
Stale Credentials: Git might require you to re-enter your authentication details if you are using HTTPS or SSH credentials.
Let’s dive into how to resolve each of these.
Step 1: Verify Git Installation
After reinstalling Git, you should first verify whether it is installed correctly.
Run the following command in your terminal:
Bash
git--version
This should display the current version of Git. If it returns a version number, then Git is properly installed.
Step 2: Check Your Global Git Configurations
You may need to reconfigure Git’s global settings, like your username and email. These are required when you commit to any Git repository. Check your current global Git configurations:
Bash
gitconfig--global--list
If you don’t see your user.name or user.email, you can set them like this:
These settings are essential for Git to know who is making the commits.
Step 3: Line Ending Issues (CRLF vs. LF)
One of the most common issues after reinstalling Git is a change in how line endings are handled. Windows uses CRLF (Carriage Return and Line Feed) for new lines, while Linux and macOS use LF (Line Feed). If your project collaborates across different operating systems, Git’s line-ending conversion setting (core.autocrlf) may cause many files to appear modified after reinstalling Git.
Check Your Line Ending Settings:
To check your current line-ending conversion setting, run:
Bash
gitconfig--globalcore.autocrlf
This will return one of the following values:
true: Git converts LF to CRLF when checking out code on Windows.
false: Git does not change line endings.
input: Git converts CRLF to LF when committing.
Set the Appropriate Line Ending Setting:
If you’re working on Windows and want to ensure consistency, it’s usually best to set core.autocrlf to true:
Bash
gitconfig--globalcore.autocrlftrue
Or, if you’re working on a cross-platform project, you can set it to input to avoid modifying line endings on commits:
Bash
gitconfig--globalcore.autocrlfinput
Once you’ve set this, reset the changes detected in your working directory:
Bash
gitreset--hard
This will reset any uncommitted changes, reverting your files to the state of the last commit.
Step 4: Handling Modified and New Files
After reinstalling Git, you might see many modified or new files when you run git status, even if you didn’t actually change these files. This often happens due to changes in .gitignore or configurations.
Check .gitignore:
Ensure your .gitignore file is correctly configured. Git might now be tracking files that should be ignored. Open the .gitignore file in the root of your project directory and check whether all unwanted files or directories (e.g., logs, build files) are listed.
Run Git Check-Ignore:
To see which files should be ignored, you can use:
Bash
gitcheck-ignore*
This command will output the files that Git is ignoring. If something is missing from .gitignore, add it and then run:
Bash
gitadd.gitignoregitcommit-m"Updated .gitignore"
Step 5: Recommit or Discard Local Changes
If the changes detected by Git are legitimate, you can either commit them or discard them if they aren’t necessary.
If You Want to Keep the Changes:
If you believe the changes are valid and need to be saved, you can stage and commit them:
Bash
gitadd.gitcommit-m"Commit changes after reinstalling Git"gitpushoriginmaster (or anycurrentfeaturebranch)
This will save the changes and push them to the remote repository.
If You Want to Discard the Changes:
If the changes are unwanted or were caused by line-ending issues, you can discard them using:
Bash
gitreset--hard
This will reset your local files to the last committed state, removing any uncommitted modifications.
Note – Even after resetting, Git is showing “untracked files” because git reset --hard only affects tracked files, not untracked files. Untracked files are new files that haven’t been staged or committed to the repository yet. These files remain even after a hard reset.
Why git reset --hard Leaves Untracked Files
The git reset --hard command only resets tracked files (files that are already part of the repository and have been committed). It doesn’t touch untracked files, which are new files Git hasn’t started tracking yet. If you want to make your repository completely clean (removing all untracked files as well), you’ll need to take an additional step.
Removing Untracked Files to Clean the Repository
To make the repository completely clean, you need to remove all untracked files. Here’s how you can do that:
Option 1: Use git clean
git clean is used to remove untracked files. Be very cautious when using this command, as it will delete files that are not part of the repository.
First, check what will be removed (dry run):
Bash
gitclean-n
If you’re sure you want to remove those files, run:
Bash
gitclean-f
This removes all untracked files. If you also want to remove untracked directories, run:
Bash
gitclean-fd
Option 2: Discard Only Specific Untracked Files
If there are specific untracked files you want to remove, you can manually delete them, or you can use:
Bash
gitrm--cached <file>
This will remove only the selected untracked file from the staging area.
Full Command to Clean the Repository
To fully clean your repository, including resetting all changes and removing untracked files, follow these commands:
Reset tracked files to the last commit:
Bash
gitreset--hard
Clean untracked files:
Bash
gitclean-fd
Now, when you run git status, it should say that there’s nothing to commit, and no untracked files should be listed. Your repository will be in a clean state, just like when you cloned it or after a fresh commit.
Step 6: Reconfigure Credentials (If Necessary)
If you used HTTPS or SSH for Git authentication, you might need to re-enter your credentials after reinstalling Git. To avoid entering your username and password every time you push or pull, you can configure Git’s credential helper.
For HTTPS Authentication:
Bash
gitconfig--globalcredential.helperwincred
This stores your credentials securely using the Windows Credential Manager.
For SSH Authentication:
Make sure your SSH key is correctly added. Run:
Bash
ssh-add-l
If no SSH keys are listed, you’ll need to re-add them using:
Bash
ssh-add~/.ssh/id_rsa
The command ssh-add ~/.ssh/id_rsa is used to add a private SSH key to the SSH authentication agent (ssh-agent). Here’s a breakdown:
ssh-add: A command that adds private SSH keys to ssh-agent, which manages your private keys and stores them securely in memory.
~/.ssh/id_rsa: This is the path to your private SSH key (in this case, the default file id_rsa stored in the ~/.ssh directory). The ~ represents the home directory of the current user.
By running this command, you’re telling ssh-agent to hold the private key in memory, allowing you to authenticate with SSH servers without needing to enter your passphrase for each connection.
Note – If your SSH key was reset, you may need to regenerate it and add it to your Git hosting service (GitHub, Bitbucket, etc.).
Conclusion
Reinstalling Git on your Windows machine can sometimes lead to unexpected behavior in your repositories, such as detecting modified files, resetting configurations, or needing to reconfigure credentials. By following the steps outlined above, you can troubleshoot and resolve these issues to get Git working smoothly again.
Remember to verify your Git installation, check your global configuration, review line-ending settings, and ensure that ignored files are still ignored. In most cases, resetting line-ending settings and recommitting or discarding changes will solve the issue.
By taking these steps, you can confidently continue working with Git after reinstalling it on your machine, without losing any data or productivity.
Git, the distributed version control system, is a powerful tool that allows developers to manage and track changes in their projects efficiently. Despite its robustness, developers sometimes find themselves needing to undo a commit, either due to a mistake, a change in requirements, or other reasons. Git provides several ways to revert changes, and one of the common methods is using the git revert command. In this blog post, we will explore how to use git revert to undo the last commit and understand its implications.
Let’s say we are working on your code in Git and something didn’t go as planned. So now we need to revert our last commit. How do we do it? Let’s find out!
There are two possible ways to undo your Git last commit
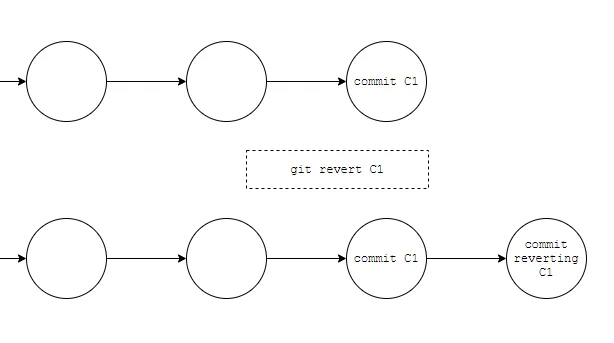
revert Command — The revert command will create a commit that reverts the changes of the commit being targeted. means here git will create a new commit that contains reverted changes so that we will maintain commit history in the shared repository.
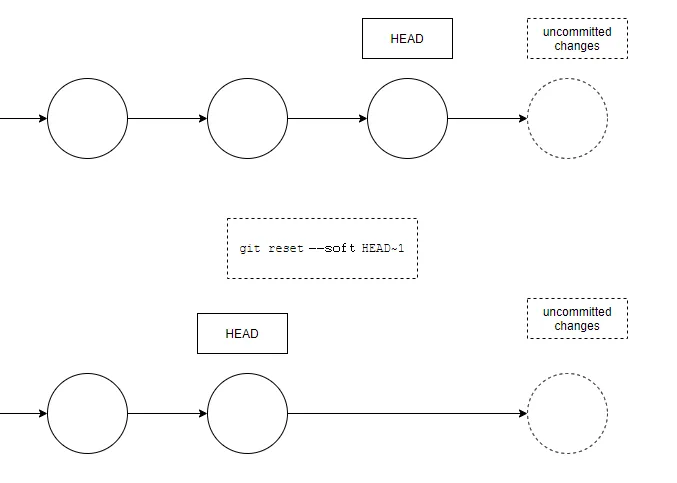
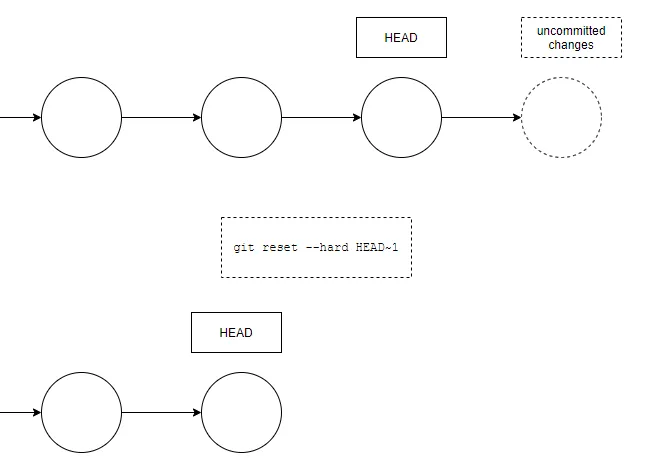
2. reset Command — the reset command to undo your last commit. So be careful. it will change the commit history, it will move the HEAD of the working branch indicating commit and discard anything after.
we use the reset command with two options
a. The --soft option means that you will not lose the uncommitted changes you may have.
git reset --soft HEAD~1
b. If you want to reset to the last commit and also remove all unstaged changes, you can use the --hard option:
git reset --hard HEAD~1
This will undo the latest commit, but also any uncommitted changes.
When should we use resetor revert?
we should really only use reset if the commit being reset only exists locally. This command changes the commit history and it might overwrite the history that remote team members depend on.
revert instead creates a new commit that undoes the changes, so if the commit to revert has already been pushed to a shared repository, it is best to use revert as it doesn’t overwrite commit history.
Conclusion
Undoing the last commit using git revert is a safe and effective way to manage mistakes or changes in your Git project without altering the commit history. It promotes collaboration by preserving the commit history’s integrity and allows for seamless integration with subsequent changes. Understanding the implications of git revert empowers developers to make informed decisions when managing their version-controlled projects.