The Factory Pattern is a creational design pattern that handles object creation for you.
Instead of creating objects directly using constructors, you delegate that responsibility to a factory.
In simple terms:
A factory decides which object to create and how to create it.
Your main code just asks for an object and uses it. It doesn’t care about the details.
This separation is what makes the Factory Pattern Simplify Complex Object Creation so effective.
Why Object Creation Becomes Complex
In real-world applications, object creation often depends on:
User input
Configuration files
API responses
Environment (development, testing, production)
Example without a factory:
Kotlin
val paymentProcessor = when (paymentType) {"CARD"->CardPaymentProcessor()"UPI"->UpiPaymentProcessor()"WALLET"->WalletPaymentProcessor()else->throwIllegalArgumentException("Invalid payment type")}
Now imagine this logic repeated across multiple files.
Problems appear quickly:
Code duplication
Hard-to-maintain logic
Difficult testing
Violations of the Single Responsibility Principle
This is why developers rely on patterns that simplify complex object creation.
How the Factory Pattern Helps
The Factory Pattern solves these issues by:
Centralizing object creation
Reducing tight coupling
Making code easier to extend
Improving testability
Most importantly, it lets your business logic focus on what to do, not how objects are created.
That’s the real power behind Factory Pattern Simplify Complex Object Creation.
Modern software design isn’t just about writing code that works; it’s about writing code that’s maintainable, scalable, and easy to understand. One way to achieve this is by using Use Case Patterns — a structured approach to modeling software functionality based on real-world user interactions. In this guide, we’ll break down everything you need to know about use case patterns, provide practical Kotlin examples, and show how to apply them effectively in your projects.
What Are Use Case Patterns?
A use case pattern is a reusable template that describes how a system should respond to specific user actions or events. Think of them as building blocks for designing your software’s functionality. Instead of starting from scratch each time, you can rely on patterns to standardize workflows, reduce errors, and speed up development.
For example, common use case patterns include:
Authentication — logging in and out
CRUD Operations — create, read, update, delete
Notification Handling — sending emails or push notifications
These patterns provide a blueprint for solving recurring problems, making your code more predictable and maintainable.
Why Use Use Case Patterns in Modern Software Design?
Consistency: Patterns ensure that similar functionalities follow a consistent approach across your project.
Reusability: Once you define a pattern, you can reuse it in multiple parts of your app without rewriting code.
Clarity: Clear use case patterns make it easier for new developers to understand your system.
Scalability: Patterns help design systems that can grow without becoming messy or unmanageable.
Core Principles of Use Case Patterns
To master use case patterns, keep these principles in mind:
Single Responsibility: Each pattern should handle one type of use case.
Clear Actors: Define who or what interacts with the system.
Explicit Steps: Document each step the system performs in response to an action.
Reusability: Design patterns so they can be applied in multiple scenarios.
Implementing Use Case Patterns in Kotlin
Kotlin is a modern, concise programming language that’s perfect for demonstrating use case patterns. Let’s go through a simple example: a user registration system.
Define the Use Case Interface
Start by creating an interface that represents the use case:
This simple example shows how use case patterns create a clear, reusable structure. You can now create other use cases, like LoginUserUseCase, following the same template.
Best Practices for Use Case Patterns
Keep Use Cases Small: Avoid overloading a single use case with too many responsibilities.
Focus on Business Logic: Use case patterns should contain only business logic — not UI or database code.
Combine With Repositories: Use repositories or services for data access while keeping the use case focused.
Document Clearly: Add descriptions for each use case to improve maintainability.
Advanced Tip: Chaining Use Cases
Sometimes, a single user action involves multiple steps. Kotlin’s flexibility allows chaining use cases:
Here, the CompleteUserOnboardingUseCase combines registration and email notification, keeping each use case modular and reusable.
Conclusion
Mastering use case patterns is a game-changer for modern software design. They help you write cleaner, maintainable code that is easy to understand and scale. Using Kotlin, you can implement these patterns with minimal boilerplate, keeping your focus on business logic.
Start small, focus on clarity, and gradually build a library of reusable patterns. Before long, your software architecture will be robust, consistent, and much easier to maintain.
By embracing use case patterns, you not only improve your code today — you future-proof your projects for tomorrow.
Software projects rarely stay small. Features grow, requirements change, and teams expand. When data access logic is tightly coupled with business logic, even a simple update can break multiple parts of the system.
In this blog, we’ll explain the Repository Pattern in a clear and beginner-friendly way using Kotlin examples. You’ll learn what it is, why it matters, and how it makes your code easier to test, maintain, and scale over time.
What Is the Repository Pattern?
The Repository Pattern is a design pattern that separates data access logic from business logic.
Instead of letting your services or view models talk directly to a database, API, or data source, all data operations are handled by a repository. Your business logic interacts only with the repository interface.
You can think of the repository as a middle layer that hides all the details of how data is stored or retrieved.
This separation leads to cleaner, safer, and more flexible code.
Why the Repository Pattern Is Important
Without the Repository Pattern, applications often suffer from:
Database queries scattered across the codebase
Business logic tightly tied to a specific database or framework
Difficult and slow unit testing
High risk when changing data sources
The Repository Pattern solves these problems by creating a single, consistent place for data access.
Core Structure of the Repository Pattern
A typical Repository Pattern implementation includes:
A repository interface that defines allowed operations
A repository implementation that handles actual data access
Business logic that depends only on the interface
Let’s walk through a simple Kotlin example.
Repository Pattern in Kotlin
Step 1: Define a Data Model
Kotlin
dataclassUser(val id: Int,val name: String)
This is a simple data class that represents a user in the system.
This class contains all the data access logic. Whether the data comes from Room, SQL, an API, or another source, the rest of the app does not need to know.
In software development, design patterns offer proven solutions to common problems. They provide a standardized approach to designing and implementing software, making code more readable, maintainable, and scalable. Kotlin, a modern, statically typed programming language running on the JVM, is well-suited for implementing design patterns. Here, I will guide you through some of the most commonly used design patterns in Kotlin.
The True Power of Design Patterns
Design patterns are tried-and-tested solutions to common problems in software design. Think of them as templates that help developers solve recurring challenges in a structured way. By using design patterns, developers can write code that is more efficient, easier to maintain, and easier to understand. These patterns also create a common language among developers, making it simpler to communicate and collaborate. While design patterns can be very useful, it’s important to use them thoughtfully and only when they fit the specific problem you’re trying to solve.
Origins: From Architecture to Software
The concept of design patterns originally came from architecture, not software. In the late 1970s, architect Christopher Alexander introduced design patterns in his book “A Pattern Language.” He and his team identified common problems in building design and suggested solutions that could be reused in different situations. These solutions were documented as patterns, providing a shared language that architects could use to create better buildings.
This idea caught the attention of the software community, which faced similar issues when designing complex systems. By the 1980s and early 1990s, software developers started adapting these architectural patterns to help solve problems in software design.
The Gang of Four: A Key Moment
A major milestone in software design patterns came in 1994 with the publication of the book “Design Patterns: Elements of Reusable Object-Oriented Software.” This book was written by four authors — Erich Gamma, Richard Helm, Ralph Johnson, and John Vlissides — who are often referred to as the “Gang of Four” (GoF).
The Gang of Four identified 23 design patterns that address specific problems in object-oriented programming. They grouped these patterns into three categories:
Creational Patterns: Focus on how objects are created, helping ensure systems can grow easily. Examples: Singleton, Factory, and Builder patterns.
Structural Patterns: Deal with how classes and objects are organized, making complex systems easier to manage. Examples: Adapter, Composite, and Decorator patterns.
Behavioral Patterns: Focus on how objects communicate and work together. Examples: Observer, Strategy, and Command patterns.
Their work provided us (developers) with a common set of best practices that could be consistently applied to software design, making their book a foundational resource for learning about design patterns.
Evolution and Modern Perspectives
Since the publication of the GoF book, design patterns have continued to evolve, adapting to new programming paradigms, technologies, and methodologies. As software development shifted towards more dynamic languages and frameworks, we developers began to explore and document new patterns that addressed emerging challenges.
In the context of Android development, architectural patterns like Model-View-ViewModel (MVVM) and Model-View-Presenter (MVP) have gained prominence. These patterns have been developed to tackle the complexities of building scalable, maintainable, and testable mobile applications.
MVVM (Model-View-ViewModel): MVVM separates the application logic from the UI, facilitating a cleaner and more modular architecture. In MVVM, the ViewModel handles the logic and state of the UI, the View is responsible for rendering the UI and user interactions, and the Model manages the data and business logic. This pattern integrates well with Android’s data-binding library, LiveData, and Flow, promoting a reactive and decoupled approach to app development.
MVP (Model-View-Presenter): MVP also promotes the separation of concerns but differs in how it manages interactions between components. In MVP, the Presenter acts as an intermediary between the View and the Model. It handles user inputs, updates the Model, and updates the View accordingly. This pattern can be particularly useful for applications requiring complex user interactions and more straightforward unit testing.
Other Modern Architectures: The rise of microservices and modularization has influenced Android architecture as well, encouraging practices that support more granular and scalable app development. Patterns like Clean Architecture and the use of Dependency Injection frameworks (e.g., Dagger, Hilt) have become integral to developing robust and maintainable Android applications.
In addition to new patterns, the community has also refined existing ones, adapting them to modern contexts. For example, the Singleton pattern has been revisited with a focus on thread safety and lazy initialization in multi-threaded environments.
Common Design Patterns
The main categories of design patterns are:
Creational Patterns: Deal with object creation mechanisms.
Structural Patterns: Concerned with object composition or structure.
Behavioral Patterns: Focus on communication between objects.
In Kotlin, thanks to its concise syntax and powerful features like higher-order functions, extension functions, and null safety, implementing design patterns often becomes more streamlined compared to other languages like Java.
Creational Patterns
These patterns deal with object creation mechanisms, trying to create objects in a manner suitable for the situation.
Singleton: Ensures a class has only one instance and provides a global point of access to it.
Factory Method: Defines an interface for creating an object, but lets subclasses alter the type of objects that will be created.
Abstract Factory: Provides an interface for creating families of related or dependent objects without specifying their concrete classes.
Builder: Separates the construction of a complex object from its representation.
Prototype: Creates new objects by copying an existing object, known as the prototype.
Structural Patterns
These patterns focus on composing classes or objects into larger structures, like classes or object composition.
Adapter: Allows incompatible interfaces to work together by wrapping an existing class with a new interface.
Bridge: Separates an object’s abstraction from its implementation so that the two can vary independently.
Composite: Composes objects into tree structures to represent part-whole hierarchies.
Decorator: Adds responsibilities to objects dynamically.
Facade: Provides a simplified interface to a complex subsystem.
Flyweight: Reduces the cost of creating and manipulating a large number of similar objects.
Proxy: Provides a surrogate or placeholder for another object to control access to it.
Behavioral Patterns
These patterns are concerned with algorithms and the assignment of responsibilities between objects.
Chain of Responsibility: Passes a request along a chain of handlers, where each handler can process the request or pass it on.
Command: Encapsulates a request as an object, thereby allowing for parameterization and queuing of requests.
Interpreter: Defines a representation of a grammar for a language and an interpreter to interpret sentences in the language.
Iterator: Provides a way to access elements of a collection sequentially without exposing its underlying representation.
Mediator: Reduces chaotic dependencies between objects by having them communicate through a mediator object.
Memento: Captures and externalizes an object’s internal state without violating encapsulation, so it can be restored later.
Observer: Defines a one-to-many dependency between objects so that when one object changes state, all its dependents are notified.
State: Allows an object to alter its behavior when its internal state changes.
Strategy: Defines a family of algorithms, encapsulates each one and makes them interchangeable.
Template Method: Defines the skeleton of an algorithm in a method, deferring some steps to subclasses.
Visitor: Represents an operation to be performed on elements of an object structure, allowing new operations to be defined without changing the classes of the elements on which it operates.
Why Do We Use Design Patterns?
Several compelling reasons drive the utilization of design patterns, especially in the context of Android development:
Reusability: Design patterns provide proven solutions to recurring problems in Android development, whether it’s managing UI interactions, handling data flow, or structuring complex applications. By leveraging these patterns, developers can avoid reinventing the wheel, thereby promoting reusability and modularity in Android apps.
Improved Communication: In Android development, where teams often collaborate on different parts of an app, design patterns establish a shared vocabulary and understanding among developers. This shared language facilitates more effective communication about design decisions, making it easier to align on architecture and implementation strategies.
Best Practices: Design patterns encapsulate the best practices of experienced Android developers. Whether it’s using MVVM for a clean separation of concerns or implementing Dependency Injection for better scalability, these patterns serve as a learning ground for novices to adopt industry-proven approaches, ensuring that the code adheres to high standards.
Maintainability: The use of design patterns often leads to more maintainable Android code. For example, adopting the Repository pattern can simplify data management across different sources, making the code easier to update, debug, and extend as the app evolves. This maintainability is crucial for Android apps, which often need to support various devices, screen sizes, and OS versions.
Easier Problem-Solving: Design patterns offer a structured approach to problem-solving in Android development. They aid developers in breaking down complex issues — like handling asynchronous operations or managing state across activities — into more manageable components. This structured approach not only speeds up development but also leads to more robust and error-free applications.
Choosing the Right Design Pattern
It’s super important to use design patterns wisely, especially in Android development. Think of them as powerful tools, but not every tool is suited for every task, Right? Here’s why:
Think About the Situation: Design patterns are most effective in specific contexts within Android development. For example, while MVVM is excellent for handling UI logic, it might be overkill for a simple utility app. Using a pattern just for the sake of it can lead to unnecessary complexity.
Keep It Simple: Android development can get complex quickly, especially when dealing with things like lifecycle management and background tasks. Sometimes, a straightforward solution — like using basic Android components instead of a full-blown architecture pattern — is better. Don’t complicate your app with patterns that aren’t needed.
Watch Out for Speed Bumps: Implementing certain design patterns can introduce overhead that might affect performance, particularly in resource-constrained environments like mobile devices. For instance, dependency injection frameworks like Dagger can slow down app startup time if not used carefully. Always weigh the benefits against the potential performance impacts.
Be Ready to Change: As your Android project evolves, the design patterns you initially chose might no longer be the best fit. For example, an app that started with a simple MVP architecture might need to transition to MVVM as it grows in complexity. Flexibility and the willingness to refactor are key to maintaining a healthy codebase.
Using design patterns in Android development is like having a toolbox full of helpful tools. Just remember, not every tool is right for every job. We should pick the ones that fit the situation best. If we do that, our Android apps will be robust, efficient, and easier to maintain!
Conclusion
Design patterns are powerful tools in the software developer’s arsenal. They provide a structured and proven approach to solving recurring problems, fostering reusability, modularity, and better communication within teams. However, like any tool, they must be used wisely, with an understanding of the specific context and potential trade-offs. By mastering design patterns, developers can craft robust, maintainable, and scalable software solutions, leveraging the collective wisdom of the software engineering community.
Design patterns are vital in developing software that is not only robust but also easy to maintain and scale. These patterns can be divided into three main categories: creational, structural, and behavioral. Behavioral patterns specifically focus on how objects interact with one another, manage their internal processes, and coordinate communication. By leveraging these patterns, developers can simplify complex behavior and make systems more adaptable to change.
In this blog, we’ll dive into several behavioral design patterns in Kotlin. We’ll explore each pattern with clear, easy-to-understand examples and explanations, helping you grasp the concepts without getting lost in technical jargon. Let’s get started and see how these patterns can improve your code!
What Are Behavioral Design Patterns?
Behavioral design patterns focus on how objects collaborate and share responsibilities. Unlike structural patterns, which deal with the composition of objects, behavioral patterns emphasize how objects interact and communicate with one another. These patterns help achieve loose coupling, allowing objects to work together without needing to know too much about each other’s inner workings.
Some of the most commonly used behavioral patterns include:
Chain of Responsibility
Command
Interpreter
Iterator
Mediator
Memento
Observer
State
Strategy
Template Method
Visitor
In this post, we’ll take a closer look at each of these patterns and demonstrate how they can be implemented using Kotlin.
Chain of Responsibility (CoR)
Design patterns are a cornerstone of writing clean, maintainable, and reusable code. One of the more elegant patterns, the Chain of Responsibility (CoR), allows us to build a flexible system where multiple handlers can process a request in a loosely coupled manner.
What is the Chain of Responsibility (CoR) Pattern?
The Chain of Responsibility design pattern is a behavioral design pattern that allows passing a request along a chain of handlers, where each handler has a chance to process the request or pass it along to the next handler in the chain. The main goal is to decouple the sender of a request from its receivers, giving multiple objects a chance to handle the request.
That means the CoR pattern allows multiple objects to handle a request without the sender needing to know which object handled it. The request is passed along a chain of objects (handlers), where each handler has the opportunity to process it or pass it to the next one.
Think of a company where a request, such as budget approval, must go through several levels of management. At each level, the manager can either address the request or escalate it to the next level.
Now imagine another situation: an employee submits a leave application. Depending on the duration of leave, it might need approval from different authorities, such as a team leader, department head, or higher management.
These scenarios capture the essence of the Chain of Responsibility design pattern, where a request is passed along a series of handlers, each with the choice to process it or forward it.
Why Use the Chain of Responsibility Pattern?
The Chain of Responsibility pattern offers several advantages:
Decouples the sender and receiver: The sender doesn’t need to know which object in the chain will handle the request.
Simplifies the code: It eliminates complex conditionals and decision trees by delegating responsibility to handlers in the chain.
Adds flexibility: New handlers can be seamlessly added to the chain without impacting the existing implementation.
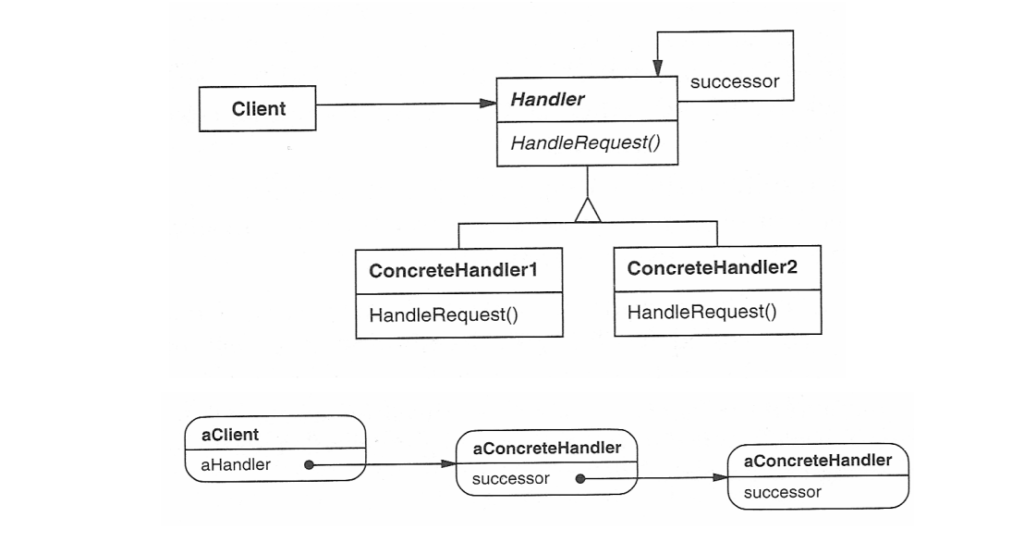
Structure of the Chain of Responsibility Pattern
Structure of the Chain of Responsibility
Handler (Abstract Class or Interface)
Defines the interface for handling requests and the reference to the next handler in the chain.
This defines an interface for handling requests, usually with a method like handleRequest(). It may also have a reference to the next handler in the chain.
The handler may choose to process the request or pass it on to the next handler.
ConcreteHandler
Implement the handleRequest() method to either process the request or pass it to the next handler.
These are the actual handler classes that implement the handleRequest() method. Each concrete handler will either process the request or pass it to the next handler in the chain.
If a handler is capable of processing the request, it does so; otherwise, it forwards the request to the next handler in the chain.
Client
Interacts only with the first handler in the chain, unaware of the specific handler processing the request.
Kotlin
funmain() {val handlerA = ConcreteHandlerA()val handlerB = ConcreteHandlerB() handlerA.setNextHandler(handlerB)// Client sends the request to the first handler handlerA.handleRequest("A") // Handler A processes the request handlerA.handleRequest("B") // Handler B processes the request}
The client sends the request to the first handler in the chain. The client does not need to know which handler will eventually process the request.
State Design Pattern
The State Design Pattern is part of the behavioral design patterns group, focusing on managing an object’s dynamic behavior based on its current state. As described in the Gang of Four’s book, this pattern “enables an object to modify its behavior as its internal state changes, giving the impression that its class has changed.” In short, it allows an object to alter its behavior depending on its internal state.
Key Features of the State Pattern
State Encapsulation: Each state is encapsulated in its own class.
Behavioral Changes: Behavior changes dynamically as the object’s state changes.
No Conditionals: It eliminates long if-else or when chains by using polymorphism.
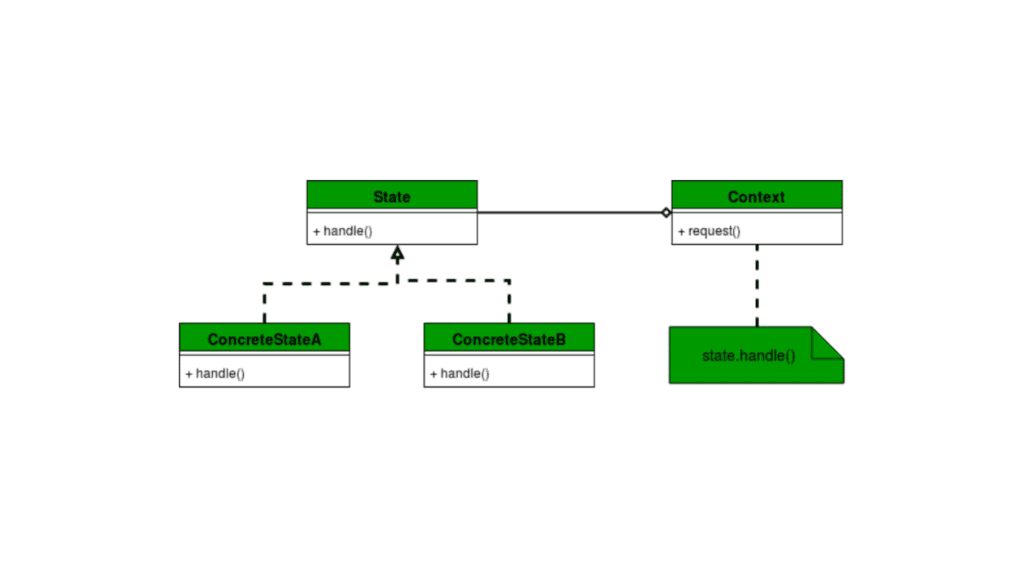
Structure of the State Design Pattern
State pattern encapsulates state-specific behavior into separate classes and delegates state transitions to these objects. Here’s a breakdown of its structure:
State Interface
The State Interface defines the methods that each state will implement. It provides a common contract for all concrete states.
Kotlin
interfaceState {funhandle(context: Context)}
Here,
The State interface declares a single method, handle(context: Context), which the Context calls to delegate behavior.
Each concrete state will define its behavior within this method.
Concrete States
The Concrete States implement the State interface. Each represents a specific state and its associated behavior.
Kotlin
classConcreteStateA : State {overridefunhandle(context: Context) {println("State A: Handling request and transitioning to State B") context.setState(ConcreteStateB()) // Transition to State B }}classConcreteStateB : State {overridefunhandle(context: Context) {println("State B: Handling request and transitioning to State A") context.setState(ConcreteStateA()) // Transition to State A }}
ConcreteStateA and ConcreteStateB implement the State interface and define their unique behavior.
Each state determines the next state and triggers a transition using the context.setState() method.
Context
The Context is the class that maintains a reference to the current state and delegates behavior to it.
Kotlin
classContext {privatevar currentState: State? = nullfunsetState(state: State) { currentState = stateprintln("Context: State changed to ${state::class.simpleName}") }funrequest() { currentState?.handle(this) ?: println("Context: No state is set") }}
The Context class holds a reference to the current state via currentState.
The setState() method updates the current state and logs the transition.
The request() method delegates the action to the current state’s handle() method.
Test the Implementation
Finally, we can create a main function to test the transitions between states.
Kotlin
funmain() {val context = Context()// Set initial state context.setState(ConcreteStateA())// Trigger behavior and transition between states context.request() // State A handles and transitions to State B context.request() // State B handles and transitions to State A context.request() // State A handles and transitions to State B}
The Context is the central point of interaction for the client code. It contains a reference to the current state.
The State Interface ensures that all states adhere to a consistent set of behaviors.
The Concrete States implement specific behavior for the Context and may trigger transitions to other states.
When a client invokes a method on the Context, the Context delegates the behavior to the current state, which executes the appropriate logic.
Command Design Pattern
At its core, the Command Design Pattern decouples the sender (the one making a request) from the receiver (the one handling the request). Instead of calling methods directly, the sender issues a command that encapsulates the details of the request. This way, the sender only knows about the command interface and not the specific implementation.
In short,
Sender: Issues commands.
Command: Encapsulates the request.
Receiver: Executes the request.
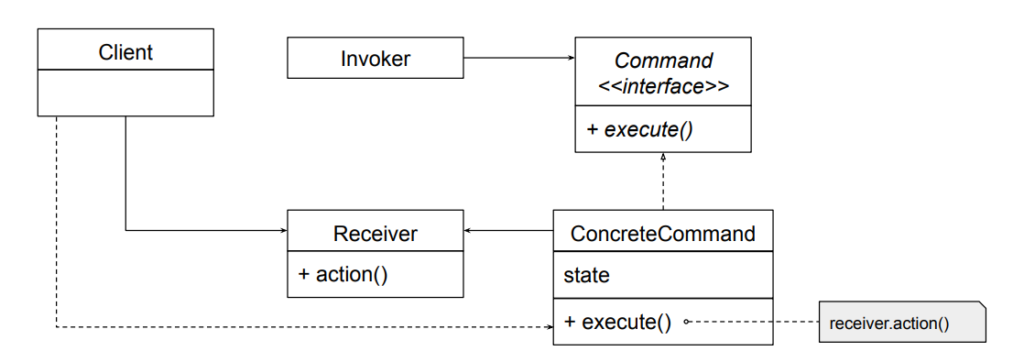
Structure of the Command Pattern
Before we dive into code, let’s see the primary components of this pattern:
Command: An interface or abstract class defining a single method, execute().
ConcreteCommand: Implements the Command interface and encapsulates the actions to be performed.
Receiver: The object that performs the actual work.
Invoker: The object that triggers the command’s execution.
Client: The entity that creates and configures commands.
Command Pattern Implementation
Imagine a smart home system, similar to Google Home, where you can control devices like turning lights on/off or playing music. This scenario can be a great example to demonstrate the implementation of the Command design pattern.
Kotlin
// Command.ktinterfaceCommand {funexecute()}
Create Receivers
The receiver performs the actual actions. For simplicity, we’ll create two receivers: Light and MusicPlayer.
Kotlin
// Light.ktclassLight {funturnOn() {println("Light is turned ON") }funturnOff() {println("Light is turned OFF") }}// MusicPlayer.ktclassMusicPlayer {funplayMusic() {println("Music is now playing") }funstopMusic() {println("Music is stopped") }}
Create Concrete Commands
Each concrete command encapsulates a request to the receiver.
The invoker doesn’t know the details of the commands but can execute them. In this case, our remote is the center of home automation and can control everything.
Now, let’s create the client code to see the pattern in action.
Kotlin
// Main.ktfunmain() {// Receiversval light = Light()val musicPlayer = MusicPlayer()// Commandsval turnOnLight = TurnOnLightCommand(light)val turnOffLight = TurnOffLightCommand(light)val playMusic = PlayMusicCommand(musicPlayer)val stopMusic = StopMusicCommand(musicPlayer)// Invokerval remoteControl = RemoteControl()// Set and execute commands remoteControl.setCommand(turnOnLight) remoteControl.setCommand(playMusic) remoteControl.executeCommands() // Executes: Light ON, Music Playing remoteControl.setCommand(turnOffLight) remoteControl.setCommand(stopMusic) remoteControl.executeCommands() // Executes: Light OFF, Music Stopped}
Here,
Command Interface: The Command interface ensures uniformity. Whether it’s turning on a light or playing music, all commands implement execute().
Receivers: The Light and MusicPlayer classes perform the actual work. They are decoupled from the invoker.
Concrete Commands: Each command bridges the invoker and the receiver. This encapsulation allows us to add new commands easily without modifying the existing code (We will see it shortly after this).
Invoker: The RemoteControl acts as a controller. It queues and executes commands, providing flexibility for batch operations.
Client Code: We bring all components together, creating a functional smart home system.
Enhancing the Pattern
If we wanted to add undo functionality, we could introduce an undo() method in the Command interface. Each concrete command would then implement the reversal logic. For example:
To iterate simply means to repeat an action. In software, iteration can be achieved using either recursion or loop structures, like for and while loops. When we need to provide functionality for iteration in a class, we often use something called an iterator.
Now, let’s talk about aggregates. Think of an aggregate as a collection of objects. It could be implemented in various forms, such as an array, a vector, or even a binary tree — essentially, any structure that holds multiple objects.
The iterator design pattern offers a structured way to handle how aggregates and their iterators are implemented. This pattern is based on two key design principles:
Separation of Concerns This principle encourages us to keep different functionalities in separate areas. In the context of iterators, it means splitting the responsibility:
The aggregate focuses solely on managing (Means storing and organizing) its collection of objects.
The iterator takes care of traversing through the aggregate.
By doing this, we ensure that the code for maintaining the collection is cleanly separated from the code that deals with traversing it.
Decoupling of Data and Operations This principle, rooted in generic programming, emphasizes independence between data structures and the operations performed on them. In short, the iterator pattern allows us to create traversal logic that works independently of the underlying data structure — whether it’s an array, a tree, or something else. This makes the traversal code more reusable and adaptable.
In practice, this design pattern simplifies things by moving the traversal logic out of the aggregate and into a dedicated iterator. This way, the aggregate focuses on its core responsibility — managing data — while the iterator focuses on efficiently navigating through that data. By adhering to these principles, we get cleaner, more modular, and reusable code.
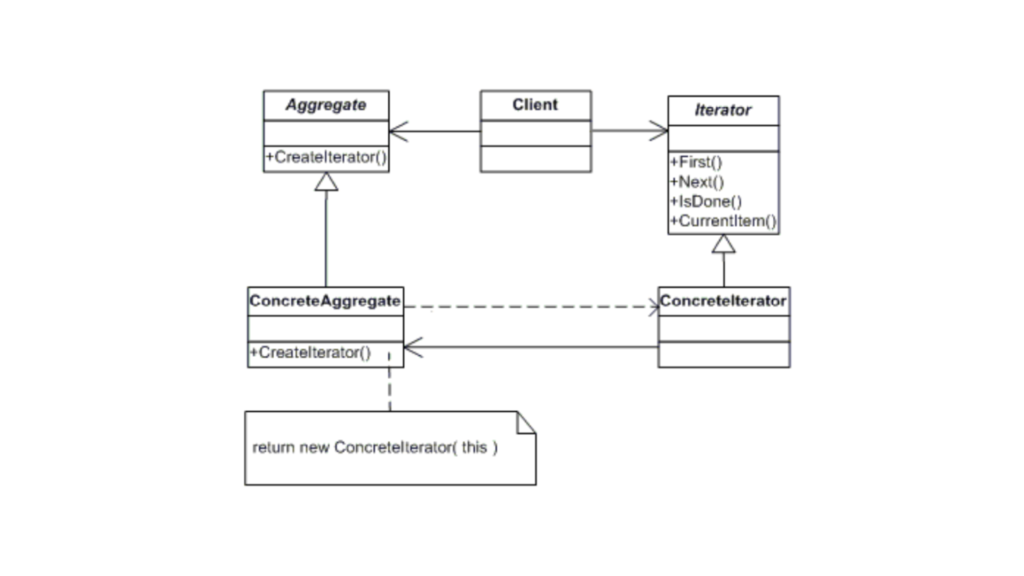
Structure of the Iterator Design Pattern
Basically, here:
Iterator: Defines an interface for accessing and traversing elements.
Concrete Iterator: Implements the Iterator interface and provides the mechanism for iteration.
Aggregate: Represents the collection of elements.
Concrete Aggregate: Implements the collection (Aggregate) interface and returns an iterator to traverse its elements.
Now, let’s implement the Iterator Pattern in Kotlin
Defines the standard methods First(), Next(), IsDone(), and CurrentItem().
ConcreteIterator
Implements these methods and provides specific logic for iterating over a list of items.
Kotlin
classConcreteIterator<T>(privateval items: List<T>) : Iterator<T> {privatevar currentIndex = 0overridefunfirst(): T {return items[0] // Return the first item }overridefunnext(): T {if (!isDone()) {return items[currentIndex++] // Move to next and return the current item }throwNoSuchElementException("No more items.") }overridefunisDone(): Boolean {return currentIndex >= items.size // Check if we've iterated past the last item }overridefuncurrentItem(): T {if (isDone()) throwNoSuchElementException("No more items.")return items[currentIndex] // Return the current item }}
Here,
first(): Returns the first item in the list.
next(): Returns the next item and increments the index.
isDone(): Checks if all items have been traversed.
The Aggregate interface only defines the createIterator() method that will return an iterator.
ConcreteAggregate
Kotlin
classConcreteAggregate<T>(privateval items: List<T>) : Aggregate<T> {overridefuncreateIterator(): Iterator<T> {returnConcreteIterator(items) // Return a new ConcreteIterator }}
The ConcreteAggregate class implements Aggregate, and its createIterator() method returns a new instance of ConcreteIterator to iterate over the collection.
Client Code
The client creates an aggregate and uses the iterator to traverse the items in the collection.
The Interpreter design pattern is used to define a representation for a grammar of a language and provide an interpreter that uses the representation to interpret sentences in the language. In simpler terms, it’s a way to evaluate statements or expressions based on a predefined set of rules or grammar.
It’s particularly useful when you need to evaluate strings that follow a specific format, like mathematical expressions, SQL queries, or even programming languages.
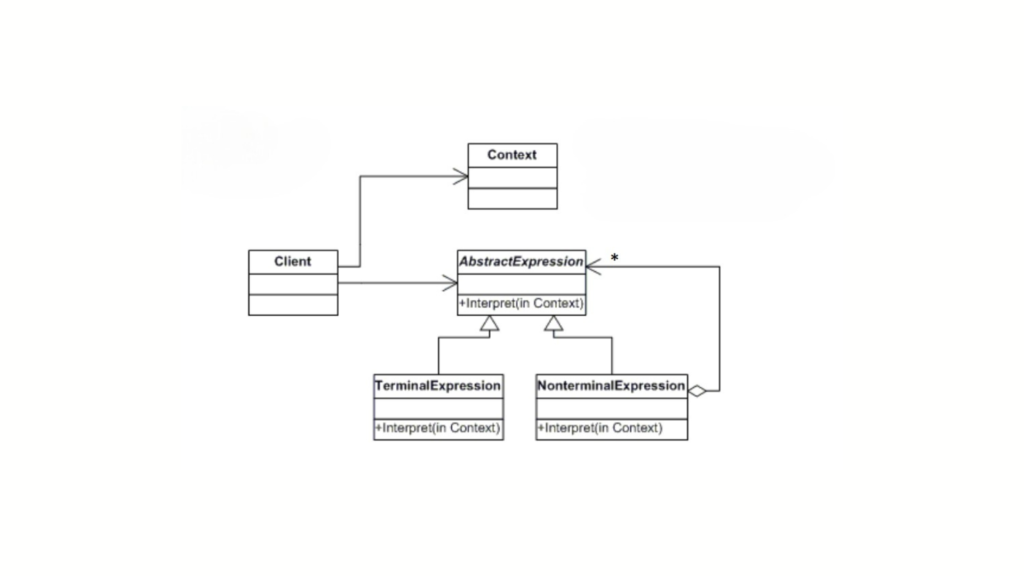
Structure of Iterpreter Design Pattern
The main components of the Interpreter pattern:
AbstractExpression: This defines the interface for all expressions. It usually has an interpret() method, which is responsible for interpreting the expression.
TerminalExpression: These are the basic expressions in the grammar. They usually don’t have any sub-expressions. For example, in a mathematical expression, a number or a variable would be a terminal expression.
NonTerminalExpression: These expressions are made up of one or more terminal or non-terminal expressions. For example, an addition or subtraction operator in a mathematical expression.
Context: This holds the data or the input we want to interpret.
When Should We Use It?
The Interpreter pattern comes in handy when:
We need to evaluate a series of expressions that follow some grammar or rules.
We’re dealing with complex expressions that can be broken down into smaller components.
The language we’re working with is relatively simple but needs a structured approach.
Now that we know what the pattern is and when to use it, let’s look at how we can implement it in Kotlin.
Wait… Have you ever wanted to create a calculator for math expressions like 3 + 5 - 2? Or a command parser for a small scripting language? That’s the perfect use case!
Simple Math Expression Interpreter
We’re going to interpret a basic math expression like 3 + (5 - 2). Here’s how we’ll do it step by step.
Define the Abstract Expression
We’ll start by defining our abstract expression interface, which will be used by both terminal and non-terminal expressions.
Here, the interpret method takes a context (which can be a map of variable values) and returns an integer result.
Create Terminal Expressions
Now, let’s create terminal expressions. These are the base expressions, like numbers in the expression.
Kotlin
// TerminalExpression class for numbersclassNumberExpression(privateval number: Int) : Expression {overridefuninterpret(context: Map<String, Int>): Int {return number }}
In this class, we simply store a number, and when we interpret it, we return that number.
Create Non-Terminal Expressions
Next, we’ll implement the non-terminal expressions. These are the operators like addition or subtraction. Each non-terminal expression will hold references to two sub-expressions: the left-hand side and the right-hand side.
Kotlin
// NonTerminalExpression class for additionclassAddExpression(privateval left: Expression, privateval right: Expression) : Expression {overridefuninterpret(context: Map<String, Int>): Int {return left.interpret(context) + right.interpret(context) }}// NonTerminalExpression class for subtractionclassSubtractExpression(privateval left: Expression, privateval right: Expression) : Expression {overridefuninterpret(context: Map<String, Int>): Int {return left.interpret(context) - right.interpret(context) }}
Here, the AddExpression and SubtractExpression are the operators, and they each hold two Expression objects, representing the left and right operands. When we interpret them, we recursively interpret both sides and then apply the operation. Basically each of these expressions takes two sub-expressions (left and right) and performs an operation on their results.
Build the Expression Tree (Bringing All Together)
Now that we’ve created our expressions, we can evaluate them as a tree, where each node represents an operation and the leaves are the numbers. Let’s explore how these components come together in a simple interpreter.
Kotlin
funmain() {// Build the expression treeval expression = AddExpression(NumberExpression(3),SubtractExpression(NumberExpression(5), NumberExpression(2)) )// Create a context if needed (in this case, we don't need it, so we use an empty map)val result = expression.interpret(emptyMap())// Print the resultprintln("Result: $result") // Output will be 3 + (5 - 2) = 6}
Here,
Expression Tree Construction: To begin, we construct an expression tree. At the root, we have an AddExpression, which consists of two child nodes:
The left child is a NumberExpression(3).
The right child is a SubtractExpression, which further has two children: NumberExpression(5) and NumberExpression(2).
Interpretation: When the interpret() method is called on the root node (AddExpression), it processes its children recursively. The AddExpression calculates the sum of its left and right sub-expressions. The right sub-expression (SubtractExpression) computes the result of 5 - 2. Finally, the root evaluates 3 + 3, resulting in the value 6.
Context: In this example, no external variables are required, so we use an empty map as the context. But what if we want to handle variables like x + y, where the values of x and y are defined at runtime? In that case, we would use a context like this:
Kotlin
// Context: x = 3, y = 5val context = mapOf("x" to 3, "y" to 5)
Observer Design Pattern
The Observer design pattern is used to keep parts of a program in sync. It works by having subjects (the components being watched) notify observers (the components watching) whenever something changes. This creates a system where multiple observers can automatically update themselves when the subject’s state changes. It’s like a group chat where everyone gets notified when someone sends a message, keeping everyone updated.
In the Observer pattern, a subject keeps track of a list of observers and notifies them whenever there’s a change in its state. This is the most common use case, where one subject is observed by many observers.
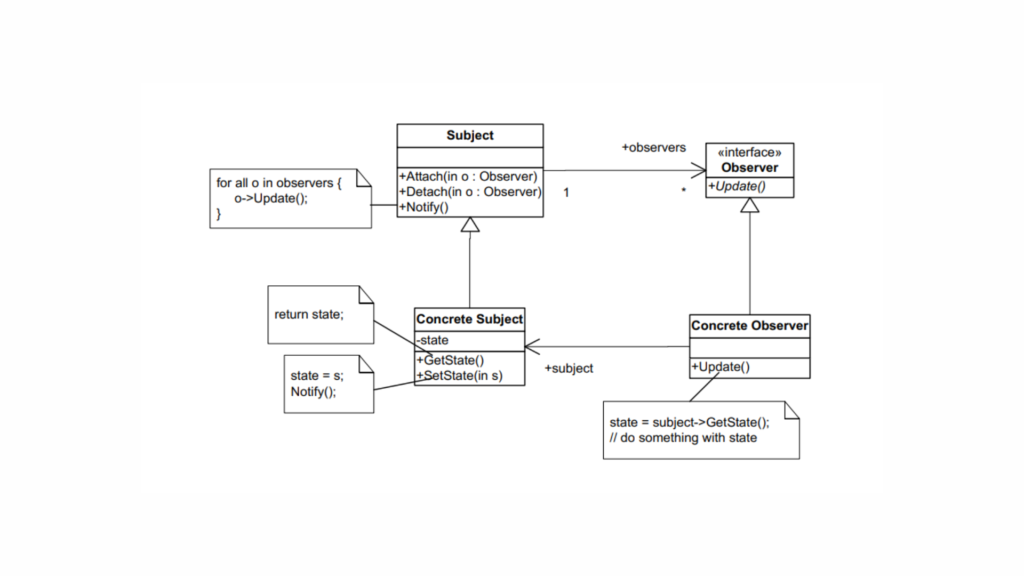
Observer Design Pattern Structure
The key components of the Observer pattern are:
Subject: The object that holds the state and notifies observers of changes.
Observer: The object that wants to be notified about changes in the subject.
Concrete Subject: A specific implementation of the subject.
Concrete Observer: A specific implementation of the observer.
Implementation
Kotlin
// Subject InterfaceinterfaceSubject {funattach(observer: Observer)fundetach(observer: Observer)funnotifyObservers()}// Observer InterfaceinterfaceObserver {funupdate()}// Concrete SubjectclassConcreteSubject : Subject {privateval observers = mutableListOf<Observer>()var state: String = ""set(value) {field = valuenotifyObservers() }// Attach an observeroverridefunattach(observer: Observer) { observers.add(observer)println("Observer added.") }// Detach an observeroverridefundetach(observer: Observer) { observers.remove(observer)println("Observer removed.") }// Notify all observers of a state changeoverridefunnotifyObservers() {println("Notifying observers...") observers.forEach { it.update() } }}// Concrete ObserverclassConcreteObserver(privateval id: String, privateval subject: ConcreteSubject) : Observer {privatevar observerState: String = ""// Update the observer's stateoverridefunupdate() { observerState = subject.stateprintln("Observer $id state updated to: $observerState") }}// Main function to demonstratefunmain() {// Create a concrete subjectval subject = ConcreteSubject()// Create observersval observer1 = ConcreteObserver("1", subject)val observer2 = ConcreteObserver("2", subject)// Attach observers to the subject subject.attach(observer1) subject.attach(observer2)// Change the subject's state and notify observers subject.state = "State 1" subject.state = "State 2"// Detach an observer and change the state subject.detach(observer1) subject.state = "State 3"}
Output
Kotlin
Observer added.Observer added.Notifying observers...Observer 1 state updated to: State1Observer 2 state updated to: State1Notifying observers...Observer 1 state updated to: State2Observer 2 state updated to: State2Observer removed.Notifying observers...Observer 2 state updated to: State3
Here,
Both observers (observer1 and observer2) are attached to the subject.
When the state changes to “State 1”, both observers receive the update.
When the state changes to “State 2”, both observers again receive the update.
observer1 is detached, so only observer2 receives the update when the state changes to “State 3”.
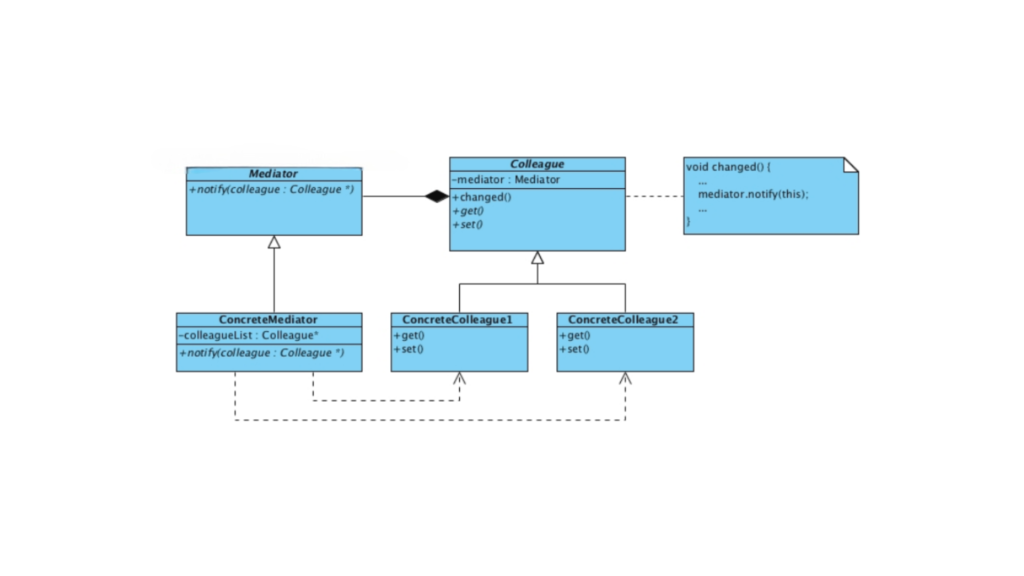
Mediator Design Pattern
The Mediator Design Pattern simplifies communication between multiple objects by introducing a mediator object that acts as a central hub. Instead of objects directly referencing each other, they interact through the mediator. This reduces dependencies and makes the code more modular and easier to manage.
While both the Mediator and Observer patterns involve communication between objects, the key difference is in how they handle it. In the Observer pattern, a subject notifies its observers whenever it changes, leading to direct communication between the subject and its observers. In contrast, the Mediator Pattern centralizes communication, where objects (colleagues) send messages to a mediator instead of directly interacting with each other. The mediator then coordinates and notifies the relevant colleagues about changes.
Think of it like a project manager in a team. Team members don’t communicate directly for every decision; instead, the project manager coordinates their interactions. This reduces chaos and improves collaboration.
When Should We Use the Mediator Design Pattern?
When designing reusable components, tight dependencies between them can lead to tangled, “spaghetti-like” code. In this situation, reusing individual classes becomes difficult because they are too interconnected. It’s like trying to remove one piece from a tangled heap—you either end up taking everything or nothing at all.
Spaghetti Code Analogy: Imagine a string of Christmas lights where each bulb is directly wired to the next. If one bulb is faulty or needs to be replaced, you can’t just swap out that single bulb. Since all the bulbs are tightly connected, replacing one requires adjusting or replacing the entire string. This is similar to spaghetti code, where components are so tightly coupled that isolating one to make changes without affecting others becomes very difficult.
Solution with the Mediator Pattern: Now, imagine instead that each bulb is connected to a central controller (the mediator). If one bulb needs to be replaced or updated, the controller handles the communication between bulbs. The bulbs no longer interact with each other directly. Instead, all communication goes through the mediator. This way, the rest of the system remains unaffected by changes to a single bulb, and the system becomes more modular with fewer dependencies between components.
We should consider using the Mediator Pattern when:
Multiple objects must interact in complex ways.
Tight coupling between objects makes the system difficult to maintain or extend.
Changes in one component should not cascade through the entire system, causing ripple effects.
Structure of Mediator Design Pattern
Mediator Interface
Defines a contract for communication between components.
Concrete Mediator
Implements the Mediator interface and manages the communication between components.
Colleague (Component)
Represents the individual components that interact with each other via the mediator.
Concrete Colleague
Implements the specific behavior of a component.
The Mediator design pattern is structured to centralize communication and decouple interacting objects. Here’s how it works:
Centralized Communication: All communication between objects (known as colleagues) is routed through a central mediator. This ensures that each object doesn’t need to be aware of the others, and all interactions are coordinated in one place.
Decoupling of Objects: The colleague objects don’t communicate with each other directly. Instead, they send messages through the mediator, which handles the communication. This reduces the complexity of managing direct dependencies between objects. For example, in an air traffic control system, instead of planes communicating directly with one another, they interact with the air traffic controller (the mediator). The controller manages the planes’ interactions, ensuring safe, efficient, and orderly communication, preventing collisions or miscommunication.
Memento Design Pattern
The Memento Design Pattern is one of the behavioral design patterns. It’s all about capturing an object’s state at a particular moment in time, so you can restore it later. It’s like taking a snapshot of an object’s current state and saving it for safekeeping.
Here’s the official definition:
The Memento Design Pattern provides the ability to restore an object to its previous state without exposing the implementation details.
We can’t always expose an object’s internal details due to encapsulation. This pattern allows us to:
Save the state without breaking encapsulation.
Support features like undo/redo, checkpoints, or versioning.
Real-Life Analogy
Sanjay, who forgets every 15 minutes, uses photos, notes, and tattoos to restore his memory
Imagine writing a letter and using an eraser. Before making changes, you take a photo of the letter. If you mess up, you can refer to the photo and restore the original version. In this analogy:
The letter is the Originator.
The photo is the Memento.
You, with your eraser, are the Caretaker.
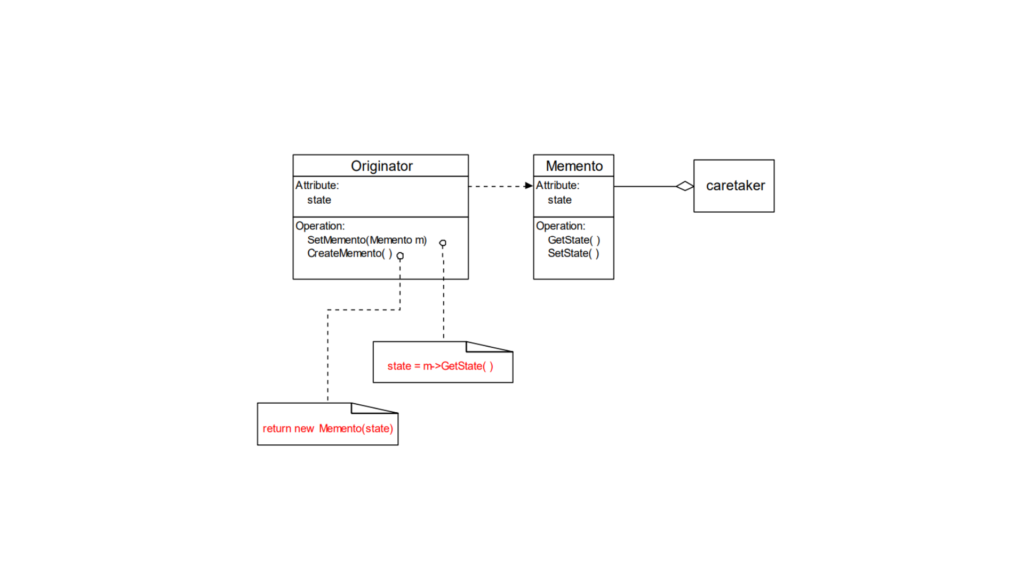
Memento Design Pattern Structure
Encapsulate an object’s state so that its internal structure is hidden from external entities. The core of the structure lies in the memento, which stores the object’s state, while another object, known as the caretaker, is responsible for saving and restoring the memento without accessing the object’s internal details.
The Memento pattern involves three primary components:
Memento: It’s like a snapshot of an object’s internal state. It saves the object’s data at a specific moment, and it can save only what is necessary.
Protection: The Memento ensures that only the object that created it (the “Originator”) can access and modify its content. Other objects (like the “Caretaker”) can only store and pass the Memento around without seeing or changing its data.
Originator: This is the object that wants to save its state.
It creates a Memento to store its current state.
Later, it can use the Memento to go back to that saved state.
Caretaker: This object is responsible for keeping the Memento safe.
It never looks inside the Memento or changes its content. It simply stores and retrieves it when needed.
In short, the Originator creates a snapshot (Memento) of its state, and the Caretaker keeps track of these snapshots. Later, the Originator can use the snapshots to restore itself.
In practice, the Originator creates a Memento to store its state, and the Caretaker keeps the Memento for future use. When the user triggers an undo (like pressing Ctrl + Z), the Caretaker retrieves the saved state from the Memento and hands it back to the Originator, which then reverts to that state.
Kotlin
// Memento class stores the state of the OriginatorclassMemento(val state: String)// Originator is the object whose state is savedclassOriginator(var state: String) {// Creates a Memento with the current statefuncreateMemento(): Memento {returnMemento(state) }// Restores the state from a Mementofunrestore(memento: Memento) {this.state = memento.state }funshowState() {println("Current State: $state") }}// Caretaker is responsible for storing and restoring the MementoclassCaretaker {privateval mementoList = mutableListOf<Memento>()// Adds a Memento to the listfunaddMemento(memento: Memento) { mementoList.add(memento) }// Retrieves the last saved Memento (undo functionality)fungetLastMemento(): Memento? {if (mementoList.isNotEmpty()) {return mementoList.removeAt(mementoList.size - 1) }returnnull }}// Demonstrating the Memento pattern in actionfunmain() {val originator = Originator("Initial State")val caretaker = Caretaker() originator.showState() // Output: Current State: Initial State// Save the state caretaker.addMemento(originator.createMemento())// Change the state originator.state = "State 1" originator.showState() // Output: Current State: State 1// Save the new state caretaker.addMemento(originator.createMemento())// Change the state again originator.state = "State 2" originator.showState() // Output: Current State: State 2// Now let's undo the last state change (Ctrl + Z)val lastMemento = caretaker.getLastMemento()if (lastMemento != null) { originator.restore(lastMemento) originator.showState() // Output: Current State: State 1 }// Undo again (Ctrl + Z)val previousMemento = caretaker.getLastMemento()if (previousMemento != null) { originator.restore(previousMemento) originator.showState() // Output: Current State: Initial State }}
Initially, the Originator has the state “Initial State”.
The state is saved into the Caretaker‘s list.
The state changes to “State 1”, and it is saved again.
The state changes to “State 2”, and the change is saved.
The Caretaker then provides the last saved state (from “State 2” to “State 1”), and then the previous state (“State 1” to “Initial State”) is restored.
Strategy Design Pattern
The Strategy Pattern falls under the category of behavioral design patterns, and its purpose is straightforward: it enables us to define multiple algorithms and switch between them dynamically, without modifying the client code. Instead of duplicating code or repeatedly writing the same logic, this pattern allows you to define a family of algorithms and choose the one that best fits the client’s needs.
This pattern aligns with two key principles of software design:
Encapsulation: Each algorithm is encapsulated in its own class.
Open/Closed Principle: The code is open for extension (new strategies can be added) but closed for modification (existing code remains unchanged).
The beauty of the Strategy Pattern lies in its simplicity and flexibility. It enables you to add new features or extend functionality without requiring significant changes to existing code. Additionally, it allows your program to swap behaviors dynamically at runtime, making it highly adaptable to changing requirements with minimal effort.
When to Use the Strategy Pattern?
You should consider using the Strategy Pattern when:
You have multiple ways to accomplish a task and want the flexibility to switch between them easily.
You want to avoid cluttered classes with lots of if or when statements.
You need to keep the algorithm’s implementation separate from the rest of your code.
You want your code to be easily extended with new features or behaviors without changing existing code.
Here are a few real-life scenarios where the Strategy Pattern works really well:
Payment gateways: Letting users choose between different payment methods, like credit cards, PayPal, or bank transfers.
Sorting algorithms: Allowing users to switch between sorting methods, like quick sort or bubble sort, based on their preference.
Discount calculations: Handling various types of discounts in a shopping cart, such as percentage-based, fixed amount, or special promotions.
We will soon look at the code implementation, but before that, let’s first understand the structure of the Strategy Pattern and its key components.
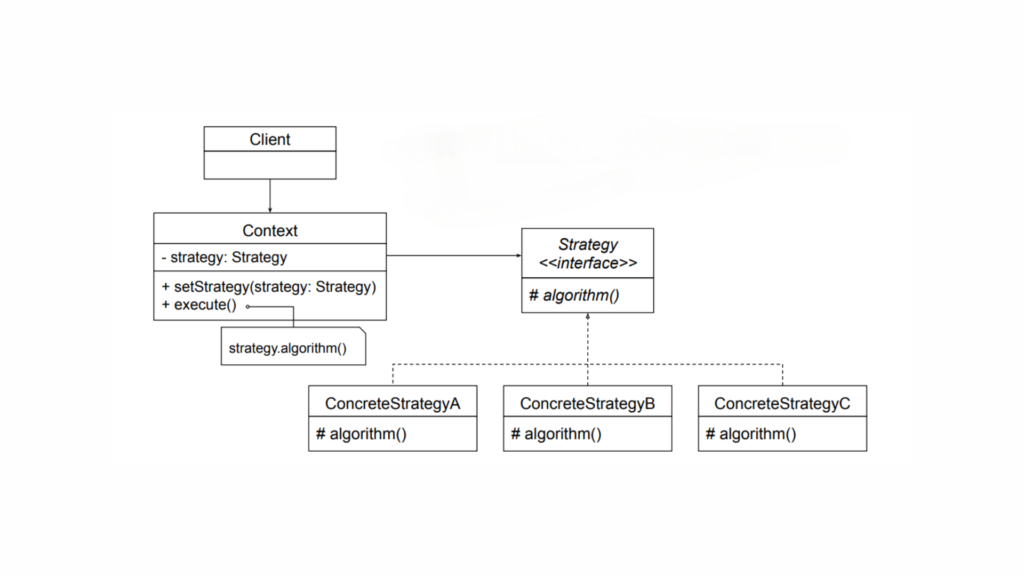
Strategy Design Pattern Structure
Let’s break the pattern into its core components:
Strategy
Defines a common interface for all the supported algorithms.
The context uses this interface to call the algorithm defined by a specific strategy.
ConcreteStrategy
Implements the algorithm as outlined by the Strategy interface.
Context
Is configured with a ConcreteStrategy object.
Holds a reference to a Strategy object.
May offer an interface that allows the Strategy to access its internal data or state, but only when necessary.
Let’s now implement the Strategy Design Pattern for a simple calculation operation.
The Strategy interface defines the contract for the algorithm.
OperationAdd, OperationSubtract, and OperationMultiply are concrete classes that implement the Strategy interface.
The Context class uses a Strategy to perform an operation.
In main(), we change the Strategy at runtime by passing different Strategy objects to the Context.
Template Method Pattern
The Template Method Pattern is a behavioral design pattern that defines the skeleton of an algorithm in a base class and lets subclasses override specific steps without altering the algorithm’s overall structure.
Think of it as a recipe. You can follow the recipe to make a dish, but certain ingredients or techniques might vary depending on your preferences. The structure remains the same, but you get the flexibility to tweak the details.
Let me simplify that. Imagine you’re a chef creating a recipe for your restaurant. Some steps, like washing ingredients and plating the dish, are always the same. But steps like seasoning or cooking style might vary depending on the type of dish. The Template Method allows you to define this recipe in a general way while letting individual chefs (subclasses) tweak specific steps.
Template Method Pattern: Problem and Solution
Understanding the Problem: Imagine you are building a gaming application with different types of games: Chess and Soccer. Each game has the following steps:
Initialize the game.
Start playing.
End the game.
While the general structure is the same, the details of each step vary for Chess and Soccer. If you were to write separate implementations for each game, you might duplicate code for the steps that are common, which violates the DRY principle (Don’t Repeat Yourself).
Solution: The Template Method pattern addresses this by providing a template (skeleton) for the algorithm in a base class. Subclasses define the specific behavior for the varying steps.
Key Principles of the Template Method Pattern
Algorithm Structure: The base class provides a high-level structure of the algorithm.
Customizable Steps: Subclasses implement the specific parts of the algorithm.
Consistency and Reusability: Common steps are reused, ensuring consistency across implementations.
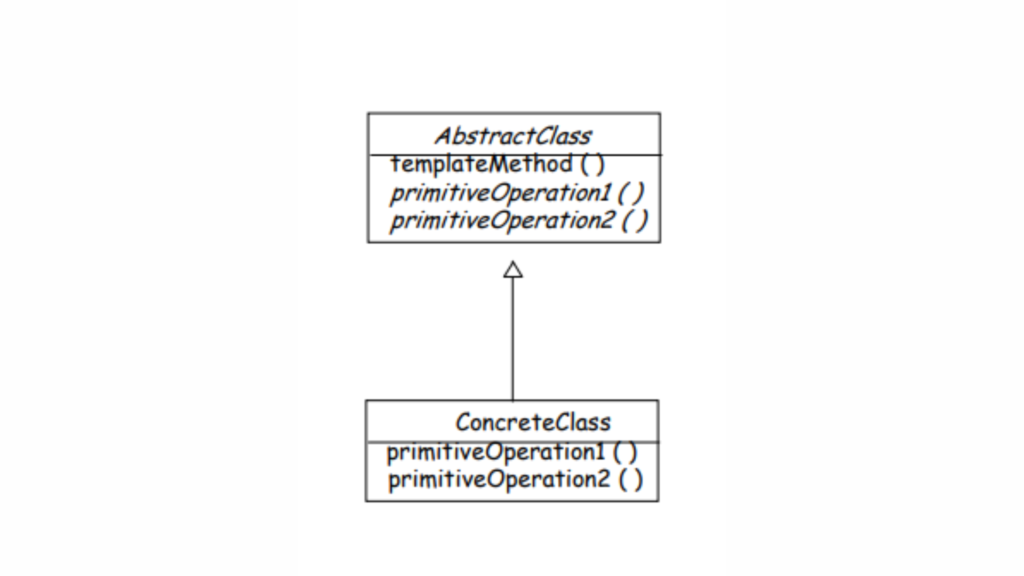
Structure of Template Method Pattern
Key Components of the Template Method Pattern
Abstract Class: Contains the template method, which defines the algorithm’s structure and some default implementations of steps.
Template Method: A method that defines the sequence of steps in the algorithm. Some steps are concrete (already implemented), while others are abstract (to be implemented by subclasses).
Concrete Class: Implements the abstract steps to provide specific behaviors.
Think of an abstract class as the foundation for a group of related classes. The common behavior for all these classes is defined in the abstract class, while the specific details are handled by the individual subclasses. The Template Method pattern gives you a way to outline the basic structure of an algorithm in a method, while leaving certain steps for the subclasses to fill in. This lets subclasses customize parts of the algorithm without changing its overall structure.
Let’s implement the Template Method design pattern for our gaming application.
Define the Abstract Class
Kotlin
abstractclassGame {// Template methodfunplay() {initialize()startPlay()endPlay() }// Steps of the algorithm (template method components)abstractfuninitialize()abstractfunstartPlay()abstractfunendPlay()}
The play() method is the template method. It defines the skeleton of the algorithm.
The steps initialize(), startPlay(), and endPlay() are abstract and must be implemented by subclasses.
Create Concrete Classes
Chess Game
Kotlin
classChess : Game() {overridefuninitialize() {println("Chess Game Initialized. Set up the board.") }overridefunstartPlay() {println("Chess Game Started. Players are thinking about their moves.") }overridefunendPlay() {println("Chess Game Finished. Checkmate!") }}
Soccer Game
Kotlin
classSoccer : Game() {overridefuninitialize() {println("Soccer Game Initialized. Players are on the field.") }overridefunstartPlay() {println("Soccer Game Started. Kickoff!") }overridefunendPlay() {println("Soccer Game Finished. The final whistle blows.") }}
Playing Chess:Chess Game Initialized. Set up the board.Chess Game Started. Players are thinking about their moves.Chess Game Finished. Checkmate!Playing Soccer:Soccer Game Initialized. Players are on the field.Soccer Game Started. Kickoff!Soccer Game Finished. The final whistle blows.
Here,
Abstract Class:
The Game class encapsulates the skeleton of the algorithm in the play() method.
The play() method ensures the steps are executed in the defined order.
Concrete Classes:
The Chess and Soccer classes override the abstract methods to provide specific implementations for each step.
Reusability:
The play() method in the Game class ensures the overall structure of the algorithm is consistent across different games.
The Secret Twist of the Hook Method
In the Template Method Pattern, the Hook Method is an optional concept that adds flexibility to the algorithm. The Hook Method is a method defined in the abstract class, but it doesn’t have to do anything by default. Instead, it provides a “hook” for subclasses to override and implement custom behavior, if needed, without changing the overall flow of the algorithm.
Note: A hook is a simple method (not marked with any special ‘hook’ keyword; it’s just a regular method with hook functionality) defined in the abstract class, typically with an empty or default implementation. It enables subclasses to ‘hook into’ the algorithm at specific points if needed. Subclasses can also choose to ignore the hook if it isn’t relevant to their specific behavior.
How it works:
The Template Method defines the skeleton of an algorithm, calling a series of steps (methods), some of which can be abstract (requiring subclasses to implement them).
A Hook Method is a method in the abstract class that does nothing by default but can be overridden in the subclasses to add specific functionality.
Why it’s useful:
Flexibility: It allows subclasses to optionally customize parts of the algorithm without changing the structure.
Control: The base class controls the algorithm’s flow, while allowing subclasses to “hook” in additional behavior when needed.
Kotlin
abstractclassCookingRecipe {funcook() {prepareIngredients()cookMainPart()serve() }// Must be implemented by subclassesabstractfunprepareIngredients()// Default implementation, can be overriddenopenfuncookMainPart() {println("Cooking the main dish in a standard way") }// Hook methodopenfunserve() {println("Serving the dish") }}classPastaRecipe : CookingRecipe() {overridefunprepareIngredients() {println("Preparing pasta, sauce, and vegetables") }overridefuncookMainPart() {println("Cooking the pasta and sauce together") }// Override hook method to add custom behavioroverridefunserve() {println("Serving the pasta with extra cheese") }}
Here,
prepareIngredients() is an abstract method, so subclasses must implement it.
cookMainPart() has a default implementation that can be overridden.
serve() is a hook method. It has a default behavior but can be overridden in subclasses to provide custom serving logic.
Visitor Design Pattern
The Visitor Design Pattern is a behavioral design pattern. Its primary goal is to separate an algorithm from the object structure on which it operates. In short, it allows you to add new operations (or behaviors) to a set of classes without modifying their source code.
Imagine this: You’ve just arrived in a new city and you’re super excited to explore. You quickly hop onto Google and search for “must-visit places near me.” The results are full of options: a beautiful park with breathtaking views, a cozy restaurant that serves your favorite cuisine, and a renowned museum with tons of fascinating exhibits. You decide to visit all of them.
The next morning, you set out. First, you head to the park and take a bunch of photos because, well, it’s stunning. Then, you go to the restaurant and indulge in that delicious dish you’ve been craving. Finally, you make your way to the museum, grab a ticket, and check out some of the exhibits before catching a movie in the cinema hall.
Each place is different, and at each one, you do something unique based on what it is — take photos, eat, or watch a movie. But here’s the key: you didn’t change the park, the restaurant, or the museum. You simply experienced them in different ways.
This is where the Visitor Design Pattern comes into play.
In short, the Visitor Design Pattern is all about interacting with different objects (in this case, the park, restaurant, and museum) in different ways, but without changing the objects themselves. It’s like you, as the “visitor,” can do different activities based on the type of place (object) you’re visiting, but the places (objects) remain exactly the same.
How Does It Work?
In programming, this pattern allows you to add new operations (or behaviors) to objects without changing their internal code. This is important because often, we don’t want to go digging into existing code and modifying it when we want to add new features. Instead, we can add new operations externally.
This pattern involves two main components:
Visitor: Encapsulates the new operation you want to perform.
Visitable or Element: Represents the classes that the visitor will operate on.
The Visitor Design Pattern mainly relies on the double dispatching mechanism. To grasp double dispatching, it’s important to first understand single dispatching.
Single Dispatch
Most design patterns that use delegation rely on a feature called single dispatch. This means:
The specific function that gets called is determined by the type of one object (the object the method is being called on).
This is also known as a virtual function call, where the dynamic type (the actual type of the object at runtime) decides which function to execute.
In languages like Java or Kotlin, if you have a method in a superclass that is overridden in a subclass, the method that gets executed is determined at runtime based on the actual object type, not the reference type. This behavior, known as polymorphism, is an example of single dispatch because the method is chosen based on the type of a single object (the one calling the method).
Double Dispatch
The Visitor Design Pattern extends this concept by introducing double dispatch, where the method that gets called depends on two factors:
The method being invoked
The runtime types of two objects (e.g., the object being visited and the visitor object).
This means:
Double dispatch is a mechanism where the function call depends on the runtime types of two objects instead of one.
In the Visitor Design Pattern, double dispatch ensures that the correct function is executed based on the combination of the Visitor and the element being visited.
So, final thoughts on them:
Single Dispatch: The method invoked depends on the method name and the type of the receiver (polymorphism).
Double Dispatch: The method invoked depends on the method name and the types of two receivers (the element and the visitor). This allows adding operations to an object structure without modifying the structure itself.
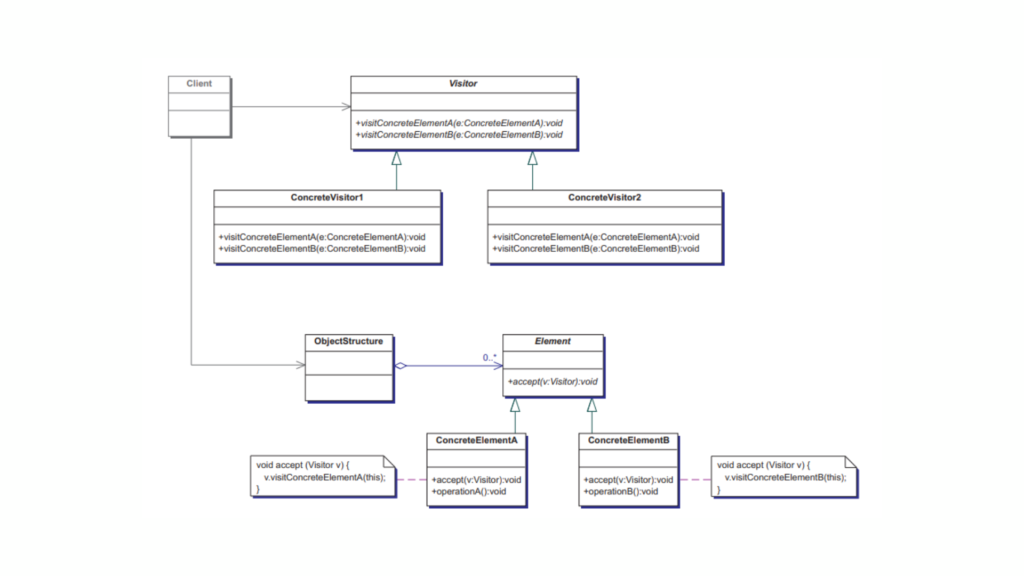
Structure of the Visitor Design Pattern
There are five main players in this pattern:
Visitor
An interface or abstract class defining operations to be performed on elements (Visitable objects) in the structure.
Declares methods for performing specific operations on each type of element in the structure.
Defines specific behaviors for each type of element it visits.
May maintain state or data relevant to the operations performed during visitation.
Kotlin
classConcreteVisitor : Visitor {overridefunvisitConcreteElementA(element: ConcreteElementA) {// Specific operation for ConcreteElementA }overridefunvisitConcreteElementB(element: ConcreteElementB) {// Specific operation for ConcreteElementB }}
Visitable (Element)
An interface or abstract class representing elements that can be visited by a Visitor.
Declares an accept(visitor: Visitor) method, enabling the element to accept a Visitor and let it perform its operation.
Kotlin
interfaceVisitable {funaccept(visitor: Visitor)}
Concrete Visitable Classes
Implements the Visitable interface.
Provides the accept(visitor: Visitor) method implementation, which calls the appropriate visit() method on the visitor, passing itself as a parameter.
Create ConcreteVisitable classes: These are concrete shapes like Circle and Rectangle that implement the Shape interface and define the accept() method.
Client code: This is where we use the visitor pattern. We create the shapes and use the AreaCalculator to perform operations.
Kotlin
funmain() {val shapes: List<Shape> = listOf(Circle(5.0), Rectangle(4.0, 6.0))// Create the visitorval areaCalculator = AreaCalculator()// Visit each shape and calculate the area shapes.forEach { shape -> shape.accept(areaCalculator) }}//////////// OUTPUT //////////////////Calculating area of circle: π * 5.0^2Area: 78.53981633974483Calculating area of rectangle: 4.0 * 6.0Area: 24.0
Now, you might be thinking, ‘What is the benefit of doing this?‘ Yes, there are several:
Open for extension, closed for modification: You can add new operations (visitors) without modifying the existing code for shapes.
Separation of concerns: The logic for operations is kept separate from the objects, making it easier to manage and extend.
In this way, the Visitor pattern helps you add new functionalities to existing classes without changing their code. It’s especially useful when you need to perform different operations on a group of objects that share a common interface.
Conclusion
Behavioral design patterns enhance the interaction between objects by clearly defining the roles and responsibilities of each component. The patterns we’ve covered today, including Chain of Responsibility, Command, Interpreter, Iterator, Mediator, Memento, Observer, State, Strategy, Template Method, and Visitor, represent just a small selection of the many behavioral patterns available.
By incorporating these patterns into your Kotlin projects, you can make your code more flexible, maintainable, and easier to modify as requirements evolve. As with any skill, mastering design patterns takes time and practice, so experiment with these patterns in your own work to build a deeper understanding.
When diving into the world of design patterns, one of the more intriguing patterns you’ll encounter is the Visitor Design Pattern. While it might not be as commonly used as patterns like Singleton or Factory, it becomes incredibly powerful when you need to operate on a hierarchy of objects.
At first glance, the Visitor Design Pattern can seem challenging. Its name might feel familiar, yet the technical concept can appear tricky to grasp. But don’t worry — once you understand its core principles, implementing it will be much easier than you expect.
In this guide, we’ll break down the Visitor Pattern step by step. We’ll start by understanding its fundamentals, explore its structure in detail, and then finish with practical examples to solidify your understanding.
Ready to simplify this complex pattern? Let’s dive in and master the Visitor Design Pattern in Kotlin..!
What Is the Visitor Design Pattern?
The Visitor Design Pattern is a behavioral design pattern. Its primary goal is to separate an algorithm from the object structure on which it operates. In short, it allows you to add new operations (or behaviors) to a set of classes without modifying their source code.
Imagine this: You’ve just arrived in a new city and you’re super excited to explore. You quickly hop onto Google and search for “must-visit places near me.” The results are full of options: a beautiful park with breathtaking views, a cozy restaurant that serves your favorite cuisine, and a renowned museum with tons of fascinating exhibits. You decide to visit all of them.
The next morning, you set out. First, you head to the park and take a bunch of photos because, well, it’s stunning. Then, you go to the restaurant and indulge in that delicious dish you’ve been craving. Finally, you make your way to the museum, grab a ticket, and check out some of the exhibits before catching a movie in the cinema hall.
Each place is different, and at each one, you do something unique based on what it is — take photos, eat, or watch a movie. But here’s the key: you didn’t change the park, the restaurant, or the museum. You simply experienced them in different ways.
This is where the Visitor Design Pattern comes into play.
In short, the Visitor Design Pattern is all about interacting with different objects (in this case, the park, restaurant, and museum) in different ways, but without changing the objects themselves. It’s like you, as the “visitor,” can do different activities based on the type of place (object) you’re visiting, but the places (objects) remain exactly the same.
How Does It Work?
In programming, this pattern allows you to add new operations (or behaviors) to objects without changing their internal code. This is important because often, we don’t want to go digging into existing code and modifying it when we want to add new features. Instead, we can add new operations externally.
This pattern involves two main components:
Visitor: Encapsulates the new operation you want to perform.
Visitable or Element: Represents the classes that the visitor will operate on.
The Visitor Design Pattern mainly relies on the double dispatching mechanism. To grasp double dispatching, it’s important to first understand single dispatching.
Single Dispatch
Most design patterns that use delegation rely on a feature called single dispatch. This means:
The specific function that gets called is determined by the type of one object (the object the method is being called on).
This is also known as a virtual function call, where the dynamic type (the actual type of the object at runtime) decides which function to execute.
In languages like Java or Kotlin, if you have a method in a superclass that is overridden in a subclass, the method that gets executed is determined at runtime based on the actual object type, not the reference type. This behavior, known as polymorphism, is an example of single dispatch because the method is chosen based on the type of a single object (the one calling the method).
Double Dispatch
The Visitor Design Pattern extends this concept by introducing double dispatch, where the method that gets called depends on two factors:
The method being invoked
The runtime types of two objects (e.g., the object being visited and the visitor object).
This means:
Double dispatch is a mechanism where the function call depends on the runtime types of two objects instead of one.
In the Visitor Design Pattern, double dispatch ensures that the correct function is executed based on the combination of the Visitor and the element being visited.
So, final thoughts on them:
Single Dispatch: The method invoked depends on the method name and the type of the receiver (polymorphism).
Double Dispatch: The method invoked depends on the method name and the types of two receivers (the element and the visitor). This allows adding operations to an object structure without modifying the structure itself.
Structure of the Visitor Design Pattern
There are five main players in this pattern:
Visitor
An interface or abstract class defining operations to be performed on elements (Visitable objects) in the structure.
Declares methods for performing specific operations on each type of element in the structure.
Defines specific behaviors for each type of element it visits.
May maintain state or data relevant to the operations performed during visitation.
Kotlin
classConcreteVisitor : Visitor {overridefunvisitConcreteElementA(element: ConcreteElementA) {// Specific operation for ConcreteElementA }overridefunvisitConcreteElementB(element: ConcreteElementB) {// Specific operation for ConcreteElementB }}
Visitable (Element)
An interface or abstract class representing elements that can be visited by a Visitor.
Declares an accept(visitor: Visitor) method, enabling the element to accept a Visitor and let it perform its operation.
Kotlin
interfaceVisitable {funaccept(visitor: Visitor)}
Concrete Visitable Classes
Implements the Visitable interface.
Provides the accept(visitor: Visitor) method implementation, which calls the appropriate visit() method on the visitor, passing itself as a parameter.
Create ConcreteVisitable classes: These are concrete shapes like Circle and Rectangle that implement the Shape interface and define the accept() method.
Client code: This is where we use the visitor pattern. We create the shapes and use the AreaCalculator to perform operations.
Kotlin
funmain() {val shapes: List<Shape> = listOf(Circle(5.0), Rectangle(4.0, 6.0))// Create the visitorval areaCalculator = AreaCalculator()// Visit each shape and calculate the area shapes.forEach { shape -> shape.accept(areaCalculator) }}//////////// OUTPUT //////////////////Calculating area of circle: π * 5.0^2Area: 78.53981633974483Calculating area of rectangle: 4.0 * 6.0Area: 24.0
Now, you might be thinking, ‘What is the benefit of doing this?‘ Yes, there are several:
Open for extension, closed for modification: You can add new operations (visitors) without modifying the existing code for shapes.
Separation of concerns: The logic for operations is kept separate from the objects, making it easier to manage and extend.
In this way, the Visitor pattern helps you add new functionalities to existing classes without changing their code. It’s especially useful when you need to perform different operations on a group of objects that share a common interface.
Real-world scenario: Campaigner visiting voters
This year has been a whirlwind of elections, including the US Presidential Election. On June 9, 2024, Narendra Modi was sworn in for his third term as Prime Minister of India. Election season is always full of energy, with promises aimed at addressing the needs of all sections of society.
Imagine a campaign in full swing: a candidate going door-to-door, tailoring their message for each voter. To high-income groups, they promise tax cuts to fuel growth. For low-income families, the focus is on welfare programs to improve daily life. For middle-income voters, the emphasis is on policies that ensure economic stability.
This adaptability mirrors the Visitor Design Pattern. It allows you to add new strategies or actions — just like a campaigner fine-tuning their pitch — without altering the core structure. It’s flexible, efficient, and perfect for managing change.
Let’s implement the Visitor Design Pattern in Kotlin to see how it works.
Define the Visitor Interface
This represents the actions a Campaigner can take for different types of residents.
Each type of resident implements the accept() method to interact with the visitor.
Kotlin
classHighIncome : Resident {overridefunaccept(visitor: Visitor) { visitor.visit(this) // Calls the visitor's method for HighIncome }funincomeGroup() = "High Income Group"}classLowIncome : Resident {overridefunaccept(visitor: Visitor) { visitor.visit(this) // Calls the visitor's method for LowIncome }funincomeGroup() = "Low Income Group"}classMediumIncome : Resident {overridefunaccept(visitor: Visitor) { visitor.visit(this) // Calls the visitor's method for MediumIncome }funincomeGroup() = "Medium Income Group"}
Implement Concrete Visitor (Campaigner)
The campaigner performs different actions for each type of resident.
Kotlin
classCampaigner : Visitor {overridefunvisit(highIncome: HighIncome) {println("Campaigning to ${highIncome.incomeGroup()} with promises of tax cuts.") }overridefunvisit(lowIncome: LowIncome) {println("Campaigning to ${lowIncome.incomeGroup()} with promises of welfare programs.") }overridefunvisit(mediumIncome: MediumIncome) {println("Campaigning to ${mediumIncome.incomeGroup()} with promises of economic growth.") }}
Client Code (main())
The client creates residents and a campaigner, then executes the campaign.
Kotlin
funmain() {// List of residentsval residents: List<Resident> = listOf(HighIncome(),LowIncome(),MediumIncome() )// Create a campaigner (visitor)val campaigner = Campaigner()// Campaigner visits each resident residents.forEach { resident -> resident.accept(campaigner) // Accept allows double dispatch }}///////////////////// OUTPUT ///////////////////////////////Campaigning to High Income Group with promises of tax cuts.Campaigning to Low Income Group with promises of welfare programs.Campaigning to Medium Income Group with promises of economic growth.
First, let’s take a look at how Double Dispatch works here:
First Dispatch: The Resident objects (HighIncome, LowIncome, MediumIncome) call the accept() method and pass the Campaigner object to it.
Kotlin
resident.accept(campaigner) // First dispatch: HighIncome, LowIncome, MediumIncome
Second Dispatch: Inside the accept() method, the visitor (Campaigner) calls the appropriate visit() method based on the specific type of the Resident object.
Kotlin
campaigner.visit(this) // Second dispatch: visit() based on Resident type
This allows the Campaigner (visitor) to perform different actions depending on the concrete type of Resident (HighIncome, LowIncome, MediumIncome).
Other code is quite self-explanatory, so let’s take a look at the benefits we gain from using the Visitor Design Pattern.
Stable Resident Structure: You can add new behaviors, like a new type of campaigner, without changing the existing Resident hierarchy.
Flexible Behavior: To introduce a new visitor, like a Surveyor, you simply create a new class — no need to modify the Resident classes at all.
Encapsulation of Logic: Each visitor keeps its own behavior separate, meaning the Resident classes stay clean and focused on their core responsibilities.
This pattern works great when behaviors need to change often, but the overall structure of the objects remains stable.
We’ve talked a lot about the benefits, but the Visitor Pattern has its downsides too. Let’s take a look at them.
Inflexibility: Adding new element types requires changes to the visitor interface and all its implementations.
Coupling: Tight coupling between visitors and element classes.
Complexity: The pattern can increase complexity when there are numerous element types and visitors.
Conclusion
The Visitor pattern is a powerful way to add operations to object structures without modifying them. While it might seem complex initially, once you break it down (like we did here), its elegance becomes apparent. It’s especially useful when working with stable hierarchies that require diverse operations.
By applying this pattern thoughtfully in Kotlin, we can write clean, maintainable, and extensible code.
I love cooking, but I’m not a master chef—just someone who enjoys experimenting in the kitchen. Wait, what am I talking about? How does this relate to the Template Method design pattern? Don’t worry; we’ll uncover the mystery shortly. First, let me outline what we’ll cover in this blog. We’ll start by understanding the Template Method Pattern, explore its structure, and then dive into some real-world use cases.
So, back to cooking! As I mentioned, I love it. I often watch recipes on YouTube and try to cook accordingly. Sometimes they turn out delicious; other times, not so much. But here’s an important point I want to highlight: I never follow a recipe exactly. And I bet most of you don’t either. This is where the core idea of the Template Method design pattern comes into play.
When I watch a recipe, I use it as a guide but adapt it based on the ingredients I have or my personal preferences. There’s no strict rule that says I have to stick to the exact steps—it’s up to me to modify it as I go. Similarly, the Template Method provides a skeleton or structure for an algorithm but allows flexibility to fill in the details and decide how to proceed.
I hope you’re starting to connect the dots. Don’t worry—it will all become clearer as we proceed further.
What is the Template Method Pattern?
The Template Method Pattern is a behavioral design pattern that defines the skeleton of an algorithm in a base class and lets subclasses override specific steps without altering the algorithm’s overall structure.
Think of it as a recipe. You can follow the recipe to make a dish, but certain ingredients or techniques might vary depending on your preferences. The structure remains the same, but you get the flexibility to tweak the details.
Let me simplify that. Imagine you’re a chef creating a recipe for your restaurant. Some steps, like washing ingredients and plating the dish, are always the same. But steps like seasoning or cooking style might vary depending on the type of dish. The Template Method allows you to define this recipe in a general way while letting individual chefs (subclasses) tweak specific steps.
Template Method Pattern: Problem and Solution
Understanding the Problem: Imagine you are building a gaming application with different types of games: Chess and Soccer. Each game has the following steps:
Initialize the game.
Start playing.
End the game.
While the general structure is the same, the details of each step vary for Chess and Soccer. If you were to write separate implementations for each game, you might duplicate code for the steps that are common, which violates the DRY principle (Don’t Repeat Yourself).
Solution: The Template Method pattern addresses this by providing a template (skeleton) for the algorithm in a base class. Subclasses define the specific behavior for the varying steps.
Key Principles of the Template Method Pattern
Algorithm Structure: The base class provides a high-level structure of the algorithm.
Customizable Steps: Subclasses implement the specific parts of the algorithm.
Consistency and Reusability: Common steps are reused, ensuring consistency across implementations.
Structure of Template Method Pattern
Key Components of the Template Method Pattern
Abstract Class: Contains the template method, which defines the algorithm’s structure and some default implementations of steps.
Template Method: A method that defines the sequence of steps in the algorithm. Some steps are concrete (already implemented), while others are abstract (to be implemented by subclasses).
Concrete Class: Implements the abstract steps to provide specific behaviors.
Think of an abstract class as the foundation for a group of related classes. The common behavior for all these classes is defined in the abstract class, while the specific details are handled by the individual subclasses. The Template Method pattern gives you a way to outline the basic structure of an algorithm in a method, while leaving certain steps for the subclasses to fill in. This lets subclasses customize parts of the algorithm without changing its overall structure.
Let’s implement the Template Method design pattern for our gaming application.
Define the Abstract Class
Kotlin
abstractclassGame {// Template methodfunplay() {initialize()startPlay()endPlay() }// Steps of the algorithm (template method components)abstractfuninitialize()abstractfunstartPlay()abstractfunendPlay()}
The play() method is the template method. It defines the skeleton of the algorithm.
The steps initialize(), startPlay(), and endPlay() are abstract and must be implemented by subclasses.
Create Concrete Classes
Chess Game
Kotlin
classChess : Game() {overridefuninitialize() {println("Chess Game Initialized. Set up the board.") }overridefunstartPlay() {println("Chess Game Started. Players are thinking about their moves.") }overridefunendPlay() {println("Chess Game Finished. Checkmate!") }}
Soccer Game
Kotlin
classSoccer : Game() {overridefuninitialize() {println("Soccer Game Initialized. Players are on the field.") }overridefunstartPlay() {println("Soccer Game Started. Kickoff!") }overridefunendPlay() {println("Soccer Game Finished. The final whistle blows.") }}
Playing Chess:Chess Game Initialized. Set up the board.Chess Game Started. Players are thinking about their moves.Chess Game Finished. Checkmate!Playing Soccer:Soccer Game Initialized. Players are on the field.Soccer Game Started. Kickoff!Soccer Game Finished. The final whistle blows.
Here,
Abstract Class:
The Game class encapsulates the skeleton of the algorithm in the play() method.
The play() method ensures the steps are executed in the defined order.
Concrete Classes:
The Chess and Soccer classes override the abstract methods to provide specific implementations for each step.
Reusability:
The play() method in the Game class ensures the overall structure of the algorithm is consistent across different games.
The Secret Twist of the Hook Method
In the Template Method Pattern, the Hook Method is an optional concept that adds flexibility to the algorithm. The Hook Method is a method defined in the abstract class, but it doesn’t have to do anything by default. Instead, it provides a “hook” for subclasses to override and implement custom behavior, if needed, without changing the overall flow of the algorithm.
Note: A hook is a simple method (not marked with any special ‘hook’ keyword; it’s just a regular method with hook functionality) defined in the abstract class, typically with an empty or default implementation. It enables subclasses to ‘hook into’ the algorithm at specific points if needed. Subclasses can also choose to ignore the hook if it isn’t relevant to their specific behavior.
How it works:
The Template Method defines the skeleton of an algorithm, calling a series of steps (methods), some of which can be abstract (requiring subclasses to implement them).
A Hook Method is a method in the abstract class that does nothing by default but can be overridden in the subclasses to add specific functionality.
Why it’s useful:
Flexibility: It allows subclasses to optionally customize parts of the algorithm without changing the structure.
Control: The base class controls the algorithm’s flow, while allowing subclasses to “hook” in additional behavior when needed.
Kotlin
abstractclassCookingRecipe {funcook() {prepareIngredients()cookMainPart()serve() }// Must be implemented by subclassesabstractfunprepareIngredients()// Default implementation, can be overriddenopenfuncookMainPart() {println("Cooking the main dish in a standard way") }// Hook methodopenfunserve() {println("Serving the dish") }}classPastaRecipe : CookingRecipe() {overridefunprepareIngredients() {println("Preparing pasta, sauce, and vegetables") }overridefuncookMainPart() {println("Cooking the pasta and sauce together") }// Override hook method to add custom behavioroverridefunserve() {println("Serving the pasta with extra cheese") }}
Here,
prepareIngredients() is an abstract method, so subclasses must implement it.
cookMainPart() has a default implementation that can be overridden.
serve() is a hook method. It has a default behavior but can be overridden in subclasses to provide custom serving logic.
Real-World Use Case: Making a Beverage
To better understand the hook method, let’s consider another example:
Suppose we’re building a system to prepare beverages like tea and coffee. The preparation steps are generally similar:
Boil water.
Brew the beverage.
Pour it into a cup.
Add condiments.
However, the brewing and condiment steps vary between tea and coffee. This is where the Template Method Pattern and the Hook Method shine. Let’s implement it!
Define the Abstract Class
We’ll create an abstract class Beverage that defines the template method prepareBeverage() and includes common steps.
Kotlin
abstractclassBeverage {// Template method: defines the skeleton of the algorithmfunprepareBeverage() {boilWater()brew()pourInCup()if (addCondimentsNeeded()) { // Hook to customize behavioraddCondiments() } }// Common steps with default implementationprivatefunboilWater() {println("Boiling water...") }privatefunpourInCup() {println("Pouring beverage into the cup...") }// Abstract steps to be implemented by subclassesabstractfunbrew()abstractfunaddCondiments()// Optional hook method for additional behavior customizationopenfunaddCondimentsNeeded(): Boolean = true}
Here,
prepareBeverage(): The template method, defining the algorithm in a step-by-step manner.
Common Methods: Steps like boiling water and pouring the beverage are common across all beverages, so we provide default implementations.
Abstract Methods: Methods like brew() and addCondiments() vary based on the beverage, so subclasses must define them.
classCoffee : Beverage() {overridefunbrew() {println("Brewing the coffee...") }overridefunaddCondiments() {println("Adding milk and sugar...") }overridefunaddCondimentsNeeded(): Boolean {// Assume the user doesn't want condiments for coffeereturnfalse }}
Here,
Tea: Implements brew() by steeping tea and adds lemon as a condiment.
Coffee: Implements brew() by brewing coffee and adds milk and sugar.
addCondimentsNeeded() in Coffee: Returns false to skip adding condiments. This demonstrates the use of the hook method.
Preparing tea:Boiling water...Steeping the tea...Pouring beverage into the cup...Adding lemon...Preparing coffee:Boiling water...Brewing the coffee...Pouring beverage into the cup...
Notice how the algorithm remains consistent, while the specific steps differ.
Advantages of the Template Method Pattern
Code Reusability: Common logic is centralized in the base class, reducing duplication.
Flexibility: Subclasses can customize specific steps without altering the algorithm’s structure.
Maintainability: Changes to the algorithm can be made in one place (the template method).
When to Use the Template Method Pattern?
When you have a set of similar processes with variations in specific steps.
When you want to enforce a specific sequence of steps.
When you need to provide optional hooks for behavior customization.
Conclusion
The Template Method design pattern is like creating a blueprint for an algorithm. In Kotlin, it shines when you want to reuse code while still allowing flexibility for subclasses. By defining the “recipe” in a base class and letting subclasses fill in the details, we achieve a balance of consistency and customization.
I hope this explanation helped you understand the Template Method pattern in a relatable and clear way.
Writing clean, maintainable, and scalable code is every developer’s goal, and design patterns play a big role in making that happen. One pattern that stands out for its flexibility and simplicity is the Strategy Design Pattern. It lets you define a group of algorithms, keep them separate, and easily switch between them when needed.
In this blog, we’ll explore how the Strategy Design Pattern works in Kotlin, break down its implementation step by step, and look at some real-world examples to show how it can make your code more organized and easier to work with.
Strategy Design Pattern
The Strategy Pattern falls under the category of behavioral design patterns, and its purpose is straightforward: it enables us to define multiple algorithms and switch between them dynamically, without modifying the client code. Instead of duplicating code or repeatedly writing the same logic, this pattern allows you to define a family of algorithms and choose the one that best fits the client’s needs.
This pattern aligns with two key principles of software design:
Encapsulation: Each algorithm is encapsulated in its own class.
Open/Closed Principle: The code is open for extension (new strategies can be added) but closed for modification (existing code remains unchanged).
The beauty of the Strategy Pattern lies in its simplicity and flexibility. It enables you to add new features or extend functionality without requiring significant changes to existing code. Additionally, it allows your program to swap behaviors dynamically at runtime, making it highly adaptable to changing requirements with minimal effort.
When to Use the Strategy Pattern?
You should consider using the Strategy Pattern when:
You have multiple ways to accomplish a task and want the flexibility to switch between them easily.
You want to avoid cluttered classes with lots of if or when statements.
You need to keep the algorithm’s implementation separate from the rest of your code.
You want your code to be easily extended with new features or behaviors without changing existing code.
Here are a few real-life scenarios where the Strategy Pattern works really well:
Payment gateways: Letting users choose between different payment methods, like credit cards, PayPal, or bank transfers.
Sorting algorithms: Allowing users to switch between sorting methods, like quick sort or bubble sort, based on their preference.
Discount calculations: Handling various types of discounts in a shopping cart, such as percentage-based, fixed amount, or special promotions.
We will soon look at the code implementation, but before that, let’s first understand the structure of the Strategy Pattern and its key components.
Strategy Design Pattern Structure
Let’s break the pattern into its core components:
Strategy
Defines a common interface for all the supported algorithms.
The context uses this interface to call the algorithm defined by a specific strategy.
ConcreteStrategy
Implements the algorithm as outlined by the Strategy interface.
Context
Is configured with a ConcreteStrategy object.
Holds a reference to a Strategy object.
May offer an interface that allows the Strategy to access its internal data or state, but only when necessary.
Let’s now implement the Strategy Design Pattern for a simple calculation operation.
The Strategy interface defines the contract for the algorithm.
OperationAdd, OperationSubtract, and OperationMultiply are concrete classes that implement the Strategy interface.
The Context class uses a Strategy to perform an operation.
In main(), we change the Strategy at runtime by passing different Strategy objects to the Context.
Real-World Example: Payment System
I hope you’ve grasped the basic concept and are now ready for a real-world code implementation. Let’s apply the Strategy Pattern to build a payment processing system where users can choose from different methods: Credit Card, PayPal, or Cryptocurrency.
Define the Strategy Interface
The PaymentStrategy interface will define a common method for all payment strategies.
Each class provides its unique implementation of the pay method. Notice how we’re encapsulating the logic specific to each payment method.
Create the Context
The PaymentContext class will use the selected PaymentStrategy to process payments.
Kotlin
// Context ClassclassPaymentContext(privatevar paymentStrategy: PaymentStrategy) {// Allows dynamic switching of strategyfunsetPaymentStrategy(strategy: PaymentStrategy) { paymentStrategy = strategy }// Delegates the payment to the selected strategyfunexecutePayment(amount: Double) { paymentStrategy.pay(amount) }}
The PaymentContext class acts as a bridge between the client code and the various payment strategies. It allows us to switch strategies on the fly using the setPaymentStrategy method.
Putting everything together
Now let’s see how we can use the Strategy Pattern.
Kotlin
funmain() {// Create specific payment strategiesval creditCardPayment = CreditCardPayment("1234-5678-9876-5432")val paypalPayment = PayPalPayment("[email protected]")val cryptoPayment = CryptoPayment("1A2b3C4d5E6F")// Create the context with an initial strategyval paymentContext = PaymentContext(creditCardPayment)// Execute payment using Credit Card paymentContext.executePayment(100.0)// Switch to PayPal strategy and execute payment paymentContext.setPaymentStrategy(paypalPayment) paymentContext.executePayment(200.0)// Switch to Cryptocurrency strategy and execute payment paymentContext.setPaymentStrategy(cryptoPayment) paymentContext.executePayment(300.0)}
Output
Kotlin
Paid $100.0 using Credit Card (Card Number: 1234-5678-9876-5432)Paid $200.0 using PayPal (Email: user@paypal.com)Paid $300.0 using Cryptocurrency (Wallet: 1A2b3C4d5E6F)
Basically, in India, we rarely use crypto for payments, but UPI payments are everywhere. Let’s add that here. The reason I’m providing this context is to demonstrate how extensible this pattern is, in line with the Open/Closed Principle.
Kotlin
// New Concrete Strategy: UPI PaymentclassUPIPayment(privateval upiId: String) : PaymentStrategy {overridefunpay(amount: Double) {println("Paid $$amount using UPI (UPI ID: $upiId)") }}
One more thing I’d like to highlight here is that the Strategy Pattern works well with Kotlin’s functional features. For simpler use cases, we can replace strategies with Kotlin lambdas to further reduce boilerplate code.
Here is a simple modification to test it.
Kotlin
classPaymentContextWithLambda {privatevar paymentStrategy: (Double) -> Unit = {}funsetPaymentStrategy(strategy: (Double) -> Unit) { paymentStrategy = strategy }funexecutePayment(amount: Double) {paymentStrategy(amount) }}funmain() {val paymentContext = PaymentContextWithLambda()// Using lambdas as strategies paymentContext.setPaymentStrategy { amount ->println("Paid $$amount using Credit Card") } paymentContext.executePayment(500.0) paymentContext.setPaymentStrategy { amount ->println("Paid $$amount using PayPal") } paymentContext.executePayment(600.0)}// Output// Paid $500.0 using Credit Card// Paid $600.0 using PayPal
If we closely look at everything here, we’ll find…
Encapsulation of Algorithms The PaymentStrategy interface encapsulates the algorithms (payment methods), ensuring each has a unique implementation in its respective class.
Dynamic Behavior The PaymentContext class allows you to switch payment methods dynamically by calling the setPaymentStrategy method.
Open/Closed Principle Adding a new payment method doesn’t require modifying existing classes. Instead, you just create a new implementation of PaymentStrategy.
Reusability The strategy classes (CreditCardPayment, PayPalPayment, etc.) can be reused in different contexts.
Benefits of Using the Strategy Pattern
Eliminates Conditional Logic: No more lengthy if-else or when statements for selecting an algorithm.
Promotes Single Responsibility Principle: Each algorithm resides in its class, simplifying maintenance and testing.
Improves Flexibility: You can change strategies at runtime without impacting the client code.
Encourages Code Reuse: Strategies can be reused across different projects or modules.
Drawbacks of the Strategy Pattern
Increased Number of Classes: Each algorithm requires its own class, which may clutter the codebase.
Context Dependency: The context relies on the strategy being set correctly before use, which might lead to runtime errors if not handled carefully.
When Not to Use the Strategy Pattern
Avoid the Strategy Pattern if:
The algorithms are unlikely to change or expand.
There’s no need for runtime flexibility.
Conclusion
The Strategy Design Pattern is an elegant way to handle situations where multiple algorithms or behaviors are needed. Kotlin’s modern syntax makes implementing this pattern straightforward and flexible.
By encapsulating algorithms into individual classes or leveraging Kotlin’s lambda expressions, we can write code that’s not only clean and modular but also adheres to key principles like the Open/Closed Principle.
So next time you find yourself writing a series of if or when statements to handle various behaviors, consider using the Strategy Pattern.
As developers, we’re all too familiar with hitting Ctrl + Z to undo our code changes. It’s almost second nature at this point. But have you ever stopped to wonder what really happens when you hit that magic combination? Sure, we might think, ‘It just stores the previous state somewhere and then brings it back,’ but that’s only part of the story.
The real magic behind undoing your changes lies in the Memento Design Pattern. This pattern is what makes undo functionality so efficient and seamless. Curious to know how it works? Let’s dive in and take a closer look!
Memento Design Pattern
The Memento Design Pattern is one of the behavioral design patterns. It’s all about capturing an object’s state at a particular moment in time, so you can restore it later. It’s like taking a snapshot of an object’s current state and saving it for safekeeping.
Here’s the official definition:
The Memento Design Pattern provides the ability to restore an object to its previous state without exposing the implementation details.
We can’t always expose an object’s internal details due to encapsulation. This pattern allows us to:
Save the state without breaking encapsulation.
Support features like undo/redo, checkpoints, or versioning.
Real-Life Analogy
Sanjay, who forgets every 15 minutes, uses photos, notes, and tattoos to restore his memory
Imagine writing a letter and using an eraser. Before making changes, you take a photo of the letter. If you mess up, you can refer to the photo and restore the original version. In this analogy:
The letter is the Originator.
The photo is the Memento.
You, with your eraser, are the Caretaker.
Memento Design Pattern Structure
Encapsulate an object’s state so that its internal structure is hidden from external entities. The core of the structure lies in the memento, which stores the object’s state, while another object, known as the caretaker, is responsible for saving and restoring the memento without accessing the object’s internal details.
The Memento pattern involves three primary components:
Memento: It’s like a snapshot of an object’s internal state. It saves the object’s data at a specific moment, and it can save only what is necessary.
Protection: The Memento ensures that only the object that created it (the “Originator”) can access and modify its content. Other objects (like the “Caretaker”) can only store and pass the Memento around without seeing or changing its data.
Originator: This is the object that wants to save its state.
It creates a Memento to store its current state.
Later, it can use the Memento to go back to that saved state.
Caretaker: This object is responsible for keeping the Memento safe.
It never looks inside the Memento or changes its content. It simply stores and retrieves it when needed.
In short, the Originator creates a snapshot (Memento) of its state, and the Caretaker keeps track of these snapshots. Later, the Originator can use the snapshots to restore itself.
In practice, the Originator creates a Memento to store its state, and the Caretaker keeps the Memento for future use. When the user triggers an undo (like pressing Ctrl + Z), the Caretaker retrieves the saved state from the Memento and hands it back to the Originator, which then reverts to that state.
Kotlin
// Memento class stores the state of the OriginatorclassMemento(val state: String)// Originator is the object whose state is savedclassOriginator(var state: String) {// Creates a Memento with the current statefuncreateMemento(): Memento {returnMemento(state) }// Restores the state from a Mementofunrestore(memento: Memento) {this.state = memento.state }funshowState() {println("Current State: $state") }}// Caretaker is responsible for storing and restoring the MementoclassCaretaker {privateval mementoList = mutableListOf<Memento>()// Adds a Memento to the listfunaddMemento(memento: Memento) { mementoList.add(memento) }// Retrieves the last saved Memento (undo functionality)fungetLastMemento(): Memento? {if (mementoList.isNotEmpty()) {return mementoList.removeAt(mementoList.size - 1) }returnnull }}// Demonstrating the Memento pattern in actionfunmain() {val originator = Originator("Initial State")val caretaker = Caretaker() originator.showState() // Output: Current State: Initial State// Save the state caretaker.addMemento(originator.createMemento())// Change the state originator.state = "State 1" originator.showState() // Output: Current State: State 1// Save the new state caretaker.addMemento(originator.createMemento())// Change the state again originator.state = "State 2" originator.showState() // Output: Current State: State 2// Now let's undo the last state change (Ctrl + Z)val lastMemento = caretaker.getLastMemento()if (lastMemento != null) { originator.restore(lastMemento) originator.showState() // Output: Current State: State 1 }// Undo again (Ctrl + Z)val previousMemento = caretaker.getLastMemento()if (previousMemento != null) { originator.restore(previousMemento) originator.showState() // Output: Current State: Initial State }}
Initially, the Originator has the state “Initial State”.
The state is saved into the Caretaker‘s list.
The state changes to “State 1”, and it is saved again.
The state changes to “State 2”, and the change is saved.
The Caretaker then provides the last saved state (from “State 2” to “State 1”), and then the previous state (“State 1” to “Initial State”) is restored.
A few key points remain to be highlighted regarding how the Memento pattern works and its structure, particularly focusing on the concepts of a wide interface and a narrow interface.
What is a Wide Interface and a Narrow Interface?
In the context of the Memento Design Pattern, the terms wide interface and narrow interface typically refer to the scope of access provided by the Memento class.
Wide Interface: A Memento with a wide interface exposes more details of the internal state of the Originator. This allows the Caretaker to access and potentially modify the internal data of the Memento. This approach can lead to more flexibility but might break encapsulation.
Narrow Interface: A Memento with a narrow interface provides limited access to the internal state of the Originator. It hides the details of the state, ensuring that only essential information is made available. This helps maintain encapsulation and prevents external manipulation of the internal state, ensuring that the Originator remains in control.
In short,
Wide interface gives more access to the internal state.
Narrow interface restricts access to only necessary information, maintaining better encapsulation and control.
Real Scenario: A Text Editor with Undo Functionality
Let’s implement a simple text editor with undo functionality. We’ll use the Memento pattern to save and restore the editor’s state.
Define the Originator
The Originator is the class whose state we want to save and restore. In our case, it’s the TextEditor class.
Kotlin
// Originator: TextEditorclassTextEditor {var content: String = ""// Save current state as a Mementofunsave(): Memento {returnMemento(content) }// Restore state from a Mementofunrestore(memento: Memento) { content = memento.state }// Nested Memento class to encapsulate the statedataclassMemento(val state: String)}
Here’s what’s happening:
The content variable represents the editor’s current text.
The save() method creates a Memento containing the current state.
The restore() method updates the editor’s state using a Memento.
One more twist is that we used a Nested Memento, but it doesn’t really affect the approach. So, go ahead with this approach as well.
Create the Caretaker
The Caretaker manages the mementos. It decides when to save and restore the state. For simplicity, we’ll use a stack (List) to store multiple mementos (for undo functionality).
Kotlin
// Caretaker: Manages mementosclassCaretaker {privateval mementoStack = mutableListOf<TextEditor.Memento>()// Save a mementofunsave(memento: TextEditor.Memento) { mementoStack.add(memento) }// Retrieve the last mementofunundo(): TextEditor.Memento? {if (mementoStack.isNotEmpty()) {return mementoStack.removeAt(mementoStack.size - 1) }returnnull }}
Here,
The save() method pushes a memento onto the stack.
The undo() method pops the last memento, providing the most recent state.
Tie Everything Together
Now let’s combine the Originator and Caretaker to see the Memento pattern in action.
Kotlin
funmain() {val textEditor = TextEditor()val caretaker = Caretaker()// Initial content textEditor.content = "Hello, World!"println("Content: ${textEditor.content}")// Save state caretaker.save(textEditor.save())// Modify content textEditor.content = "Hello, Kotlin!"println("Modified Content: ${textEditor.content}")// Save another state caretaker.save(textEditor.save())// Modify content again textEditor.content = "Design Patterns are fun!"println("Further Modified Content: ${textEditor.content}")// Undo last changeval lastState = caretaker.undo()if (lastState != null) { textEditor.restore(lastState)println("After Undo: ${textEditor.content}") }// Undo againval previousState = caretaker.undo()if (previousState != null) { textEditor.restore(previousState)println("After Another Undo: ${textEditor.content}") }}
Furthermore, we can apply this pattern to similar use cases, such as:
Games: Saving checkpoints or progress.
Graphical Editors: Reverting to earlier canvas states.
Benefits of the Memento Pattern
Encapsulation: The Memento class keeps the state private, adhering to encapsulation.
Undo/Redo: It’s perfect for features like undo/redo in editors or games.
Simple and Scalable: Easy to implement and extend for more complex states.
Limitations of the Memento Pattern
Memory Usage: Storing many mementos can consume a lot of memory.
Complexity for Large States: If the state is large or includes references to other objects, managing mementos can get tricky.
Tips for Using the Memento Pattern in Kotlin
Immutable Mementos: Ensure mementos are immutable to avoid accidental changes.
Use Serialization for Complex States: For large or nested states, consider saving mementos using Kotlin serialization.
Limit History: To save memory, consider capping the number of mementos stored.
Conclusion
The Memento design pattern is a powerful tool for managing an object’s state in a controlled and encapsulated way. In this blog, we implemented the pattern in Kotlin, showcasing its practical usage with a simple Text Editor example.
By mastering the Memento pattern, you can build applications that support undo/redo features or maintain state history without violating encapsulation principles. As seen in Kotlin, the pattern is intuitive and aligns well with the language’s concise syntax and data class features.
Feel free to experiment with the pattern in your projects. Whether it’s a game, an editor, or a stateful application, the Memento pattern will prove invaluable!
Design patterns provide us with well-structured and reusable solutions to recurring problems. Today, we’ll explore one such pattern that plays a crucial role in managing complex interactions between objects—the Mediator Design Pattern. In this blog, I’ll guide you through its concept, benefits, and how to implement it in Kotlin. By the end, you’ll have a clear and solid understanding of the Mediator Design Pattern.
What is the Mediator Design Pattern?
The Mediator Design Pattern simplifies communication between multiple objects by introducing a mediator object that acts as a central hub. Instead of objects directly referencing each other, they interact through the mediator. This reduces dependencies and makes the code more modular and easier to manage.
While both the Mediator and Observer patterns involve communication between objects, the key difference is in how they handle it. In the Observer pattern, a subject notifies its observers whenever it changes, leading to direct communication between the subject and its observers. In contrast, the Mediator Pattern centralizes communication, where objects (colleagues) send messages to a mediator instead of directly interacting with each other. The mediator then coordinates and notifies the relevant colleagues about changes.
Think of it like a project manager in a team. Team members don’t communicate directly for every decision; instead, the project manager coordinates their interactions. This reduces chaos and improves collaboration.
When Should We Use the Mediator Design Pattern?
When designing reusable components, tight dependencies between them can lead to tangled, “spaghetti-like” code. In this situation, reusing individual classes becomes difficult because they are too interconnected. It’s like trying to remove one piece from a tangled heap—you either end up taking everything or nothing at all.
Spaghetti Code Analogy: Imagine a string of Christmas lights where each bulb is directly wired to the next. If one bulb is faulty or needs to be replaced, you can’t just swap out that single bulb. Since all the bulbs are tightly connected, replacing one requires adjusting or replacing the entire string. This is similar to spaghetti code, where components are so tightly coupled that isolating one to make changes without affecting others becomes very difficult.
Solution with the Mediator Pattern: Now, imagine instead that each bulb is connected to a central controller (the mediator). If one bulb needs to be replaced or updated, the controller handles the communication between bulbs. The bulbs no longer interact with each other directly. Instead, all communication goes through the mediator. This way, the rest of the system remains unaffected by changes to a single bulb, and the system becomes more modular with fewer dependencies between components.
We should consider using the Mediator Pattern when:
Multiple objects must interact in complex ways.
Tight coupling between objects makes the system difficult to maintain or extend.
Changes in one component should not cascade through the entire system, causing ripple effects.
Structure of Mediator Design Pattern
Mediator Interface
Defines a contract for communication between components.
Concrete Mediator
Implements the Mediator interface and manages the communication between components.
Colleague (Component)
Represents the individual components that interact with each other via the mediator.
Concrete Colleague
Implements the specific behavior of a component.
The Mediator design pattern is structured to centralize communication and decouple interacting objects. Here’s how it works:
Centralized Communication: All communication between objects (known as colleagues) is routed through a central mediator. This ensures that each object doesn’t need to be aware of the others, and all interactions are coordinated in one place.
Decoupling of Objects: The colleague objects don’t communicate with each other directly. Instead, they send messages through the mediator, which handles the communication. This reduces the complexity of managing direct dependencies between objects. For example, in an air traffic control system, instead of planes communicating directly with one another, they interact with the air traffic controller (the mediator). The controller manages the planes’ interactions, ensuring safe, efficient, and orderly communication, preventing collisions or miscommunication.
Project Manager and Team Communication
If you remember, we discussed a real-world example earlier—Project Manager and Team. Now, let’s implement the Mediator design pattern for their communication.
Define the Mediator Interface
This interface allows the mediator to facilitate communication between colleagues.
Kotlin
// The Mediator interface defines how colleagues communicate via the mediatorinterfaceMediator {funsendMessage(message: String, colleague: Colleague)}
Create the Concrete Mediator
The ProjectManager acts as the mediator.
Kotlin
// Concrete Mediator (Project Manager) that implements the Mediator interfaceclassProjectManager : Mediator {privateval colleagues = mutableListOf<Colleague>()// Method to register colleagues (team members)funaddColleague(colleague: Colleague) { colleagues.add(colleague) }// The mediator routes the messages between colleaguesoverridefunsendMessage(message: String, colleague: Colleague) {// Forward the message to all other colleagues, but not to the sender colleagues.forEach {if (it != colleague) { it.receiveMessage(message, colleague.name) } } }}
Define the Colleague AbstractClass
This represents participants that communicate through the mediator.
Kotlin
// The Colleague class represents a team member who communicates through the mediatorabstractclassColleague(protectedval mediator: Mediator, val name: String) {// Send a message through the mediatorabstractfunsendMessage(message: String)// Receive a message from the mediatorabstractfunreceiveMessage(message: String, sender: String)}
Create Concrete Colleagues
The team members are the concrete colleagues.
Kotlin
// Concrete Colleague (Team Member) classes representing individual team membersclassTeamMember(mediator: Mediator, name: String) : Colleague(mediator, name) {// Implementing the sendMessage method, sends message through the mediatoroverridefunsendMessage(message: String) {println("$name sends message: \"$message\"") mediator.sendMessage(message, this) }// Implementing the receiveMessage method, where messages are received via the mediatoroverridefunreceiveMessage(message: String, sender: String) {println(" -> $name received message: \"$message\" from $sender") }}
Demonstrate the Pattern
Here’s how it all comes together in the main function.
Kotlin
// Main function to run the simulationfunmain() {// Create a mediator (Project Manager)val projectManager = ProjectManager()// Create team members (colleagues)val akshay = TeamMember(projectManager, "Akshay") val ria = TeamMember(projectManager, "Ria") val amol = TeamMember(projectManager, "Amol") // Register team members with the mediator projectManager.addColleague(akshay) projectManager.addColleague(ria) projectManager.addColleague(amol)// Communication through the mediatorprintln("--- Communication Flow ---") akshay.sendMessage("Ria, have you completed the feature Alpha-Approval?") // Akshay sends a message to Ria ria.sendMessage("Yes, Akshay. I'll demo it soon.") // Ria replies to Akshay amol.sendMessage("Hey team, are there any blockers?") // Amol sends a message to the team akshay.sendMessage("No blockers from my side, Amol.") // Akshay responds to Amol ria.sendMessage("Same here, ready to deploy.") // Ria responds to Amol}
Output
Kotlin
--- Communication Flow ---Akshay sends message: "Ria, have you completed the feature Alpha-Approval?"-> Ria received message: "Ria, have you completed the feature Alpha-Approval?" from Akshay-> Amol received message: "Ria, have you completed the feature Alpha-Approval?" from AkshayRia sends message: "Yes, Akshay. I'll demo it soon."-> Akshay received message: "Yes, Akshay. I'll demo it soon." from Ria-> Amol received message: "Yes, Akshay. I'll demo it soon." from RiaAmol sends message: "Hey team, are there any blockers?"-> Akshay received message: "Hey team, are there any blockers?" from Amol-> Ria received message: "Hey team, are there any blockers?" from AmolAkshay sends message: "No blockers from my side, Amol."-> Ria received message: "No blockers from my side, Amol." from Akshay-> Amol received message: "No blockers from my side, Amol." from AkshayRia sends message: "Same here, ready to deploy."-> Akshay received message: "Same here, ready to deploy." from Ria-> Amol received message: "Same here, ready to deploy." from Ria
We implemented the Mediator design pattern using a Project Manager as the central point of coordination. In a typical team setup, communication and updates would flow directly through the Project Manager. But after the COVID-19 pandemic, team members started working remotely from different locations, and that’s when communication shifted to platforms like chatrooms, WhatsApp groups, Slack, or other tools.
In this new setup, these platforms essentially became the mediators. They ensure that all communication flows through a central hub, which eliminates the need for team members to communicate directly with each other. This helps keep things organized and reduces confusion.
With this approach, using a generalized implementation of the Mediator design pattern (with the Project Manager as an example), messages are now clearly formatted, making it easier to track who sent the message and who received it. Symbols, like arrows (->), show the flow of messages from the sender to the recipients. This layout gives us a clear, visual representation of how the communication happens through the mediator.
Benefits of Using the Mediator Pattern
Reduced Complexity: By centralizing interactions, we eliminate the need for multiple direct references.
Improved Flexibility: Adding or modifying components becomes easier as they are only dependent on the mediator.
Enhanced Maintainability: The mediator encapsulates the interaction logic, making it easier to manage.
Potential Drawbacks
Single Point of Failure: The mediator can become a bottleneck or overly complex if not designed well.
Overhead: For simple scenarios, using a mediator may introduce unnecessary indirection.
Conclusion
The Mediator design pattern is a fantastic way to manage complex interactions in a decoupled, organized manner. Implementing it in Kotlin is both simple and powerful, allowing you to streamline communication by centralizing it through a mediator. This approach leads to cleaner, more maintainable, and easily extendable systems.
I hope this blog has helped clear up the Mediator pattern for you. If you’re working on a Kotlin project, give it a try—it’s a great way to simplify your codebase.
What’s awesome about Kotlin is that the Mediator pattern fits seamlessly with advanced concepts like coroutines or dependency injection, giving you even more power and flexibility. Of course, it’s important to weigh the pattern’s benefits against potential downsides, making sure it aligns with your project’s needs.
Let’s keep learning and building amazing things together!