Managing dependencies efficiently is crucial for any Android project, and Gradle Version Catalog makes it much easier. It centralizes dependency versions in one place, simplifies updates, and enhances project maintainability.
In this blog, we’ll explore:
What is Gradle Version Catalog?
Why should we use it?
How to implement it in an Android project with clear, step-by-step explanations.
Let’s dive in!
What is Gradle Version Catalog?
Gradle Version Catalog is a feature introduced in Gradle 7.0 that allows you to manage all your dependencies in a structured and centralized way using a file called libs.versions.toml.
Traditionally, we define dependencies in build.gradle or build.gradle.kts like this:
With Gradle Version Catalog, these versions are stored separately in a TOML file, making it easier to manage and update dependencies in large projects.
With Gradle Version Catalog
Dependencies are defined in gradle/libs.versions.toml:
plugins {id(libs.plugins.androidApplication.get().pluginId) version libs.plugins.androidApplication.get().versionkotlin("android")}dependencies {implementation(libs.kotlin.stdlib)implementation(libs.androidx.core.ktx)}
Best Practices for Using Gradle Version Catalog
Use version references instead of hardcoding values.
Group related dependencies logically in the TOML file.
Leverage aliases for clear naming conventions.
Keep libraries and plugins together for easier maintenance.
Regularly update dependencies via a single source of truth.
FAQs
Q1: What is the purpose of libs.versions.toml in Gradle? It centralizes all dependency versions in one place, making updates easier and preventing conflicts across modules.
Q2: Can Gradle Version Catalog manage plugins? Yes. You can declare both library dependencies and Gradle plugins in the TOML file.
Q3: Do I need Gradle 8 to use Version Catalog? No. It was introduced in Gradle 7.0. Gradle 8+ enables it by default, but you can enable it manually in Gradle 7 projects.
Q4: Is Gradle Version Catalog mandatory for Android projects? No, but it is highly recommended for scalability, especially in multi-module projects.
Q5: How does Gradle Version Catalog improve collaboration? By keeping all dependencies in one place, teams avoid mismatched versions across different modules or branches.
Conclusion
Gradle Version Catalog is a must-have tool for modern Android development. It reduces duplication, improves maintainability, and ensures consistent dependency management across projects.
If you’re still hardcoding dependencies in multiple build.gradle files, now is the perfect time to migrate. With libs.versions.toml, your Android project becomes cleaner, more maintainable, and easier to scale.
Dependency management is a crucial aspect of Android development using Gradle. It helps in organizing external libraries, avoiding version conflicts, and improving project maintainability. In this blog, we will explore Gradle dependency management in Android, discuss best practices, and demonstrate its implementation with Kotlin code examples.
What is Dependency Management in Android?
In Android, applications rely on various third-party libraries, SDKs, and modules to add features without reinventing the wheel. These dependencies are managed using Gradle, a powerful build automation tool.
Gradle allows developers to:
Add dependencies from remote repositories like Maven Central or Google’s Maven.
Specify versions and update them easily.
Use dependency constraints to avoid conflicts.
Create reusable dependency configurations for modular projects.
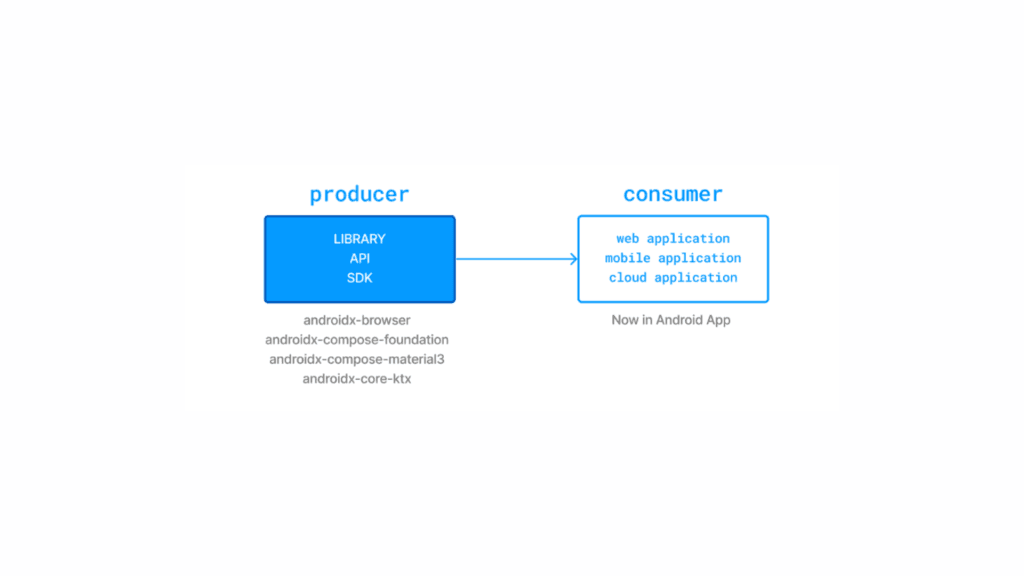
Producers and Consumers in Dependency Management
In Android development, dependency management is about how libraries and modules interact. Simply put, it’s important to differentiate between producers and consumers in dependency management.
Producer: When you create an Android library (like a custom UI component or a utility library), you are the producer because you provide this library for others to use.
Consumer: When you add dependencies in your Android project (e.g., using implementation 'com.squareup.retrofit2:retrofit:2.9.0' in build.g
To keep your Gradle builds clean, stable, and efficient, follow these practices:
Use BOM (Bill of Materials): Align versions across related libraries.
Centralize versions: Store dependency versions in one place (e.g., gradle/libs.versions.toml or buildSrc).
Handle conflicts explicitly: Use dependencyResolutionStrategy or constraints.
Avoid duplicate libraries: Regularly check for unused dependencies.
Prefer api vs implementation wisely:
Use implementation for internal dependencies (faster builds).
Use api only when consumers need access to transitive dependencies.
Kotlin Example: Dependency Constraints
Here’s how you can enforce consistent versions across dependencies:
Kotlin
dependencies {constraints {implementation("com.squareup.okhttp3:okhttp:4.11.0") {because("Ensures compatibility across Retrofit and OkHttp usage") } }}
This prevents Gradle from pulling in mismatched versions.
Conclusion
Dependency management in Android Gradle is more than just adding libraries — it’s about keeping your app maintainable, efficient, and conflict-free. By using BOMs, centralizing versions, managing conflicts, and understanding producers vs. consumers, you’ll avoid common pitfalls that slow down development.
Mastering Gradle dependency management not only improves build speed but also makes your project easier to scale and collaborate on. The payoff is an Android project that’s stable, consistent, and production-ready.
FAQ: Android Gradle Dependency Management
Q1: What’s the difference between implementation and api in Gradle?
implementation: Dependency is used internally; faster builds since it’s not exposed.
api: Exposes the dependency to consumers of your module. Use sparingly.
Q2: How do I avoid version conflicts in Gradle? Use dependency constraints, enforce consistent versions with a BOM, and run ./gradlew dependencies to audit conflicts.
Q3: Can I remove unused dependencies automatically? Yes, tools like Gradle Lint Plugin or IDE inspections can detect and remove unused libraries.
Q4: What’s the benefit of centralizing dependency versions? It ensures consistency across all modules, simplifies upgrades, and prevents subtle runtime issues from mismatched versions.
Q5: Should I prefer local or remote dependencies? Prefer remote dependencies from trusted repositories for maintainability. Use local JAR/AAR files only for custom or private libraries not available publicly.
Gradle is the official build system for Android development, offering flexibility and powerful dependency management. Understanding how to declare Gradle dependencies properly is crucial for efficient Android app development. In this guide, we’ll break down Gradle dependencies, their types, and how to use them effectively in Android Projects.
What are Gradle Dependencies?
Gradle dependencies are external libraries or modules that your Android project needs to function. They allow you to include reusable code, such as UI components, networking libraries, or database handlers, without writing everything from scratch.
Dependencies in Gradle are usually defined in the build.gradle.kts (Kotlin DSL) or build.gradle (Groovy) files. Modern Android projects use Kotlin DSL (build.gradle.kts), which is more type-safe and readable.
Producers and Consumers in Dependency Management
In Android development, dependency management is about how libraries and modules interact. Simply put, it’s important to differentiate between producers and consumers in dependency management.
Producer: When you create an Android library (like a custom UI component or a utility library), you are the producer because you provide this library for others to use.
Consumer: When you add dependencies in your Android project (e.g., using implementation 'com.squareup.retrofit2:retrofit:2.9.0' in build.gradle), you are the consumer because you are using a library created by someone else.
How to Declare Gradle Dependencies in Android Projects
Declaring dependencies correctly in Gradle is fundamental to building reliable Android applications. Dependencies are specified inside the Gradle build files, most commonly in build.gradle.kts (Kotlin DSL) or build.gradle (Groovy). Since modern Android development encourages using Kotlin DSL for better readability and type safety, this guide focuses on it.
Types of Gradle Dependencies
There are several types of dependencies in an Android project, each serving a different purpose:
implementation: The most common configuration, implementation adds the dependency to the project but hides it from consumers, improving build performance and avoiding unnecessary exposure.
api: Exposes the dependency to both the project and any consumers of the project’s library module. Useful when creating Android libraries.
compileOnly: Adds the dependency at compile time only; it is not packaged in the final APK. Ideal for annotation processors.
runtimeOnly: The dependency is available only at runtime but not at compile time.
testImplementation: Dependencies required only for testing purposes.
androidTestImplementation: Dependencies used only in Android instrumentation tests.
To avoid version conflicts and manage library versions efficiently, Gradle supports the Bill of Materials (BOM). It declares a fixed set of compatible library versions.
Here, the versions for Firebase libraries are controlled centrally by the BOM, ensuring consistency without explicitly specifying versions for each artifact.
Best Practices for Dependency Management
Use Kotlin DSL: It improves readability, offers type safety, and better IDE support compared to Groovy syntax.
Keep dependencies updated: Regularly check for updates to benefit from bug fixes and performance improvements, but test carefully to avoid breaking changes.
Avoid unnecessary dependencies: Minimize the size of your APK and reduce build times by only including libraries essential to your app.
Utilize Dependency Constraints: To enforce or restrict specific versions across your entire project and avoid unexpected version conflicts.
Separate test dependencies: Keep your production code clean by isolating libraries used solely for testing.
Managing Transitive Dependencies
Gradle automatically includes transitive dependencies (dependencies of your dependencies). Sometimes, conflicts arise when different versions of the same library appear. Use strategies like excluding particular transitive dependencies or forcing specific versions to resolve conflicts.
Understanding how to declare and manage Gradle dependencies in Android development is essential for keeping projects well-organized and optimized. By leveraging Kotlin DSL, BOM, and dependency constraints, you can efficiently manage dependencies, prevent version conflicts, and ensure your project remains maintainable.
By following these best practices, you’ll improve your build process, reduce errors, and create a scalable Android application.
Gradle is the backbone of Android development, powering build automation, dependency management, and project configuration. As projects scale, module dependencies in Android Gradle become essential for keeping your codebase organized, improving reusability, and reducing build times. In this guide, we’ll break down: What module dependencies are in Android Gradle Different types of dependencies (implementation, api,...
If you’ve worked on an Android project, you’ve definitely dealt with Gradle dependencies. They help bring in external libraries, connect different parts of your project, and even let you add custom files. But not all dependencies work the same way. Some are used for linking modules, others for adding external projects, and some for including specific files. Choosing the right type can make your project more organized and easier to maintain.
In this blog, we’ll break down the different types of Gradle dependencies and when to use each one.
Types of Gradle dependencies
Gradle provides three main types of dependencies:
Module dependencies
Project dependencies
File dependencies
Each type serves a different purpose, and choosing the right one ensures better project organization, maintainability, and performance.
Module Dependencies: The Standard Approach
Module dependencies are the most commonly used in Android development. They allow you to connect different modules within the same project.
Example use case:
You have a core module that handles networking and database logic.
Your app module depends on core to access those functionalities.
In Gradle, this might look like:
Kotlin
implementation project(":core")
Why use module dependencies?
Encourages modularization, making projects easier to scale.
Improves build times by allowing Gradle to compile modules separately.
Keeps your code organized and avoids duplication.
Project Dependencies: Linking External Projects
Project dependencies come into play when you want to include another Gradle project that isn’t part of your main project by default.
Example use case:
You’re working on a shared internal library that’s used across multiple apps.
Instead of publishing it to Maven or JCenter every time, you directly link the project.
In Gradle:
Kotlin
implementation project(path: ':shared-library')
Why use project dependencies?
Great for internal library development.
Lets you work with multiple projects simultaneously without extra publishing steps.
Useful in large teams or enterprise-level apps.
File Dependencies: Adding Custom JAR or AAR Files
File dependencies allow you to include JAR or AAR files directly into your project.
Example use case:
You’re integrating a third-party SDK that isn’t available in a public Maven repository.
You have a legacy .jar file you need for backward compatibility.
In Gradle:
Kotlin
implementation files('libs/custom-library.jar')
Why use file dependencies?
Perfect for custom or private libraries.
Helps when working with offline builds or older dependencies.
Best practice: Use file dependencies sparingly. If a library is available via Maven Central or Google’s repository, prefer that method — it’s easier to update and maintain.
Best Practices for Managing Gradle Dependencies
Prefer remote repositories (Maven Central, Google) over file dependencies.
Modularize your project: keep reusable logic in separate modules.
Use version catalogs (Gradle 7+) to centralize dependency versions.
Keep dependencies updated to avoid security vulnerabilities.
Avoid duplication by consolidating commonly used libraries in shared modules.
Conclusion
Gradle dependencies may seem simple, but choosing the right type — module, project, or file — can have a huge impact on your Android project’s structure and maintainability.
Use module dependencies for modular apps.
Use project dependencies for shared libraries across projects.
Use file dependencies only when necessary.
By understanding these distinctions, you’ll write cleaner code, speed up build times, and set yourself up for long-term project success.
FAQ: Gradle Dependencies in Android
Q1: What’s the difference between implementation and api in Gradle?
implementation: The dependency is only available in the current module.
api: The dependency is exposed to modules that depend on your module.
Q2: When should I use file dependencies in Gradle?
Only when the library isn’t available in a Maven or Gradle repository. Otherwise, prefer remote dependencies.
Q3: Can I convert a file dependency into a module or project dependency later?
Yes. If you gain access to the source code or publish the library internally, you can switch to module/project dependencies for better maintainability.
Q4: Do Gradle dependencies affect build speed?
Yes. Modular dependencies can improve build times, while excessive file dependencies can slow things down.
If you’re working on a multi-module Gradle project, encountering circular dependencies can be a frustrating roadblock. You may see an error like this:
Kotlin
Circular dependency between the following tasks::javaModule:compileJava+--- :kotlinModule:compileJava| +--- :javaModule:compileJava (*)| \--- :kotlinModule:compileKotlin| \--- :javaModule:compileJava (*)\--- :kotlinModule:compileKotlin (*)
This error occurs when two modules depend on each other, creating a loop that prevents Gradle from determining the correct build order.
Note- To recreate this scenario, we created two modules (javaModule and kotlinModule) and intentionally introduced a circular dependency.
In this guide we will cover the root cause of circular dependencies in Gradle and practical solutions to fix them.
Understanding the Problem: What Causes Circular Dependencies in Gradle?
A circular dependency occurs when two or more modules depend on each other, forming a loop that Gradle cannot resolve. In the error above:
javaModule needs kotlinModule to compile.
kotlinModule depends on javaModule to compile its Java code.
kotlinModule:compileKotlin also requires javaModule, reinforcing the cycle.
Common Causes of Circular Dependencies
Bi-Directional Module Dependencies: If javaModule and kotlinModule both reference each other using implementation project(":eachOtherModule"), Gradle gets stuck in an infinite loop.
Transitive Dependencies: A third-party dependency might be causing an indirect loop between your modules.
Improper Task Dependencies: Gradle’s build order may be incorrectly configured, forcing modules to compile in a conflicting sequence.
How to Fix Circular Dependencies in Gradle
1. Remove Direct Bi-Directional Dependencies
The most common cause of circular dependencies is when two modules depend on each other directly.
Check your build.gradle or build.gradle.kts files:
Kotlin
// javaModule's build.gradle.ktsdependencies {implementation(project(":kotlinModule")) // Java module depends on Kotlin module}// kotlinModule's build.gradle.ktsdependencies {implementation(project(":javaModule")) // Kotlin module depends on Java module (Creates a cycle)}
Since both modules reference each other, Gradle cannot determine the correct build order.
Solution: Remove one of the dependencies or refactor the project.
2. Use api Instead of implementation for Interface Dependencies
If a module only requires interfaces or abstract classes from another module, use api instead of implementation.
Kotlin
// build.gradle.ktsdependencies {api(project(":javaModule")) // Instead of implementation// ... other dependencies}
This allows dependent modules to access the necessary classes without forcing a full compile-time dependency.
3. Introduce a Common Module
If both javaModule and kotlinModule share some code, it’s best to move that code into a separate module (e.g., commonModule).
New Project Structure:
Kotlin
commonModule├── javaModule (depends on commonModule)├── kotlinModule (depends on commonModule)
Update build.gradle.kts files accordingly:
javaModule/build.gradle.kts
Kotlin
// build.gradle.ktsdependencies {implementation(project(":commonModule"))// ... other dependencies}
kotlinModule/build.gradle.kts
Kotlin
// build.gradle.ktsdependencies {implementation(project(":commonModule"))// ... other dependencies}
Now, both javaModule and kotlinModule rely on commonModule, breaking the circular dependency.
4. Use Gradle Dependency Constraints
If you suspect a transitive dependency is causing the issue, use constraints in dependencies:
Kotlin
dependencies {constraints {implementation(project(":javaModule")) {because("Avoids circular dependency with kotlinModule") } }}
This helps Gradle prioritize dependencies correctly.
5. Exclude Unnecessary Transitive Dependencies
If kotlinModule indirectly depends on javaModule due to a third-party library, exclude it:
This ensures Kotlin compilation happens after Java compilation, resolving potential conflicts.
Final Checks: Debugging Dependencies
After making changes, run the following command to inspect your project’s dependency tree:
Kotlin
./gradlew dependencies
Lists all dependencies in the project, including:
Direct dependencies
Transitive dependencies
Dependency versions
Resolved dependency graph
Helps debug dependency issues, such as conflicts or unexpected transitive dependencies.
If a circular dependency still exists, this command will highlight the problematic modules.
Conclusion
Circular dependencies in Gradle can cause major build issues, but they can be resolved using the right strategies. The best approach depends on the cause:
If modules depend on each other directly, remove one of the dependencies.
If shared code is needed, move it to a commonModule.
If the issue is caused by transitive dependencies, use exclude or constraints.
If compilation order is incorrect, manually adjust tasks.named("compileKotlin").
By following these steps, you can eliminate circular dependencies and improve the maintainability of your Gradle projects.
Gradle is an essential build tool for Android development, managing dependencies and automating the build process. One of the critical aspects of Gradle is its dependency configurations, which control how dependencies are included in a project. In this article, we will explore different Gradle dependency configurations in Android, explaining their usage with Kotlin DSL (build.gradle.kts) examples.
What Are Gradle Dependency Configurations?
In Gradle, dependencies have specific scopes, meaning they are used in different phases of your project.
Some dependencies are needed during compilation to build your source code.
Others are required only at runtime when the application is running.
Kotlin
dependencies {implementation("androidx.core:core-ktx:1.12.0") // Needed for compiling and running the appruntimeOnly("com.squareup.okio:okio:3.3.0") // Needed only at runtime (e.g. for file I/O)}
Gradle manages these scopes using Configurations, which define when and how dependencies are used in the build process. Dependency configurations help organize dependencies based on their purpose, such as:
Compiling source code
Running the application
Testing the project
These configurations ensure that dependencies are available at the right stage of development, helping Gradle resolve them efficiently.
Commonly Used Gradle Dependency Configurations in Android
For Main Code (Application/Library Code)
api – Used for both compilation and runtime. Also included in the published API (for libraries).
implementation – Used for compilation and runtime, but not exposed in the published API.
compileOnly – Used only for compilation, not available at runtime.
compileOnlyApi – Like compileOnly, but included in the published API.
runtimeOnly – Used only at runtime, not needed for compilation.
For Tests
testImplementation – Used for compiling and running tests.
testCompileOnly – Used only for compiling tests, not available at runtime.
testRuntimeOnly – Used only at test runtime, not needed for compilation.
Have you noticed this — what does ‘published API’ mean?
When we say ‘published API,’ we are talking about the public API of our module or library — the part that other modules or projects can see and use.
For example, if we are creating a library (myLibrary) that will be used by another project (otherApp), some dependencies need to be exposed to the users of our library, while others should remain internal.
Now, let’s break down each configuration with explanations and see how we will use it in our code.
implementation
The implementation configuration is the most commonly used dependency type. It ensures that a module can access the dependency but does not expose it to other modules.
The implementation keyword ensures that the dependency is only available to the module where it is declared.
Other modules cannot access these dependencies, reducing compilation time and improving modularity.
Also, dependencies declared with implementation are available at compile time and runtime.
api
The api configuration behaves similarly to implementation, but it exposes the dependency to other modules that depend on that particular module. This means we should use api when we want to expose a dependency to other modules that depend on our module.
Kotlin
// Adding a dependency that should be exposed to other modulesdependencies {api("androidx.lifecycle:lifecycle-viewmodel-ktx:2.6.1")}
If Module A includes this dependency with api, then Module B (which depends on Module A) can also accesslifecycle-viewmodel-ktx.
Use api for both compilation and runtime, but only when the dependency is part of your public API.
This is useful for creating libraries or shared modules.
compileOnly
The compileOnly configuration includes dependencies only during compilation but excludes them at runtime.
Kotlin
// Adding a dependency that is required only at compile time// Lombok is a Java library, but we can also use it in Android to reduce boilerplate code by providing annotationsdependencies {compileOnly("org.projectlombok:lombok:1.18.36")annotationProcessor("org.projectlombok:lombok:1.18.36")kapt("org.projectlombok:lombok:1.18.36") // kotlin project(Kotlin KAPT plugin)}
compileOnly is typically used for annotation processors or compile-time dependencies that are not needed when the application is running.
Useful for lightweight dependencies that assist in code generation.
The dependency will not be included in the final APK.
compileOnlyApi
The compileOnlyApi configuration behaves like compileOnly, but it also exposes the dependency to modules that depend on this module.
Kotlin
// Adding a compile-only dependency that should be exposeddependencies {compileOnlyApi("org.jetbrains:annotations:20.1.0")}
The module itself uses this dependency only during compilation.
Other modules that depend on this module can also access the dependency.
Useful when developing shared libraries where compile-time dependencies need to be propagated.
runtimeOnly
The runtimeOnly configuration ensures that the dependency is available only at runtime, not during compilation.
Kotlin
dependencies {implementation("com.jakewharton.timber:timber:5.0.1") // Available at compile-timeruntimeOnly("com.github.tony19:logback-android:3.0.0") // Only used at runtime for logging, logback-android is a backend logging framework that processes logs at runtime.}
The code is compiled without logback-android because it is not available during compilation.
runtimeOnly ensures that the dependency is available only at runtime and is not included in the compilation classpath.
Helps in keeping the compilation classpath clean.
testImplementation
testImplementation is used when you need a dependency for both compiling and running test cases. This is the most commonly used configuration for test dependencies.
Kotlin
// Adding a testing librarydependencies {testImplementation("junit:junit:4.13.2")}
testImplementation ensures that the JUnit library is only available in the test environment.
It does not get bundled into the final application.
testCompileOnly
testCompileOnly is used when a dependency is required only at test compile-time but is not needed at runtime. This is useful when a dependency provides compile-time annotations or APIs but doesn’t need to be included during test execution.
Kotlin
dependencies { testCompileOnly 'junit:junit:4.13.2'// Available at compile-time but not included at runtime}
This means,
The dependency is only available during compilation for unit tests.
It is not included in the test runtime classpath.
Use it when you need a library at compile time (e.g., compile-time annotations) but don’t want it in the runtime environment.
testRuntimeOnly
testRuntimeOnly is used when a dependency is needed only at test runtime and is not required at compile-time.
The junit-vintage-engine is used only for executing JUnit 4 tests under the JUnit 5 framework.
Means, junit-vintage-engine is used to bridge the gap when you are using the latest version, JUnit 5, but still need to test some functionality that primarily relies on JUnit 4 or JUnit 3. In such cases, it allows you to run these older JUnit 3 and JUnit 4 tests alongside your new JUnit 5 tests within the same JUnit 5 test runner.
It is not needed for compilation but must be available when running tests.
Bonus
androidTestImplementation
Similar to testImplementation, but specifically for Android instrumentation tests that run on a device or emulator.
The JUnit extension for Android testing is only available for instrumented tests (which run on an actual device or emulator).
Helps in isolating dependencies specific to Android UI tests.
annotationProcessor
Used for annotation processors that generate code at compile time.
Kotlin
dependencies {annotationProcessor("androidx.room:room-compiler:2.4.2")}// Note: Even though I defined it in a Kotlin file, it is actually in the Gradle file (build.gradle). // Also, annotationProcessor is mostly used for Java-based projects; its alternative in Kotlin is KAPT, // which we will see just after this.
Room’s compiler processes annotations at compile time and generates necessary database-related code.
Typically used with libraries like Dagger, Room, and ButterKnife.
kapt (Kotlin Annotation Processing Tool)
Since annotationProcessor does not work with Kotlin, we use kapt instead.
Required for libraries that rely on annotation processing.
Conclusion
Understanding Gradle dependency configurations is crucial for managing dependencies efficiently in Android development. By using the right configurations, you can improve build performance, maintain a modular project structure, and avoid unnecessary dependencies. By following best practices, you can make your Gradle build system cleaner and more maintainable.
With these insights and examples, you should now have a clear understanding of Gradle dependency configurations in Android and how to use them effectively!
Gradle provides different dependency configurations to manage libraries and dependencies for building and testing applications. When working with tests in a Gradle-based project, three key dependency configurations are commonly used:
testImplementation – Used for compiling and running tests.
testCompileOnly – Used only for compiling tests, not available at runtime.
testRuntimeOnly – Used only at test runtime, not needed for compilation.
Let’s explore each of these in detail with examples and understand when to use them.
testImplementation
testImplementation is used when you need a dependency for both compiling and running test cases. This is the most commonly used configuration for test dependencies.
Kotlin
// Adding a testing library in build.gradle.ktsdependencies {testImplementation("junit:junit:4.13.2")}
testImplementation ensures that the JUnit library is only available in the test environment.
It does not get bundled into the final application.
When to UsetestImplementation
When the library is needed for both writing and executing tests.
Common for testing frameworks like JUnit, TestNG, and mocking libraries like Mockito.
testCompileOnly
testCompileOnly is used when a dependency is required only at test compile-time but is not needed at runtime. This is useful when a dependency provides compile-time annotations or APIs but doesn’t need to be included during test execution.
Kotlin
dependencies { testCompileOnly 'junit:junit:4.13.2'// Available at compile-time but not included at runtime}
This means,
The dependency is only available during compilation for unit tests.
It is not included in the test runtime classpath.
Use it when you need a library at compile time (e.g., compile-time annotations) but don’t want it in the runtime environment.
When to Use testCompileOnly
When a dependency provides compile-time features (such as annotation processing) but is not required at runtime.
To minimize the runtime classpath and avoid unnecessary dependencies.
testRuntimeOnly
testRuntimeOnly is used when a dependency is needed only at test runtime and is not required at compile-time.
The junit-vintage-engine is used only for executing JUnit 4 tests under the JUnit 5 framework.
Means, junit-vintage-engine is used to bridge the gap when you are using the latest version, JUnit 5, but still need to test some functionality that primarily relies on JUnit 4 or JUnit 3. In such cases, it allows you to run these older JUnit 3 and JUnit 4 tests alongside your new JUnit 5 tests within the same JUnit 5 test runner.
It is not needed for compilation but must be available when running tests.
When to Use testRuntimeOnly
When a dependency is required only at runtime, such as database drivers, logging frameworks, or test execution engines.
When you want to keep the compile-time classpath clean and only include dependencies that are absolutely necessary for execution.
Conclusion
Understanding testImplementation, testCompileOnly, and testRuntimeOnly helps in optimizing test dependencies and ensuring efficient builds.
Use testImplementation for dependencies needed both at compile-time and runtime.
Use testCompileOnly for dependencies required only during compilation.
Use testRuntimeOnly for dependencies that are only needed when running tests.
By applying these configurations effectively, you can keep your test environment lightweight and efficient while avoiding unnecessary dependencies in the build process.
Gradle is a powerful build automation tool used in many software development projects. One of the lesser-known but incredibly useful features of Gradle is its support for init scripts. Init scripts provide a way to configure Gradle before any build scripts are executed. In this blog post, we will delve into the world of init scripts in Gradle, discussing what they are, why you might need them, and how to use them effectively.
What are Init Scripts?
Init scripts in Gradle are scripts written in Groovy or Kotlin that are executed before any build script in a Gradle project. They allow you to customize Gradle’s behavior on a project-wide or even system-wide basis. These scripts can be used to define custom tasks, apply plugins, configure repositories, and perform various other initialization tasks.
Init scripts are particularly useful when you need to enforce consistent build configurations across multiple projects or when you want to set up global settings that should apply to all Gradle builds on a machine.
Why Use Init Scripts?
Init scripts offer several advantages that make them an essential part of Gradle’s flexibility:
Centralized Configuration
With init scripts, you can centralize your configuration settings and plugins, reducing redundancy across your project’s build scripts. This ensures that all your builds follow the same guidelines, making maintenance easier.
Code Reusability
Init scripts allow you to reuse code snippets across multiple projects. This can include custom tasks, custom plugin configurations, or even logic to set up environment variables.
Isolation of Configuration
Init scripts runindependently of your project’s build scripts. This isolation ensures that the build scripts focus solely on the tasks related to building your project, while the init scripts handle setup and configuration.
System-wide Configuration
You can use init scripts to configure Gradle globally, affecting all projects on a machine. This is especially useful when you want to enforce certain conventions or settings across your organization.
Creating an Init Script
Now, let’s dive into creating and using init scripts in Gradle:
Location
Init scripts can be placed in one of two locations:
Project-specific location:You can place an init script in the init.d directory located at the root of your project. This script will apply only to the specific project in which it resides.
Global location: You can also create a global init script that applies to all Gradle builds on your machine. These scripts are typically placed in the USER_HOME/.gradle/init.d directory.
Script Language
Init scripts can be written in either Groovy or Kotlin. Gradle supports both languages, so choose the one you are more comfortable with.
Basic Structure
Here’s a basic structure for an init script in Groovy:
Kotlin
// Groovy init.gradleallprojects {// Your configuration here}
And in Kotlin:
Kotlin
// Kotlin init.gradle.ktsallprojects {// Your configuration here}
Configuration
In your init script, you can configure various aspects of Gradle, such as:
Applying plugins
Defining custom tasks
Modifying repository settings
Setting up environment variables
Specifying project-level properties
Applying the Init Script
To apply an init script to your project, you have a few options:
Project-specific init script:Place the init script in the init.d directory of your project, and it will automatically apply to that project when you run Gradle tasks.
Global init script: If you want the init script to apply to all projects on your machine, place it in the USER_HOME/.gradle/init.d directory.
Command-line application:You can apply an init script to a single invocation of Gradle using the -I or --init-script command-line option, followed by the path to your script:
Kotlin
gradle -I /path/to/init.gradle <task>
Use Cases : Configuring Projects with an Init Script
As we know now, an init script is a Groovy or Kotlin script, just like a Gradle build script. Each init script is linked to a Gradle instance, meaning any properties or methods you use in the script relate to that specific Gradle instance.
Init scripts implement the Script interface, which is how they interact with Gradle’s internals and perform various tasks.
When writing or creating init scripts, it’s crucial to be mindful of the scope of the references you’re using. For instance, properties defined in a gradle.properties file are available for use in Settings or Project instances but not directly in the top-level Gradle instance.
You can use an init script to set up and adjust the projects in your Gradle build. It’s similar to how you configure projects in a multi-project setup. Let’s take a look at an example where we use an init script to add an additional repository for specific environments.
Example 1. Using init script to perform extra configuration before projects are evaluated
In your Gradle init script, you can declare external dependencies just like you do in a regular Gradle build script. This allows you to bring in additional libraries or resources needed for your init script to work correctly.
Example 2. Declaring external dependencies for an init script
The initscript() method takes closure as an argument. This closure is used to configure the ScriptHandler instance for the init script. The ScriptHandler instance is responsible for loading and executing the init script.
You declare the init script’s classpath by adding dependencies to the classpath configuration. This is similar to declaring dependencies for tasks like Java compilation. The classpath property of the closure can be used to specify the classpath for the init script. The classpath can be a list of directories or JAR files. You can use any of the dependency types described in Gradle’s dependency management, except for project dependencies.
Using Classes from Init Script Classpath
Once you’ve defined external dependencies in your Gradle init script, you can use the classes from those dependencies just like any other classes available on the classpath. This allows you to leverage external libraries and resources in your init script for various tasks.
For example, let’s consider a previous init script configuration:
Example 3. An init script with external dependencies
Kotlin
// init.gradle.kts// Import a class from an external dependencyimport org.apache.commons.math.fraction.Fractioninitscript {repositories {// Define where to find dependenciesmavenCentral() }dependencies {// Declare an external dependencyclasspath("org.apache.commons:commons-math:2.0") }}// Use the imported class from the external dependencyprintln(Fraction.ONE_FIFTH.multiply(2))
We import a class Fraction from an external dependency, Apache Commons Math.
We configure the init script to fetch dependencies from the Maven Central repository.
We declare the external dependency on the “commons-math” library with version “2.0.”
We use the imported Fraction class to perform a calculation and print the result.
In the build.gradle.kts file (for reference):
We define a task named “doNothing” in the build script.
When you apply this init script using Gradle, it fetches the required dependency, and you can use classes from that dependency, as demonstrated by the calculation in the println statement.
For instance, running gradle --init-script init.gradle.kts -q doNothing will produce an output of 2 / 5.
Init script plugins
Plugins can be applied to init scripts in the same way that they can be applied to build scripts or settings files.
To apply a plugin to an init script, you can use the apply() method. The apply() method takes a single argument, which is the name of the plugin.
In Gradle, plugins are used to add specific functionality or features to your build. You can apply plugins within your init script to extend or customize the behavior of your Gradle initialization.
For example, in an init script, you can apply a plugin like this:
Kotlin
// init.gradle.kts// Apply a Gradle pluginapply(plugin = "java")// Rest of your init script
In this case, we’re applying the “java” plugin within the init script. This plugin brings in Java-related functionality for your build.
Plugins can also be applied to init scripts from the command line. To do this, you can use the -P or --project-prop option. The -P or --project-prop option takes a key-value pair, where the key is the name of the plugin and the value is the version of the plugin.
For example, the following command applies the java plugin to an init script with version 1.0:
Kotlin
gradle -Pplugin=java -Pversion=1.0
This command tells Gradle to apply the java plugin to the init script with the version 1.0.
Example 4. Using plugins in init scripts
In this example, we’re demonstrating how to use plugins in Gradle init scripts:
init.gradle.kts:
Kotlin
// Apply a custom EnterpriseRepositoryPluginapply<EnterpriseRepositoryPlugin>()classEnterpriseRepositoryPlugin : Plugin<Gradle> {companionobject {constval ENTERPRISE_REPOSITORY_URL = "https://repo.gradle.org/gradle/repo" }overridefunapply(gradle: Gradle) { gradle.allprojects {repositories {all {// Remove repositories not pointing to the specified enterprise repository URLif (this !is MavenArtifactRepository || url.toString() != ENTERPRISE_REPOSITORY_URL) { project.logger.lifecycle("Repository ${(thisas? MavenArtifactRepository)?.url ?: name} removed. Only $ENTERPRISE_REPOSITORY_URL is allowed")remove(this) } }// Add the enterprise repositoryadd(maven { name = "STANDARD_ENTERPRISE_REPO" url = uri(ENTERPRISE_REPOSITORY_URL) }) } } }}
In the init.gradle.kts file, a custom plugin named EnterpriseRepositoryPlugin is applied. This plugin restricts the repositories used in the build to a specific URL(ENTERPRISE_REPOSITORY_URL).
The EnterpriseRepositoryPlugin class implements the Plugin<Gradle> marker interface, which allows it to configure the build process.
Inside the apply method of the plugin, it removes repositories that do not match the specified enterprise repository URL and adds the enterprise repository to the project.
The build.gradle.kts file defines a task called showRepositories. This task prints the list of repositories that are used by the build.
When you run the gradle command with the-I or --init-script option, Gradle will first execute the init.gradle.kts file. This will apply the EnterpriseRepositoryPlugin plugin and configure the repositories. Once the init.gradle.kts file is finished executing, Gradle will then execute the build.gradle.kts file.
Finally the output of the gradle command shows that the STANDARD_ENTERPRISE_REPO repository is the only repository that is used by the build.
The plugin in the init script ensures that only a specified repository is used when running the build.
When applying plugins within the init script, Gradle instantiates the plugin and calls the plugin instance’s apply(gradle: Gradle) method. The gradle object is passed as a parameter, which can be used to configure all aspects of a build. Of course, the applied plugin can be resolved as an external dependency as described above in External dependencies for the init script.
In short, applying plugins in init scripts allows you to configure and customize your Gradle environment right from the start, tailoring it to your specific project’s needs.
Best Practices
Here are some best practices for working with init scripts in Gradle:
Version Control:If your init script contains project-independent configurations that should be shared across your team, consider version-controlling it alongside your project’s codebase.
Documentation: Include clear comments in your init scripts to explain their purpose and the configurations they apply. This helps maintainers and collaborators understand the script’s intentions.
Testing: Test your init scripts in different project environments to ensure they behave as expected. Gradle’s flexibility can lead to unexpected interactions, so thorough testing is crucial.
Regular Review:Init scripts can evolve over time, so periodically review them to ensure they remain relevant and effective.
Conclusion
Init scripts in Gradle provide a powerful way to configure and customize your Gradle builds at a project or system level. They offer the flexibility to enforce conventions, share common configurations, and simplify project maintenance. Understanding when and how to use init scripts can greatly improve your Gradle build process and help you maintain a consistent and efficient development environment.
So, the next time you find yourself duplicating build configurations or wishing to enforce global settings across your Gradle projects, consider harnessing the power of init scripts to streamline your development workflow.
When it comes to building and managing projects, Gradle has become a popular choice among developers due to its flexibility, extensibility, and efficiency. One of the key aspects of Gradle’s functionality lies in how it organizes and utilizes directories and files within a project. In this blog post, we will take an in-depth look at the directories and files Gradle uses, understanding their purposes and significance in the build process.
Project Structure
Before divinginto the specifics of directories and files, let’s briefly discuss the typical structure of a Gradle project. Gradle projects are structured in a way that allows for clear separation of source code, resources, configuration files, and build artifacts. The most common structure includes directories such as:
src: This directory contains the source code and resources for your project. It’s usually divided into subdirectories like main and test, each containing corresponding code and resources. The main directory holds the main application code, while the test directory contains unit tests.
build: Gradle generates build artifacts in this directory. This includes compiled code, JARs, test reports, and other artifacts resulting from the build process. The build directory is typically temporary and gets regenerated each time you build the project.
gradle: This directory contains Gradle-specific files and configurations.Itincludes the wrapper subdirectory, which holds the Gradle Wrapper files. The Gradle Wrapper is a script that allows you to use a specific version of Gradle without installing it globally on your system.
Directories
Gradle relies on two main directories: the Gradle User Home directory and the Project root directory. Let’s explore what’s inside each of them and how temporary files and directories are cleaned up.
Gradle User Home directory
The Gradle User Home (usually found at <home directory of the current user>/.gradle) is like a special storage area for Gradle. It keeps important settings, like configuration, initialization scripts as well as caches and logs, safe and organized.
1. Global cache directory (for everything that’s not project-specific): This directory stores the results of tasks that are not specific to any particular project. This includes things like the results of downloading dependencies and the results of compiling code. The default location of this directory is $USER_HOME/.gradle/caches.
2. Version-specific caches (e.g. to support incremental builds):This directory stores the results of tasks that are specific to a particular version of Gradle. This includes things like the results of parsing the project’s build script and the results of configuring the project’s dependencies. The default location of this directory is $USER_HOME/.gradle/<gradle-version>/caches.
3. Shared caches (e.g. for artifacts of dependencies):This directory stores the results of tasks that are shared by multiple projects. This includes things like the results of downloading dependencies and the results of compiling code. The default location of this directory is $USER_HOME/.gradle/shared/caches.
4. Registry and logs of the Gradle Daemon (the daemon is a long-running process that can be used to speed up builds): This directory stores the registry of the Gradle Daemon and the logs of the Gradle Daemon. The default location of this directory is $USER_HOME/.gradle/daemon.
5. Global initialization scripts (scripts that are executed before any build starts): This directory stores the global initialization scripts. The default location of this directory is $USER_HOME/.gradle/init.d.
6. JDKs downloaded by the toolchain support: This directory stores the JDKs that are downloaded by the toolchain support. The toolchain support is used to compile code for different platforms. The default location of this directory is $USER_HOME/.gradle/toolchains.
7. Distributions downloaded by the Gradle Wrapper: This directory stores the distributions that are downloaded by the Gradle Wrapper. The Gradle Wrapper is a script that can be used to simplify the installation and execution of Gradle. The default location of this directory is $USER_HOME/.gradle/wrapper.
8. Global Gradle configuration properties (properties that are used by all Gradle builds): This directory stores the global Gradle configuration properties. The default location of this directory is $USER_HOME/.gradle/gradle.properties.
Cleaning Up Caches and Distributions
When you use Gradle for building projects, it creates temporary files and data in your computer’s user home directory. Gradle automatically cleans up these files to free up space. Here’s how it works:
Background Cleanup
Gradle cleans up in the background when you stop the Gradle tool (daemon). If you don’t use the background cleanup, it happens after each build with a progress bar.
For example, imagine you’re working on a software project using Gradle for building. After you finish your work and close the Gradle tool, it automatically cleans up any temporary files it created. This ensures that your computer doesn’t get cluttered with unnecessary files over time. It’s like cleaning up your workspace after you’re done with a task.
Cleaning Strategies
In a software project, you often use different versions of Gradle. Gradle keeps some files specific to each version. If a version hasn’t been used for a while, these files are removed to save space. This is similar to getting rid of old documents or files you no longer need. For instance, if you’re not using a particular version of a library anymore, Gradle will clean up the related files.
Gradle has different ways to clean up:
Version-specific Caches: These are files for specific versions of Gradle. If they’re not used, Gradle deletesrelease version files after 30 days of inactivity and snapshot version files after 7 days of inactivity.
Shared Caches:These are files used by multiple versions of Gradle. If no Gradle version needs them, they’re deleted.
Files for Current Gradle Version:Files for the version of Gradle you’re using are checked. Depending on if they can be made again or need to be downloaded, they’re deleted after 7 or 30 days of not being used.
Unused Distributions:If a distribution of Gradle isn’t used, it’s removed.
Configuring Cleanup
Think about a project where you frequently switch between different Gradle versions. You can decide how long Gradle keeps files before cleaning them up. For example, if you want to keep the files of the released versions for 45 days and the files of the snapshots (unstable versions) for 10 days, you can adjust these settings. It’s like deciding how long you want to keep your emails before they are automatically deleted.
You can set how long Gradle keeps these files:
Released Versions: 30 days for released versions.
Snapshot Versions: 7 days for snapshot versions.
Downloaded Resources: 30 days for resources from the internet.
Created Resources: 7 days for resources Gradle makes.
How to Configure
You can change these settings in a file called “cache-settings.gradle.kts” in your Gradle User Home directory. Here’s an example of how you can do it:
beforeSettings:This is a Gradle lifecycle event that allows you to execute certain actions before the settings of your build script are applied.
caches: This part refers to the caches configuration within the beforeSettings block.
releasedWrappers.setRemoveUnusedEntriesAfterDays(45): This line sets the retention period for released versions and their related caches to 45 days. It means that if a released version of Gradle or its cache files haven”t been used for 45 days, they will be removed during cleanup.
snapshotWrappers.setRemoveUnusedEntriesAfterDays(10): This line sets the retention period for snapshot versions (unstable, in-development versions) and their related caches to 10 days. If they haven’t been used for 10 days, they will be removed during cleanup.
downloadedResources.setRemoveUnusedEntriesAfterDays(45): This line sets the retention period for resources downloaded from remote repositories (e.g., cached dependencies) to 45 days. If these resources haven’t been used for 45 days, they will be removed.
createdResources.setRemoveUnusedEntriesAfterDays(10): This line sets the retention period for resources created by Gradle during the build process (e.g., artifact transformations) to 10 days. If these resources haven’t been used for 10 days, they will be removed.
In essence, this code configures how long different types of files should be retained before Gradle’s automatic cleanup process removes them. The numbers you see (45, 10) represent the number of days of inactivity after which the files will be considered for cleanup. You can adjust these numbers based on your project’s needs and your preferred cleanup frequency.
Cleaning Frequency
You can choose how often cleanup happens:
DEFAULT: Happens every 24 hours.
DISABLED: Never cleans up (useful for specific cases).
ALWAYS: Cleans up after each build (useful but can be slow).
Sometimes you might want to control when the cleanup happens. If you choose the “DEFAULT” option, It will automatically clean up every 24 hours in the background. However, if you have limited storage and need to manage space carefully, you might choose the “ALWAYS” option. This way, cleanup occurs after each build, ensuring that space is cleared right away. This can be compared to deciding whether to clean your room every day (DEFAULT) or cleaning it immediately after a project (ALWAYS).
Above I mentioned “useful for specific cases,” I meant that the option to disable cleanup (CLEANUP.DISABLED) might be helpful in certain situations where you have a specific reason to avoid cleaning up the temporary files and data created by it.
For example,imagine you’re working on a project where you need to keep these temporary files for a longer time because you frequently switch between different builds or versions.In this scenario, you might want to delay the cleanup process until a later time when it’s more convenient for you, rather than having Gradle automatically clean up these files.
So, “useful for specific cases” means there are situations where you might want to keep the temporary files around for a longer duration due to your project’s requirements or your workflow.
Remember, you can only change these settings using specific files in your Gradle User Home directory. This helps prevent different projects from conflicting with each other’s settings.
Sharing a Gradle User Home Directory between Multiple Gradle Versions
Sharing a single Gradle User Home among various Gradle versions is a common practice. In this shared home, there are caches that belong to specific versions of Gradle. Each Gradle version usually manages its own caches.
However, there are some caches that are used by multiple Gradle versions, like the cache for dependency artifacts or the artifact transform cache. Starting from version 8.0, you can adjust settings to control how long these caches are kept. But in older versions, the retention periods are fixed (either 7 or 30 days depending on the cache).
This situation can lead to a scenario where different versions might have different settings for how long cache artifacts are retained. As a result, shared caches could be accessed by various versions with different retention settings.
This means that:
If you don’t customize the retention period, all versions of Gradle that do cleanup will follow the same retention periods. This means that sharing a Gradle User Home among multiple versions won’t cause any issues in this case. The cleanup behavior will be consistent across all versions.
If you set a custom retention period for Gradle versions equal to or greater than 8.0, making it shorter than the older fixed periods, it won’t cause any issues. The newer versions will clean up their artifacts sooner than the old fixed periods. However, the older versions won’t be aware of these custom settings, so they won’t participate in the cleanup of shared caches. This means the cleanup behavior might not be consistent across all versions.
If you set a custom retention period for Gradle versions equal to or greater than 8.0, now making it longer than the older fixed periods, there could be an issue. The older versions might clean the shared caches sooner than your custom settings. If you want the newer versions to keep the shared cache entries for a longer period, they can’t share the same Gradle User Home with the older versions.Instead, they should use a separate directory to ensure the desired retention periods are maintained.
When sharing the Gradle User Home with Gradle versions before 8.0, there’s another thing to keep in mind. In older versions, the DSL elements used to set cache retention settings aren’t available.So, if you’re using a shared init script among different versions, you need to consider this.
To handle this, you can apply a script that matches the version requirements. Make sure this version-specific script is stored outside the init.d directory, perhaps in a sub-directory.This way, it won’t be automatically applied, and you can ensure that the right settings are used for each Gradle version.
Cache marking
Starting from Gradle version 8.1, a new feature is available. Gradle now lets you mark caches using a file called CACHEDIR.TAG, following the format defined in the Cache Directory Tagging Specification. This file serves a specific purpose: it helps tools recognize directories that don’t require searching or backing up.
By default, in the Gradle User Home, several directories are already marked with this file: caches, wrapper/dists, daemon, and jdks. This means these directories are identified as ones that don’t need to be extensively searched or included in backups.
Here is a sample CACHEDIR.TAG file:
Kotlin
# This file is a cache tag file, created by Gradle version 8.1.# It identifies the directory `caches` as a Gradle cache directory.name = cachesversion = 8.1signature = sha256:<signature>
The name field specifies the name of the directory that is being tagged. In this case, the directory is caches.
The version field specifies the version of Gradle that created the tag. In this case, the version is 8.1.
The signature field is a signature that can be used to verify the authenticity of the tag. This signature is created using a cryptographic hash function.
The CACHEDIR.TAG file is a simple text file, so you can create it using any text editor. However, it is important to make sure that the file is created with the correct permissions. The file should have the following permissions:
-rw-r--r--
This means that the file is readable by everyone, but only writable by the owner.
Configuring cache marking
The cache marking feature can be configured via an init script in the Gradle User Home:
Kotlin
//gradleUserHome/init.d/cache-settings.gradle.ktsbeforeSettings {caches {// Disable cache marking for all caches markingStrategy.set(MarkingStrategy.NONE) }}
Note that cache marking settings can only be configured via init scripts and should be placed under the init.d directory in the Gradle User Home. This is because the init.d directory is loaded before any other scripts, so the cache marking settings will be applied to all projects that use the Gradle User Home.
This also limits the possibility of different conflicting settings from different projects being applied to the same directory. If the cache marking settings were not coupled to the Gradle User Home, then it would be possible for different projects to apply different settings to the same directory. This could lead to confusion and errors.
Project Root Directory
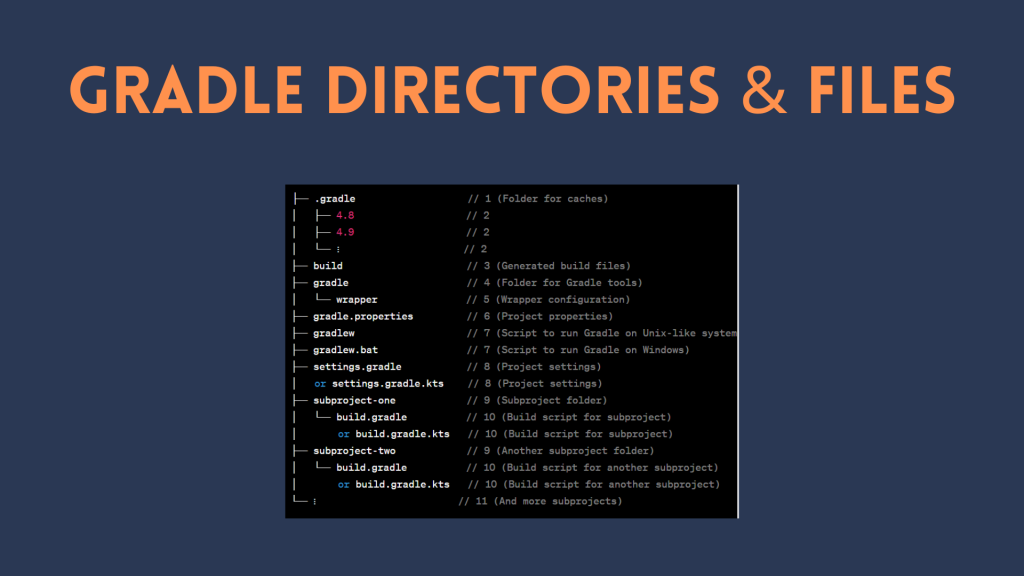
The project root directory holds all the source files for your project. It also includes files and folders created by Gradle, like .gradle and build. While source files are typically added to version control, the ones created by Gradle are temporary and used to enable features like incremental builds. A typical project root directory structure looks something like this:
Kotlin
├── .gradle // 1 (Folder for caches)│ ├── 4.8// 2 │ ├── 4.9// 2│ └── ⋮├── build // 3 (Generated build files)├── gradle // (Folder for Gradle tools)│ └── wrapper // 4 (Wrapper configuration)├── gradle.properties // 5 (Project properties)├── gradlew // 6 (Script to run Gradle on Unix-like systems)├── gradlew.bat // 6 (Script to run Gradle on Windows)├── settings.gradle or settings.gradle.kts // 7 (Project settings)├── subproject-one // 8 (Subproject folder)| └── build.gradle or build.gradle.kts // 9 (Build script for subproject)├── subproject-two // 8 (Another subproject folder)| └── build.gradle or build.gradle.kts // 9 (Build script for another subproject)└── ⋮ // (And more subprojects)
Project-specific cache directory generated by Gradle:This is a folder where Gradle stores temporary files and data that it uses to speed up building projects. It’s specific to your project and helps Gradle avoid redoing certain tasks each time you build, which can save time.
Version-specific caches (e.g. to support incremental builds):These caches are used to remember previous build information, allowing Gradle to only rebuild parts of your project that have changed. This is especially helpful for “incremental builds” where you make small changes and don’t want to redo everything.
The build directory of this project into which Gradle generates all build artifacts: When you build your project using Gradle, it generates various files and outputs. This “build directory” is where Gradle puts all of those created files like compiled code, libraries, and other artifacts.
Contains the JAR file and configuration of the Gradle Wrapper:The JAR file is a packaged software component. Here, it refers to the Gradle Wrapper’s JAR file, which allows you to use Gradle without installing it separately. The configuration helps the Wrapper know how to work with Gradle.
Project-specific Gradle configuration properties:These are settings that are specific to your project and control how Gradle behaves when building. For example, they might determine which plugins to use or how to package your project.
Scripts for executing builds using the Gradle Wrapper: The gradlew and gradlew.bat scripts are used to execute builds using the Gradle Wrapper. These scripts are special commands that let you run Gradle tasks without needing to have Gradle installed globally on your system.
The project’s settings file where the list of subprojects is defined:This file defines how your project is structured, including the list of smaller “subprojects” that make up the whole. It helps Gradle understand the layout of your project.
Usually a project is organized into one or multiple subprojects:A project can be split into smaller pieces called subprojects. This is useful for organizing complex projects into manageable parts, each with its own set of tasks.
Each subproject has its own Gradle build script:Each subproject within your project has its own build script. This script provides instructions to Gradle on how to build that specific part of your project. It can include tasks like compiling code, running tests, and generating outputs.
Project cache cleanup
From version 4.10 onwards, Gradle automatically cleans the project-specific cache directory. After building the project, version-specific cache directories in .gradle/<gradle-version>/ are checked periodically (at most every 24 hours) for whether they are still in use. They are deleted if they haven’t been used for 7 days.
This helps to keep the cache directories clean and free up disk space. It also helps to ensure that the build process is as efficient as possible.
Conclusion
In conclusion, delving into the directories and files that Gradle utilizes provides a valuable understanding of how this powerful build tool operates. Navigating through the cache directory, version-specific caches, build artifacts, Gradle Wrapper components, project configuration properties, and subproject structures sheds light on the intricate mechanisms that streamline the development process. With Gradle’s continuous enhancements, such as automated cache cleaning from version 4.10 onwards, developers can harness an optimized environment for building projects efficiently. By comprehending the roles of these directories and files, developers are empowered to leverage Gradle to its fullest potential, ensuring smooth and effective project management.