Docker Desktop has long been the go-to recommendation for hosting self-hosted automation tools. However, configuring Docker on Windows 11 can turn into a technical headache when nested virtualization, Hyper-V errors, or WSL2 corruptions get in the way.
The good news? n8n is built entirely on Node.js. You do not need Docker, Hyper-V, or a Linux virtual machine to run it locally. You can install it directly onto your Windows host OS like any other command-line tool.
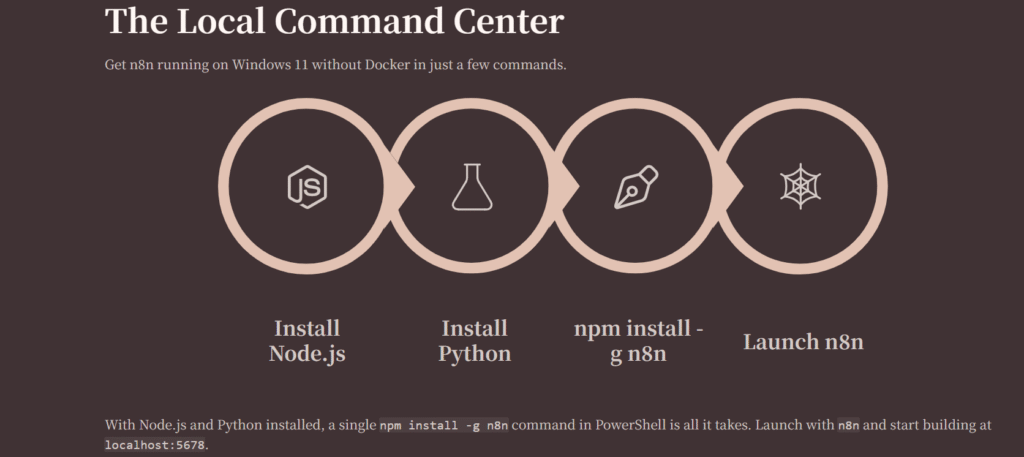
This comprehensive guide will walk you through installing n8n natively on Windows 11, building your first automated workflow, and deploying it to the cloud via Render for free — complete with a clever workaround to keep Render’s free tier server awake 24/7.
Why Skip Docker?
Docker is powerful, but it adds complexity.
For beginners, Docker usually means:
Installing Docker Desktop
Enabling WSL
Learning containers
Managing images and volumes
Higher RAM usage
Using Node.js directly gives you:
Faster setup
Lower resource usage
Easier debugging
More control over files and configurations
If your goal is learning or lightweight automation, Node.js installation is often simpler.
Install Node.js LTS
n8n requires Node.js to execute. We will use the Long-Term Support (LTS) version 22 for stability.
Download the Windows Installer (.msi) for the Node 22LTS version.
Run the installer. Accept the license agreement and click Next through the defaults.
Crucial: Ensure the “Node.js runtime” and “npm package manager” options are selected to be installed on your local hard drive.
Finish the installation.
To verify that Node.js and npm (Node Package Manager) are correctly configured in your system environment variables, open PowerShell or Command Prompt and type:
Bash
node -v
npm -v
You should see version numbers returned for both commands (e.g., v22.x.x or higher).
Install the n8n Package Globally
With npm ready, you can install n8n directly into your global Node directory. Open an Administrator PowerShell session (Right-click Start -> Terminal (Admin) or PowerShell (Admin)) and run:
npm install -g n8n
Note: The -g flag tells npm to install it globally so you can trigger the n8n command from any directory on your computer.
Install Python
Some dependencies require Python during build.
Install Python 3 and enable:
Add Python to PATH or Download from Microsoft Store
Verify:
python --version
Launch n8n Natively
To start your local self-hosted instance, simply type:
n8n
The terminal will boot up the n8n backend engine. Once initialized, look for the success message indicating your local URL:
n8n ready.
Editor is accessible via: http://localhost:5678/
Keep this terminal window open. Open your web browser, navigate to http://localhost:5678/, and set up your owner account credentials.
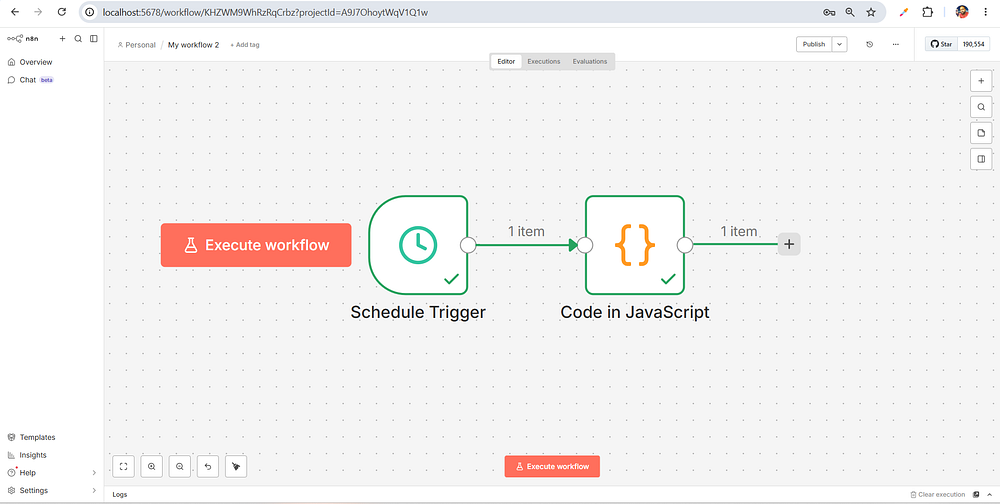
Building a Simple Local Test Workflow
Before pushing to the cloud, let’s build a lightweight workflow to ensure your local execution engine is functioning perfectly. We will create a workflow that checks the current time and logs a custom message.
Step 1: Create a Trigger
Inside your new n8n dashboard, click Add first step or click the + icon in the canvas.
Search for Schedule Trigger (this functions like a local cron job).
Set the interval to Every Minute or Every Hour for testing.
Step 2: Add an Action Node
Drag a line from the Schedule Trigger node to open the node creation menu.
Search for the Code node.
Select JavaScript as the language mode.
Replace the default snippet with a clean, simple object mapping:
JavaScript
return [ {json: {status:"Success",message:"n8n is running flawlessly on Windows 11 without Docker!",timestamp:newDate().toISOString() } }];
Step 3: Test and Activate
Click Execute Workflow at the bottom of the screen.
2. You will see green checkmarks appear over both nodes. Click the Code node to inspect the output data and verify your success message.
Deploying n8n to Render (Free Tier)
Now that you have mastered n8n locally, you don’t want to leave your Windows machine running 24/7 just to execute automations. We can offload this to Render, a powerful cloud platform that offers a free tier.
While we are avoiding Docker on our local Windows machine, Render natively uses Docker behind the scenes to spin up web services. The beautiful part? Render reads a pre-configured Docker blueprint file and builds it automatically. You don’t need Docker installed on your computer to deploy it there.
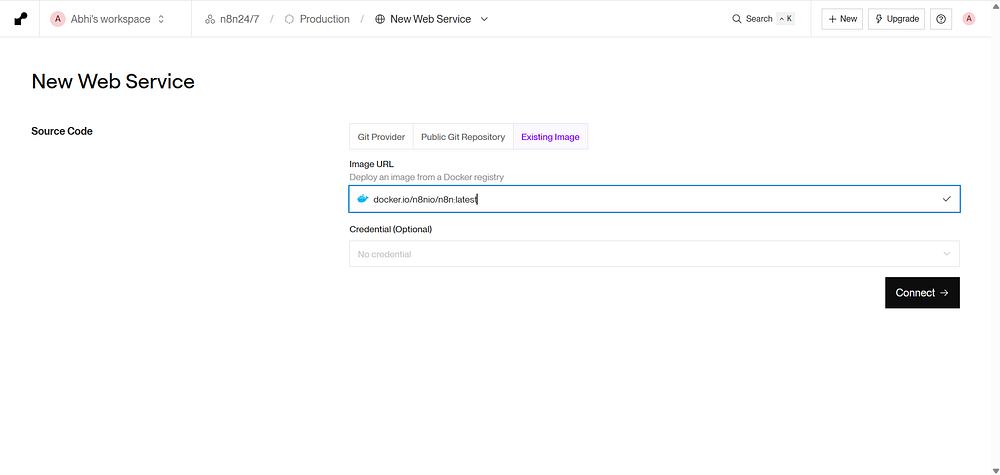
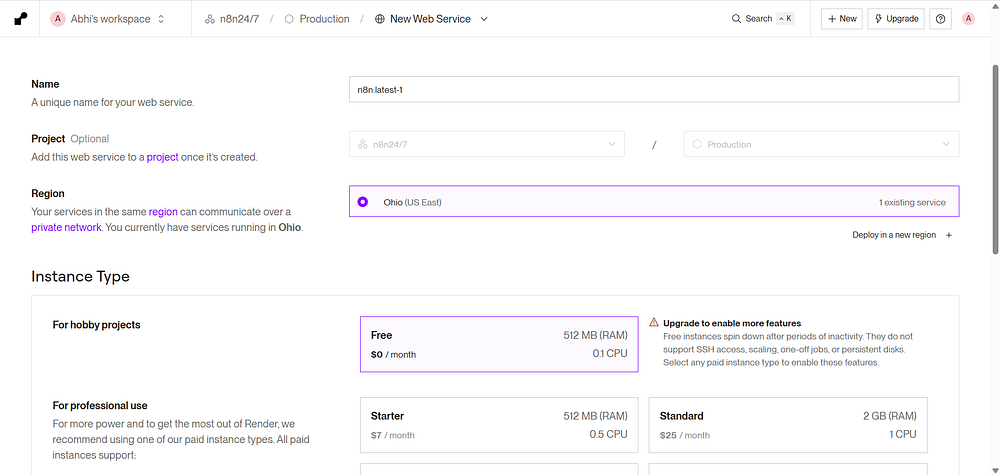
Connect and Configure on Render
Go to Render and sign up using your GitHub account.
From your Render dashboard, click New + and select Web Service.
Select Existing Image option.
Image URL :- docker.io/n8nio/n8n:latest
Click on Deploy Web Service. Render will start service perform necessary steps, download the n8n package, and provide you with a live public URL (e.g., https://my-n8n-instance.onrender.com).
Keeping Render Active 24/7 (Bypassing the Free-Tier Spin Down)
The Problem: Render’s free tier sleeps after 15 minutes of inactivity, causing your workflows to stop.
The Solution: Use a free external cron job service to ping your n8n URL regularly, keeping it awake 24/7.
Render’s free tier has an auto-sleep feature: If your web service does not receive any inbound web traffic for 15 minutes, it spins down to a suspended state. When an automation needs to run, it takes over 30 seconds for the server to wake up, causing delayed runs or timed-out webhooks.
To bypass this without paying a cent, we can use an external, cloud-hosted cron service to send a “ping” to our n8n instance every 10–14 minutes, keeping it perpetually awake.
We also have other options available, such as UptimeRobot.
Migration from Local to Render
Step 1: Export Workflows Locally
Open local n8n (http://localhost:5678)
Open each workflow
Click “…” → “Export or Download”
Save as .json files
Step 2: Import to Render n8n
Open Render n8n (https://your-app.onrender.com)
Click “Workflow” → “Import”
Upload JSON files
Reconnect credentials (API keys are not exported for security)
Conclusion
Overall, running n8n locally on Windows with Node.js while deploying to a remote server using Docker creates a smoother and more practical workflow. It avoids the headaches of local virtualization, keeps development lightweight, and still gives you a stable production setup in the cloud. By separating local development from deployment, you get a setup that’s easier to manage, more flexible, and better suited for day-to-day work — without needing Docker installed locally.
If you’ve ever caught yourself doing the same digital task over and over — copying data from one app to another, sending the same type of email, checking for updates manually — you already understand why automation exists.
Unlike many automation platforms that lock you into their ecosystem, n8n gives you something rare: the power to run it yourself, customize it completely, and connect it to almost anything — including AI models. Whether you’re a solo developer, a growing startup, or a technical team lead, n8n meets you where you are.
This guide is not a surface-level overview. We’re going deep — from installing n8n and building your first workflow to writing custom JavaScript nodes and deploying AI agents that can think, decide, and act on your behalf.
Let’s get into it.
What Is n8n and Why Should You Care?
n8n (pronounced “n-eight-n,” short for “nodemation”) is an open-source workflow automation platform. Think of it as the connector layer between every app, API, database, and service you use.
Here’s what makes n8n different from the crowd:
It’s open-source. You can self-host it, inspect its code, and modify it freely.
It supports code. When the visual editor isn’t enough, you can drop in JavaScript or Python directly.
It has native AI capabilities. n8n has built-in support for LangChain, OpenAI, Anthropic, and other AI tools — making it one of the best platforms for building AI agents.
It’s node-based. Every action in n8n is a “node,” and you connect nodes visually to create workflows.
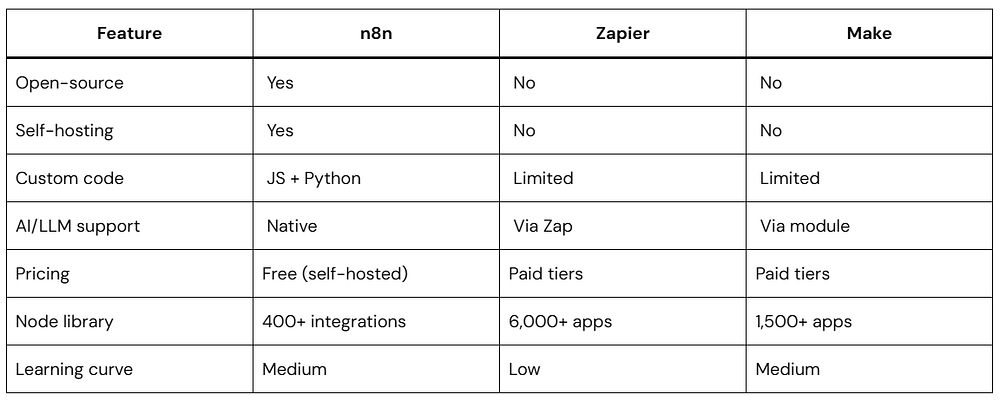
If you’ve used Zapier or Make (formerly Integromat), you already have a mental model for what n8n does. But n8n goes further — it’s more flexible, more powerful, and far more customizable.
n8n vs. Other Automation Tools
Before you invest time learning a tool, it’s worth understanding where it stands.
The trade-off is real: n8n requires more setup than Zapier, but you gain control, cost savings (especially at scale), and capabilities that the others simply can’t match — especially when it comes to AI workflows.
Installing n8n: Three Ways to Get Started
Option A: Run It Locally with npx (Fastest)
If you have Node.js installed (version 18 or higher), this is the quickest way to try n8n:
N8N_BASIC_AUTH_ACTIVE — Enables a login screen so only you can access the instance.
DB_TYPE=postgresdb — Uses PostgreSQL for storing workflow data reliably (better than SQLite for production).
WEBHOOK_URL — Tells n8n what public URL to use when generating webhook links for external services.
The volumes section maps persistent storage so your data survives container restarts.
Start it with:
docker-compose up -d
Understanding the n8n Interface
Once you open n8n, you’ll see a canvas-based editor. Here’s what each part does:
Canvas: The main area where you drag, drop, and connect nodes. Think of it as your visual workflow builder.
Node Panel (left sidebar): A searchable library of all available integrations and utility nodes. Click any node to add it to the canvas.
Node Settings (right panel): When you click a node on the canvas, its configuration appears here — inputs, outputs, credentials, and options.
Executions Tab: A history of every time your workflow ran, with full input/output data for debugging.
Credentials Manager: A secure vault for storing API keys, OAuth tokens, and database passwords. You set these once and reference them across workflows.
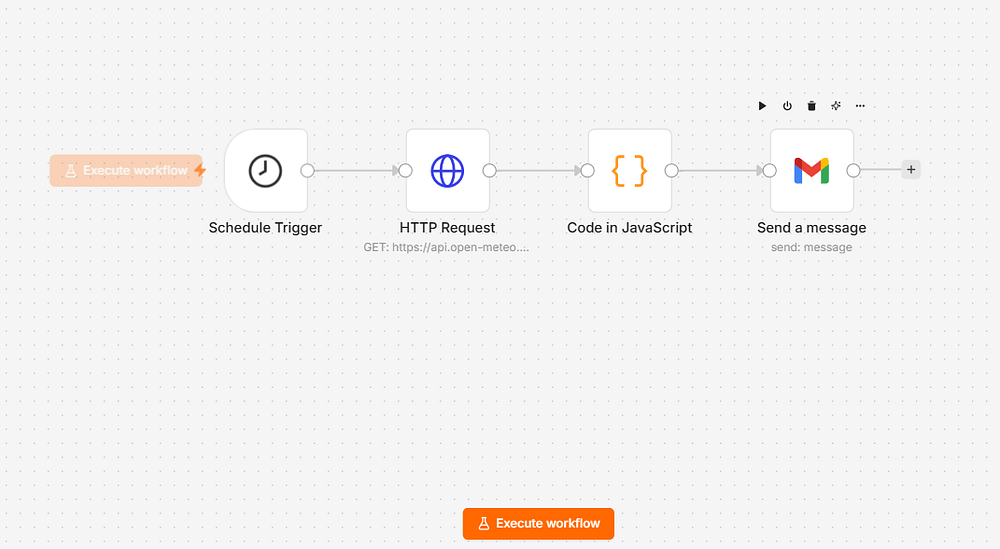
Your First Workflow: A Real-World Example
Let’s build something practical: a workflow that checks a weather API every morning and sends you an email summary.
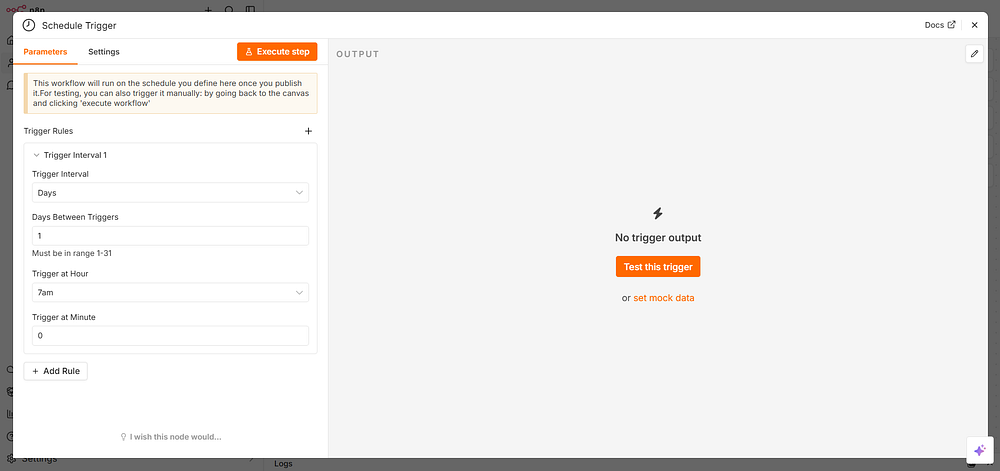
Step 1: Add a Schedule Trigger
Click the + button or search for “Schedule” in the node panel. Add the Schedule Trigger node.
Configure it:
Rule: Every Day
Hour: 7 (for 7:00 AM)
Minute: 0
This node fires automatically at 7 AM every day — no code needed.
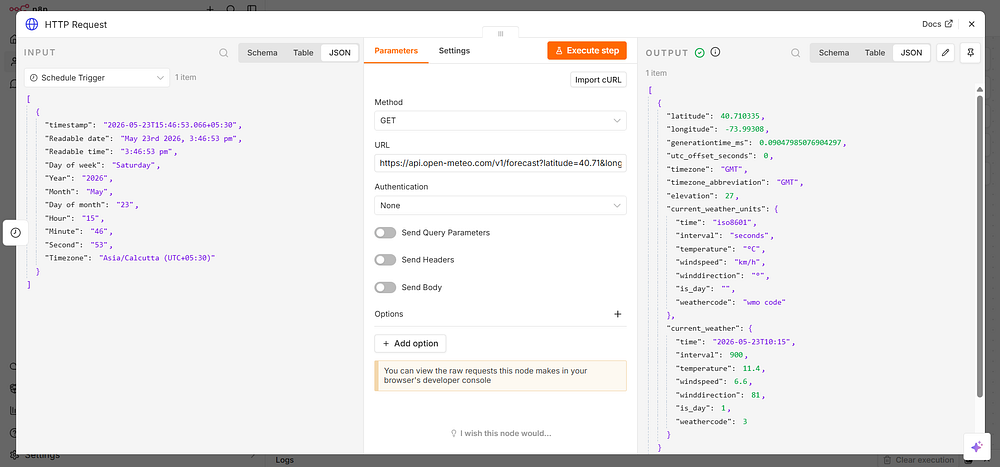
Step 2: Fetch Weather Data
Add an HTTP Request node and connect it to the Schedule Trigger.
Message: Click the expression icon {} next to the field and type:
{{ $json.summary }}
This pulls the summary field from the Code node’s output directly into the email body.
Note: Allow all OAuth scopes for it to work properly.
Step 5: Test and Activate
Click ExecuteWorkflow to run it immediately and verify the email arrives. If everything looks good, toggle Active in the top-right corner.
Your first n8n automation is live.
n8n recommends self-hosting for experienced users only. Configuration mistakes can lead to downtime, security risks, or data loss. If you’re just trying out n8n or want to save time on setup and configuration, use n8n Cloud.
Core n8n Concepts You Must Know
Nodes
Every action in n8n is a node. There are several types:
Trigger nodes — Start a workflow (schedule, webhook, app event)
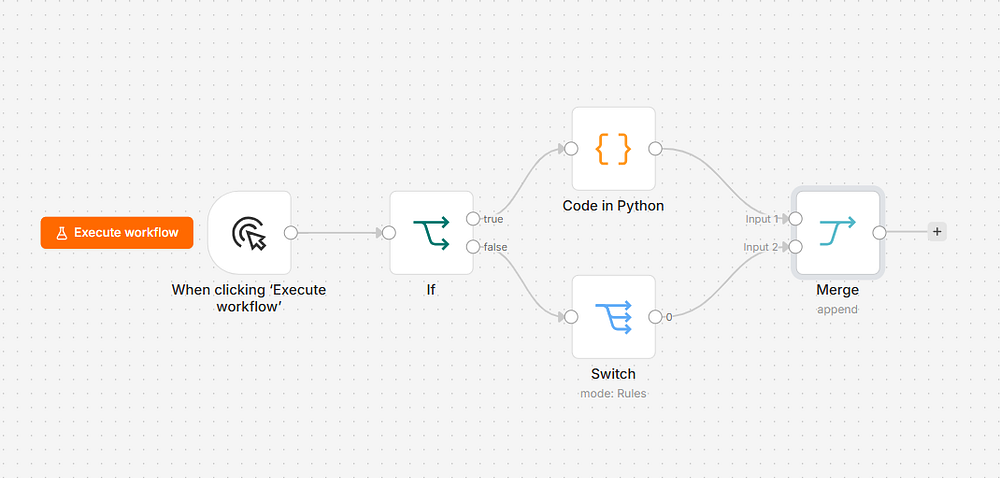
Core nodes — Transform or control data flow (IF, Switch, Merge, Code, Set)
AI nodes — Interact with language models and AI tools
Items
n8n processes data as items — each item is a JSON object. A node can output one item or hundreds. Understanding this is key to working with lists, loops, and batch operations.
For example, if you fetch a list of 10 customers from a database, n8n creates 10 items — one per customer. Every downstream node then runs once per item by default.
Expressions
Expressions let you reference data dynamically using the {{ }} syntax.
You connect nodes by dragging from one node’s output dot to another node’s input dot. Data flows left to right. A node can have multiple outputs (used in IF/Switch nodes for branching).
Working with Data in n8n
The Set Node
Use the Set node to add, rename, or remove fields from your data.
Example use case: You get a response from an API with a field called cust_id, but downstream you need it called customerId. The Set node handles that rename cleanly without writing code.
The Code Node
When the visual nodes aren’t enough, the Code node lets you write raw JavaScript (or Python) to transform data any way you need.
Here’s a practical example — flattening a nested API response:
JavaScript
// Input: items with nested address objects// Goal: pull city and country up to the top levelreturn$input.all().map(item=> {constdata = item.json;return {json: {name:data.name,email:data.email,city:data.address?.city || 'Unknown',country:data.address?.country || 'Unknown',// Drop the nested address object } };});
$input.all() — returns every item from the previous node as an array.
.map() — transforms each item and returns a new version.
Many APIs return results in pages. Here’s an n8n pattern using a Loop node:
Start with page 1
Fetch data
Check if there’s a next_page in the response
If yes, increment the page number and loop back
If no, exit the loop and merge all collected data
You can implement this with the Loop Over Items node combined with a Code node that tracks state:
JavaScript
// Code node: check if we should continue fetchingconstresponse = $input.first().json;// If the API returns a next_page_token, keep goingif (response.next_page_token) {return [{json: { ...response,shouldContinue:true,nextToken:response.next_page_token } }];}// Otherwise, signal we're donereturn [{json: { ...response,shouldContinue:false }}];
Writing Custom JavaScript in n8n
The Code node is where n8n becomes genuinely powerful. Here are patterns you’ll use constantly.
Filtering Items
JavaScript
// Only keep customers who signed up in the last 30 daysconstthirtyDaysAgo = newDate();thirtyDaysAgo.setDate(thirtyDaysAgo.getDate() - 30);return$input.all().filter(item=> {constsignupDate = newDate(item.json.created_at);returnsignupDate >= thirtyDaysAgo;}).map(item=> ({ json:item.json }));
Grouping Items
JavaScript
// Group orders by customer IDconstorders = $input.all();constgrouped = {};for (constorderoforders) {constcustomerId = order.json.customer_id;if (!grouped[customerId]) {grouped[customerId] = {customer_id:customerId,orders: [],total:0 }; }grouped[customerId].orders.push(order.json);grouped[customerId].total += order.json.amount;}// Return one item per customerreturnObject.values(grouped).map(group=> ({ json:group }));
Working with Dates
JavaScript
// Format a timestamp for a reportconstitem = $input.first().json;constdate = newDate(item.timestamp);return [{json: { ...item,formatted_date:date.toLocaleDateString('en-US', {weekday:'long',year:'numeric',month:'long',day:'numeric' }),days_since:Math.floor((Date.now() - date) / (1000 * 60 * 60 * 24)) }}];
Making HTTP Calls Inside Code Nodes
n8n’s Code node supports $http for making API calls directly from JavaScript:
JavaScript
// Fetch additional data for each itemconstresults = [];for (constitemof$input.all()) {constuserId = item.json.id;// Make an API call for each userconstresponse = await$http.get({url:`https://api.softaai.com/users/${userId}/profile`,headers: {'Authorization':'Bearer your_token_here' } });results.push({json: { ...item.json,profile:response.data } });}returnresults;
Important: Use await for async operations inside Code nodes. n8n handles the async context for you.
Error Handling and Workflow Reliability
Production workflows fail. An API goes down, a webhook sends unexpected data, a rate limit kicks in. n8n gives you tools to handle this gracefully.
n8n has a built-in Error Trigger node. Create a separate “error handling” workflow, start it with an Error Trigger, and configure your main workflows to call it on failure.
Your error workflow can:
Send you a Slack message with the error details
Log the error to a Google Sheet
Retry the failed workflow after a delay
Create a ticket in your project management tool
Setting Up Retries
For any node that makes an external call, you can enable retries in the node settings:
Retry On Fail: Enabled
Max Tries: 3
Wait Between Tries: 5000ms (5 seconds)
This is especially useful for flaky APIs or rate-limited services.
Building AI-Powered Workflows in n8n
This is where n8n truly pulls ahead of other automation tools. n8n has native LangChain integration, meaning you can build sophisticated AI pipelines visually.
Add a Chat OpenAI (OpenAI Chat Model) node to your workflow
Click on Credentials → Create New
Paste your OpenAI API key
Configure the model, temperature, and system prompt
Model: gpt-4o
System Prompt: You are a professional summarizer. Take the article text provided and return a 3-sentence summary that captures the key points. Be concise and factual.
User Message: {{ $json.content }}
Classifying Data with AI
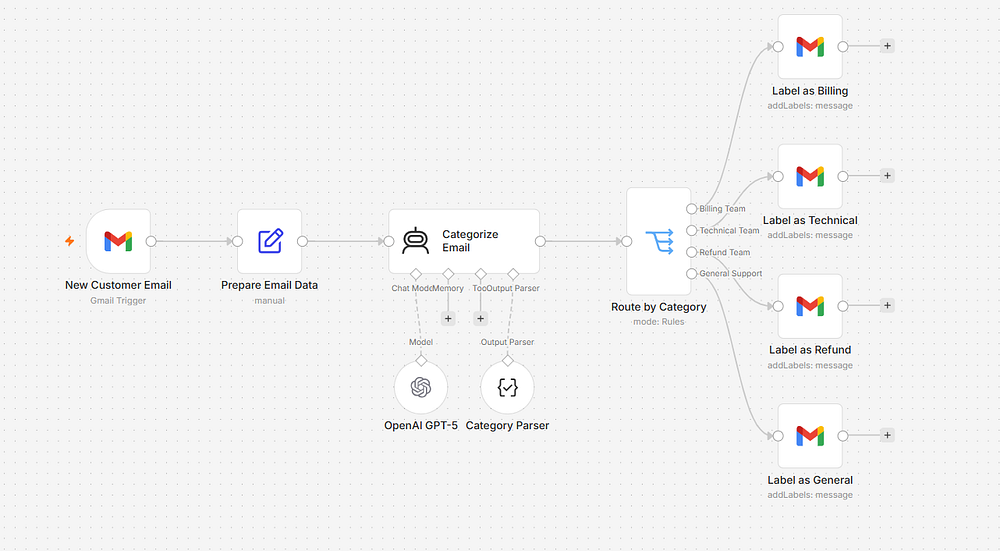
Here’s a workflow that uses n8n + OpenAI to automatically categorize customer support emails:
Gmail Trigger → Code Node (extract body) → OpenAI → IF Node → Route to correct team
The Code node that prepares the prompt:
JavaScript
constemail = $input.first().json;return [{json: {emailId:email.id,from:email.from,subject:email.subject,body:email.snippet,prompt:`Classify this customer email into exactly one category: BILLING, TECHNICAL, GENERAL, or REFUND.Email Subject: ${email.subject}Email Body: ${email.snippet}Respond with only the category name, nothing else.` }}];
The OpenAI node uses {{ $json.prompt }} as the user message. The output goes into an IF node that checks {{ $json.message.content }} for the category name.
n8n AI Agents: The Next Level
An AI agent in n8n isn’t just a node that calls an LLM — it’s a workflow that can reason, use tools, and take actions based on that reasoning.
n8n’s Agent node supports the ReAct (Reasoning + Acting) pattern. Here’s what that means in practice:
You give the agent:
A goal (“Research this company and summarize what they do”)
A set of tools it can use (web search, database lookup, email sending)
A starting input
The agent then decides which tools to use, in what order, and when it’s done — without you hardcoding that logic.
Building an AI Research Agent
Here’s a full agent setup in n8n:
Trigger → AI Agent Node
Agent Node configuration:
System Message:
You are a business research assistant. When given a company name, you will:
1. Search for their website and core business description
2. Look for recent news about the company
3. Summarize your findings in 3-5 bullet points

Always be factual. If you can't find information, say so clearly.
Tools connected to the agent:
HTTP Request tool — lets the agent fetch web pages
SerpAPI tool — lets the agent run Google searches
Code tool — lets the agent run JavaScript for data processing
The agent decides autonomously which tools to invoke and how many times. You just pass in the company name and get back a structured research report.
Memory in n8n Agents
For agents that need to remember context across multiple runs (like a customer service bot), connect a Memory node:
Window Buffer Memory — remembers the last N messages in a conversation
Postgres Chat Memory — stores conversation history in a database for long-term persistence
Example: A support chatbot that remembers what a customer said 3 messages ago:
Chat Trigger → AI Agent (with Window Buffer Memory → OpenAI) → Respond to Chat
The Memory node automatically retrieves and injects previous messages into the agent’s context — no extra code needed.
Scheduling, Triggers, and Real-Time Automation
Types of Triggers in n8n
Schedule Trigger Runs workflows on a fixed schedule. Uses cron syntax for precision:
Every weekday at 9 AM:    0 9 * * 1-5
Every 15 minutes:         */15 * * * *
First day of each month:  0 0 1 * *
Webhook Trigger Creates an HTTP endpoint that external services can call. n8n gives you a unique URL like:
Set your WEBHOOK_URL environment variable to the ngrok URL, and webhook testing works perfectly from your local machine.
n8n Best Practices for Production Workflows
After building dozens of workflows, these are the habits that separate clean, maintainable automations from ones that break at 3 AM.
Name Everything
Every node in n8n has a name. Use it. Instead of “HTTP Request1” and “HTTP Request2,” name them “Fetch Customer Data” and “Update Order Status.” Future-you will thank current-you.
Use Environment Variables for Secrets
Never hardcode API keys, passwords, or URLs in your workflow. Use n8n’s Credentials system for authentication, and environment variables for configuration:
Access them in workflows via $env.N8N_API_BASE_URL.
Keep Workflows Focused
One workflow should do one thing well. Instead of a 40-node mega-workflow, break it into:
Workflow A: Collect and validate data
Workflow B: Process and enrich data
Workflow C: Send notifications
Use the Execute Workflow node to chain them together. This makes debugging infinitely easier.
Add Monitoring
For important workflows, add a final node that logs the result:
JavaScript
// Logging node at the end of critical workflowsconstresult = $input.first().json;consttimestamp = newDate().toISOString();// Log to your monitoring systemconsole.log(JSON.stringify({workflow:$workflow.name,timestamp,itemsProcessed:$input.all().length,success:true}));return$input.all();
Test Edge Cases
Before activating a workflow, manually test it with:
An empty dataset (what happens with zero items?)
Missing required fields
Unexpected data types (string where a number is expected)
Very large datasets
Common n8n Mistakes and How to Avoid Them
Mistake 1: Forgetting that nodes process items individually
By default, most nodes run once per item. If you have 100 items and add an HTTP Request node, it makes 100 separate API calls. This can blow through rate limits fast.
Fix: Use the Split In Batches node to process items in groups, with delays between batches.
Mistake 2: Not pinning test data
When you run a test, n8n captures the output of each node. You can pin this data so the node always returns it during development, even if the real API is down.
Click the pin icon on any executed node to lock its output. This is huge for building workflows that depend on external services you don’t want to call repeatedly.
Mistake 3: Using the wrong data reference
There’s a common confusion between:
$json — refers to the current item’s data
$node["Node Name"].json — refers to a specific node’s output
If your expression returns undefined, double-check which one you need.
Mistake 4: Ignoring the Executions tab
Every workflow run is logged in the Executions tab with full input/output data at every node. This is your best debugging tool. Get in the habit of checking it the moment something behaves unexpectedly.
Mistake 5: Not handling null/undefined values
APIs return inconsistent data. A field might exist in 99 records and be missing from 1. Always use defensive coding:
n8n’s self-hosted version is free and open-source under the Sustainable Use License. The cloud version (n8n.io) has a free tier and paid plans. For most solo developers and small teams, self-hosting on a $5–10/month VPS is the most cost-effective option.
Q: How many integrations does n8n have?
As of 2026, n8n has over 400 built-in integrations — covering CRMs, email providers, databases, cloud storage, payment processors, communication tools, and AI platforms. Plus, the HTTP Request node lets you connect to any service with an API, even if there’s no native node.
Q: Can n8n replace a backend developer?
For straightforward automation tasks and API orchestration, absolutely yes. For complex business logic, high-traffic applications, or custom user-facing features — n8n handles a lot, but you’ll likely want it as a complement to a codebase rather than a replacement for one.
Q: Is n8n secure for handling sensitive data?
Self-hosted n8n keeps all data within your own infrastructure. Credentials are encrypted at rest. For regulated industries (healthcare, finance), self-hosting with proper access controls, SSL, and audit logging is entirely viable. Review n8n’s security documentation and ensure your server follows standard hardening practices.
Q: How does n8n compare to building automation with code?
n8n is dramatically faster for building automation than writing it from scratch. What might take a developer a full day to build (API integrations, error handling, scheduling, logging) takes minutes in n8n. The Code node ensures you’re never blocked when you hit the limits of the visual editor.
Conclusion
n8n is one of those tools that genuinely changes how you work. Once you start building workflows, you’ll find yourself automating things you never thought to question — and getting hours of your week back.
Start small. Build the weather email workflow from this guide. Then add a second step. Then try connecting it to an AI model. Before long, you’ll have a personal automation layer that runs silently in the background, handling dozens of repetitive tasks while you focus on the work that actually matters.
The best automation is the one you build today — even if it’s imperfect. n8n makes iteration fast, and every workflow you ship teaches you something that makes the next one better.
If you’ve been following the AI space lately, you’ve probably bumped into the term MCP (Model Context Protocol) more than once. It’s showing up in developer communities, AI tooling discussions, and product announcements — and for good reason.
But what actually is MCP? Is it just another buzzword, or does it solve a real problem?
Spoiler: it solves a very real, very annoying problem.
In this post, we’re going to break down MCP (Model Context Protocol) from the ground up — what it is, why it was created, how it works under the hood, and how you can actually use it.
The Problem MCP Was Built to Solve
Before we define MCP, let’s talk about the frustration that led to its creation.
Large Language Models (LLMs) like Claude, GPT-4, or Gemini are incredibly powerful at generating text, reasoning through problems, and answering questions. But here’s the catch: they don’t inherently know anything about your world.
They don’t know what’s in your database. They can’t read your company’s internal documents on their own. They have no idea what your codebase looks like. And without the right setup, they can’t take actions on your behalf — like sending an email, creating a task, or querying a live API.
For a while, developers worked around this by building custom integrations for every single tool. Want your AI assistant to read from your Notion database? Write a custom connector. Want it to pull data from Salesforce? Write another one. Want it to check your calendar? Yet another bespoke integration.
This approach doesn’t scale. Every new tool requires new engineering work. Every new AI model might need the integrations rewritten. It’s a mess of brittle, one-off code that nobody wants to maintain.
That’s the exact problem MCP (Model Context Protocol) was designed to solve.
What Is MCP (Model Context Protocol)?
MCP, which stands for Model Context Protocol, is an open standard introduced by Anthropic in late 2024. Think of it as a universal plug-and-play connector between AI models and the tools, data sources, and services they need to interact with.
In simpler terms:
MCP (Model Context Protocol) is to AI what USB-C is to devices — a single, standardized interface that works across different systems.
Instead of building a custom integration for every AI model + every tool combination, MCP defines one protocol. Any AI application that supports MCP can talk to any MCP-compatible server. Build the connector once, use it everywhere.
Anthropic released MCP as an open-source protocol, which means the community can build on it, extend it, and implement it across different AI platforms — not just Claude.
Why MCP Matters
Let’s put this in perspective with a quick analogy.
Before USB became standard, every device had its own proprietary connector. Your printer used one cable, your keyboard used another, your camera used yet another. It was a nightmare.
USB changed everything. One standard connector. Any device. Any computer. Just plug in and it works.
MCP (Model Context Protocol) is doing the same thing for AI.
Before MCP, connecting an AI model to a tool looked like this:
Developer writes custom integration code
That code is model-specific and tool-specific
When either the model or the tool changes, the integration might break
Scaling to 10 tools means 10 separate integrations
With MCP (Model Context Protocol), the picture changes dramatically:
Tools expose themselves via a standard MCP server
AI models connect through a standard MCP client
Any MCP-compatible model works with any MCP-compatible tool
Adding a new tool is as simple as spinning up a new MCP server
This unlocks what the AI community calls truly agentic AI — models that can actually do things in the world, not just talk about them.
The Core Architecture of Model Context Protocol
Now let’s get into how MCP actually works. The protocol has a clean, three-part architecture.
1. MCP Hosts
The MCP Host is the AI application the end user interacts with. This is where the LLM lives and runs. Examples include:
Claude Desktop
An AI-powered coding tool like Cursor
A custom chatbot you build on top of Claude’s API
Any LLM-based application that supports the MCP client protocol
The host is responsible for managing MCP client connections and deciding which servers to connect to.
2. MCP Clients
The MCP Client lives inside the host application. It’s the piece of software that handles the communication layer — sending requests to MCP servers and receiving results back. Think of it as the “translator” that speaks the MCP language on behalf of the AI model.
One MCP client can maintain connections to multiple MCP servers simultaneously.
3. MCP Servers
MCP Servers are lightweight programs that expose specific capabilities to AI models. Each server wraps a tool, data source, or service and presents it in a standardized way that MCP clients understand.
For example:
A filesystem MCP server lets the AI read and write local files
A database MCP server lets the AI query a SQL database
A GitHub MCP server lets the AI create issues, read code, and manage pull requests
A Slack MCP server lets the AI send messages and read channels
The beauty of MCP is that once you have an MCP server for a tool, any MCP-compatible AI model can use it.
The Three Primitives of Model Context Protocol
MCP defines three core building blocks — called primitives — that servers can expose to AI models. Understanding these is key to understanding what MCP can actually do.
Primitive 1: Tools
Tools are executable functions that the AI model can call. They represent actions — things the AI can do.
Examples of tools:
search_web(query) — perform a web search
create_issue(title, body) — create a GitHub issue
send_email(to, subject, body) — send an email
run_query(sql) — execute a database query
When the AI wants to use a tool, it generates a structured “tool call” — basically saying “I want to invoke this function with these arguments.” The MCP server receives the call, executes the action, and returns the result.
Primitive 2: Resources
Resources are data sources the AI model can read from. They represent context — information the AI can know.
Examples of resources:
A file on your local system
A database record
A page from your company wiki
An API response
Resources are identified by URIs (like file:///home/user/docs/report.pdf or database://customers/123) and are streamed to the model as needed.
Primitive 3: Prompts
Prompts in the MCP context are pre-built, reusable prompt templates that servers can expose. Think of them as “saved workflows” or “starter templates” that guide the AI toward specific tasks in a consistent, reliable way.
For example, a code review server might expose a prompt template called code_review that structures the AI’s output in a standardized format your team expects.
How MCP Actually Works?
Let’s walk through a real-world scenario to see MCP in action.
Scenario: You’re using an AI coding assistant powered by Claude. You ask it: “Look at the open GitHub issues in my repo and create a summary report, then save it to my desktop.”
Here’s what happens behind the scenes with Model Context Protocol:
Step 1 — The request hits the LLM: Your message is sent to Claude (the MCP host). Claude analyzes your request and identifies that it needs two capabilities: access to GitHub and the ability to write a file.
Step 2 — The MCP client queries available servers: The MCP client checks which MCP servers are currently connected. It finds a GitHub MCP server and a filesystem MCP server.
Step 3 — Claude calls the GitHub tool: Claude generates a tool call like:
The MCP client sends this to the GitHub MCP server.
Step 4 — The GitHub server executes and responds: The GitHub MCP server calls the GitHub API, retrieves the open issues, and returns structured data to the MCP client, which passes it back to Claude.
Step 5 — Claude processes and plans: Claude reads the issues and composes a summary. Then it generates another tool call to write the file:
JSON
{"tool": "write_file","arguments": {"path": "/Users/me/Desktop/issues-summary.md","content": "# Open Issues Summary\n\n..." }}
Step 6 — The filesystem server executes: The filesystem MCP server writes the file to your desktop and confirms success.
Step 7 — Claude responds to you: Claude tells you: “Done! I’ve summarized the 12 open issues and saved the report to your desktop.”
All of this happened through clean, standardized MCP (Model Context Protocol) communication — no custom glue code required.
MCP Communication: The Technical Side
Under the hood, MCP uses a well-defined communication protocol. Here’s how it works technically.
Transport Layer
MCP supports two primary transport mechanisms:
1. stdio (Standard Input/Output): Used for local MCP servers running on the same machine as the host. The host spawns the server as a subprocess and communicates through stdin/stdout. This is the most common setup for local tools like filesystem access or running terminal commands.
2. HTTP with SSE (Server-Sent Events): Used for remote MCP servers. The client makes HTTP requests, and the server can stream responses back using SSE. This is ideal for cloud-hosted tools and services.
Message Format
MCP uses JSON-RPC 2.0 as its message format — a lightweight, human-readable standard for remote procedure calls.
{"jsonrpc": "2.0","id": 1,"result": {"content": [ {"type": "text","text": "Here are the top results for 'MCP Model Context Protocol tutorial'..." } ] }}
Clean. Structured. Predictable. That’s what makes MCP (Model Context Protocol) so reliable to build on.
Building Your First MCP Server: A Real Example
Let’s look at a practical code example. We’ll build a simple MCP server in Python using the official MCP SDK that exposes a single tool: a weather lookup function.
Install the MCP SDK
pip install mcp
Create the MCP Server
Python
# weather_server.pyfrom mcp.server import Serverfrom mcp.server.stdio import stdio_serverfrom mcp.types import Tool, TextContentimport json# Initialize the MCP server with a nameapp = Server("weather-server")# Register the list of tools this server exposes@app.list_tools()asyncdeflist_tools() -> list[Tool]:return [ Tool(name="get_weather",description="Get the current weather for a given city",inputSchema={"type": "object","properties": {"city": {"type": "string","description": "The name of the city to get weather for" } },"required": ["city"] } ) ]# Define what happens when the tool is called@app.call_tool()asyncdefcall_tool(name: str, arguments: dict) -> list[TextContent]:if name == "get_weather": city = arguments.get("city", "Unknown")# In a real app, you'd call a weather API here# For this example, we're returning mock data weather_data = {"city": city,"temperature": "22°C","condition": "Partly Cloudy","humidity": "65%","wind": "12 km/h" }return [ TextContent(type="text",text=json.dumps(weather_data, indent=2) ) ]# If an unknown tool is called, raise an errorraiseValueError(f"Unknown tool: {name}")# Run the server using stdio transport (for local use)asyncdefmain():asyncwith stdio_server() as (read_stream, write_stream):await app.run(read_stream, write_stream, app.create_initialization_options())if__name__ == "__main__":import asyncio asyncio.run(main())
We create a Server instance and give it a name ("weather-server"). This name helps MCP clients identify what the server does.
The @app.list_tools() decorator tells the MCP client what tools this server exposes. We define the tool name, a human-readable description, and an input schema (so the AI knows what arguments to pass).
The @app.call_tool() decorator handles incoming tool calls. When Claude (or any MCP client) asks our server to run get_weather, this function executes and returns the result.
We use stdio_server() so this runs as a local process that communicates through standard input/output.
Connect It to Claude Desktop
To make Claude Desktop use your new MCP server, add it to the MCP configuration file (typically at ~/Library/Application Support/Claude/claude_desktop_config.json on macOS):
It tells Claude Desktop about your MCP server named "weather"
It specifies that Claude should start this server by running python weather_server.py
Claude will automatically launch this process when it starts and connect to it via MCP (Model Context Protocol)
After restarting Claude Desktop, it will automatically discover the get_weather tool and make it available during conversations. You can literally type “What’s the weather in Tokyo?” and Claude will use your custom tool to answer.
MCP vs. Traditional API Integration
You might be wondering: how is this different from just calling APIs directly?
It’s a fair question. Let’s compare.
The key difference is standardization and discoverability. With traditional integrations, the AI model has no structured way to discover what tools exist, what arguments they take, or how to handle errors. MCP (Model Context Protocol) bakes all of that in.
Real-World Model Context Protocol Use Cases
MCP isn’t just a theoretical concept. It’s already powering real applications. Here are some compelling use cases:
AI-Powered Development Environments
Coding tools like Cursor and Zed use MCP to give AI models direct access to your codebase, terminal, file system, and version control. The AI doesn’t just suggest code — it can actually read your files, run tests, check git history, and make changes.
Business Intelligence and Reporting
Connect your AI assistant to your company’s database via an MCP server. Ask natural language questions like “What were our top 5 products by revenue last quarter?” and the AI writes and executes the SQL query, then formats the results.
Autonomous AI Agents
MCP (Model Context Protocol) is foundational infrastructure for building AI agents that operate with minimal human supervision. An agent can use MCP to check emails, update project management tools, search the web, and coordinate across services — all through a single standardized protocol.
Enterprise Knowledge Management
Connect an MCP server to your internal documentation system (Confluence, Notion, SharePoint). Employees can ask the AI questions and get answers grounded in your actual company knowledge base, not just general training data.
Customer Support Automation
Build an MCP server that wraps your CRM and order management system. Your AI support agent can look up real customer accounts, check order statuses, process refunds, and escalate tickets — all through MCP.
MCP Security: What You Need to Know
Security is a critical consideration with any protocol that gives AI models access to real systems. MCP takes a thoughtful approach to this.
Principle of Least Privilege
MCP servers only expose what you explicitly define. Your filesystem MCP server might only allow reading files in a specific directory — not your entire hard drive. You have fine-grained control over exactly what the AI can and cannot access.
User Consent and Approval
Many MCP implementations require explicit user approval before tools are called. The host application can show a confirmation dialog: “Claude wants to send an email to [email protected] — do you approve?” This keeps humans in the loop for sensitive actions.
Local-First for Sensitive Data
Because MCP supports stdio transport, you can run MCP servers entirely locally. Sensitive data — like your private files or internal database — never leaves your machine. The AI model sees only what the MCP server returns, not the raw connection details.
Scoped Access Tokens
When MCP servers connect to third-party APIs, they manage their own credentials and access tokens server-side. The AI model never directly handles your API keys or passwords — it just sends structured requests and receives structured responses.
The Model Context Protocol Ecosystem Today
Since Anthropic open-sourced MCP (Model Context Protocol) in November 2024, the ecosystem has grown rapidly.
Official SDKs are available in Python, TypeScript/JavaScript, Java, Kotlin, and Go — making it accessible to developers across the stack.
Pre-built MCP servers exist for dozens of popular tools, including:
GitHub, GitLab
PostgreSQL, SQLite, MySQL
Google Drive, Dropbox
Slack, Discord
Brave Search, web fetching
AWS, Docker, Kubernetes
Notion, Linear, Jira
And many more…
Model support extends beyond Claude. OpenAI, Google, and various open-source model providers have either adopted or announced plans to support MCP (Model Context Protocol), making it a genuine industry standard rather than a proprietary Anthropic technology.
This cross-company adoption is what truly validates MCP — it’s not just a company-specific feature, it’s evolving into the backbone of how AI agents interact with the world.
Common MCP Questions Answered
Q: Do I need to know a specific programming language to use MCP?
Not necessarily. If you just want to use MCP-compatible tools with Claude Desktop, you don’t need to write any code — just configure which pre-built servers to use. If you want to build a custom MCP server, Python and TypeScript are the most beginner-friendly options thanks to excellent official SDKs.
Q: Is MCP only for Claude?
No. MCP (Model Context Protocol) is an open standard. While Anthropic created it, other AI companies and open-source projects are adopting it. The goal is a universal protocol, not a Claude-exclusive feature.
Q: How is MCP different from function calling / tool use?
Function calling (as offered by OpenAI, Anthropic, and others) is a feature of individual model APIs. MCP (Model Context Protocol) is the infrastructure layer on top of that — it standardizes how tools are discovered, described, and connected across different models and applications. They work together, not against each other.
Q: Is MCP production-ready?
Yes — as of now, MCP is being used in production applications by numerous companies. The protocol itself is stable, with SDKs in active development and a growing community of contributors.
Q: Can I run MCP servers in the cloud?
Absolutely. Using the HTTP + SSE transport, you can host MCP servers on any cloud platform — AWS, GCP, Azure, or even a simple VPS. This is ideal for tools that your whole team needs to share, like a company-wide database connector.
The Future of MCP (Model Context Protocol)
We’re still in the early days of what MCP (Model Context Protocol) makes possible, but the trajectory is clear.
As AI models become more capable and agentic — capable of planning and executing multi-step tasks autonomously — the need for reliable, standardized infrastructure becomes more critical. MCP is positioning itself as that infrastructure.
A few exciting directions on the horizon:
Multi-agent coordination: MCP is evolving to support communication between AI agents, not just between AI and tools. This opens the door to complex multi-agent systems where specialized agents collaborate through a shared MCP layer.
Richer resource types: Future versions of MCP will support richer resource formats — structured data, real-time streams, and binary content — expanding what AI models can perceive and act on.
Standardized auth flows: The community is working on standardized authentication patterns built into MCP, so connecting to OAuth-protected services becomes seamless and secure by default.
Edge deployment: Running lightweight MCP servers on edge devices will enable AI models to interact with local hardware, IoT sensors, and offline-capable tools.
The vision is a world where any AI model can securely and reliably connect to any tool, data source, or service — through a single, open protocol. MCP is the bet that this vision is not just desirable, but achievable.
Quick Recap: MCP in a Nutshell
Let’s summarize everything we’ve covered:
What it is: MCP (Model Context Protocol) is an open standard for connecting AI models to tools, data sources, and services in a standardized way.
Why it matters: It replaces a fragmented landscape of custom integrations with one universal protocol — dramatically reducing development effort and improving reliability.
How it works: MCP uses a client-server architecture where AI hosts connect to MCP servers via either stdio (local) or HTTP+SSE (remote), using JSON-RPC 2.0 messages.
Three primitives: Tools (actions the AI can take), Resources (data the AI can read), and Prompts (reusable templates the AI can use).
Who it’s for: Developers building AI applications, teams wanting to give their AI assistants access to internal tools, and anyone building autonomous AI agents.
Ecosystem status: Growing rapidly, with official SDKs in 5+ languages, dozens of pre-built servers, and cross-industry adoption beyond just Anthropic.
Conclusion
If you’re building anything in the AI space right now, MCP (Model Context Protocol) deserves your serious attention. It’s not hype — it’s foundational infrastructure that makes AI models genuinely useful in real-world workflows.
The shift from “AI that knows things” to “AI that can do things” is already happening. And MCP is one of the most important protocols making that shift possible, safely and reliably.
Whether you’re just curious about how modern AI agents work, or you’re ready to build your first MCP server today, you now have a solid foundation to build on.
The best part? The MCP ecosystem is open, growing, and hungry for contributors. The USB standard of AI is here — and the world of plug-and-play AI tools is just getting started.
If you’ve ever wondered how apps seem to “talk” to each other instantly without someone manually refreshing data, the answer is often a webhook.
When a payment succeeds and you receive a confirmation email instantly, when a Slack message appears after a form submission, or when an order automatically updates your CRM, there’s a good chance a webhook is doing the work behind the scenes.
Despite sounding technical, webhooks are one of the simplest and most powerful concepts in modern software.
This guide explains what a webhook is, how it works, where it’s used, and how to build one, all in simple way.
What Is a Webhook?
A webhook is a way for one application to automatically send information to another application when a specific event happens.
Think of it as a digital notification system.
Instead of asking repeatedly:
“Has anything changed?”
a webhook says:
“Something changed. Here’s the data.”
This happens in real time.
Simple Definition
A webhook is an HTTP callback triggered by an event.
That means:
Something happens in App A.
App A sends data to a URL.
App B receives the data and acts on it.
No manual checking. No repeated polling.
Webhooks for Humans
Imagine ordering pizza.
Without a webhook:
You keep calling the restaurant every five minutes.
“Is my pizza ready?”
With a webhook:
The restaurant calls you.
“Your pizza is ready.”
That’s exactly how a webhook works.
One side waits.
The other side notifies.
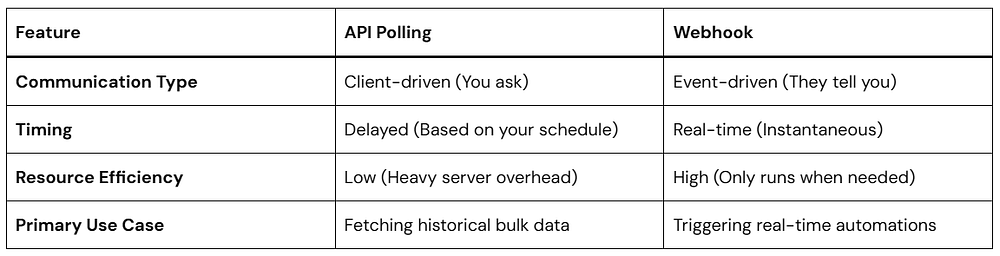
Polling vs. Webhooks: What is the Difference?
To truly appreciate the value of a webhook, it helps to understand its traditional alternative: API Polling.
When an application uses polling, it sends a request to a server at regular intervals (like every 30 seconds or every hour) asking, “Any new data yet?” Most of the time, the answer is “No.” This wastes a massive amount of server power and bandwidth.
A webhook completely flips this relationship. Instead of the receiving app asking for updates, the sending app automatically pushes the data out the moment the event occurs.
Here is a quick look at how they stack up side-by-side:
How a Webhook Works
Setting up a webhook relationship involves a simple, predictable flow between two entities: the Provider (the app where the event happens) and the Listener/Receiver (your app, or a tool like Zapier).
Here is exactly how the data travels:
The Trigger Event: An event happens on the Provider’s platform (e.g., a new user signs up, a payment succeeds).
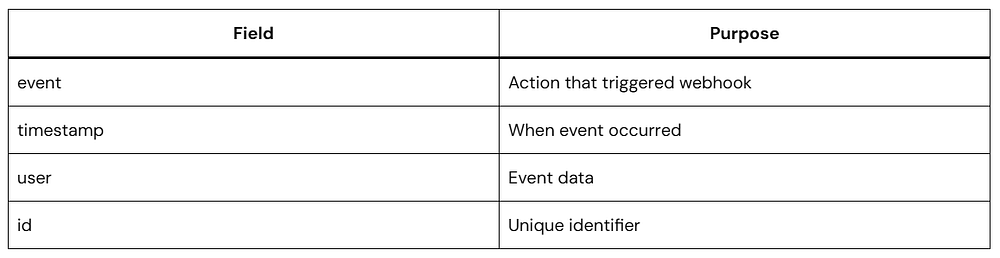
The Payload Generation: The Provider packages all the relevant details about that event into a structured data format, usually JSON.
The HTTP Request: The Provider makes an HTTP POST request to a specific URL that you previously set up in their dashboard.
The Action: Your listener URL receives the incoming data packet, reads it, and kicks off an automated action on your end (like creating a database profile or sending a text).
Visual Flow
Customer Purchase
       ↓
Application A
(Event Trigger)
       ↓
POST Request
(Webhook)
       ↓
Webhook URL
       ↓
Application B
(Process Data)
       ↓
Action Completed
A webhook is an automated, event-driven communication mechanism that allows one web application to send real-time data to another application as soon as a specific event occurs. It functions via a user-defined HTTP POST request, passing a data payload (typically in JSON format) to a unique destination URL provided by the receiving application.
Anatomy of a Webhook Request
A webhook usually sends data using HTTP POST.
Example:
POST /webhook HTTP/1.1
Content-Type: application/json
The receiving server uses this information to decide what to do.
A Simple Look at Webhook Code
Don’t let the programming side intimidate you. A webhook receiver is essentially just a web page that sits silently and listens for incoming POST requests.
Below is a highly secure, clean example of a webhook receiver written in Node.js using the popular Express framework. This code listens for an event and reads the data payload sent to it.
JavaScript
constexpress = require('express');constapp = express();// Middleware to parse incoming JSON payloads automaticallyapp.use(express.json());// This is your unique Webhook Destination URL endpointapp.post('/my-webhook-receiver', (req, res) => {consteventData = req.body;console.log(`Webhook received! Event Type: ${eventData.event}`);console.log(`Data Payload:`, eventData.data);// Step 1: Securely validate the event typeif (eventData.event === 'user.registered') {constuser = eventData.data;// Step 2: Execute your custom real-time automation hereconsole.log(`Successfully processed registration for ${user.email}`); }// Step 3: Always return a swift 200 OK status code to the senderres.status(200).send('Webhook successfully processed.');});// Start listening for incoming webhook events on port 3000app.listen(3000, () =>console.log('Listening for webhooks on port 3000'));
app.use(express.json()): This reads the incoming raw data stream from the webhook provider and turns it into a clean, readable JavaScript object.
app.post('/my-webhook-receiver'): This defines your unique endpoint. This is the exact URL address you would copy and paste into your provider’s settings (e.g., [https://yourdomain.com/my-webhook-receiver]).
res.status(200): This is the most important part of webhook handling. It tells the provider, “Message received successfully — no need to send it again.” If your server doesn’t return this response quickly, the provider may assume something went wrong and retry the webhook, which can lead to the same event being delivered multiple times.
Because webhooks expose a public URL to the open internet, it is critical to follow core engineering safety standards to protect your applications from malicious traffic:
Implement Webhook Signatures: Reliable providers (like Stripe or GitHub) include a unique cryptographic signature in the header of each incoming request. Your code should verify this signature using a secret key to prove the data actually came from them, and not an attacker pretending to be them.
Handle Retries and Idempotency: Webhook deliveries can occasionally fail due to brief network hiccups. Good providers will try resending the data a few times. Your code must be smart enough to recognize if it has already processed a specific transaction ID so it doesn’t charge a customer twice or create duplicate accounts.
Acknowledge Fast, Process Later: If your receiver takes too long to process an event (e.g., executing a massive database migration), the provider’s server might time out and flag it as a failure. Accept the webhook instantly with a 200 OK, save the payload to a queue, and handle the heavy processing safely in the background.
Popular Webhook Use Cases
Webhooks now power:
Ecommerce
Order updates
Shipping events
Inventory sync
SaaS
User onboarding
Billing automation
AI Applications
Agent triggers
Workflow orchestration
DevOps
Deployment notifications
Monitoring alerts
Internal Operations
CRM updates
Report generation
Frequently Asked Questions
Is a webhook the same as an API?
No.
APIs are typically request-driven.
Webhooks are event-driven.
Does a webhook run continuously?
No.
It activates only when an event occurs.
Are webhooks real time?
Usually yes.
Delivery often happens within seconds.
Can webhooks fail?
Yes.
Common reasons:
Timeouts
Network issues
Invalid endpoints
Retry systems reduce failures.
Do webhooks require coding?
Not always.
Many no-code platforms support webhook automation.
Conclusion
A webhook is one of those concepts that sounds complicated until you see it in action.
At its core, it does one simple thing:
When something happens, send data somewhere immediately.
That simple model powers modern automation.
Whether you’re building apps, connecting tools, creating AI workflows, or reducing manual work, understanding how a webhook works gives you a foundation for building faster and smarter systems.
Start small:
Receive one event.
Log the payload.
Trigger one action.
That’s how nearly every real-time automation system begins.
If you’ve ever used ChatGPT or another AI writing tool, you’ve probably seen the word tokens. You might have noticed messages like:
“Context window exceeded”
“Input too long”
“This model supports 128K tokens”
“Usage billed per token”
At first glance, tokens sound technical. But once you understand them, many things about AI suddenly make sense.
This guide explains Tokens in LLMs: what they are, how large language models use them, why token limits exist, how token counting works, and what this means for prompts, coding, and content.
By the end, you’ll understand how LLMs actually “read” text and why tokens are one of the most important concepts in modern AI.
What Are Tokens in LLMs?
Tokens in LLMs are small units of text that AI models process instead of reading complete words or sentences.
A token can be:
A whole word
Part of a word
A punctuation mark
A number
A space pattern
A code symbol
For example:
Humans read language as meaning.
Large language models read language as tokens plus patterns.
That distinction changes everything.
Why LLMs Don’t Read Words Like Humans
Humans understand language through experience, memory, and context.
LLMs work differently.
When you type:
“Write an article about climate change.”
The model does not see a sentence.
Internally, it converts text into tokens and then transforms those tokens into numbers.
The process looks roughly like this:
Text
↓
Tokenization
↓
Numeric Representation
↓
Pattern Processing
↓
Prediction
↓
Generated Text
An LLM predicts what token should come next based on everything that came before.
That’s the core mechanism.
Not understanding.
Prediction.
How Text Becomes Tokens
This conversion process is called tokenization.
Tokenization breaks text into pieces that the model can process efficiently.
That helps models preserve natural language structure.
Different LLMs may tokenize the exact same sentence differently.
That means:
1,000 words ≠ always 1,000 tokens
Token counts vary between models
Pricing can differ even for identical content
Tokenization Explained with Simple Examples
Example 1: Short Words
Input:
I love coffee
Possible tokens:
["I"]
[" love"]
[" coffee"]
Total: 3 tokens
Example 2: Long Words
Input:
internationalization
Possible output:
["inter"]
["national"]
["ization"]
Total: 3 tokens
Long words often become multiple tokens.
Example 3: Numbers
Input:
Revenue grew 18.5%
Possible tokens:
["Revenue"]
[" grew"]
[" 18"]
["."]
["5"]
["%"]
Numbers frequently split unexpectedly.
Example 4: Emoji
Input:
Amazing 🔥
Possible tokens:
["Amazing"]
[" 🔥"]
Emoji consume tokens too.
How LLMs Count Tokens
Token counting is important because models have a maximum amount of information they can process at one time.
When you send a prompt, the total includes:
Input Tokens
+
System Instructions
+
Conversation History
+
Output Tokens
=
Total Token Usage
Example:
Prompt:
Explain machine learning.
Input: 50 tokens
Generated answer: 450 tokens
Total: 500 tokens used
This is why longer conversations gradually consume more context.
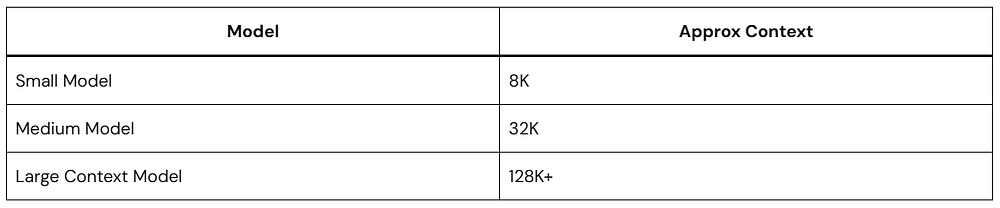
Context Windows: Why Token Limits Exist
Every LLM has a context window.
This is the maximum number of tokens it can consider simultaneously.
Example conceptually:
If the conversation exceeds the limit:
Older content may be removed
Responses may become inconsistent
Important instructions may disappear
Think of context like a whiteboard.
Once it fills up, older notes get erased.
How LLMs Actually Process Tokens
Why don’t language models just read full words? If an AI tried to remember every single word in existence — including slang, typos, medical terms, and names — its vocabulary database would be endlessly massive and incredibly inefficient.
On the flip side, reading letter-by-letter (character tokenization) would force the model to look at an overwhelming number of tiny data points, dragging down its processing speed and shrinking how much memory context it can handle.
To solve this, modern systems use Byte Pair Encoding (BPE) (Hayase et al., 2024). This algorithmic technique strikes a balance by keeping common full words intact while splitting rarer phrases into familiar fragments.
Once the text has been tokenized, the model can begin processing those tokens through a series of computational stages.
Step 1: Convert Tokens into IDs
Hello → 1258
world → 3987
Words become numbers.
Step 2: Create Embeddings
Those IDs become mathematical vectors.
Hello → [0.14, -0.62, 0.87...]
These vectors capture relationships.
Words with similar meaning appear closer together.
Step 3: Apply Attention
The model determines:
Which earlier tokens matter
Which context is relevant
What relationships exist
Example:
Sentence:
Sarah dropped the glass because it broke.
The model learns:
it → glass
Attention helps maintain meaning.
Step 4: Predict the Next Token
Given:
The sky is
Possible probabilities:
blue → 81%
clear → 12%
beautiful → 4%
green → 0.2%
The selected token becomes part of the output.
Then the cycle repeats.
Tokens in Code and Programming
Code is tokenized too.
This matters because developers often assume only text consumes context.
Example Python code:
Python
defgreet(name):returnf"Hello {name}"
Possible token breakdown:
Python
defgreet(name):returnf"Hello{name}"
Even small scripts can become large token counts.
Why this matters for coding assistants
When working with AI coding tools:
Large files consume context quickly
Repeated imports increase token usage
Long comments add overhead
Structured prompts improve efficiency
For example:
Instead of:
Review my entire application.
Use:
Review authentication.py only.
Focus on security and performance.
Smaller scope often gives better output.
Why Token Efficiency Matters
Understanding Tokens in LLMs helps you write better prompts.
Better Prompt
Summarize this article in 5 bullets.
Clear.
Specific.
Efficient.
Less Efficient Prompt
Can you maybe sort of explain everything
about this article in a lot of detail?
More tokens.
More ambiguity.
Often weaker results.
Token efficiency improves:
Response quality
Speed
Cost
Context retention
Python Token Counting
Let’s look at how token counting works under the hood using code. OpenAI uses an open-source, highly efficient BPE tokenizer implementation called tiktoken.
Below is a Python script that reveals exactly how an engine like GPT-4o processes a sentence, showing the raw strings alongside their unique token ID values.
Python
import tiktokendefanalyze_text_tokens(text: str, model_encoding: str = "o200k_base"):# Load the specific encoder used by modern models like GPT-4o encoder = tiktoken.get_encoding(model_encoding)# Convert text to a list of token integers token_ids = encoder.encode(text)# Decode individual tokens back to byte strings to see the breakdown byte_tokens = [encoder.decode_bytes([tid]) for tid in token_ids]print(f"Original Text: '{text}'")print(f"Total Token Count: {len(token_ids)}\n")print(f"{'Token ID':<12} | {'Visual Segment':<15}")print("-" * 32)for tid, b_tok inzip(token_ids, byte_tokens):# Convert bytes to string, safely handling spaces and special characters visible_str = b_tok.decode('utf-8', errors='replace').replace(" ", "␣")print(f"{tid:<12} | {visible_str:<15}")# Run the analyzeranalyze_text_tokens("Tokenization is brilliant!")#############################################################Original Text: 'Tokenization is brilliant!'Total Token Count: 4Token ID | Visual Segment --------------------------------38407 | Token 4389 | ization 374 | ␣is48408 | ␣brilliant!
If you run this code, you will notice that the space before a word often gets bundled straight into the next token (represented here by ␣).
Instead of treating a space as a separate punctuation mark, BPE optimization fuses it directly to the word that follows. This small design choice cuts down the overall token count of a document by up to 20%, keeping processing fast and costs low.
The Business and Cost of Tokens
Understanding Tokens in LLMs isn’t just an academic exercise — it dictates the functional and financial reality of building with AI.
API Cost Modeling: Commercial AI vendors charge you directly by the token. You are billed for every single token passed into the prompt, plus every token generated in the response.
The Context Window Limit: Every model has a hard ceiling on its memory capacity, known as the context window. Whether a model has an 8K capacity or a 1M capacity, that boundary is measured entirely in tokens, not words or pages.
The Multilingual Disparity: Historically, because BPE vocabularies were primarily trained on English data, non-English scripts often faced heavy text fragmentation. A single word in Hindi or Arabic could consume three to four times as many tokens as its English translation, creating higher costs and slower runtimes for global applications. Fortunately, newer architectures are expanding their structural vocabularies to balance this out.
Common Myths About Tokens
Myth 1: One Word Equals One Token
False.
Words often split into multiple tokens.
Myth 2: More Tokens Mean Better Responses
False.
Long prompts can dilute important instructions.
Myth 3: Tokens Only Matter for Billing
False.
Tokens affect:
Memory
Context
Accuracy
Latency
Output quality
Myth 4: LLMs Understand Language Like Humans
Not exactly.
LLMs identify statistical relationships between tokens.
That creates surprisingly human-like outputs, but the underlying process is different.
Practical Tips for Working with Tokens
If you regularly use AI tools, these habits help.
1. Keep prompts focused
Remove unnecessary background.
2. Split large tasks
Instead of one huge request:
Write website copy
Create FAQs
Generate SEO metadata
Break it apart.
3. Use structured formatting
Example:
Goal:
Audience:
Constraints:
Output:
Models process structure well.
4. Reduce repeated instructions
Avoid copying the same context repeatedly.
5. Watch long chats
If responses degrade, start a fresh thread.
Frequently Asked Questions
How many words equal one token?
A rough estimate:
1 token ≈ ¾ of an English word
100 tokens ≈ 75 words
1,000 tokens ≈ 750 words
Actual results vary.
Do spaces count as tokens?
Sometimes.
Many tokenizers attach spaces to adjacent text.
Are tokens the same across all LLMs?
No.
Different models use different tokenization systems.
Why do AI tools charge per token?
Because token processing drives compute usage.
More tokens generally require more processing resources.
Conclusion
Understanding Tokens in LLMs changes how you think about AI.
Large language models do not read paragraphs the way humans do. They break text into tokens, convert those tokens into numerical representations, analyze relationships, and predict what comes next.
That single idea explains:
Why context windows exist
Why prompts matter
Why AI pricing is token-based
Why long conversations sometimes lose focus
Why efficient prompting improves results
If you work with AI, write prompts, create content, build software, or optimize workflows, learning how Tokens in LLMs work is one of the highest-leverage concepts you can understand.
The better you understand tokens, the better you can communicate with modern AI systems.
Most developers hit a wall somewhere between “interesting demo” and “actually useful thing.” LLMs can answer questions, summarize text, and write passable code — but the moment you want them to do something across multiple steps, the standard prompt-response model starts feeling pretty limited.
That’s where AI agents come in. An AI agent doesn’t just respond to a single prompt. It reasons through a goal, decides which tools to use, acts, checks what happened, and repeats until the task is done. It’s a different programming model, and once it clicks, you’ll find yourself reaching for it constantly.
This guide walks through building one from scratch — no framework hand-waving, actual working code — and covers the design decisions that matter once you move past toy examples.
What an AI Agent Actually Is
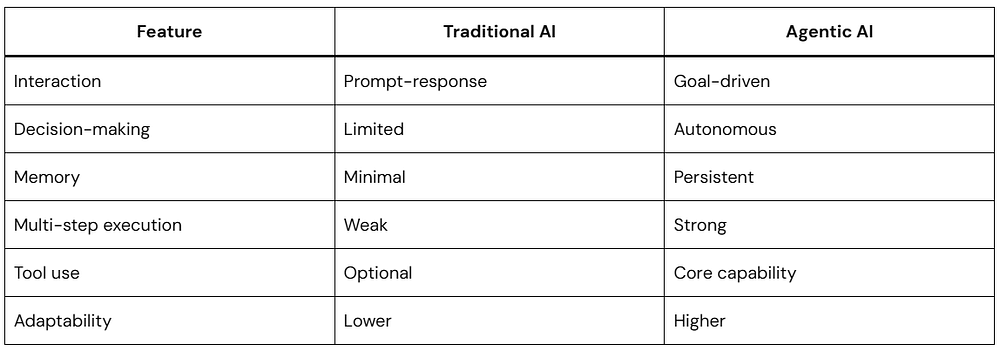
The term gets applied to everything from simple chatbots to autonomous research pipelines, so let’s be precise.
A chatbot takes input and returns output. One turn, one response.
An AI agent operates over a loop. It receives a goal, picks an action (usually a tool call), observes the result, and uses that result to decide what to do next. It keeps looping until either the task is complete or it hits a limit you’ve set.
A useful mental model: think of an AI agent as a developer who’s been handed a Jira ticket with no acceptance criteria. They have to figure out what “done” looks like, which tools to use, and when to stop. You’re not scripting every step — you’re giving them the goal, the tools, and enough context to work independently.
This pattern is called ReAct (Reasoning + Acting). The model reasons about what to do, takes an action, observes the result, and reasons again. That’s the whole thing. Everything else is implementation detail.
The Five Building Blocks
Before writing code, it helps to know what you’re actually assembling.
1. The LLM (Brain): GPT-4, Claude, Gemini, Llama — pick one. This is the reasoning engine. It decides what to do next based on the conversation history and the results of previous actions.
2. Tools: Python functions the agent can call. search_web(query), run_code(snippet), read_file(path), send_email(to, subject, body). Each tool is a way for the agent to interact with the outside world.
3. Memory: Short-term memory is just the message history: everything the agent has seen and done in the current task, passed back to the LLM on every loop iteration. Long-term memory requires an external store — a JSON file for simple cases, a vector database for anything more sophisticated.
4. Planning: How the agent breaks a goal into steps. Some agents plan the full sequence upfront before acting. Others decide one step at a time, using each result to inform the next. For most tasks, reactive step-by-step planning works fine.
5. The Orchestrator: The code that runs the loop — sends messages to the LLM, handles tool calls, feeds results back, decides when to stop. You can write this yourself or use a framework. We’ll do both.
Picking Your Stack
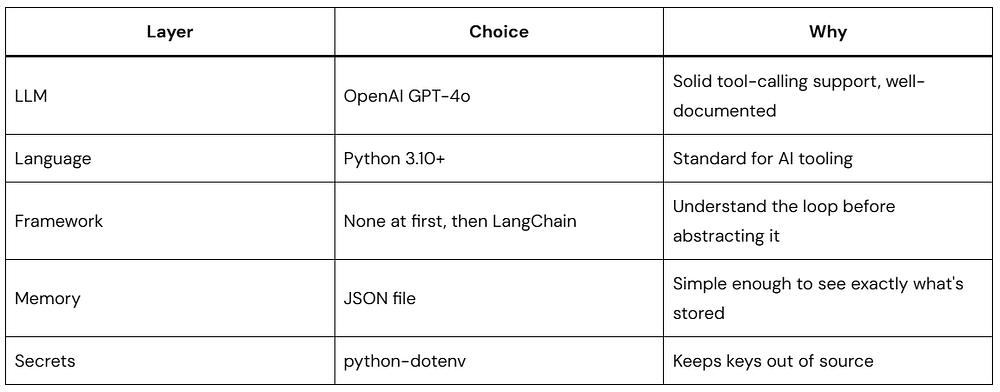
Here’s what this guide uses and why:
Other LLMs work fine — Claude and Gemini both support tool calling with similar APIs. The patterns here translate directly.
Add .env to .gitignore immediately. API keys in git history have a way of becoming expensive problems.
Building the Agent Loop Yourself
Frameworks abstract the agent loop behind a nice API. That’s useful once you know what the loop does. Start here first — you’ll understand framework behavior, debug issues faster, and make better architectural decisions later.
Define Your Tools
Every tool is a Python function that accepts typed arguments and returns a string. The string return type matters: the LLM reads results as text, so unclear or unstructured output leads to confused reasoning.
Python
# tools.pydefsearch_web(query: str) -> str:""" Simulates a web search. In production, replace with Serper, Brave Search, or Tavily. """returnf"[Search result for '{query}']: Placeholder. Connect to a real search API here."defcalculate(expression: str) -> str:""" Evaluates a math expression with a restricted scope. Uses eval() — safe only because __builtins__ is emptied. """try: allowed = {"__builtins__": {},"abs": abs, "round": round,"min": min, "max": max,"sum": sum, "pow": pow } result = eval(expression, allowed)returnstr(result)exceptExceptionas e:returnf"Error calculating: {str(e)}"defget_current_time() -> str:"""Returns the current date and time."""from datetime import datetimereturn datetime.now().strftime("%Y-%m-%d %H:%M:%S")
Simple, self-contained, returns strings. That’s all a tool needs to be.
Describe the Tools to the LLM
The agent has no awareness of your Python functions. You expose them through a structured definition that the LLM reads to decide which tool fits the situation.
Python
# tool_definitions.pyTOOLS = [ {"type": "function","function": {"name": "search_web","description": "Search the web for current information on any topic. Use this when you need up-to-date facts or information beyond your training data.","parameters": {"type": "object","properties": {"query": {"type": "string","description": "The search query to look up" } },"required": ["query"] } } }, {"type": "function","function": {"name": "calculate","description": "Evaluate a mathematical expression and return the numeric result. Use for any arithmetic — don't try to compute numbers mentally.","parameters": {"type": "object","properties": {"expression": {"type": "string","description": "A valid Python math expression, e.g. '2 + 2' or '(15 * 8) / 3'" } },"required": ["expression"] } } }, {"type": "function","function": {"name": "get_current_time","description": "Get the current date and time.","parameters": {"type": "object","properties": {},"required": [] } } }]
The description field is where most agent reliability problems live. The LLM picks tools based entirely on reading these strings, so vague descriptions produce wrong choices. Write them like you’re documenting for someone who has never seen your codebase — because that’s exactly what you’re doing.
Compare:
Bad: "Gets data"
Good: "Retrieves the current stock price for a given ticker symbol (e.g., 'AAPL', 'GOOGL'). Returns the price in USD as a float."
Write the Agent Loop
This is the core of the AI agent — everything else hangs off this structure.
Python
# agent.pyimport jsonimport osfrom openai import OpenAIfrom dotenv import load_dotenvfrom tools import search_web, calculate, get_current_timefrom tool_definitions import TOOLSload_dotenv()client = OpenAI(api_key=os.getenv("OPENAI_API_KEY"))# Maps tool name strings to actual callable functionsTOOL_FUNCTIONS = {"search_web": search_web,"calculate": calculate,"get_current_time": get_current_time,}defrun_agent(user_goal: str, max_iterations: int = 10) -> str:""" Runs the agent loop until the task is complete or max_iterations is reached. """print(f"\n{'='*60}")print(f"Goal: {user_goal}")print(f"{'='*60}\n")# This list is the agent's working memory.# Every message — user input, assistant response, tool result —# gets appended here and passed back to the LLM each iteration. messages = [ {"role": "system","content": ("You are a capable AI agent. Complete tasks step by step ""using the tools available to you. Think before each action. ""When you have a complete answer, provide it clearly. ""Do not stop until the goal is fully addressed." ) }, {"role": "user","content": user_goal } ]for iteration inrange(max_iterations):print(f"--- Iteration {iteration + 1} ---") response = client.chat.completions.create(model="gpt-4o",messages=messages,tools=TOOLS,tool_choice="auto"# Model decides: call a tool or give a final answer ) message = response.choices[0].message finish_reason = response.choices[0].finish_reason# Always add the assistant's response to the message history messages.append(message)if finish_reason == "tool_calls"and message.tool_calls:# The model wants to use one or more toolsfor tool_call in message.tool_calls: tool_name = tool_call.function.name tool_args = json.loads(tool_call.function.arguments)print(f" → {tool_name}({tool_args})")if tool_name in TOOL_FUNCTIONS: tool_result = TOOL_FUNCTIONS[tool_name](**tool_args)else: tool_result = f"Error: Tool '{tool_name}' not found."print(f" ↳ {tool_result[:120]}")# Feed the result back so the model can act on it messages.append({"role": "tool","tool_call_id": tool_call.id,"content": tool_result })elif finish_reason == "stop":# Model is done — this is the final answerprint(f"\n Done\n")print(message.content)return message.contentelse:print(f"Unexpected finish reason: {finish_reason}")breakreturn"Reached maximum iterations without completing the task."if__name__ == "__main__": run_agent("What is 15% of 2,847, and what time is it right now?")
A few things worth understanding before moving on:
The messages list is the agent’s memory. Every iteration, the full history gets sent back to the LLM. It knows what it tried, what the tools returned, and what’s still unresolved — all from reading this list.
tool_choice="auto" lets the model decide. When it thinks another tool call is needed, finish_reason comes back as "tool_calls". When it has enough to answer, it returns "stop". That toggle is how the loop progresses.
role: "tool" closes the loop. After a tool runs, you add the result to messages with the tool_call_id that matches the request. Without this, the model never “sees” what the tool returned.
max_iterations is your circuit breaker. A confused agent can keep calling tools indefinitely. Set a reasonable limit and handle the exhaustion case cleanly — your users (and your API bill) will thank you.
What the Output Looks Like
Python
============================================================Goal: What is15% of 2,847, and what time is it right now?============================================================--- Iteration 1--- → calculate({'expression': '0.15 * 2847'}) ↳ 427.05 → get_current_time({}) ↳ 2026-05-1914:32:18--- Iteration 2--- Done15% of 2,847is **427.05**.The current time is **2026-05-19 at 14:32:18**.
Two tools, two results, one synthesized answer. The loop ran twice: once to gather data, once to compose the response.
Giving Your Agent Memory Between Sessions
The current agent forgets everything when run_agent() returns. For a one-shot task that’s fine, but for anything that benefits from continuity — a personal assistant, a research tool, a project helper — you need some form of persistence.
Here’s a lightweight JSON-backed memory store:
Python
# memory.pyimport jsonimport osfrom datetime import datetimeMEMORY_FILE = "agent_memory.json"defload_memory() -> list:"""Loads saved interactions from disk."""ifnot os.path.exists(MEMORY_FILE):return []withopen(MEMORY_FILE, "r") as f:return json.load(f)defsave_to_memory(user_input: str, agent_response: str):""" Appends a completed interaction and trims to the last 20 entries. Keeps the file from growing indefinitely. """ memory = load_memory() memory.append({"timestamp": datetime.now().isoformat(),"user": user_input,"agent": agent_response }) memory = memory[-20:] # rolling windowwithopen(MEMORY_FILE, "w") as f: json.dump(memory, f, indent=2)defget_memory_context(last_n: int = 5) -> str:""" Formats recent interactions as a string for injection into the system prompt. """ memory = load_memory()ifnot memory:return"No previous interactions." recent = memory[-last_n:] lines = []for entry in recent: lines.append(f"[{entry['timestamp'][:10]}] "f"User: {entry['user'][:80]}... "f"→ Agent: {entry['agent'][:80]}..." )return"\n".join(lines)
Then in agent.py, update the system message:
Python
memory_context = get_memory_context(last_n=3)messages = [ {"role": "system","content": ("You are a capable AI agent with memory of past interactions.\n\n"f"Recent history:\n{memory_context}\n\n""Use this context when it's relevant." ) }, {"role": "user", "content": user_goal}]
Call save_to_memory(user_goal, final_answer) before returning. Now each session is aware of the previous few, which covers most use cases without needing a vector database.
The Same Agent in LangChain
Once you’ve written the loop yourself, frameworks make sense. Here’s the same AI agent in LangChain — about 30 lines, no boilerplate:
Python
pip install langchain langchain-openai
Python
# agent_langchain.pyimport osfrom dotenv import load_dotenvfrom langchain_openai import ChatOpenAIfrom langchain.agents import AgentExecutor, create_openai_tools_agentfrom langchain.tools import toolfrom langchain_core.prompts import ChatPromptTemplate, MessagesPlaceholderload_dotenv()@tooldefsearch_web(query: str) -> str:"""Search the web for information on any topic."""returnf"[Search result for '{query}']: Mock result — connect a real API here."@tooldefcalculate(expression: str) -> str:"""Evaluate a math expression and return the result."""try:returnstr(eval(expression, {"__builtins__": {}}))exceptExceptionas e:returnf"Error: {e}"@tooldefget_current_time() -> str:"""Get the current date and time."""from datetime import datetimereturn datetime.now().strftime("%Y-%m-%d %H:%M:%S")llm = ChatOpenAI(model="gpt-4o", temperature=0)prompt = ChatPromptTemplate.from_messages([ ("system", "You are a helpful AI agent. Complete tasks step by step using your tools."), MessagesPlaceholder("chat_history", optional=True), ("human", "{input}"), MessagesPlaceholder("agent_scratchpad"),])tools = [search_web, calculate, get_current_time]agent = create_openai_tools_agent(llm, tools, prompt)agent_executor = AgentExecutor(agent=agent, tools=tools, verbose=True, max_iterations=10)result = agent_executor.invoke({"input": "What is the square root of 144, and what time is it?"})print(result["output"])
The @tool decorator pulls the tool description straight from the docstring, which is why keeping docstrings clear and specific matters just as much here. The agent_scratchpad placeholder is where intermediate tool results live during the loop — LangChain manages that automatically.
The tradeoff with frameworks is reduced visibility. When something breaks, you’re one abstraction layer further from the actual prompt. That’s why building the loop yourself first pays off — you already know what’s happening underneath.
Best Practices Worth Internalizing
These come from actual production failures, not theoretical caution.
Keep the Initial Toolset Small
Launch with 2–3 well-defined tools. Agents given 15 tools at once often pick the wrong one, or hedge between multiple options and produce garbled results. Add tools incrementally, after you’ve confirmed the core loop is reliable.
Tool Descriptions Are Load-Bearing
The description field decides which tool gets called. Treat it with the same care you’d give a public API’s documentation.
Weak:"Gets data"
Clear:"Retrieves the current stock price for a ticker symbol like 'AAPL'. Returns a float in USD."
If your agent keeps picking the wrong tool, the description is usually the culprit — not the model.
Cap Your Iteration Count
Always set max_iterations. Handle the exhaustion case with a real error message, not a silent failure. Five iterations is often enough for simple tasks; ten to fifteen covers most practical workflows.
Log Tool Calls During Development
When the agent misbehaves, you need a trace of exactly what it did. Add logging around every tool call:
verbose=True in LangChain’s AgentExecutor does this automatically.
Tools Should Never Crash — Only Fail Gracefully
If a tool raises an exception, the agent loop dies. Wrap every tool in a try/except and return a descriptive error string instead:
Python
defsearch_web(query: str) -> str:try:# ... actual search logic ...passexceptTimeoutError:return"Error: Search timed out. Try a more specific query."exceptExceptionas e:returnf"Error: {str(e)}"
The agent can read an error string and adjust. It can’t recover from an unhandled exception.
Validate Before Acting
For any tool that writes, sends, or deletes — validate inputs before doing anything expensive:
Python
defsend_email(to: str, subject: str, body: str) -> str:if"@"notin to or"."notin to:return"Error: Invalid email address."ifnot subject.strip():return"Error: Subject is empty."iflen(body.strip()) < 10:return"Error: Message body is too short."# proceed
This catches the obvious failure modes before they become real-world problems.
Set Temperature to 0 for Tool Use
Reasoning tasks and tool selection benefit from determinism. High temperature adds variety, which works well for creative output — it undermines reliability in a loop that needs to consistently pick the right tool and parse structured data. Use temperature=0.
Instrument Production Agents
Once you’re running an agent in production, you need visibility into what it’s doing. Track at minimum:
Task completion rate
Average iterations per task
Tool call frequency and error rate
Where the loop tends to stall or fail
LangSmith (from the LangChain team) handles this if you’re already in that ecosystem. Otherwise, structured logs and a simple dashboard get you most of the way there.
Mistakes Worth Knowing About in Advance
Underspecified system prompts. The agent knows nothing about your application context unless you put it in the system message. Generic system prompts produce generic, unreliable behavior. Spend real time here.
Expecting consistent first runs. Agent behavior is probabilistic. Wrong tool choices, incomplete answers, and logic detours will happen occasionally — that’s the nature of the loop. Evaluate across many runs, not a single test.
Write access before you’re confident. If the agent can delete records or send emails, test extensively in a sandboxed environment first. Roll out write tools with confirmation steps wherever possible. Read-only by default is a reasonable starting point.
Ignoring latency. Each loop iteration is an LLM API call. A five-iteration task might take 15–30 seconds. Design the user experience around that — show progress indicators, stream output where you can, and set clear expectations.
Reinventing the loop once you understand it. The reason to build from scratch first was understanding — not as a permanent architecture choice. Once you’ve got the fundamentals, frameworks handle the repetitive scaffolding well. Use them.
What to Build Next
Here are four AI agent projects that each exercise a different part of the pattern:
Research Agent — Takes a topic, runs multiple searches, synthesizes findings into a structured report. Good for practicing multi-step planning and output formatting.
Code Review Agent — Receives a diff, analyzes changes, runs a linter, flags common issues, drafts review comments. Introduces file I/O and structured output.
Personal Task Agent — Connects to calendar and to-do APIs, plans tasks, schedules meetings, sends reminders. The best way to learn multi-tool orchestration with real-world consequences.
Data Analysis Agent — Given a CSV, explores the data through code execution, finds patterns, generates charts. Teaches iterative analysis and code interpreter patterns.
Each one will surface edge cases this guide couldn’t anticipate — which is exactly the point.
Quick Reference Checklist
Before You Start
Goal is clearly defined
Toolset scoped to the minimum needed
API keys in .env, not in source files
During Development
Tool descriptions are specific and accurate
max_iterations is set
All tool functions have error handling
Logging in place for debugging
Testing against a sandbox before touching production data
Before Production
Validated across 20+ diverse test cases
Latency measured and acceptable
Monitoring and alerting configured
Write tools have confirmation steps
Rate limiting applied to prevent runaway loops
Conclusion
The agent loop itself is straightforward: give the LLM tools, let it reason over them, feed results back, stop when done. That’s the whole pattern.
What takes practice is the surrounding decisions — scoping tools correctly, writing descriptions the model can actually use, knowing when the loop is healthy versus spinning, and building in the observability to tell the difference.
Start with the raw loop. Write the messages array by hand. Once you’ve seen the pattern clearly, let frameworks handle the scaffolding. Then focus your energy on the domain-specific logic that actually makes your AI agent useful.
Artificial intelligence has moved far beyond answering questions and generating text.
Today, a new category of AI is changing how software works: Agentic AI.
Unlike traditional AI systems that wait for instructions, Agentic AI can plan, make decisions, take actions, and adapt to changing situations with minimal human involvement.
That shift is important.
Businesses are using Agentic AI to automate operations. Developers are building AI systems that can complete multi-step tasks. Consumers are starting to interact with software that behaves more like an assistant than a tool.
But what exactly is Agentic AI, and why is everyone talking about it?
This guide explains Agentic AI in simple way, with practical examples, architecture, code, benefits, risks, and real-world applications.
What Is Agentic AI?
Agentic AI refers to artificial intelligence systems designed to operate autonomously toward goals rather than simply responding to prompts.
Instead of executing one isolated command, these systems:
Close your eyes for a moment. Imagine typing a sentence like “Create a melancholic piano piece that feels like a rainy Sunday afternoon” — and seconds later, an original, studio-quality composition plays back that captures exactly that mood. No musician needed. No recording studio. No hours of editing.
That’s not science fiction. That’s Generative Audio AI working right now, today.
Or picture this: a voiceover artist records just five minutes of audio. A few days later, a company uses her voice — cloned using Generative Audio AI — to narrate an audiobook in three different languages, with perfect pronunciation and natural emotional inflection. She approved it, she gets paid, and the publisher saves weeks of studio time.
We are living in the most transformative era in the history of sound. Generative Audio AI isn’t just a tech trend — it’s a complete rethinking of how humans and machines interact with one of our most fundamental senses.
In this deep-dive blog, we’ll unpack exactly how this technology works, walk through real code examples you can try yourself, and explore where this revolution is taking us. Whether you’re a developer, a musician, a podcaster, or simply a curious mind, buckle up — this is going to be a fascinating ride.
What Is Generative Audio AI — Really?
Let’s start simple.
Generative Audio AI is a category of artificial intelligence that can create audio content — voices, music, sound effects, ambient soundscapes — from scratch, based on patterns it learned from existing audio data.
The “generative” part is key. This isn’t AI that simply plays back pre-recorded sounds or filters noise from a recording. This is AI that invents new audio that has never existed before.
Think of it like this: you teach a child thousands of songs, and eventually they start humming melodies they’ve never heard before. Generative Audio AI does something similar — it absorbs patterns from massive datasets of audio and learns the underlying “grammar” of sound.
There are three main flavors of Generative Audio AI:
Voice AI — Cloning, synthesizing, and modifying human voices.
Music AI — Composing original music in any genre, mood, or style.
Sound Design AI — Generating environmental sounds, Foley effects, and custom audio textures.
Each of these uses different underlying model architectures, but they all share one fundamental goal: make computers understand and create sound the way humans do.
A Brief History: From Sine Waves to Neural Nets
To appreciate where we are, it helps to know where we started.
The Early Days (1950s–1990s)
The first computer-generated speech came in 1961 when an IBM 704 computer sang “Daisy Bell.” It was a milestone, but it was also clearly robotic — syllables strung together with no understanding of rhythm, emotion, or naturalness.
For decades, text-to-speech systems worked using a technique called concatenative synthesis — essentially, massive libraries of recorded phonemes (the smallest units of speech) stitched together algorithmically. The results were functional but unmistakably artificial.
Early music generation was similarly primitive — rule-based systems that could follow music theory but couldn’t improvise, feel, or surprise.
The Deep Learning Breakthrough (2010s)
Everything changed when deep learning matured. Two major breakthroughs stand out:
WaveNet (2016) — DeepMind released WaveNet, a neural network that generated raw audio waveforms sample by sample. For the first time, synthesized speech sounded genuinely human. The catch? It was painfully slow — generating one second of audio took minutes.
GANs Applied to Audio (2018–2019) — Generative Adversarial Networks, already a sensation in image generation, were adapted for audio. Models like GAN-TTS and MelGAN could generate high-quality audio far faster than WaveNet.
The Transformer Era (2020s–Now)
Then came transformer models — the same architecture powering GPT and other language models. When applied to audio, transformers unlocked a new level of coherence, expressiveness, and creative generation.
Models like AudioLM, MusicGen, Tortoise TTS, Vall-E, and Stable Audio represent the current cutting edge. They can generate minutes of high-quality, contextually appropriate audio from a simple text prompt.
That’s where we are today. And we’re just getting started.
How Machines Actually Learn to Understand Sound
Before a machine can create audio, it needs to understand audio. Here’s how that actually works.
Sound as Data
Sound is, at its core, vibration — pressure waves moving through air. A microphone converts those waves into electrical signals, which are then digitized into a sequence of numbers called samples. A standard audio file contains 44,100 samples per second (44.1 kHz), meaning one minute of audio is about 2.6 million individual data points.
That’s a lot of raw data. Processing it directly is computationally expensive, so AI systems typically work with spectrograms instead.
What’s a Spectrogram?
A spectrogram is a visual representation of audio that shows how the frequency content changes over time.
Think of it as a heat map where:
The X-axis is time
The Y-axis is frequency (pitch)
The color/brightness represents amplitude (loudness)
By converting audio to spectrograms, we transform an audio problem into an image problem — and image processing is something neural networks are extremely good at.
The most common variant used in Generative Audio AI is the Mel spectrogram, which uses a perceptual frequency scale that matches how human ears actually perceive pitch differences.
The Training Process
Here’s a simplified breakdown of how a Generative Audio AI model learns:
Data Collection — Thousands to millions of hours of audio are gathered (speech, music, environmental sounds).
Feature Extraction — Raw audio is converted into Mel spectrograms or other intermediate representations.
Model Training — A neural network is fed these representations and learns to predict what comes next (autoregressive models) or to reconstruct audio from noise (diffusion models).
Conditioning — The model is conditioned on text descriptions, speaker embeddings, or style tokens, so it learns to associate specific inputs with specific audio characteristics.
Evaluation & Fine-Tuning — Human raters listen to outputs and score them on naturalness, accuracy, and quality. This feedback helps refine the model.
The result is a model that has internalized the “rules” of sound so deeply that it can create new sounds that follow those rules — even for combinations it’s never encountered before.
Voice Cloning: The Science of Copying a Human Voice
Voice cloning is arguably the most fascinating — and controversial — application of Generative Audio AI. Let’s dig into how it actually works.
What Makes a Voice Unique?
Every human voice has a distinct acoustic fingerprint shaped by:
The size and shape of the vocal tract
Resonance characteristics of the skull and chest cavity
Speaking rhythm and pace
Pitch range and variation patterns
Emotional coloration and prosody
Accent and dialect-specific phoneme pronunciations
When we talk about cloning a voice, we’re talking about capturing all of these characteristics and encoding them into a mathematical representation that a model can replicate.
Speaker Embeddings: The DNA of a Voice
The key technology behind voice cloning is speaker embeddings — compact numerical vectors (essentially lists of numbers) that represent the unique characteristics of a specific voice.
A speaker embedding is generated by a specialized neural network called a speaker encoder. You feed it a few seconds of someone’s voice, and it outputs a vector — typically 256 or 512 numbers — that uniquely identifies that speaker.
Here’s a conceptual illustration:
Python
# Conceptual example of speaker embedding extraction# In practice, you'd use a pretrained speaker encoder modelimport numpy as npdefextract_speaker_embedding(audio_file, speaker_encoder_model):""" Takes a short audio clip and returns a vector that represents the unique characteristics of that speaker's voice. Parameters: ----------- audio_file : str Path to a WAV file containing the target voice (as little as 5-30 seconds) speaker_encoder_model : SpeakerEncoder A pretrained neural net that maps audio → embedding vectors Returns: -------- embedding : np.ndarray A 256-dimensional vector capturing the voice's unique characteristics """# Load and preprocess the audio waveform = load_audio(audio_file, sample_rate=16000)# Convert to mel spectrogram for the encoder mel_spec = audio_to_mel_spectrogram(waveform)# Run through the speaker encoder# This is where the magic happens — the model distills# all the unique vocal characteristics into a fixed-size vector embedding = speaker_encoder_model(mel_spec)# Normalize the embedding (important for consistent results) embedding = embedding / np.linalg.norm(embedding)return embedding # Shape: (256,) — the "DNA" of this voice# Example usage:# voice_dna = extract_speaker_embedding("target_speaker.wav", encoder_model)# This vector now encodes everything distinctive about the speaker's voice
The extract_speaker_embedding function converts a raw audio file into a Mel spectrogram (a visual frequency representation of the audio), then feeds it through a pretrained speaker encoder neural network. The output is a 256-dimensional vector — think of it as the voice’s “fingerprint.” This fingerprint is later used by the synthesis model to generate new speech that sounds like the target speaker.
The Two-Stage Voice Cloning Pipeline
Once you have the speaker embedding, voice cloning typically involves two stages:
Stage 1: Text to Mel Spectrogram
The synthesis model takes your text and the speaker embedding as inputs, and generates a Mel spectrogram — a visual representation of what the audio should look like frequency-wise.
Stage 2: Mel Spectrogram to Waveform
A second model called a vocoder (like WaveGlow, HiFi-GAN, or BigVGAN) converts the Mel spectrogram into an actual audio waveform you can play.
Python
# Simplified two-stage voice cloning pipeline# Using a Tacotron2-style synthesizer + HiFi-GAN vocoderimport torchdefclone_voice_pipeline(text, speaker_embedding, synthesizer, vocoder):""" Full pipeline: text + voice embedding → spoken audio Stage 1: Synthesizer maps (text + speaker embedding) → mel spectrogram Stage 2: Vocoder maps mel spectrogram → audio waveform Parameters: ----------- text : str The words you want the cloned voice to say speaker_embedding : torch.Tensor The 256-dim voice "fingerprint" from extract_speaker_embedding() synthesizer : nn.Module Tacotron2 or similar text-to-mel model vocoder : nn.Module HiFi-GAN or similar mel-to-audio model Returns: -------- audio_waveform : np.ndarray Raw audio samples ready to save as a WAV file """# --- Stage 1: Text → Mel Spectrogram ---# Tokenize the text into phoneme IDs# Example: "Hello" → [h, ə, l, oʊ] → [18, 41, 27, 55] text_tokens = text_to_phoneme_ids(text) text_tensor = torch.LongTensor(text_tokens).unsqueeze(0)# The synthesizer uses BOTH the text AND the speaker embedding# The speaker embedding tells it "sound like THIS person"# The text tells it "say THESE words"with torch.no_grad(): mel_spectrogram, _ = synthesizer.inference(text_tokens=text_tensor,speaker_embedding=speaker_embedding.unsqueeze(0),# Controls speaking pace — higher = slower speechlength_scale=1.0,# Controls how much pitch varies — higher = more expressivepitch_scale=1.0 )# mel_spectrogram shape: (1, 80, T) where T is time steps# 80 mel frequency bins capturing the full tonal texture of speech# --- Stage 2: Mel Spectrogram → Audio Waveform ---# The vocoder is a neural upsampler — it takes the compact# mel representation and generates the actual sound wavewith torch.no_grad(): audio_waveform = vocoder(mel_spectrogram)# Squeeze batch dimension and convert to numpy audio_waveform = audio_waveform.squeeze().cpu().numpy()return audio_waveform # Ready to save as WAV or stream# Usage:# audio = clone_voice_pipeline(# text="Welcome to the future of audio technology.",# speaker_embedding=voice_dna,# synthesizer=tts_model,# vocoder=hifi_gan_model# )# save_audio("output.wav", audio, sample_rate=22050)
The first stage runs the text through a phoneme tokenizer (which converts words to their sound units), then a synthesizer model uses both those phonemes AND the speaker’s voice fingerprint to generate a Mel spectrogram. Think of this as the “blueprint” of the audio. The second stage feeds that blueprint into a vocoder — a neural network that’s essentially an expert at converting spectral blueprints into real, listenable sound waves. The result is audio that sounds like the target speaker saying words they never recorded.
Text-to-Speech (TTS): From Robotic to Indistinguishable
Modern Generative Audio AI has made TTS so good that human listeners often can’t tell the difference between synthesized and real speech. Here’s what makes modern TTS special.
The Key Ingredients of Natural-Sounding Speech
Prosody — The natural rise and fall of pitch, the pauses between phrases, the subtle emphasis on certain syllables. Early TTS systems had flat, monotonous prosody. Modern models learn prosody from data.
Coarticulation — In natural speech, sounds blend into each other. The “t” in “butter” sounds different from the “t” in “top” because of neighboring sounds. Neural TTS models capture this naturally.
Breathing and Micro-pauses — Real humans breathe between sentences. They hesitate occasionally. They have micro-pauses. Modern TTS models incorporate these to sound more human.
A Practical TTS Example Using a Modern API
Python
# Modern Text-to-Speech with emotional control# This example shows the style of API calls used with# services like ElevenLabs, Google Cloud TTS, or Azure Neural Voiceimport requestsimport jsondefgenerate_speech_with_emotion(text: str,voice_id: str,emotion: str = "neutral",stability: float = 0.5,speaking_rate: float = 1.0) -> bytes:""" Generate expressive speech with controllable emotion. Parameters: ----------- text : str The text to convert to speech voice_id : str ID of the voice to use (from your TTS provider) emotion : str Target emotion: "neutral", "happy", "sad", "excited", "calm" stability : float 0.0 = very expressive/variable, 1.0 = very stable/consistent speaking_rate : float 1.0 = normal speed, 0.75 = 75% speed, 1.25 = 25% faster Returns: -------- audio_bytes : bytes Raw MP3 or WAV audio bytes you can save or stream """# Emotion maps to specific prosody settings internally# Each emotion shifts the pitch contour, speaking rate,# and energy distribution across the spectrogram differently emotion_presets = {"neutral": {"pitch_shift": 0.0, "energy_boost": 1.0},"happy": {"pitch_shift": +2.0, "energy_boost": 1.3},"sad": {"pitch_shift": -3.0, "energy_boost": 0.7},"excited": {"pitch_shift": +4.0, "energy_boost": 1.5},"calm": {"pitch_shift": -1.0, "energy_boost": 0.85}, } preset = emotion_presets.get(emotion, emotion_presets["neutral"])# Build the request payload payload = {"text": text,"voice_settings": {"voice_id": voice_id,"stability": stability,"similarity_boost": 0.8, # How closely to match voice characteristics"style": preset["energy_boost"],"speaking_rate": speaking_rate * (1.0 + preset["pitch_shift"] / 20), },"model_id": "eleven_multilingual_v2", # Supports 29 languages"output_format": "mp3_44100_128"# 44.1kHz, 128kbps MP3 }# Make the API call (replace with your actual endpoint and API key) response = requests.post(url="https://api.your-tts-provider.com/v1/text-to-speech",headers={"xi-api-key": "YOUR_API_KEY_HERE","Content-Type": "application/json" },data=json.dumps(payload) )if response.status_code == 200:return response.content # Raw audio byteselse:raiseException(f"TTS API error: {response.status_code} - {response.text}")# Practical example — generate a podcast intro in an excited voice:audio_bytes = generate_speech_with_emotion(text="""Welcome back to Tech Frontier! Today, we're diving deep into Generative Audio AI — the technology that's changing how we think about sound forever.""",voice_id="josh_professional_v2",emotion="excited",stability=0.45,speaking_rate=0.95# Slightly slower for clarity)# Save to filewithopen("podcast_intro.mp3", "wb") as f: f.write(audio_bytes)print("Generated podcast intro successfully!")
This function wraps a modern TTS API with emotional control. The key insight is that different emotions map to different acoustic parameters — a happy voice has a higher pitch contour and more energy, while a sad voice is lower and more subdued. The stability parameter controls how consistent vs. expressive the voice sounds — lower stability means more natural variation (like a real human), while higher stability sounds more measured and consistent (great for customer service bots). The similarity_boost ensures the output closely matches the chosen voice’s characteristics. Once the API returns audio bytes, you can save them directly as an MP3 file.
Music Generation: When AI Becomes the Composer
This is where Generative Audio AI gets truly mind-bending. Teaching a machine to compose original, emotionally resonant music requires understanding not just patterns, but tension and release, harmony and dissonance, rhythm and silence.
How Music Generation Models Think
Unlike speech, music has multiple simultaneous streams of information:
Melody — The main tune
Harmony — Chords supporting the melody
Rhythm — The timing pattern of notes
Timbre — The characteristic quality of each instrument
Structure — Verse, chorus, bridge — how sections relate
Modern music generation models handle this in different ways. Symbolic models work with MIDI-like representations (think of piano roll notation). Audio models like MusicGen work directly with audio tokens.
Using Meta’s MusicGen for Prompt-Based Music Creation
Python
# Music generation using Meta's MusicGen model# Install first: pip install audiocraftfrom audiocraft.models import MusicGenfrom audiocraft.data.audio import audio_writeimport torchdefgenerate_music_from_prompt(prompt: str,duration_seconds: int = 30,model_size: str = "medium") -> None:""" Generate original music from a text description. Parameters: ----------- prompt : str Natural language description of the music you want. Be specific! Include genre, mood, instruments, tempo. duration_seconds : int How many seconds of audio to generate (max ~30s for 'small' model) model_size : str "small" (300M params), "medium" (1.5B params), "large" (3.3B params) Larger = better quality but slower and needs more GPU memory The model internally: 1. Tokenizes your text prompt using a frozen T5 text encoder 2. Generates audio tokens autoregressively (like a language model predicts words) 3. Decodes audio tokens back to waveforms using the EnCodec decoder """print(f"Loading MusicGen-{model_size} model...") model = MusicGen.get_pretrained(f"facebook/musicgen-{model_size}")# Configure generation parameters model.set_generation_params(duration=duration_seconds,# Temperature controls creativity vs. faithfulness# Higher (>1.0) = more creative/random, Lower (<1.0) = more predictabletemperature=1.0,# Top-k sampling — only consider the top 250 most likely next tokens# Prevents the model from generating incoherent audiotop_k=250,# Classifier-free guidance scale# Higher = follows prompt more strictly (try 3.0 to 5.0)cfg_coef=3.0, )print(f"Generating {duration_seconds}s of music for prompt: '{prompt}'")# Generate audio — this returns a tensor of shape (batch, channels, samples)with torch.no_grad(): wav = model.generate(descriptions=[prompt], # Can pass multiple prompts for batch generationprogress=True# Show a progress bar in the terminal )# wav shape: (1, 1, num_samples) — batch=1, mono=1# Sample rate is always 32000 Hz for MusicGen# Save the generated audio output_filename = "generated_music" audio_write(stem_name=output_filename,wav=wav[0], # Take the first (only) batch itemsample_rate=32000, # MusicGen's native sample ratestrategy="loudness", # Normalize loudness for consistent playback volumeloudness_compressor=True# Apply gentle dynamic compression )print(f"✓ Music saved as '{output_filename}.wav'")# --- Example prompts to try ---# Cinematic & emotionalgenerate_music_from_prompt(prompt="""An epic orchestral piece with swelling strings and triumphant brass, building tension then releasing into a soaring, hopeful melody. Suitable for a film climax scene.""",duration_seconds=30,model_size="medium")# Lo-fi & chillgenerate_music_from_prompt(prompt="""Lo-fi hip hop beat with warm vinyl crackle, mellow Rhodes piano, soft jazz drums at 85 BPM, and a lazy bassline. Perfect for studying or late-night coding sessions.""",duration_seconds=30,model_size="medium")# Electronic & energeticgenerate_music_from_prompt(prompt="""Energetic progressive house music with a driving four-on-the-floor kick drum at 128 BPM, arpeggiated synthesizers, a euphoric breakdown, and a powerful drop with sweeping pads.""",duration_seconds=30,model_size="large"# Use large for better electronic music quality)
This script loads Meta’s MusicGen model — a transformer-based audio language model trained on 20,000 hours of licensed music — and generates original compositions from text descriptions. The temperature parameter is particularly interesting: just like in text generation, higher temperatures produce more creative/surprising outputs while lower temperatures produce safer, more predictable ones. The cfg_coef (classifier-free guidance coefficient) controls how strictly the model follows your prompt — higher values mean it sticks closer to your description but may produce slightly less musically natural results. The output is a 32kHz stereo WAV file you can immediately play.
Sound Effect & Ambient Audio Generation
Beyond voices and music, Generative Audio AI is transforming sound design — the art of creating the audio environment around us.
Practical Sound Generation with AudioCraft
Python
# Environmental and Foley sound generation using Meta's AudioGen# Part of the AudioCraft library (same family as MusicGen, but for sounds)from audiocraft.models import AudioGenfrom audiocraft.data.audio import audio_writedefgenerate_sound_effect(description: str,duration: float = 5.0,variations: int = 3) -> list:""" Generate multiple variations of a sound effect from a text description. Generating multiple variations is standard practice because generative models have inherent randomness — some outputs will be better than others. Parameters: ----------- description : str Describe the sound in plain English. Include context for realism. Good: "Heavy rain on a metal roof with distant rolling thunder" Bad: "Rain" (too vague — model has to guess) duration : float Length of each generated sound effect in seconds variations : int Number of different versions to generate (pick the best one) Returns: -------- List of generated audio tensors — listen to each and pick your favorite """print("Loading AudioGen model...")# AudioGen-medium has 1.5B parameters, trained on environmental sounds model = AudioGen.get_pretrained("facebook/audiogen-medium") model.set_generation_params(duration=duration,temperature=1.2, # Slightly higher temp for more varied sound texturestop_k=250,cfg_coef=3.0 )# Generate multiple variations simultaneously (efficient batch processing)# The same prompt generates different results each time due to# the stochastic (random) nature of the generation process prompts = [description] * variationsprint(f"Generating {variations} variations of: '{description}'") wavs = model.generate(descriptions=prompts, progress=True)# Save each variation for comparison output_files = []for i, wav inenumerate(wavs): filename = f"sfx_variation_{i+1}" audio_write(stem_name=filename,wav=wav,sample_rate=16000, # AudioGen outputs at 16kHzstrategy="loudness" ) output_files.append(f"{filename}.wav")print(f" ✓ Saved variation {i+1}: {filename}.wav")return output_files# --- Real-world sound design use cases ---# Game audio — dynamic ambiencegenerate_sound_effect(description="Dense medieval tavern ambience: murmuring crowd, clinking tankards, ""a bard playing a lute in the background, fire crackling in the hearth",duration=10.0,variations=3)# Film Foley — specific action soundgenerate_sound_effect(description="Heavy wooden door creaking open slowly on rusty hinges, ""in a large empty stone castle corridor",duration=3.0,variations=5# More variations for a specific one-shot Foley sound)# Podcast/YouTube production — ambient backgroundgenerate_sound_effect(description="Calm coffee shop ambience: gentle background chatter, ""coffee machine hissing, occasional cup clink, soft jazz music barely audible",duration=30.0, # Long loop for continuous background usevariations=2)
AudioGen is the sound-effect counterpart to MusicGen. It was trained on a large dataset of environmental sounds and Foley recordings. The key here is the prompting strategy — specific, contextually rich descriptions consistently produce better results than vague ones.
The code generates multiple variations intentionally, because with generative models, you often need to “roll the dice” a few times to get exactly the right texture and character. In professional sound design workflows, generating 5–10 variations and selecting the best one is completely standard practice.
The Core Models Powering Generative Audio AI
Let’s take a step back and look at the major model architectures that make all of this possible.
Autoregressive Models (Language-Style Generation)
These models generate audio token by token, left to right, like predicting the next word in a sentence. AudioLM and MusicGen use this approach. They’re coherent and expressive but can be slow for long audio segments.
Diffusion Models (Noise to Signal)
Diffusion models start with pure random noise and gradually remove it, guided by a text condition, until structured audio emerges. Stable Audio, AudioLDM 2, and DiffWave use this approach. They’re particularly good at producing rich, textured audio.
Python
# Conceptual illustration of how diffusion works for audio# (simplified — not a runnable implementation)import numpy as npdefdiffusion_audio_generation_concept(text_prompt, num_steps=50):""" Demonstrates the conceptual flow of diffusion-based audio generation. The model: 1. Starts with pure random noise (thinks of it as static) 2. At each step, predicts "which parts of this noise are NOT signal" 3. Subtracts the noise, guided by the text prompt 4. After enough steps, structured, meaningful audio remains This is analogous to a sculptor removing material from marble — the audio was "always there," you just had to remove what wasn't it. """# Start: pure Gaussian noise (nothing but static)# Shape: (audio_length_samples,) — e.g., 220500 samples = 5 seconds at 44.1kHz latent = np.random.randn(220500)print(f"Step 0: Pure noise — entropy = {np.std(latent):.3f}")# Encode the text prompt into a conditioning vector# This vector guides the denoising at every step text_embedding = encode_text(text_prompt) # Shape: (768,)# Iteratively denoise, guided by the text promptfor step inrange(num_steps, 0, -1):# Noise level decreases with each step# Early steps: large-scale structure (overall shape of the audio)# Later steps: fine details (texture, timbre nuances) noise_level = step / num_steps# The denoiser neural network predicts what to remove at this step# It simultaneously considers:# - Current noisy latent (what the audio looks like now)# - The text embedding (what audio we're aiming for)# - The current noise level (how much noise to expect) noise_prediction = denoiser_network(latent, text_embedding, noise_level)# Remove the predicted noise# As noise_level decreases, meaningful structure emerges latent = latent - (noise_level * noise_prediction)if step % 10 == 0: structure_score = 1.0 - noise_levelprint(f"Step {num_steps - step + 1}/{num_steps}: "f"Audio structure: {structure_score:.0%} formed")# The latent is now a structured audio representation# Decode it back to a waveform final_audio = decode_latent_to_waveform(latent)print("Generation complete!")return final_audio# Example:# audio = diffusion_audio_generation_concept(# "A gentle acoustic guitar melody over soft rainfall"# )
This conceptual walkthrough illustrates why diffusion models are so powerful. Rather than generating audio sequentially, they refine it progressively — like developing a photograph in a darkroom, where the image slowly emerges from a blank, foggy slate.
The noise_level schedule is critical: early denoising steps establish large-scale structure (the overall form of the music or voice), while later steps refine fine-grained details (specific timbres, subtle textures). The text embedding acts as a “compass” at every step, ensuring the audio develops in the direction of the prompt.
Voice Activity Detection + Conditioning
High-quality voice cloning systems also use Voice Activity Detection (VAD) to ensure clean reference audio:
Python
# Voice Activity Detection — cleaning reference audio before cloning# This step is crucial for high-quality voice cloningimport numpy as npdefpreprocess_reference_audio(audio_path: str, target_sample_rate: int = 16000) -> np.ndarray:""" Clean and prepare a voice recording for use as a cloning reference. Problems this solves: - Background music or noise that confuses the speaker encoder - Silence or breathing sounds that waste the reference "quota" - Volume inconsistencies that affect embedding quality - Multiple speakers (only want one voice in the reference) Parameters: ----------- audio_path : str Path to the reference audio file (WAV, MP3, etc.) target_sample_rate : int Speaker encoders typically expect 16kHz audio Returns: -------- clean_speech : np.ndarray Cleaned, resampled audio containing only active speech segments """# Load audio and resample to target sample rate waveform, original_sr = load_audio_file(audio_path) waveform = resample_audio(waveform, original_sr, target_sample_rate)# --- Step 1: Noise Reduction ---# Estimate the noise profile from the quietest parts of the audio# (assumed to be background noise rather than speech) noise_profile = estimate_noise_floor(waveform, percentile=10) waveform = spectral_subtract(waveform, noise_profile)# --- Step 2: Voice Activity Detection ---# Split audio into 10ms frames frame_length = int(target_sample_rate * 0.01) # 160 samples at 16kHz frames = split_into_frames(waveform, frame_length)# For each frame, determine if it contains speech or silence# The VAD looks at: energy level, zero-crossing rate, spectral centroid speech_frames = []for frame in frames: energy = np.sum(frame ** 2) zero_crossing_rate = np.mean(np.abs(np.diff(np.sign(frame))))# A frame is "speech" if it has sufficient energy AND# the right frequency characteristics (not just noise bursts) is_speech = ( energy > SPEECH_ENERGY_THRESHOLD and MIN_SPEECH_ZCR < zero_crossing_rate < MAX_SPEECH_ZCR )if is_speech: speech_frames.append(frame)# Concatenate only the speech frames clean_speech = np.concatenate(speech_frames)# --- Step 3: Normalization ---# Normalize to -23 LUFS (broadcast standard loudness)# Ensures consistent embedding quality regardless of recording volume clean_speech = normalize_loudness(clean_speech, target_lufs=-23.0)print(f"Original duration: {len(waveform)/target_sample_rate:.1f}s")print(f"Clean speech duration: {len(clean_speech)/target_sample_rate:.1f}s")print(f"Speech ratio: {len(clean_speech)/len(waveform):.1%}")return clean_speech
This preprocessing pipeline solves a common practical problem — real-world audio recordings are messy. Before feeding audio to a speaker encoder for cloning, this function removes background noise using spectral subtraction (estimating what “silence” sounds like and removing it from the full signal), uses Voice Activity Detection to keep only frames that actually contain speech (discarding breathing, silence, and noise), and normalizes the loudness to a broadcast standard.
Cleaner reference audio = better speaker embeddings = more accurate voice cloning.
Real-World Applications Across Industries
Generative Audio AI isn’t just a lab experiment — it’s reshaping multiple industries right now.
Podcasting & Content Creation
Podcasters are using Generative Audio AI to generate custom intro jingles in seconds, create synthetic co-hosts or guest voices for solo creators, auto-generate multiple language versions of episodes with voice preservation, and clean up audio quality on budget recordings.
Video Game Development
Game studios use Generative Audio AI for procedurally generated ambient sound environments that never repeat, dynamic NPC dialogue that responds to player actions in real time, instant voice acting for prototyping before hiring voice actors, and adaptive music that shifts mood based on gameplay state.
Accessibility & Assistive Technology
This may be the most profound application. Generative Audio AI is giving voice to people with ALS, throat cancer, or other conditions that have taken away their ability to speak — by cloning their voice before they lose it, or by creating a personalized synthetic voice that sounds natural rather than robotic.
Film & TV Production
The entertainment industry uses Generative Audio AI for de-aging actor voices to match younger archive footage, generating background crowd chatter and ambient sound environments, dubbing foreign-language versions while preserving the original actor’s voice characteristics, and creating custom music scores that adapt to final cut timing.
Customer Experience & Telephony
Customer service is transformed by hyper-natural AI voices for IVR systems, real-time emotion detection in customer calls with appropriate voice response tuning, and personalized voice assistants that match brand personality.
Education & E-Learning
Educational platforms are using Generative Audio AI to narrate courses in hundreds of languages while keeping instructor personality, adapt reading speed and tone to different learning levels, and create immersive audio environments for historical or scientific simulations.
Ethical Considerations: The Dark Side of the Wave
We’d be doing you a disservice if we only talked about the exciting possibilities without confronting the real risks. Generative Audio AI introduces some serious ethical challenges.
The Deepfake Voice Problem
The same technology that lets an ALS patient preserve their voice can be used to impersonate world leaders, create fake audio evidence in legal proceedings, or conduct voice phishing (“vishing”) scams. This is not hypothetical — it’s already happening.
Detection Is Racing to Keep Up
AI audio detection tools (like those developed by organizations like Resemble AI and Pindrop) analyze spectral artifacts, unnatural prosody patterns, and “fingerprints” left by specific generative models. But it’s an arms race — as generation quality improves, detection becomes harder.
Consent and Ownership
Whose voice data was used to train these models? Did they consent? Many early training datasets scraped audio from the internet without explicit consent. This raises significant questions about data rights, artist compensation, and intellectual property.
Regulatory Response
The EU AI Act includes provisions specifically addressing synthetic audio. Several US states have passed legislation requiring disclosure of AI-generated audio in political advertising. Several music labels are actively pursuing legal action against AI companies that trained on their catalogs without licensing.
Responsible Development Practices
The Generative Audio AI community is developing practical safeguards: audio watermarking (encoding invisible signals in AI-generated audio to identify its origin), provenance metadata standards, voice cloning consent verification systems, and model cards that document training data sources.
The technology itself is neutral. What matters is how it’s governed, and that’s a conversation all of us need to be part of.
The Future: Where Generative Audio AI Is Headed
Here’s what the next 2–5 years likely hold for Generative Audio AI.
Real-Time Everything
Today’s voice cloning and music generation usually takes seconds to minutes. The next frontier is real-time generation at low latency — enabling live AI voice translation during phone calls, real-time adaptive game music, and instant custom voice creation in the moment.
Multimodal Audio-Visual Generation
Future systems will generate audio synchronized with video — not just matching music to a scene, but generating Foley sounds, dialogue, and music simultaneously with visual content generation. Imagine: describe a 30-second video scene, get back video and audio as a unified output.
Personalized AI Music Companions
Rather than static playlists, AI music companions will generate music continuously, adapting in real time to your heart rate, activity level, mood (inferred from device sensors), and even the specific task you’re doing. Your workout music will literally be composed for your exact pace and energy in that moment.
Zero-Shot Cross-Lingual Voice Transfer
Current voice cloning works best within one language. Future models will clone your voice and immediately speak in 50+ languages with authentic accent, preserved personality, and natural prosody — without needing native recordings in each language.
On-Device Generation
As hardware improves, Generative Audio AI will move from cloud servers to your phone, earbuds, and smart speakers — enabling offline, private, low-latency generation that doesn’t send your data anywhere.
Best Generative Audio AI Tools in 2026
FAQs
Q: How much audio do I need to clone a voice accurately?
Modern systems like VALL-E can clone a voice from as little as 3 seconds of reference audio, though 30–60 seconds typically produces significantly better results. For professional-grade cloning, 5–10 minutes of clean speech data is considered ideal.
Q: What’s the difference between TTS and voice cloning?
TTS (Text-to-Speech) converts text to speech using a predefined voice. Voice cloning goes further — it captures a specific person’s unique voice characteristics so you can make that specific voice say anything new. Voice cloning is essentially personalized TTS.
Q: Is AI-generated music protected by copyright?
This is currently unsettled law. In most jurisdictions, copyright requires human authorship, meaning purely AI-generated music with no human creative input currently has limited copyright protection. However, the legal landscape is evolving rapidly. Consult a music IP attorney for current guidance specific to your situation.
Q: What hardware do I need to run these models locally?
Smaller TTS models can run on a standard laptop CPU. MusicGen-small and AudioGen-medium require a GPU with at least 8GB VRAM. Larger, higher-quality models (MusicGen-large, Stable Audio) benefit from 16GB+ VRAM. Cloud API alternatives (ElevenLabs, OpenAI TTS, Google Cloud TTS) eliminate hardware requirements entirely.
Q: How can I detect if audio is AI-generated?
Tools like AI Speech Classifier (by ElevenLabs), Resemble Detect, and Adobe’s Content Authenticity Initiative tools analyze spectral artifacts to identify AI-generated audio. No tool is perfect, but detection accuracy above 90% is achievable for current-generation models.
Q: Can AI music generation be used commercially?
It depends on the tool and license. MusicGen’s training data includes licensed music, and Meta has specific licensing terms. Stability AI’s Stable Audio uses only licensed training data. Always check the specific terms of the model and service you use before commercial use.
Conclusion
We’re standing at an extraordinary inflection point. Generative Audio AI is giving individuals the creative tools that previously required entire professional teams. It’s giving voice to those who’ve lost theirs. It’s creating musical forms and sonic textures that have never been heard before.
But like every transformative technology, it demands something from us — thoughtfulness, responsibility, and genuine engagement with the ethical questions it raises.
The machines have learned to listen, to understand, and now to create. What we do with that capability is entirely up to us.
Whether you’re a developer looking to integrate audio AI into your apps, a musician curious about collaboration with AI tools, or simply someone fascinated by the future of sound — the best time to start exploring Generative Audio AI is right now.
The revolution isn’t coming. It’s already playing through your speakers.
Generative AI has changed how we create digital content. From AI-generated art to synthetic voices, machines are now capable of producing content that looks surprisingly human. But when it comes to video generation, there’s one challenge that separates average AI videos from truly realistic ones: Temporal Coherence.
Without Temporal Coherence, AI-generated videos often appear unstable. Faces flicker. Objects change shape between frames. Lighting shifts unexpectedly. Movements feel unnatural.
With strong Temporal Coherence, videos become smooth, believable, and visually consistent.
In this guide, you’ll learn what Temporal Coherence means, why it matters in generative AI, how modern AI systems achieve it, and how developers implement it using machine learning models.
What Is Temporal Coherence?
Temporal Coherence refers to the consistency of visual elements across consecutive video frames.
In simple words, it ensures that:
Objects stay stable over time
Colors remain consistent
Lighting does not randomly change
Characters maintain identity
Motion appears natural and fluid
Imagine an AI-generated video of a person walking through a park.
If the person’s face changes slightly every frame, the video feels fake. If trees randomly appear and disappear, viewers immediately notice the inconsistency.
Temporal Coherence prevents these issues.
It helps AI maintain continuity from one frame to the next.
Why Temporal Coherence Matters in AI Video Generation
Humans are extremely sensitive to motion inconsistencies.
Even small visual changes between frames can make AI-generated videos feel uncanny or unrealistic.
That’s why Temporal Coherence is one of the most important concepts in:
AI video generation
Animation synthesis
Deepfake technology
Motion transfer
AI filmmaking
Virtual avatars
Game rendering
Video enhancement systems
Strong Temporal Coherence improves:
Understanding the Problem: Frame-by-Frame Generation
Early AI image generators worked independently on each image.
That approach works fine for static pictures.
But video is different.
A video contains multiple frames played rapidly in sequence.
For example:
24 FPS = 24 frames per second
60 FPS = 60 frames per second
If an AI generates each frame separately without considering previous frames, inconsistencies appear.
The Core Problem With Video Generation
Common problems include:
Facial Flickering
A person’s eyes, hair, or skin tone changes slightly between frames.
Object Warping
Cars, buildings, or backgrounds distort unexpectedly.
Lighting Instability
Brightness changes randomly frame-to-frame.
Motion Jitter
Movement appears shaky or robotic.
These problems break realism immediately.
How Temporal Coherence Works in Generative AI
Modern AI systems use several advanced techniques to maintain Temporal Coherence.
Let’s explore the most important ones.
1. Optical Flow Tracking
Optical Flow estimates how pixels move between frames.
It helps AI understand motion patterns.
For example:
A moving car shifts right
A walking person changes position gradually
Background objects move consistently
The AI tracks these movements to maintain continuity.
Why Optical Flow Matters
Without motion tracking:
Objects jump randomly
With Optical Flow:
Motion remains smooth and predictable
Optical Flow Example in Python
Here’s a simple OpenCV example that detects motion between frames.
AI tools can write code, summarize documents, answer questions, and generate content in seconds. But for a long time, they all shared the same problem: they confidently returned wrong answers.
These made-up responses are called hallucinations. If you’ve used an AI chatbot long enough, you’ve probably seen one. A model cites a fake research paper, invents an API method, or gives outdated information as if it were current.
Retrieval-Augmented Generation gives AI systems access to external knowledge before generating a response. Instead of relying only on what the model learned during training, the system retrieves relevant information from trusted sources and feeds it into the prompt.
The result is far more grounded and reliable output.
This article breaks down how Retrieval-Augmented Generation works, why it matters, how developers build RAG pipelines, and where it still falls short.
What Is Retrieval-Augmented Generation (RAG)?
Retrieval-Augmented Generation (RAG) combines two systems:
Information retrieval
Large language models (LLMs)
The retrieval layer searches for relevant information from external sources. The language model then uses that information to generate a response.
Without Retrieval-Augmented Generation, an LLM answers questions using only the data it saw during training. That creates obvious problems:
Training data becomes outdated
Domain-specific knowledge may be missing
Models fill gaps with statistically likely text
RAG changes the workflow by giving the model fresh context at runtime.
Instead of generating answers from memory alone, the model works from retrieved evidence.
Why AI Hallucinations Happen
Large language models predict the next token in a sequence. They are optimized for language generation, not fact verification.
That distinction matters.
A model can produce fluent, convincing answers even when the underlying information is wrong. In many cases, hallucinations happen because the model lacks reliable context for the question being asked.
Common causes include:
Outdated training data
Missing domain knowledge
Ambiguous prompts
Weak retrieval pipelines
Limited context windows
For example, if you ask a standard LLM about a recently released framework or API update, it may generate an answer based on older patterns from training data.
Retrieval-Augmented Generation helps by pulling in current, relevant information before the response is generated.
How Retrieval-Augmented Generation Works
At a high level, a RAG pipeline follows this sequence:
A user submits a query
The system searches a knowledge source
Relevant documents are retrieved
Retrieved content is injected into the prompt
The LLM generates a response using that context
The architecture is simple conceptually, but each step affects answer quality.
Core Components of a RAG System
Most Retrieval-Augmented Generation systems contain the same foundational pieces.
1. Data Source
This is the knowledge layer the system retrieves from.
Typical sources include:
PDFs
Internal documentation
Wikis
Databases
APIs
Research papers
Web content
The quality of your RAG system depends heavily on the quality of these sources.
Poor documentation leads to poor retrieval.
2. Chunking
Documents are split into smaller sections called chunks.
Language models and embedding systems work better with smaller pieces of text than large documents.
A long PDF might become hundreds of chunks, each containing:
A focused topic
Related context
Roughly 200–500 words
Chunk size has a direct impact on retrieval quality.
Small chunks improve precision but may lose context. Large chunks preserve context but can reduce search accuracy.
3. Embeddings
Each chunk is converted into a vector embedding.
Embeddings are numerical representations of semantic meaning. They allow systems to compare text based on similarity rather than exact keywords.
For example:
“Authentication token expired”
“Session credential timeout”
These phrases may produce similar embeddings even though the wording differs.
Popular embedding models include:
OpenAI Embeddings
Sentence Transformers
Cohere Embeddings
4. Vector Database
Embeddings are stored inside a vector database.
Common options include:
Pinecone
Weaviate
Chroma
Milvus
When a user submits a query, the query is converted into an embedding and compared against stored vectors.
The system retrieves the closest semantic matches.
This process is called similarity search.
5. Large Language Model (LLM)
The retrieved chunks are added to the prompt sent to the language model.
The model generates a response using that retrieved context as grounding material.
This step is what reduces hallucinations. The model has relevant information available during generation instead of relying entirely on training memory.
A Simple RAG Example
Suppose a user asks:
“What is our company’s refund policy?”
A standard LLM may:
Guess based on common refund policies
Return outdated information
Invent policy details entirely
A Retrieval-Augmented Generation system handles it differently:
Search company documents
Retrieve the refund policy section
Inject the text into the prompt
Generate the answer from retrieved context
That workflow is why RAG has become common in enterprise AI systems.
Retrieval-Augmented Generation Architecture
A simplified RAG pipeline looks like this:
Python
User Query ↓Embedding Model ↓Vector Search ↓Retrieve Relevant Chunks ↓Augment Prompt ↓Large Language Model ↓Final Response
Each layer improves the model’s ability to generate grounded answers.
Why Retrieval-Augmented Generation Matters
As AI systems move into production environments, accuracy becomes critical.
Hallucinated answers can create real problems in:
Healthcare
Finance
Legal systems
Customer support
Enterprise search
Developer tooling
Retrieval-Augmented Generation helps teams build systems that are more reliable and easier to trust. Grounded responses backed by verifiable sources naturally support those principles.
Benefits of Retrieval-Augmented Generation
Reduced Hallucinations
This is the primary reason teams adopt RAG.
The model generates answers from retrieved evidence instead of unsupported assumptions.
Access to Current Information
Traditional LLMs are limited to their training cutoff.
RAG systems can work with:
Live APIs
Updated documentation
Internal databases
Recently published content
Better Enterprise Search
Organizations can build internal AI assistants trained on:
SOPs
Product docs
Internal wikis
Support documentation
Without retraining the entire model.
Lower Operational Costs
Updating a knowledge base is generally faster and cheaper than repeatedly fine-tuning large models.
Improved Transparency
Many RAG systems can expose retrieved sources alongside generated answers.
That makes outputs easier to verify.
Limitations of Retrieval-Augmented Generation
RAG improves accuracy, but it does not solve every problem.
Retrieval Quality Still Matters
If retrieval fails, generation quality drops quickly.
Irrelevant chunks often lead to weak or misleading answers.
Added Latency
A RAG pipeline introduces additional steps:
Embedding generation
Vector search
Context assembly
That increases response time compared to direct generation.
Context Window Constraints
LLMs still have token limits.
Too much retrieved context can dilute answer quality or exceed model limits.
Infrastructure Complexity
Building Retrieval-Augmented Generation systems requires multiple moving parts:
Embedding pipelines
Vector databases
Search optimization
Prompt engineering
Evaluation workflows
Production-grade RAG systems need careful tuning.
RAG vs Fine-Tuning
Retrieval-Augmented Generation and fine-tuning solve different problems.
Many production systems combine both approaches.
Fine-tuning shapes model behavior. RAG supplies current knowledge.
Types of Retrieval-Augmented Generation
Naive RAG
This is the simplest setup:
Retrieve documents
Inject context
Generate response
It works surprisingly well for many use cases.
Advanced RAG
Advanced pipelines often include:
Hybrid search
Reranking models
Query rewriting
Metadata filtering
These additions improve retrieval precision.
Agentic RAG
Agentic systems allow models to decide:
What to retrieve
When to retrieve
How to validate information
Which tools to use
This area is evolving quickly.
Real-World Use Cases
Customer Support
AI assistants retrieve information from product documentation and support articles before answering customer questions.
Legal Research
Law firms use Retrieval-Augmented Generation to surface relevant statutes, case law, and legal references.
Healthcare Applications
Medical AI systems retrieve verified medical literature and clinical references before generating responses.
Enterprise Knowledge Search
Employees can search across thousands of internal documents using natural language queries.
AI Coding Assistants
Coding tools retrieve API docs, repositories, and framework references before generating code suggestions.
Platforms like GitHub Copilot increasingly rely on retrieval-based workflows.
Building a Simple RAG Pipeline in Python
Let’s walk through a minimal Retrieval-Augmented Generation setup using:
Python
LangChain
OpenAI
FAISS
Install Dependencies
Python
pip install langchain openai faiss-cpu tiktoken
These packages handle:
Document loading
Text chunking
Embeddings
Vector search
LLM interaction
Step 1: Load Documents
Python
from langchain.document_loaders import TextLoaderloader = TextLoader("knowledge_base.txt")documents = loader.load()
This loads your knowledge source into memory.
The file could contain:
Product documentation
Internal policies
Technical articles
Research material
Step 2: Split Documents Into Chunks
Python
from langchain.text_splitter import CharacterTextSplittertext_splitter = CharacterTextSplitter(chunk_size=500,chunk_overlap=50)docs = text_splitter.split_documents(documents)
Chunking improves retrieval quality by breaking large documents into manageable sections.
The overlap helps preserve context between chunks.
Step 3: Generate Embeddings
Python
from langchain.embeddings import OpenAIEmbeddingsembeddings = OpenAIEmbeddings()
Embeddings convert text into vectors that represent semantic meaning.
Those vectors allow the system to retrieve related content even when exact wording differs.
Step 4: Store Embeddings in FAISS
Python
from langchain.vectorstores import FAISSvectorstore = FAISS.from_documents(docs, embeddings)
Meta developed FAISS for efficient similarity search across large vector datasets.
At this point, the system can search documents semantically instead of relying on keyword matching alone.
Step 5: Retrieve Relevant Chunks
Python
query = "How does Retrieval-Augmented Generation reduce hallucinations?"retrieved_docs = vectorstore.similarity_search(query)
The query is converted into an embedding and compared against stored vectors.
The database returns the closest semantic matches.
This is the retrieval phase of the pipeline.
Step 6: Generate the Final Response
Python
from langchain.chat_models import ChatOpenAIllm = ChatOpenAI(model_name="gpt-4")context = "\n".join([doc.page_content for doc in retrieved_docs])prompt = f"""Use the following context to answer the question accurately.Context:{context}Question:{query}"""response = llm.predict(prompt)print(response)
The retrieved context is injected into the prompt before generation.
That gives the model grounded information to work from and improves factual accuracy.
Best Practices for RAG Systems
Start With Good Data
Strong retrieval begins with clean, accurate documentation.
Weak source material creates weak outputs.
Test Different Chunk Sizes
Chunk size directly affects retrieval quality.
There is no universal setting that works for every dataset.
Use Hybrid Search
Combining semantic search with keyword search often improves retrieval precision.
Add Reranking
Rerankers help prioritize the most relevant retrieved chunks before generation.
This can significantly improve final answers.
Measure Hallucination Rates
RAG reduces hallucinations, but evaluation still matters.
Track:
Retrieval relevance
Citation accuracy
Response correctness
Failure cases
The Future of Retrieval-Augmented Generation
Retrieval-Augmented Generation is becoming standard infrastructure for production AI systems.
Current trends include:
Multimodal RAG
Real-time retrieval pipelines
Agentic workflows
Long-term memory systems
Self-evaluating retrieval loops
As models improve, retrieval quality is becoming one of the biggest differentiators between AI products.
Frequently Asked Questions
Is Retrieval-Augmented Generation better than fine-tuning?
They solve different problems.
RAG works well for dynamic knowledge and frequently updated information. Fine-tuning is useful for behavior customization and specialized tasks.
Does RAG eliminate hallucinations completely?
No.
It reduces hallucinations significantly, but generation errors can still happen if retrieval quality is poor or context is incomplete.
Which vector database is best for RAG?
Popular choices include:
Pinecone
Weaviate
Chroma
FAISS
The right choice depends on scale, latency requirements, infrastructure preferences, and budget.
Can Retrieval-Augmented Generation use live internet data?
Yes.
Many systems retrieve information from APIs, search engines, and real-time web sources.
Conclusion
Retrieval-Augmented Generation has become one of the most practical ways to improve AI reliability.
Instead of relying entirely on static training data, RAG systems retrieve relevant information at runtime and use it to ground generated responses.
That shift improves:
Accuracy
Transparency
Freshness
Trustworthiness
For developers building production AI systems, Retrieval-Augmented Generation is quickly becoming a core architectural pattern rather than an optional enhancement.